Buches de Noel also known as Yule Logs were the challenge given by Lisa and Ivonne, founders and co-host this month of the Daring Bakers. I think they just had the perverted idea to see us buttered, creamed and rolled in light genoise, Swiss buttercream, decorated in meringue and flavorful Marzipan. You should not that when I talk in those terms it can only be because they gave us an awesome challenge! Did I mentioned I buttercreamed my hair? Hmm, yeah…what I thought was the first gray hair was just a streak of buttercream from picking up the phone, lifting my glasses up and frosting my hair with a fork full of buttercream. See, they even raise my blood pressure…those two I tell you!!
Buche de Noel is ancient tradition in my family, and I think for most European families as well. Wasn’t too long after I figured out how to make genoise that yes, it could be filld, and yes it could be rolled and “oh my!” before you know it I was making it for our Christmas dinner. Over the years, there were the traditional stump looking one, with flavors just as traditional: chestnuts, chocolate, caramel, coffee. One year I decided to make a pink and purple one to match the table setting (not Grandma’s favorite!). We also had the genius frozen one that required 6 hands and an electric knife for proper dissection! Yeah, not an event I wish to revisit. Buche de Noel, how do I love thee….well ask me next Tuesday when I am done making them for family, church, friends and strangers. Ok, so they pay me, still…I like when Yule Log season starts, I also like when it ends.
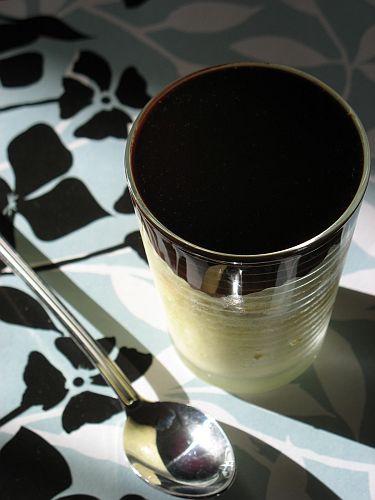
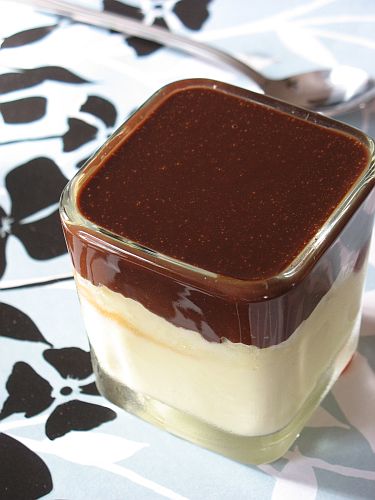
This time our instructions were to do a light genoise, fill and frost it with preferably coffee Swiss buttercream, so as to prevent any white/red/green/blue logs (how did they find out about my childhood one is still a mystery J) although options were given for those who did not like coffee. Requirements for decorations were either meringue or marzipan mushrooms.
It turned I needed two logs within days of each other so instead of visiting the recipe twice, I went ahead and made double batches of everything. I have long ago learned that December is the most hectic month of the year in which days are 12 hour long instead of 24…yep, really and although I am a night owl I have also seen too many sunrises this month with buttercream in my eyes? Did I mention I tried it as eye shadow one night I still had someone the back of my hand and went to rub my eyes?
So, here was my game plan and you can see executed in the pictures:
Log # 1: Coffee – Burnt Orange
– burnt orange genoise: instead of mixing orange zest in the batter, I scattered it on top and put the tray in a hot oven. The zest got darker but nor bitter.
– Once cooled, I brushed the cake with a Grand Marnier simple syrup
– Coffee Swiss meringue for the frosting where I dissolved the coffee with Grand Marnier instead of the brandy called for in the recipe. (French meringue is egg whites whipped firm with sugar, Italian is hot syrup drizzled over whipped egg whites and continuing whipping until is cools, Swiss is egg whites and sugar brought to 140F over double boiler then whipped until cooled)
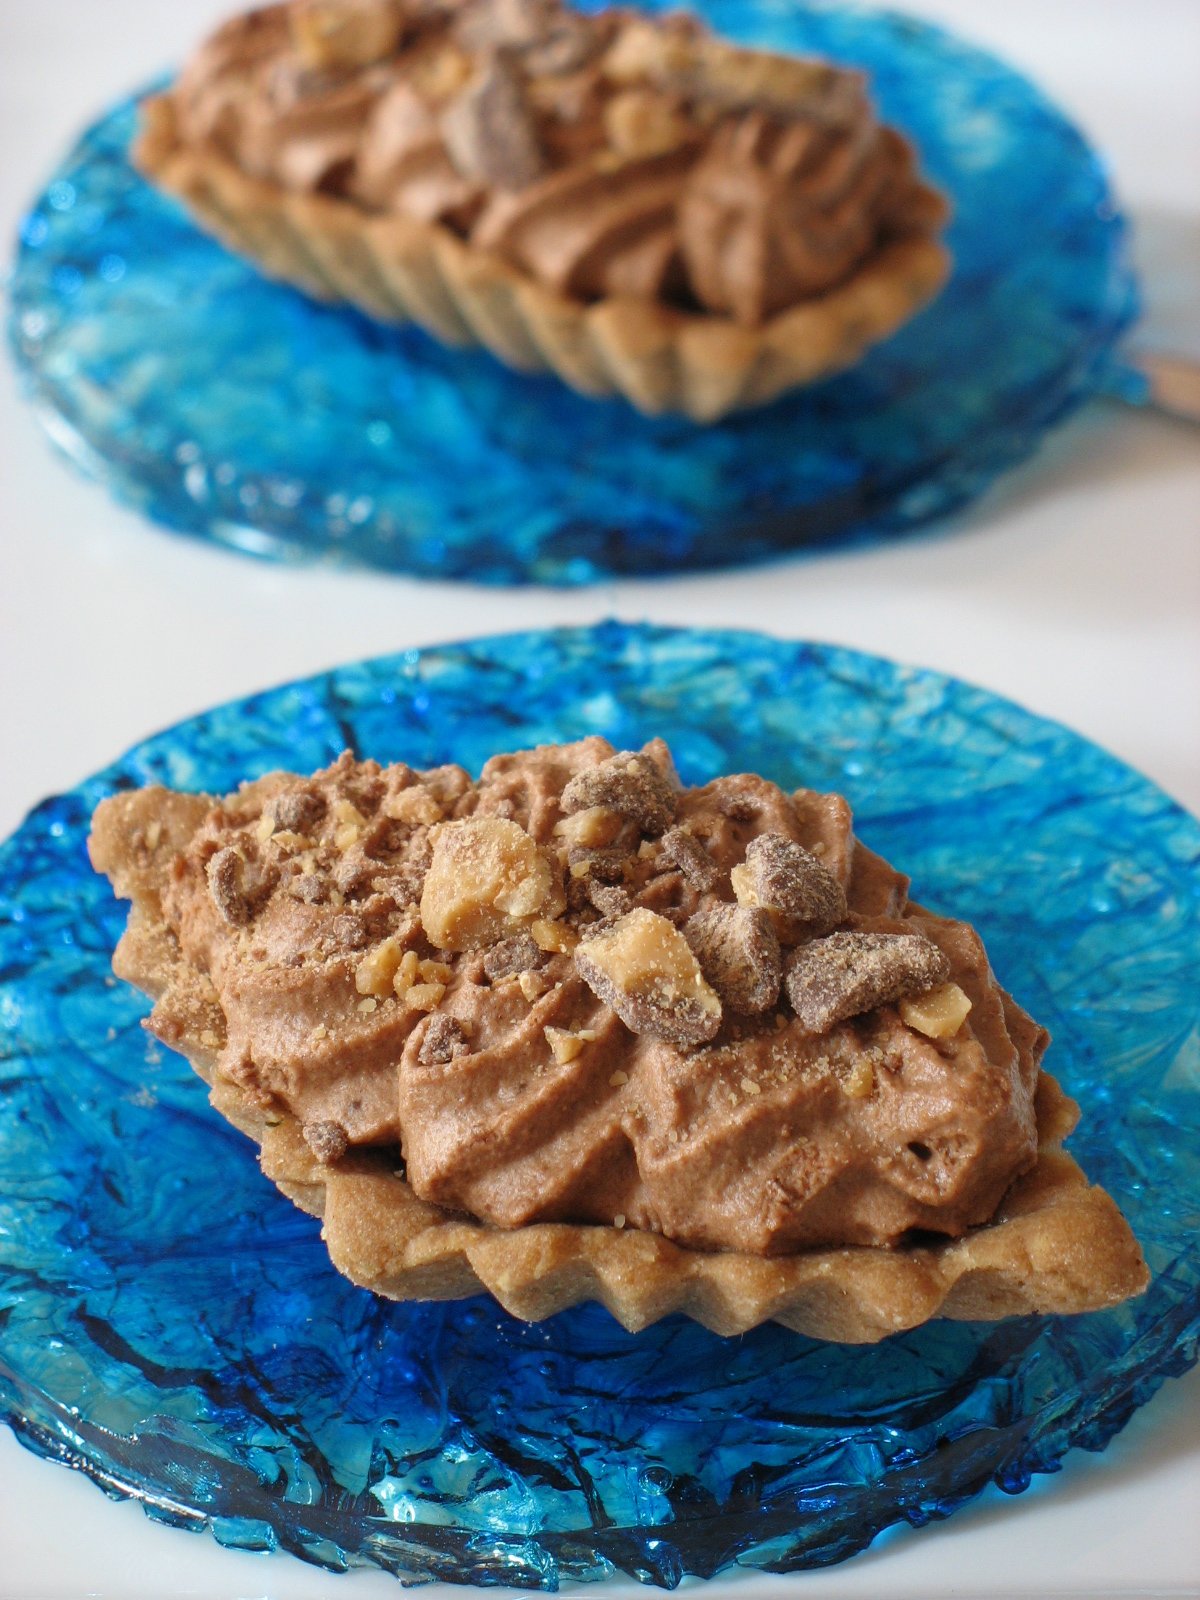
– Filling: Orange Confit Coffee Mousse; part coffee buttercream, part whipped cream with added coffee and bits of orange confit scattered in it. Some broken meringue mushroom pieces for a crunch
– Decorations: Meringue mushrooms called for in the recipe and then I needed to challenge my sculpting skills so I made a marzipan teddy bear (Theodore), a red hatted snowman (Albert) and green hatted snowman (Truman). Lisa challenge me to a moose which turned out looking like a donkey so I ate it…I am evil, I know!
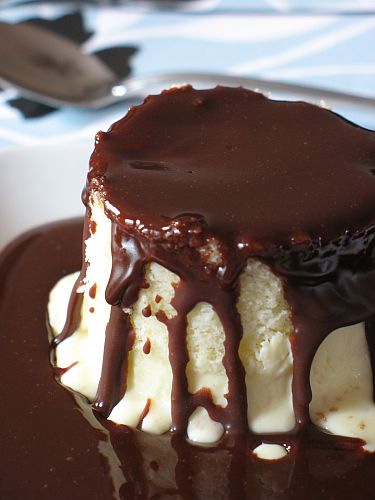
Log #2: Chocolate – Vanilla Crème Brulee – Chocolate Sauce
That’s where I challenged myself and the log almost won: I had the crazy idea that it would be cool to have a layer of vanilla bean crème brulee inside the Yule Log. How was I going to come up with that? I made a classic brulee batter, threw in some gelatin, poured it into a sheet pan and let it set in the fridge. Rolling that thing in the cake proved to be a challenge as the set batter had only one thing in mind, escape!! But I stepped away, took a deep breath and rolled again, tighter this time,and closed the thing shut.
– genoise was left plain, with some vanilla in there for good measure
– layer of chocolate ganache, layer of chocolate buttercream, layer of vanilla crème brulee
– chocolate buttercream to cover it all
– decorations: I drew rounds on top of the log with a glass and carefully spooned out some of the cream, filled the indentation was homemade chocolate sauce. That way the log comes with its own sauce and everybody get a little extra chocolate!
The final testing for that one will be Tuesday, for now it is parked in the freezer, well wrapped, hoping I don’t crush it with a bag of cauliflower! Did I mention I also buttercreamed my dog? My spatula was overloaded, he yapped, I turned abruptly and a big dollop landed on his snout. He spent ten minutes chasing it around, on its own nose…a sight to be seen!
The cake was light and airy and the buttercream smooth and oh so good sandwiched in between chocolate shortbread cookies! I had a blast, as you can see by the pictures and should you want the recipe, check either Lisa or Ivonne for the full lowdown. I am having issues with blogger so not posting the recipe just yet. Make yourself a good cup of coffee and check out all the beautiful logs out there.
What if I were to tell you I am anti-carbs?….Ahahahahah!!! Well, you reacted the way I expected: a big loud laugh instead of throwing me a stone. Yeah, because let’s face it, telling you that Tartelette is a blog sans carb would be telling you it never snows in Ohio. Where am I going with this? To the latest Daring Bakers’ Challenge, Tender Potato Bread, chosen by this month host, Tanna from My Kitchen In Half Cups.
Bread….Oh there is home made bread here at the house, surprise, surprise! We love bread and are always looking for the next best loaf and now we want Tanna to live on our street too. (gosh, there is a whole lot of bloggers I want as neighbors I just realized!!) Not only can the woman bake but she also knows to pick a very fun challenge. I know for some I am the weirdo down the street who likes to get hand deep in dough and make bread, 4-5 loaves a week…and there are just 2 of us (oh yeah, B. adapted the bread – cheese – salad dinner of the Mrs. without a complaint!) : dried fruit bread, brioche for our breakfasts and a couple of other breads like multigrain, rustic, artisan or European breads. There are a couple of starters in the fridge, in marked containers : Gertie is purple lidded, Bob is green. Gertie, my potato sourdough starter gives me the best bread ever so I was really thrilled to be able to play with another potato bread recipe this month.
Fougasse
Play is the word: sticky dough up to my elbows for about 15 minutes….now talk about some spa treatment!! The recipe calls for 8 to 16 oz of potatoes, the more potato the stickier the dough and mine was about 12 oz raw. I ended up using 7 cups of flour (6-8 cups were suggested) and boy was B. in for a treat of severe looks and mild curses. I know I appear all cool collected and calm on my blog but Lisa will tell you that when I get aggravated well, all that Southern cool goes out the window. When the boy asked if dinner was ready, I think the look I gave him was enough to sent him back to his garage to play or organize or bang on something because I was in the middle of pure sticky heaven. Don’t get me wrong, that was not challenging in itself. The challenging part was to keep everything I touched free of bread goo….I started to wonder how the dough would behave upon shaping.
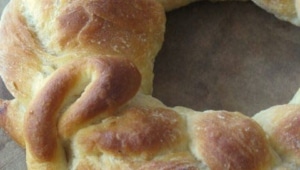
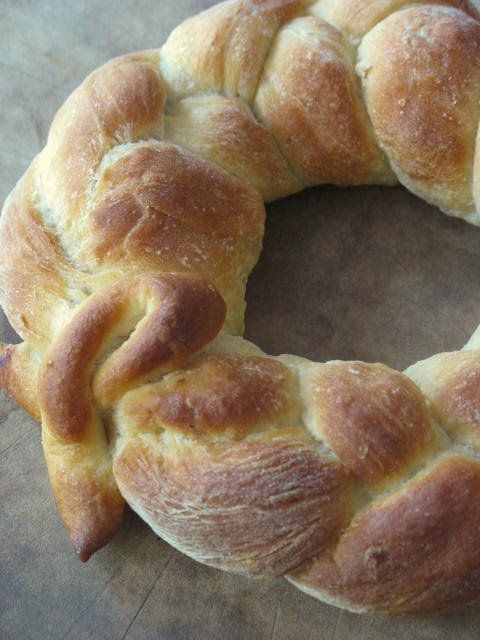
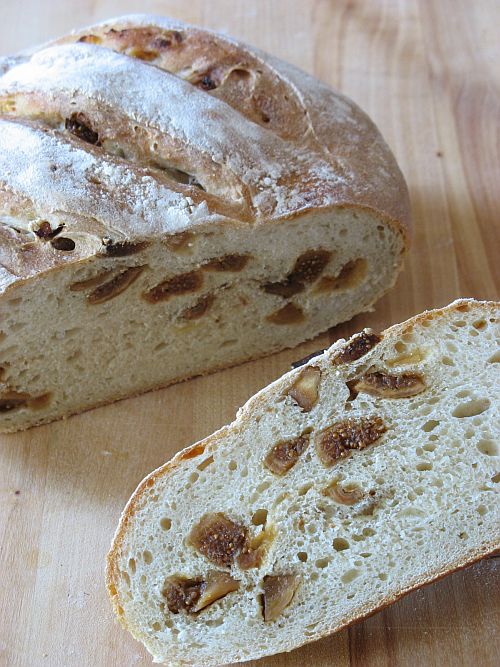
Tanna gave us a lot of playroom with the shapes and flavors we could give our breads. I decided to go for a French shape first, a fougasse, filled with fresh oregano, a braid, and a fig and feta boule. The epis I made got eaten before I could take pictures so we’ll just have to imagine that one or wait until I do the challenge once again. The beauty of such a sticky dough is that if you mess up while shaping there does not seem to be a problem of over kneading. I think I played with the braid shape three or four times before I was happy and it still turned out tender. The only drawback we had with this recipe was that the bread turned a little tough after it was frozen for a week or so. Ah, what am I saying? It made great toasts, so I guess there isn’t anything bad with this bread.
I want to thank Tanna for choosing such a high quality recipe and being such an awesome host, responding promptly to all Daring Bakers’ inquiries, issues and troubles. Hats off to you!! You make the group proud! Check out the other 300 other Daring Bakers by visiting our blogroll. Thank you Ivonne and Lisa for making it as much fun for me every month!
4 medium to large floury (baking) potatoes, peeled and cut into chunks variety of potatoes you might want to use would include Idaho, Russet & Yukon gold (8 to 16 oz)
4 cups water (See Note)
1 tablespoon plus
1 teaspoon salt
2 teaspoons active dry yeast
6 ½ cups to 8 ½ cups unbleached all-purpose flour
1 tablespoon unsalted butter, softened
1 cup whole wheat flour
Put the potatoes and 4 cups water in a sauce pan and bring to boil. Add 1 teaspoon salt and cook, half covered, until the potatoes are very tender. Drain the potatoes, SAVE THE POTATO WATER, and mash the potatoes well. Measure out 3 cups of the reserved potato water (add extra water if needed to make 3 cups). Place the water and mashed potatoes in the bowl you plan to mix the bread in – directions will be for by hand. Let cool to lukewarm – stir well before testing the temperature – it should feel barely warm to your hand. You should be able to submerge you hand in the mix and not be uncomfortable.
Mix & stir yeast into cooled water and mashed potatoes & water and let stand 5 minutes.
Then mix in 2 cups of all-purpose flour and mix. Allow to rest several minutes.
Add yeast and flour to the cooled mashed potatoes & water and mix well. Allow to rest/sit 5 minutes. Sprinkle on the remaining 1 tablespoon salt and the softened butter; mix well. Add the 1 cup whole wheat flour, stir briefly.
Add 2 cups of the unbleached all-purpose flour and stir until all the flour has been incorporated. At this point you have used 4 cups of the possible 8 ½ cups suggested by the recipe. Turn the dough out onto a generously floured surface and knead for about 10 minutes, incorporating flour as needed to prevent sticking. The dough will be very sticky to begin with, but as it takes up more flour from the kneading surface, it will become easier to handle; use a dough scraper to keep your surface clean. The kneaded dough will still be very soft.
As a beginner, you may be tempted to add more flour than needed. Most/many bread recipes give a range of flour needed. This is going to be a soft dough. At this point, add flour to the counter slowly, say a ¼ cup at a time. Do not feel you must use all of the suggested flour. When the dough is soft and smooth and not too sticky, it’s probably ready.
Place the dough in a large clean bowl or your rising container of choice, cover with plastic wrap or lid, and let rise about 2 hours or until doubled in volume. Turn the dough out onto a well-floured surface and knead gently several minutes. It will be moist and a little sticky.
The dough is now ready for you to shape your breads in many different ways:
Divide the dough into 2 unequal pieces in a proportion of one-third and two-thirds (one will be twice as large as the other). Place the smaller piece to one side and cover loosely. To shape a large loaf: Butter a 9X5 inch loaf/bread pan. Flatten the larger piece of dough on the floured surface to an approximate 12 x 8 inch oval, then roll it up from a narrow end to form a loaf. Pinch the seam closed and gently place seam side down in the buttered pan. The dough should come about three-quarters of the way up the sides of the pan. Cover with plastic wrap and let rise for 35 to 45 minutes, until puffy and almost doubled in volume. To make a small loaf with the remainder:Butter an 8 x 4 inch bread pan. Shape and proof the loaf the same way as the large loaf. To make rolls:Butter a 13 x 9 inch sheet cake pan or a shallow cake pan. Cut the dough into 12 equal pieces. Shape each into a ball under the palm of your floured hand and place on the baking sheet, leaving 1/2 inch between the balls. Cover with plastic wrap and let rise for about 35 minutes, until puffy and almost doubled. To make focaccia:Flatten out the dough to a rectangle about 10 x 15 inches with your palms and fingertips. Tear off a piece of parchment paper or wax paper a little longer than the dough and dust it generously with flour. Transfer the focaccia to the paper. Brush the top of the dough generously with olive oil, sprinkle on a little coarse sea salt, as well as some rosemary leaves, if you wish and then finally dimple all over with your fingertips. Cover with plastic and let rise for 20 minutes.Place a baking stone or unglazed quarry tiles, if you have them, if not use a baking/sheet (no edge – you want to be able to slide the shaped dough on the parchment paper onto the stone or baking sheet and an edge complicates things). Place the stone or cookie sheet on a rack in the center of the oven and preheat to 450°F/230°C. Bake the flat-bread before you bake the loaf; bake the rolls at the same time as the loaf.If making foccacia, just before baking, dimple the bread all over again with your fingertips. Leaving it on the paper, transfer to the hot baking stone, tiles or baking sheet. Bake until golden, about 10 minutes. Transfer to a rack (remove paper) and let cool at least 10 minutes before serving.
Dust risen loaves and rolls with a little all-purpose flour or lightly brush the tops with a little melted butter or olive oil (the butter will give a golden/browned crust). Slash loaves crosswise two or three times with a razor blade or very sharp knife and immediately place on the stone, tiles or baking sheet in the oven.
Place the rolls next to the loaf in the oven.
Bake rolls until golden, about 30 minutes. Bake the small loaf for about 40 minutes. Bake the large loaf for about 50 minutes. Transfer the rolls to a rack when done to cool. When the loaf or loaves have baked for the specified time, remove from the pans and place back on the stone, tiles or baking sheet for another 5 to 10 minutes. The corners should be firm when pinched and the bread should sound hollow when tapped on the bottom.
Let breads cool on a rack for at least 30 minutes before slicing. Rolls can be served warm or at room temperature.
I can’t believe it has already been a month since our last Daring Bakers' challenge, and once again I had such a good time getting this one done. I got the greatest opportunity of all by making it in my kitchen with my mom beside me….It is quite special since we don’t get to cook or bake together much often since I left France. Mom laughed when we were done putting it together because she felt she was not doing much. Since I move rather fast and I know where all my utensils are, I get around quicker but I really appreciated the help she provided by handing me the ingredients, weighing everything, washing the dishes and most of all being there with me in the same room, chatting about nothing and everything at once. I can’t begin to tell you how much I loved the moments spent reminiscing about my grandmother or her teaching me how to make my first dough or chocolate mousse.
Mary, from my Alpineberry (one of my first blog reads) and our host for October chose a recipe that took a classic looking Boston Cream Pie and turned it into a completely 100% deliciously buttery and creamy: a Bostini Cream Pie. Eggs a plenty, heavy cream flowing like a river…everything to make your Tartelette a happy gal! Working with that many eggs, can be daunting for new cooks and bakers but remember to temper your egg yolks for the custard (adding some hot liquid to them so they get acclimated to the temperature rise) and folding in 2 or 3 times the egg whites for the sponge. Once to thin out the cake mixture thus making more susceptible to the texture change when you incorporate the rest of the whites. Eggs are fussy but when you get the basics, they really are just as sweet as the cake they make.
This Bostini Cream Pie is a soft orange chiffon sponge set on a pool of vanilla flavored custard and covered with a buttery dark chocolate glaze. I am thankful that Mary allowed us to change the cake flavor while keeping it light colored. I immediately went for coconut water. I have become addicted to this over the summer as it was the only thing I could put in my stomach before and after an outdoor run in the morning. The chiffon sponge turned out beautiful and this is by far the best recipe I have used for chiffons and believe me I have gone through many a recipe for that airy, soft not mushy texture. Beside its health benefits, it is colorless, has a nice toasty coconut flavor that get very mellow while bakes, which gave plenty of space for the custard to shine through. And what a custard! I rarely make custard sauce with that many egg yolks or rich heavy cream, and now I know why….there was barely enough for the dinner time plating!! I used vanilla paste, since all my vanilla beans are flavoring my vodka to make extract and oh my god….B. had to hide the bowl away from me and mom!! The custard was quite thick enough that I was able to plate a cake round (3 inches) on top of the custard set in a pastry ring and refrigerated it, unmolded and had a short time to photograph it before it fell apart in contact with my spoon. The part I liked the least was the chocolate glaze, equal parts chocolate and butter and that was a little too much butter for me..oh I can’t believe I just wrote that but it was. I would have preferred a light ganache, but I have had Boston Cream Pies before that featured both styles so I guess I could "push" myself t eat them anyway (ahahahaha… "push", eheheh!!)
I am also thankful to Mary for giving us creative license with the plating of the Bostini. The first night with my parents I used a cookie cutter and cut out 3-4 inches circles out of the sponge (baked in a 9×13 inch pan). The remaining servings were set in different sized and shaped glasses to be taken to a dinner party down the street. When I make the recipe again, and notice I did not say "when", I will halve it if it is for us or a small dinner party or keep it the same if I know I have more than a dozen guests (if I use 3 inches diameter cookie cutters again)
Bostini Cream Pie (from Donna Scala & Kurtis Baguley of Bistro Don Giovanni and Scala’s Bistro)
Makes 8 generous servings
INGREDIENTS:
Custard
3/4 cup whole milk
2 3/4 tablespoons cornstarch
1 whole egg, beaten
9 egg yolks, beaten
3 3/4 cups heavy whipping cream
1/2 vanilla bean ( I used 1 tsp. vanilla bean)
1/2 cup + 1 tablespoon sugar
Chiffon Cake
1 1/2 cups cake flour
3/4 cup superfine sugar
1 1/3 teaspoons baking powder
1/3 teaspoon salt
1/3 cup canola oil
1/3 cup beaten egg yolks (3 to 4 yolks)
3/4 cup fresh orange juice (I used coconut water) 1 1/2 tablespoons grated orange zest
1 teaspoon pure vanilla extract
1 cup egg whites (about 8 large)
1 teaspoon cream of tartar
Chocolate Glaze
8 ounces semi or bittersweet chocolate
8 ounces unsalted butter
To prepare the custard:
Combine the milk and cornstarch in a bowl; blend until smooth. Whisk in the whole egg and yolks, beating until smooth. Combine the cream, vanilla bean and sugar in a saucepan and carefully bring to a boil. When the mixture just boils, whisk a ladleful into the egg mixture to temper it, then whisk this back into the cream mixture. Cook, stirring constantly, until the mixture is thick enough to coat the back of a spoon. Strain the custard and pour into 8 large custard cups. Refrigerate to chill.
To prepare the chiffon cakes:
Preheat the oven to 325°F. Spray 8 molds with nonstick cooking spray. You may use 7-ounce custard cups, ovenproof wide mugs or even large foil cups. Whatever you use should be the same size as the custard cups.
Sift the cake flour, sugar, baking powder and salt into a large bowl. Add the oil, egg yolks, orange juice, zest and vanilla. Stir until smooth, but do not overbeat.
Beat the egg whites until frothy. Add the cream of tartar and beat until soft peaks form. Gently fold the beaten whites into the orange batter. Fill the sprayed molds nearly to the top with the batter.
Bake approximately 25 minutes, until the cakes bounce back when lightly pressed with your fingertip. Do not overbake. Remove from the oven and let cool on a wire rack. When completely cool, remove the cakes from the molds. Cover the cakes to keep them moist.
To prepare the glaze:
Chop the chocolate into small pieces. Place the butter in a saucepan and heat until it is just about to bubble. Remove from the heat; add the chocolate and stir to melt. Pour through a strainer and keep warm.
To assemble:
Cut a thin slice from the top of each cake to create a flat surface. Place a cake flat-side down on top of each custard. Cover the tops with warm chocolate glaze. Serve immediately.
Or layer the custard, cake and glaze in glasses or cups.
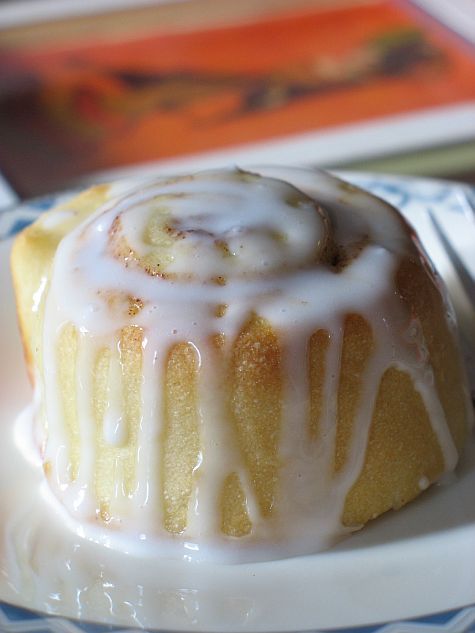
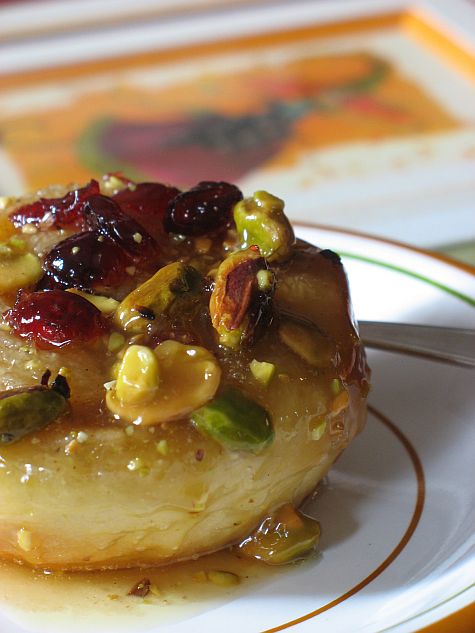
Are you ready for Fall yet? Well, you might with these Cinnamon and Sticky Buns, courtesy of the Daring Bakers, September edition. If I were you I would trust the numerous other Daring Bakers out there (over 100 by now), tempting you with pictures of gooey goodness and telling you how wonderful and soft these are. If anything, trust me: I have made them 4 times since the recipe was announced by Marce from Pip In The City, our hostess this month. Each month takes on a different aspect as far as the challenges and recipes are concerned. Sometimes, it is the challenge of coordinating schedules, sometimes it is trying to be creative with presentation or design, this time it was just difficult to keep them around long enough to share, let alone take pictures!
Everything about this recipe from Peter Reinhart’s The Bread Baker´s Apprentice made me want to make it again and again. Lisa got us started on a comical note as poor lady was suffering tremendously from her back and made the buns within the first week of September while high on painkillers. I expect her post to draw tears from my eyes, but her experience seriously made me crave sticky buns and cinnamon rolls. I made my first batch a couple of days later, in the evening, with the intention to photograph them in the morning and bring some to the neighbors before. When I got up, my husband was long gone…so was my tray of walnut sticky buns when they should have been awaiting their photo shoot! I thought that by no, he would now the rules of baking/blogging: don’t take any, don’t give any, don’t hide any until it has been photographed…nope! I got a sweet note form one of his students a few days later “Thank you Mrs. Tartelette, the sticky buns were delicious and it was great to start the day like this…” Well, I wish I had been there too!!
Now, you understand my challenge this month…but it deter me to make them again and again. I froze the cinnamon buns and proceeded to make the buns, this time with cranberries and pistachios. Probably my favorite combo of nuts/berries and it worked really well taste wise and packed a punch of visual appeal when I served them to my parents for brunch a couple of weeks ago. I changed the filling to cardamom instead of cinnamon a few times and it was jsut out of this world. We all loved the buttery goodness, (well, that’s a given with one pound of butter in the caramel part), the moistness of the dough and all the cinnamon flavor we tasted with every bite. I found that there was more than enough cinnamon sugar (used inside the rolls and buns) as well as powdered sugar glaze for the rolls. Turned out B. adds glaze as he eats away so if our mate is anything like mine, who knows?!!
Cinnamon and Sticky Buns (from Peter Reinhart’s The Bread Baker’s Apprentice)
Days to Make: One (1)Active/Resting/Baking Time: 15 minutes to mix, 3 1/2 hours fermentation/shaping/proofing, 20 – 40 minutes to bakeRecipe Quantity: Eight(1) – twelve (12) large rolls or twelve (12) – sixteen (16) small rollsMaking the Dough
6 1/2 tablespoons (3.25 ounces) granulated sugar
1 teaspoon salt
5 1/2 tablespoons (2.75 ounces) shortening or unsalted butter or margarine
1 large egg, slightly beaten
1 teaspoon lemon extract OR 1 teaspoon grated zest of 1 lemon
3 1/2 cups (16 ounces) unbleached bread or all-purpose flour
2 teaspoons instant yeast*
1 1/8 to 1 1/4 cups whole milk or buttermilk, at room temperature OR 3 tablespoons powdered milk (DMS) and 1 cup water
1/2 cup cinnamon sugar (6 1/2 tablespoons granulated sugar plus 1 1/2 teaspoons ground cinnamon, or any other spices you want to use, cardamom, ginger, allspice, etc.)
White fondant glaze for cinnamon buns or caramel glaze for sticky buns (at the end of the recipe.)
Walnuts, pecans, or other nuts (for sticky buns.)
Raisins or other dried fruit, such as dried cranberries or dried cherries (for sticky buns, optional.)
*Instant yeast contains about 25% more living cells per spoonful than active dry yeast, regardless of the brand. Instant yeast is also called rapid-rise or fast-rising.
Making the Dough: Cream together the sugar, salt, and shortening or butter on medium-high speed in an electric mixer with a paddle attachment (or use a large metal spoon and mixing bowl and do it by hand).
Note: if you are using powdered milk, cream the milk with the sugar, and add the water with the flour and yeast.
Whip in the egg and lemon extract/zest until smooth. Then add the flour, yeast, and milk. Mix on low speed (or stir by hand) until the dough forms a ball. Switch to the dough hook and increase the speed to medium, mixing for approximately 10 minutes (or knead by hand for 12 to 15 minutes), or until the dough is silky and supple, tacky but not sticky. You may have to add a little flour or water while mixing to achieve this texture. Lightly oil a large bowl and transfer the dough to the bowl, rolling it around to coat it with oil. Cover the bowl with plastic wrap.
Fermentation: Ferment at room temperature for approximately 2 hours, or until the dough doubles in size.
Form the Buns: Mist the counter with spray oil and transfer the dough to the counter. Roll out the dough with a rolling pin, lightly dusting the top with flour to keep it from sticking to the pin. Roll it into a rectangle about 2/3 inch thick and 14 inches wide by 12 inches long for larger buns, or 18 inches wide by 9 inches long for smaller buns. Don´t roll out the dough too thin, or the finished buns will be tough and chewy rather than soft and plump. Sprinkle the cinnamon sugar over the surface of the dough and roll the dough up into a cigar-shaped log, creating a cinnamon-sugar spiral as you roll. With the seam side down, cut the dough into 8 to 12 pieces each about 1 3/4 inches thick for larger buns, or 12 to 16 pieces each 1 1/4 inch thick for smaller buns.)
Prepare the Buns for Proofing:
For cinnamon buns: line 1 or more sheet pans with baking parchment. Place the buns approximately 1/2 inch apart so that they aren´t touching but are close to one another.
For sticky buns: coat the bottom of 1 or more baking dishes or baking pans with sides at least 1 1/2 inches high with a 1/4 inch layer of the caramel glaze. Sprinkle on the nuts and raisins (if you are using raisins or dried fruit.) You do not need a lot of nuts and raisins, only a sprinkling. Lay the pieces of dough on top of the caramel glaze, spacing them about 1/2 inch apart. Mist the dough with spray oil and cover loosely with plastic wrap or a food-grade plastic bag.
Proof the Buns: Proof at room temperature for 75 to 90 minutes, or until the pieces have grown into one another and have nearly doubled in size. You may also retard the shaped buns in the refrigerator for up to 2 days, pulling the pans out of the refrigerator 3 to 4 hours before baking to allow the dough to proof.
Bake the Buns:
Preheat the oven to 350°F (175°C) with the oven rack in the middle shelf for cinnamon buns but on the lowest shelf for sticky buns.
Bake the cinnamon buns for 20 to 30 minutes or the sticky buns 30 to 40 minutes, or until golden brown. If you are baking sticky buns, remember that they are really upside down (regular cinnamon buns are baked right side up), so the heat has to penetrate through the pan and into the glaze to caramelize it. The tops will become the bottoms, so they may appear dark and done, but the real key is whether the underside is fully baked. It takes practice to know just when to pull the buns out of the oven.
Cool the buns:
For cinnamon buns, cool the buns in the pan for about 10 minutes and then streak white fondant glaze across the tops, while the buns are warm but not too hot. Remove the buns from the pans and place them on a cooling rack. Wait for at least 20 minutes before serving.
For the sticky buns, cool the buns in the pan for 5 to 10 minutes and then remove them by flipping them over into another pan. Carefully scoop any run-off glaze back over the buns with a spatula. Wait at least 20 minutes before serving.
Toppings for the Buns: White fondant glaze for cinnamon buns:
Cinnamon buns are usually topped with a thick white glaze called fondant. There are many ways to make fondant glaze, but here is a delicious and simple version, enlivened by the addition of citrus flavor, either lemon or orange. You can also substitute vanilla extract or rum extract, or simply make the glaze without any flavorings.
Sift 4 cups of powdered sugar into a bowl. Add 1 teaspoon of lemon or orange extract and 6 tablespoons to 1/2 cup of warm milk, briskly whisking until all the sugar is dissolved. Add the milk slowly and only as much as is needed to make a thick, smooth paste.
When the buns have cooled but are still warm, streak the glaze over them by dipping the tines of a fork or a whisk into the glaze and waving the fork or whisk over the tops. Or, form the streaks by dipping your fingers in the glaze and letting it drip off as you wave them over the tops of the buns. (Remember to wear latex gloves.)
Caramel glaze for sticky buns
Caramel glaze is essentially some combination of sugar and fat, cooked until it caramelizes. The trick is catching it just when the sugar melts and lightly caramelizes to a golden amber. Then it will cool to a soft, creamy caramel. If you wait too long and the glaze turns dark brown, it will cool to a hard, crack-your-teeth consistency. Most sticky bun glazes contain other ingredients to influence flavor and texture, such as corn syrup to keep the sugar from crystallizing and flavor extracts or oils, such as vanilla or lemon. This version makes the best sticky bun glaze of any I´ve tried. It was developed by my wife, Susan, for Brother Juniper´s Cafe in Forestville, California.
NOTE: you can substitute the corn syrup for any neutral flavor syrup, like cane syrup or gold syrup.
1. In the bowl of an electric mixer, combine 1/2 cup granulated sugar, 1/2 cup firmly packed brown sugar, 1/2 teaspoon salt, and 1/2 pound unsalted butter, at room temperature.
2. Cream together for 2 minutes on high speed with the paddle attachment. Add 1/2 cup corn syrup and 1 teaspoon lemon, orange or vanilla extract. Continue to cream for about 5 minutes, or until light and fluffy.
3. Use as much of this as you need to cover the bottom of the pan with a 1/4-inch layer. Refrigerate and save any excess for future use; it will keep for months in a sealed container.
I might make another batch before this coming week is over! Thanks Marce for picking up such a recipe. Thanks Lisa and Ivonne, founders of the Daring Bakers, for managing this wonderful group with such gusto and taste. Check the blogroll to read more sticky goodness!
I was lucky enough to photograph the buns and rolls on pictures framed by my mom. See, her talent is that she is a framing artist. My dad paints watercolors and that’s how she got started, she took classes to be able to display his work. After many years, the class became more of a group of friends, challenging themselves with new techniques. Last year I ordered a set of prints from a French artist, Anne-Soline, 3 fairies and 3 dancers, and she brought them over this trip, double bubble-wrapped. They made it one piece, which enabled me to play around with the layout of the pictures.
How to combine a house guest, a Daring Baker challenge and a sunburn…just ask your crazy little Tartelette!
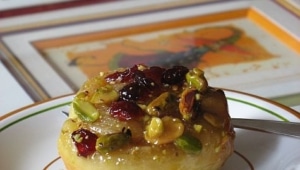
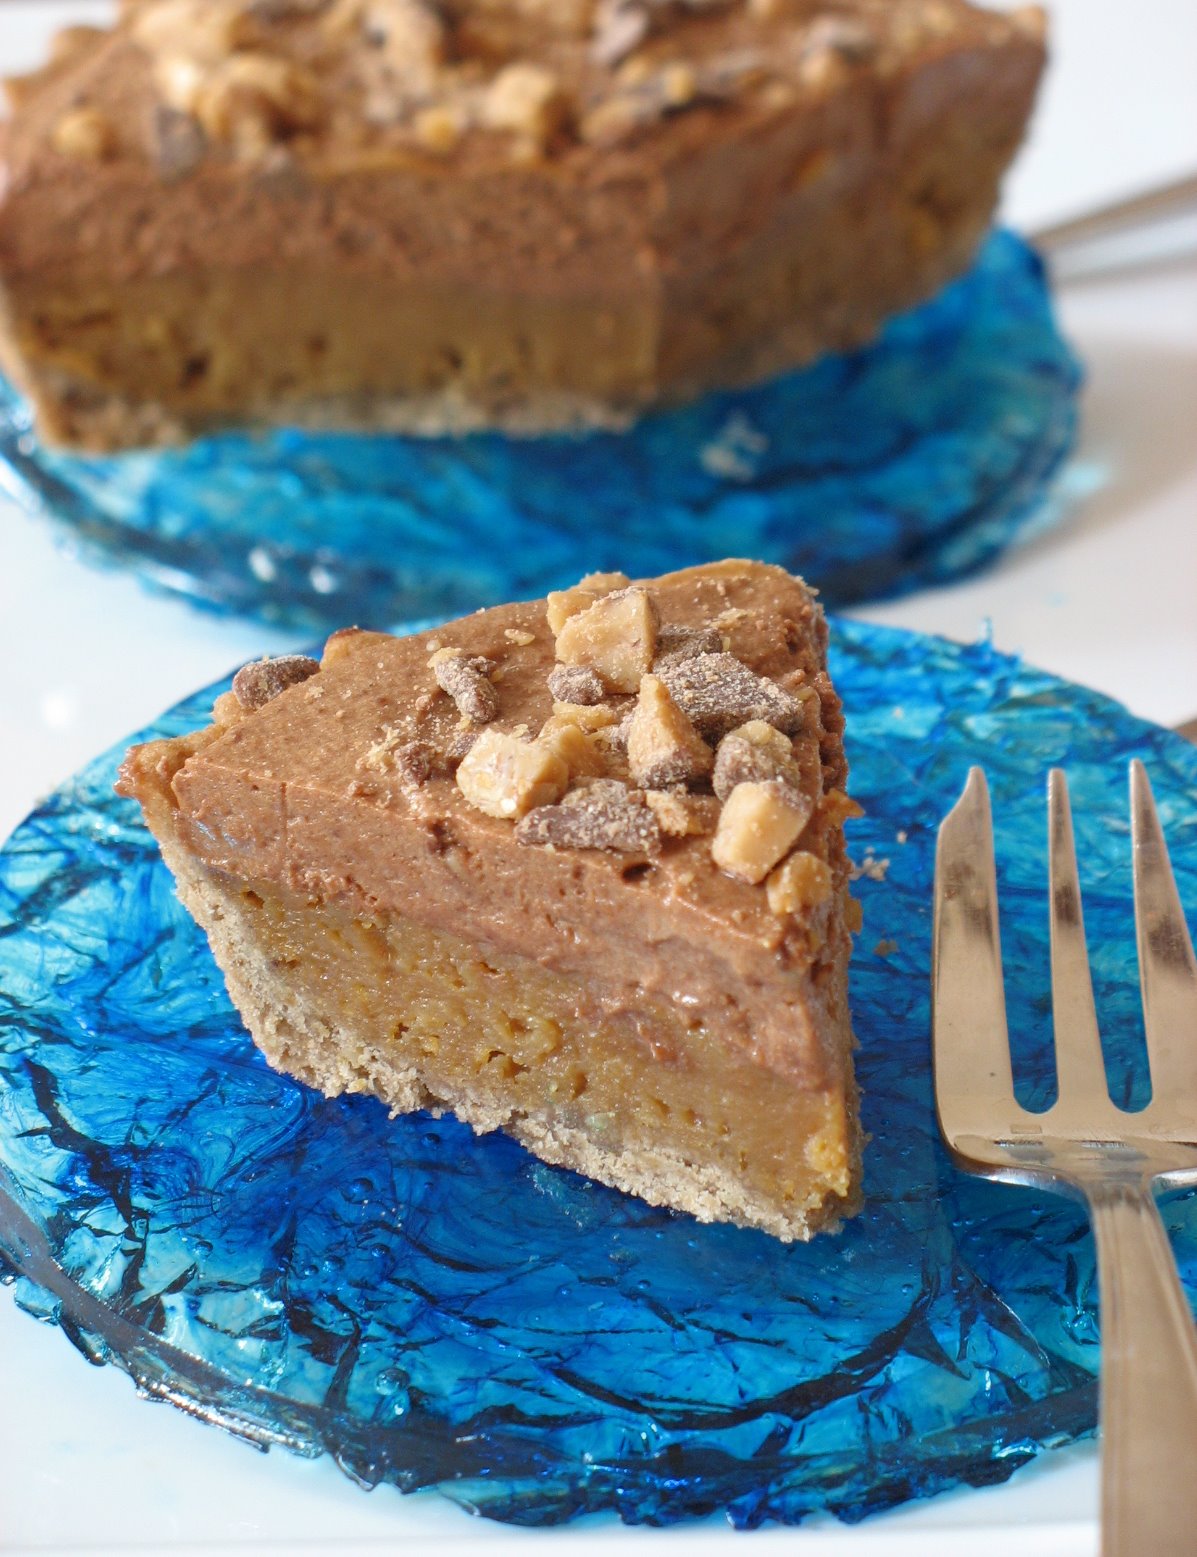
The challenge this month took on a complete different meaning for me. If you have been following my posts lately, you have noticed that they have been fewer and quite short in story telling, kind of drive by but not exactly. Well, you see, I had the very important job this month to be Godmother extraordinaire to a beautiful 18 year old soul named Sophie. My god child is a little storm of a woman and I bet you she will melt a thousand hearts before she meets the right guy. In the meantime, I wanted to melt hers and become the coolest godmother ever….and when Veronica and Patricia announced the Daring Bakers’ August challenge as a Milk Chocolate and Caramel Tart from Eric Kayser’s Sweet and Savory Tarts, I knew I had just the ticket….except we only got to it this past weekend!!
I was too busy taking her around town whenever I had a day or afternoon off , or even an hour to go shoe shopping (guys take a hint here for your daughters…works like a charm to fix “boys issues”). Her last days were just around the corner and still no tart….Oh believe me, we got quite busy in the kitchen, especially making sourdough bread every other day (those French and their bread!), making lasagna, pizza, Financiers, brownies, macarons…well, you get the picture.
Saturday night, we took her out to dinner at Middleton Place (watch The Patriot) and took the time to stroll the plantation’s gardens and ate a fabulous meal of seafood and pecan pies…and it was on a very satisfied stomach (read I ate my pie and finished hers) that I started on the tart. No way I was going to loose my crown of Coolest Godmother by not completing the challenge.
The tart is based on 3 components that you can spread out over several days if necessary plus a decoration element, which I took some liberty with by the look of my tarts (blue sugar plates). The recipe is very straightforward and the tart presents no major hurdle if you know some about sugar. The chocolate shortbread crust came together without a glitch but I had to omit the cinnamon (with Veronica’s approval) called for because Sophie does not like it (and remember I am Zee Coolest Godmother). I wish I had made some with though because it needed that extra kick in my opinion.
The caramel layer seemed to have given some trouble to other Daring Bakers. Lisa, I still don’t know why yours was so liquidy….and yes, people think I am officially crazy when I take your phone calls in the middle of grocery shopping! Anyways, I would love to say I know why mine set out just fine and not others, truth is that Sophie and B. were so involved in a game of Othello that I had to make sure she was saving the family’s honor and I completely forgot about the tart in the oven….I think I baked them for 25 instead of 15 minutes, and the explanation might be in the translation of the book and temperature conversions, not given appropriately in English. I made the caramel layer Sunday after a full day at the beach and a double dose of sunburn. I made the caramel using the dry method, as it is the one I am most familiar with. I understand it scared some Daring Bakers and some did actually ruin a few pots trying it, I have to admit that I had the luxury of burning a few restaurant saucepans and never my own learning it so I see why they would feel tempted to use the alternative given by Veronica to make a water/sugar/corn syrup caramel which takes longer but is somewhat foolproof. My word of advice for novices who are tempted by the dry method: low/medium heat is best and sugar clumps “declump” if you lower your heat and let the sugar melt at its own pace.
Monday during my lunch break, I came home to make the final part of the tart. I found Sophie and B. watching Donkey Skin. : “A fairy godmother helps a princess disguise herself so she won’t have to marry a man she doesn’t love”…(See where I am going with this?) Time to finish this baby and get my stripes!!
The mousse sent me back to my restaurant days big time. When I learned how to make mousse it was the old traditional way: melt chocolate, separate eggs, add yolks to chocolate, whip the whites to firm peaks and fold in the chocolate mass. In a large restaurant turning tables 2-3 times a night, this method can be quite costly and it’s not before long that you have to resort to the quicky approach of melted chocolate folded in whipped cream. Now you understand why my eyes popped and had to smirk when I read that even Eric Kayser used this method…the fraud…no just kidding….I don’t really like mousses like that, and I can’t say whether it is because I used to make it day in and day out or because I find too heavy. Egg whites mousse are really delicate and intense in flavors whereas the whipped cream ones are too dairy tasting. Just my thoughts people, don’t start coming at me with your spoon to bang me on the head….I just expressed an opinion, nothing else.
½ lb (250 g) chocolate shortbread pastry (see recipe below)
1 ½ cups (300 g) granulated sugar
1 cup (250 g) heavy cream (30-40 percent butterfat) or crème fraiche
¼ cup (50 g) butter
2 whole eggs
1 egg yolk
2 ½ tablespoons (15 g) flour
1 ¼ cups (300 g) whipping cream
½ lb (250 g) milk chocolate
1. Preheat oven to 325 °F (160 °C).
2. Line the baking pan with the chocolate shortbread pastry and bake blind for 15 minutes.
3. In a saucepan, caramelize 1 cup (200 g) granulated sugar using the dry method until it turns a golden caramel color. Incorporate the heavy cream or crème fraiche and then add butter. Mix thoroughly. Set aside to cool.
4. In a mixing bowl, beat the whole eggs with the extra egg yolk, then incorporate the flour.
5. Pour this into the cream-caramel mixture and mix thoroughly.
6. Spread it out in the tart shell and bake for 15 minutes. Remove from oven and allow to cool.
7. Prepare the milk chocolate mousse: beat the whipping cream until stiff. Melt the milk chocolate in the microwave or in a bain-marie, and fold it gently into the whipped cream.
8. Pour the chocolate mousse over the cooled caramel mixture, smoothing it with a spatula. Chill for one hour in the refrigerator.
To decorate: melt ½ cup (100g) granulated sugar in a saucepan until it reaches an amber color. Pour it onto waxed paper laid out on a flat surface. Leave to cool. Break it into small fragments and stick them lightly into the top of the tart.
1 cup (250g ) unsalted butter, softened
1 cup plus 2 tablespoons (150 g) confectioners’ sugar
½ cup (50 g) ground hazelnuts
2 level teaspoons (5 g) ground cinnamon
2 eggs4 ½ cups (400 g) cake flour
2 ½ teaspoons (10 g) baking powder
1 ½ tablespoons (10 g) cocoa powder
A day ahead
1. In a mixing bowl of a food processor, cream the butter.
2. Add the confectioners’ sugar, the ground hazelnuts, and the cinnamon, and mix together
3. Add the eggs, one by one, mixing constantly
4. Sift in the flour, the baking powder, and the cocoa powder, and mix well.
5. Form a ball with the dough, cover in plastic wrap, and chill overnight.
Alright, so we are now Monday night and it is time to finally taste the tarts. I made several sizes just to see what we could play with and I spooned it in a pastry bag fitted with a large start tip and swirled it around on top of the caramel.
I remembered I had some Milk Chocolate Toffee (think homemade Heath Bar) that I had made a couple of weeks prior and crushed the remainder on top of the tarts.
At first I thought I was not that inspired to dress them up a little for their beauty shots but you know what happens in those cases…my mind goes stir crazy and I decided to give them pretty little glass- marbled like plates made out of clear caramel and food coloring so completely edible if you ever should need more sugar! That part, Sophie did not see come together as I made them after I dropped her off at the airport today. The house was eerily quiet, suddenly too big and although I finally had all my kitchen space back to myself, I did not want it anymore….I wanted to share it with her again…I guess that’s why they put “mother” in godmother…Well, girl, I hope you like them and “non, ca ne pique pas”…!!
Well, both Sophie and Bill loved it, or they lie very well….I was not so keen on it. I wish I had made half with cinnamon and half without because it really needed something to offset all that sugar. But I love milk chocolate, hazelnuts and caramel so I have to really thank Veronica and Patricia for choosing this recipe and the rest of the Daring Bakers for going along with it!
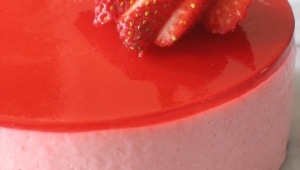
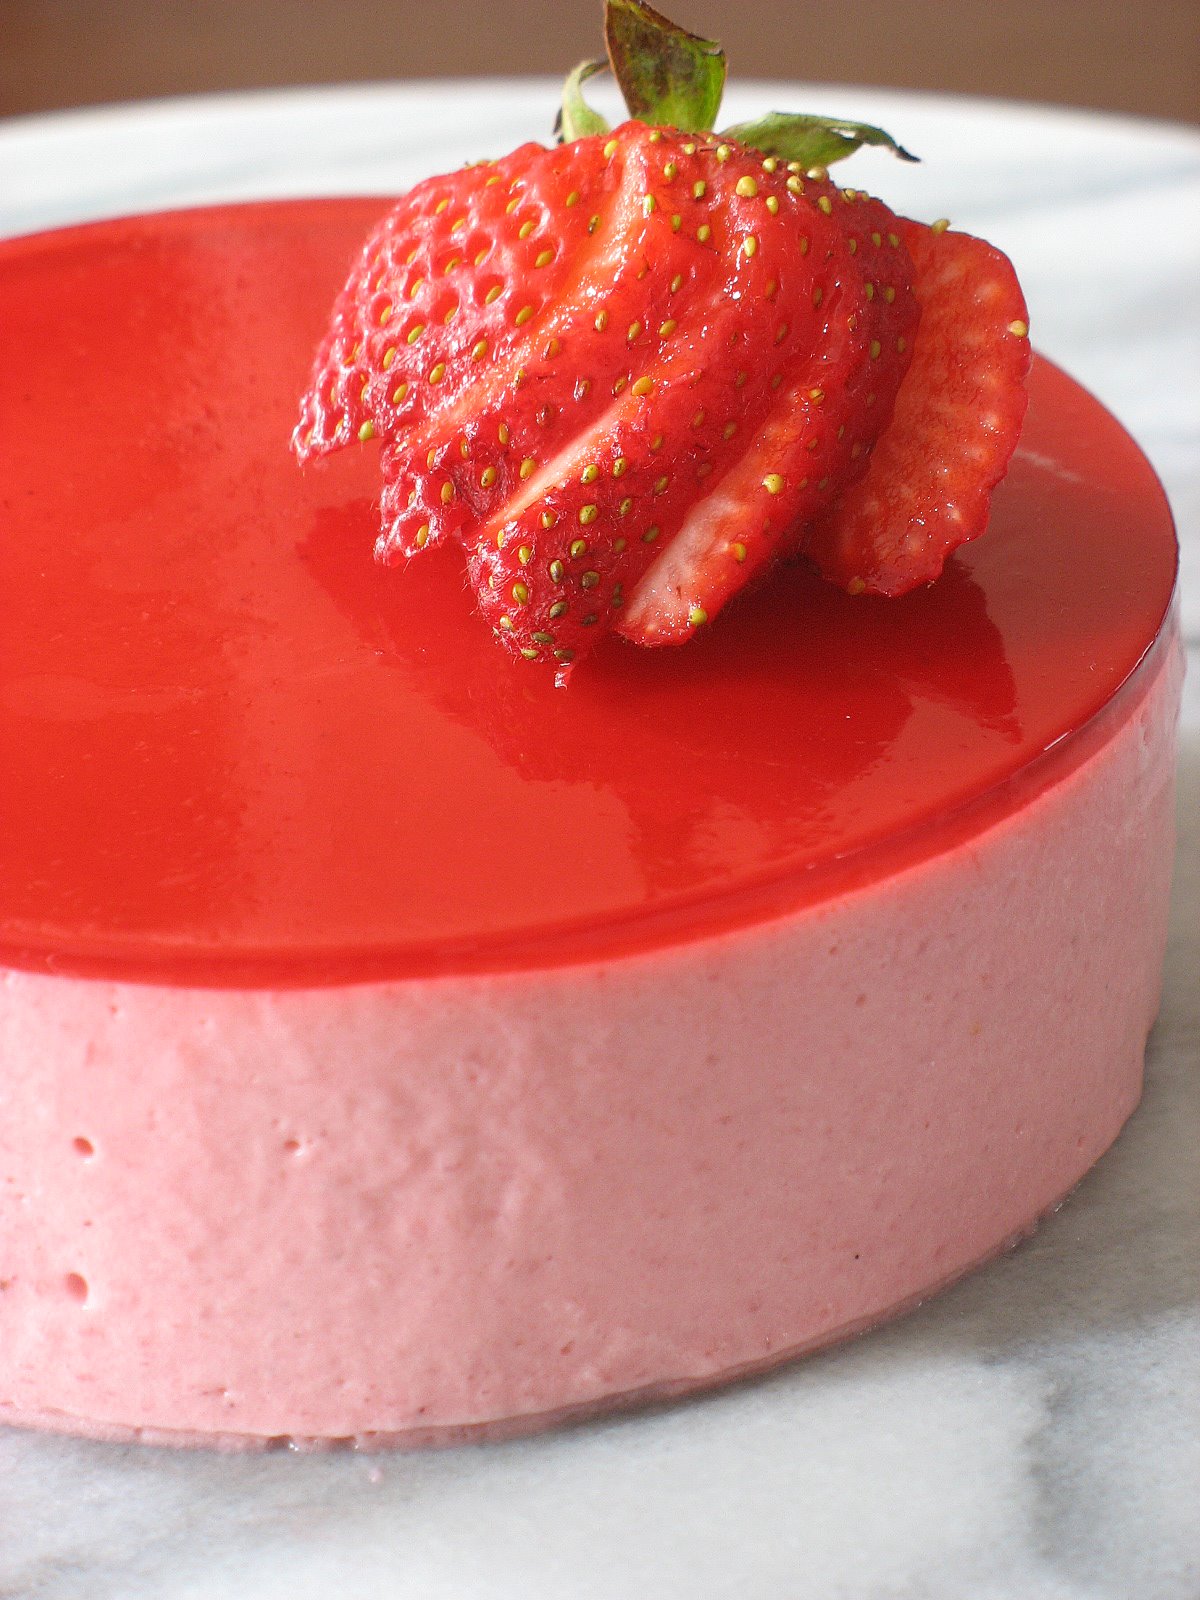
For those who have been following the monthly adventures of the Daring Bakers, you were maybe starting to wonder if we had drawn a blank on a recipe challenge for this month….Well, as you can see from the above picture, the answer is no….we are just sitting there…quietly reveling in the beauty of a refreshing and light Strawberry Mirror Cake.
Everything about the cake that Peabody had chosen this month had me excited for so many different reasons. The most obvious being that it seems like ages since I have made a mirror cake which is weird in my field since it is a very attractive cake, and has a perfect mix of light vanilla sponge cake and creamy bavarian cream, and travels and keeps well. Thus, having to make it for our challenge was a great way for me to reconnect with an old friend. As I was thinking about writing this very post I figured that you will have the chance to read about its making process, texture and taste and many other blogs (there are over 90 of us), and realized that for me this cake and its whole making experience was centered around friends. Building, sharing and entertaining friendships.
Soon after we were given the challenge, I started preparing for my trip to visit my new best girlfriend, Lisa. That was a big deal: the Queen of Dorkdom herself, co-founder with Ivonne of the Daring Bakers and accomplished Italian chef! Since we had decided to spend a good bit of time in the kitchen, I asked her if there were specific pastry items she wanted me to teach her, like macarons, caramel work and others. I also asked if she wanted to make the challenge cake that weekend. Her answer was "Oh my god, I am so glad you mentioned it. I was about to beg you to help me with it". Folks, although she feels quite nervous about pastry, Lisa rocked that challenge like a pro! I knew her back and feet were killing her we had done so much walking in the heat so I helped with little things like straining the fruit for the puree and juice, measuring little things and washing bowls and cups. Any nervousness about the cake were quickly dissipated, maybe by the fact that I could give her explanation on what the Bavarian should be like, how to decipher a pastry school recipe, giving her tricks like tapping the side of a pan with the back of a knife to get rid of air bubbles and so on. When other Daring Bakers started to ask how long it took to make certain parts of the recipe, I know we were giggling together, although miles away from each other, because we took the entire day and the next morning to make it. See, much like Tanna and Karen did in June with the bagel challenge, we truly shared a great moment of friendship making this one. The high point being when we sat down Sunday evening with her family and shared a great dinner ending with this gorgeous looking cake.
When I got back home, I tackled the cake challenge yet again but this time on a different feeling. I was by myself in the kitchen that Saturday afternoon, and after such a high friendly first time, I felt quite lonely making it. Instead of making one 10 inch cake like the recipe suggested I decided to make 4 individual ones (4 inches wide), kept one for us and brought the remaining three for our weekly cookout with the neighbors. At that point, the cake screamed friendship to me: sharing, laughing, eating…There was not one moment when I was making it that I did not think about Lisa and her family, the laughs and giggles we shared that weekend. Because I went with individual ones, I had quite a bit of cake and cram leftover so I layered them in glasses and we ate cake that week for breakfast, lunch and dinner, but we are up for that in this house, trust me on that! It is light and refreshing, not too sweet and filling enough in small quantities. I used Lemon Vodka instead of the kirsch and did not use any food coloring as B. is allergic and the strawberries were bright red enough.
Strawberry Mirror Cake
3 eggs
3 egg yolks
¾ cup sugar
1 tsp vanilla extract
3 egg whites
1/8 tsp cream of tartar
2 TBSP sugar
2/3 cup sifted cake flour
½ cup water
1/3 cups sugar
2 TBSP kirsch or strawberry liqueur
Strawberry Bavarian Cream
2 ½ TBSP unflavored gelatin
1 ½ cups strained strawberry puree(1 ½ baskets)
5 egg yolks
2/3 cup sugar
1 ½ cups milk
1 TBSP lemon juice
several drops of red food coloring
1 ¾ cups whipping cream
Strawberry Mirror
1 tsp lemon juice
1 TBSP kirsch
1 TBSP water
1 TBSP unflavored gelatin
Few drops of red food coloring
Strawberry Juice
1 ½ pints of strawberries(18 oz)
¾ cup sugar
¾ cup water
1.Preheat oven to 450F. Butter and flour the sides of an 11-by-17 inch jelly roll pan(rimmed baking sheet). Line bottom of pan with a sheet of parchment paper cut to fit bottom pan exactly.
2.Beat eggs, egg yolks and ¾ cup sugar together in a medium bowl until thick and light. Beat in the vanilla.
3.In a separate bowl, beat the egg whites until foamy, ad cream of tartar and beat until whites begin to form peaks. Add the 2 TBSP sugar and beat until the whites hold stiff, glossy peaks(do not over beat).
4.Sift flour over the egg yolk mixture and fold in . Stir in one fourth of the whites. Then carefully fold in the remaining whites.
5.Spread batter evenly in pan. Bake until light brown and springy to touch(7 to 10 minutes). Cool in pan 5 minutes. Run a knife along edge to loosen. Invert cake tin to cut out 8 ¼ inch circles of cake. Wrap the cake layers, separated with waxed paper, and set aside. Cake may be frozen at this point.
6.To make soaking syrup: Combine water and the 1/3 cup sugar in saucepan; bring to a boil to dissolve sugar. Cool to room temperature; flavor with liqueur. Set aside or refrigerate in glass jar until ready to use.
7.To assemble cake: Brush sides of 10-inch springform pan lightly with flavorless salad oil or almond oil. Cut out a cardboard circle that is exactly the same size as the bottom inside of the pan; cover cardboard with aluminum foil and fit into bottom of pan. Center one layer of the cake bottom of pan. Brush the cake with some of the soaking syrup to just moisten(not drench) the cake; set aside.
8.Prepare Strawberry Bavarian Cream. Immediately pour about half of the Bavarian Cream over the first layer of cake in the pan. Set the next layer of cake on top of the cream. Pour remaining Bavarian Cream over cake and smooth top of the cream with spatula. Refrigerate until the cream sets(1 to 2 hours).
9.Prepare the Strawberry Mirror.
10.To serve: Wrap a hot towel around the outside of springform pan for a few minutes. Run a small sharp knife tip around the edge of the Strawberry Mirror to separate it form the sides of pan. Mirror will tear when sides are unlatched if it is stuck at ANY point. Slowly unlatch the pan and slide it off the cake. Slice cake in wedges and serve in upright slices.
Prep Work Strawberry Bavarian Cream
1.Sprinkle the gelatin over the strawberry puree in a small bowl and set aside until spongy.
2.Combine egg yolks and sugar in a bowl' beat until light. Bring milk to a boil in sauce pan. Pour hot milk into yolk mixture ans stir with a wooden spoon(it doesn’t say so but I would temper the egg mixture first to be safe). Return this mixture to the saucepan and cook over medium heat, stirring constantly, until your finger leaves a clear trail in sauce when drawn across the back of the spoon.(Do not boil or mixture will curdle.) Immediately remove from heat and stir in softened gelatin mixture. Pour into a stainless steel bowl places over a bowl of ice water. Stir in lemon juice and a few drops of red food coloring. Cool over ice water, stirring occasionally, until mixture thickens to the consistency of softly whipped cream.
3.White gelatin mixture is cooling, whip the whipping cream until it holds soft peaks. When the gelatin mixture resembles softly whipped cream, fold the whipped cream into the gelatin mixture.
Strawberry Mirror
1.Prepare strawberry juice.
2.Place lemon juice, kirsch, and water in a small bowl. Sprinkle gelatin over this mixture; set aside until spongy and soft.
3.Measure 1 ½ cups Strawberry juice into a small saucepan and bring to a simmer; pour over gelatin mixture and stir to dissolve gelatin. Tint to desired color with red food coloring. Place bowl over bowl of ice water and stir occasionally until the mixture is syrupy and just beings to thicken(do not let jell); remove from ice water.
4.When mixture is syrupy, pour a 1/16-inch layer over the top of cake. Refrigerate until set.
Strawberry JuiceWash and hull strawberries; coarsely chop. Place strawberries in saucepan; crush to start juices flowing. Place over low heat; add sugar and water; simmer slowly 10 minutes. Pour juice and pulp through damp jelly bag or cheesecloth-lined colander and drain into a bowl for 15 minutes(Do not press down on fruit).
Adapted from Cakes and Pastries At The Academy by the California Culinary Academy 1993
Want to know what everybody else has been up to with this challenge? Head over to my side bar under "Daring Bakers" and click on "Find Us Here" where you will be directed to our official blogroll and start clicking to your heart’s content!
Thanks Peabody for giving me the chance to share great moments both away and at home while making the challenge! Looking forward to August!
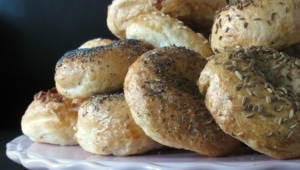
If you don’t, be sure to stop by my house because we have more than we can wrap our stomachs around. Part of it is my fault, part is due to this month Daring Bakers challenge. Our mission given by Jenny and Freya was to make Real Honest Jewish Purist’s Bagels. They were honestly good and since I made mini ones, twice, I ended up with a bunch…
Funny thing is that I had never had a bagel prior to moving to the US. I am sure you can find them in France but my catholic provencal background probably shunned me from knowing this delicacy. I made up for lost time, believe me! I love how versatile they are. We eat ours with sweet spread sor breakfast, pile halves with pizza topping, or use mini ones with snoked slamon and mascarpone for little munchies with friends. I like having a bagel around the house even if I won’t eat all of it…it’s bumpy smooth belly brings me comfort…I know I am weird…but if you know me you kow I am also the one who makes bread like crazy just for the smell and feel of it, even if I don’t eat that much.
Toppings (I had 32 mini ones and free time so I played around), left to right, back to front:
Herbes de Provence, poppy seeds, bacon, sesame seeds, fennel seeds, caraway seeds, coarse demerara sugar, cheddar cheese and maldon sea salt.
Our challenge was to follow it without changes so we could all compare notes. Seems like we all pretty much experienced the same things. For more reports, you can click on the side bar blog roll for Daring Bakers. All this to say that I had a blast making these and would make them again. Actually I did make them twice, just to see if the recipe would end up differently if halved. A few observations to keep in mind if you decide to try them: the dough was wickedly rising fast and high. Kneading does not take that long, about 8-10 minutes but do not skip this step. It’s good for the nerves and it really helps the texture of your bagels in the end. When the time comes to shape your bagel, divide the dough in half and refrigerate the batch that you are not working on. The recipe mentionned that the bagels would sink to the bottom of the pot and then rise and float in the water. My first batch yielded about 32 mini ones, and only 10 sank, the rest nagged me by floating their little merry way … Floaters or sinkers, they still tasted the same. I used all of the flour measurement, kneaded appropriately, respected rising times and still floaters. Same issue when I made them again a couple of weeks later and halved the recipe. I decided to go for the poke method to form them, and I had to push a rather large hole in the middle as the bagels had a tendency to swallow it back up upon their rising before their little trip in the water.
Thanks Jenny and Freya for a fun challenge. I will keep the recipe and make it again with some tweaking….I still want to make my bagels sink!
Since we eat them mostly at breakfast and since we are a mostly sweet household, these are some of the spreads we have with our bagels: mirabelles jam (yellow plums), cherry preserves, coconut honey and wildflower honey. Since I have so many bagels, I have been using them for mini sandwishes also with a spread of chive cream cheese, sprouts and some turkey slices.
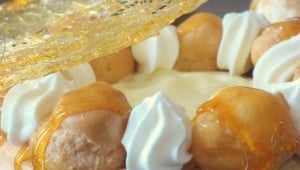
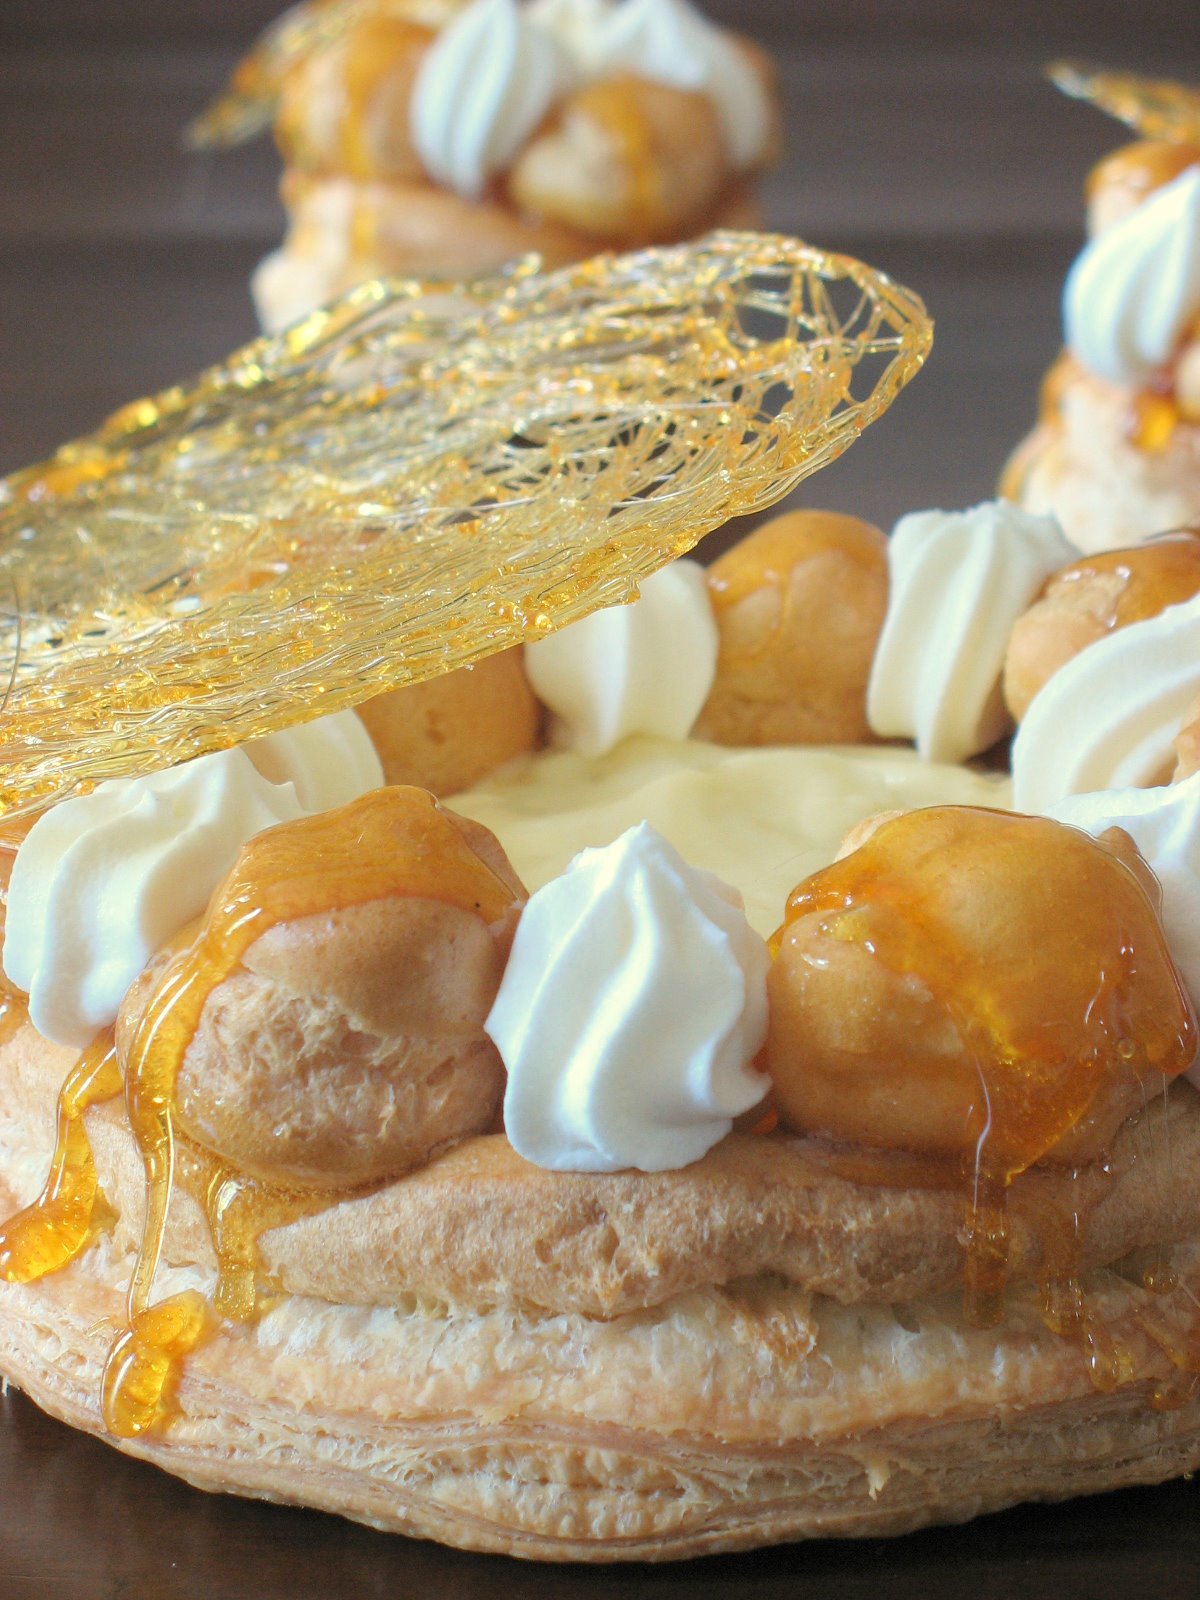
It’s time for the May installment of the Daring Bakers’ production, created by Ivonne and Lisa. It was my turn to pick a recipe and risk a minor stone throwing if it did not work out. After last month somewhat hair pulling Crepe Cake (and yes, Brilynn we still love you), I was really worried about presenting the recipe I had chosen: Gateau Saint Honore. I knew that some of us had previously made it either in their jobs or pastry school, some had baked parts of it for other recipes or had been tempted by makin some aspects of it without taking the plunge. There were several reasons behind my choice but primarily:
– Turns out that May 16th was Saint Honore (pronounced o-no-ray) Day, patron Saint of pastry chefs and bakers.
– It is the “must pass” element of pastry school students and it is a cake that includes several elements and techniques that bakers should try at least once: puff pastry, cream puff dough, caramel and pastry filling.
– We are Daring Bakers after all!
Since there is an ever growing number of Daring Bakers, I asked Anita to co-host with me and you will find half of the Daring Bakers’s links to their creation on this blog and half on hers. We will be updating the links as people post throughout the day. There are 48 of us this month, from various baking backgrounds and accomplishments, with various jobs and trades and we have our first male Daring Baker too! On to the nitty-griddy of the recipe:
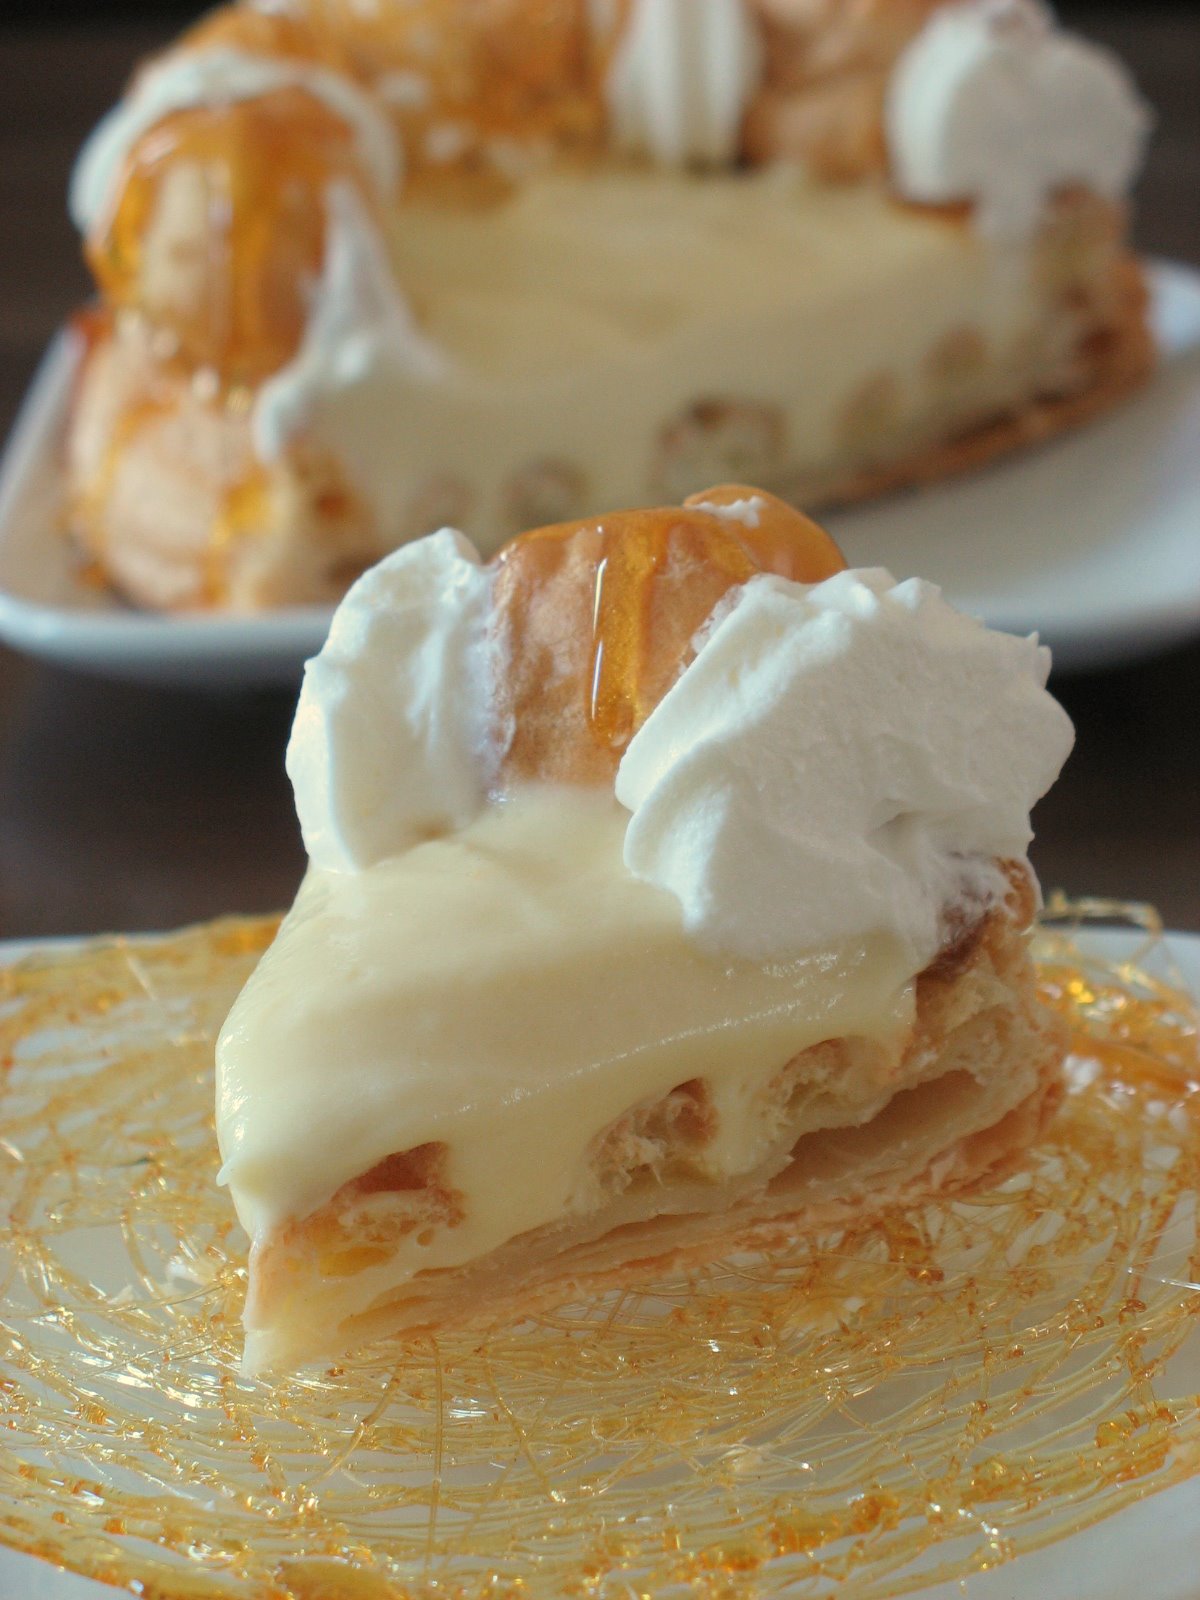
There are many fillings as they are bakeries: chiboust cream, pastry cream, Bavarian cream (aka Diplomat cream). The cake building goes like this:- base of puff pastry- rings of cream dough baked on top (so that the cream sticks)- cream puffs set on the pastry filling or hooked to the base with hot caramel- cream filling to fill everything
I compiled recipes from Bo Friberg’s books “The Professional Pastry Chef” editions 3rd and 4th, and "The Advanced Pastry Chef". It is straightforward and very close to what you would find nowadays walking on the streets of Paris and popping into a bakery (close our eyes, you’re there). I realize it calls for time consuming puff pastry so you can use store bought, but if you have never made it why not try? It is just a long process, but the recipe given below makes more than you need so you can freeze it and use it later for something else. The recipe for the Saint Honore cream is flavored with rum and that may not appeal to you, so substitute an alcohol that you like more (Grand Marnier, White Godiva, Kirsch,…), or vanilla.
Gateau Saint Honore is built upon the followwing pastry items:
Puff pastry, Pate a Choux (Cream Puff Dough), Saint Honore Cream, caramel and whipped cream.
Pate a Choux – Cream Puffs Dough
4 ¾ oz. all purpose flour (135 gr)
1 cup water ( 240 ml)
2 oz unsalted butter (58 gr)
¼ tsp. salt (1 gr)
1 cup eggs (240 ml)
Sift the flour and set aside. Heat the water, butter and salt to a full rolling boil, so that the fat is not just floating on the top but is dispersed throughout the liquid. Stir the flour into the liquid with a heavy wooden spoon, adding it as fast as it can be absorbed. Avoid adding it all at once or it will form clumps. Cook, stirring constantly and breaking up the lumps if necessary, by pressing them against the side of the pan with the back of the spoon until the mixture comes away from the sides of the pan, about 2-3 minutes. Transfer the dough to a mixer bowl. Let the paste cool slightly so that the eggs will not cook when they are added. You can add and stir the eggs by hand but it requires some serious elbow grease.Mix in the eggs, one at a time, using the paddle attachment on low or medium speed. Do not add all the eggs at once. Check after a few, the dough should have the consistency of thick mayonnaise.Transfer the dough to a piping bag and use as desired.
Pate Feuillete – Puff Pastry:
Makes about 2 1/2 pounds.
3 cups all-purpose flour, plus more for work surface (420 gr)
3/4 cup cake flour (105 gr)
1 1/2 teaspoons salt (7 gr)
4 tablespoons unsalted butter, cut into 1/2-inch pieces, well chilled (60 gr)
1 1/4 cups cold water (295.5 ml)
1 tablespoon all-purpose flour (14 gr)
1 3/4 cups (3 1/2 sticks) unsalted butter, well-chilled (405 gr)
1/ Make the dough package: In a large mixing bowl, combine both flours with the salt. Scatter butter pieces over the flour mixture; using your fingers or a pastry cutter, incorporate butter until mixture resembles coarse meal.
2/ Form a well in center of mixture, and pour the water into well. Using your hands, gradually draw flour mixture over the water, covering and gathering until mixture is well blended and begins to come together. Gently knead mixture in the bowl just until it comes together to form a dough, about 15 seconds. Pat dough into a rough ball, and turn out onto a piece of plastic wrap. Wrap tightly, and place in refrigerator to chill 1 hour.
3/ Make the butter package: Sprinkle 1/2 tablespoon flour on a sheet of waxed or parchment paper. Place uncut sticks of butter on top, and sprinkle with remaining 1/2 tablespoon flour. Top with another sheet of paper; using a rolling pin, pound butter to soften and flatten to about 1/2 inch. Remove top sheet of paper, and fold butter package in half onto itself. Replace top sheet of paper, and pound again until butter is about A inch thick. Repeat process two or three times, or until butter becomes quite pliable. Using your hands, shape butter package into a 6-inch square. Wrap well in plastic wrap, and place in refrigerator until it is chilled but not hardened, no more than 10 minutes.
4/ Assemble and roll the dough: Remove dough package from refrigerator, and place on a lightly floured work surface. Using a rolling pin, gently roll dough into a 9-inch round. Remove butter package from refrigerator, and place it in the center of the dough round. Using a paring knife or bench scraper, lightly score the dough to outline the butter square; remove butter, and set it aside. Starting from each side of the center square, gently roll out dough with the rolling pin, forming four flaps, each 4 to 5 inches long; do not touch the raised square in the center of the dough. Replace butter package on the center square. Fold flaps of dough over the butter package so that it is completely enclosed. Press with your hands to seal.
5/ Using the rolling pin, press down on the dough at regular intervals, repeating and covering the entire surface area, until it is about 1 inch thick. Gently roll out the dough into a large rectangle, about 9 by 20 inches, with one of the short sides closest to you. Be careful not to press too hard around the edges, and keep the corners even as you roll out the dough by squaring them with the side of the rolling pin or your hands. Brush off any excess flour. Starting at the near end, fold the rectangle in thirds as you would a business letter; this completes the first single turn.Wrap in plastic wrap; place in refrigerator 45 to 60 minutes.
6/ Remove dough from refrigerator, and repeat process in step 5, giving it five more single turns.Always start with the flap opening on the right as if it were a book. Mark the dough with your knuckle each time you complete a turn to help you keep track. Chill 1 hour between each turn. After the sixth and final turn, wrap dough in plastic wrap; refrigerate at least 4 hours or overnight before using.
Saint Honore Cream (Rapid Chiboust or Diplomat Cream)
1 envelope unflavored gelatin (7 gr.)
1/4 cup cold water (60 ml)
1/2 cup + 2 Tablespoons sugar (130 gr)
½ cup all-purpose flour (70 gr)
1/4 teaspoon salt
5 egg yolks
2 cups whole milk (500ml)
1 Tb. rum
¼ cup whipping cream (57 gr)
3 egg whitesdash of salt
1/2 cup sugar (105 gr)
Soak the gelatin in the 1/4 cup of cold water.
Put the sugar, flour, and salt into a saucepan and stir together with a whisk. Add the yolks and enough milk to make a paste. Whisk in the remainder of the milk. Place over low heat and stirring constantly, cook until thick. Remove from heat and stir in the rum and the gelatin. Stir until the gelatin is completely dissolved.Stir in the whipping cream. Set the mixing bowl in cold water and stir until the cream is cool. Place the egg whites in a clean bowl and using clean beaters, whip them with the dash of salt. As soon as the whites begin to stiffen, gradually add the 1/2 cup of sugar and beat until they are very stiff. Fold the egg whites into the cooled cream.
Caramel:8 oz sugar (240 gr)Assembly:
Roll the puff pastry out to 1/8 inch (3 mm) thick, 12 inch square (30 cm). Place on a sheet pan lined with parchment paper. Refrigerate covered at least 20 minutes.While the puff pastry is resting, make the pate a choux and place it in a pastry bag with a # 4 (8mm) plain tip. Reserve.Leaving the puff pastry on the sheet pan, cut a 11 inch (27.5 cm) circle from the dough and remove the scraps. (An easy way to cut it is to use a 11inch tart pan as a “cookie cutter”). Prick the circles lightly with a fork. Pipe 4 concentric rings of Pate a Choux on the pastry circle. Pipe out 12 cream puffs the size of Bing cherries onto the paper around the cake. Bake the puff pastry circle and the cream puffs at 400F (205C) until the pate a choux has puffed, about 10 minutes. Reduce the heat to 375F (190C) and bake until everything is dry enough to hold its shape, about 35 minutes longer for the cake and 8 minutes longer for the cream puffs (just pick them up and take them out as they are done)Place about 4 oz (114 gr) of the Saint Honore Cream in a pastry bag with a #2 (4mm) plain tip. Use the pastry bag tip or the tip of a paring knife to make a small hole in the bottom of each cream puff. Pipe the cream into the cream puffs to fill them. Refrigerate.Spread the remaining cream filling on the cake. Refrigerate for at least 2 hours to set the cream.
Caramelize the 8 oz. of sugar:Fill a bowl that is large enough to hold the pan used for cooking the sugar with enough cold water to reach halfway up the sides of the pan. Set the bowl aside.Place the sugar in a heavy bottomed pan and cook until the sugar until it has caramelized to just a shade lighter than the desired color. Remove from the heat and immediately place the bottom of the pan in the bowl of cold water to stop the cooking process. Dip the cream puffs into the hot caramel, using 2 forks or tongues to avoid burning your fingers. Place them on a sheet pan. The caramel must be hot enough to go on in a thin layer. Reheat if necessary as you are dipping, stirring constantly to avoid darkening the caramel any more than necessary. Also, avoid any Saint Honore cream to leak out of the puffs and get mixed in with the caramel while dipping as the cream can cause the sugar to recrystalize.
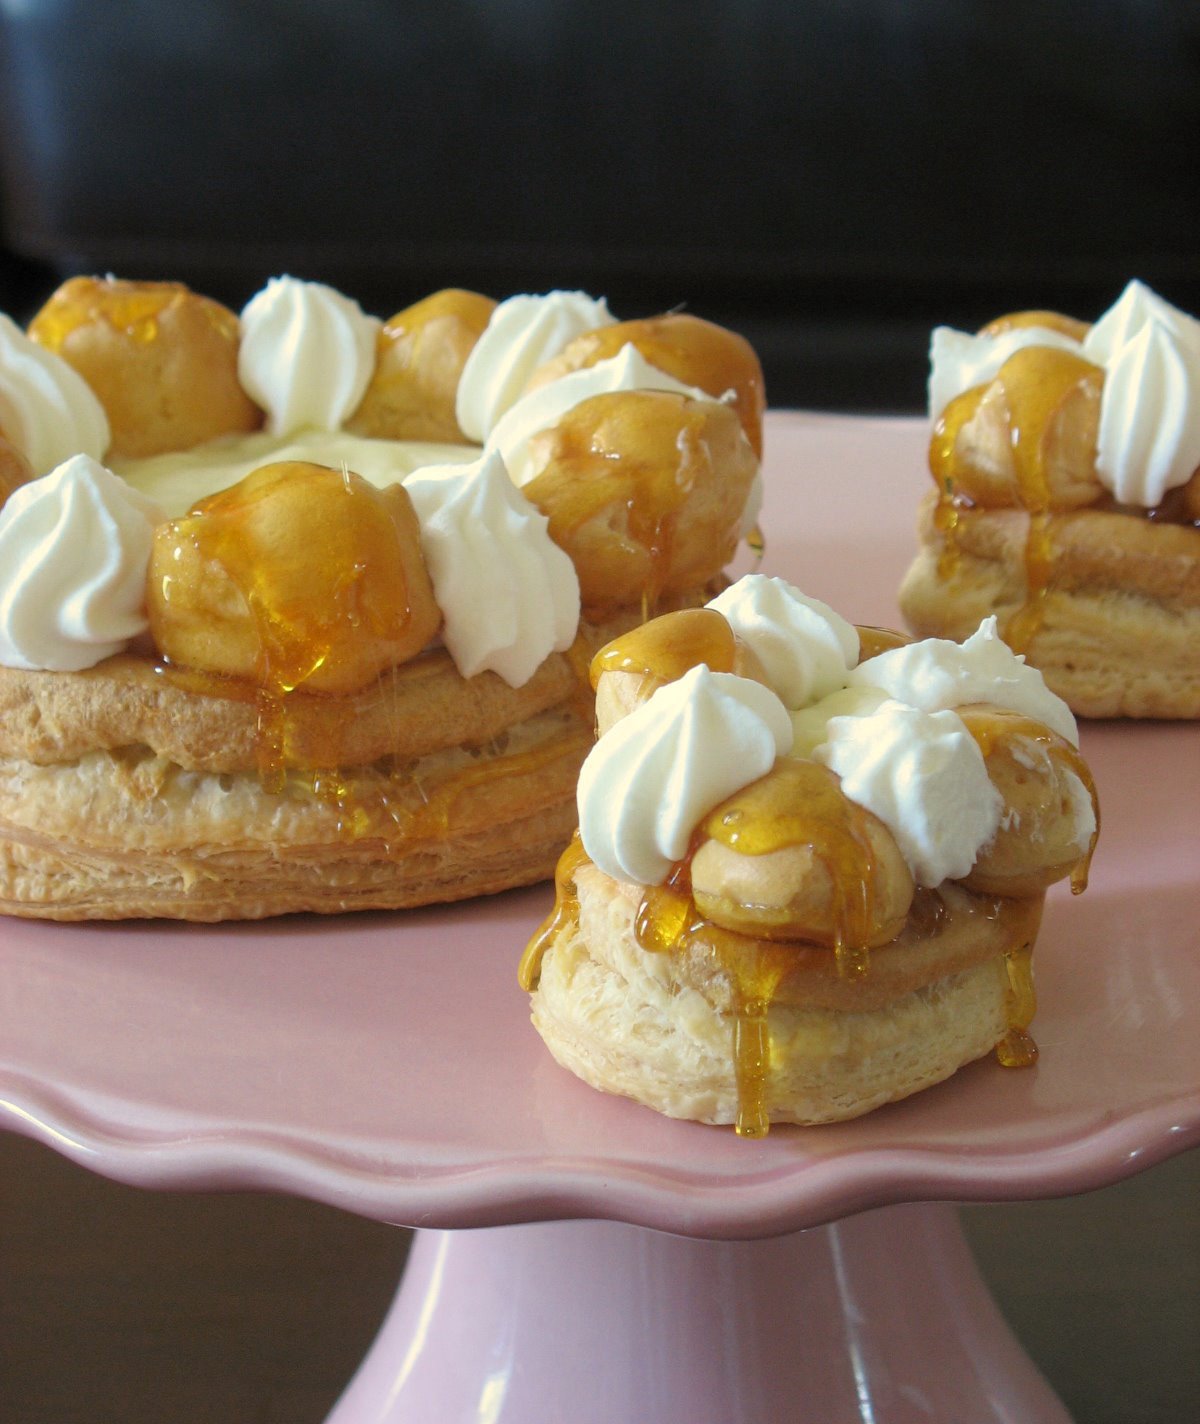
Whip one cup of heavy cream and teaspoon of sugar to stiff peaks. Place the whipped cream in pastry bag fitted with a #5 (10mm) star tip. Pipe a border of whipped cream around the top of the cake. Arrange the cream puffs, evenly spaced, on top of the filling, next to the cream.
Option: Before filling the cake, take care of the cream puffs, dip them in more caramel, hook them up to the base. Fill with the cream filling and fill the holes with the whipped cream.
From the sneak previews and reports I got, it seems that the majority had a “good time” (it’s all relative with a lengthy recipe), and no major doozies, some had a runny pastry cream filling, some puffs had difficulty rising and we only had minor burnt fingers casualties.
In my love of all things mini I did not go quite as small as last month crepe cake but I made 2 6-inch cakes and 6 3- inches.
What I love about monthly challenges like these is to be able to take one recipe that we all follow and compare notes. 48 bakers means 48 ways to bake and 48 different experiences. I love it!
Don’t be fooled by how cute these look…I am almost 100% convinced I will not make them again…at least not like this…
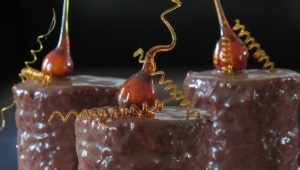
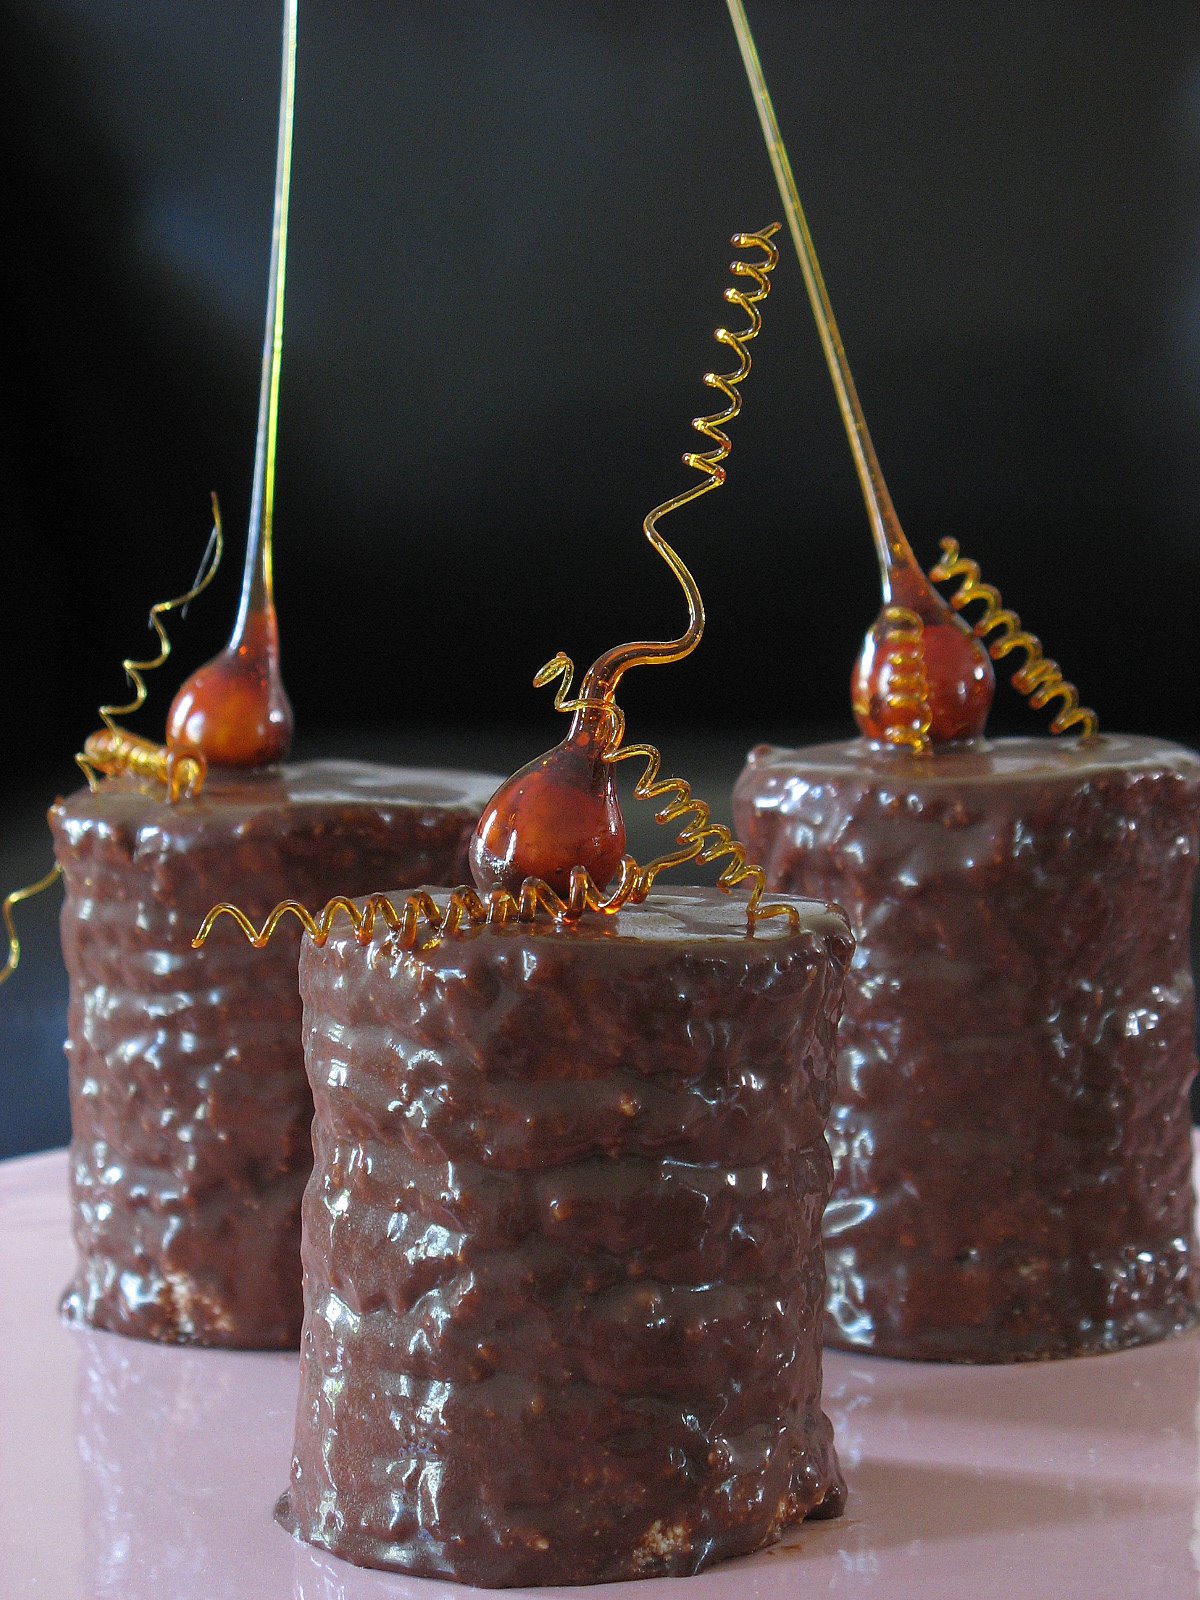
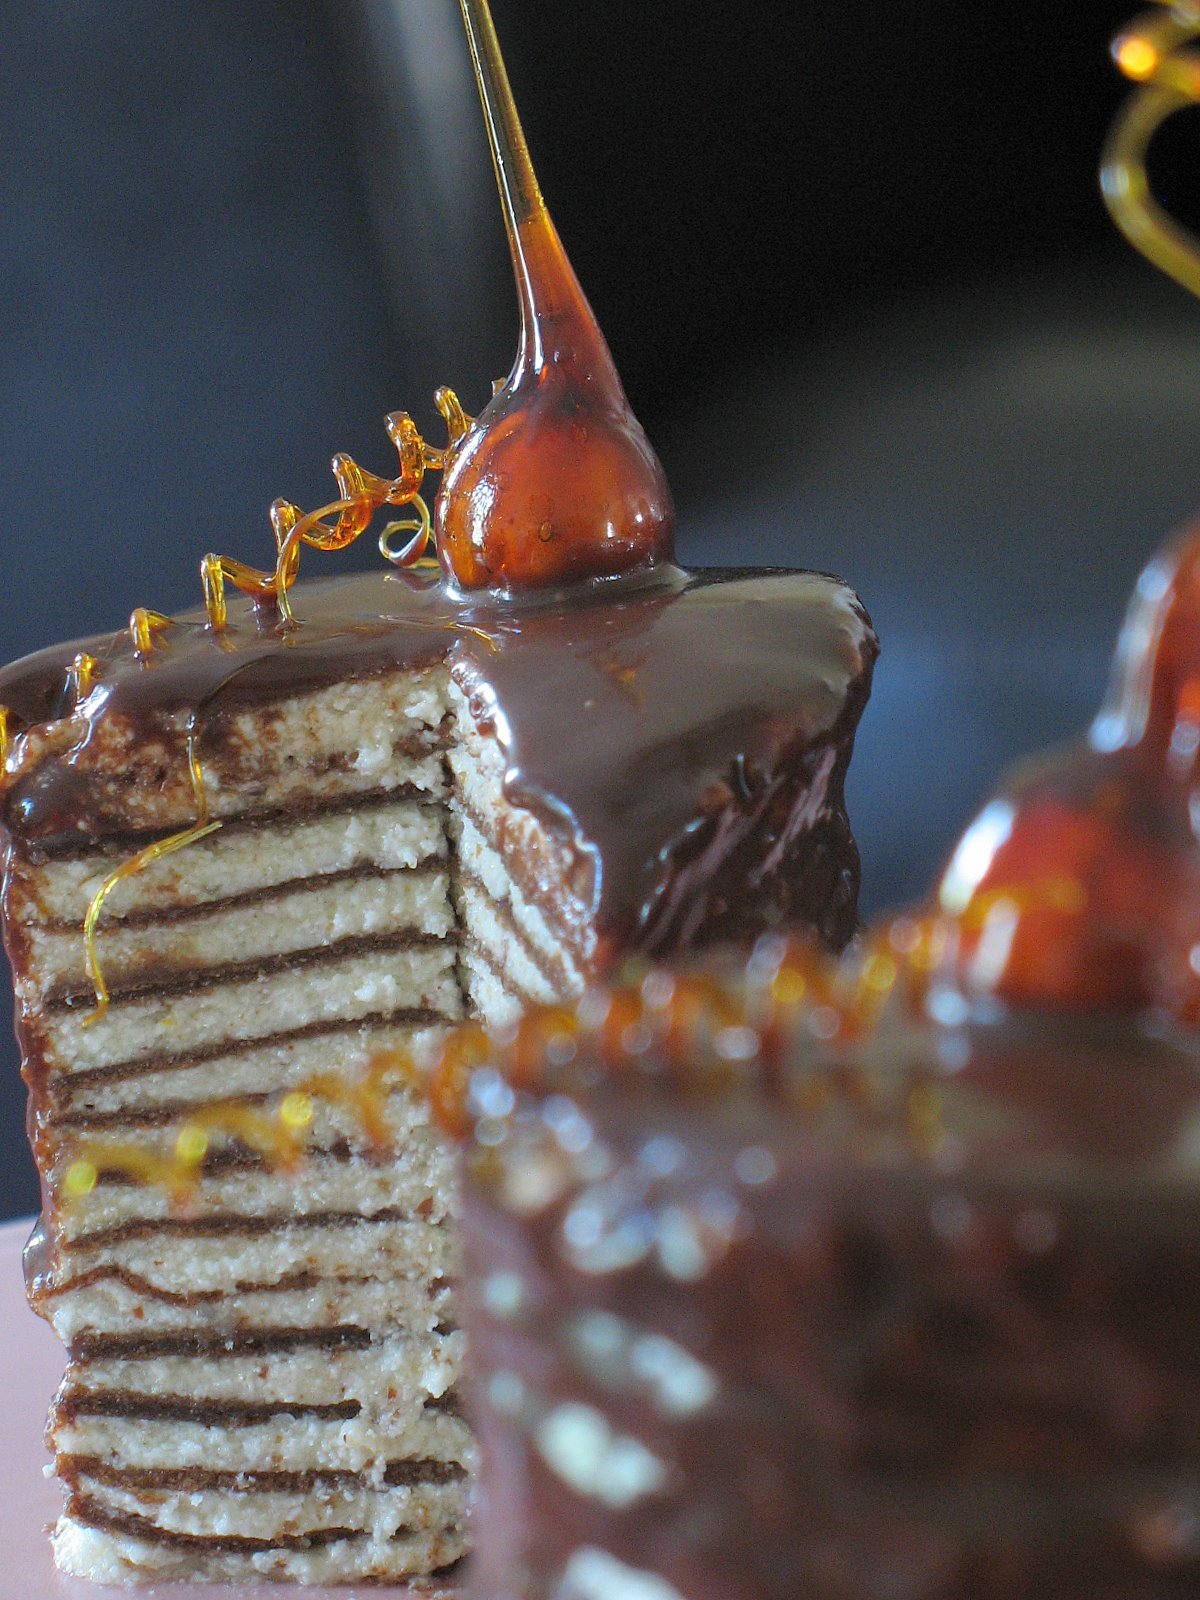
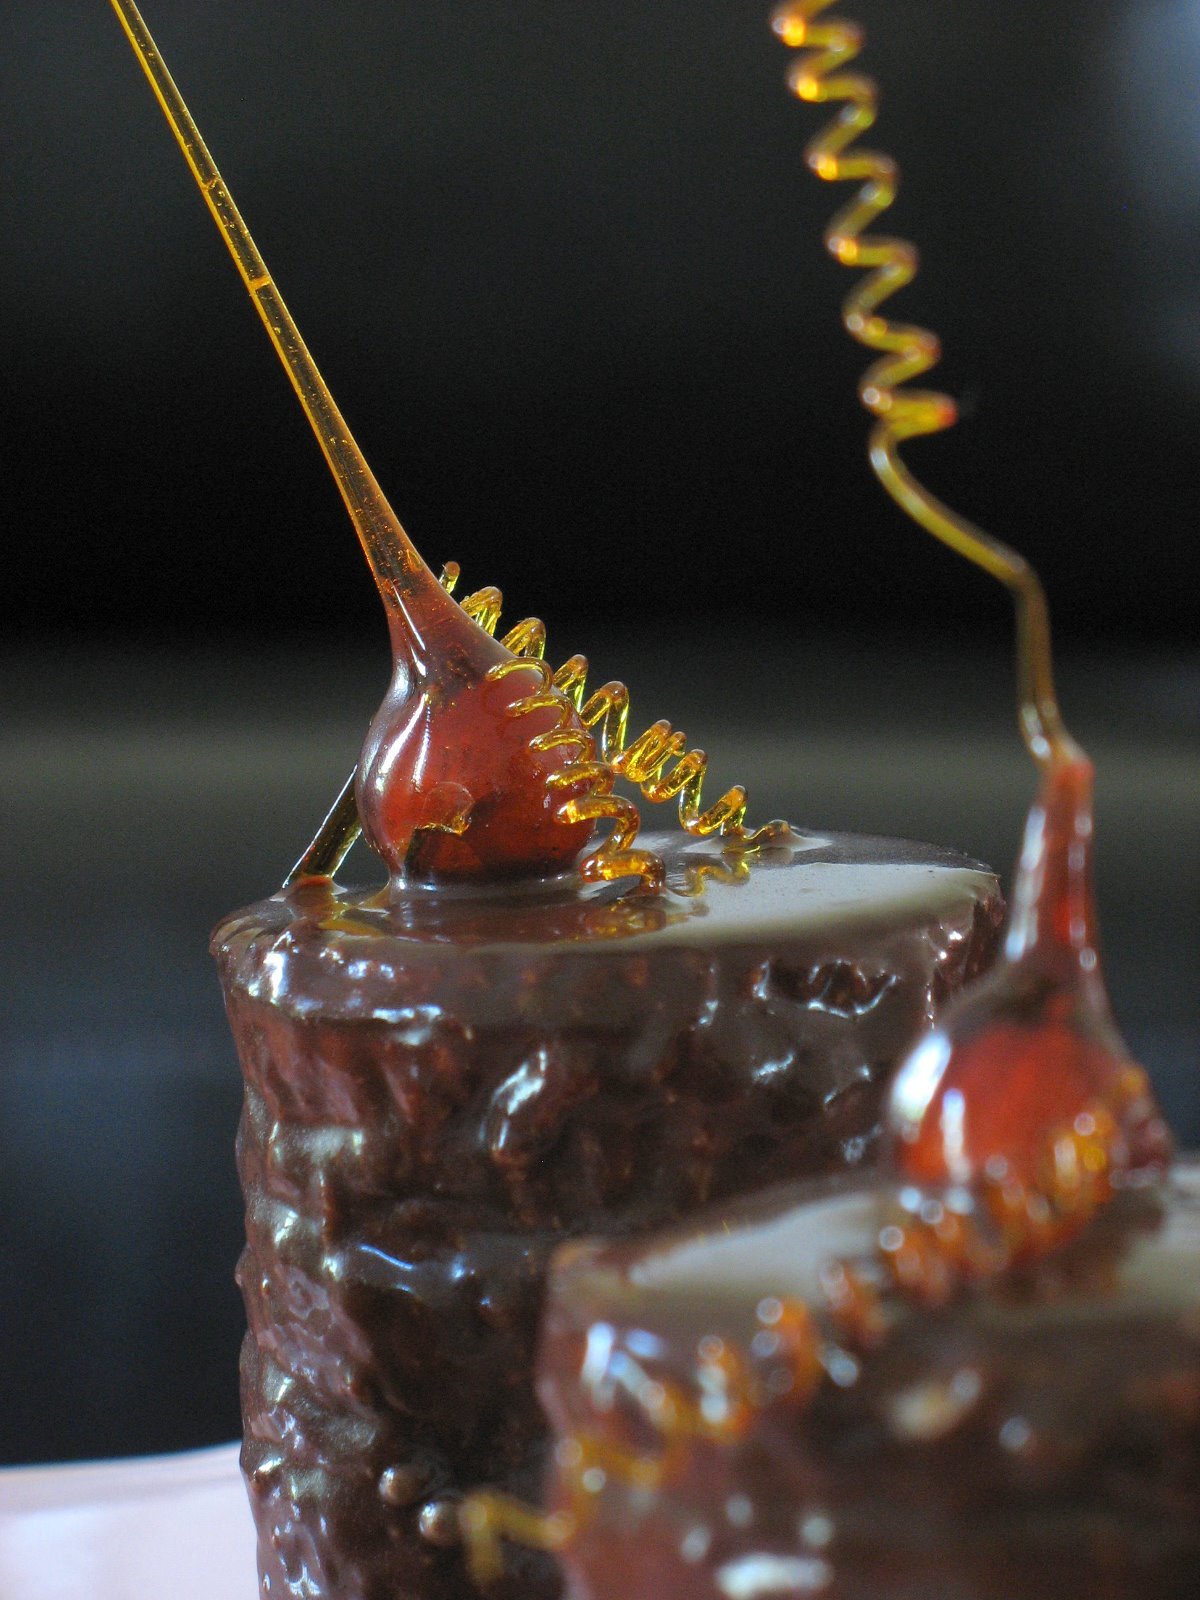
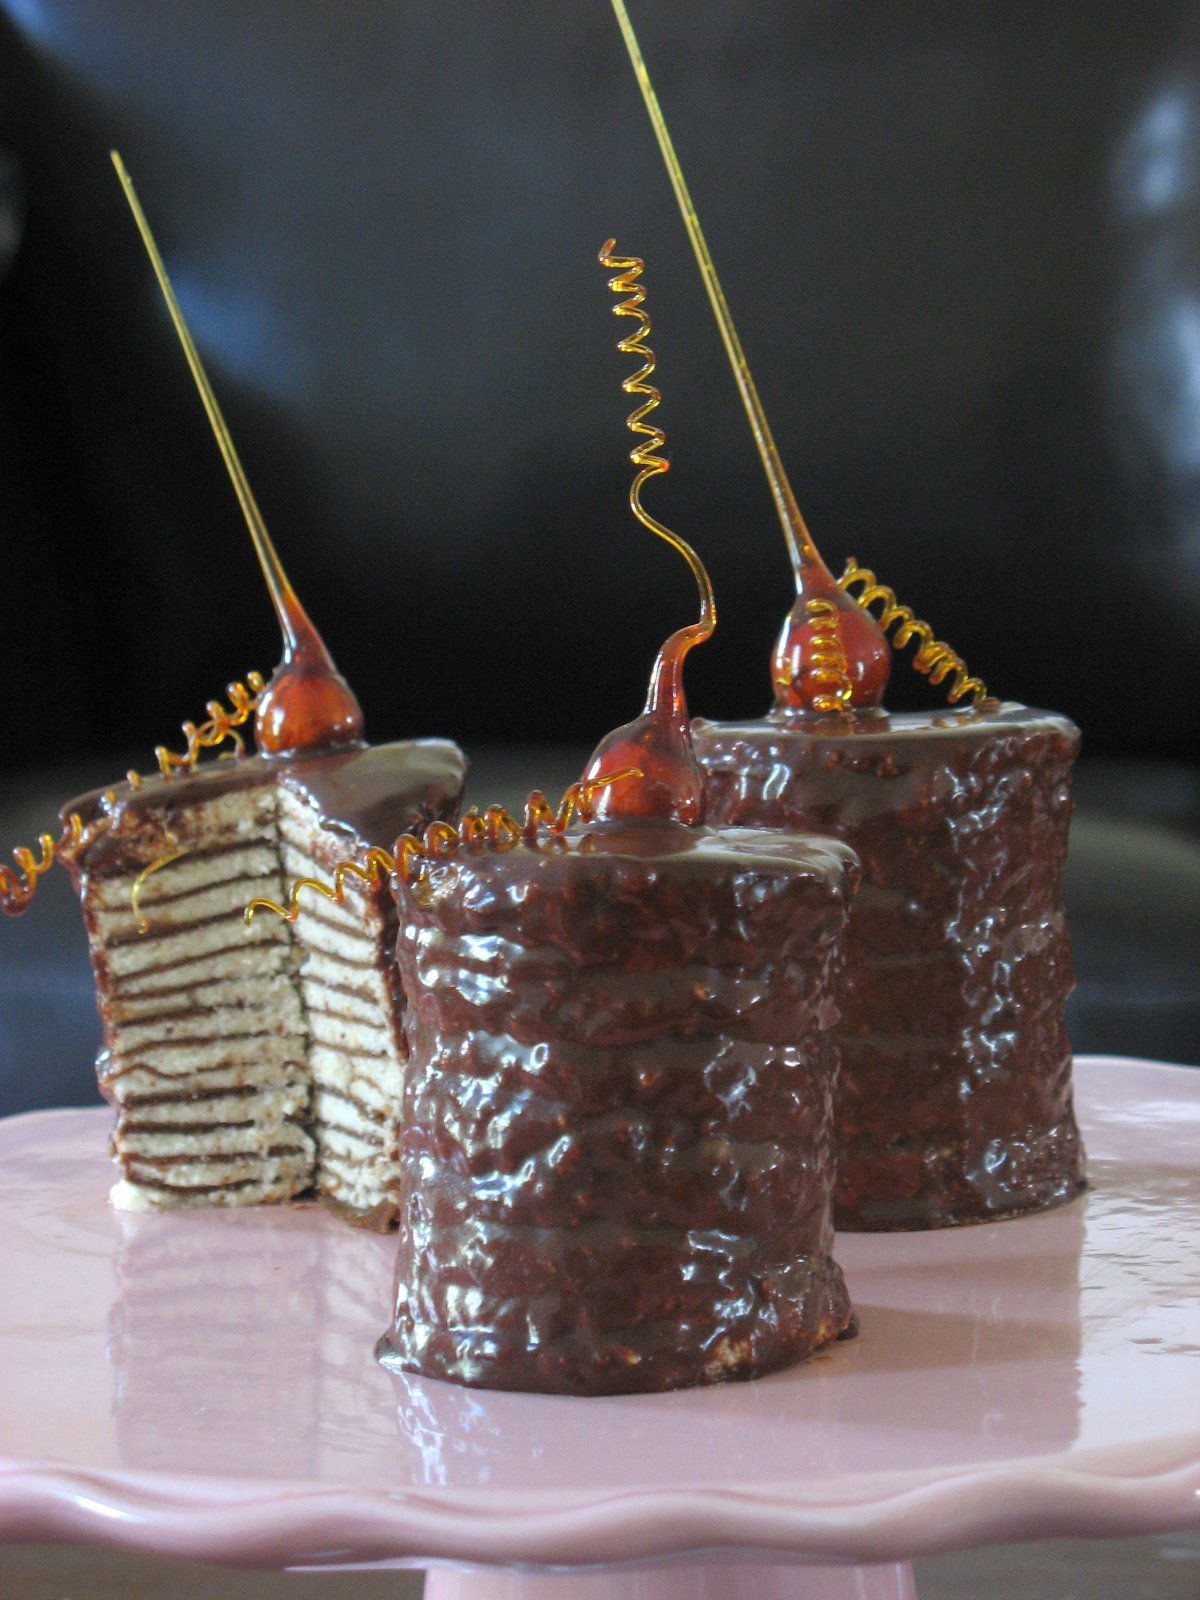
These three chocolate crepe cakes were actually part of a bigger group of 10, and shamelessly served to my dinner guests so I could complete my April Daring Baker challenge and tell you all about it. Remember the croissants or red velvet cakes? Yep, it is that time of the month again and our group grew even bigger this time so if you see 29 other Chocolate Crepe Cakes in various sizes and flavors, do not reset your computer. We decided to go big, go high…except with my never ending love of individual desserts I went small but high. But fear not, from all our discussions it appears that all of us have had very different experiences with the same recipe, so I urge you to read all the other Daring Bakers’ posts to have a idea and in some cases a good laugh.
Don’t get me wrong, the guests were delighted with the presentation, all those caramel dipped hazelnuts and mini caramel corkscrews. Yes, I could have gone another road and make it exactly asand I love crepes. For crying out loud, I come from the country of crepes, I make them every February for the Chandeleur, I even once made over 100 for our Girl Scout troups meeting! Yet, I hated these!
I had no major trouble making the crepes, except that the batter was thicker than what I like to work with and the chocolate flavor did not really come through despite the 70% Lindt chocolate that I used. I like crepes on the lighter side, the ones I can swirl easily in a hot sauté pan with a slight and graceful wrist movement (or so I like to think!); the ones that have tiny microscopic holes in them once cooled thanks to a little added beer to bring some air into them. In my case, Martha’s crepes were on the heavy side, kind of gummy, took longer to cook and required much patience while being flipped and handled. I ended up with about 30 crepes. To make the mini cakes, I took out 3 inch metal rings, cut out rounds in the crepes and began alternating filling and crepes until I had used all the crepes.
The icing was the part that I liked the least. It was a thin ganache, which made it easy to spoon on top of the cakes but it slid down the sides way too fast to cover them nicely. Looking at Martha’s picture I understand that it was to show the essence of the cake, kind of like “rustic ingredient (crepe) goes to the ball (caramel work)”, but that did not do it for me…I like smooth when it comes to chocolate icing….
Now the filling was another story! “Awesome” pretty much describes it. When Brilynn chose the recipe (Martha Stewart’s) this month, she was kind enough to let us play with the original and some of us decided t go another route. I originally made a blood orange cream, inspired by a lemon one from Pierre Herme , but it was so good we ended up spooning it on toasts, brioches, scones, anything but the crepes…shame on us, but that cream is so good it deserves its own post, so I went for the filling given in the recipe but made my own hazelnut paste (see end of post) because unlike Martha I did not find any “hazelnut cream” anywhere…that was too vague for my taste. I could eat this filling simply with a spoon and it would be fantastic in a macaron or sandwiched in 2 thin shortbread cookies.
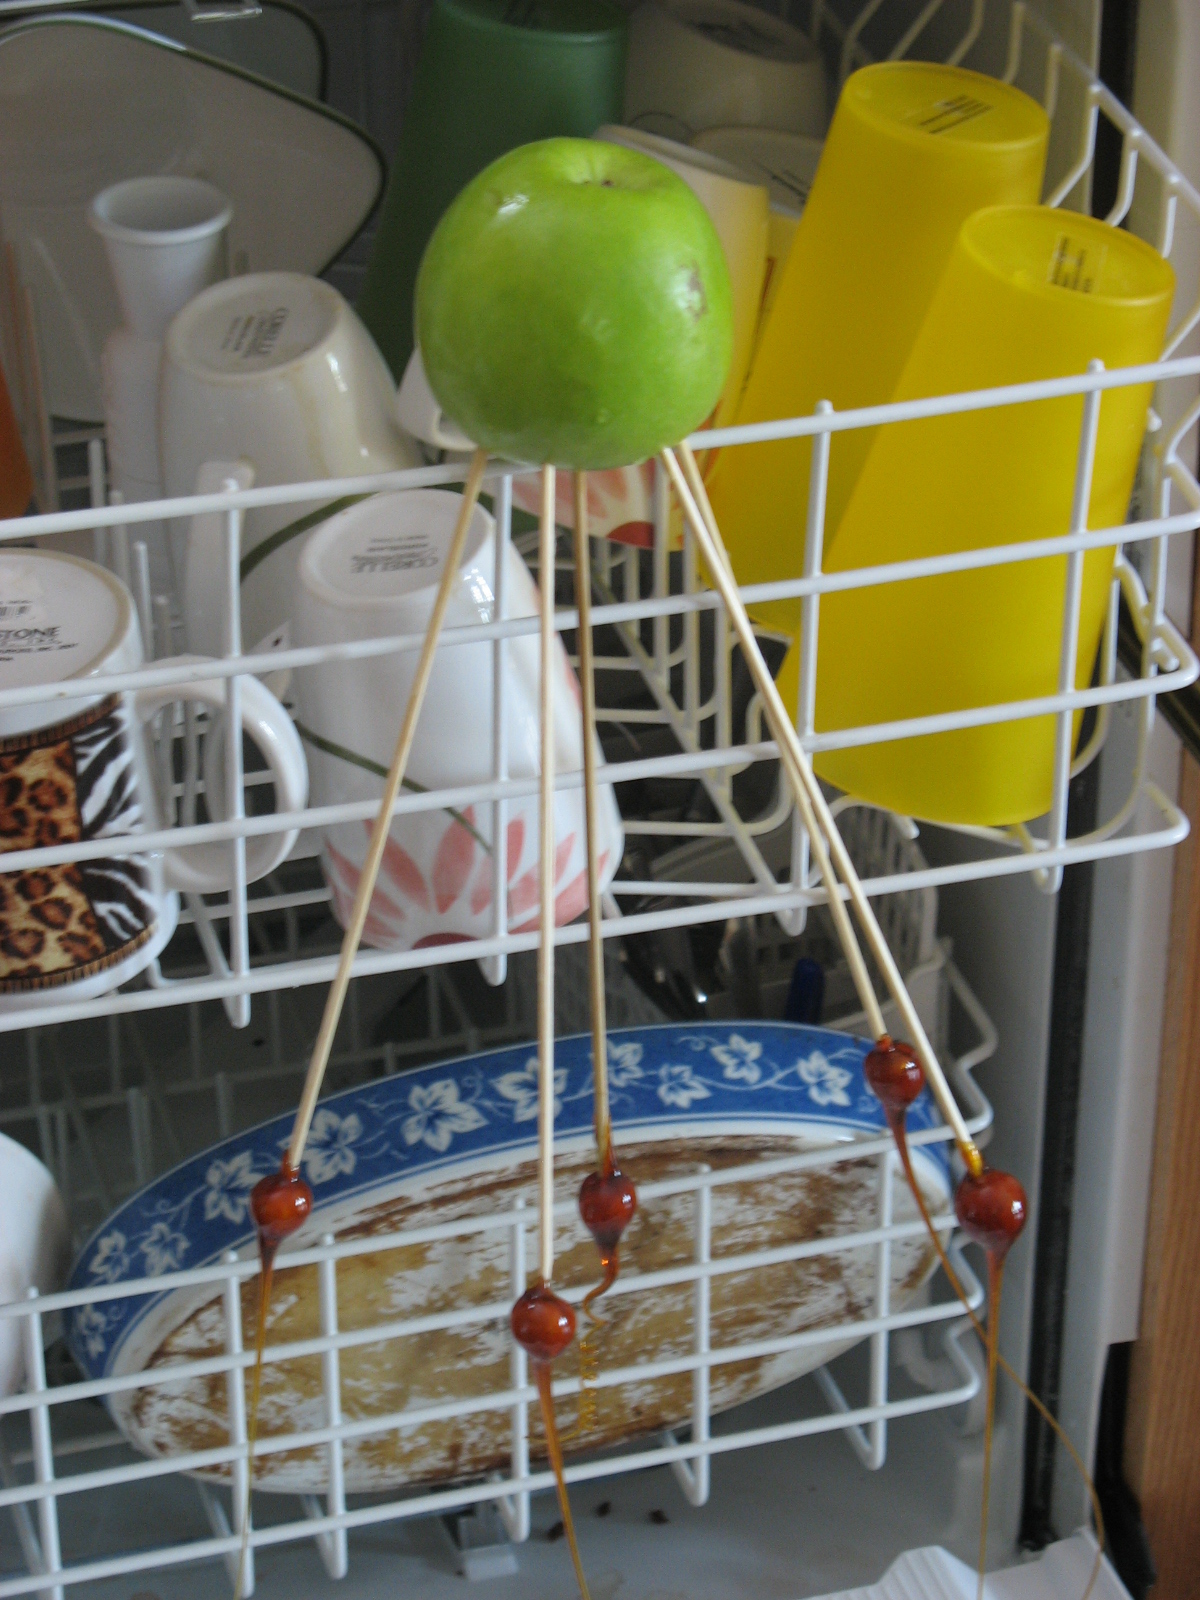
The final component of the cake was the caramel….and this is when I usually do a happy dance. I absolutely love working with caramel, but was not always the case but I had a great teacher in Old Chef and I am continuously learning from him. He is the same one who made me handle boiling hot sugar with my bare hands (burning them) almost 8 years ago so I “would get used to it”…(crazy old French man!) and yet I love him and love working with him. I disgress… To me caramel is as confusing, fun, tantrum-prone, and alive as yeast. There is always room for improvement and always thousands of way to handle it. At home, I use all kinds of weird contraptions to play with hot sugar. I duct tape 2 wooden spoon to my countertop above the dishwasher, open the door and spun my sugar in between the spoons. Once I am done, close the dishwasher door and turn it on…and voila…clean up done.
I thought about doing it nice little nest of spun sugar but I had already done that for the Chocolate Intensity challenge and I feared the mini cakes would get drowned under them, so I kept it pretty simple and clean. (Very Martha said B.) For the caramel hazelnuts I attached them to long skewers dipped them into the caramel, stuck the skewers into an apple and balanced the apple above the dishwasher. For the corkscrews, I lightly oiled a metal skewer and twirled the caramel around it. Let it dry a minute and let it slide off onto a lightly oiled parchment paper lined baking sheet. Make sure the caramel is thick enough to play with. One easy cooling method is to put your pan into a larger one filled with ice as soon as your caramel has taken on the right color on the stove. If it gets too thick, simply reheat on low for a minute. Oh, and have scissors near by in case those caramel strands start taking on a life of their own!
To sum up: it was kind of a mixed bag of feelings for me this month. Too much fuss for an okay cake. I can’t talk for the other gals just yet but I suspect that there were as many different experiences and opinion as they were Daring Bakers involved. The techniques employed are not difficult to master even for a novice ( ok-ok- I am the weirdo that thinks that practicing flipping crepe should be a Sunday activity!), but the batter consistency makes it a pain. Texture wise, I am guessing that unless you use good quality chocolate you won’t taste it much in the final product. Taste wise, it is a shame to say but the filling makes the cake.
To see what my fellow Daring Bakers have done, check out the drop down menu on the right side of this blog.
Hazelnut Paste, from Cook’s Thesaurus
Coarsely chop one pound roasted hazelnuts. In a food processor or blender, finely grind about 1/3 of the nuts at a time, until mealy. Add egg whites from 3 large eggs, 2 cups powdered sugar and 2 teaspoons hazelnut liqueur. Blend until paste forms. Wrap and store in a covered container, up to 2 weeks. Makes 2-3 cups
Update: per Lisa’s request here is my unprofessional technique to let my caramel dry…: