I love, like, enjoy, many people and many things in this life but if there is one thing that I live for on the weekends is when B. comes home from playing music and we sit on the bed and geek out for hours about all sorts of topics. Photography, films, history, and often times, food. Before we know, it’s three o’clock in the morning (not his bedtime at all) and we go to sleep with growling stomachs and visions of sugar plums. Especially when we geek out about macarons. Especially when they are Peanut Butter and Jelly, Lemon Meringue Pie and Banana Caramel Macarons.
We were recently putting together a care package for a friend in town and we started brainstorming about what to include. Macarons, are always first on the list for some reason, eheh! I was looking for flavors I had not done before and he was looking to recreate some of his favorites. In the end, our friend S. received 2/3 of the Daring Bakers challenge delivered right to her front steps. From the look on her face, I knew I’d be repeating these flavors over again.
Bill’s go-to breakfast is a bagel with peanut butter and jelly and turning this into a macaron was very easy. I used half almond and half peanuts for the shells and filled those with a teaspoon each of peanut butter and homemade raspberry jelly.
One of my favorite desserts is lemon meringue pie and after coniving on the best way to make this into a macaron, I finally settled on keeping the shells all almonds and adding the zest of one lemon to the batter. I filled the insides with homemade lemon curd and a teaspoon of freshly made Swiss meringue.
One of my husband’d favorite snacks when he comes home from playing music is to cut up a banana and drizzle it with Salidou, the homemade salted butter caramel sauce that I always keep handy in the fridge. For the macarons I simply mashed a whole banana and mixed it with the leftover from theTaffy Apples I posted yesterday. Once cooled and naturally thickened a bit, it was easy to pipe on the macarons shells and sandwich them.
I’ve known about this month challenge since this summer when Amy emailed with concerns about doing macarons for the Daring Bakers. We covered all types of questions from aging the egg whites, drying the macs before baking to food coloring and how to best incorporate flavors. I volunteered a phone macaron making session and guided her over the phone while she baked my tried and true recipe. In the end she felt most comfortable with the version she knew best, Claudia Flemming’s, which brought on my most common comment about macarons: if you find a recipe that works for you, stick to it, no matter whose it is, especially if you are new to macarons and don’t make them that often.
Amy, thank you for the fun phone macaron making session and it was a pleasure helping out with some of your questions!
I’m glad I tried a new recipe for macarons and did not have any problems with it, probably because I’ve been making them for 15 years so I know what to expect. I will however stick to the recipe I use all the time, for no other reason that it is engrained in my DNA right now!
The 2009 October Daring Bakers’ challenge was brought to us by Ami S. She chose macarons from Claudia Fleming’s The Last Course: The Desserts of Gramercy Tavern as the challenge recipe.
Macarons, from Claudia Flemming' The Last Course: The Desserts Of Gramercy Tavern.
Preheat the oven to 200°F (93°C). Combine the confectioners’ sugar and almond flour in a medium bowl. If grinding your own nuts, combine nuts and a cup of confectioners’ sugar in the bowl of a food processor and grind until nuts are very fine and powdery.
Beat the egg whites in the clean dry bowl of a stand mixer until they hold soft peaks. Slowly add the granulated sugar and beat until the mixture holds stiff peaks.
Sift a third of the almond flour mixture into the meringue and fold gently to combine. If you are planning on adding zest or other flavorings to the batter, now is the time. Sift in the remaining almond flour in two batches. Be gentle! Don’t overfold, but fully incorporate your ingredients.
Spoon the mixture into a pastry bag fitted with a plain half-inch tip (Ateco #806). You can also use a Ziploc bag with a corner cut off. It’s easiest to fill your bag if you stand it up in a tall glass and fold the top down before spooning in the batter.
Pipe one-inch-sized (2.5 cm) mounds of batter onto baking sheets lined with nonstick liners (or parchment paper).
Bake the macaroon for 5 minutes. Remove the pan from the oven and raise the temperature to 375°F (190°C). Once the oven is up to temperature, put the pans back in the oven and bake for an additional 7 to 8 minutes, or lightly colored.
Cool on a rack before filling.
For the PB&J Macarons:– Replace half the amount of almonds with finely ground unsalted roasted peanuts.
– Once cooled, fill the shells with a dollop of peanut butter (either smooth or crunchy) and jam.
For the Lemon Meringue Macarons:
– Fill the shells with a teaspoon or so of freshly made lemon curd
– Add a teaspoon or so of Swiss meringue. (I made half the recipe)
For the Caramel Banana Macarons:
– Mixed one smashed banana with half the quantity of toffee sauce I made for the dipped crabapples.
I am never comfortable with scheduling blog posts to go up while I am away playing working. Oh yes…this conference is maximum work: all that shaking hands, exchanging business cards, hugging, eating, discovering, laughing, all this pretty much on loop. Tough job. Alright, so you don’t buy it. Wouldn’t either (check on Twitter) What you can believe is that my dear and better half is certainly enjoying the last bit of this month Daring Bakers’ challenge, Vols Au Vent and other puff pastry based items.
I remember back in the 80s when these were the hottest appetizers on restaurant menus, at cocktails parties, often topping over with cream and rich fillings. As a child I did get my share of them, happily volunteering my tastebuds to my mother’s latest puff pastry creation. I often associate these with memories of Christmas dinner, with a house filled with cousins, parents and pets, each of us sliding our fork in a pillow of layers upon layers of puff pastry, letting my grandmother’s morels, sweetbreads and cream filling ooze out on the plate. Yes, I just closed my eyes and sighed just now….
As much as I would have loved to recreate that particular food memory, sweetbreads and morels are pretty hard to find this time of year in my parts. Thus, I pretty much stuck to sweets for this challenge with a little savory diversion as shrimp season is in full swing here in South Carolina.
I started by divided the recipe in half and making one chocolate while the other remained plain. Having made mille-feuilles many times here and having hosted a Daring Baker challenge including puff pastry, I was really happy that we had to do something else this time and it had been a long while since I had last made vols au vent.
We go shrimping just about every other day lately and my freezer and fridge are bursting. Friends come over right now and leave with a couple of pounds of shrimp and a couple of vols au vent. The savory rounds were filled with soft fresh goat cheese whipped together with dill, lemon zest, salt and pepper then topped with a steamed shrimp and garnished with capers .and dill springs. So easy and so fresh! Makes me want to keep a dozen of these ready in the fridge at all time.
My brain is on chocolate and caramel lately so once the chocolate vols au vent were baked and cooled, I filled them with a salted caramel mousse. I know. I am so predictable. “Yep!” is all I have to say about that. With a huge smile on my face of course. These were just perfect. The bittersweet cocoa powder coming through from the pastry mixed with the sweet and creamy caramel….oh that was good!
I still had a lot of lemons (in frozen juice form by now) from that case that fell on my lap a couple of weeks ago and so I filled the plain vols au vent with a tart lemon curd mousse and topped them with kiwi, nectarine, and strawberries. A little burst of summer still since it won’t feel like Fall for a very long time around here.
I did play with the scraps of dough a bit and made what Bill called Tiramisu Pear Tarts. The chocolate puff pastry was rolled thin and topped with a mascarpone marsala filling and thin slices of pears. I have to say these go down way too easily with an after dinner espresso! Trust me, they are all gone.
It’s good when everything is a bit crazy to be able to rely on a technique that you have done many times but I did enjoy playing around this month. If you take care of your first two turns when making puff pastry, you are set to go. These are crucial. Make sure to keep your butter pliable. Firm and it will no roll and will tear into your dough. Too soft and it won’t layer as you fold but create pockets and puddles at the bottom of your oven. Once you get the first two turns, you can pretty much put your brain on cruise and keep on.
The September 2009 Daring Bakers' challenge was hosted by Steph of A Whisk and a Spoon. She chose the French treat, Vols-au-Vent based on the Puff Pastry recipe by Michel Richard from the cookbook Baking With Julia by Dorie Greenspan.
Vols Au Vent:
Notes: I will update with all the recipes for the fillings when I get back from BlogHer Food 2009.
Michel Richard’s Puff Pastry Dough
From: Baking with Julia by Dorie Greenspan
Yield: 2-1/2 pounds dough
Notes: for the chocolate puff pastry, I just added 2 tablespoons to half the recipe for the regular puff pastry.
Ingredients:
2-1/2 cups (12.2 oz/ 354 g) unbleached all-purpose flour
1-1/4 cups (5.0 oz/ 142 g) cake flour
1 tbsp. salt (you can cut this by half for a less salty dough or for sweet preparations)
1-1/4 cups (10 fl oz/ 300 ml) ice water
1 pound (16 oz/ 454 g) very cold unsalted butter
plus extra flour for dusting work surface
Mixing the Dough:
Check the capacity of your food processor before you start. If it cannot hold the full quantity of ingredients, make the dough into two batches and combine them.
Put the all-purpose flour, cake flour, and salt in the work bowl of a food processor fitted with a metal blade and pulse a couple of times just to mix. Add the water all at once, pulsing until the dough forms a ball on the blade. The dough will be very moist and pliable and will hold together when squeezed between your fingers. (Actually, it will feel like Play-Doh.)
Remove the dough from the machine, form it into a ball, with a small sharp knife, slash the top in a tic-tac-toe pattern. Wrap the dough in a damp towel and refrigerate for about 5 minutes.
Meanwhile, place the butter between 2 sheets of plastic wrap and beat it with a rolling pin until it flattens into a square that’s about 1″ thick. Take care that the butter remains cool and firm: if it has softened or become oily, chill it before continuing.
Incorporating the Butter:
Unwrap the dough and place it on a work surface dusted with all-purpose flour (A cool piece of marble is the ideal surface for puff pastry) with your rolling pin (preferably a French rolling pin without handles), press on the dough to flatten it and then roll it into a 10″ square. Keep the top and bottom of the dough well floured to prevent sticking and lift the dough and move it around frequently. Starting from the center of the square, roll out over each corner to create a thick center pad with "ears," or flaps.
Place the cold butter in the middle of the dough and fold the ears over the butter, stretching them as needed so that they overlap slightly and encase the butter completely. (If you have to stretch the dough, stretch it from all over; don’t just pull the ends) you should now have a package that is 8″ square.
To make great puff pastry, it is important to keep the dough cold at all times. There are specified times for chilling the dough, but if your room is warm, or you work slowly, or you find that for no particular reason the butter starts to ooze out of the pastry, cover the dough with plastic wrap and refrigerate it . You can stop at any point in the process and continue at your convenience or when the dough is properly chilled.
Making the Turns:
Gently but firmly press the rolling pin against the top and bottom edges of the square (this will help keep it square). Then, keeping the work surface and the top of the dough well floured to prevent sticking, roll the dough into a rectangle that is three times as long as the square you started with, about 24″ (don’t worry about the width of the rectangle: if you get the 24″, everything else will work itself out.) With this first roll, it is particularly important that the butter be rolled evenly along the length and width of the rectangle; check when you start rolling that the butter is moving along well, and roll a bit harder or more evenly, if necessary, to get a smooth, even dough-butter sandwich (use your arm-strength!).
With a pastry brush, brush off the excess flour from the top of the dough, and fold the rectangle up from the bottom and down from the top in thirds, like a business letter, brushing off the excess flour. You have completed one turn.
Rotate the dough so that the closed fold is to your left, like the spine of a book. Repeat the rolling and folding process, rolling the dough to a length of 24″ and then folding it in thirds. This is the second turn.
Chilling the Dough:
If the dough is still cool and no butter is oozing out, you can give the dough another two turns now. If the condition of the dough is iffy, wrap it in plastic wrap and refrigerate it for at least 30 minutes. Each time you refrigerate the dough, mark the number of turns you’ve completed by indenting the dough with your fingertips. It is best to refrigerate the dough for 30 to 60 minutes between each set of two turns.
The total number of turns needed is six. If you prefer, you can give the dough just four turns now, chill it overnight, and do the last two turns the next day. Puff pastry is extremely flexible in this regard. However, no matter how you arrange your schedule, you should plan to chill the dough for at least an hour before cutting or shaping it.
Forming and Baking the Vols-au-Vent
Yield: 1/3 of the puff pastry recipe below will yield about 8-10 1.5” vols-au-vent or 4 4” vols-au-vent
In addition to the equipment listed above, you will need:
-well-chilled puff pastry dough (recipe below)
-egg wash (1 egg or yolk beaten with a small amount of water)
-your filling of choice
Line a baking sheet with parchment and set aside.
Using a knife or metal bench scraper, divided your chilled puff pastry dough into three equal pieces. Work with one piece of the dough, and leave the rest wrapped and chilled. (If you are looking to make more vols-au-vent than the yield stated above, you can roll and cut the remaining two pieces of dough as well…if not, then leave refrigerated for the time being or prepare it for longer-term freezer storage. See the “Tips” section below for more storage info.)
On a lightly floured surface, roll the piece of dough into a rectangle about 1/8 to 1/4-inch (3-6 mm) thick. Transfer it to the baking sheet and refrigerate for about 10 minutes before proceeding with the cutting.
(This assumes you will be using round cutters, but if you do not have them, it is possible to cut square vols-au-vents using a sharp chef’s knife.) For smaller, hors d’oeuvre sized vols-au-vent, use a 1.5” round cutter to cut out 8-10 circles. For larger sized vols-au-vent, fit for a main course or dessert, use a 4” cutter to cut out about 4 circles. Make clean, sharp cuts and try not to twist your cutters back and forth or drag your knife through the dough. Half of these rounds will be for the bases, and the other half will be for the sides. (Save any scrap by stacking—not wadding up—the pieces…they can be re-rolled and used if you need extra dough. If you do need to re-roll scrap to get enough disks, be sure to use any rounds cut from it for the bases, not the ring-shaped sides.)
Using a ¾-inch cutter for small vols-au-vent, or a 2- to 2.5-inch round cutter for large, cut centers from half of the rounds to make rings. These rings will become the sides of the vols-au-vent, while the solid disks will be the bottoms. You can either save the center cut-outs to bake off as little “caps” for you vols-au-vent, or put them in the scrap pile.
Dock the solid bottom rounds with a fork (prick them lightly, making sure not to go all the way through the pastry) and lightly brush them with egg wash. Place the rings directly on top of the bottom rounds and very lightly press them to adhere. Brush the top rings lightly with egg wash, trying not to drip any down the sides (which may inhibit rise). If you are using the little “caps,” dock and egg wash them as well.
Refrigerate the assembled vols-au-vent on the lined baking sheet while you pre-heat the oven to 400ºF (200ºC). (You could also cover and refrigerate them for a few hours at this point.)
Once the oven is heated, remove the sheet from the refrigerator and place a silicon baking mat (preferred because of its weight) or another sheet of parchment over top of the shells. This will help them rise evenly. Bake the shells until they have risen and begin to brown, about 10-15 minutes depending on their size. Reduce the oven temperature to 350ºF (180ºC), and remove the silicon mat or parchment sheet from the top of the vols-au-vent. If the centers have risen up inside the vols-au-vent, you can gently press them down. Continue baking (with no sheet on top) until the layers are golden, about 15-20 minutes more. (If you are baking the center “caps” they will likely be finished well ahead of the shells, so keep an eye on them and remove them from the oven when browned.)
Remove to a rack to cool. Cool to room temperature for cold fillings or to warm for hot fillings.
Fill and serve.
*For additional rise on the larger-sized vols-au-vents, you can stack one or two additional ring layers on top of each other (using egg wash to "glue"). This will give higher sides to larger vols-au-vents, but is not advisable for the smaller ones, whose bases may not be large enough to support the extra weight.
*Although they are at their best filled and eaten soon after baking, baked vols-au-vent shells can be stored airtight for a day.
*Shaped, unbaked vols-au-vent can be wrapped and frozen for up to a month (bake from frozen, egg-washing them first).
I realized as I was starting to write down the recipe for this post that it was actually my 550th post. Wow…That made me a little proud and left me slightly amazed at the same time! I think I even said "oh la vache!" (holy cow!). That’s a whole lot of stories, words, laughs, tears and just as much sugar, butter, flour and eggs! What could be more fitting to celebrate post #550 than a Daring Bakers Challenge? A very sweet and very rich one: a Dobos Torte.
I wrote last time that I hadn’t had an ounce of craving for chocolate lately and when I set out to make this challenge, things turned out just about the same. I looked at the recipe and could not chase the images of sweet sugared berries floating in my head. Or was it sugar made saber equipped raspberries fighting off little chocolate critters? Hmmmm…Still, not an ounce of chocolate was calling my name yet. Too hot, too humid and a fridge full of raspberries thanks to my mother – in – law who always buys for 8 when there are just the 2 of them.
A Dobos Torte is traditionally a rich layer sponge cake layered with chocolate buttercream and topped with caramel pieces. I respected all the components of the challenge while changing things around a bit for a few reasons: the season, the plentitude of raspberries and mascarpone I had (mother – in – law again) and the weather.
I baked the sponge layers in a sheet pan, cut out disks in the cake to form several 3-inch cakes in dessert rings. I layered the disks with a super light (but rich) mascarpone mousse and fresh raspberries. For the buttercream, I kept a similar method as the one given by the hostesses and made vanilla bean Swiss meringue buttercream where the egg whites are heated on the stove prior to being whipped. On a side note, the specks you notice on the cakes are neither caused by a problem with your vision or your computer screen. It’s not dirt either as my 5 year-old neighbor thought earlier. It’s the pure goodness of a vanilla bean.
I thought about that caramel topping long and hard and knew it was just not going to happen as it was written given our heat and humidity. I made pulled sugar ribbons because I could make just what I needed for the cake before they’d disintegrate in sugar puddles. Going back on previous posts, I realized there had been bubble caramel, caramel circles, caramel strands, caramel corkscrews, caramel window panes, caramel plates but never good old pulled sugar. Ah! No more! Here it is!
Before you say you will never ever do it because it’s caramel-and-oh-my-god-it’s-just-too-hard-because-it’s-caramel let me tell you why you could make it tomorrow and neither glue your entire kitchen nor burn all your pots and pans trying to get it to "the proper shade of amber". First, there is a high enough ratio of water to sugar for the liquid not to turn to caramel before you reach the desired temperature for pulled sugar. Then, your mission is NOT to let it turn color. You boil, add coloring or not, take it to a certain temperature, pour it off, let it cool a bit and start playing.
See? One more cool pastry thing to try one quiet evening. Do not fear the sugar!
We loved this version and I have already bookmarked the original one given by our hostesses to make this Fall and Winter. Thank you ladies for hosting and to Lisa and Ivonne for being such incredible Daring Bakers Founders! There are plenty more Dobos Torte to be seen from around the globe here.
For the sponge cake layers
6 large eggs, separated, at room temperature
1 1/3 cups (162g) confectioner’s (icing) sugar, divided
1 teaspoon (5ml) vanilla extract
1 cup plus 2 tablespoons (112g) sifted cake flour
pinch of salt
For the mascarpone mousse:
For the mousse:
3 egg yolks
1/2 tablespoon powdered gelatin
1/2 cup (125ml) honey
3 oz (90gr) mascarpone, at room temperature
1 cup (250ml) heavy cream
For the buttercream:
1 cup (200gr) sugar
4 large egg whites
3 sticks (340gr) unsalted butter, at room temperature
Prepare the cake layers:
Position the racks in the top and centre thirds of the oven and heat to 400F (200C). Line a half sheet pan with parchment paper and spray lightly with cooking spray. Set aside.
Beat the egg yolks, 2/3 cup (81g) of the confectioner’s (icing) sugar, and the vanilla in a medium bowl with a mixer on high speed until the mixture is thick, pale yellow and forms a thick ribbon when the beaters are lifted a few inches above the batter, about 3 minutes. (You can do this step with a balloon whisk if you don’t have a mixer). In another bowl, using clean beaters, beat the egg whites until soft peaks form. Gradually beat in the remaining 2/3 cup (81g) of confectioner’s (icing)sugar until the whites form stiff, shiny peaks. Using a large rubber spatula, stir about 1/4 of the beaten whites into the egg yolk mixture, then fold in the remainder, leaving a few wisps of white visible. Combine the flour and salt. Sift half the flour over the eggs, and fold in; repeat with the remaining flour. Pour the batter into the prepared half sheet pan and bake for 8 to 10 minutes or until slightly brown.
Prepare the mousse:
Whisk the egg yolks to break them up in the bowl of stand mixer (or with hand held beaters).
Sprinkle the gelatin over 2 Tb of cold water in a small cup and let it bloom.
In a heavy saucepan set over medium high heat, bring the honey to a boil and cook until it reaches 240F. Remove the pan from the stove and pour it carefully into a cup with a spout (easier to pour) .
Dissolve the gelatin in the microwave for 10 seconds, or in a bowl set over a pan of simmering water.
While still whipping the yolks, slowly pour in the hot honey, being careful to temper them and not cook them. Pour the gelatin over the egg/honey and whip together for a few seconds and add the mascarpone, one tablespoon at a time. Whip until cooled to room temperature and has tripled in volume
In another bowl, whip the cream to soft peaks or if you are using a stand mixer, pour the mousse into a large bowl and clean the mixer bowl thoroughly, or use another mixer bowl if you have one. Gently fold the whipped cream into the mousse trying to deflate the whole thing as little as possible. Use immediately.
Prepare the buttercream:
Place the sugar and egg whites in a large heatproof bowl over a saucepan of simmering water and whisk constantly, keeping the mixture over the heat, until it feels hot to the touch, about 3 minutes. The sugar should be dissolved, and the mixture will look like marshmallow cream (temperature should be about 235-238F). Pour the mixture into the bowl of a stand mixer fitted with the whisk attachment and beat the meringue on medium speed until it cools and forms a thick shiny meringue, about 5 minutes. Switch to the paddle attachment and add the butter, one tablespoon at a time, beating until smooth. Once all the butter is in, beat in the buttercream on medium-high speed until it is thick and very smooth, 6-8 minutes. Proceed per recipe or store for up to a week in the fridge or 3 months (well wrapped in the freezer).
Assemble the cakes: like eight cake rings with rhodoid or plastic protector sleeves cut to fit (yes, like the ones in the office)and place them on a baking sheet. Place a cake round at the bottom, place a layer of raspberries on the outside, fill with mousse to the top of the raspberries, top with one round of cake, more mousse and a final round of cake. Place in the refrigerator and let set 2 hours or overnight. When the mousse is set, cover with the buttercream and refrigerate.
For the pulled sugar ribbons:
1 1/4 cup (250gr) sugar
100 ml water
1 teaspoon lemon juice
5-8 drops red food coloring
In a heavy saucepan set over high heat, bring the sugar and water to a boil (do not let it turn into caramel). Once it is boiling, add the lemon juice and coloring. Bring the syrup to 298F on a candy thermometer. Immediately pour the caramel onto a silicone mat. You might want to wear some pastry gloves at this point because the caramel is extremely hot. Little tip: I have found myself with not one glove in the tool box so I used a new pair of dishwashing gloves instead.
Let it harden until it is pliable and carefully start folding the mat back and forth onto itself to work the sugar mass a bit. Take small pieces of the mass and start pulling, twirling or even make rose petals and other flowers with it. Beware that pulled sugar cools as fast as it gets hot so if it becomes harder and harder to work with you have different options available. If you have a heat lamp, place the pulled sugar underneath until pliable again. If you are like me (sans heat lamp) you can either place the pulled sugar on the silicone mat on a baking sheet directly on the stove on low heat until pliable or in a low heated oven. Be careful and watch it carefully: it can turn into "real" caramel very fast this way so do not walk away while you reheat.
Happy birthday to you! Happy Birthday to you! Happy Birthday dear Bill! Happy Birthday to you!!
I know today is the Daring Bakers' challenge reveal but it is also my better half, the pepper to my salt, the flour to my sugar and my favorite Cookie Monster’s birthday today! The man should clearly enter cookie eating contests. I have never seen him shy away at the idea of eating a dozen, straight up with a glass of milk. That’s why I waited until the last couple of days before the challenge reveal date to make these Mallow Cookies. Just for him.
Well, not really. Where there is shortbread cookie, there is Bill. Where there is marshmallow there is me. And where there is chocolate there is us. Hmmm, let’s start over. Where there is a shortbread cookie, there is me. Where there is marshmallow there is Bill and where there is chocolate there is us. Ha! Obviously these Mallows did not stand a chance with either of us.
Ok, so I won’t go as far as putting a red bow around a few or stick a candle in one of them but they will be part of the mini dessert bar/table I am putting together for dinner. Nothing lavish, just a few close friends, good wines and good cheers!
I must say that this month challenge was actually two in one: either make the Mallows or Milanos cookies or make both. I did make both and tossed the Milanos to the birds (hence the lack of pictures for those). We literally looked at each other and said "not worth it". To us, it was a waste of ingredients in a cookie that had neither texture nor taste to show for it. Now, that’s only our opinion (we like having one) and some Daring Bakers have enjoyed their cookies just fine. I’d say make half the recipe once to decide if it’s worth keeping in your repertoire.
So, the Mallows. Good. Even better with a layer of peanut butter sandwiched between the cookie and the marshmallow for some. I kept the dominant flavor simple because I was waiting on Bill to decide what he really wanted (birthday boy also had a weekend pass!). We didn’t stray too far from that, using Mexican vanilla which has slightly spicy undertones and worked well to play ying to the yang that was the chocolate.
While I was making the Mallows I decided to keep half the cookies as described in the recipe and made square shapes with the other half both with the cookie dough and marshmallow which I poured in a small square dish before it had time to set. Once "cured", I cut square shapes the same size as the shortbread bottoms, spread some peanut butter, topped with a square of marshmallow and dipped the whole thing in chocolate. I also saved a couple and made a deconstructed Mallow with each component laid out separately on a plate.
Oops, except I did not dip. There were so many cookies that I placed them on cooling rack over parchment paper and poured the chocolate right over them, gave them a rattle and a shake and left them to set before refrigerating. I am all about better time management lately and that saved me a good bit of time instead of standing in front of the island dipping. And it’s summer, it’s hot and birthday boy wanted to go to the beach!
Would I make them again. Maybe. Probably. Why not? With friends, around a hot cup of cocoa in the winter most likely.
The July Daring Bakers' challenge was hosted by Nicole at Sweet Tooth. She chose Chocolate Covered Marshmallow Cookies and Milan Cookies from pastry chef Gale Gand of the Food Network.
For the Cookies:
3 cups (375grams/13.23oz) all purpose flour
1/2 cup (112.5grams/3.97oz) white sugar
1/2 teaspoon salt
3/4 teaspoon baking powder
3/8 teaspoon baking soda
1/2 teaspoon ground cinnamon
12 tablespoons (170grams/ 6 oz) unsalted butter
3 eggs, whisked together
For the marshmallows:
1/4 cup (60ml) water
1/4 cup (60ml) light corn syrup
3/4 cup (170 grams) sugar
1 tablespoon powdered gelatin
2 tablespoons cold water
2 egg whites, room temperature
1 whole vanilla bean, split open and seeded
For the chocolate glaze:
12 ounces semisweet chocolate
2 ounces cocoa butter or vegetable oil (I used 2 pounds of chocolate and 2 tablespoons shortening)
Prepare the cookies:
In a mixer with the paddle attachment, blend the dry ingredients. On low speed, add the butter and mix until sandy. Add the eggs and mix until combine. Form the dough into a disk, wrap with clingfilm or parchment and refrigerate at least 1 hour and up to 3 days. When ready to bake, grease a cookie sheet or line it with parchment paper or a silicon mat.
Preheat the oven to 375 degrees F. Roll out the dough to 1/8-inch thickness, on a lightly floured surface. Use a 1 to 1 1/2 inches cookie cutter to cut out small rounds of dough. Transfer to the prepared pan and bake for 10 minutes or until light golden brown. Let cool to room temperature.
Prepare the marshmallows:
In a medium saucepan, combine the water, corn syrup, and sugar, bring to a boil until “soft-ball” stage, or 235 degrees on a candy thermometer. Sprinkle the gelatin over the cold water and let dissolve. Remove the syrup from the heat, add the gelatin, and mix. Whip the whites until soft peaks form and pour the syrup into the whites. Add the vanilla seeds and continue whipping until stiff. Transfer to a pastry bag.
Prepare the chocolate glaze:
Melt the chocolate and shortening together in the top of a double boiler or a bowl set over barely simmering water.
To assemble: Pipe a “kiss” of marshmallow onto each cookie. Let set at room temperature for 2 hours. Line a cookie sheet with parchment or silicon mat. One at a time, gently drop the marshmallow-topped cookies into the warm chocolate glaze. Lift out with a fork and let excess chocolate drip back into the bowl. Place on the prepared pan and let set at room temperature until the coating is firm, about 1 to 2 hours.
June has definitely been a strange month starting by my baking the latest Daring Bakers challenge the first week it was revealed. That has not happened in almost two years but there are too many work deadlines this month to monkey around with all forms of important business. Work and Daring Bakers that is. These Bakewell Cherry Tarts served with Cherry Pit Ice Cream Milkshakes don’t monkey around either.
Oh yes, even after all this time I still take my DB very seriously!! Our challenge this month was to make this traditional British tart and beside the three key components of the shortbread pastry crust, preserves and frangipane filling, we were pretty much let loose to do as we desired. If you have been catching my latest Daring Bakers challenges, when I am given this much freedom, my mind goes in overdrive and the kitchen turns into super porduction for a few hours. All around me usually rub their hands knowing there will be an abundance of desserts for the next few days while B. sighs as he approached the scene of the crime.
This time, I decided to throw myself a real challenge. To only make one possibility. How did I do? Well, I thought everything was groovy, sticking to my one idea of cherry preserve and almond frangipane. Then my brain got a little looser and I had this urgent craving to make cherry pit ice cream while pitting a few boxes of cherries for jams. Summer is here, I am jamming people and stone fruits are definitely high on my list. I like to get the darkest one I can find for jams, makes the finished color really pretty.
Having made Bakewell tarts before, I wanted to fiz things up a bit and serve them with tiny milkshake shots. I have had cherry pit ice cream on my mind ever since Shuna from Eggbeater posted about it last year. I am not going to get into the whole controversy of using pits in ice creams (or jams for that matter). Shuna wrote three very detailed posts about it so please read them well if you are interested in the topic.
All I can say is I did not hear a peep out of my guests when dessert came around. I think that means they’ll be back, ahahah!
The June Daring Bakers' challenge was hosted by Jasmine of Confessions of a Cardamom Addict and Annemarie of Ambrosia and Nectar. They chose a Traditional (UK) Bakewell Tart… er… pudding that was inspired by a rich baking history dating back to the 1800’s in England. Cherry Bakewell Tartelettes:
Notes: The only change I made to the recipe given by our hostesses was to prebake the tart shells before filling them with jam and frangipane. The high ratios of butter in both the crust and filling can hinder the crust from baking all the way through while your filling overcooks.
Sweet shortcrust pastry:
225g (8oz) all purpose flour
30g (1oz) sugar
2.5ml (½ tsp) salt
110g (4oz) unsalted butter, cold (frozen is better)
2 (2) egg yolks
2.5ml (½ tsp) almond extract (optional)
15-30ml (1-2 Tbsp) cold water
Frangipane:
125g (4.5oz) unsalted butter, softened
125g (4.5oz) icing sugar
3 eggs
2.5ml (½ tsp) almond extract
125g (4.5oz) ground almonds (or other nut of your choice)
30g (1oz) all purpose flour
Jam or preserve of your choice Prepare the dough:
Sift together flour, sugar and salt. Grate butter into the flour mixture, using the large hole-side of a box grater. Using your finger tips only, and working very quickly, rub the fat into the flour until the mixture resembles bread crumbs. Set aside.Lightly beat the egg yolks with the almond extract (if using) and quickly mix into the flour mixture. Keep mixing while dribbling in the water, only adding enough to form a cohesive and slightly sticky dough.
Form the dough into a disc, wrap in cling and refrigerate for at least 30 minutes.
Prepare the frangipane:
Cream butter and sugar together for about a minute or until the mixture is primrose in colour and very fluffy. Scrape down the side of the bowl and add the eggs, one at a time, beating well after each addition. The batter may appear to curdle. In the words of Douglas Adams: Don’t panic. Really. It’ll be fine. After all three are in, pour in the almond extract and mix for about another 30 seconds and scrape down the sides again. With the beaters on, spoon in the ground nuts and the flour. Mix well. The mixture will be soft, keep its slightly curdled look (mostly from the almonds) and retain its pallid yellow colour.
Assemble the tartelettes:
Place the chilled dough disc on a lightly floured surface. If it’s overly cold, you will need to let it become acclimatised for about 15 minutes before you roll it out. Flour the rolling pin and roll the pastry to 5mm (1/4”) thickness, by rolling in one direction only (start from the centre and roll away from you), and turning the disc a quarter turn after each roll. When the pastry is to the desired size and thickness, transfer it to the tart pans, press in and trim the excess dough. Patch any holes, fissures or tears with trimmed bits. Place the tarts on a baking sheet line with parchment paper and chill in the freezer for 15 minutes.
Preheat oven to 200C/400F. Position a rack in the center of the oven.
Remove shell from freezer, spread as even a layer as you can of jam onto the pastry base. Top with frangipane, spreading to cover the entire surface of the tart. Smooth the top and pop into the oven for 30 minutes. Five minutes before the tart is done, the top will be poofy and brownish.
For the milkshakes: process about one cup of the cherry pit ice cream (or you favorite one) in blender with enough milk to achieve milkshake consistency. Serve in glass shots alongside the tarts.
It’s been a long time since I made strudel dough and it’s been even longer since I made it for our own eating pleasures. When I first moved to the US, one of my first pastry jobs was at a German bakery where we would make strudel dough by the buckets, starting fresh and early around 3am. I made so much strudels in that one year there that I overdosed a little and never made it at home after that. When I saw that the Daring Bakers challenge for May was strudel I had a split reaction. A "meh" followed by "oh wait I have always wanted to do this and this and this…"
The instructions were to make the strudel dough per the recipe given but allowed us to get creative as far as the fillings, shapes and sizes. I started with one idea and as (most) usual, I ended up with three. My first idea was not to make a traditional strudel and I blame Richard Leach for that. I have been itching to make his Ricotta Cheese Tarts in Strudel Rings since the first day I flipped the pages of his book "Sweet Seasons". I refrained from it up until now because of that studel making overdose mentionned above. Ha! No more! I had the perfect opportunity!
For the strudel rings, I rolled and stretched the dough until I could see through it and cut four 1 1/2-inch strips that I rolled around a 3-inch cake rings about 3-4 times. I baked them just until the rings were golden brown. I let them slide of the cake rings and let them cool while I prepared the mascarpone tart base. It is really like a light cheesecake baked right inside the rings. Once they were cooled, I placed them inside the strudel rounds and plated some with fresh cherries and others with lemon balm infused cherries. Both versions were equally good but my heart goes toward the lemon balm one.
Of course the strudel dough recipe would give me a lot more than the quantity necessary for the strudel rings. I used the same technique to make slightly higher rings with the intention to use them as baskets for ice cream or sorbet. I even made handles for them but a mini trip over pupp Bailey and the handles flew across the room and broke to pieces. Sorbet cups would have to do. I made Garrett’srhubarb sorbet over the weekend and it was a wonder there was enough left to fill the cups. If you have the chance, run to make it! Absolutely delightful. My only change to his recipe is that I did not strain the rhubarb but pureed the heck out of it. Worked like a charm. Pink, smooth and creamy all at once.
I still had plenty of dough to make a traditional strudel like most of my Daring Bakers partners. I filled this one with roasted quince that I had in the freezer and fresh roasted white peaches. I sprinkled a basic hazelnut crumble on the dough before layering the fruits and rolled the dough in a log. In the cacophony of friends coming over for brunch, I completely forgot to take pictures of the log and had just a split moment to take pictures of the small strudel bites I cut for everybody to sample.
I found the dough a litte bland at first but paired with a punch of flavors it really took a life of its own and today I am glad to have leftovers of all three desserts to chose from after dinner!
See below for all the recipes and my notes.
The May Daring Bakers’ challenge was hosted by Linda of make life sweeter! and Courtney of Coco Cooks. They chose Apple Strudel from the recipe book Kaffeehaus: Exquisite Desserts from the Classic Cafés of Vienna, Budapest and Prague by Rick Rodgers.
Strudel dough
from “Kaffeehaus – Exquisite Desserts from the Classic Cafés of Vienna, Budapest and Prague” by Rick Rodgers
Notes: I used a printed tablecloth so I could see better how thin the dough was getting and how much I could keep on stretching. I found out that no pleats or wrinkles was much better or the dough will take on those at the same time you roll.
Use plenty (and more) flour to roll and instead of rubbing my hands on the cloth to make the flour stick down, I rolled my rolling pin over a few times. Do not refrain from kneading a full 8 to 10 minutes. It will develop all the gluten strands necessary to make this dough stretch like a breeze
1 1/3 cups (200 g) unbleached flour
1/8 teaspoon salt
7 tablespoons (105 ml) water, plus more if needed
2 tablespoons (30 ml) vegetable oil, plus additional for coating the dough
1/2 teaspoon cider vinegar
Combine the flour and salt in a stand-mixer fitted with the paddle attachment. Mix the water, oil and vinegar in a measuring cup. Add the water/oil mixture to the flour with the mixer on low speed. You will get a soft dough. Make sure it is not too dry, add a little more water if necessary.
Take the dough out of the mixer. Change to the dough hook. Put the dough ball back in the mixer. Let the dough knead on medium until you get a soft dough ball with a somewhat rough surface.
Take the dough out of the mixer and continue kneading by hand on an unfloured work surface. Knead for about 2 minutes. Pick up the dough and throw it down hard onto your working surface occasionally.
Shape the dough into a ball and transfer it to a plate. Oil the top of the dough ball lightly. Cover the ball tightly with plastic wrap. Allow to stand for 30-90 minutes (longer is better).
It would be best if you have a work area that you can walk around on all sides like a 36 inch (90 cm) round table or a work surface of 23 x 38 inches (60 x 100 cm). Cover your working area with table cloth, dust it with flour and rub it into the fabric. Put your dough ball in the middle and roll it out as much as you can.
Pick the dough up by holding it by an edge. This way the weight of the dough and gravity can help stretching it as it hangs. Using the back of your hands to gently stretch and pull the dough. You can use your forearms to support it.
The dough will become too large to hold. Put it on your work surface. Leave the thicker edge of the dough to hang over the edge of the table. Place your hands underneath the dough and stretch and pull the dough thinner using the backs of your hands. Stretch and pull the dough until it’s about 2 feet (60 cm) wide and 3 feet (90 cm) long, it will be tissue-thin by this time. Cut away the thick dough around the edges with scissors. The dough is now ready to be filled.
To make strudel rings and cups: Cut four 1.5-inch strips of dough, brush them with melted butter and roll them around cake rings. Bake at 350F until golden brown, about 15 minutes.
Cut four 2-inch strips for the sorbet cups. Proceed as with the rings.
For the hazelnut crumble, quince and white peach filling: Notes: this will make enough for 1/3 of the dough. Adapt if necessary.
2 white peaches, cur in half and pitted
1 large quince, peeled and cored
2 tablespoons (25gr) sugar
equal parts light brown sugar, flour, butter (cut in 1/4-inch cubes) and chopped hazelnuts (I did 50gr of each)
Place the peaches and the quince in a medium baking pan lightly sprayed with cooking spray and roast at 350F for 30 to 40 minutes until caramelized. Check at half time and add 1/4 cup of water to the pan is necessary to prevent them from scortching. Once baked, let cool completely to room temperature. Slice the fruits thin.
In a large bowl, stir together all the crumble ingredients and mix with your fingertips until the mixture forms pea size crumbs.
Fill the strudel with a layer of crumble and top with the roasted fruit. Roll from the short end, lightly brush with melted butter and bake at 350 for 30 minutes (more if you are doing the whole quantity of dough as a regular strudel).
Mascarpone Ricotta Cheese Tarts In Strudel Rings, adapted from Richard Leach.
Makes 4
Tart Rings: See above
For Lemon Balm Cherries:
2 cups (290gr) pitted and halved cherries
1/2 cup (125ml) water
juice of 1/2 lemon
1/2 cup (100gr) sugar
4 leaves lemon balm, roughly chopped
For the Mascarpone-Ricotta Tarts:
3/4 cup (180gr) mascarpone cheese, at room temperature
1/4 cup + 2 tablespoons (90gr) ricotta cheese
1/4 cup (50gr) sugar
1/2 vanilla bean, split in half and seeded
1 whole egg
1 egg white
1/4 cup (60ml) heavy cream
Prepare the cherries:
Place all the ingredients in a heavy saucepan and bring to a boil over high heat. Reduce heat to medium and simmer 5 minutes. Remove from the heat and let cool. Strain to discard the lemon balm. Use to decorate the tarts.
Prepare the tarts:
Wrap four 3-inch dessert rings with foil and place them on baking sheet. Lightly spray the inside with cooking spray.
Preheat the oven to 350F and position a rack in the middle.
In a mixer fitted with the paddle attachment, whip together the mascarpone, ricotta, sugar and vanilla bean seeds at medium speed, until smooth, about 2 minutes. Reduce the speed to low and add the egg and egg white and beat until smooth, scraping the sides and bottom of your bowl if necessary. Still on low speed, add the heavy cream and whip until incorporated.
Divide the mxiture evenly among the prepared cake rings and bake for 20 minutes or until just set. Let cool completely.
Once cooled, place a strudel ring around each tart and spoon some marinated cherries around the tarts.
Rhubarb Sorbet For Strudel Cups, adapted from Garrett’s.
3 1/2 cups of chopped fresh rhubarb (4-5 stalks)
2 1/2 cups of water
1 2/3 cups of sugar
2 teaspoons of lemon zest
2 tablespoons of corn syrup (I used glucose)
Placethe rhubarb, sugar, water, and lemon zest in a large and heavy saucepan. Bring to a boil over high heat. Reduce heat to low, and simmer 5 minutes, uncovered.
Let cool to room temperature. Working in batches, purée the mixture in a blender until smooth. Stir in the glucose. Cover and refrigerate until completely cold, preferably overnight.
Process the ice cream according to your machine’s manufacturer’s instructions. The sorbet will have a soft texture right out of the ice cream maker. Freeze a couple of hours before serving.
I giggle everytime I look a the picture above. It’s Daring Bakers time today and my Cherry Blossom Strawberry Cheesecake looks like it is smiling. Maybe it’s just me as I am eating some while typing this and smiling to know there is plenty left in the fridge.
And when I mean plenty, I am not exaggerating! For a household of two people this month challenge just kept on giving and we had no problem with it! We were given a simple cheesecake recipe and let loose with our creativity. If you let me loose in the kitchen on a Daring Baker’s challenge this can happen, or this.
It might look like I did again but really I did contain myself (no snorting Jen). Somewhat…
This recipe was really straightforward and the end result was smooth, creamy and not overly sweet which I really like. I started by making the entire recipe and used half to make 4 individual cheesecakes. Two were Cherry Blossom and Strawberry Lava Cheesecakes and two were Peanut Butter topped with a chocolate ganache. I piped the remaining batter in different cups and jars and played a bit.
I drew my inspiration from Spring since cherry trees are still blooming and used cherry blossom extract that Rachael from La Fuji Mama sent me while she was still in Japan. For the strawberry lava center, I cooked about a cup of fresh strawberries with some sugar, strained it and thickened it on the stove before spooning it in between the cheesecake layers.
For the Peanut Butter ones, I just followed B’s strong desire to have a peanut butter and chocolate dessert. I mixed some of the batter with chunky peanut butter and added a few tablespoons of heavy cream and poured a simple bittersweet chocolate ganache on top with chopped roasted peanuts.
For the remaining batter, I spooned some of the graham cracker crumbs in different jars and topped with some plain cheesecake batter. The others were topped with a quick cranberry compote using frozen cranberries, sugar and lemon zest. And some were baked without crust and topped with a sprinkle of graham cracker crumbs and chopped pistachios.
The April 2009 challenge is hosted by Jenny from Jenny Bakes. She has chosen Abbey’s Infamous Cheesecake as the challenge. Abbey’s Infamous Cheesecake:
Helen’s Kitchen Notes: For the cheesecakes baked in individual dessert rings, I lined them with parchment paper and wrapped them around a couple of layers of foil to prevent leaking since they were to be baked in a water bath. Just don’t be shy with the foil or you will have some leakage. I lowered the oven to 275F (convection) and baked them for the same amount of time. I also baked all the jars and cups in a water bath at 275F. The possibilities are endless with such an easy going recipe thus I including the recipe as given by the host and my variations and tips at the end.
crust:
2 cups / 180 g graham cracker crumbs
1 stick / 4 oz butter, melted
2 tbsp. / 24 g sugar
1 tsp. vanilla extract
cheesecake:
3 sticks of cream cheese, 8 oz each (total of 24 oz) room temperature
1 cup / 210 g sugar
3 large eggs
1 cup / 8 oz heavy cream
1 tbsp. lemon juice
1 tbsp. vanilla extract (or the innards of a vanilla bean)
1 tbsp liqueur, optional, but choose what will work well with your cheesecake
Preheat oven to 350 degrees F (Gas Mark 4 = 180C = Moderate heat). Begin to boil a large pot of water for the water bath.
Mix together the crust ingredients and press into your preferred pan. You can press the crust just into the bottom, or up the sides of the pan too – baker’s choice. Set crust aside.
Combine cream cheese and sugar in the bowl of a stand-mixer (or in a large bowl if using a hand-mixer) and cream together until smooth. Add eggs, one at a time, fully incorporating each before adding the next. Make sure to scrape down the bowl in between each egg. Add heavy cream, vanilla, lemon juice, and alcohol and blend until smooth and creamy.
Pour batter into prepared crust and tap the pan on the counter a few times to bring all air bubbles to the surface. Place pan into a larger pan and pour boiling water into the larger pan until halfway up the side of the cheesecake pan. If cheesecake pan is not airtight, cover bottom securely with foil before adding water.
Bake 45 to 55 minutes, until it is almost done – this can be hard to judge, but you’re looking for the cake to hold together, but still have a lot of jiggle to it in the center. You don’t want it to be completely firm at this stage. Close the oven door, turn the heat off, and let rest in the cooling oven for one hour. This lets the cake finish cooking and cool down gently enough so that it won’t crack on the top. After one hour, remove cheesecake from oven and lift carefully out of water bath. Let it finish cooling on the counter, and then cover and put in the fridge to chill. Once fully chilled, it is ready to serve.
Pan note: The creator of this recipe used to use a springform pan, but no matter how well she wrapped the thing in tin foil, water would always seep in and make the crust soggy. Now she uses one of those 1-use foil "casserole" shaped pans from the grocery store. They’re 8 or 9 inches wide and really deep, and best of all, water-tight. When it comes time to serve, just cut the foil away.
Prep notes: While the actual making of this cheesecake is a minimal time commitment, it does need to bake for almost an hour, cool in the oven for an hour, and chill overnight before it is served. Please plan accordingly!
Variations I used:
For the strawberry lava center: cook down 1 cup of clean strawberries with 1/4 cup of sugar and 1 tablespoon of lemon juice. Strain and cook the syrp until reduced by half. Let cool. Spoon some cake batter over the crumb crust, add some strawberry juice and seal with more batter.
For the peanut butter cheesecake: I added 1/3 cup of peanut butter to 1/4 of the recipe and added 3 tablespoons of heavy cream to make sure the batter would remain smooth.
For the chocolate gananche: I heated up 1/3 cup of heavy cream over medium heat and poured it over 2/3 cup of bittersweet chocolate. Let stand 2 minutes and stir to smooth.
For the cheesecake in souffle cups: I just buttered the cups and baked them without the crust which I sprinkled later on with some chopped pistachios.
For the cranberry topped ones: I poured some crumb crust at the bottom of glass jars, topped with the batter and baked them like that. Once cooled I added the cranberry compote that I made by cooking 2 cups of frozen cranberries with 1/4 cup of sugar, a dash of cinnamon and some lemon juice.
I can’t believe today is the last day of February! This month has flown by! Tomorrow, my parents will be here. March will be filled with more deadlines, assignments and anticipation of things to come. End of the month? Well, that must mean another Daring Bakers' challenge. Yes indeed! A Flourless Chocolate Cake to be precise. And ice cream…hmmhmmm.
As I do with many of the challenges, I read the recipe and walked away. I like to look at the structure of recipes and think about how I could play with them. This one was perfect for some afternoon fun in the kitchen. I like to take out molds and baking pans and ponder about how to make a recipe work with what I have on hand but I really had little time lately to play as much as I would have wanted to (manuscript due in about a month!). Once the cake batter was made, I divided it up in different ways: square silicone molds, round cake rings and a half sheet pan. For the ice cream, my MO these days is "one recipe-several applications" so I made a vanilla bean ice cream base and divide it to be flavored in a couple of other ways.
The square flourless cakes have an indent on top which was perfect to fill with some fresh berries and top with a quenelle of vanilla cinnamon ice cream. I split the round cakes and layered them with coffee ice cream with almond brittle bits and wrapped them around sheets of tempered dark chocolate. That’s when B. entered the kitchen and exclaimed "Yum! Ice cream sandwiches!"…."Ugh no…these are layered ice cream cakes". He then asked what I was going to do with the half sheet pan leftover and since he really seemed to want ice cream sandwiches, I went ahead and used a nifty little gadget that Mary sent me for my birthday and made him some simple vanilla bean ice cream sandwiches.
The February 2009 challenge is hosted by Wendy of WMPE's blog and Dharm of Dad ~ Baker & Chef. They have chosen a Chocolate Valentino cake by Chef Wan; a Vanilla Ice Cream recipe from Dharm and a Vanilla Ice Cream recipe from Wendy as the challenge.
Chocolate Valentino Cake Recipe, adapted from Chef Wan.16 ounces (1 pound) (454 grams) of semisweet chocolate, roughly chopped
½ cup (1 stick) plus 2 tablespoons (146 grams total) of unsalted butter
5 large eggs separated
Put chocolate and butter in a heatproof bowl and set over a pan of simmering water (the bottom of the bowl should not touch the water) and melt, stirring often.
While your chocolate butter mixture is cooling. Butter your pan and line with a parchment circle then butter the parchment.
Separate the egg yolks from the egg whites and put into two medium/large bowls.
Whip the egg whites in a medium/large grease free bowl until stiff peaks are formed (do not over-whip or the cake will be dry).
With the same beater beat the egg yolks together.
Add the egg yolks to the cooled chocolate.
Fold in 1/3 of the egg whites into the chocolate mixture and follow with remaining 2/3rds. Fold until no white remains without deflating the batter. {link of folding demonstration}
Pour batter into prepared pan, the batter should fill the pan 3/4 of the way full, and bake at 375F/190C
Bake for 25 minutes until an instant read thermometer reads 140F/60C.
Note – If you do not have an instant read thermometer, the top of the cake will look similar to a brownie and a cake tester will appear wet.
Cool cake on a rack for 10 minutes then unmold.
Vanilla Bean Ice Cream Recipe:
6 egg yolks
1 cup (100gr)
2 cups whole milk
1 cup heavy cream
1 vanilla bean, split open and seeded
In a large bowl, whisk the egg yolks and the sugar until pale and thick. In a saucepan set over medium heat, bring the milk, cream and vanilla bean to a simmer, without letting it come to a full boil. Slowly pour the hot cream over the egg yolks mixture while whisking to temper the egg yolks. Pour the whole mixture back into the saucepan and cook over low heat, stirring constantly, until the cream coats the back of spoon. It should register 170F on a candy thermometer. At this point you have made a custard sauce, also known as "creme anglaise". Let cool completely, strain and refrigerate until cold, preferably overnight.
Once and the custard is cold, process according to your ice cream maker manufacturer’s instructions.
Divide the ice cream in three equal portions.
Cinnamon Ice Cream Recipe: place a cinnamon stick in the soft ice cream and let it freeze 2 hours or overnight to get all the flavor from the spice without the brown color. Remove the stick before using.
Coffee-Almond Brittle Ice Cream Recipe:
Almond brittle:
2 tablespoons unsalted butter, plus more for baking sheet
1/4 cup packed light-brown sugar
2 tablespoons honey
1/2 cup slivered almonds
1/3 of vanilla ice cream mixed with 1 teaspoon intant espresso powder. Freeze until almost set.
Preheat oven to 350°. Butter a half sheet pan or an 8×8 baking pan and set aside.
Melt butter in a small saucepan over medium heat. Stir in sugar and honey. Bring to a boil. Cook, without stirring, until mixture is golden brown and registers 280°on a candy thermometer, about 6 minutes. Stir in the almonds. Cook until mixture reaches 300°, about 2 minutes. Pour onto the prepared baking sheet. Let cool completely. Break into pieces.
Add the broken brittle to the coffe ice cream and freeze.
Sometimes I feel B. thinks I am crazy. Often, I know B. thinks I am crazy. Prime example this month was when he walked in the kitchen one day and saw all countertops covered with all sorts of tuile (twea-l) cookies. Traditional dough tuiles, nougatine tuiles, chocolate tuiles, mousses and sorbets of all sorts, tuile cones, tuiles cups, tuiles cannoli… He looked at me puzzled and said "I thought you said you did not know what you wanted to do with the Daring Bakers' challenge". I looked up and exclaimed "well, I could not decide which one to do so I made them all. Hungry?!"
This month’s challenge is brought to us by Karen of Bake My Day and Zorra of 1x umruehren bitte aka Kochtopf. They have chosen Tuiles from The Chocolate Book by Angélique Schmeink and Nougatine and Chocolate Tuiles from Michel Roux.
Yes, this month we could chose from 3 different recipes to make the tuile cookies and we had complete freedom for the choices of filling. I like tuiles. A lot. I like making them. A lot. After the initial "which one to do"…I ended up making them all. It started with the simple tuile cones and throughout the day I found myself coming up with more combinations, shapes for the tuiles to accommodate all the sorbets and mousses I had in the freezer. Talk about one good January freezer cleaning!! You know, like when you need more bread for your cheese, then more cheese for your bread, and so forth and so on….
Let’s see…. I started with the nougatine recipe as my own little wink at a New Year’s Eve dessert at the restaurant years ago where I had decided to serve nougatine cornucopias filled with different sorbets. It was pouring rain and a 100% humidity and as the day was unfolding so where my cornucopias. I was checking on them as if they were my first born. This time, I waited for a dry day and made nougatine cups that I filled with a vanilla and star anise mousse (first picture).
I made another sugar tuile recipe to make poppy seed cones for raspberry-strawberry sorbet, and swirled cocoa and vanilla cones dipped in chocolate and filled with a vanilla bean mousse ( same recipe as the one with the star anise but without the spice this time). Then I made a leaf stencil and layered the leaves wiht a grapefruit sorbet and topped with a piece of candied grapefruit. I had extras so I filled shot glasses with the the berry sorbet and topped them with a poppy seed cone.
I had some nougatine dough left in the fridge so I went ahead and made nougatine cannoli that I filled with the remaining vanilla bean mousse. These were so thin they almost shattered in between your fingertips…but absolutely delicious!
Finally I tempered some dark chocolate and made the chocolate tuiles to go alongside a simple Bailey’s cream.
Now you understand why I sometimes get "the look" but I also get another one from the neighbors when I tell them to come over for desserts!!
Recipe for Nougatine Tuiles, adapted from Michel Roux’s Finest Desserts
125 grams sliced almonds
165 grams sugar
15 grams butter (optional)
1/2 tablespoon oil (vegetable, sunflower, peanut)
Preheat oven to 350F.
Spread the almonds on a baking sheet and toast in the oven until lightly browned. Cook the sugar in a heavy based saucepan over low heat, stirring gently and continuously with a spatula, until it melts to a light golden caramel. Add the almonds and stir over low heat for 1 minute, then stir in the butter until completely absorbed. (This is not essential, but will give the nougat an added sheen) Pour the nougatine onto an oiled baking sheet
Place a baking sheet toward the front of the warm oven, leaving the door half open. The warmth will keep the cookies malleable. Work with one piece at a time, of a size appropriate to the shape you want. Roll out each piece on a warm, lightly oiled baking sheet or lightly oiled marbled surface. It is essential to work quickly, since the nougatine rapidly becomes brittle. Heat the nougatine in a microwave oven for a few seconds only to soften it if needed. Roll the nougatine into the appropriate thickness for your desired shape, but never thicker than 1/8 inch or 3 mm. Quickly cut out your chosen shapes using cookie cutters, or the blade or heel of a chef’s knife. To mold the nougatine, drape it very rapidly over the mold so that it follows the shape and contours. Leave until completely cold before removing from the mold. Or, cut out and using your fingers or a knife, push into folds or pleats… use as a basket, twirl round a knitting needle..Nougatine based shapes can be made two or three days in advance, Keep them in a very dry place and do not fill with something like a mousse more than 2 hours prior to serving.
Recipe for Vanilla Star Anise Mousse:
3 egg yolks
pinch of salt
1/2 tablespoon (3.5gr) powdered gelatin + 2 tablespoons water
100ml water
1 /2 cup (100gr) sugar
1 star anise
1 cup heavy cream
1 teaspoon vanilla bean paste
In the bowl of a stand mixer, whisk the egg yolks and the salt. In a small bowl, sprinkle the gelatin over the water, set aside. Combine the remaining water, sugar and star anise in a heavy saucepan. Cover and bring to a rapid boil over medium high heat (prevents crystallization of the sugar on the side of the pan). Once boiling, uncover and cook the syrup reaches 238F. Remove the star anise and pour the syrup in a container with a spout, it will be easier to add the to the yolks. Pour the syrup slowly and into a steady stream into the egg yolks with the machine running on medium high. Melt the gelatin in the microwave for 10 seconds or into the (now empty) saucepan until dissolved. Add it to the yolk mixture and continue to whisk on medium high until it triples in volume and cools to room temperature. In a separate bowl, whip the heavy cream to soft peaks with the vanilla paste. Gently fold the egg yolk mixture into the whipped cream and use immediately.
Vanilla Tuiles, adapted from Bo Friberg’s The Professional Pastry Chef:
4 ounces unsalted butter, softened
4 ounces powdered sugar, sifted
1/2 cup egg whites, at room temperature
1 teaspoon vanilla extract
4 ounces all purpose flour, sifted
Cream the butter and powdered sugar together in a stand mixer fitted with the paddle attachment. Add the egg whites and vanilla and beat until just coming together. Add the flour to the butter mixture and mix until incorporated. Do not overmix. Use right away or store in the refrigerator, taking it out 30 minutes before you plan to use it.
Cut out two 4 inch round stencils in a piece of card stock paper and place them on a parchment lined baking sheet. Spread a little of the batter over the stencils, carefully lift the card stock paper, and bake 5-8 minutes at 350F until the edges are just getting golden brown.
To make cocoa swirls, take about one tablespoon of the batter and add one teaspoon of sifted cocoa powder and mix thoroughly. Pipe dots and swirl them around with a toothpick on the tuiles before they go in oven.
Shape the tuiles around a couple of cones or Bismarck tubes. Let cool completely before storing in an airtight container.
Recipe for Grapefruit Sorbet:
2 cups (500ml) freshly squeezed pink grapefruit juice
1 cup (100gr) sugar
4 cups (1 liter)water
2 tablespoons vodka (optional)
In a saucepan, combine the sugar and water and bring to a boil, stirring to dissolve the sugar. Add the vodka (if using)and let cool to room temperature.
Pass the grapefruit juice through a sieve to remove the pulp and add it to the sugar syrup, stirring well to blend.
Pour into the container of an ice cream maker, and freeze according to the manufacturer’s instructions. Transfer to a container and freeze until firm before serving.
Chocolate Tuiles, adapted from Michel Roux’s Finest Desserts
9 oz/250 grams dark or white couverture or best-quality bittersweet chocolate, chopped
Temper the couverture. Place the template on a sheet of rodoïde (or use a clean sheet of sturdy plastic such as a folder) and fill with about 1 tbs of the mixture. Repeat the process a little distance away from the first one. As soon as you have 5 tuiles fit, slide them onto a mold or rolling pin (side of a glass) to curve. Let cool completely, lift tuiles off the plastic only after the chocolate has set and just before serving, so that they keep their shine.
Bailey’s cream:
4 oz (120gr) mascarpone cheese, at room temperature
2 tablespoons (20gr)sugar
1/4 cup Bailey’s Irish cream
75 ml. heavy cream
In a large mixing bowl, whisk the mascarpone with the sugar until light. Whisk in the liqueur. Whip the heavy cream to medium stiff peaks, and fold into the mascarpone. Divide among ramekins or glasses and serve with the chocolate tuiles.
Please visit the other Daring Bakersto see their take on the challenge!
Now say that twelve times real fast after after one too many glasses of Champagne!! These Yule Logs are the desserts I served the family on Christmas dinner and between the 12 of us there were barely enough left for a midnight snack! I did not intend to double the work and make two "just" for fun but between the ubber chocolate fans and the "I ate too much but I still want dessert" peeps, and for my sake of a stress free meal where everybody was happy, I knew that making two was a necessity. Interesting how I belong to both groups…Let’s face it, it’s dessert, it’s mousse, it’s chocolate and it was delicious!
It was also the dessert chosen by the adventurous Hilda from Saffron and Blueberry and Marion from Il en Faut Peu Pour Etre Heureux for the December Daring Bakers' Challenge: a French Yule Log by Flore from Florilege Gourmand. I loved the traditional cake Yule Log we made last year but this entremet version suits me perfectly…if there is mousse and creme brulee and anything contrasting in texture such as a layer of crisp or feuillantine….I am coming running!!
I loved that even with the rules laid out to make a log filled with 6 different components, we still had plenty of room to use our favorite combos and flavors. Each log had to include a dacquoise layer, a feuillantine insert, a creme brulee insert, a ganache insert, a mousse and an icing. Yes…both my logs have 7 components…Again, not trying to be special….just playing with aesthetics and visuals by splitting the mousse component in two and flavoring differently.
The dark chocolate Yule Log had hazelnut dacquoise layer, a milk chocolate feuillantine, a milk chocolate and chesnut mousse, a vanilla mousse, a chestnut creme brulee, a dark chocolate ganache and a dark chocolate icing.
The white chocolate Yule Log had an almond dacquoise, a white chocolate feuillantine, a raspberry mousse, a a vanilla mousse, a Meyer Lemon creme brulee, a white chocolate ganache and a white chocolate icing.
Because I was working with two logs at the same time, (and getting Christmas together) it was easier for each log to make the vanilla mousse recipe, divide it in half and add milk chocolate and chesnut puree to one part and do the same for the other log adding pureed raspberries to half the mousse. I used the traditional French gavottes for the feuillantine part in the chocolate log as the recipe stated but I ate too many (!) to have enough for the other one so I subbed with cereals like I had done in the Poire D’Eve cake last month. The chesnut puree was from a can sent by mom in one of her care packages and the Meyer lemon addition to the creme brulee in the second log was a last minute addition after a neighbor gave us a couple….but I can’t ever turn those down!
I also went very DIY with the inserts and molds (just ask Lisa, she’s got pixel proofs!). The rounded vanilla insert in the chocolate log was creating by pushing a foil covered pvc pipe down the chocolate-chestnut mousse, freezing that part and then taking the insert out, brushing the ganache on and then filling it with the vanilla mousse. The mold was a traditional French loaf pan I brought with me when I moved here…a girl’s gotta have her necessities, right?!!
The rounded mold for the white chocolate log was made by cutting an aluminium foil pan and molding it around a wine bottle and setting it in the bottom of another loaf pan. The mousse set up was created by using another foil wrapped pvc pipe but a foil wrapped paper towel insert-roll thingie works the same. Since I did not have the right size of rhodoids sheets used to line up the loaf pans I cut sheet protectors (you know the ones used to protect your important documents during presentations) and used them the same way…but plastic wrap works just as well.
For the sake of keeping this post to less than a mile and not losing your attention too long, I am only writing down the instructions for the chocolate log with the changes I made in italics for the raspberry one.
Chocolate Chesnut Yule Log:
Note: You can use the Dacquoise for the bottom of your Yule Log only, or as bottom and top layers, or if using a Yule log mold (half-pipe) to line your entire mold with the biscuit. Take care to spread the Dacquoise accordingly.
2.8 oz (3/4cup + 1Tbsp / 80g) ground hazelnuts
1.75 oz (1/2 cup / 50g) confectioner’s sugar
2Tbsp (15g) all-purpose flour
3.5oz (100g / ~100ml) about 3 medium egg whites
1.75 oz (4 Tbsp / 50g) granulated sugar
Finely mix the hazelnuts and the confectioner’s sugar. (If you have a mixer, you can use it by pulsing the ingredients together for no longer than 30 seconds)
Sift the flour into the mix. Beat the eggs whites, gradually adding the granulated sugar until stiff. Pour the hazelnut mixture into the egg whites and blend delicately with a spatula.
Grease a piece of parchment paper and line your baking pan with it. Spread the batter on a piece of parchment paper to an area slightly larger than your desired shape (circle, long strip etc…) and to a height of 1/3 inches (8mm).
Bake at 350°F (180°C) for approximately 15 minutes (depends on your oven), until golden. Let cool and cut to the desired shape. For the raspberry log I used almonds instead.
Vanilla Mousse: (divided in half before the end to add the chocolate and chesnut)
2/3 cup (160g) heavy cream (35% fat content)
2/3 cup (160g) whole milk
1 vanilla bean
4 medium-sized egg yolks
3 oz (6 Tbsp / 80g) granulated sugar
3 Tbsp (25g) cornstarch, sifted
4g / 2 tsp powdered gelatin or 2 sheets gelatin
1 cup (240g) whipping cream (35% fat content)
Pour the milk and 2/3 cup cream into a saucepan. Split the vanilla bean in half, scrape the seeds from the vanilla bean halves into milk and put the vanilla bean in as well. Heat to boiling, then turn the heat off, cover and let infuse for at least 30 minutes. Then remove the vanilla bean. Beat the egg yolks with the sugar until white, thick and fluffy. Add the cornstarch, beating carefully to ensure that there are no lumps. While whisking vigorously, pour some of the milk into the yolk mixture to temper it. Put infused milk back on the stove on medium heat. Pour yolk mixture back into the milk while whisking vigorously. Keep whisking vigorously until mixture thickens considerably. As soon as the mixture starts to boil, leave on for only 2 more minutes. (The recipe says you should remove the vanilla bean at this time but in the interest of no one getting burned, that can be done after you take the pastry cream off the stove.) Add the gelatin and let it melt completely, stirring once or twice. Divide the batter in two equal parts. For the milk chocolate-chesnut variation: add 1/4 cup melted milk chocolate and 1/4 cup chesnut puree to one half of the cream. For the raspberry log: add 1/2 cup pureed raspberries to half the cream.
Whip the 1 cup whipping cream until stiff and add gradually to the pastry cream. Blend delicately with a spatula.
Dark Chocolate Ganache insert:
1.75 oz (4 Tbsp / 50g) granulated sugar
4.5oz (2/3 cup – 1 Tbsp/ 135g) heavy cream
5 oz (135g) dark chocolate, finely chopped
3Tbsp + 1/2tsp (45g) unsalted butter softened
Make a caramel: Using the dry method, melt the sugar by spreading it in an even layer in a small saucepan with high sides. Heat over medium-high heat, watching it carefully as the sugar begins to melt. Never stir the mixture. As the sugar starts to melt, swirl the pan occasionally to allow the sugar to melt evenly. Cook to dark amber color (for most of you that means darker than last month’s challenge).
While the sugar is melting, heat the cream until boiling. Pour cream into the caramel and stir thoroughly. Be very careful as it may splatter and boil.
Pour the hot caramel-milk mixture over the dark chocolate. Wait 30 seconds and stir until smooth. Add the softened butter and whip hard and fast (if you have a plunging mixer use it). The chocolate should be smooth and shiny. For the white chocolate ganache insert: change the chocolate and skip the butter, proceed the same way.
Feuillantine insert: 3.5 oz (100g) milk chocolate
1 2/3 Tbsp (25g) butter
2 Tbsp (1 oz / 30g) praline (or bring 1/2 cup of sugar to an amber caramel and spread it on 1/2 cup almonds and ground until fine)
2.1oz (60g) lace crepes(gavottes) or rice krispies or corn flakes or Special K
Melt the chocolate and butter in a double boiler.Add the praline and the coarsely crushed lace crepes. Mix quickly to thoroughly coat with the chocolate. Spread between two sheets of wax paper to a size slightly larger than your desired shape. Refrigerate until hard. For the raspberry log: replace the milk chocolate with white.
Chestnut Creme Brulee:
1 cup (230g) heavy cream
4 medium-sized (72g) egg yolks
0.75 oz (2 Tbsp / 25g) granulated sugar
1/2 cup chesnut puree
Heat the cream to just boiling. Whisk together the sugar and egg yolks (but do not beat until white). Add the chestnut puree. Pour the cream over the sugar/yolk mixture. Mix well. Wipe with a very wet cloth and then cover your baking mold (whatever shape is going to fit on the inside of your Yule log/cake) with parchment paper. Pour the cream into the mold and bake at 275°F (100°C) for about 1 hour or until firm on the edges and slightly wobbly in the center. For the raspberry log: replace the chestnut puree with 1 tablespoon of Meyer lemon juice and zest of a whole one.
Dark Chocolate Icing: Note: I recommend doubling it to make eaiser to spread evenly.
4g / 2 tsp powdered gelatin or 2 sheets gelatin
¼ cup (60g) heavy cream
2.1 oz (5 Tbsp / 60g) granulated sugar
¼ cup (50g) water1/3 cup (30g) unsweetened cocoa powder
Soften the gelatin in cold water for 15 minutes. (if using powdered, use 2 tablespoons of water) Boil the rest of the ingredients and cook an additional 3 minutes after boiling. Add gelatin to the chocolate mixture. Mix well. Let cool while checking the texture regularly. As soon as the mixture is smooth and coats a spoon well (it is starting to gelify), use immediately. For the raspberry log: use 100 gr of white chocolate, milk instead of cream and no cocoa.
For the chocolate fans: everything is explained very well by Alice Medrich with Julia Child in this tutorial.
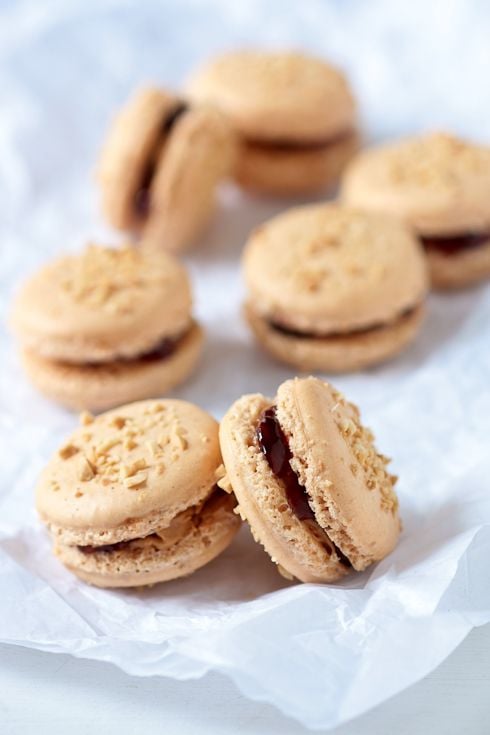
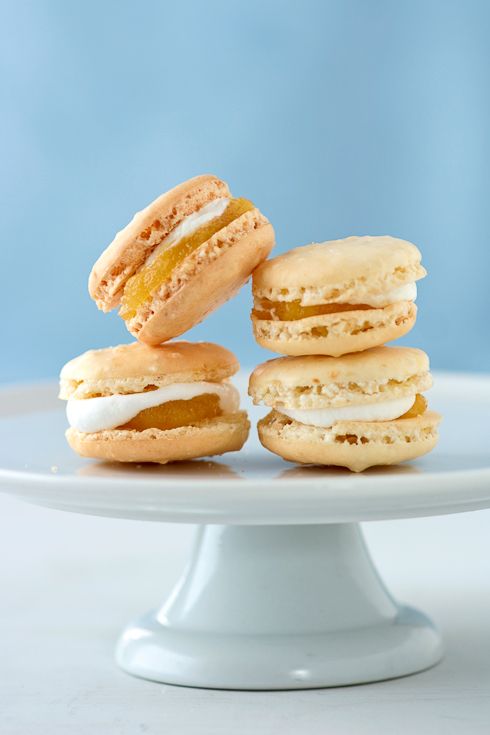
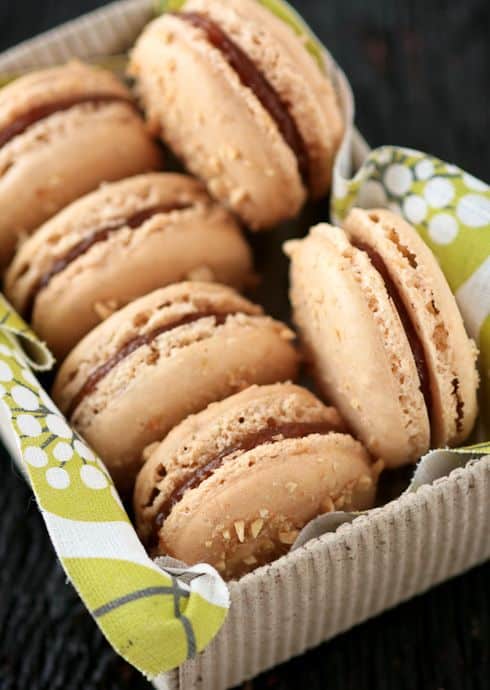
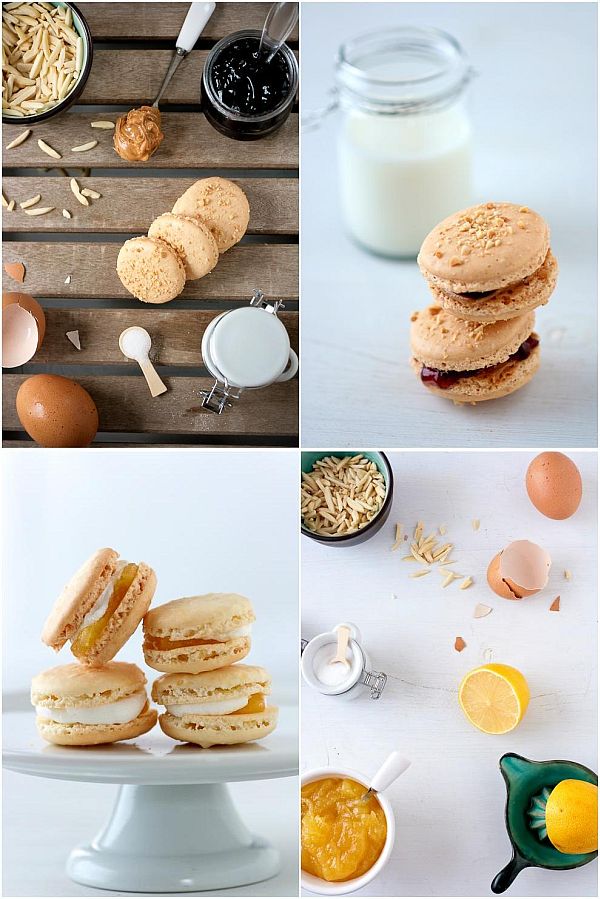
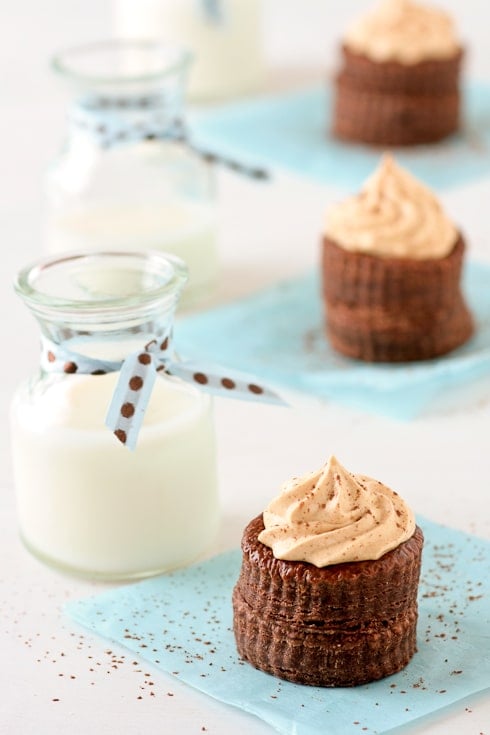

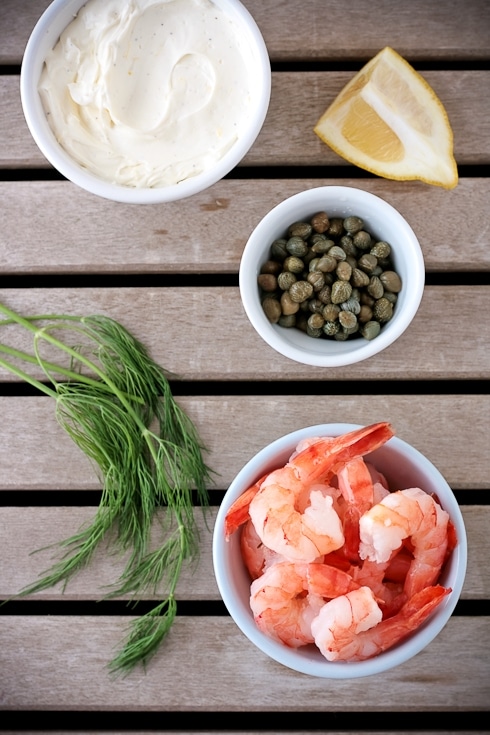
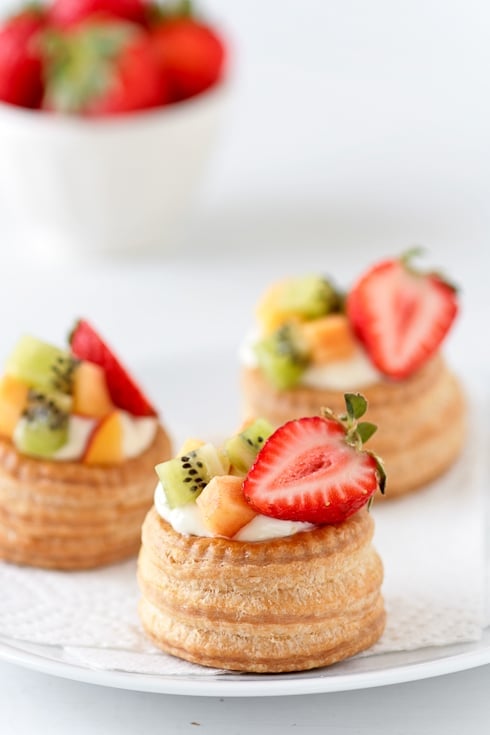
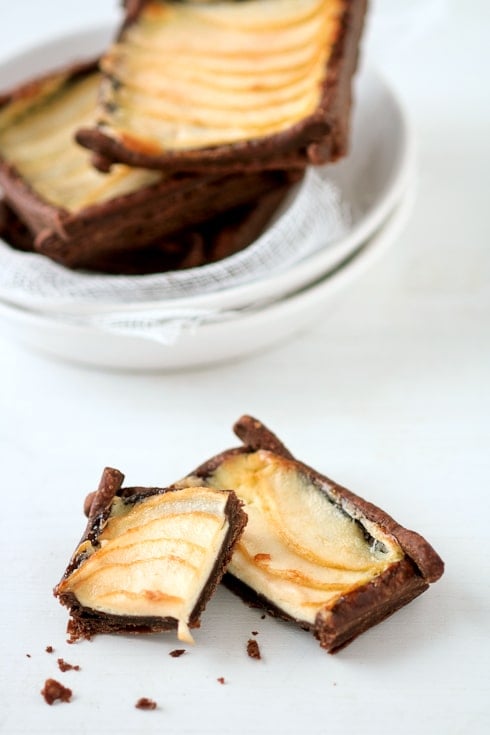


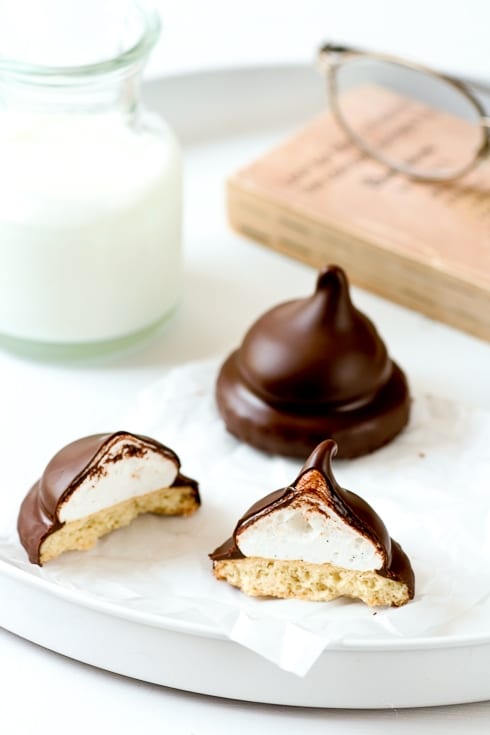
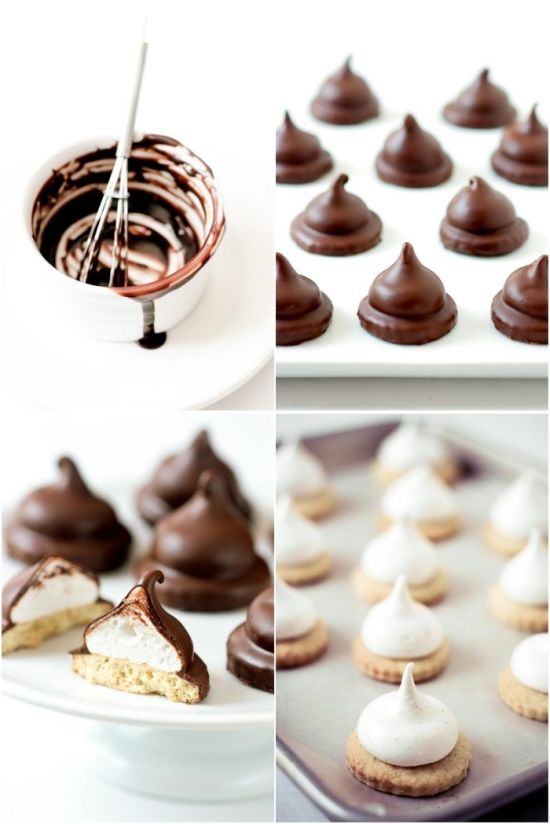
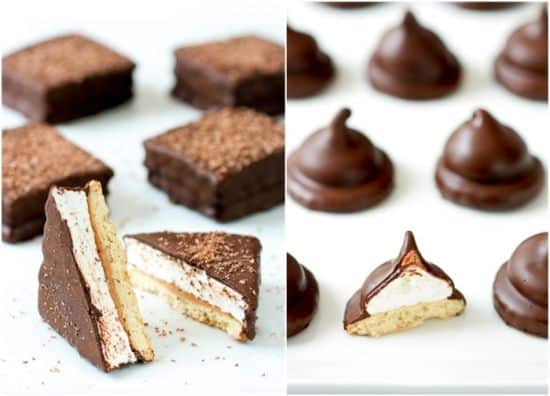
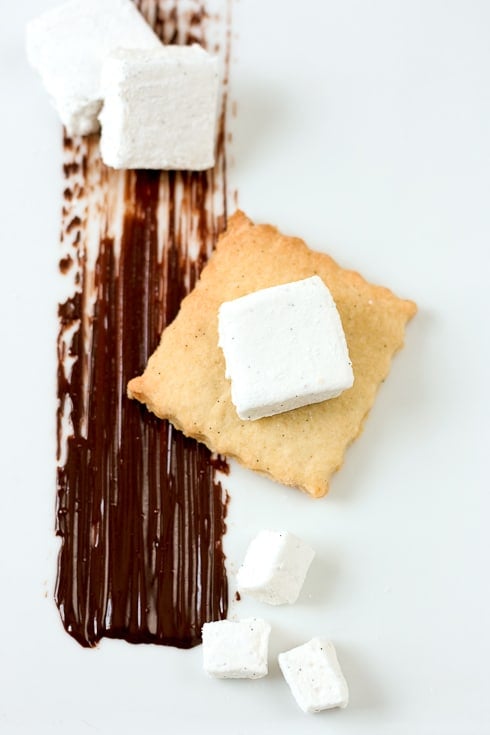
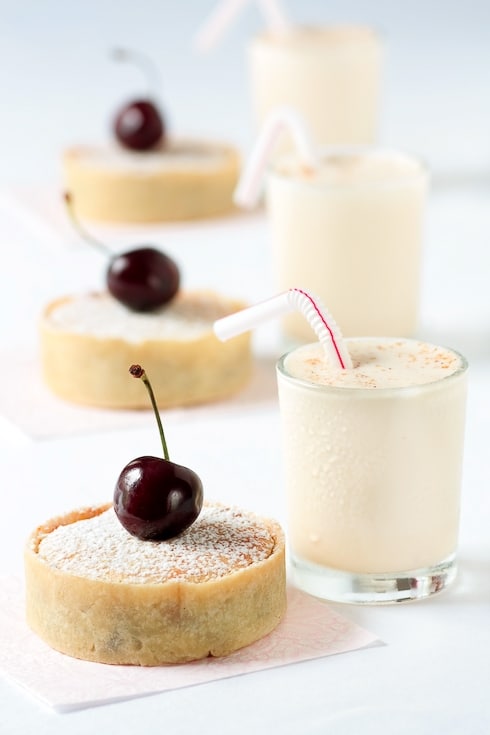
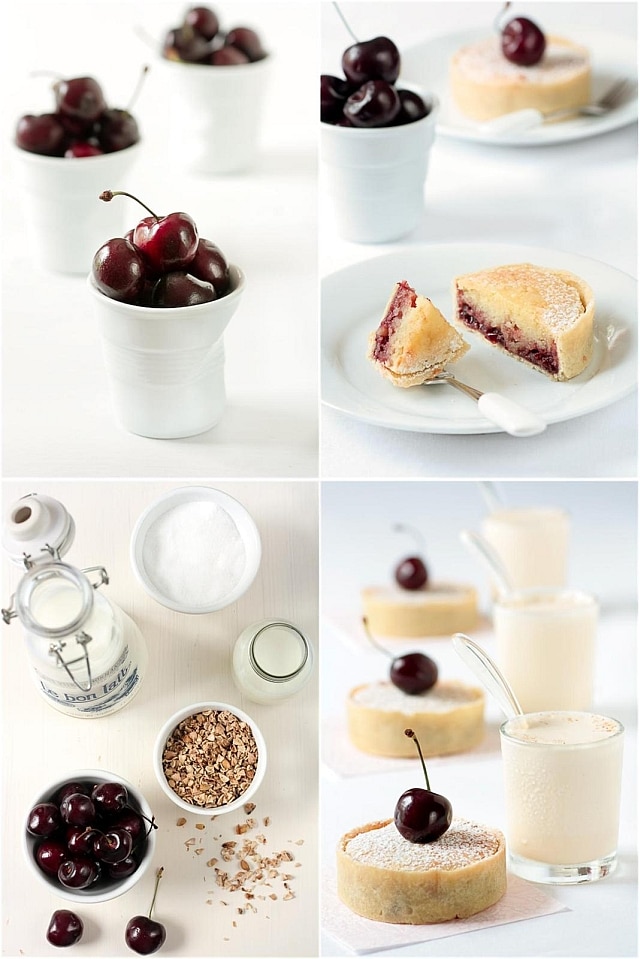
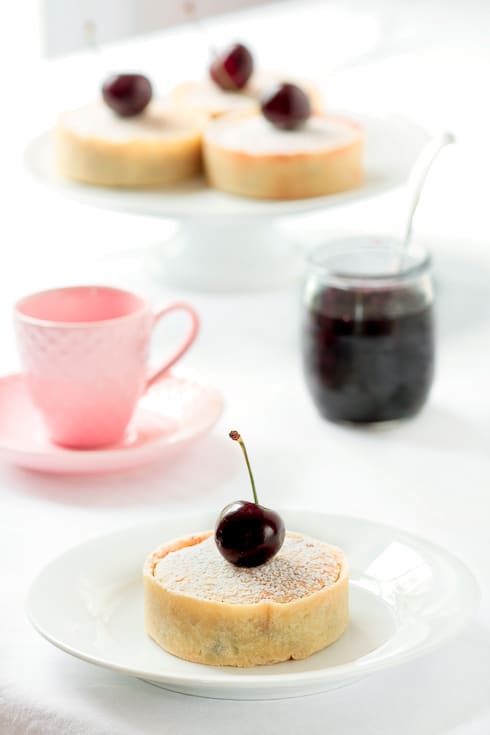
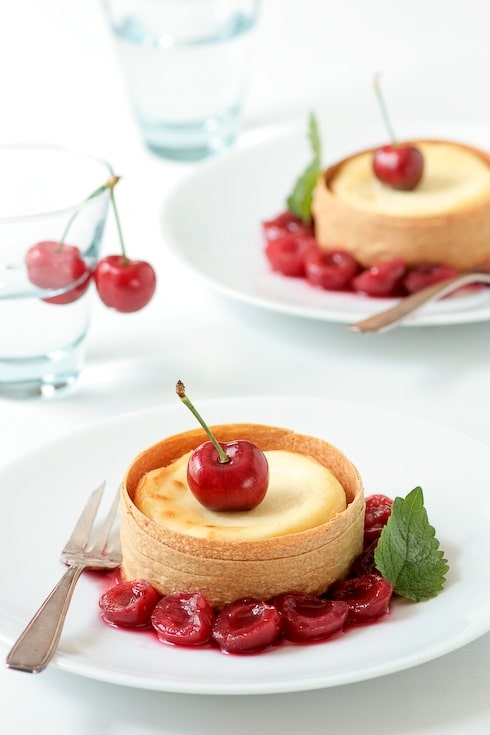
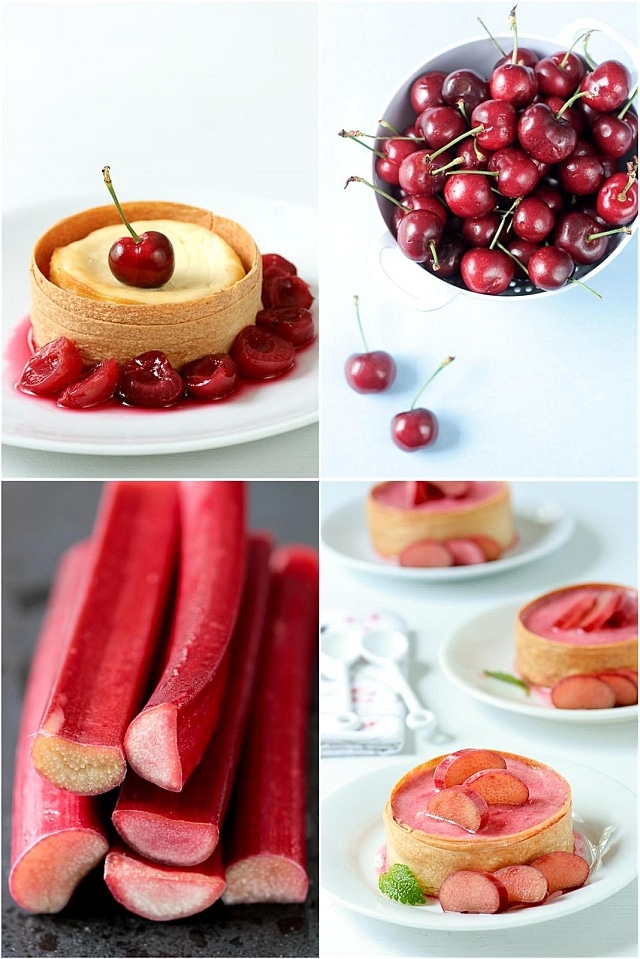
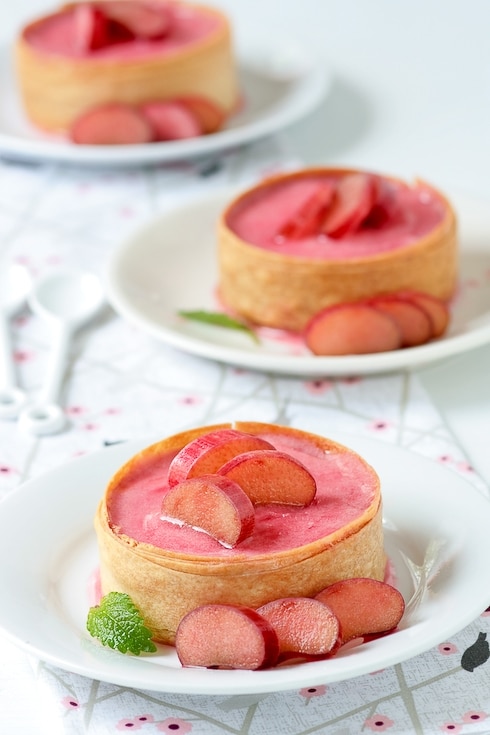

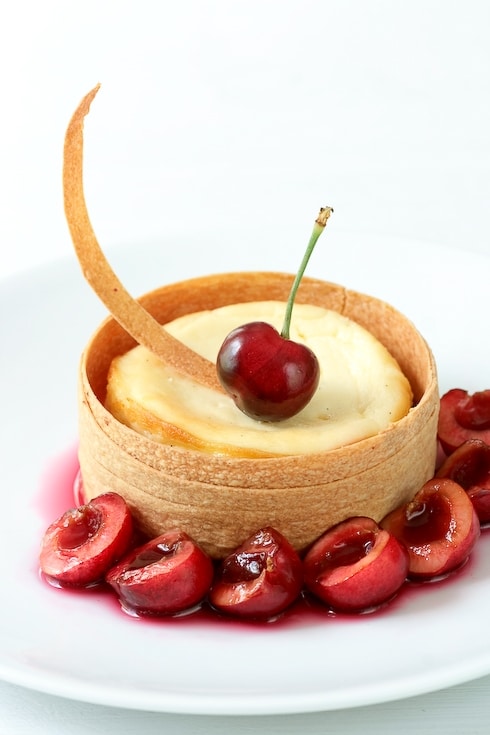
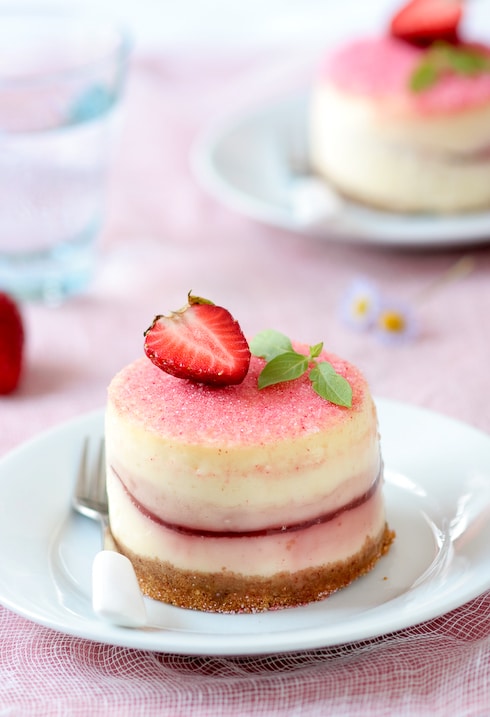
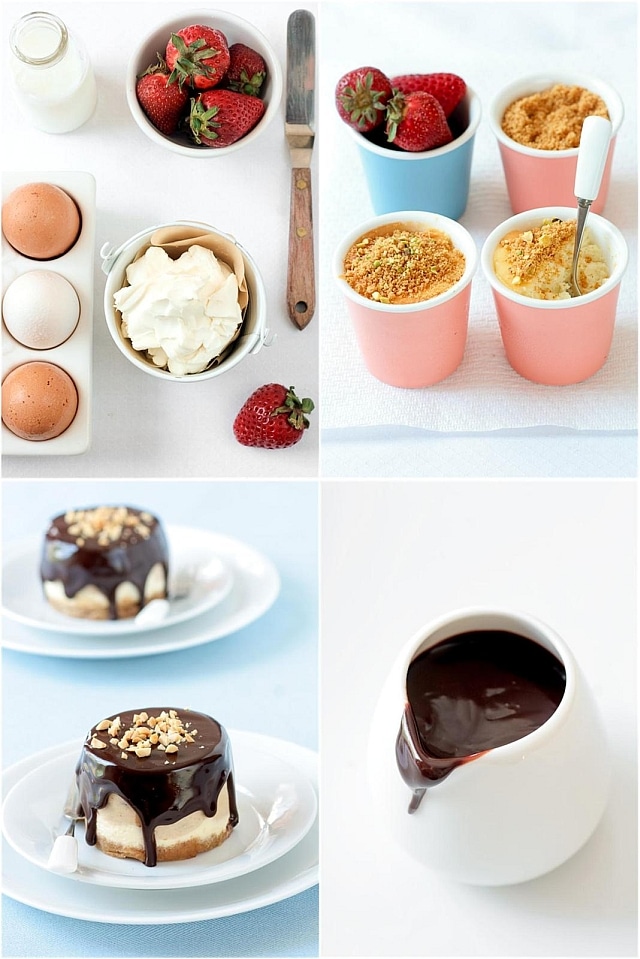
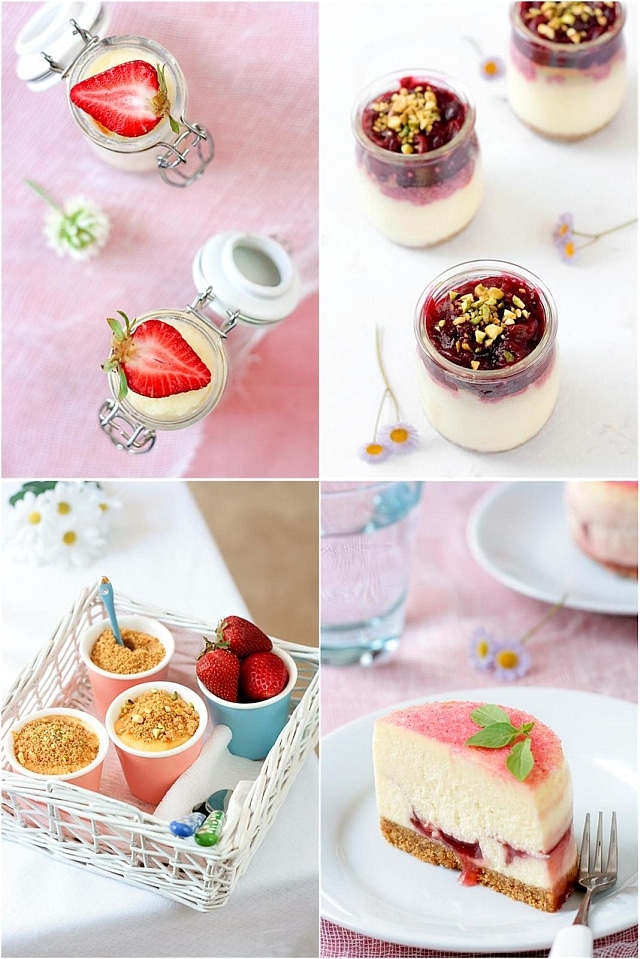

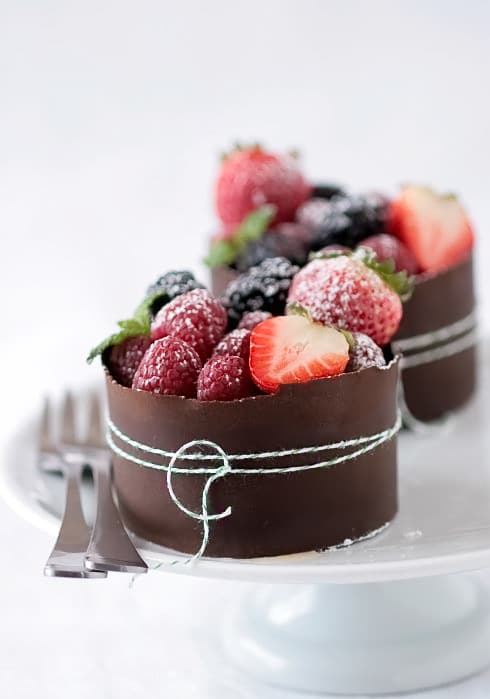
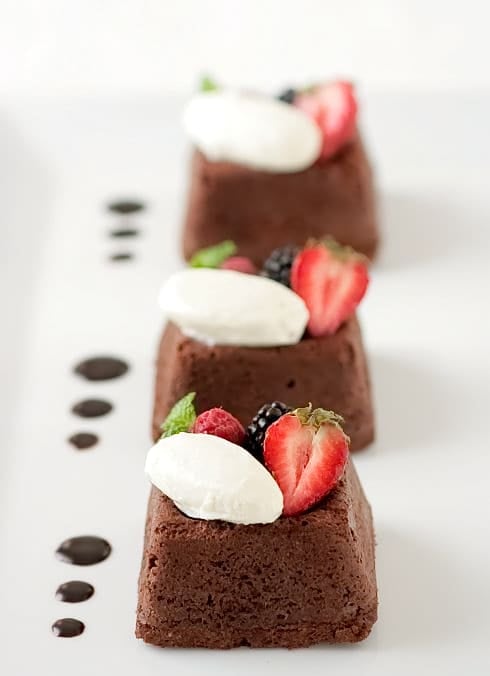
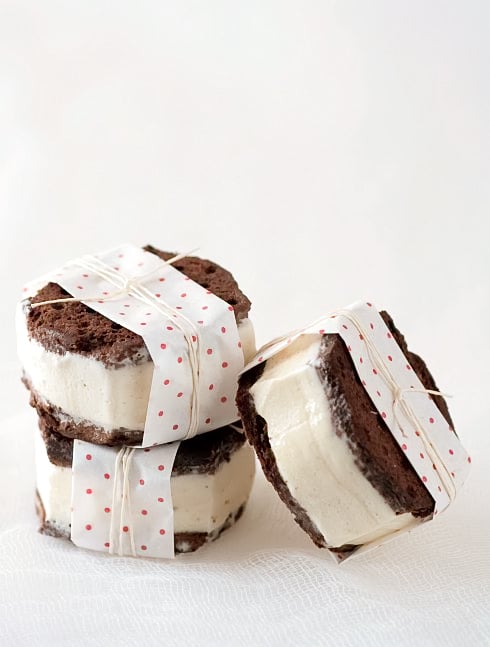
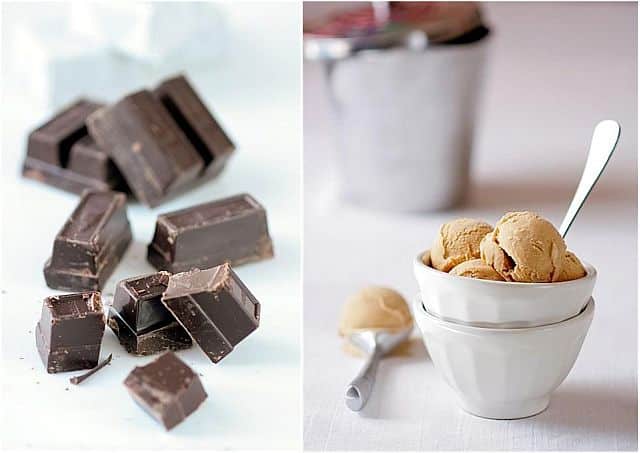
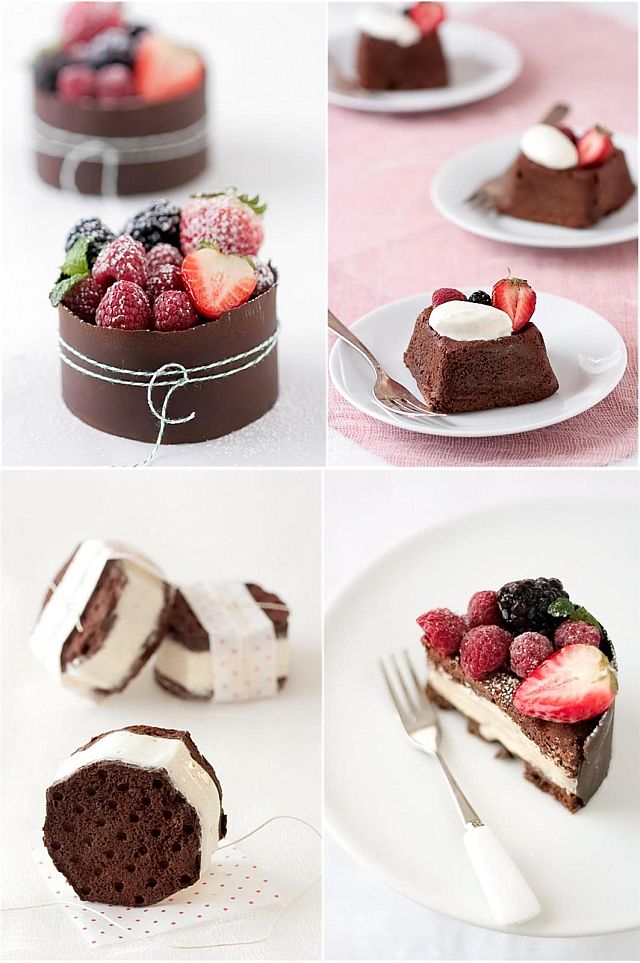
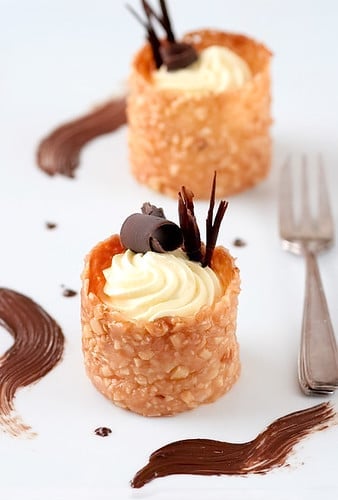
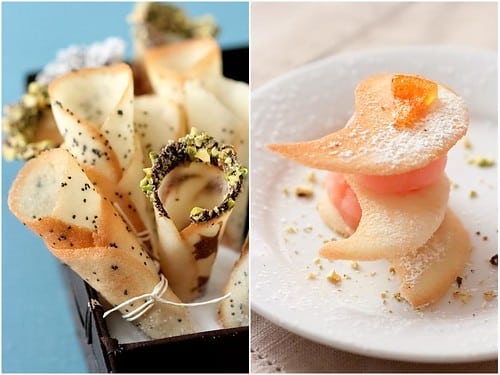
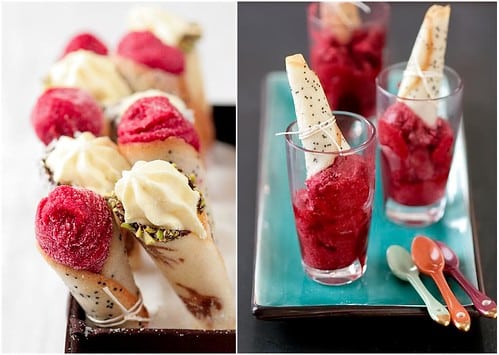
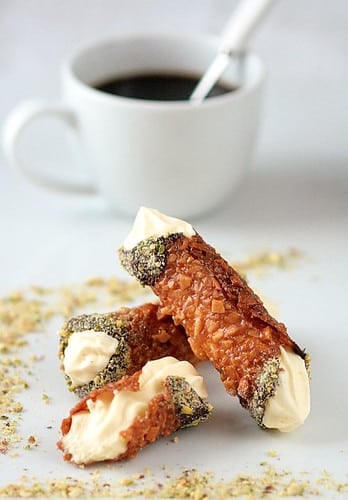
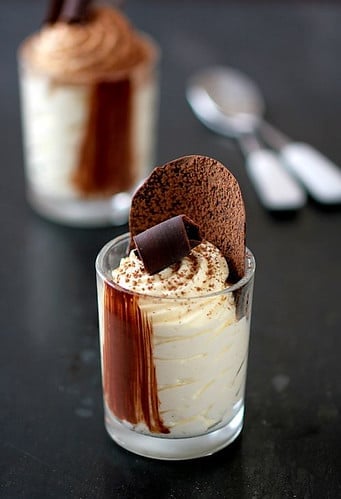
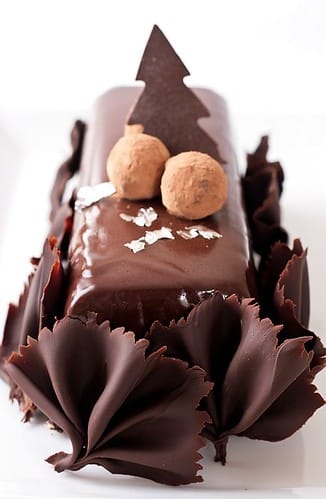

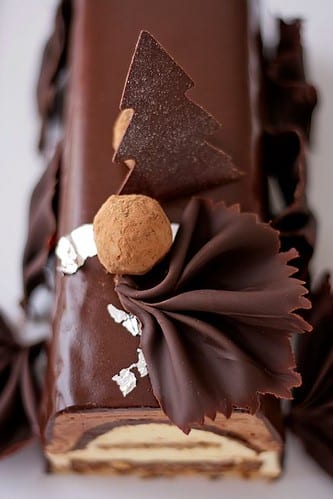
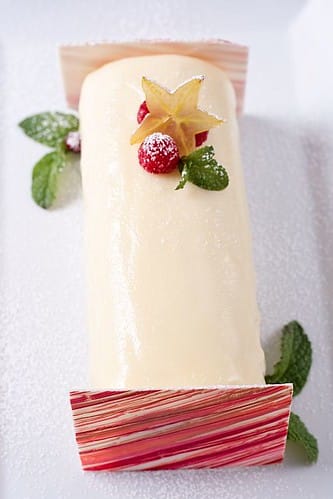
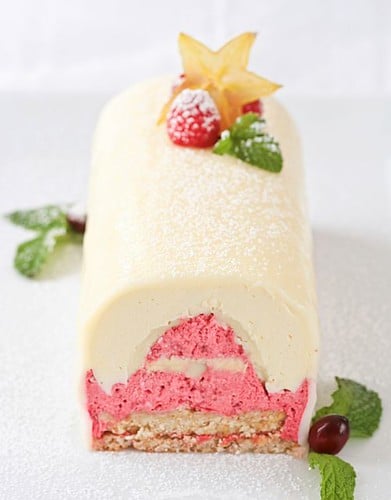