
article

Crackers Au Bleu


Yes, cheese, blue cheese to be exact is sneaking its way into my "everything sweet and baked" blog. No, I have not gone mad….since it has to do with baking, flour and butter it qualifies.

I wish I could have made this with Roquefort cheese but for a couple of reasons I went with a basic Gorgonzola: the taste is strong enough to show through the cracker once it is baked and I am trying to use up as many perishables as I can before our upcoming trip. I am also including these in my goodie baskets for Christmas because not everybody likes sweets…I know crazy eh?! They go really well with the rest of the assortments, especially beside a little box of spiced nuts.

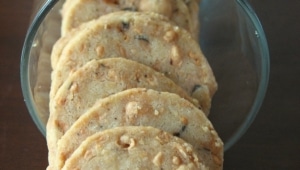
I found the recipe ages ago and originally made them for a cocktail party but they never made to the munchies table because B. and I devoured the whole batch before our guests arrived….they are excellent. You can really taste the blue cheese because there is barely enough flour to hold them together and they are so buttery that they instantly melt in your mouth.

These are really convenient to have around during the holidays. The dough can be made way ahead of time since it needs to refrigerate before baking and you can cut slices as needed if you have a small party. Believe me, that won’t be necessary…. If you have leftovers, which I highly doubt, the baked crackers will keep for a week in an air tight container in the refrigerator.

Blue Cheese Crackers, adapted from Pascale:

100 gr. all purpose flour
80 gr. salted butter (unsalted works fine too)
1/2 tsp. chili powder ( I used piment d’Espelette)
1 Tb cornmeal
100 gr. blue cheese

Crumble the cheese. Cut the cold butter in small pieces. In a large bowl, mix all the ingredients with you fingers or a pastry cutter and gather into a ball. On a lightly floured surface, roll the dough into a cylinder about 6 inches long. Wrap in plastic wrap and refrigerate for an hour.
Preheat the oven to 350. Cut the log into 1/2 thick slices and spread them out onto a parchment paper lined baking sheet. They will spread a little. Bake for 10 minutes or until the edges start to get golden brown.

I made another batch the other day and baked bigger slices, about 3 inches wide and topped them with smoked salmon for an appetizer. Delicious!

Cranberry Biscotti

I hope you are not getting tired of my cranberry obsession but I found a cup left of home dried ones and after sampling the chocolate biscotti from Dorie Greenspan, I decided to go for the first recipe I had noticed: her Lenox Biscotti. We are not getting tired of the mighty berry yet but that reminds me if a time where the executive chef ordered me two cases of pears instead of one. You would not believe how many desserts, recipes, creations, adaptations I came up with trying not to waste any. I almost thought about writing on book on pears.

Another great one from that book, so good that I made another batch right away since we could not stop dunking and finding inventive reason why we should!
Her original recipe called for chopped almonds which I replaced with cranberries, and I used orange flower extract instead of almond extract. If you want a foolproof recipe that you can adapt to your heart’s content, well look no further.

Lenox Biscotti, adapted from Baking From My Home To Yours

1 1/2 cups flour
1 1/2 tsp baking powder
1/4 tsp. salt
1/2 cup cormeal
1 stick butter, at room temperature
1 cup sugar
2 eggs
1 1/2 tsp almond extract (I used orange flower water)
3/4 cup sliced almonds ( I used dried unsweet cranberries, but store bought work well, believe me I have tried aready)

In stand mixer (hand held is fine) cream the butter and sugar. Add the eggs, beating well after each addition. Add the flavor extract you chose.
Sift together the flour, baking powder,salt and cormeal and add to the butter mixture. Fold in the cranberries (or nuts).
Scrape half the dough onto a parchment paper lined baking sheet. Using a spatula and your fingers, form the dough into a log, 12 inches long and 1 1/2 inches wide. Repeat with the second portion of the dough.
Bake at 350 for 15 minutes or until the logs are light golden but still soft to the touch. Let cool for 30 minutes but keep the oven on.
With a long serrated knife cut slices from each log and spread them out onto baking sheets. Return to the oven for another 15 minutes until firm.

Next step? Try to wait until they are cold enough not to burn your tongue….! Happy dunking!

White Chocolate and Cranberry Cake

I don’t know whether to blame or thank Lisa for that one! I have made it twice already and my neighbor ordered a whole on after sampling some over the weekend. A few days ago she mentionned a white chocolate and cranberry cake I should try in order to help me use the one bag of cranberries I still had. The mere thought of these flavors melding together in a cake made me crave a taste. She graciously emailed me the recipe and it sounded too good not to make it on the spot. The flavors of white chocolate and cranberries go perfectly together and the addition of orange zest and juice made it close to heaven. Perfect with a cup of bergamot tea on a cold afternoon…that’s the part I have to imagine because it was 72 today.

The recipe calls for a tube or 9 inch round pan but I wanted bite size squares (except for the picture) so I used a 13×9. The cake is supposed to be drizzled with a white chocolate-orange icing but I skipped that part. Why? Could not wait that long to eat it! The only thing I will do next time will be to reduce the butter from 2 to 1 or 1.5 sticks.

White Chocolate-Cranberry Cake:

1-1/2 pkg. (9 squares) whit chocolate, divided
1 cup (2 sticks) butter, softened
1 cup firmly packed brown sugar
1/2 cup granulated sugar
4 eggs
3 Tbsp. grated orange zest
5 Tbsp. orange juice, divided
2 cups flour
2 tsp. baking powder
1-1/2 cups fresh or frozen cranberries

Preheat oven to 350ºF. Grease and flour 9-inch tube pan or fluted tube pan.

Chop 6 of the chocolate squares; set aside. Beat butter and sugars in large bowl with electric mixer on medium speed until light and fluffy. Add eggs, orange peel and 3 Tbsp. of the orange juice; mix well. Add flour and baking powder; beat until well blended. Stir in chopped chocolate and the cranberries.
Bake 1 hour to 1 hour 10 min. or until toothpick inserted near center comes out clean. Cool in pan 10 min.; remove from pan to wire rack. Cool completely.

Place remaining 3 chocolate squares and remaining 2 Tbsp. orange juice in small saucepan; cook on low heat until chocolate is completely melted, stirring frequently. Drizzle over cake. Let stand until glaze is firm

Another winner going into my gifts baskets, cut into squares and nicely packaged in tin boxes.

Marshmallow – Chamallow

Sounds like an insult but really it is just pillowy cottony light homemade marshmallows that I am including in my gift baskets. When I was a child, they were known to me as "chamallow", I guess the French had an issue with the pronounciation, but if you were a purist, they were "guimauve" and they were good…no matter what you called them!

I had been wanting to make them from scratch for a while and although the technique is not difficult I never really had the occasion to take out the powdered sugar, candy thermometer just because I had 30 minutes to kill and why not stand at the stove to watch that syrup get to 260!

When T&D invited us to dinner and I was preparing their goodie basket I remembered a long standing joke regarding T. and some very precious marshmallows. About two or three Christmases ago, he was showing the town to a couple of friends visiting for the holidays and they stopped at a Williams Sonoma store. The ladies got a couple of items and T. grabbed a couple of bags of marshmallows. I had never seen someone as close to a heart attack as when the cashier said :" And your total comes to $30, sir"….. were they coated with gold, was there a precious stone inside one of them? Not wanting to look like a Scrooge, T. took out his wallet and paid. The worst part was that they were not "that" special….and that really bites coming from a fine-gourmet store.
As a joke I decided to make him a couple of bags and the three marshmallows you see in the picture above are the ones that I managed to save for us to sample.

The process is actually quite easy and like in most things confectionary the only requirements are a good dose of patience, following instructions, and a thermometer.

Marshmallows, adapted from Cooking Light:

2 1/2 envelopes unflavored gelatin (2 tablespoons plus 1 1/4 teaspoons)
3/4 cup cold water, divided
2 cups granulated sugar, divided
2/3 cup light-colored corn syrup
1 tablespoon vanilla extract
1/4 teaspoon salt
2 large egg whites
2/3 cup powdered sugar
3 tablespoons cornstarch

Line a 13 x 9-inch baking pan with heavy-duty plastic wrap, allowing plastic wrap to extend 1 inch over sides of pan. Lightly coat the plastic wrap with cooking spray.
Sprinkle gelatin over 1/2 cup cold water in a small bowl; set aside.
Combine remaining 1/4 cup of water, 1 3/4 cups granulated sugar, and corn syrup in a large saucepan. Cook, without stirring, over medium-high heat until a candy thermometer registers 260° (about 15 minutes). Remove from heat; gradually stir in softened gelatin (mixture will appear foamy).
While sugar mixture cooks, beat the vanilla, salt, and egg whites at high speed in a heavy-duty stand mixer with whisk attachment until foamy.

Gradually add remaining 1/4 cup granulated sugar, 1 tablespoon at a time, until stiff peaks form. Gradually pour in gelatin mixture, beating until very thick (about 5 minutes). Gently spread marshmallow mixture over coconut in prepared pan. Coat 1 side of another sheet of plastic wrap with cooking spray. Place plastic wrap, coated side down, over marshmallow mixture. Chill 8 hours or until firm.
Sprinkle powdered sugar and cornstarch over a cutting board. Remove top sheet of plastic wrap. Invert marshmallow mixture over powdered sugar mixture. Using a dough scraper, cut mixture into about 1-inch squares. Store between sheets of wax or parchment paper in an airtight container.
Yield: 8 dozen

Results? Delicious! I am definetely making more! Next time I am trying them in color!

Chocolate Biscotti – 5 Times Around

They are indeed 5 of us who conspired to bring you the same biscotti on this nice sunday night. Lisa emailed me the other night asking if I wanted to join her, Yvonne, Brilynn and Peabody in making a chocolate biscotti from Dorie Greenspan’s Baking: From My Home To Yours. I jumped on the project with great enthusiasm as I had been eyeing the recipe for a while now and thought about including it in some of my Christmas baskets.

At the time of this post, I know that Peabody went after my heart by dipping hers in white chocolate, wicked! and Brilynn went all out with a beauiful combinations of all the variations Dorie gives on the sidebar. I went with the recipe as written…with 2 minor changes. A novelty for me which made B. wondered if I was coming down with something! The reason is twofold: I very seldom follow recipe instructions, always adding or changing ingredients depending on what I have on hand, and because I wanted to see what the "base" recipe would taste like before I start using Dorie’s suggestions for variations and add-ons.

My changes: I did not use espresso powder but 2 TB of strong coffee and I toasted the almonds before adding them to the dough. See! Minor I tell you!

I made them last night and add a bite as soon as they were cool enough to handle and I have to say I was a little disappointed. There was something missing, a little "Oh Yumm!" moment that did not happen. We just had another cookie after taking some pics and I can say that the flavor greatly improved obernight. They are actually excellent! We did not say two words, sipping or tea, twirling that biscotti in it, enjoying a nice fire.

Chocolate Biscotti, adapted from Dorie Greenspan:

2 cups all-purpose flour
1/2 cup unsweetened cocoa powder
2 TBSP strong coffee
3/4 tsp baking soda
1/2 tsp baking powder
1 tsp salt
3/4 stick unsalted butter
1 cup sugar
2 large eggs
1 tsp vanilla extract
1 cup chopped almonds, toasted and cooled
4 ounces store bought mini bittersweet chocolate chips

Preheat oven to 350F.
Sift together the flour, cocoa, baking soda, baking powder and salt.
In a stand mixer, preferably fitted with a paddle attachment, or with a hand mixer in a large bowl, cream the butter and sugar together on medium speed until pale, about 2 minutes.
Add the eggs, one at a time, beating well after each addition and the vanilla and coffee and beat for another 2 minutes. Reduce the mixer speed to low and mix in the dry ingredients, mixing only until dough forms. Scrape down the sides of the bowl. Mix in the chopped nuts and chocolate.
Turn the dough out onto a work surface and knead any dry ingredients that might have escaped mixing. Divide the dough in half. Working with one half at a time, roll the dough into a 12 inch long logs. Flatten both logs with the palm of your hand, so that they are 1/2 to 1 inch high, about 2 inches across and sort of rectangular, then carefully lift the logs onto the baking sheet. Sprinkle each log with a little sugar.
Bake the logs for about 25 minutes, or until they are just slightly firm. The logs will spread and crack-and that’s fine. Remove the baking sheet from the oven, put it on a cooling rack and cool the logs for about 20 minutes. Working with one log at a time, using a long serrated knife, cut each log into slices between 1/2 and 3/4 inch thick. Stand the slices up on the baking sheet-you’ll have an army of biscotti-and bake the cookies again for another 10 minutes.Transfer the biscotti to a rack to cool.

Coconut Honey

We just got back from dinner with T&D and I think they were pretty happy with the assortment of goodies I put together: 3 different cookies, spiced nuts, chocolate truffles, homemade marshmallows and this Coconut Honey. The first time I saw the recipe I knew I had to try it as I love everything coconut. My husband B. thought it was a really weird concept but accepted to be my guinea pig, especially when I told him there was no actual coconut thread/flesh in that preserve. It looks funny, sets funny but one spoon on his morning bagel and he was conquered. I tend to give it away for people to try and they always come back for more.

In the spirit of this ongoing series about holiday food gift, here is the recipe for this simple yet luscious spread. I found the original here and adapted it according to the ingredients I could find at the store.

Coconut Honey:

2 cans coconut milk

1 can cream of coconut

600 gr sugar

1/4 cup lemon juice

1 box powdered pectin

Pour the coconut milk, cream and lemon juice in a large pot, add the sugar and slowly heat over medium heat until it boils. Simmer for abut 15 minutes. Stir in the powdered pectin and stir until combined. Boil 2 more minutes. Pour into canning jars. Wipe the mouths of the jars with a clean towel, put the lids on them. Fill a large pot with water, put the jars in it, making sure they are covered with water and boil for 10 minutes. Remove from the water. Withing 10 minutes, you should be able to hear the lid pop inward.

Vanilla and Lemon Syrup

In two weeks we’ll be in my hometown in France and then we will have the chance to visit family, go to Normandy, spend a few days in Paris and spend New Year’s Eve with my brother, his family and 4 other couples and their kids. This means that we will miss the holidays here and all the decorations and preparations of Christmas in the US, and some people among our friends and relatives here are getting worried that they won’t have any holiday sweets because we are leaving…I knew why they really like me now!

The theme here for the first two weeks of December is going to be centered around food gifts and holiday baking.
One year we had difficulties Christmas shopping for the ones around us I decided to make gift baskets for everybody. Some had a theme like "Girls night in", "Movie Night", "Next Camping Trip",…. Some included a gift certificates to the recipients' favorite store, some a homemade card, sachets, picture frame, etc… People liked them so much that they started asking if I was going to do again early October!
Since we are leaving soon and we are already invited here and there for dinner before we go, I decided to start my food gift giving early and post about the different items I will include. There is nothing like something homemade this time of year!

I liked the color and the flavor of this syrup so much that this is where I’ll start. Our friends T&D are new foodies but quickly catching up and they like healthful and balance meals as well as the occasional sunday brunch splurge, so this sauce I found on Cooking Light works perfectly next time they make pancakes or waffles. Not too sweet, with a slight tang from the lemon, great consistency.

Vanilla and Lemon Syrup, adapted from Cooking Light:

1 vanilla bean, split lengthwise
2 cups granulated sugar
1 1/2 cups water
1/4 cup fresh lemon juice, strained
1 tablespoon light brown sugar

Scrape seeds from vanilla bean; place seeds and bean in a small bowl.
Combine granulated sugar and remaining ingredients in a medium saucepan. Bring to a boil over medium-high heat, stirring until sugar dissolves. Reduce heat; simmer 10 minutes. Remove from heat. Add vanilla bean and seeds, stirring gently. Cool syrup to room temperature.

Pour syrup and vanilla bean into a glass container. Cover and chill.

Note: Store in the refrigerator for up to 1 month.

Yield: 2 1/4 cups

The Mighty Cranberry…An Ongoing Story

What to do after drying a pound of cranberries? I could have done some trail mix, but we are not big fan. I thought about granola but I knew I would have eaten it all before I could photograph it. I thought about making brioche or panettone and using them in the dough, but I plan on making fruit stollen next week. Wednesday, B. usually stays home in the afternoon, works on bills, lesson plans or grades papers so around 4 – 5pm, we usually sit down for a cup of tea and a slice of cake. I went online and searched for a fairly easy coffee cake recipe since I did not have much time to bake that morning.

This one looked promising with such high ratings, I modified it a bit using dried berries and I added 1/2 cup eggnog (yes, you read right…homemade). I also skipped the nuts for the topping as I am saving them for food gifts I am giving away before we leave for France. Hard to believe I’ll be home in 2 weeks!

Dried Cranberries Coffee Cake, adapted from Recipezaar:

1/4 cup butter
3/4 cup sugar
1 egg
1/2 cup milk, plus
1/2 cup eggnog
2 cups all-purpose flour
2 teaspoons baking powder
1/2 teaspoon salt
1 cup dried cranberries

Topping:
1/2 cup brown sugar
3 tablespoons all-purpose flour
1 teaspoon ground cinnamon
3 tablespoons butter

Preheat oven to 375. Grease 9 inch springform pan.
Sift together flour, baking powder and salt, set aside.
Cream together the butter and sugar until light and fluffy. Beat in egg. Beat in the flour mixture alternately with the milk and eggnog, mixing just until incorporated. Stir in the cranberries. Pour batter into prepared pan.
In a small bowl, combine topping ingredients.Cut in butter until crumbly.Sprinkle over batter.
Bake for 45 minutes,until toothpick inserted into the center comes out clean. Allow to cool.

Turned out to be easy and delicious, perfect after it has a chance to cool completely. It is perfect with afternoon tea.

The Mighty Cranberry

Well, in this case it was not one solo cranberry that preoccupied my day but rather 4 pounds of the mighty berry!…and I did not even host Thanksgiving dinner. When November comes around and the market stalls are covered with ruby red, plump cranberries and pomegranates I think I lose it. These are relatively new to me as when I left France 10 years ago I knew only of"airelles", a smaller relative (and the only way I had had a pomegranate was in a "grenadine")I have made up for lost time since them and prepared traditional cranberry sauce and used them in upside down cakes and cobblers.

It was about the same time when I visited Tanna’s blog and found out she was in the same kind of situation. I first read about her making cranberry juice from scratch and that really (really) tempted me but all of a sudden I saw many Cosmopolitans dancing in front of my eyes and that was not a good sign, it was only monday for crying out loud!

Her second use for them was an absolutely delicious looking coffee cake. Once again, temptation set in but it called for whole, fresh ones and I was not ready yet to use mine like that. I wanted to do something I had not done before and that is when the words "dried cranberries" became embeded in my brain. I use dried ones anywhere a recipe calls for raisins because B. hates (and believe it is a small word), so I go through a pretty (penny) big supply of them, and I had the perfect opportunity to make my own right at my fingertips. A quick search on the internet, a sleepover in the oven and I finally had dried cranberries in the morning and a whole lot to boot!

Oven Dried Cranberries, adapted from VegFamily:

For any quantity: wash and then plunge them into boiling water for 15-30 seconds, just until the skin 'pops.' Stop the cooking action by placing berries in ice water. Drain on paper towels. Turn on the oven for 10 minutes at 350°F. Then place the cranberries on a cookie sheet in the oven, turn off the oven, and let them sit overnight or until sticky and no longer wet. Once dry, they can be kept at refrigerator temperatures for 18 to 24 months or in a freezer for 5 to 8 years.
I used 2 pounds this time.

Still 2 more pounds to go… I have decided to save one pound fresh for something…not sure yet, but all if a sudden this evening I got very thirsty for a Cosmopolitan, and tuesday is closer to the weekend than monday…right?…please say yes! It was my turn to make Tanna’s homemade cranberry juice and boy I don’t regret it….absolutely delicious. She uses an orange instead of the lemon the original recipe called for, I admit I did not use either and for no other reason that I completely forgot….

Homemade Cranberry Juice, adapted from Tanna:

1 lb. cranberries, washed & drained
1 quart plus 1 c water
cheesecloth
1/3 to 1 c sugar

Cull through the cranberries and discard bad ones.
Place cranberries in a heavy nonreactive saucepan or dutch oven.
Bring to a boil. Reduce heat to medium. Cover loosely and simmer 10 minutes until all cranberries have burst.
Line a sieve with cheesecloth.
Pour cranberry mixture through lined sieve. Do not press on fruit.
Pour juice back into pan. Stir in sugar and boil about 3 minutes. The amount of sugar needed can vary, use according to your own taste.
Cool juice before serving.

Heaven….in a cup!

Sweet Potato and Baby Vidalia Scones

I am really liking all the blog events going on each month and with a baking and pastry blog there are always plenty to chose from. When Zorra started World Bread Day back in October, I had no idea that I would still be looking at participants' entries one month down the line, but there are so many great breads outhere. She came up with the "After Hours Party" event, giving each of us the chance to try somebody else’s bread and post about it. I had fun participating again. A couple of weeks ago, she sent me an e-mail about her latest one-off event "Onion Day"…. and then I got speechless (yes, it is actually possible!). I was torn: I wanted to participate but I wanted to keep with the sweet/baking theme of my blog.

My mind went immediately into bread baking mode and particularly gravitated toward something that would be sweet enough to have a place here but with a type of onion that would complement it. It was not until yesterday afternoon that I found what I wanted to make when I went to the store and stood in front of my produce guy: "I need a very sweet onion for baking, even sweeter than the sweet Vidalia, help!".
Sunny is the man! He went to the back and came back with a case of baby Vidalia. They looked like big eyed leeks with a sweet and smooth fragrance. I had one of the components… On the drive home I had that light bulb effect over my head and remembered the small container of leftover sweet potato puree wasting its life away in the back of the fridge. What do you do with about 1 cup of the stuff…a Sweet Potato and Baby Vidalia Scone!
Not only did my sweet potato puree did not find a fateful end but I’d get the chance to join the festivities and have a yummy breakfast in the morning!

Although I have a recipe for scones that I love and use almost every week, I tought it was hogh time I tried another one and I now have a second favorite. These came out so tender and you can really taste the sweet potato. I bet they would be good with some bacon in them too. We sliced them open and used them as the base for a couple of poached eggs and that was our dinner last night with a side salad. Delicious!

Sweet Potato and Baby Vidalia Scones, adapted from recipezaar:

2 baby vidalia onion or one small one, sliced or diced
1 cup all purpose flour
2 teaspoons baking powder
1/2 teaspoon salt
1 teaspoon sugar
1 cup mashed cooked sweet potatoes
3 tablespoons butter, melted and cooled

Line a baking sheet with parchment paper; set aside.
In a medium pan, saute the onion until tender, set aside to cool.
Sift flour, baking powder and salt into a medium-size bowl; stir in sugar.
In a large bowl, thoroughly mix potatoes and 1 1/2 tablespoons melted butter with a fork. Add the onion.
Add dry ingredients and mix to form a soft dough.
Turn out onto floured surface.
Roll out with a floured rolling pin or pat dough with your hands to make a round about 1/2-inch thick.
Cut into rounds with a 2-inch fluted or plain cookie cutter.
Place 1 to 1 1/2 inches apart on baking sheet; brush tops with remaining 1 1/2 tablespoons melted butter.
Bake about 20 minutes or until light brown.
Split and serve warm with butter and honey.
Makes about 10 scones.