
vanilla

A Daring Bakers' Flourless Chocolate Cake….Oh The Possibilities!

Flourless Chocolate Cakes


I can’t believe today is the last day of February! This month has flown by! Tomorrow, my parents will be here. March will be filled with more deadlines, assignments and anticipation of things to come. End of the month? Well, that must mean another Daring Bakers' challenge. Yes indeed! A Flourless Chocolate Cake to be precise. And ice cream…hmmhmmm.


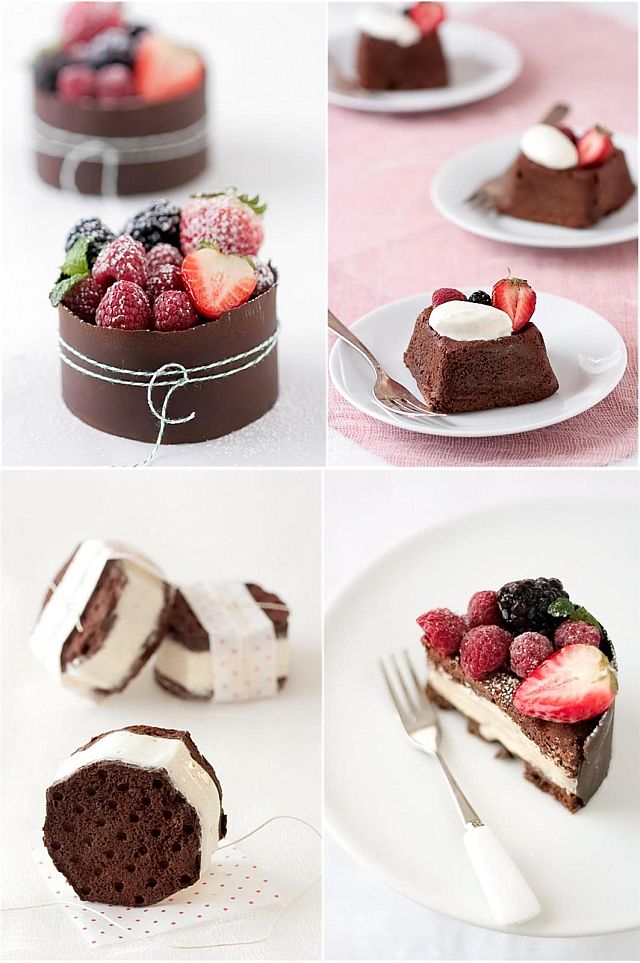
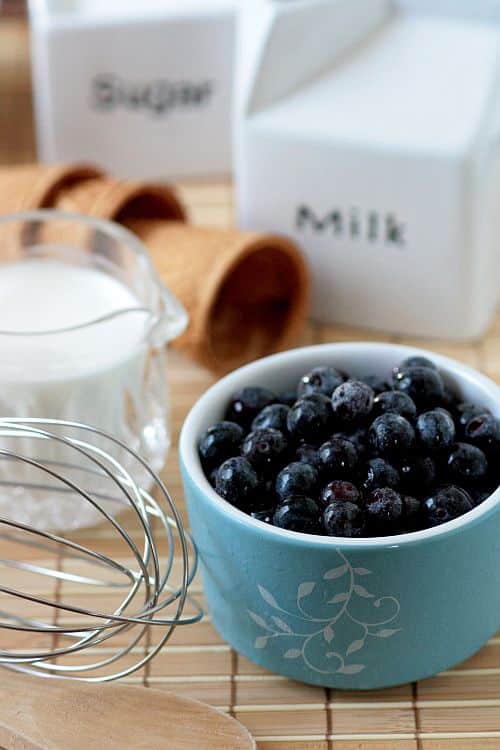
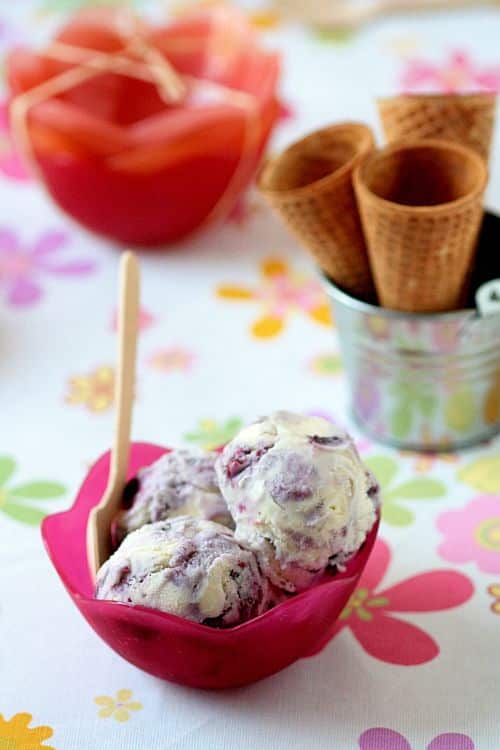
As I do with many of the challenges, I read the recipe and walked away. I like to look at the structure of recipes and think about how I could play with them. This one was perfect for some afternoon fun in the kitchen. I like to take out molds and baking pans and ponder about how to make a recipe work with what I have on hand but I really had little time lately to play as much as I would have wanted to (manuscript due in about a month!). Once the cake batter was made, I divided it up in different ways: square silicone molds, round cake rings and a half sheet pan. For the ice cream, my MO these days is "one recipe-several applications" so I made a vanilla bean ice cream base and divide it to be flavored in a couple of other ways.

squarecake1b


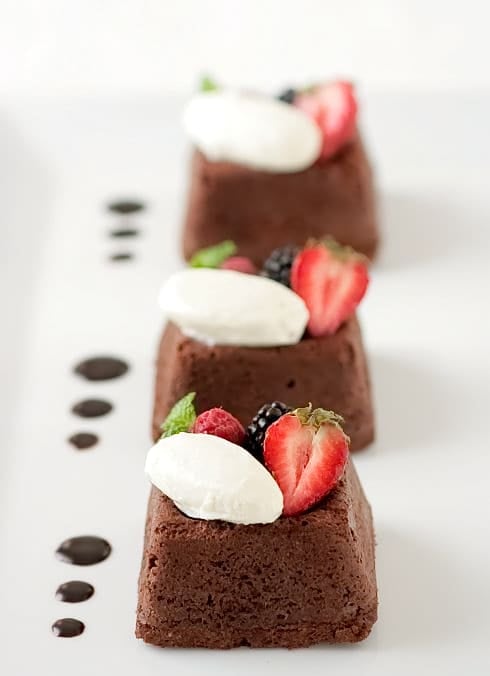
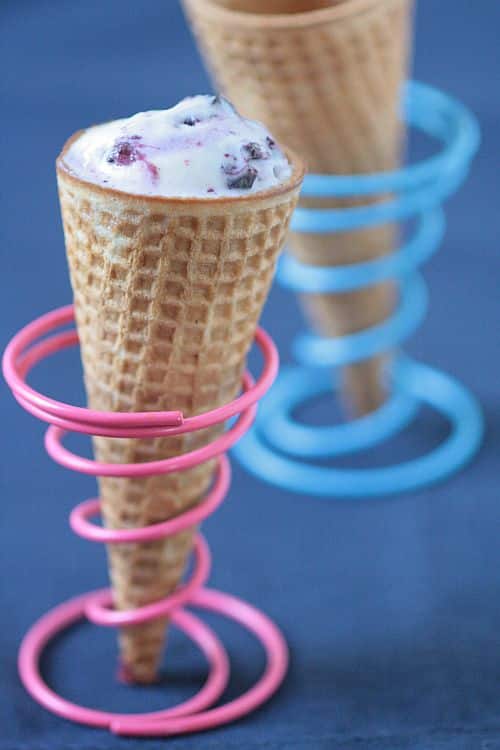
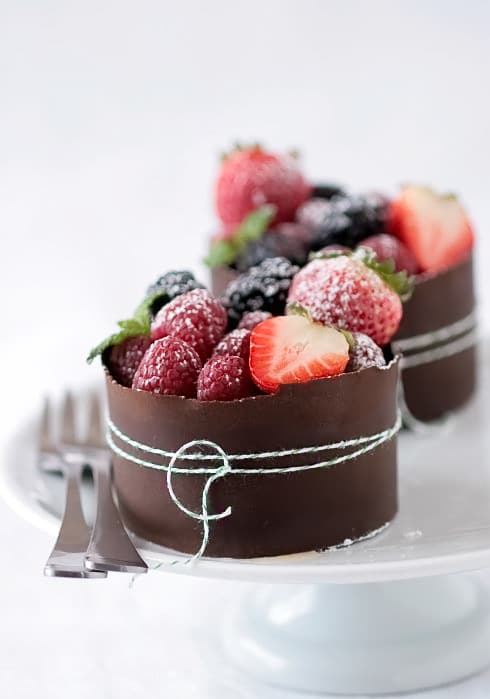
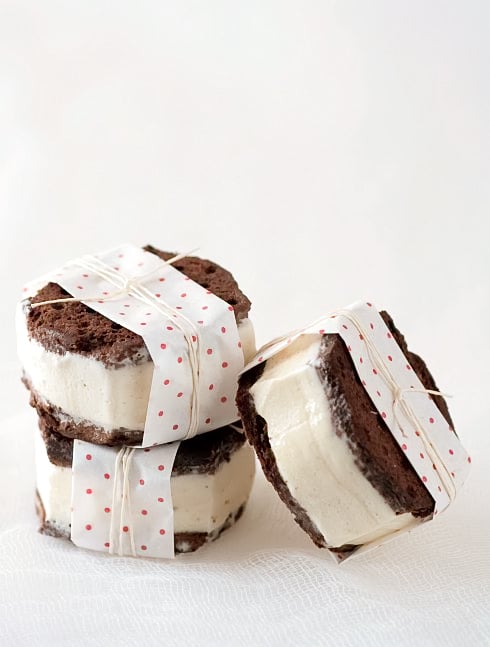
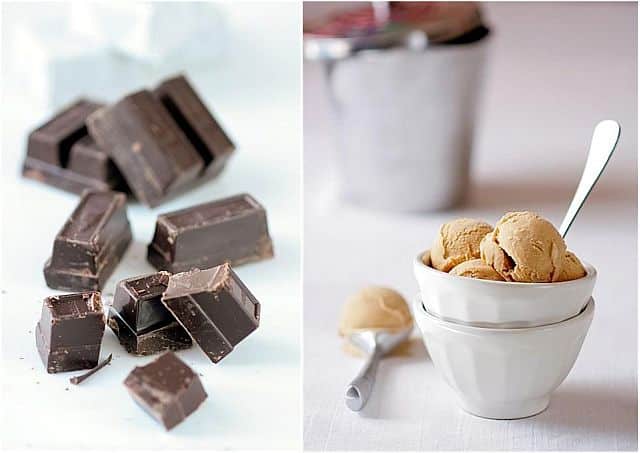
The square flourless cakes have an indent on top which was perfect to fill with some fresh berries and top with a quenelle of vanilla cinnamon ice cream. I split the round cakes and layered them with coffee ice cream with almond brittle bits and wrapped them around sheets of tempered dark chocolate. That’s when B. entered the kitchen and exclaimed "Yum! Ice cream sandwiches!"…."Ugh no…these are layered ice cream cakes". He then asked what I was going to do with the half sheet pan leftover and since he really seemed to want ice cream sandwiches, I went ahead and used a nifty little gadget that Mary sent me for my birthday and made him some simple vanilla bean ice cream sandwiches.

icecreamsandwich1good


The February 2009 challenge is hosted by Wendy of WMPE's blog and Dharm of Dad ~ Baker & Chef. They have chosen a Chocolate Valentino cake by Chef Wan; a Vanilla Ice Cream recipe from Dharm and a Vanilla Ice Cream recipe from Wendy as the challenge.

Chocolate Valentino Cake Recipe, adapted from Chef Wan.16 ounces (1 pound) (454 grams) of semisweet chocolate, roughly chopped
½ cup (1 stick) plus 2 tablespoons (146 grams total) of unsalted butter
5 large eggs separated

Put chocolate and butter in a heatproof bowl and set over a pan of simmering water (the bottom of the bowl should not touch the water) and melt, stirring often.
While your chocolate butter mixture is cooling. Butter your pan and line with a parchment circle then butter the parchment.
Separate the egg yolks from the egg whites and put into two medium/large bowls.
Whip the egg whites in a medium/large grease free bowl until stiff peaks are formed (do not over-whip or the cake will be dry).
With the same beater beat the egg yolks together.
Add the egg yolks to the cooled chocolate.
Fold in 1/3 of the egg whites into the chocolate mixture and follow with remaining 2/3rds. Fold until no white remains without deflating the batter. {link of folding demonstration}
Pour batter into prepared pan, the batter should fill the pan 3/4 of the way full, and bake at 375F/190C
Bake for 25 minutes until an instant read thermometer reads 140F/60C.
Note – If you do not have an instant read thermometer, the top of the cake will look similar to a brownie and a cake tester will appear wet.
Cool cake on a rack for 10 minutes then unmold.

dbdip9


Vanilla Bean Ice Cream Recipe:

6 egg yolks
1 cup (100gr)
2 cups whole milk
1 cup heavy cream
1 vanilla bean, split open and seeded

In a large bowl, whisk the egg yolks and the sugar until pale and thick. In a saucepan set over medium heat, bring the milk, cream and vanilla bean to a simmer, without letting it come to a full boil. Slowly pour the hot cream over the egg yolks mixture while whisking to temper the egg yolks. Pour the whole mixture back into the saucepan and cook over low heat, stirring constantly, until the cream coats the back of spoon. It should register 170F on a candy thermometer. At this point you have made a custard sauce, also known as "creme anglaise". Let cool completely, strain and refrigerate until cold, preferably overnight.
Once and the custard is cold, process according to your ice cream maker manufacturer’s instructions.
Divide the ice cream in three equal portions.

Cinnamon Ice Cream Recipe: place a cinnamon stick in the soft ice cream and let it freeze 2 hours or overnight to get all the flavor from the spice without the brown color. Remove the stick before using.

Coffee-Almond Brittle Ice Cream Recipe:
Almond brittle:
2 tablespoons unsalted butter, plus more for baking sheet
1/4 cup packed light-brown sugar
2 tablespoons honey
1/2 cup slivered almonds

1/3 of vanilla ice cream mixed with 1 teaspoon intant espresso powder. Freeze until almost set.

Preheat oven to 350°. Butter a half sheet pan or an 8×8 baking pan and set aside.
Melt butter in a small saucepan over medium heat. Stir in sugar and honey. Bring to a boil. Cook, without stirring, until mixture is golden brown and registers 280°on a candy thermometer, about 6 minutes. Stir in the almonds. Cook until mixture reaches 300°, about 2 minutes. Pour onto the prepared baking sheet. Let cool completely. Break into pieces.

Add the broken brittle to the coffe ice cream and freeze.

Flourless Chocolate Cake...

Tossing With The Daring Bakers: Plum Mascarpone and Streusel Pizza

Plum Mascarpone Streusel Pizza


This Daring Bakers' challenge almost did not come to be. Almost. It’s been a busy month, work, play, life…the usual. Multiply that by two or three. It took a dinner invitation and a little Halloween inspiration to make it happen.

Our October hostess, Rosa from Rosa’s Yummy Yums chose pizza as our challenge and although excited about it right from the start (it’s got carbs…I am excited), I did not get to it until Monday morning. We had friends coming over yesterday for dinner and since it was going to be a late casual nibble around a game of Scrabble and some wine, I figured that pizza would be the perfect thing for that kind of get together. I made four small pizzas and kept three on the savory side and you guess it, one sweet for the blog. Turns out our guests arrived while I was still in traffic and helped themselves to the Plum Mascarpone and Streusel Pizza before Scrabble…my kind of peeps…dessert first!

One of Rosa’s requests, although not mandatory was to take a picture of us tossing the dough. My schedule is completely opposite my husband’s these days so I knew it would be a hard thing to do, not having extra hands to hold the camera while I tossed, even with a remote control it was proving difficult. I kept having this nightmare: 2 in the morning and you toss your dough, click the remote button and then watch your pretty dough fall on a glass of water or pan full of cookies, catch the said glass or pan and takes them for a dive down to the floor and with a big sound of broken glass, baking sheet tumbling and loud cursing you end up waking up a puppy, an old dog and your mate. So you spend the next hour, cleaning, playing, calming and promising more cookies to ease the pain of a bing and a bang…Yep…as I said, I had to find a back up.

Late Sunday night, I went to the attic to get some Halloween decorations and I was sitting there in the middle of unlabeled boxes (grhhh!), I picked up my favorite Halloween witches, Greta and Hilda. Ha!Ha! They would do the tossing or stretching and I would photograph their tribulations!Greta started on her own while Hilda was getting her pretty pink hair fixed up a bit and the task was proving to be a little to much for one person so Hilda jumped right in like a good Daring Bakers. Once they were done tossing, stretching and playing with the dough I spread some mascarpone flavored with some vanilla on one pizza, arranged plum slices over it and topped the whole thing with some almond streusel. The end result was close to a rustic brioche tart and absolutely wonderful warm out of the oven.

Thank you Rosa for such a fun challenge and to you Lisa and Ivonne for coordinating things so well each month! I bet your quest for pizza toppings and variations will forever be answered by taking a look at all the other Daring Bakers' creations. Happy tossing!

Pizza Ingredients


BASIC PIZZA DOUGH

Adapted from “The Bread Baker’s Apprentice” by Peter Reinhart.
Makes 4-6 pizza crusts

For the dough:
4 1/2 Cups (20 1/4 ounces/607.5 g) all purpose flour, chilled
1 3/4 Tsp Salt
1 Tsp Instant yeast
1/4 Cup (2 ounces/60g) olive oil or vegetable oil
1 3/4 Cups (14 ounces/420g or 420ml) ice cold water, ice cold (40° F/4.5° C)
1 Tb sugar
Semolina/durum flour or cornmeal for dusting

Toppings:
6 oz mascarpone, at room temperature
1 Tb sugar
1 vanilla bean
3 -4 plums, pitted and sliced
streusel topping (add 1/3 cup sliced almonds)

In a bowl combine the mascarpone, sugar and seeds from the vanilla bean and stir until smooth. Spread over the dough right before baking, arrange the plum slices around and topped with the streusel. Bake at 375 for 15 minutes (unlike for savory pizza, the streusel needs to bake a little longer and not burn).

DAY ONE
Mix together the flour, salt and instant yeast in a big bowl or stand mixer. Add the oil, sugar and cold water and mix well (spoon or paddle attachment) to form a sticky ball of dough. On a clean surface, knead for about 5-7 minutes, until the dough is smooth. If it is too wet, add a little flour and if it is too dry add 1 or 2 teaspoons extra water.
If you are using an electric mixer, switch to the dough hook and mix on medium speed for the same amount of time. The dough should clear the sides of the bowl but stick to the bottom of the bowl. If the dough is too wet, sprinkle in a little more flour. If it clears the bottom of the bowl, dribble in a teaspoon or two of cold water. The finished dough should be springy, elastic, and sticky, not just tacky, and register 50°-55° F/10°-13° C.
Flour a work surface or counter. Line a jelly pan with baking paper/parchment. Lightly oil the paper. Cut the dough into 4-6 equal pieces. Sprinkle some flour over the dough. Make sure your hands are dry and then flour them. Gently round each piece into a ball.
Transfer the dough balls to the lined jelly pan and mist them generously with spray oil and cover with plastic wrap. Put the pan into the refrigerator and let the dough rest overnight or for up to thee days.
NOTE: You can store the dough balls in a freezer bag if you want to save some of the dough for any future baking. In that case, pour some oil (a few tablespooons only) in a medium bowl and dip each dough ball into the oil, so that it is completely covered in oil. Then put each ball into a separate bag. Store the bags in the freezer for no longer than 3 months. The day before you plan to make pizza, remember to transfer the dough balls from the freezer to the refrigerator.

DAY TWO
On the day you plan to eat pizza, exactly 2 hours before you make it, remove the desired number of dough balls from the refrigerator. Dust the counter with flour and spray lightly with oil. Press the dough into disks about 1/2 inch/1.3 cm thick and 5 inches/12.7 cm in diameter. Sprinkle with flour and mist with oil. Loosely cover the dough rounds with plastic wrap and then allow to rest for 2 hours.
At least 45 minutes before making the pizza, place a baking stone on the lower third of the oven. Preheat the oven as hot as possible (500° F/260° C). If you do not have a baking stone, then use the back of a jelly pan. Do not preheat the pan.
Generously sprinkle the back of a jelly pan with semolina/durum flour or cornmeal. Take 1 piece and lay the dough across your fists in a very delicate way and carefully stretch it by bouncing it in a circular motion on your hands, and by giving it a little stretch with each bounce. Once the dough has expanded outward, move to a full toss.
Make only one pizza at a time. During the tossing process, if the dough tends to stick to your hands, lay it down on the floured counter and reflour your hands, then continue the tossing and shaping. In case you would be having trouble tossing the dough or if the dough never wants to expand and always springs back, let it rest for approximately 5-20 minutes in order for the gluten to relax fully,then try again.You can also resort to using a rolling pin.
When the dough has the shape you want, place it on the back of the jelly pan, making sure there is enough semolina/durum flour or cornmeal to allow it to slide and not stick to the pan. Lightly top it with sweet or savory toppings of your choice.
Slide the garnished pizza onto the stone in the oven or bake directly on the jelly pan. Close the door and bake for about 5-8 minutes.

Plum Mascarpone Streusel Pizza

Saffron And Vanilla Poached Pears

Saffron & Vanilla Poached Pears


It has been really hot and muggy in the last week or so, nothing unusual in our area but we all took it as the usual sign of upcoming rain and thunderstorms. I don’t mind hot and I don’t mind rain, I actually don’t mind hot rain…I dislike the few hours before the sky falls open. The dogs seem to pair up and want out every thirty minutes although they just stand there noses up to the air.

Three days a week I work almost completely from home so they "know" that they will be taken out, played with, petted and loved all this in between cracking a few many eggs and rolling out pastry dough. I get up early and start baking or writing depending on what has not been done the day before and they lie around, right outside the kitchen. When the smell of the coffee brewing reaches their snouts, they suddenly jolt up and want out. Out of the five households in our little custer around the curve, 3 of us work from home while looking over kids or animals. It is not unusual for us to be in our yards, still in our jammies sipping coffee and making sleepy small talk.

Except this morning. This morning was one of those morning you want your entire body to feel, your entire soul to take in. You want mornings like this to enter your pores and breathe inside you for as long as you can take it. This morning, I felt the dew under my bare feet. Not the one you want to capture when you know the day is going to be blistering hot, no, it was harsh and delightfully unsettling. This morning, I felt goosebumps along my arms and legs, and a whiff of cold air brought the feeling of a season trying to change. The dogs started bumping around the yard, excited by all these new scents and sensations. I started taping my feet in the dewy grass, knowing full well it would be another couple of months before we’d get another morning like this, all chilly and wet, all grassy and autumnal. If only I could be a painter of scents….

We all went back upstairs and resumed our activities, baking for me, and you guessed it, sleeping for them. While I was going down my baking to do list, I could not shake away that feeling I had earlier in the yard. It was inspiring and humbling at the same time. Nature does its thing and we just happen to be in the middle of it. So after I was done with half the "to-dos", I tried to recapture the flavors I sensed earlier.

Vanilla Bean Pods & Saffron


Pears seemed perfect by in their femininity and yet firm and assertive natural scent. Vanilla, the smell of a lazy embrace. Saffron, the dewy grass under my feet. Poached….well because we were about to get soaked!! This is a most easy dessert yet rich in flavors, leaving you with nothing with goosebumps. I realize that vanilla beans and saffron are not cheap ingredients. I was very lucky that my mom sent a care package with a bag of vanilla beans and that Veronica shared some of her saffron with me for my birthday back in May. Like most people, we are on a budget but I like to save a little and invest in the "real" thing once in a while. It might seem trivial during our strange economic times to spend extras on more expensive food items, but that is really between you and….you! I am bumm….people send me care package… 🙂 On a serious note, if you want to try this without the vanilla beans and saffron, use 2 Tb pure vanilla extract and the juice of one orange (blood orange if you can) in the poaching liquid and you will still have an excellent dessert.

Saffron And Vanilla Poached Pears:

Serves 4

4 cups water
1 vanilla bean
1 to 2 teaspoons saffron
3/4 cup (170 gr) sugar
juice of one lemon
4 pears

– Peel the pears and sprinkle them with the lemon juice and set them aside while you prepare the poaching liquid.
Note: I don’t core the pears in this dessert, I would do it if they were filled, I like eating around the core but feel free to do so.
– In a large pot or deep saucepan, combine the water, saffron and sugar. Split open the vanilla bean and scrape the seeds out of the pod with a paring knife. Add the seeds and pods to the water and sugar mixture. Bring to boil over medium high heat, stirring a couple of times to make sure the sugar is dissolved. Bring down to a simmer and add the pears with the lemon juice.
– Cover the pot and cook the pears 10-12 minutes, turning them halfway through to make sure they cook evenly and all the way through (insert a toothpick to check).
– Remove the pears from the liquid and set them aside in deep serving plates or small ramequins.
– Simmer the poaching liquid until it reduces by half, about 10 minutes. Remove the vanilla bean and pour the syrup over the pears and serve either hot or room temperature.
I like mine plain but fee free to add some ice cream or whipped cream.

Saffron & Vanilla Poached Pears

Blueberry Swirl Vanilla Ice Cream

Blueberry Swirl Ice Cream-Copyright©Tartelette 2008 Usually, when I get up first in the morning, I turn the coffee machine on, put a couple of pieces of bread in the toaster and hop right back into bed. Takes us an extra 10-15 minutes before we are fully awake during which we might tell a joke, talk about our schedules, etc….normal. Except the other day… B. opened up one eye and sleepily said "what the heck is that noise? What is wrong with this coffee maker?". I had to fess up "That’s not the coffee, that’s the ice cream maker!". He had this look, a perfect mix of fear that I had blown a fuse this early in the morning and of giddy happiness that he might have ice cream for breakfast. "At 6 o’clock in the morning? What got into you?!!"

"Nothing! That’s work!". He straighten out on the bed and gave me a huge smile "Oh! Then I love it when you go to work!"… Add the dog to the mix who does not miss an opportunity to lick whatever edible falls on his snout and you have a pretty good morning. Don’t be fooled though, I usually hit the snooze button a couple of times, ok…maybe three. The day before, I had started to work on the ice creams recipes that were starting to create a big mess in my head when I decided to take a break. That break turned out in yet another custard ready to be churned but one I know by heart from the restaurant, vanilla bean ice cream. Plain, simple, so satisfying… so yes, I’ll take that as a break.

I wanted to give the ice cream maker the chance to stretch out its limb too that morning by starting with the vanilla but when I reached for another vanilla bean in the freezer the night before, I bumped into a jar of cooked blueberries. I have this habit of cooking or roasting fruit that is getting over ripe and freezing it so I can throw it into ice cream or cheesecake when I need to. And this is how my simple vanilla ice cream became Blueberry Swirl Ice Cream.

I prepared the vanilla bean custard the evening before, and let the blueberries thaw at the same time. In the morning, I let the custard churn for about 20 minutes, (soft serve consistency), poured the blueberries in and let it swirl for a couple of times before pouring the ice cream into a container and freezing. The vanilla base was smooth and soft mixed with the tartness and natural sweetness of the blueberry juice and fruit.

I admit, I love my ice cream maker…but it can take some space in my small freezer and some of you have complained they did not have one so they could not try ice cream recipes….Let’s stop with the nonsense right now…I want you to have ice cream!! If you want ice cream, you will have ice cream! A stand mixer, handheld electric beaters or an immersion are ok substitute. When your custard is cold, pour it into a freezer safe container and freeze it for about one hour, take it out and give it a good whip with the Kitchen Aid with the paddle attachment, your hand mixer with the paddle beaters (not the balloon whisks ones), or your immersion blander. Put the ice cream back into the container and back in the freezer and repeat two more time (freeze one hour, whip, freeze,…). It won’t be as smooth as professionally churned ice cream but it is a great substitute. See…..you can do it!

Blueberry Swirl Ice Cream-Copyright©Tartelette 2008
Blueberry Swirl Vanilla Ice Cream:

4 egg yolks
1 cup heavy cream
1 cup whole milk
1/2 cup sugar
1 vanilla bean or 1 Tb vanilla paste
1 cup blueberries (fresh or frozen)
1/4 cup sugar

In a large bowl, whisk the egg yolks and sugar until pale and thick. Run a knife through the center of the vanilla bean, not cutting all the way through, split it open and with the tip of a pairing knife, scrape the seeds. Place them in a saucepan over medium heat, add the milk and cream to boiling point but do not let it boil. Slowly pour the hot cream onto the egg yolks mixture and stir to combine (tempering). Pour the whole mixture back into the saucepan and cook over low heat, stirring constantly, until the cream coats the back of spoon. At this point you have a thick custard sauce. Remove from the heat and let cool completely, refrigerate until cold, or overnight.
In the meantime prepare the blueberries: in a small saucepan, combine the berries and the sugar and cook over medium low heat until the berries start to pop and release their natural juices. Let cool completely.
Process the custard according to your ice cream maker manufacturer’s instructions and towards the last couple of minutes of churning time pour in the cooled blueberries and give it a couple of swirls. Pour the soft ice cream into a freezer safe container until it reaches your preferred consistency.
If you do not have an ice cream machine: take care of the vanilla ice cream first, during your last whipping, add the blueberries the same way and freeze.

Blueberry Swirl Ice Cream-Copyright©Tartelette 2008

Vanilla Vanilla Cupcakes

First, I wanted to thank you all for sharing your pet stories when I posted about our collie/sheltie Tippy and the great demise of the cinnamon buns. It really brightened my weekend and brought on a couple of welcome laughs! Those animals sure are unbelievable!!

Now, the Vanilla Vanilla Cupcakes… B’s mom called Monday night and we started to chat about everything and nothing as we usually do, and she started to beat around the bush, as she usually does, about needing me to bake something for her garden club. She is a talented baker but she does not get in the kitchen much nowadays, and she knows I am happy to give her and "her ladies" a hand whenever I can. I usually try to fit the cake, treats, and sweets to the theme of their meeting, but when she pronounced the words "Easter" I admit I drew a blank. I am still warming up to Peeps and Chicks (nothing wrong there just different countries different candies) and really beside liking the colors I don’t think I wanted to make a bunny cake or something like that (nothing wrong there either). I hung up and went outside to consult with my favorite baking associates, the Twins. We sat down on the sidewalk and after a good ten minutes of dreaming out loud about their favorite desserts, I asked them their favorite questions "So, what do you think I should bake?" They both said vanilla cupcakes with yellow frosting and tons of sprinkles.

They got very distracted by the two little girls at the end of the street so I went on baking and told them to come later help me with the sprinkles. I think it was the loudest "Yeah!" I had ever heard!! I don’t know if they were more excited about the little girls or the sprinkles. In my perfect little world I don’t think I want to know!!

While I was getting all the ingredients ready, I remembered that one of my favorite bloggers, Arfi from HomeMades was hosting a Cupcake Spectacular this month. Very timely! For the cupcakes I went with the tried and true Vanilla ones from Magnolia Bakery and Rose Levy Berembaum mousseline buttercream. I could eat both together or separately by the bucket… I went for minis for a couple of reasons: I love treats that fit in the palm of my hand and the ladies at the garden club have an easier time pretending they only ate four two. When the kids arrived for the decorating part they were really happy to empty a couple of bottles of sprinkles on the cupcakes. Their words? "Look it’s raining sprinkles! Cool!"….and I now have multicolored floors!

Vanilla Vanilla Mini Cupcakes:

Makes 4 dozens minis

1 1/2 cups self-rising flour
1 1/4 cups all-purpose flour
1 cup (2 sticks) unsalted butter, softened
2 cups sugar
4 large eggs, at room temperature
1 cup milk
1 teaspoon vanilla bean paste

Preheat oven to 350 degrees.
Line two 24-cup muffin tins with mini cupcake papers.
Combine the flours together and sift them. Set aside.
In a large bowl, on the medium speed of an electric mixer, cream the butter and sugar together until fluffy. Add the eggs, one at a time, beating well after each addition. Add the dry ingredients in three parts, alternating with the milk and vanilla. Do not overmix the batter. Spoon the batter into the cupcake liners, filling them about three-quarters full (I use a mini ice cream scoop to do that) Bake for 20 minutes, or until the tip of a knife or skewer inserted in the center of the cupcake comes out clean.
Cool the cupcakes in the tins for 15 minutes. Remove from the tins and cool completely on a wire rack before frosting. Fill a pastry bag fitted with a star tip with the buttercream and pipe it on the cupcakes. Decorate with sprinkles if desired.

Vanilla Buttercream Frosting:

4 sticks butter at room temperature
5 egg whites
1 cup sugar divided
1/4 cup water
2 tsp. vanilla extract
food coloring if desired

In the bowl of stand mixer, whip 5 egg whites until they have soft peaks.
In the meantime, combine 1/4 cup water with 3/4 cup sugar to a boil in a heavy saucepan and bring the syrup to 250F. Slowly add the sugar syrup to the egg whites. If you use hand beaters, this is even easier and there is less hot syrup splatter on the side of your bowl and in the whisk attachment of the stand mixer. Continue to whip until the meringue is completely cooled.
Slowly add the butter, one tablespoon at a time. The mass might curddle but no panic, continue to whip until it all comes together. Add the vanilla extract and the food coloring if using.