
tarts

Grandma’s Apple Tartelettes

Grandma's Apple Tarts - Afternoon Baking


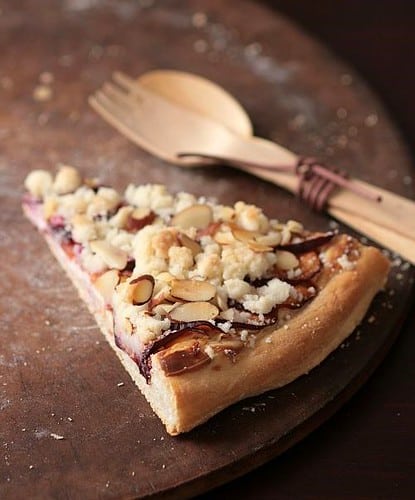
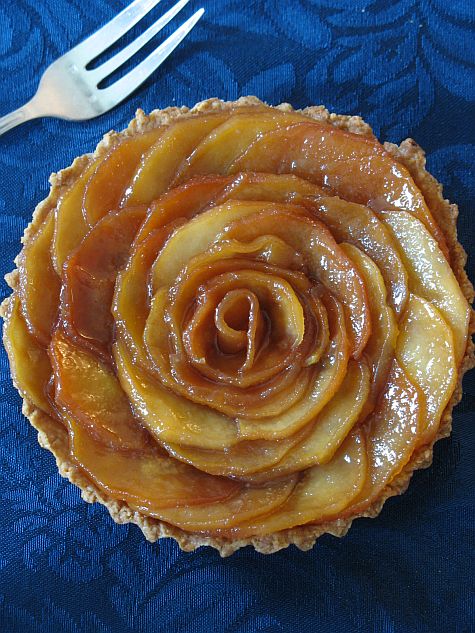
I know I have kept building this up since my mother’s ratatouille and wrote a couple of other things in between. Part of me is thrilled to share my grandma’s apple tart with you and part of me wants to keep it inside just a little longer. It’s unlike me not to share so these past few days I kept wondering why it was so dang hard to write this very simple, very humble yet delicious recipe. A simple pate sucree topped with a vanilla bean apple compote and thin slices of apples. A sprinkling of sugar.

You can guess that it is just not about the tart. It’s the mamie behind it and telling "her" in a few paragraphs in a blog can’t possibly explain why this recipe means so much to us and why we absolutely love to make it. I am willing to try though, because I know that my grandmother is very much like yours. Comforting, simple and sometimes complex.

appledip3b


What can I say that could possibly do justice to my grandmother’s heart and personality? She was married to my grandfather for 71 years (love their wedding picture). This year they would have celebrated 75 years of marriage and I get all choked up when I think know what my grandfather truly wants nowadays. I know he wishes to see her again soon. It never saddens me when I hear him say that. I smile instead. I want to make him her apple tart so that he can smell the wonderful aromas of vanilla beans and apple "compoting" together. So that he can hear the swishing of her apron as I roll the dough for the crust. So that he can pass beside me as I am slicing the apples and say "listen to your grandmother. She knows when they are too thick".

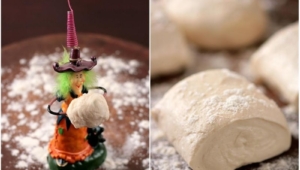
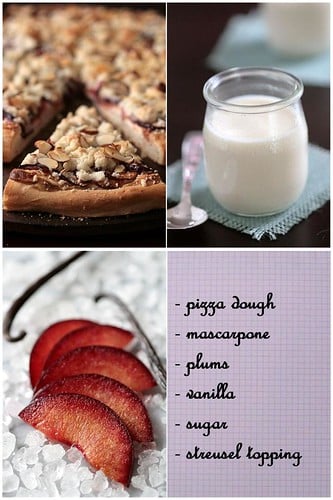
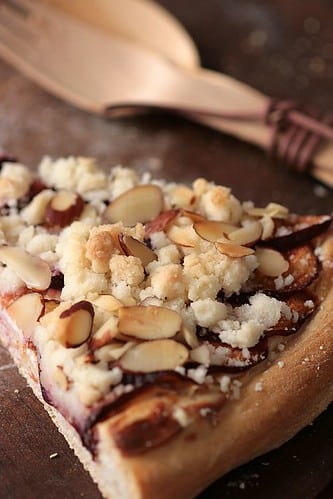
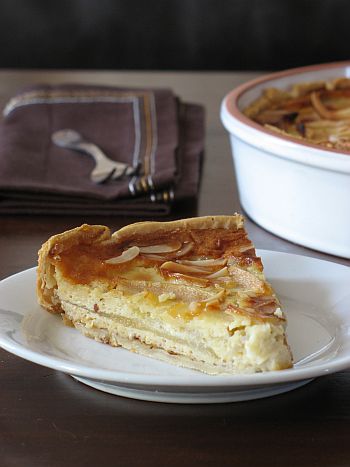
Following her thought that a recipe is a canvas for the baker to give a recipe his or hers personality, she never wrote the ingredients or recipe down. To anyone who asked her about it she would simply jot down "pate sucree – compote de pommes – tranches de pommes". Basically, if you use what you know you like, you can’t go wrong even if it changes every time you make it. I did just that. I added some almonds to the dough for a little earthy flavor. I combined vanilla and cardamom for the cooked apple and I sprinkled the sliced apple with some sugar rubbed with lemon zest. To me that was Mamie. A little bite, a little spice, a good bit of delicious and a touch of pizzaz.

Grandma's Apple Tarts


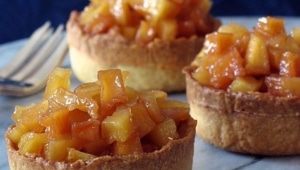
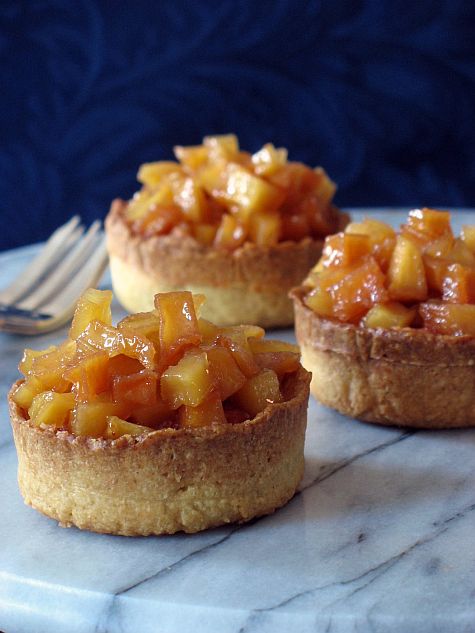
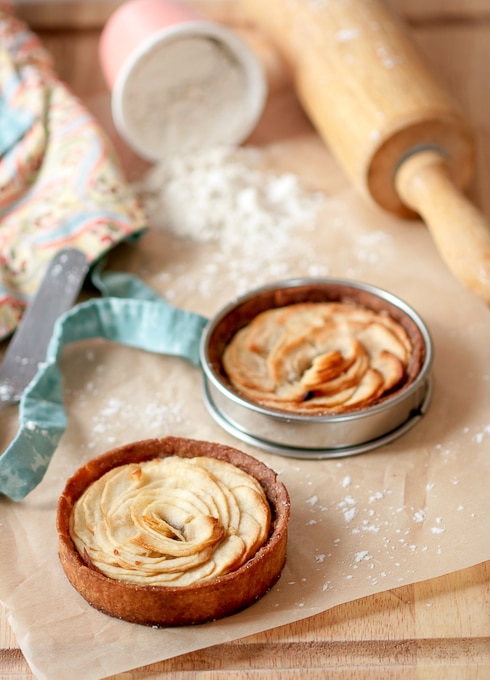
Apple Tartelettes Recipe:

Makes four 4- inch tartlets

Pate Sucree:
2 tablespoons (20gr) slivered almonds
1/2 (60gr) cup powdered sugar, unsifted, divided
1/2 stick (56.5gr) unsalted butter, at room temperature
pinch of salt
3/4 cup (90gr) all-purpose flour
1 egg yolk

Preheat oven to 350F.
Place almonds and 1 tablespoon powdered sugar in a food processor. Pulse until the nuts are finely ground. In bowl of electric mixer fitted with paddle attachment, cream butter, ground nuts and salt on medium speed until well-combined. Slowly add remaining powdered sugar and flour and mix well. Add the egg yolk and mix until incorporated. Shape dough into a ball and flatten into a disc. Wrap with plastic wrap and refrigerate for two hours or overnight.
Place the dough in between two sheets of plastic wrap or parchment paper and roll it out to about 1/8-inch thick. Cut out four 6- inch rounds and fit them inside four 4- inch tartlet molds, patting the dough in with your fingertips if it breaks on you as you transfer the rounds. Gather the scraps and set aside.
Prick the dough with a fork and refrigerate 30 minutes.
Preheat the oven to 350F and bake the shells for 12 to 15 minutes. Let cool on wire racks.

Apple Compote:
1/2 vanilla bean
1 teaspoon (2gr) ground cardamom
2 tablespoons sugar
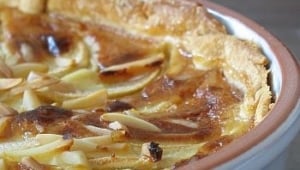
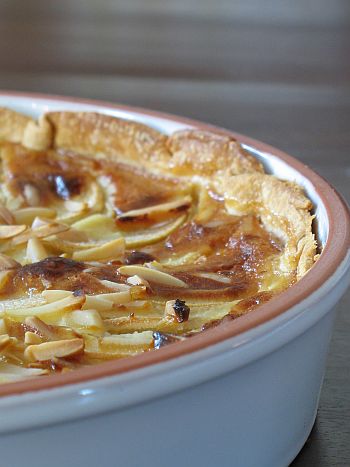
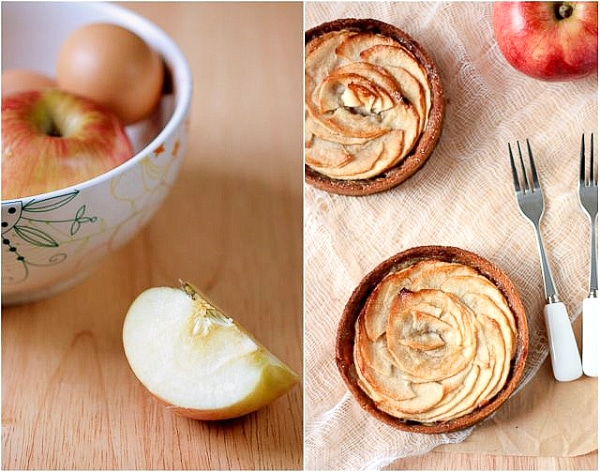
4 medium apples (your preference. I went with Fuji)
1/4 cup to 1/3 cup (60 to 80ml) water

On a flat surface, cut the vanilla bean in half lenghtwise without cutting all the way through and scrape the seeds from the pods with a pairing knife. Place them in a large saucepan along with the cardamom and sugar. Set aside.
Peel, core and roughly chop the apples. Add them to the vanilla and sugar mixture along with the water. Bring the mixture to a simmer over medium heat. Turn the heat down, cover and let the apples stew for 30 to 45 minutes. Check every 20 minutes to and add water to the mixture if the liquid evaporates faster than the apples can cook. I tend to cook mine just unti soft so that they keep a bit of texture under the tooth. Remove from the heat and let cool to room temperature. Divide the mixture evenly among the tart shells.

Apple Topping:
2 tablespoons (15gr) granulated sugar
zest of half a lemon
2-3 medium apples

In a small bowl, rub together the sugar and lemon zest so that the citrus natural oils can flavor the sugar.
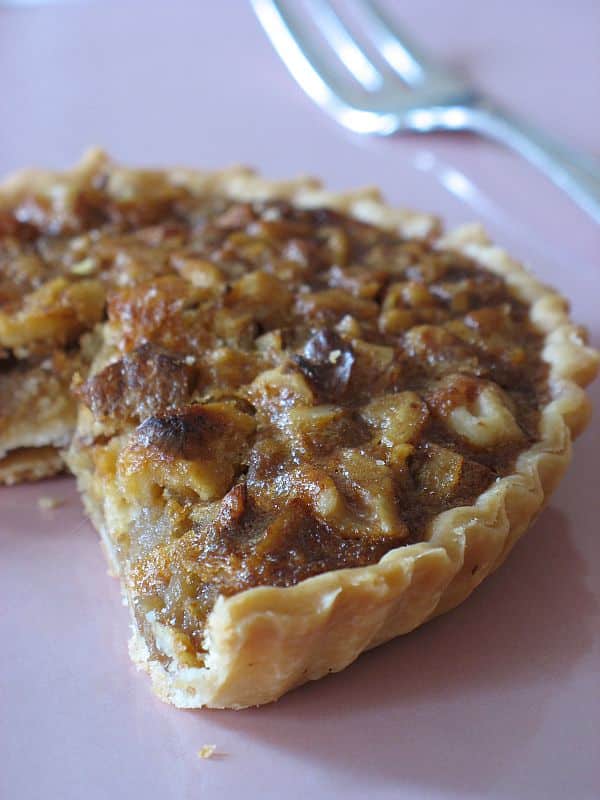
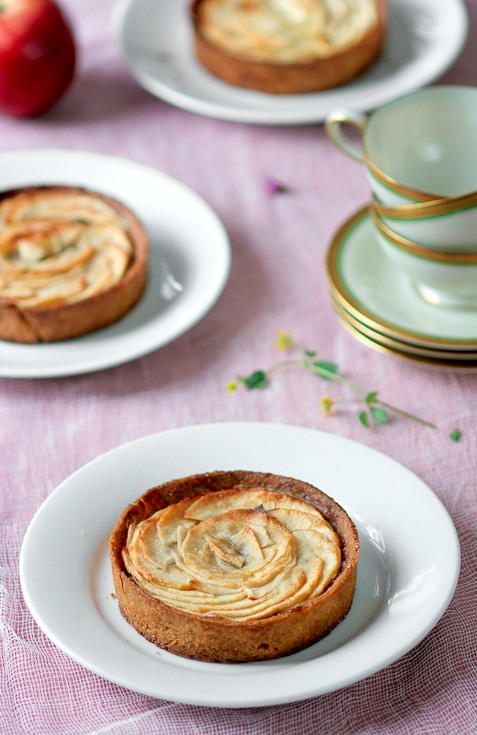
Peel, core and thinly slice the apples (the thinner the prettier. Decoratively arrange the slices over the compote and sprinkle evenly with the sugar.
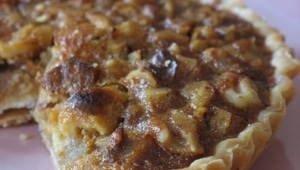
Bake at 350F for 20 to 25 minutes or until the top appples are golden brown.

Tossing With The Daring Bakers: Plum Mascarpone and Streusel Pizza

Plum Mascarpone Streusel Pizza


This Daring Bakers' challenge almost did not come to be. Almost. It’s been a busy month, work, play, life…the usual. Multiply that by two or three. It took a dinner invitation and a little Halloween inspiration to make it happen.

Our October hostess, Rosa from Rosa’s Yummy Yums chose pizza as our challenge and although excited about it right from the start (it’s got carbs…I am excited), I did not get to it until Monday morning. We had friends coming over yesterday for dinner and since it was going to be a late casual nibble around a game of Scrabble and some wine, I figured that pizza would be the perfect thing for that kind of get together. I made four small pizzas and kept three on the savory side and you guess it, one sweet for the blog. Turns out our guests arrived while I was still in traffic and helped themselves to the Plum Mascarpone and Streusel Pizza before Scrabble…my kind of peeps…dessert first!

One of Rosa’s requests, although not mandatory was to take a picture of us tossing the dough. My schedule is completely opposite my husband’s these days so I knew it would be a hard thing to do, not having extra hands to hold the camera while I tossed, even with a remote control it was proving difficult. I kept having this nightmare: 2 in the morning and you toss your dough, click the remote button and then watch your pretty dough fall on a glass of water or pan full of cookies, catch the said glass or pan and takes them for a dive down to the floor and with a big sound of broken glass, baking sheet tumbling and loud cursing you end up waking up a puppy, an old dog and your mate. So you spend the next hour, cleaning, playing, calming and promising more cookies to ease the pain of a bing and a bang…Yep…as I said, I had to find a back up.

Late Sunday night, I went to the attic to get some Halloween decorations and I was sitting there in the middle of unlabeled boxes (grhhh!), I picked up my favorite Halloween witches, Greta and Hilda. Ha!Ha! They would do the tossing or stretching and I would photograph their tribulations!Greta started on her own while Hilda was getting her pretty pink hair fixed up a bit and the task was proving to be a little to much for one person so Hilda jumped right in like a good Daring Bakers. Once they were done tossing, stretching and playing with the dough I spread some mascarpone flavored with some vanilla on one pizza, arranged plum slices over it and topped the whole thing with some almond streusel. The end result was close to a rustic brioche tart and absolutely wonderful warm out of the oven.

Thank you Rosa for such a fun challenge and to you Lisa and Ivonne for coordinating things so well each month! I bet your quest for pizza toppings and variations will forever be answered by taking a look at all the other Daring Bakers' creations. Happy tossing!

Pizza Ingredients


BASIC PIZZA DOUGH

Adapted from “The Bread Baker’s Apprentice” by Peter Reinhart.
Makes 4-6 pizza crusts

For the dough:
4 1/2 Cups (20 1/4 ounces/607.5 g) all purpose flour, chilled
1 3/4 Tsp Salt
1 Tsp Instant yeast
1/4 Cup (2 ounces/60g) olive oil or vegetable oil
1 3/4 Cups (14 ounces/420g or 420ml) ice cold water, ice cold (40° F/4.5° C)
1 Tb sugar
Semolina/durum flour or cornmeal for dusting

Toppings:
6 oz mascarpone, at room temperature
1 Tb sugar
1 vanilla bean
3 -4 plums, pitted and sliced
streusel topping (add 1/3 cup sliced almonds)

In a bowl combine the mascarpone, sugar and seeds from the vanilla bean and stir until smooth. Spread over the dough right before baking, arrange the plum slices around and topped with the streusel. Bake at 375 for 15 minutes (unlike for savory pizza, the streusel needs to bake a little longer and not burn).

DAY ONE
Mix together the flour, salt and instant yeast in a big bowl or stand mixer. Add the oil, sugar and cold water and mix well (spoon or paddle attachment) to form a sticky ball of dough. On a clean surface, knead for about 5-7 minutes, until the dough is smooth. If it is too wet, add a little flour and if it is too dry add 1 or 2 teaspoons extra water.
If you are using an electric mixer, switch to the dough hook and mix on medium speed for the same amount of time. The dough should clear the sides of the bowl but stick to the bottom of the bowl. If the dough is too wet, sprinkle in a little more flour. If it clears the bottom of the bowl, dribble in a teaspoon or two of cold water. The finished dough should be springy, elastic, and sticky, not just tacky, and register 50°-55° F/10°-13° C.
Flour a work surface or counter. Line a jelly pan with baking paper/parchment. Lightly oil the paper. Cut the dough into 4-6 equal pieces. Sprinkle some flour over the dough. Make sure your hands are dry and then flour them. Gently round each piece into a ball.
Transfer the dough balls to the lined jelly pan and mist them generously with spray oil and cover with plastic wrap. Put the pan into the refrigerator and let the dough rest overnight or for up to thee days.
NOTE: You can store the dough balls in a freezer bag if you want to save some of the dough for any future baking. In that case, pour some oil (a few tablespooons only) in a medium bowl and dip each dough ball into the oil, so that it is completely covered in oil. Then put each ball into a separate bag. Store the bags in the freezer for no longer than 3 months. The day before you plan to make pizza, remember to transfer the dough balls from the freezer to the refrigerator.

DAY TWO
On the day you plan to eat pizza, exactly 2 hours before you make it, remove the desired number of dough balls from the refrigerator. Dust the counter with flour and spray lightly with oil. Press the dough into disks about 1/2 inch/1.3 cm thick and 5 inches/12.7 cm in diameter. Sprinkle with flour and mist with oil. Loosely cover the dough rounds with plastic wrap and then allow to rest for 2 hours.
At least 45 minutes before making the pizza, place a baking stone on the lower third of the oven. Preheat the oven as hot as possible (500° F/260° C). If you do not have a baking stone, then use the back of a jelly pan. Do not preheat the pan.
Generously sprinkle the back of a jelly pan with semolina/durum flour or cornmeal. Take 1 piece and lay the dough across your fists in a very delicate way and carefully stretch it by bouncing it in a circular motion on your hands, and by giving it a little stretch with each bounce. Once the dough has expanded outward, move to a full toss.
Make only one pizza at a time. During the tossing process, if the dough tends to stick to your hands, lay it down on the floured counter and reflour your hands, then continue the tossing and shaping. In case you would be having trouble tossing the dough or if the dough never wants to expand and always springs back, let it rest for approximately 5-20 minutes in order for the gluten to relax fully,then try again.You can also resort to using a rolling pin.
When the dough has the shape you want, place it on the back of the jelly pan, making sure there is enough semolina/durum flour or cornmeal to allow it to slide and not stick to the pan. Lightly top it with sweet or savory toppings of your choice.
Slide the garnished pizza onto the stone in the oven or bake directly on the jelly pan. Close the door and bake for about 5-8 minutes.

Plum Mascarpone Streusel Pizza

Lemon Meringue Pie

Or in my case Lemon Meringue Tartelettes…yep, can’t escape that nickname but to my defense Jen from The Canadian Baker and hostess for this month Daring Bakers' challenge had given us the option to make several tartelettes instead of one large pie. Be prepared to bathe in deliciously tart lemon curd and come out all sticky of meringue as 450 Daring Bakers got all sticky gooey once more just for you….and to overcome their fears, baking issues or just to have some fun!

Although this was not my first lemon meringue pie, it was fun to use someone else’s recipe for crust and curd and compare them with the ones I constantly use. No big challenge but I was so tired the day I made it that I really did not pay close attention and followed the recipe blindly. Hint to those DB who have to use violent threats to themselves to follow a recipe to a "t"…do it when you can barely stand on your feet from exhaustion, physical or mental. Mine was mental so I went ahead and dove in.

The crust turned out ok, not my favorite but very good. I like mine flaky with good ole Crisco. Since my mother in law gave me her recipe, I just think this is the best (and not too many worries for my arteries I use the non trans-fat one that came out a couple of years ago). This one did the trick, except that being on auto-drive that evening I added the whole measurement of cold water to the flour mixture instead of my usual a few tablespoons at a time until it comes together. Oopps…dough was wet…Wrapped it up, parked it in the fridge for an hour, with the absolutely faith (that means all digits crossed here) that the flour and butter would work their magic and tame their thirst with the extra moisture. Worked! People, never fondle your dough too much no matter how soft and shiny it is or you will pay the price of tough and too elastic a piece to work with! After that a familiar scene happened: roll the dough, cut rounds, fill tartelettes molds, cover with parchment paper, fill with dry beans, blind bake and let cool. Oven on, tired Tartelette…I almost forgot they were in when the neighbors gathering for drinks started to wonder what I was baking! I had forgotten we had planned a game of Scrabble.

On to the curd….now I had an audience…ahahahah!!!! Most likely they will be too invested in the game to notice if I mess up! It wa the first time I used a curd recipe that involved water and which method was slightly unsual (see the recipe below). I have been spoiled by the lemon curd in Alice Medrich’s book on low fat dessert and the fantabulous full fat lemon cream from Pierre Herme. But eh! I am always willing to try something new for my lovely Daring Bakers!! Everything went smoothly and the curd turned out smooth and tart, just like I love it. I remembered the good old advice from Harold McGee not to stir the cornstarch mixture too vigorously and not to cook it passed boiling or it will reverse its thickening properties…amazing given I was completely distracted by C. challenging B. about a word during our Scrabble game. Kids……!

The meringue part….delicious. Again, of where there is fluffy sugar topping there usually is a happy Tartelette. The recipe instructed us to use the oven for that part, but my oven was crowded with pizza when that part came up so I "had" to use the blowtorch (another excuse to play with fire) and for the kids to be convinced I had magical powers!! I first played with it on the tartelettes like I had done previously on lime meringue cupcakes and then I just used a plain tip and a large star tips and did the minis with them…and they kind of looked like cupcakes after all. I think I lost at Scrabble but I took the prize for eating the most of the mini lemon meringue pies in one sitting. What can I say…I love anything with lemons!

Will I make this particular lemon meringue pie again? Actually I did a couple of times for a friend and my mother in law and everybody enjoyed it. For us? Probably, not so much for the crust but the curd was really tart…which I love, so I will make sure to serve it to people who share the same fancy. The meringue was not overly, cloyingly sweet so it will be used again for other tarts.
Be sure to check my fellow Daring Bakers' posts popping out there everywhere and thanks Jen for a yummy recipe!

Lemon Meringue Pie: recipe courtesy of Wanda’s Pie in the Sky by Wanda Beaver, 2002

Makes one 10-inch (25 cm) pie. I made four 3.5-inch ones and twelve 2-inch minis.

For the Crust:

¾ cup (180 mL) cold butter; cut into ½-inch (1.2 cm) pieces
2 cups (475 mL) all-purpose flour
¼ cup (60 mL) granulated sugar
¼ tsp (1.2 mL) salt
⅓ cup (80 mL) ice water

For the Filling:

2 cups (475 mL) water
1 cup (240 mL) granulated sugar
½ cup (120 mL) cornstarch
5 egg yolks, beaten
¼ cup (60 mL) butter
¾ cup (180 mL) fresh lemon juice
1 tbsp (15 mL) lemon zest
1 tsp (5 mL) vanilla extract

For the Meringue:

5 egg whites, room temperature
½ tsp (2.5 mL) cream of tartar
¼ tsp (1.2 mL) salt
½ tsp (2.5 mL) vanilla extract
¾ cup (180 mL) granulated sugar

For the Crust:

Make sure all ingredients are as cold as possible. Using a food processor or pastry cutter and a large bowl, combine the butter, flour, sugar and salt. Process or cut in until the mixture resembles coarse meal and begins to clump together. Sprinkle with water, let rest 30 seconds and then either process very briefly or cut in with about 15 strokes of the pastry cutter, just until the dough begins to stick together and come away from the sides of the bowl. Turn onto a lightly floured work surface and press together to form a disk. Wrap in plastic and chill for at least 20 minutes.
Allow the dough to warm slightly to room temperature if it is too hard to roll. On a lightly floured board (or countertop) roll the disk to a thickness of ⅛ inch (.3 cm). Cut a circle about 2 inches (5 cm) larger than the pie plate and transfer the pastry into the plate by folding it in half or by rolling it onto the rolling pin. Turn the pastry under, leaving an edge that hangs over the plate about ½ inch (1.2 cm). Flute decoratively. Chill for 30 minutes.
Preheat oven to 350ºF (180ºC). Line the crust with foil and fill with metal pie weights or dried beans. Bake for 20 to 25 minutes. Carefully remove the foil and continue baking for 10 to 15 minutes, until golden. Cool completely before filling.

For the Filling:

Bring the water to a boil in a large, heavy saucepan. Remove from the heat and let rest 5 minutes. Whisk the sugar and cornstarch together. Add the mixture gradually to the hot water, whisking until completely incorporated.
Return to the heat and cook over medium heat, whisking constantly until the mixture comes to a boil. The mixture will be very thick. Add about 1 cup (240 mL) of the hot mixture to the beaten egg yolks, whisking until smooth. Whisking vigorously, add the warmed yolks to the pot and continue cooking, stirring constantly, until mixture comes to a boil. Remove from the heat and stir in butter until incorporated. Add the lemon juice, zest and vanilla, stirring until combined. Pour into the prepared crust. Cover with plastic wrap to prevent a skin from forming on the surface, and cool to room temperature.

For the Meringue:

Preheat the oven to 375ºF (190ºC). Using an electric mixer beat the egg whites with the cream of tartar, salt and vanilla extract until soft peaks form. Add the sugar gradually, beating until it forms stiff, glossy peaks. Pile onto the cooled pie, bringing the meringue all the way over to the edge of the crust to seal it completely. Bake for 15 to 20 minutes, or until golden. Cool on a rack. Serve within 6 hours to avoid a soggy crust.

And remember that you have until 4pm today to get the chance to get yourself a box of canneles!

Cranberry Nut Caramel Tarts

Instead of pumpkin or pecan pie this Thanksgiving, we are going to have these little beauties: Cranberry Nut Caramel Tarts….Oh Yeah!!! Cranberries, pistachios, almonds all stirred in a creamy caramel and baked in little shortbread tart shells. Not that we do not like a little pumpkin or a little pecan here and there, but these we could have over and over and more…
Not only are we going to enjoy warm out of the oven, but I am also bringing them to Jeanne, who is hosting this month Waiter There Is Something In My….Tart!

I made these for the first time years ago at the restaurant a few days before Thanksgiving. I had to make the usual required pies for T-Day but I was really itching for a change. Everybody was getting in the holiday mood and I thought a little cranberry dessert would be a good idea. For some reason, our produce guy had misunderstood our order and we got twice the amount of cranberries we needed. The chefs dropped off a box by my pastry kitchen with a little "Have Fun!" sticky note on it. Their idea of a good time…ahahah!!! Same guys who loaded me with two crates of pears one day and I ended up re-writing the book on pear dessert! I digress, sorry.

Well, I looked around the kitchen, closed the door behind me in the walk-in cooler for a few minutes (my best thinking place), and took out the shortbread tart dough I had made that morning and figured I would make a tart with them. Question was: which one? Can I be trusted with cranberries? After all they were not part of my culture growing up and I had only had them in cranberry sauce with turkey. Mmmm…I emerged from the walk-in and found a book on my prep table with another sticky note, this one from Old Chef "It’s in here and it’s good". Got to love those guys! He knew I was starting to struggle with the "Tart of the Day" on the menu. I thought I had a brilliant idea with that one: using only fresh produce to come up with a different tart every time. Different doughs, fillings, fruits, toppings, but other time consuming desserts on the menu were taking my attention away from the tart. The book in question was appropriately named The Book Of Tarts by Maury Rubin, and I believe it saved me from boredom and a few of our regulars from another Pear or Banana tart! The book is a treasure trove of tarts, tartlets and other inspiring recipes.


The recipe in the book uses sliced almonds but I wanted little festive look and used half the amount in pistachios and the rest in slivered almonds (what I had in hand). Feel free to use your favorite nuts, I have tired several combinations over the years and they never turned out bad. The caramel part can be a little tricky for new bakers but if you watch your pot carefully there should not be a major need for firefighters. It starts with a dry method caramel in which you had cream and butter. Baby your sugar so that it does not burn and be careful of splatter and bubbles when you stir in the cream and butter. If the mixture does not appear smooth, put it back on the stove and stir slowly until it becomes smooth.

Cranberry Nut Caramel Tarts, adapted from Maury Rubin.

Makes 8-10 3 inch tarts or one 9 inch.

Shortbread Dough:

13 tablespoons (1 stick plus 5 tablespoons) unsalted butter, cut into 1-inch pieces
1/3 cup powdered sugar
1 egg yolk
1 1/2 cups unbleached flour
1 tablespoon heavy cream

Let the butter sit at room temperature for 15 minutes, until malleable.
Place the powdered sugar in the bowl of a standing mixer. Add the pieces of butter and toss to coat. Using a paddle attachment with a standing mixer, combine the sugar and butter at medium speed, until the sugar is no longer visible.
Add the egg yolk and combine until no longer visible.
Scrape down the butter off the sides of the bowl. Add half of the flour, then begin mixing again until the dough is crumbly. Add the remaining flour and then the cream and mix until the dough forms a sticky mass.
Flatten the dough into a thick pancake, wrap it in plastic and refrigerate at least 2 hours before preparing to roll out the dough.
Roll out the dough and cut out 8-10 6inch circles, fit into your 3 inch tart molds (or 9 inch tart pan), trim away the excess. Line with parchment paper and fill with dried beans or pie weights and bake at 350F for 10-15 minutes until golden brown.

Filling:

1 1/4 cups heavy cream
1/2 cup (1 stick) unsalted butter, cut into eight pieces
1 cup granulated sugar
2 cups fresh cranberries
1 cup coarsely chopped pistachios
1 cup slivered almonds

Measure the cream and butter into a saucepan and heat it over low heat. When the butter has melted completely, remove from heat.
To make the caramel, spread the sugar evenly in a perfectly dry, deep 10-inch skillet and place it over medium-low heat.
The sugar should turn straw-colored, then gold and then a nutty-brown caramel after about 10 minutes. If the sugar cooks unevenly, gently tilt or swirl the pan to evenly distribute the sugar. Remove from heat and slowly whisk the cream and butter into the sugar, which can splatter as the cream is added. If the caramel seizes, return it to the heat and continue to stir until it is smooth and creamy. Strain the caramel into a bowl and cool it for 30 minutes.
Stir the cranberries and the nuts into the caramel and mix until all the fruit and nuts are coated. Spoon the filling into the partially baked tart shells mounding toward the center.
Bake for 20-25 minutes, until the juices and the caramel are bubbling slowly around the edges. Remove from the oven and let stand for 1 hour.


Although Thanksgiving is not a holiday I grew up with, I wanted to write down a few things and people (you know who you are. I am probably IMing with you too) I am thankful for.
* I am thankful for my family, who often times closes their eyes on my silliness and loves me no matter what.
*I am thankful for love, the kind that gives your step a skip and makes your hiney tingle at the same time.
*I am thankful for my friends who accept me with all my sensitivity and dorkiness and have stopped correcting my pronunciation of certain English words ("iron" being one of them)
*I am thankful for my health (beside a tooth that needs fixing), which helps me push the envelope a little more each day and discovering that I can put my body through 2 hours of BootCamp training and still have enough energy to make a cake and dinner.
* I am thankful for my readers whose words are not received as praises but encouragement that I am writing in the right direction, that I am on the right track in telling them to get in the kitchen and bake! Thank you all for all your emails, questions, keep them coming eve if sometimes it takes me a long time to reply.

Happy Thanksgiving Everybody!

Apple And Thyme: Pear Tart With Grandma And Mom

It’s interesting how life comes at you full force, sometimes from people you don’t even know.
A few weeks ago one member of the Daring Bakers, Inge, posted an event she was hosting to honor the women, be it moms or grandmothers (or any person special to us) who influenced us in the kitchen. The event, Apple and Thyme, was somewhat prompted by the fact that a blogging friend of hers, Jeni from the Passionate Palate, had just lost her mother to a long battle with cancer.

Losing is the right term when it comes to loved ones, especially mothers. You lose a bit of your essence, a small part of your flesh is ripped and your heart is taken away from away from you. The hurt and the pain diminish with time but never really go away. I am sorry that Jeni had to experience such a tragedy. I often think about the pain my own mother must feel day in day out after losing her own mother and it just breaks my heart. I can’t think about a day without my mom, even though we do not talk on the phone everyday or even when sometimes we don’t really like each other (hey, we all have our moods!). Jeni, I offer you my deepest condolences and thank you for reminding me to hug my mom, even if only in my dreams.

If you have been reading this blog for a while, you know how deeply my grandmother has influenced my baking. She had that magical touch…you would come to visit and within half an hour the table was set with a wonderful spread of foods. It seemed almost effortless to her to come up with the most delicious foods. I used to believe my grandmother was this goddess of the kitchen, even when she was too frail from battling cancer. It’s not that I thought less of my mother’s cooking and baking, don’t get me wrong, but I felt like my mother was showing me the ropes, the behind the scenes, while grandma was giving me the picture perfect, no mise-en-place necessary final product.

My mother is more of a cook than a baker but when she tackles the dough, man! She is good! Just as good as her own mother and I hope I am up to par with their talent. Most French house cooks and bakers do not make elaborate 5 courses meal or produce 3 layer mousse cakes every day of the week. We make yogurt cakes, chocolate mousses, clafoutis, flans, and tarts….lots of tarts!! I think the first item I ever baked was a tart, maybe a quiche, something with a crust, something with a filling, something with cream….and I got hooked, hence the blog name "Tartelette"…. There is always a tart of some sort in the fridge…no lie. Well, except tonight because I finished the last slice of this one. I love the contrast between crust and filling, the endless possibilities of ingredients combination. If a tart had a cousin, it would be a salad: both can be as rustic or elaborate as you wish, both can make a meal (savory tart) or a side, both make use of seasonal produce or what is overripe in the fruit basket and both adapt to a myriad of cultures and cuisines.

I remember my mother and grandmother teaching me the A,B,Cs of tart doughs, "pate sablee, pate brisee, pate feuilletee" (shortbread, basic, puff pastry), and I grew up making my doughs from scratch every time. Even when the times brought packages of ready made tart dough at the grocery store, they were still making them from scratch most of the time. It always seemed funny to me to buy them only to have them remain in the fridge drawer. "Juste au cas ou" …just in case. But again, "just in case" never usually happens in France…because nobody drops in "just like that"…we are a nation of planners you see, so there is always plenty of time to make dough…but that aspect of French culture is for another post. I have one of those pre-made dough in my fridge actually…and you know what? I think I ought to throw it away…it’s been there for a while and probably will never get used…why? In my mind, there is nothing like homemade: it is neither labor nor time consuming and if you are really lazy, you can turn a dough in your food processor in less than 5 minutes. A little resting time, a little rolling and "hop" you’re there…

For this particular tart to pay tribute to both my mother and grandmother I have chosen one of our favorite combination: pears and almonds. I miss you grandma and mom, and hope I make you proud everytime I step in and out of the kitchen.


Pear And Almond Tart

Makes one 10 inch tart.

Crust:
1 1/4 cups all-purpose flour
1 1/2 Tbs sugar
1/2 cup chilled (1 stick) unsalted butter, cut in pieces
2 Tbs ice water
1 egg yolk, lightly beaten

Place flour and sugar in the bowl of a food processor, and process for a few seconds. Add butter, and process until the mixture resembles coarse crumbs. Add the ice water then the egg yolk, processing just until the dough holds together. Do not process for more than 30 seconds. Turn the dough out onto a work surface. Place on a sheet of plastic wrap. Flatten, and form into a disc. Wrap, and refrigerate at least 1 hour before using.
Preheat oven to 350F and blind bake the tart shells: roll the dough out on a lightly floured surface, lay into tart shell, cover with parchment paper or foil, pour dry beans or pie weights on top and bake fro 15 minutes. Let cool before proceeding.

Filling:
2 large pears, peeled and cored, thinly sliced (I chose Comice for this tart)
3 eggs
1/2 cup sugar
1/2 cup ground almonds
1 cup milk
1/2 cup heavy cream
1/4 cup slivered almonds

In a large mixing bowl, whisk together the eggs and the sugar until pale. Whisk in the ground almonds, milk and cream. Pour into the cooled pie shell, leaving about a 1 inch border so that the batter does not overflow when you arrange the ears on top. Arrange the pear slices over the top and sprinkle with the slivered almonds. Bake at 350 until golden brown, do not worry if it still wiggles a bit in the middle, the custard will keep on setting once removed from the oven. Serve warm or at room temperature…oh heck! Eat it anyway you want, it is darn good even cold!!

Pumpkin Praline Tartelettes With Butter Pecan Ice Cream


Today, it actually felt like Fall for the first time. There was a little chill in the air this morning as we left for work, and we actually had to wear a little cardigan this evening while watching the sunset. The kind of weather that makes me very, very happy… I have been impatiently awaiting a good reason to make fall favorites such as pumpkins, cranberries, pomegranates and so forth. It is rather unusual to pop by the neighbors' house on a hot humid day with pumpkin praline pies and have they exclaimed "yeah, we had been craving those!". I tend to bring more fruit filled desserts or frozen ones. However, when I walked up the stairs to the twins' house with a small box of these tartelettes, I knew everybody had fall on their mind and a little place for them. C. opened the box while we were chatting on the steps and before we knew it there was cofffe brewing and the other neighbors chatting things up with us while the kids were already devising their Halloween parade….oh yeah, this year it is a parade!!

I know you have had or/and made countless amounts of pumpkin pies before so why would I was poetic about these? Well, there are the first I make this season and that is something so be tlaked about after month of scorching ht summer days and temperature refusing to drop below 80 degrees at night. It just feels nice to say the words "pumpkin pie". The tartlets were further enhanced by homemade butter pecan ice cream showcasing the first pecans our tree gave us and the delightful Moravian cookies we brought back from Winston – Salem this past weekend. Thanks again Abby for all your suggestions: Sweet Potaotes and their sister restaurant, The Cotton Mill were both great destinations for dinners the Reynolda house and Old Salem were incredible and we threw in the battlefield in Greensboro for good measure!

Back to the tartelettes….all my favorites in a couple of bites: an almond shorbread crust, rich pumpkin and praline filling and a little touch of ice cream because…well…just because homemade ice cream rocks! For the praline, I used this paste I was given by another pastry chef in town, a sales rep. dropped two of and she wanted me to give her my opinion. Being as busy as the next person, I like the convenience of already made pastry "aids" like nut pastes and fruit purees and this particular one did not disappoint. You can also make hazelnut praline (caramelized hazelnuts) and grind it fine and use as such in the following recipe, but you can find good and affordable pastes on the internet nowadays that will your time more efficient in the kitchen. The dough is my go-to nut and butter dough inspired by Dorie Greenspan. Feel free to change the nuts in it, walnuts work as good as (even better in my taste) almonds. It needs to be rolled between sheets of plastic wrap or parchment paper and kept as cold as possible, even when handling. Use your fingertips to pat and patch it if it tears. The filling is inspired by the same Richard Leach I love and admire so much, except that I do not have time this week to follow through with his beautifully designed plated desserts. It was my first try at butter pecan ice cream and it has now become a new favorite. If you don’t have an ice cream maker, you can freeze the custard for a couple of hours, beat it with an electric mixer and refreeze again, repeating the operation 2-3 times, until you get a proper ice cream consistency. Feel free to use your favorite cookies for the ice cream sandwiches (the Moravian cookies I used had a ginger flavor).


Pumpkin Praline Tartelettes with Butter Pecan Ice Cream

Makes 8 4 inch tartelettes

Almond Short Dough:
In a food processor, combine 1 1/4 cups flour, 1/2 cup powdered sugar, 1/4 cup walnuts and 1 stick of butter, pulse until it resembles coarse meal, add 1 egg yolk and pulse until combined into a ball. Flatten the into a disk in between sheets of plastic wrap, refrigerate and roll it out to cut rounds big enough to fit into 8 mini tart pans. The dough gets soft very fast so you can flour your fingertips to push it up and down the sides and bottom of the pan.
Bake at 300 for 10 minutes. Let cool before filling them.

Pumpkin Praline Filling:

1 ½ cups pumpkin puree (I used canned)
¼ cup praline paste
½ cup sugar
1 tsp. cinnamon
½ cup milk
Pinch of salt
¾ cup heavy cream
3 eggs

In a large bowl beat the eggs with the sugar until combines. Combine the pumpkin and praline paste and cinnamon and add to the egg mixture. Slowly whisk in the milk and the cream. Divide evenly among the tart shells and bake at 300 for 20 minutes or until the custard just starts to set. Let cool to room temperature.

Butter Pecan Ice Cream:

Makes 1 quart

2 cups pecans (1/2 lb), chopped ( I like mine coarse)
3 tablespoons unsalted butter, softened
1/4 teaspoon salt
1 cups packed light brown sugar
½ cup granulated sugar
2 teaspoons cornstarch
4 large eggs
2 cups whole milk
2 cups heavy cream
3/4 teaspoon vanilla

Preheat oven to 350°F. Toast pecans in a shallow baking pan in middle of oven for 7 to 8 minutes. Add butter and salt to hot pecans and toss until butter is melted, then cool pecans completely.
Whisk together brown sugar, granulated sugar and cornstarch, then whisk in the eggs until combined. Bring milk and cream just to a boil in a heavy saucepan over medium heat, then add to egg mixture in a stream, whisking constantly, and transfer custard back to the saucepan.
Cook custard over medium low heat heat, stirring constantly with a wooden spoon, until thick enough to coat back of spoon (do not let boil).
Immediately pour custard through a fine-mesh sieve into a bowl and stir in vanilla, then cool, stirring occasionally. Chill custard, its surface covered with wax paper, until cold, at least 3 hours.
Freeze custard in ice cream maker until almost firm. Stir together ice cream and pecans in a bowl, then transfer to an airtight container and put in freezer to harden.
Use your favorite cookies to make small sandwiches and serve along side the pumpkin tartelettes (which I decorated with chopped pecan brittle for their photo shoot)

Mascarpone Banana Tartlets


I apologize for the current lack of posts but my parents are leaving in a week and I want to spend as much time as possible with them, even if it’s just relaxing on the patio with a glass of lemonade and some macarons, or spending the whole evening playing cards like when I was a kid. It’s going to be a little hectic here at Mr. and Mrs. Tartelette B&B as we have other friends dropping by for the next couple of weeks and then I am off to my favorite spa….

Back to our regular programming…

Leaving for a weekend getaway is fun and relaxing, especially with my parents (the “in-laws” for B.) They are really fun to hang out with, always ready for the next thing whether it is an exhibition or a hike. I am really happy that they adore B. and we all get along watching rugby (go France) or playing cards. I am not saying it is always rosy but when the logistics of packing for a trip and unpacking when we are back are easier when everybody gets along. I had to work last evening so I left the house in the hands of mom…unpacking the goods and knickknacks bought along the way, separating the laundry, taking care of my poor husband suffering from a terrible lumbago, etc… When I got home there was a post it on the counter top next to a plate of overripe bananas, “we are at the dock, catching shrimp for dinner. These bananas need to be used. We want dessert!” Now, this is a command I am most happy to execute! Especially if they took the time to fish dinner and all I have to do is fix the salad…There is nothing that screams more vacation to me than having boiled shrimp and salad for dinner. You can make a mess right there on the table and get silly on cocktail sauce and beer.

Back to the bananas…Right before my parents got in town, I had started to prepare a tart dough for one of my husband’s favorite pies but never got around to use it much less go beyond that part of the prep work. Hopefully I’ll get around it soon but in the meantime I had a whole delicious chocolate dough parked in the fridge about to give me a hissing fit if it did not get used (remember that my ingredients speak to me). Not wanting to make a dozen little tarts (too easy to eat!), I divided the dough in half and froze the rest for later use. Coming back home is always nice but the bananas had a most definite sad look about them. Not it was not cake or crumble, but tarts this time, how surprising eh?! The mascarpone filling is pretty straightforward. I used it a lot in catering and can’t tell you where I got it from, we all seem to have passed it down to one another over the years at the restaurant. You can use cream cheese if you prefer, but I like the smooth texture and sharper taste of mascarpone, especially with a touch of almond extract. Perfect balance to chocolate and bananas, and perfect bite size dessert after a big crab and shrimp boil!


Mascarpone and Banana Tartlets

Makes 6 3-inch tartlets

Chocolate Crust (inspired from Chocolate Passion, by Tish Boyle and Tim Moriarty)

1 1/4 cups all purpose flour
1/4 cup cocoa powder
4 egg yolks
1/4 cup granulated sugar
1/4 cup packed light brown sugar
1 tsp. vanilla extract
1 stick butter, softened, cut into small pieces

Sift flour with cocoa powder and make a well in the center. Add the egg yolks, sugars and vanilla to the well. Combine with your hands or a mixer and add the butter pieces. Knead with your hands 2-3 minutes or until the dough comes together. Divide in 2 and wrap in plastic. Note that you only need one half for the recipe. Refrigerate at least 20 minutes prior to using.
When ready to use, roll the dough in between sheets of plastic wrap or parchment paper. Cut out 4 inch circles with a cookie cutter or other template. Fit into the 3 inch tartlets or other desired molds. Prick with a fork and blind bake for 10 minutes at 350F
Let cool completely before feeling them with the mascarpone cream.

Mascarpone Banana Filling:

1 cup mascarpone cheese, at room temperature
1/4 cup to 1/2 cup sugar (depending on your taste)
1 egg
1 tsp. pure almond extract
zest of 1/2 lemon
2 tsp lemon juice
2 bananas, thinly sliced

In a large mixing bowl, combine the mascarpone, sugar and egg. Whisk until well blended. Add the lemon juice, zest and almond extract.
Divide evenly among the tart shells. Arrange the bananas slices over, pushing them in the cream a little. Bake at 350 for 10-15 minutes or until golden brown.

Quince Tartlets And One Happy Tartelette

Quince Tartlets
I am telling you I am truly spoiled. Right before my parents got here with suitcases full of pans, molds, chocolates, nut pastes, extracts and other baking ingredients, I received a box filled with quinces, freshly picked by Elle from Feeding My Enthusiasms. Back in June, I had a sudden craving for quinces and for some reason stores here carry them year round, regardless of the season and for the whopping price of $1.99 a quince (price does not change either!)…Ouch!! I was nostalgic enough of my mother’s quince jelly that I caved in and bought one little quince and tried to make the most out of it. A couple of days later, Elle sent me an e-mail telling me that she would be happy to send me some from her own backyard as soon as they were in season. I let a little "yippee" of joy and started to wish for September already! Kept busy by other baking project I kind of put the mighty quince out of my mind, although tempted to sneak one in my apple basket at the store…Yes, I admit I sometimes planned an escape route for my beloved fruit, free of being set on the back of the exotic fruit stand because no one knew what it was or what to do with it.

My mother makes the best jams…really hands down the best, and I am not saying that because she is my mom. Her method is at the complete opposite of all the recipes you read about lately, where the fruits may be marinated for a while but cooked rather briefly. My mom cooks her jams until it is almost caramel fruit. Hours of foaming and skimming, followed by days of the greatest scented house on the block. What does this have to do with Elle’s quinces? Well, one of my earliest food memories is of my mom perched high over a big copper jam and jelly pot, stirring quinces for hours on end, filling long stockings with the mixture and letting those drip until the coveted jelly is ready to be canned. The lengthy process, the pervading aroma, and to see the final product….my mother was a magician, a goddess, an artist (she really is but that’s for another post)…and I was so lucky that someone thought about using all of earth’s bounty and share it with the rest of her acquaintances, much like Elle when she remembered to send me the quinces. I aim to be as generous in sending "thank you’s" and "how are you’s", and trust me if it seems to take me forever to do so it has everything to do with the state of my pocket book and nothing with the gratitude of my heart.

Back to quinces and the tartlets…. You can’t expect to serve a dessert with quince in 30 minutes. First reason being that raw the fruit is reallytough and sour, then you would be missing on the deep amber colour you get after cooking it down. The natural high pectin content allows the fruit purees, jams or jellies to set very well on their own, require very little from you other than stirring…and stirring.
I had already used two of the quinces to make baked quinces, much like "baked apples" filled with nuts and cranberries. I originally thought about an quince tarte Tatin (upside down tart) but was afraid that the caramel would burn before the quinces had the chance to cook through. Instead I looked at the 8 remaining and decided to make "compote" with 4 of them and dice and slice the last 4 and caramelize them on the stove. The crust is inspired from an olive oil dough recipe found on a French blog I read daily, Eggs and Mouillettes, to which I added a pinch of cardamom…because I put this spice anywhere I can since I love it so much!
I have so many mini, medium and big tart shells, homemade (it is amazing what I have B. do with leftover Lowe’s materials, as well as cardboard and foil!) bought and borrowed that I took the liberty to play around with shapes and sizes of both the tartlets and the fruit.

Quince Tartlets
Quince Tartlets With Olive Oil and Cardamom Crust:

Makes 6 3.5-inch tartlets plus 2 4-inch tarts

For the crust:

200 gr. all purpose flour
50 gr. ground almonds
10 cl. cold water
10 cl. olive oil
1/2 tsp. round cardamom
75 gr. sugar

In a food processor, mix all the ingredients together and pulse until the dough comes together. Take the dough out of the mixer and knead a couple of times, wrap in plastic and refrigerate for 30 minutes.
Roll out the dough on a floured surface and cut out shapes for your molds as desired.

For the quince compote:

4 medium sized quinces
1/2 cup sugar
1/4 cup of water

Peel, core and dice the quinces. Put them in a heavy saucepan with the sugar and the water. Cook, covered over low heat until the fruit becomes all mushy and almost red, about an hour. Add more water if needed and watch that the fruit does not attach to the bottom of the pot.
Let cool to room temperature. When cooled, divide the mixture evenly among the shells.

For the caramelized quince:

4 medium sized quinces, peeled and cored
1/2 cup of brown sugar
1/2 cup granulated sugar
1 stick butter

Cut 2 of the quinces in small dices and slice the remaining two very thin.
Heat the butter and the sugar in a large heavy saute pan until the mixture starts to bubble, turn the heat down and add 2 quinces that have been diced. Cook until soft and caramelized, about 30 minutes. Remove with a slotted spoon and divide them evenly among the shells of your choice.
Cook the remaining quince slices in the same fashion, adding a little sugar and butter if necessary. Remove with a slotted spoon, layer them on a parchment paper lined baking sheet and let cool a couple of minutes before you handle the slices to make the rose pattern on the tartlets.
Starting from the outside, layer the slices overlapping the edges slightly, working your way to the the middle of the tartlets. Bake at 350F for 20-30 minutes until the pastry shells are cooked through.
Serve warm.

Thank you Elle! I spend the afternoon with mom in the kitchen again, except that this time I was the one doing the cooking and stirring! Ah, to be a kid again!!

Tartine’s Banana Cream Pie…With Caramel and Chocolate

Banana Cream Pie
I am nowhere close to Tartine Bakery in San Francisco and yet I get to have their Banana Cream Pie for dessert! Actually, it would be like going to Paris for a patisserie from my sugar daddy at that point! Except….one very generous blogger and friend, fellow Daring Baker, emailed Lisa and me one day saying she had an extra copy of Tartine and Balthazar and if we could decide which one we wanted she’d be happy to give them a new home. If I recall my email back was something along the line "I woul love the Tartine one, of it is okay with Lisa"…"please, please, please Lisa…." secretly crossing my fingers, hands and toes! As you can see I received the coveted one! Thank you Veronica…(and Lis!) I am enjoying it a lot and so is everyone else in the neighborhood!

It took me a while to decide what to make first. Really, all their pies look gorgeous, the cakes and cookies sound all so mouth watering and the pastries would make anybody drool (be right back, I forgot to wipe page 149 !).
Anyway, I had my in-laws over for dinner a couple of days ago and decided to end dinner with a very Southern treat, banana cream pie. I admit I am not a big fan of banana pudding, or pudding textures in general, except for my beloved pastry cream, but I wanted to make something that would show them my appreciation for all the wonderful things they have one for B. and me over the past 10 years. I looked online, I called my neighbor C., thinking that this good Southern girl would have a recipe for it somewhere…except that I had forgotten that C. is the one calling me for desserts so no luck there. I was started to think I would have to change my plan or come up with a botched up version of it, aka French banana cream pie – sacrilege!Nah! Can’t have that! I started daydreaming barely noticing I had my elbow propped up on Tartine. I looked down at the cover and saw the cutest pie…oh could it be?! Maybe they have a great non-pudding recipe for it! Sure they do, page 54: Banana Cream Pie, with caramel and chocolate…

Allright, so it’s not the speediest of pies to make, especially of you make individual ones, but you will be rewarded by a table of well fed, content, and well sugared guests. Just listen to this: flaky pie crust, layer of chocolate ganache, layer of caramel, pastry cream, bananas and if that was not enough a dollop of whipped cream! No pudding! No fake banana flavor!
I did change a couple of things (sorry, can’t help myself), that in my opinion only worked in its favor. Instead of the bakery’s caramel sauce, I used my beloved salted butter caramel sauce, and skipped the extra whipped cream on top as the pastry cream makes it rich enough and I think it would have masked the banana flavor. From what I can tell no one missed it…you know you did something right when there is pure sweet silence at the table!

Banana Cream Pie
Banana Cream Pie, with caramel and chocolate, adapted from Tartine.

Serves 8-12 (10 inch tart)

Flaky Pie Crust:
1 tsp / 5ml salt
2/3 cup/ 150ml very cold water
3 cups plus 2 tablespoons / 455 gr. flour
1 cup plus 5 tablespoons / 300 gr. chilled butter, cut into 1 inch cubes

In a small bowl, dissolve salt in water and keep cold.
To make dough with a food processor: put flour in the work bowl, scatter butter over flour, and pulse until the mixture forms large crumbs, but some of the butter is the size of peas. Add salted water and pulse for several seconds, until the dough comes together as a ball, but is not completely smooth (you should see some butter chunks).
On a floured surface, divide dough into two balls, shape into a 1-inch-thick disk, wrap in plastic wrap, and chill for at least 2 hours or up to overnight.
To fill a 10 inch tart pan, roll out one disk on a lightly floured surface to 1/8 inch thick, rolling from the center toward the edge in all directions, lifting and rotating the dough a quarter turn every few strokes. Cut out a circle 1½ inches larger than the tart pan and carefully transfer dough round to the pan (folding in half, if necessary), easing it into the bottom and sides and pressing into place, and trim the edge with a knife.Line with parchment paper and pie weights or dry beans.
Preheat oven to 375 F.
Bake until the surface looks dry with no opaque areas left, about 20 minutes. Remove from oven and remove parchment and weights or beans and return shell to oven for another few minutes. If the center starts to rise, gently pierce with a knife tip. Let cool completely.

Ganache Layer:
1 cup/ 250 ml heavy cream
3 oz/85 gr. bitter sweet chocolate

Set the chocolate into a bowl. Heat the heavy cream to boiling point and pour over the chocolate. Let stand a couple of minutes an gently stir until fully incorporated and glossy. Cool to room temperature. Pour over the cooled pastry shell and refrigerate.

Salted Butter Caramel Sauce:
240 gr. sugar
80 ml water
115 gr salted butter
150 ml heavy whipping cream

In a heavy saucepan set over low heat, combine the sugar and water and heat just until the sugar is dissolved. Add the butter. Let it come to a boil and cook until it reaches a golden caramel color. Remove from the heat and add the cream ( it will splatter and get crazy, but do not fear and trust the recipe). Whisk to combine and put back on the stove. Let it come to a boil again over low heat and cook 10-15 minutes until you reach a nice creamy consistency. Let cool to room temperature.Pour over the cooled chocolate ganache and refrigerate.

Pastry Cream:
2 cups/ 500ml whole milk
1/2 vanilla bean, cut open down the middle, seeded
1/4 tsp of salt
4 tablespoons of cornstarch
1/2 cup/ 110gr. sugar
2 large eggs
4 Tb/ 55 gr. butter, cut in small cubes

Heat the milk, vanilla seeds and salt in a pan and put over medium heat, and bring to a boil.
In a large mixing bowl, whisk the sugar, cornstarch and eggs until smooth. Slowly add 1/2 of the milk mixture into the egg and whisk constantly to temper them. Add the remaining milk and return the whole thing to the saucepan. Cook until you get a thick consistency, whisking non-stop. Remove from heat and pour into a bowl, let cool for 10 minutes and then incorporate the butter, one tablespoon at a time, until smooth . Cover the surface with plastic wrap, directly touching the cream, let cool completely.

Layer the pastry cream on top of the chocolate and caramel. Cut 2 ripe bananas in medium-thick slices (you know, not a mouthfull but not disintegrating when you pick it up), and arrange them over the cream, lightly pressing down. Decorate with chocolate shavings and if you really need it, some whipped cream.

Ok…there is something else that makes me beam with joy beside the pie: I will be wearing the 3rd Brownie Babe apron very soon! Go check Myriam's blogs for some seriously delicious brownies recipes. Wow! Just wow! There are so many incredible recipes I want to try soon, it is a great honor to be chosen among all these fine bakers. Ya’ll went all out! I have to thank Guillemette and Loukoum for this one, I stumbled onto the Marbled Ricotta Cheesecake Brownies one day by accident and decide that my friends on this side of the pond ought to have the recipe too!

Walnuts Honey Tartelettes

Walnut Honey Tartelettes

I made these to satisfy a craving and to help a family member in need of satisfying hers. I know, it is difficult but I feel I should sacrifice my thighs to help family and friends….! When Sophie came to visit this past month, we tried to make her sample as many local delicacies as possible. We could not get okra and hot sauce to pass her lips but she acquired a taste for tortilla chips, chow-chow, Moose Tracks ice cream, and pecan pies…Yummmm! Of course, as godmother extraordinaire I promised her I would hunt for a recipe in French, using ingredients easily available for her and I would make a batch for the blog so she could get an idea of things to come. While my tree is not quite ready to give me the pecans I needed to come up with a substitute.

I was happy to provide her with a recipe and teach her how to make them but we were faced with a couple of problems. It would be difficult for her to find pecans and corn syrup in France to duplicate the recipe. I admit that I rarely use corn syrup when I make mine and I usually substitute maple syrup or honey without a problem. I don’t really have anything against corn syrup, I just don’t understand the concept of an odorless and tasteless syrup when I can use more flavorful ones. Don’t raise your arms up in the air people and scream "food snob", it is just my opinion, my palate, my tastebuds! The extra boost of flavor after that first bite is really something! As far as the pecans, I told her not to worry if she could not find them easily back home and that walnuts made a great substitute. Since I made them a couple of days ago, I have tried them again with pine nuts, pistachios, cashews and I am happy to report that each nut bring an new dimension to the tartelettes (or tassies as they are often called).

Walnuts Honey Tartelettes

Since I found this recipe on a French blog, La Petite Cuisine, written by the lovelie Elodie, I will provide the measurements in grams but feel free to convert using this site. Like her, I usually use a shortbread crust for nut pies. They are already quite rich so why not continue with the idea and make them even richer?!

Walnut Honey Tartelettes, adapted from La Petite Cuisine.

Makes 4 4-inch tartelettes, and 8-10 mini tassies.
For the tart shells: (not provided by Elodie, but this is my go-to recipe)

1 stick plus 1 Tb. butter, cut in small pieces

1 1/2 cups flour

1/2 cup powdered sugar

1 egg yolk

In a food processor, pulse all the dry ingredients. Add the butter and pulse again. Add the egg yolk and pulse until the mixture comes together in a ball. Wrap in plastic and refrigerate while you prepare the filling. Roll between sheets of plastic wrap and cut out circles larger than your tart shells, fit the dough into the molds and cut out the excess. Set them on a sheet pan and bake at 350 for about 10-15 minutes or until golden brown. Because the dough has a tendency to puff up, I take the shells out halfway through the baking process and pat the bottoms flat with the back of a spoon.

For the filling:

150g chopped walnuts
2 eggs
75g butter, melted
100g light brown sugar
100g honey

In large bowl, whish the eggs with the brown sugar an the honey. Add the melted butter.Divide the walnuts among the tart shells. Slowly pour the filling over the nuts, trying not to move them around too much. Bake at 350 for about 20 mits or until deep golden brown.

Walnut Honey Tartelettes

I know I liked them a lot…I ate a obscene number of the mini ones but in an attempt to be completely fair for Sophie, I had B. and the neighbors try some and they all approved of the honey/walnuts combo. So go ahead dear and have fun!

In the meantime, I am taking a fresh batch to Lisa’s and Ivonne’s Festa Al Fresco coming up on September 3rd…what are ya’ll bringing?!