
tarts

Peach, Blueberry & Lemon Thyme Galettes

Peach - Blueberry Galettes


If everything goes according to plan, I’ll be home in France in two weeks. It’s been four years since I have not been back and it was not for lack of planning or trying. Just happened that way. But now, as we get closer to the date, I buzz about even faster. As B. said "now you’re like a buzzy bee on a sugar high"… There is so much to do, straighten out, finalize, revise…Things I don’t want to do while away. People to see, places to be, milestones to celebrate. Life. Family. Time. Away.

Peach - Blueberry Galettes


I am already thinking about all the flavors of my childhood. Lavender fields, apricot jam and cherry clafoutis, cantaloupe with a splash of port wine, nectarines, barbecues and Champagne and cassis cocktails. Picking berries on the side of the roads by the Durance river. The juice of fresh peaches trickling down my chin, and my arm, and ruining my dress. But always leaving me happy happy.

Peaches


I’ve always thought my little corner of Provence has some of the best stone fruit until I tried a Southern peach here. I can’t even compare they are so different. South Carolina peaches are a treat for sure. Think about your favorite peach scented anything and there you have it. It sounds like it has magical powers doesn’t it? Well it does. Right now, it makes the perfect dessert. Breakfast. Snack. I am even tempted to call it dinner tonight.

Peach - Blueberry Galettes


Imagine how giddy I was this week when I found myself the recipient of over 10 pounds of just ripe, just perfect peaches. Yeah. Giddy. It did not take me long to figure out what I wanted to do with them. Instincts kicked in and once back in the kitchen I started the little dance I’d do everytime at the restaurant. I started poaching, roasting, peeling, dicing…Pots and pans filled every corner of the stove and countertops. From savory to sweet, salsa to sorbet. Truly a good day.

Peach Blueberry Galettes


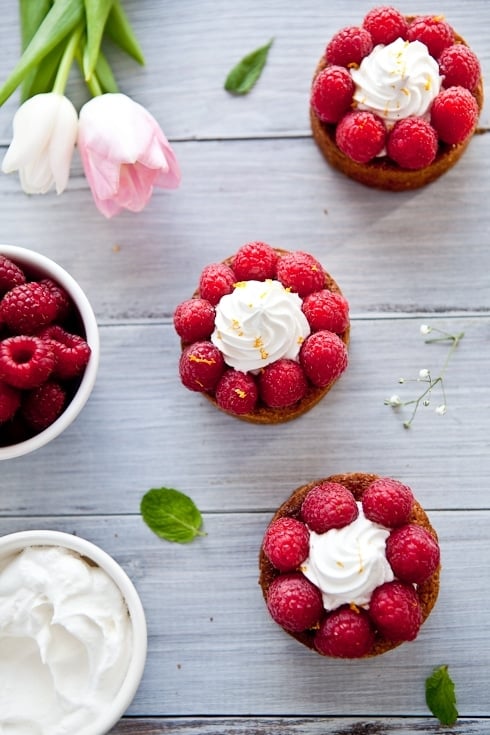
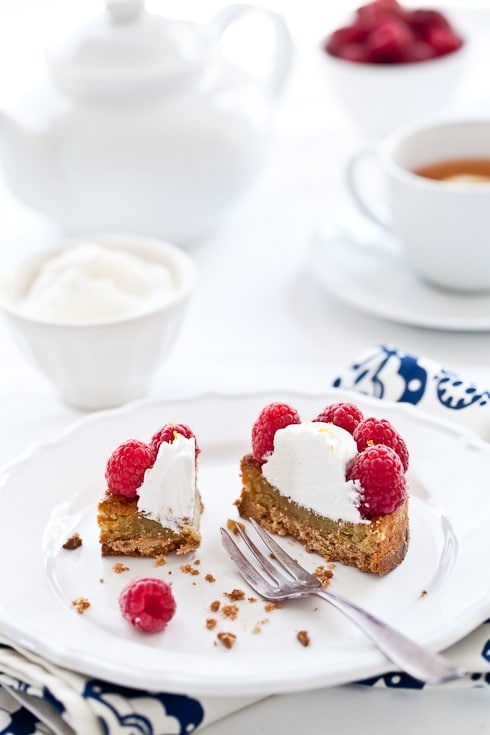
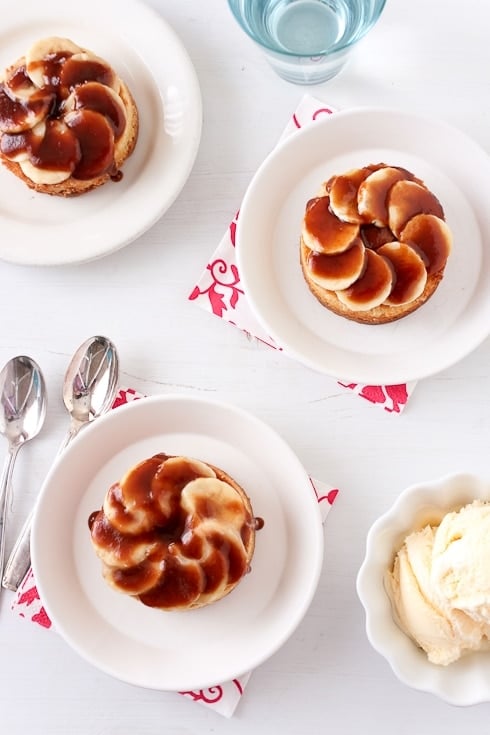
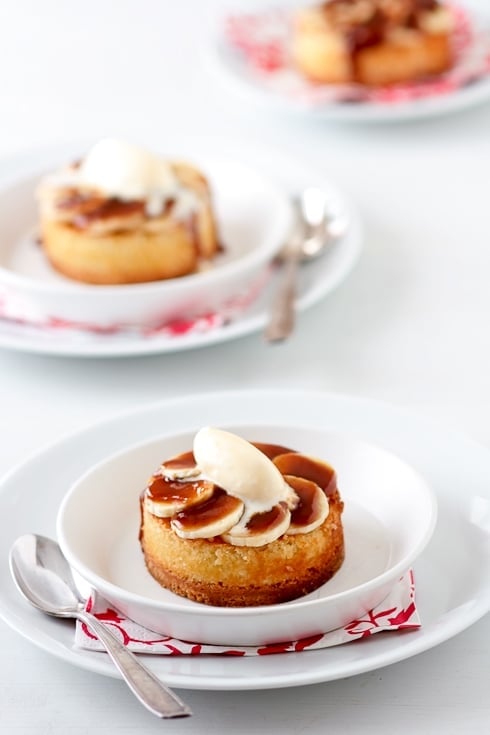
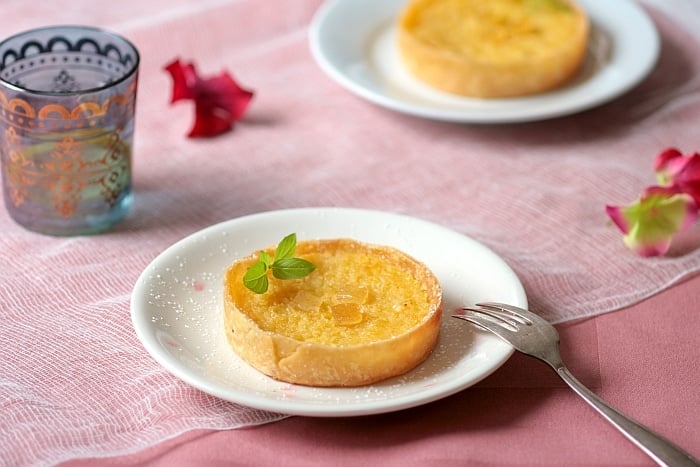
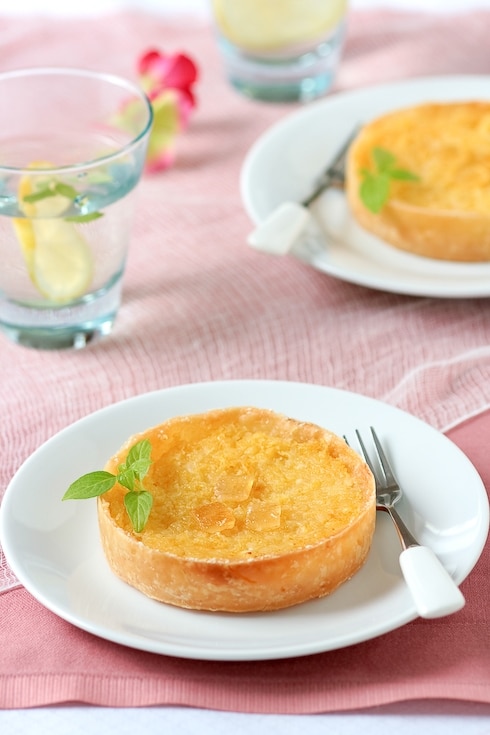
The first thing I made though was galettes, free form tarts. I poached four peaches in jasmine tea, let them cool completely, peeled, pitted and sliced them thin. I used half a peach per galette, some I left all peach and some had a small handful of blueberries added to them. All were sprinkled with sugar infused with lemon thyme like I did previously in these Fresh Berries Tartelettes. Simply rub herbs and sugar together, can be citrus zest too, it works wonders!

I love how packed the summer gets. I love the epic heat of a day spent outdoors followed by stormy winds and thunderstorms. Summer. When rules are bent and time extends following the sunset. And mostly, right now, I love summer because of peach galettes….

Peach Lemon Thyme Galettes


Peach and Peach Blueberry Galettes With Lemon Thyme Sugar:

Makes 8 individual galettes (we share but you don’t have to)

Notes:
– I use lemon thyme a lot this year because our one little plant is going wild. Our lemon balm and mint have suffered from the heat but you could definitely use those flavor.
Rosemary, oregano, chocolate mint and sweet basil work beautifully too. The sky is the limit!

– we are not fond of the taste of tapioca flour so I use cornstarch instead but feel free to use either or.

– If you are not baking gluten free, replace the rice, millet, sorghum flours and cornstarch with 1.5 cups of all purpose flour and omit the xanthan gum.

– you can make this as one large 9-inch galette if you want to.

For the pastry dough:
5 tablespoons (70gr) unsalted butter, at room temperature
2 egg yolks
pinch salt
1/2 cup (80gr) superfine sweet white rice flour
1/2 cup (60gr) millet flour
1/4 cup (30gr) sorghum flour
1/4 cup (40gr) corn starch (or tapioca flour)
1/2 teaspoon xanthan gum
2 tablespoons to 1/4 cup cold milk

For the fruits:
4 peaches
1 tea bag jasmine tea (or your favorite)
2 tablespoons sugar

1/2 cup blueberries

For the lemon thyme sugar:
1/4 cup sugar
1 tablespoon lemon thyme finely chopped

Prepare the crust:
In a mixer, whip the butter on medium speed until light and airy. Add the egg yolks, one at a time and beating well after each addition. Mix until incorporated. Add the salt, and all the different flours, and the xantham gum and mix briefly. Add enough milk to moisten it. Dump the whole mixture onto a lightly floured (use more rice flour) board and gather the dough into a smooth ball. Flatten the dough into a disk, wrap it in plastic wrap and refrigerate for an hour.

Prepare the fruits:
While the dough is resting, place the peaches, tea bag, sugar and enough water to cover the fruit in a large saucepan set over high heat. Bring to a boil, reduce the heat and poach the peach until just fork tender. Remove from the heat and let them cool on a clean kitchen towel. Once cooled, peel and halve them, remove the pits and slice the peaches thin.

Prepare the sugar:
In a small bowl, mix the sugar and lemon thyme together with your fingertips and set aside.

Preheat oven to 350F and position a rack in the center.
When the dough is nice and cold, roll it out on a lightly floured board or in between two sheets of plastic. If the dough tears while you roll, just patch it with your fingertips. Cut eight 4-inch rounds, rerolling and using the dough as you go (ig it gets too soft, just refrigerate for a few minutes as you fill the other galettes with fruit).
Arrange the slices of half a peach in the center of each round and gather the edges, pleating as you go with your fingertips (don’t worry about being even – these are free form. Imperfections are wonderful anyways…). Add blueberries on top if desired and sprinkle with some lemon thyme sugar.

Place all the galettes on a parchment lined baking sheet and bake for about 30-35 minutes.

————————————————————————————-
Props:
– bike and handlebar basket: ours
– basket on bench: Dollar Store (yes…)
– wooden bowl: Star Provisions, Atlanta
– linen last picture: Cicada Studio, etsy
– wooden forks: Sprout Home
– enamel pot: ebay

Savory Greens, Tomatoes & Goat Cheese Tarts

Arugula, Tomato & Goat Cheese Tart


It’s no secret that I love tarts. Obviously with a nickname like Tartelette. Oh you thought it was just the name of this site didn’t you? Well, not entirely. My family gave me the moniker of Tartelette when my age was still in the single digit category. I love tarts. Sweet or savory. Square or round. Rectangular or triangular (have yet to make that one!). The sky is the limit when you make a tart. I just happen to like them all…

And it really bugs me that I can’t register the domain "tartelette" but have to put "my" in front because someone grabbed it already (and is just sitting on it). This is not "my tartelette" ya’ll, it’s yours, it’s everybody’s. It’s a place to come satisfy all your senses, your eyes, your tastebuds, your brain. Read a little, smile a lot. I don’t know. I hope it feels as much of an open invitation to come sit at my table as I hope to convey.

Savory Tart Ingredients


That’s probably why we love to have friends come visit. Stay for a while or just in passing. We live in such a gorgeous city. We love to walk the old cobblestone streets with them, have dinner on the patio or go to the dock to get some crabs for dinner. You can’t help being in a good mood with all this sun year round and beauty of the city. We may not have all the stores and convenience of a big city but we are truly spoiled by the richness of the history and the spirit of the people.

I think Tami felt that when she visited us a couple of weeks ago. She came to relax after some grueling days at work and we had also made plans to contribute on a project together. I’d say our friends have varied personalities and lives but one common trait is that they all love food and they all love to eat good food. So you can bet that in the midst of working hard and playing harder, Tami and I made sure to eat fresh and satisfying foods to keep us going.

Savory Tarts


She came at the right time too! I had just made a couple of batches of gluten free puff pastry, to find the combination of flours we liked best and to make sure that the results were consistent each time. I had plenty of leftover dough but no real desire for anything sweet. I ended up blind baking and freezing three tart shells instead. At least, if I did not use them right then and there, I’d have them ready to whip up a quick quiche or tart for a light lunch or an impromptu gathering.

Tami and I shared a tart filled with a light custard filling and topped with fresh dandelion greens (she’s hand modeling for me too!, heirloom tomatoes and goat cheese. We devoured it. Almost all of it. I saved a couple of slices for B. and he wanted more. He made me promise to make more. Soon. So I did.

Tomatoes, Goat Cheese & Dandelion Greens


The second one I made shortly after was filled with a simple salad of arugula, goat cheese and cherry tomatoes tossed in a simple vinaigrette. Score once again. I literally could have eaten it all by myself but the pleasure of sharing with Bill just to see his face light up as mine did was priceless. Gosh it was good! The world goes rounder with tarts. That is all…

Check out Shauna’s Rough Puff Pastry that she just posted here. Such determination…

Props:
Someone asked me where I found the wooden spoon shown with
these cakes. It’s a picnic set that my mom got on Sprout Home but Anthropologie announced today they now carried them (price gauging them too).
– vintage knives: etsy & antique store
– enamel plate & Bowl: Pottery Barn
– cutting board: World Market
– glasses: Pier 1 (on sale for $1)

Tomatoes, Goat Cheese and Dandelion Greens Tart:

Serves 4

For the crust:
– 1/2 a recipe for gluten free puff pastry

Filling:
1 egg
3/4 cup whole milk
salt and pepper to taste
1/2 teaspoon Dijon mustard
1 cup heirloom tomatoes, halved
2 cups chopped dandelion greens (or other strong greens)
3/4 cup goat cheese, crumbled
2 tablespoons to 1/4 cup vinaigrette (depends how soaked you like your salad)

Prepare the crust:
Preheat oven to 350F.
On a lightly floured board, roll out the dough to 1/4-inch thick and line it into a 9 or 10-inch round tart pan or rectangular, etc… Place the tart on a baking sheet and line it with a piece of parchment paper on top and fill with dried beans or ceramic weights. Bake for 15 minutes. Let cool.

For the filling:
In a medium bowl, whisk together the egg and the milk until well combined. Add the salt, pepper and mustard and whisk to incorporate. Pour the filling inside the shell and bake for 10-12 minutes. Let cool completely.
Mix all the tomatoes, greens and goat cheese in a large bowl. Toss with as little or as much vinaigrette as you like and spoon the salad on top of the tart. It’s ready! C’est pret!

Arugula, Tomatoes and Goat Cheese Tart:

Serves 4

For the crust:
1/2 recipe gluten free puff pastry

For the filling:
2 cups arugula
1 cup cherry tomatoes, halved
3/4 cup goat cheese, crumbled
2 tablespoons to 1/4 cup vinaigrette (same as above)

Prepare the crust:
Follow the step in the previous tart recipe.

Prepare the filling:
Toss all the ingredients together as you would a salad and spread on top of the cooled tart shell.

Swiss Chard, Goat Cheese and Prosciutto Tart

Gluten Free Swiss Chard, Goat Cheese and Prosciutto Tart


Almost a week without posting makes me feel like I am missing out on all the fun. Can’t believe February is over and gone. Makes me wonder why so much always gets packed into such a short month but I am relieved that all the projects have been completed and deadlines met. So, "Hello March! Let’s get going!" Yep, this month is definitely another kind of busy, filled with travels, workshops and visits and you can bet I am looking forward to the change of scenery. Oh yes.

Taking small breaks throughout the work day is vital for everyone. You’ve probably noticed it just by peeking your head outside for 10 minutes or taking a walk with a colleague. One thing I find most invigorating is lunch. I can’t do without. I guess it stems directly from my childhood when my mom would pick us from school for lunch. She had nothing against cafeteria meals but she enjoyed taking the time to do it. It was nothing fancy really but breaking away for an hour also meant picking up a new book at the library, getting more stickers at the book store, stopping by the bakery for a treat. A little fun in the middle of a long work day. Always a treat when you are a kid. Or an adult.

Swiss Char, Goat Cheese and Proscuitto Tart


I love a good salad with tons of colorful vegetables, sometimes topped with a hard boiled egg, or two. Soups are another favorite staple but nothing says lunch break more than a savory tart and a side salad to me. Quintessential French bistro food. One that warms my very soul being so far away from home. One that makes me feel all grown up although I have been there for a while. Savory tarts are the perfect vessels to get a good dose of all the food essentials your brain and body need to function properly without too much effort or planning. Once you have the crust, thrown in anything that strikes your fancy or whatever you have on hand. The sky is the limit regarding fillings, spices, herbs, etc…

Funny thing is that in my family a savory tart is also the meal of choice for any exhausted traveler. Whenever we go home, I know our first meal will be my mom’s quiche Lorraine with a salad and my dad’s shallot vinaigrette. Whenever they come visit, there is quiche ready for them to get a quick bite after a long day of travel. How did it come to be this way? I don’t know. It’s tradition. And you don’t mess with tradition. Well at least no this one, ehehe.

Swiss Chard, Goat Cheese and Proscuitto Tart


I guess you can call this Swiss Chard, Goat Cheese and Prosciutto tart a rehearsal of sort for my parents' arrival in two weeks. I finally came up with a savory gluten free crust that I am in love with. Tastes good, bakes good and rolls like a charm. For the filling, I used what I had on hand: a bunch of Swiss chard languishing in the fridge, some goat cheese and prosciutto left over from a tapas night with friends. Next time it might simply be bacon and onion. Who knows…

I can’t believe I’ll be in L.A on Wednesday and Seattle on Sunday! If you are registered for any of the workshops, well, "thank you" in advance and I can’t wait to meet you! There are some tweet-ups/meet-ups being organized as I write this so if you are interested, the best thing is to check my Twitter feed (@SweetTartelette) or any of the (crazy – awesome – fun) gals who will be showing me around town this week: Rachael (@fujimama), Jen (@jenjenk) and Gaby (@WhatsGabyCookin).

Since I know it’s going to be pretty tight to get any major post in and to avoid a major "post travel" blog post, I thought I’d do quick and fun entries throughout the weeks. Capturing the moment. I have never been to any of these cities so I figured it’d be fun to post quick accounts of things that strike me. Landscape, people, food, the macaron and photography workshops, whatever… I am looking forward to it all and everything in between.

Gluten Free Swiss Chard, Goat Cheese and Proscuitto Tart


Gluten Free Swiss Chard, Goat Cheese and Prosciutto Tart:
Serves 4

For the crust:
5 tablespoons (70gr) unsalted butter, at room temperature
1 teaspoon Dijon mustard
3 egg yolks
pinch salt
1/2 cup (80gr) brown rice flour
1/2 cup (60gr) millet flour
1/4 cup (30gr) sorghum flour
1/4 cup (40gr) tapioca starch
(or 1.5 cups of all purpose flour if not using gf flours)
1/2 teaspoon xantham gum

For the filling:
2 tablespoons olive oil
1 medium onion (I used 1/2 of a giant sweet Vidalia), sliced thin
1 bunch Swiss chard (red – green rainbow – your choice), washed and patted dry
4-6 slices prosciutto
3 eggs, slightly beaten
2/3 cup whole milk
salt and pepper
pinch of freshly grated nutmeg
4 to 6 oz (120gr – 180gr) crumbled goat cheese
a few sprigs of thyme

Prepare the crust:
In a mixer, whip together the butter and mustard on medium speed until light and airy. Add the egg yolks, one at a time and beating well after each addition. Mix until incorporated. Add all the different flours, and the xantham gum and mix briefly. Dump the whole mixture onto a lightly floured (use more rice flour) board and gather the dough into a smooth ball. Flatten the dough into a disk, wrap it in plastic wrap and refrigerate for an hour.
Preheat oven to 350F and position a rack in the center.
When the dough is nice and cold, roll it out on a lightly floured board or in between two sheets of plastic to fit your prefered pie pan. (I went with rectangular this time) If the dough tears while you roll or/and transfer into the pan, just patch it with your fingertips. Line the dough with a piece of parchment paper, fill with pie weights or dy beans and par bake for 15-20 minutes until completely done. Remove the weights and parchment paper. At this point you can refrigerate the baked crust for up to 5 days if not using right away or freeze it for up to 3 months.

Prepare the filling:
Preheat the oven to 350F and position a rack in the middle.
Heat the oil in a large sautee pan over medium high heat and cook the onion until translucent (about 3-4 minutes), add the Swiss chard and cooked until wilted. Remove from the pan and set aside to cool. In the same pan, quickly sautee the slices of prosciutto to get them nice and crispy. Remove from the pan.
In a large bowl, whisk together the eggs, milk, salt, pepper and nutmeg. Layer the onion and Swiss chard at the bottom of the crust and slowly pour the egg mixture over it. Top with slices of prosciutto and crumbled goat cheese.
Bake for about 30-40 minutes or until the tart starts getting golden brown and the custard is cooked. Spinkle with freshly chopped thyme.

————————————————————————————

Le P’tit Coin Francais:

Tarte aux Bettes, Chevre et Prosciutto:

Pour 4 a 6 personnes:

Pour la pate:
70gr beurre mou, non sale
1 cc moutarde de Dijon
3 jaunes d’oeuf
pincee de sel
80gr farine de riz brun
60gr farine de millet
30gr farine de sorghum
40gr de farine de tapioca
(ou de 210gr de farine blanche)
1/2 cc de gomme de xantham

Pour la garniture:
2 cs d’huile d’olive
1 oignon moyen, coupe en tranche fine
1 petite bottes de bettes
4-6 tranches de prosciutto
3 oeufs, legerement battus
150ml lait entier
sel, poivre
pincee de muscade fraiche
120gr a 180gr de fromage de chevre emiette
quelques brins de thym

Preparer la pate:
Dans le bol d’un mixer, battez le beurre et la moutarde pendant 2 minutes. Ajoutez les jaunes d’oeufs un a un, tout en melangeant bien apres chaque jaune. Ajoutez les farines sans gluten, le sel et la gomme de xantham. Melangez brievement et verzes le contenu sur un plan de travail. Ramassez en boule et metter au refrigerateur pendant une heure.
Prechauffez le four a 180C et positionnez une plaque au milieu.
Etalez la pate sur un plan de travail legerement farine (farine sans gluten de preference), ou entre deux feuilles de papier sulfurise. Foncez en un plat a tarte (rectangulaire ou rond), mettre une feuille de papier sulfurise dans le fond, et des pois/riz. Faire pre-cuire 10-12 minutes. Sortez la tarte du four et laissez refroidir.

Preparez la garniture:
Prechauffez le four a 180C.
Dans une grande poele a feu moyen, faites revenir l’oignon dans l’huile. Ajoutez les bettes et cuire jusqu’a ce qu’elles apparaissent fanees. Retirez de la poele et faites-y revenir les tranches de prosciutto. Laissez refroidir.
Dans un grand bol, melangez les oeufs, le lait, sel, poivre et la pointe de muscade.
Repartissez les oignons et bettes au fond de la tarte. Versez dessus le melange oeufs/lait, parsemer des tranches de prosciutto et de fromage de chevre. Faites cuire 30-40 minutes. Parsemez de thym frais a la sortie du four.

Raspberry Pistachio Frangipane Tarts With Meyer Lemon Chantilly

Raspberry Pistachio Frangipane Tarts With Meyer Lemon Chantilly


If it weren’t for a bit of a chill early morning (pre-sun rising), you’d be hard pressed to feel like it is still winter here. It seems like it all happened in the past couple of days. No more need for a coat, no more fires. Piping bowls of soup are not preciously close to the body and used as hand warmers anymore. The skies are changing color. That wintry filter in front of the sun is slowly disappearing each day.

Even produce at the store is losing its marbles. It’s a bit of a mess during this seasonal transition. There’s everything everywhere. Usually it starts bugging me by late February except this year. I needed this off season produce frenzy to work on Carrie’s book as I was covering four seasons, breakfast items, main meals and desserts. I hate to admit it but for once, the fact that I could find plump and gorgeous tomatoes from California in the middle of February was making me jump for joy instead if mumbling "not the season yet damn it".

Tulips


My seasonal cook preference to find the berries stands completely void of raspberries this time of year was quickly meant with slight panick when I needed a bunch for a few recipes (had to be fresh). Good thing there was lots of other things to work on but you can bet that when the shelves filled up again, so did my cart! I had a couple of pints left over and decided to make these Raspberry Pistachio Frangipane Tarts With Meyer Lemon Chantilly.

I thought I was commiting another seasonal faux pas when I loaded my basket with (incredibly cheap) Meyer lemons for an article but Sam, my produce guy, told me their season could extend as late as April. I raised an eyebrow and said "that’s awesome. If you are in California. Since they’re not indigenous to our parts so really, we should take it to the streets and strike!" to which he replied "You’re so French. Striking!". We were both joking but deep down not so much.

Raspberry Pistachio Frangipane Tarts With Meyer Lemon Chantilly


To sum it up, don’t do what I did for these tarts unless raspberries are in season where you are. They were good but I felt like I was holding a box of diamonds at $6 a pint. Trust me, even though the photo gig is over, I am still making the last pint last to the last berry. They’re good, don’t get me wrong but I *know* they will be way better in a couple of months.

On the other hand trust me when I say that the combination of shortbread dough, topped with pistachio frangipane and fresh raspberries was pretty darn good on its own. Believe me again when I add that the Meyer lemon chantilly will wrap this whole thing in the best bite of tangy whipped cloud that will make you giggle in all the right places.

Raspberry Pistachio Frangipane Tarts With Meyer Lemon Chantilly


Raspberry Pistachio Frangipane Tarts With Meyer Lemon Chantilly:
Serves 8

Notes:
– I used eight 3-inch mousse rings to bake mine but you can fit the whole thing into an 8 or 9-inch pie plate. The tart filling will probably need extra baking time (add 10-12 minutes) at the same temperature.

– I used a combination of basic gluten free flours but you can substitute all purpose or whole wheat flour in the same quantity.

– As you can imagine, when I was preparing the dishes for Carrie’s book I had to use the exact same ingredients she does in her recipes. There were only two I was not much familiar with, one of which was "organic whole cane sugar", an unrefined and unbleached sugar with nice molasses undertones (and much healthier). It’s not organic cane sugar, nor organic brown sugar and you will find it with the names rapadura or sucanat sometimes. I love molasses so I have fallen completely in love with it. It doesn’t go with every dessert but it worked really well in the shorbread dough. Of course, feel free to substitute regular granulated sugar or a strong brown sugar like demerara or dark muscovado.

– The other one was coconut oil. I knew of it, I knew some about it but I never used it in my cooking. I do now everyday (while keeping using butter, olive oil, avocado oil, etc…) A little goes a long way but make sure to get the best kind: unrefined, extra virgin cold pressed. It is more expensive than most store bough coconut oil but a little goes a long way. It does smell like coconut but not as strongly (if at all) when cooked or baked.

For the shortbread bottoms:
1 stick (115 gr) unsalted butter or coconut oil, at room temperature
1/2 cup (95gr) whole organic cane sugar (or granulated or dark brown)
1 large egg yolk
1/2 cup (80gr) brown rice flour
1/2 cup (80gr) white rice flour
1/4 cup (30gr) sorghum flour
(Or use 1 1/4 cup all purpose flour instead of the 3 mentioned above)
2 tablespoons (20 gr) tapioca starch
pinch of salt

For the pistachio frangipane:
1 stick (115 gr) unsalted butter, at room temperature
1/2 cup (95 gr) organic whole cane sugar (or granulated)
1 cup (100 gr) ground pistachios
2 eggs
1/4 cup (60ml) heavy cream

For the Meyer lemon chantilly:
1 cup (250ml) heavy cream
1 tablespoon honey
zest of one Meyer lemon

2 pints fresh raspberries

Prepare the tart shells:
In a mixer, whip together the butter and sugar until light and fluffy. Add the egg yolk and mix until incorporated. Add the flours, tapioca starch and salt and mix briefly. Dump the whole mixture onto a lightly floured board and gather the dough into a smooth ball. Flatten the dough into a disk, wrap it in plastic wrap and refrigerate for 30 minutes to an hour.
Preheat the oven to 350F and position a rack in the middle.
When the dough is nice and cold, roll it out on a lightly floured board or in between two sheets of plastic (it tears easily). You will need half the amount of dough to make the tartelettes. The other half can be kept in the fridge for up to 5 days or frozen, well wrapped for up to 3 months. Cut out eight rounds with a 3-inch pastry ring, dock with a fork and place on a baking sheet lined with parchment paper and bake for 8-10 minutes. Let cool completely.

Prepare the pistachio frangipane filling:
Preheat the oven to 350F and position a rack in the middle.
Place the butter, sugar, ground pistachios, and the eggs in a large bowl and whisk until smooth (can also be done in a food processor). Add the cream but stir it in carefully instead of whisking it (you do not want to emulsify it or it will rise while baking). Refrigerate for 30 minutes. Place the 8 baked rounds of dough in eight 3-inch pastry rings, divide the cream evenly among the rings and bake 20 minutes. Let cool.

Prepare the Chantilly:
In the bowl of a stand mixer (or hand held) whip the heavy cream together with the honey and lemon zest to medium stiff peaks.

Assemble the tarts:
Pipe or spoon a generoud dollop of chantilly in the middle of each tart and place raspberries all around. Oh yeah…Eat!

————————————————————————————-
Le P’tit Coin En Francais:

Pour la pate sablee:
115 gr beurre non salee, a temperature ambiante
95 gr de sucanat (ou sucre integral – voir ici) (ou un bon sucre brun)
1 jaune d’oeuf
80gr farine de riz brun
80gr farine de riz blanc
30gr farine de sorghum
(Ou utilisez 160gr de farine au lieu des trois mentionees ci dessus)
20 gr de farine de tapioca (ou maizena)
pincee de sel

Pour la frangipane pistache:
115 gr beurre non sale, mou
95 gr sucanat (ou sucre brun)
100 gr de pistaches en poudre
2 oeufs
60ml de creme liquide entiere

Pour la chantilly au citron:
250ml de creme liquide entiere
1 cuilliere a soupe de miel
zeste d’un citron Meyer ou autre

500 gr de framboises fraiches

Preparer les fonds de tartes:
Dans le bol d’un mixer, fouetter le beurre et le sucre pendant 2-4 minutes. Ajoutez le jaune d’oeuf et battre jusqu’a ce que le melange soit homogene. Ajoutez les farines, le tapioca et le sel et melanger brievement pour obtenir une pate a biscuit. Formez la pate en boule sur votre plan de travail et refrigerer 30 minutes a une heure. (la moitie suffit pour la recette mais la pate se garde bien au congelateur pendant 1-3 mois).
Prechauffer le four a 170C.
Sur votre plan de travail etalez la pate sur une epaisseur d' un demi centimetre. Decoupez 8 cercles de 5cm de diametre environ et piquez les a la fourchette.
Faites les cuire environ 8 minutes. Laissez les refroidir completement et posez les dans des cercles a tarte de 5cm de diametre et de 2 cm de haut.

Preparez la frangipane:
Prechauffez le four a 170C.
Dans un grand bol, melangez tous les ingredients et ajoutez la creme doucement pour ne pa l’emulsionner ou la creme risquerait de gonfler au gour. Gardez la au refrigerateur 30 minutes a une heure.
Dressez la creme sur les fonds de tarte et cuire environ 20 minutes. Laissez refroidir completemet avant de garnir avec la chantilly.

Preparez la chantilly au citron:
Dans le bol d’un mixer, montez la creme en chantilly avec le miel et le zeste de citron. Garnir une poche a douille avec la chantilly et deposez des rosettes de creme au centre des tartes. Ajoutez les franboises tout autour.

Chocolate Caramel Banana Tart & A CookBook For Haiti

Chocolate Caramel Banana Tart


What I am happy and honored to announce below is closely related to the Chocolate Caramel Banana Tart above. But I need your attention for 2 paragraphs before I tell you more about the tart. It’s important. [Update: the BlogAid Cookbook is not available for sale anymore. For more info read this.]

A few days after the horrible tragedy of the earthquake in Haiti, I received an email from Julie from Dinner With Julie that made me jump in my seat and say "Heck yes I’m with you!". She had been watching the news and with every passing hour, she was as feeling as upset and hopeless as a lot of us did. She had a plan to help raise money for Haiti and she emailed for help. Julie set out to create the BlogAid Cookbook. Twenty seven of us came together and provided her with some of our favorite recipes and pictures.

Julie and her friend Cathryn worked almost around the clock to pull it all together. and I am honored and thrilled to announce that the BlogAid Cookbook is up for order!

Blog_Aid_Button


The proceeds from the book sales will go straight to Haitian relief via the Red Cross and Doctors without Borders. It’s not all though! Both West Canadian AND Blurb are matching the dollar amount of the proceeds raised, to TRIPLE those dollars going to Haiti. And until February 12th, the Canadian government will match that.

It’s a POD (print-on-demand) system, meaning the books are printed and shipped as they’re ordered and arrive at your doorstep in about 8 days. You can purchase yours for a good cause here.

Vespa Green


While Julie was working on this project I was having interesting discussions with a good friend about buying too much, accumulating without purpose, wanting versus needing. I am the child of a homemaker and an army guy who lived on a small pension. I worked in a restaurant where every purchase-usage-spoilage was scrutinized, discussed and fixed. And it’s in everything I do now as an adult. I am not talking about being cheap but about using things to the last drop. Or the last crumb…

My friend has a small farm. She raises a few chickens. This year she got a couple of goats. She is slowly transitioning into a path that suits her to a T and she is making enormous sacrifices along the way. Her positive energy and generosity are always invigorating. So are the eggs she gives me for baking. You can bet that none of them go to waste. As a thank you I made her this Chocolate Caramel Banana Tart.

I love the meals and snacks that take place when I clean up the pantry of fridge of all the bits and pieces before it’s too late. A homemade vegetable soup with fried pieces of prosciutto, an omelette topped with the last bit of the aged gouda I like so much, a mixed up pasta dish full of different handful of herbs. I bet there’s a bit of the same going on in your kitchen at times!

Chocolate Caramel Banana Tart


Desserts are always a different story at our house. Between us, the neighbors, the friends, the family, it’s rare to have leftovers. Dough scraps seem to abound in the freezer though. Oh and little containers with only spoonfuls of ice cream. Too many. I lost track.

Bananas are always the ones that end up being frozen and forgotten or mashed and forgotten. Or simply forgotten. Except when I play my "make a dessert by association" in my head. Banana – peanut butter – chocolate – crust. I originally thought about doing just caramel and chocolate but this version ended up being much better than anticipated.

I finally nailed a gluten free chocolate shortcrust recipe that we both love and it makes perfect chocolate shortbread cookies too. The tart filling was soft and gooey without flowing all over your fork. Just don’t be walking around the house with a slice of pie. Don’t say I did not warn you…

Chocolate Caramel Banana Tart


Chocolate Caramel Banana Tart:

Serves 8-10

For the crust:
1 stick (113gr) unsalted butter, at room temperature
1/2 cup (60gr) unsifted powdered sugar
3 egg yolks
pinch of salt
1 cup (160gr) white rice flour
1/4 cup (30gr) amaranth flour
1/4 cup (40gr) tapioca starch
1/2 teaspoon xantham gum
1/4 cup (20gr) unsweetened cocoa powder

For the caramel-peanut butter-banana layer:
1/2 cup (100gr) sugar
2 tablespoons water
2 tablespoons heavy cream
2 tablespoons unsalted butter at room temperature
1/4 cup peanut butter (your choice smooth or crunchy)
2 small bananas, peeled and mashed

For the chocolate ganache topping:
1 cup semisweet chocolate chunks or chips
1/2 cup heavy cream

Prepare the crust:
In a mixer, whip together the butter and sugar together until light and fluffy. Add the egg yolks, one at a time and beating well after each addition. Mix until incorporated. Add the three different flours, the xantham gum and cocoa powder and mix briefly. Dump the whole mixture onto a lightly floured (use more rice flour) board and gather the dough into a smooth ball. Flatten the dough into a disk, wrap it in plastic wrap and refrigerate for an hour.
Preheat oven to 350F and position a rack in the center.
When the dough is nice and cold, roll it out on a lightly floured board or in between two sheets of plastic to fit your prefered pie pan. (I went with rectangular this time) If the dough tears while you roll or/and transfer into the pan, just patch it with your fingertips. Line the dough with a piece of parchment paper, fill with pie weights or dy beans and par bake for 15-20 minutes until completely done. Remove the weights and parchment paper.

Prepare the filling:
In a heavy bottom saucepan, bring the sugar and water to a boil over meadium high heat and cook until you get a dark caramel. (do not walk away – it only takes minutes). Remove the pan from the heat and add the cream and butter. The mixture will bubble so be careful. Place the pot back on the stove and cook on low until the mixture is smooth. Remove from heat and let cool to room temperature.
Once cooled, add the peanut butter and banana and whisk until completely smooth. Pour over the crust. Refrigerate for 2 hours before topping with the ganache.

Prepare the ganache:
Place the chocolate in a medium size bowl. In a small saucepan set over medium high heat, bring the cream to a strong simmer. Remove from the heat and pour over the chocolate. Let stand for a couple of minutes and slowly stir in with a whisk or spoon until smooth. Let cool for 5 minutes and spread all over the banana filling. Refrigerate until firm.

————————————————————————————-

Le P’tit Coin Francais:

Pour la pate:

115gr beurre mou
60 gr de sucre glace
3 jaunes d’oeufs
pincee de sel
160gr farine de riz blanc
30 gr farine d’amaranthe
40gr farine de tapioca
1/2 c.c de gomme xanthan
20 gr de cacao

Pour la garniture:
For the caramel-peanut butter-banana layer:
100gr sucre
2 c.s d’eau
2 cs creme liquide entiere
2cs beurre mou
30gr de beurre de cacahuete (avec ou sans morceaux)
2 petites bananes mure, epelees et ecrasees

Pour la ganache:
240gr chocolat en morceaux
125ml de creme liquide entiere

Le reste des instructions arrive…promis.

Chocolate Caramel Banana Tart

Bananas Foster Tartelettes & A Giveaway

Bananas Foster Tartelettes


I like to think I am fairly organized. I mean, there is logic to whatever battle is taking place on my desk. Or in my head. Like most of us, I get pretty psyched about being a step ahead and I was darn happy for having posts in drafts right before I left for BlogHer food in San Francisco. David says he has 40 stories or so in drafts at all times. I giggle when I have one ahead of the game. I am however excited when “the” one is these Bananas Foster Tartelettes. Things got busy then and things got busier this week but these were too good to wait any longer to post.

Whenever I travel, I try to leave a few easy things for B. to reheat for dinner knowing too well he’d end up eating at his parents or be invited here and there. He tends to skip meals when there is no one to call him to the table. I know he can boil water for pasta. I’ve seen it. I even happen to know he can make awesome steamed clams.

This time was no different as I labeled containers of food and even took him on a guided tour of the fridge and pantry. It’s just not his thing. I was tempted to post-it the entire house but refrained. However, as previously mentioned, his eyes got stuck on all the desserts left on top shelf from my zealous attempt at getting prepared. This is his thing.

Caramel


After describing what the tarts were made of, he exclaimed “oh! Kind of like bananas foster without the fire flambéing action!” Precisely. We tend to have a surplus of bananas in the house, and after making banana donuts last month, I still had plenty to use up, hence the tarts (and a few loaves of banana nut bread).

The tarts start with a crispy shortbread base and are filled with a hazelnut and almond frangipane before being topped with fresh banana slices and a (generous) drizzle of salted butter caramel sauce. I am all over banana and nuts and I am all over salted butter anything, so the combination was pretty much a no brainer. However, it all came together out of the necessity to use all the tidbits ingredients in the fridge, pantry and freezer.

I had leftover shortbread dough in the freezer from a previous tart making day as well as a jar of salted butter caramel sauce, a handful each almonds and hazelnuts in the pantry, a knob of butter and a tiny bit of cream in the fridge. And of course a good many banana giving me the sweet eye.

As I have said before, I hate waste. Having worked in a restaurant kitchen for many year, I pretty much nailed down the recycling issue. If you don’t recycle, re-use or force yourself to use items bought on a whim, you are likely to drive your place to the pits. I have the same mentality when it comes to the kitchen. Being on a tight budget, I can’t allow us to waste, even less impulse buy certain items. Everything these days is budgeted, accounted for and used to the max. More than ever before I am aware of what I have. Time, the ability to cook, develop recipes, a wonderful mother- in -law who unexpectedly drops by with supplies, etc…

Bananas Foster Tartelettes


Some of us are not that lucky. I do my best but some can’t. In that spirit, I really like what Macy is doing in their campaign Come Together to fight hunger to raise awareness and money to feed 10 million of people suffering from hunger, and they will match donation dollar for dollar.
When Macy’s got in touch to spread the word last week, I immediately agreed. There are 3 different ways you can get involved in this great campaign:

1) You can host dinner parties and ask that instead of bringing traditional host gifts, guests make a donation to Feeding America.

2) You can donate $1 directly at any Macy’s register, one dollar provides dinner for seven.

3) You can shop at any Macy’s and get special savings in-store on October 17 (today). A portion of the $5 in-store ticket sales will benefit Feeding America.

Macy’s also provided me with two $25 gift certificates to give to my readers. All you have to do is leave a comment (multiple entry will automatically be deleted) before Tuesday october 20th midnight eastern time, for a chance to win. My better half will select the winners at random from the comments left on this post. Even if Macy’s does not ship internationally nor has stores outside the US, everyone can enter. You can always use the gift certificate to do your Christmas shopping for friends or family here and continue to spread some good spirit.

Good luck!

Bananas Foster Tartelettes:

Serves 8

Sable Dough:
1 stick (113 gr) butter, at room temperature
3/4 cup (95 gr) powdered sugar (unsifted)
1 large egg
1 1 /2 cups (190gr) all purpose flour
2 tablespoons (20 gr) cornstarch
pinch of salt

For the almond-hazelnut frangipane filling:
1 stick (115 gr) butter, softened
½ cup (100 gr) granulated sugar
½ cup (50 gr) ground almonds
½ cup (50gr) ground hazelnuts
seeds from half a vanilla bean or 2 teaspoons vanilla paste or extract
2 eggs
1/4 cup (60gr) heavy cream

Remaining ingredients:
3-4 bananas, thinly sliced
Salted butter Caramel sauce
Vanilla Ice Cream

Prepare the shortbread rounds:
In a stand mixer fitted with the paddle attachment, whip the butter and sugar together until light and fluffy on medium speed, 2-3 minutes. Add the egg and mix until combined. Add the flour, cornstarch and salt and mix briefly to incorporate. Dump the whole mixture onto a lightly floured board and gather the dough into a smooth ball. Do not work the dough while in the mixer or it will toughen up. Flatten the dough into a disk, wrap it in plastic wrap and refrigerate for an hour.
You will need half the amount of dough to make the tartelettes. The other half can be kept in the fridge for up to 5 days or frozen, well wrapped for up to 3 months.
Preheat the oven to 350F and position a rack in the middle. Line a baking sheet with parchment paper. Set aside.
When the dough is nice and cold, roll it out on a lightly floured board or in between sheets of plastic wrap to about ¼ -inch thick. Cut out eight 3-inch rounds with a pastry ring or cookie cutter. Place them on the prepared baking sheet and bake for 8-10 minutes. Let cool.

Prepare the filling:
Place the butter, sugar, ground nuts, vanilla bean seeds and the eggs in a large bowl and whisk until smooth (can also be done in a food processor). Add the cream but stir in it instead of whisking to prevent emulsifying it or it will rise while baking. Refrigerate for 30 minutes. Place 8 baked rounds of dough in 8 pastry rings of the same dimension, divide the cream evenly among the rings and bake 20 minutes at 350F. Let cool. Once cooled, remove the tarts from the rings and arrange the banana slices decoratively on top, drizzle the caramel sauce on top. Serve with vanilla ice cream if desired.

San Francisco Part 2 – Rendition of Bouchon Lemon Tarts

Gluten Free Lemon Tarts


We were still in the airport parking garage, ten minutes after landing that Bill placed a small bucket full to the rim with crabapples and positively so proud of himself said "You love them so much that as soon as I saw them at the store I had to get you some. Welcome back!" Clearly, if you knew my husband, this would make you melt in an heartbeat. This non shopping, non cooking kind of guy had just connected with me on another level. And what did I say in return? "I must recreate Bouchon Lemon Tart in a gluten free version as soon as possible! Shauna must try it!".

Forget the crabapples, forget the pot of soup simmering on the stove, forget the house all shiny and tidy. I could not shut up about the great meal I had had with Anita, Shauna, Danny and Lu the Monday after BlogHer. And I could not stop thinking about Bouchon and their lemon tart. Go figure.

Inside Bouchon Restaurant

Inside Bouchon.

We headed out in the morning to Napa in search of pork. For real. Shauna and Danny also write Pork, Knife and Spoon. It’s all about the pork, and we did find it in Napa. We made a quick stop in front of The French Laundry for a "Bench Monday" photo op and then headed down to Bouchon for lunch. What a lunch! I am not sure what I loved the most between our exquisite dishes, Lucy flirting with the people in the room or the decor that sent me back to French bistros back home. I relaxed, I breathed, I paused. I forgot every bit of crappy stuff and wished Bill had been there with me. He would have loved the food, the company and the relaxed setting.

Desserts were all tempting but if I spot a lemon tart on the menu, I blank on pretty much everything else and my mouth quickly screams for a bite. Bouchon lemon’s tart is one of the bests I have ever had. The filling is tart just so, the shortbread crust is sandy and crispy just right and the addition of pine nuts gives it an earthy texture that complements perfectly the smooth filling. The slice was big. I ate it all. I did not even think twice. And I wanted more.

Shauna and Lucy At Bouchon Bakery

Happy Gluten Free Girls

I sighed I could not share a bit with Shauna right there as the tart was not gluten free but we all agreed that this would be one of the easiest desserts to adapt for gluten sensitive folks and I set about the task as soon as I got home (recipe and more pictures are right after the jump).

After lunch we headed to Bouchon Bakery where I resisted buying another lemon tart and settled on one of their giant macarons. They are seriously huge which is perfect for sharing. I shared an espresson one with Anita while Lu and Shauna settled on a raspberry macaron. Happy. But we were on a pork mission afterall…

The Fatted Calf

The Fatted Calf

At The Fatted Calf.

Well fed and satisfied, we felt safe to tackle The Fatted Calf without wanting to eat their entire display. My desire of visiting their outpost in Napa goes back to the days when Sam of Becks and Posh used to describe the content of her Saturday market basket. Toulouse sausage, pancetta, merguez. Finally the day had come! I think I have a disease that makes my brain shut off and erase from memory all previous meals while making room for more food. I could have eaten one of every item in the store.

My heart did skip a bit when I spotted figatelli on the counter. I kept having flash backs to many aperitifs held on my parents' terrace where I’d try to sneak as many pieces of figatelli as I could. After school snacks of olives, bread rubbed with garlic and tomatoes and a few slices of that sausage. I tried my best not to spill the content of my nostalgia to the very nice lady behind the counter. I added some spicy chorizo and petit sec to my loot as I knew Bill would love some of those too.

Oxbow Market & Rancho Gordo

At Oxbow Market & Rancho Gordo.

I was psyched to hear we would also make a stop at Rancho Gordo during our Napa excursion. I have no idea why my first blog reads were almost all from the Bay area but needless to say I have been hearing them sing Steve Sando’s praises for quite some time now, increasing my desire to put my hands on some genuinely good heirloom beans.

Yes, I know. I am all about buying and eating local but I think I was a Western local in a previous life and a part of me got stuck there. I borrowed being local for 5 days and the people of San Francisco were very generous in sharing that with me.

Oh! What a day! We headed back to town and reluctantly said goodbye to Shauna, Danny and Lu. I can’t describe how lucky I felt to share so much in so little time with them. We all spilled our gutts, laughed and cried. We shared from the most raw places in our hearts and yet with the most uplifting bravery. Thank you guys! Thank you for letting me play with Lu so much!

There was so much more good stuff to come too, starting with a fabulous dinner at Contigo.

Contigo - Bar Seating

Bar seating, facing the kitchen at Contigo.

Since Brett announced on his blog In Praise Of Sardines that he was opening up his own restaurant, Contigo, I have been cheering him on all the way from SC. Thanks to Anita and Cameron who have sort of made it their joint, I have been able to read rave reviews pouring in about the place and I can add that they are all justified. The tapas menu is creative and fun, the dishes executed with flair with the freshest ingredients and the atmosphere and staff make the whole experience relaxed and delectable. Bravo Brett and your staff!

Contigo

Contigo.

I was fortunate to share this incredible feast with other smart and dedicated food bloggers, Caron, Sean and Paul, Tea and Anita. Thank you guys for making this evening memorable and lively of conversations, patient of my photographing all the dishes so I could relate the Bill exactly what we had. Everything from the garden steamed vegetables, stuffed piquillo peppers, jamon iberico, lemon verbena flan and churros con chocolate (and many more in between) were spot on! A total of 15 tapas were shared and loved.

I know Brett had quite his share of bloggers' visits for dinner that weekend and it is all well deserved. If you are in San Francisco and have not stepped foot there, run there! If you plan a trip to SF in the near future, run there too! You won’t be disappointed. Tapas done right. Local and fresh ingredients. Dedication pays off.

Contigo - The Kitchen

The Kitchen at Contigo.

I just want to wrap this post on an incredible day but saying how grateful I am to Anita and Cameron for their generosity and hospitality in having me stay a little while after the conference was over. These two live 100% whether at work or play and it shows. I could not have asked for better hosts and friends in San Francisco.

Stay tuned for another installment of this trip when I get to play a whole day with Tea and discover another side of town. There will also be another dessert adaptation. This time from one I had at Contigo.

Contigo

At Contigo.

For now, I am going to curl up on the sofa with a gluten free lemon tart and dream I were cooking and dancing with all the friends I have left out West…

Rice Flour& Lemon For Tarts


Gluten Free Lemon Tarts:

Makes six 4-inch tartlets

Kitchen note:I have a very hard time finding brown rice flour and Shauna suggested making my own by pulverizing brown rice until very fine. The gluttinous texture of the brown rice helps with the crust much better than white rice flour.

For the crust:
1 stick (113gr) unsalted butter, at room temperature
1/2 cup (60gr) unsifted powdered sugar
3 egg yolks
pinch of salt
1 cup (160gr) brown rice flour
1/4 cup (30gr) amaranth flour (you could use sorghum flour)
1/4 (40gr) potato starch
1/4 cup (20gr) ground almonds

For the filling:
5 tablespoons (80gr) unsalted butter
3 eggs
1/2 cup (100gr) sugar
4 lemons, zested and juiced (about 1/2 cup of juice)

Prepare the crust:
In a mixer, whip together the butter and sugar together until light and fluffy. Add the egg yolks and pinch of salt and mix until incorporated. Add the three different flours and ground almonds and mix briefly. Dump the whole mixture onto a lightly floured (use more rice flour) board and gather the dough into a smooth ball. Do not work the dough while in the mixer or it will toughen it up. Flatten the dough into a disk, wrap it in plastic wrap and refrigerate for an hour.
Preheat oven to 350F and position a rack in the center. Place eight tart rings on a parchment lined baking sheet and set aside.
When the dough is nice and cold, roll it out on a lightly floured board or in between two sheets of plastic. Cut out eight 6-inch-rounds into the dough and fit them into eight 4-inch tart rings. If the dough tears while you roll or/and transfer into the rings, just patch it with your fingertips. Line the dough with pieces of parchment paper, fill with pie weights or dy beans and par bake for 10 minutes. Remove the weights and parchment paper. Keep the oven at 350F.

Prepare the filling:
In a small saucepan, melt the butter and set aside to cool. In a large bowl, whisk together the eggs, sugar, the juice and zest from the lemons. Add the melted butter and whisk to incorporate. Divide evenly among the tarts and bake for 15 to 20 minutes. Serve room temperature.

Gluten Free Lemon Tarts


Chocolate Truffle Tarts

Chocolate Trufle Tarts


Hanging out on Twitter late at night when I can’t seem to figure out where sleep went has very very good outcomes. I get to talk to my favorite people as if they were just a few feet away and beside geeking out with Jen, ZenChef and Mark, I also get to talk gluten free with Shauna of Gluten Free Girl . I love the way she is gently coaxing me to push my own boundaries. These Chocolate Truffle Tarts for example are the pure result of an idea that Shauna unkowingly planted in my head one late night.

When we are having large gatherings of friends and family like this weekend, I always try to accomodate everyone’s needs, especially when it comes to gluten free and low salt recipes since they directly affect me too. After weeks spent reading about my diagnosis last year and ways to eleviate the symptoms, I realized that a gluten free diet could help a lot with genetic diseases and there was not much around as far as treatments were concerned. Our diet is 90% gf to start with except when it comes to pastries. Even there, I take a small portion and ship the rest to the neighbors, family or friends.

I admit, beside the obvious desserts like macarons, ice creams, panna cottas and financiers, I rarely practice my gluten free flours to the most of their ability. I should, I know it. I clearly see a difference when I keep the salt and gluten under wrap. The attacks are far less and few in between, the strength a bit less violent and I recover faster from feeling on a rollercoaster for a couple of hours. Trust me, it’s not only "not fun", it’s rather debilitating when you are in the middle of work. And who likes to feel like they are on a plane 24/7 from the ringing and pressure?

Chocolate Trufle Tarts


Thus, hanging out on Twitter and chatting with people like Shauna gives me the necessary push to try making more gluten free desserts. I have played with gf mixes in the past and often ended up with a brick to cut or cement to chew. I knew it was my lack of practice, and time to persue the issue because there are millions (the gf Daring Bakers for a start) eating gf pastries that not only look good but taste great. I mean, just give a look at this pie!

I had the perfect oppportunity this weekend to tackle a gluten free dessert once again. There are full blown celiacs in our family and then there’s me, who does not have the usual stomach reactions but who could benefit from a little tightening of the regimen here and there. I had just the ticket with Chocolate Truffle Tarts and since the filling is already gf, the only thing I’d have to work on was the chocolate crust. I put one of Shauna’s recipes side by side with mine and went about tweaking.

Oh happy happy me! The result was exactly like the original. A crisp, deep chocolate flavored crust, filled with an amazing truffle like chocolate filling and topped with a rich chocolate ganache. If I had been looking for my chocolate cravings to be back all these weeks, well….I was surely not looking anymore with these. Decadent and rich without being heavy or coyingly sweet. My kind of chocolate heaven!

Chocolate Trufle Tarts


While I don’t think about turning this blog into a complete gluten free one, and developing the gf recipes I want to make demands more than I can handle right now, I am looking forward to finding the right balance for you readers and us here at home. I can cheat about 10% and feel fine but I know I am also tempting my symptoms and playing with the good days. These tarts were the perfect place to start. Not a crumb was left on anybody’s plates.

Chocolate Truffle Tarts:

Makes eight 4-inch tarts

Note: There are many gluten free flours out there that would work with this crust and I just used what I had available in the pantry. Here is a list of gluten free flours from which you can get inspired to try your own concoctions. For a non gf crust, use 1 1/4 cup all purpose flour instead of the 3 gf flours

For the chocolate crust: (adapted from Shauna’s pie crust recipe)
1 stick (113gr) unsalted butter, at room temperature
1/2 cup (60gr) unsifted powdered sugar
3 egg yolks
pinch of salt
1 cup (160gr) white rice flour
1/4 cup (30gr) amaranth flour (you could use sorghum flour)
1/4 (40gr) potato starch
1/4 cup (20gr) unsweetened cocoa powder

For the chocolate truffle filling:
8 ounces (240gr) bittersweet chocolate
12 tablespoons (170gr) unsalted butter, at room temperature
1/4 (50gr)cup sugar
1/4 cup (60ml) strong brewed coffee
4 large eggs

For the chocolate ganache:
4 ounces (120gr) bittersweet chocolate
1/3 cup heavy whipping cream
2 tablespoons unsalted butter, at room temperature

Prepare the crust:
In a mixer, whip together the butter and sugar together until light and fluffy. Add the egg yolks and pinch of salt and mix until incorporated. Add the three different flours and cocoa pwder and mix briefly. Dump the whole mixture onto a lightly floured (use more rice flour) board and gather the dough into a smooth ball. Do not work the dough while in the mixer or it will toughen it up. Flatten the dough into a disk, wrap it in plastic wrap and refrigerate for an hour.
Preheat oven to 350F and position a rack in the center. Place eight tart rings on a parchment lined baking sheet and set aside.
When the dough is nice and cold, roll it out on a lightly floured board or in between two sheets of plastic. Cut out eight 6-inch-rounds into the dough and fit them into eight 4-inch tart rings. If the dough tears while you roll or/and transfer into the rings, just patch it with your fingertips. Line the dough with pieces of parchment paper, fill with pie weights or dy beans and par bake for 10 minutes. Remove the weights and parchment paper. Keep the oven at 350F.

Prepare the filling:
Place the chocolate in a medium bowland set aside. In a medium saucepan set over medium heat, bring the butter, sugar, and coffee together to a boil over medium. Pour the mixture over the chocolate and leave it undisturbed for 2-3 minutes. Gently whisk until smooth. Add the eggs, one at a time whisking quickly until the mixture is smooth. Divide the batter evenly among the tart shells and bake for 10 minutes.
Let cool completely.

Prepare the chocolate ganache:
Place the chocolate in a medium bowl and set aside. In a medium saucepan set over medium heat, bring the heavy cream to a gentle boil. Pour it over the chocolate and let sit for 2-3 minutes. Whisk until smooth and incorporate the butter at the same time until the ganache is completely smooth. Divide evenly on top of the tarts and snooth out with an offset spatula. Refrigerate until ready to eat.

Lemon Basil Lemon Tartelettes

Lemon Tartelettes - Late Afternoon


I know I talk a lot about my family back home and the times, desserts and events shared over there but I also have a strong sense of my being and living here in the States, in the present moment. And I am always very aware of things coming up this fine weekend of May. It’s Mother’s Day. Except it does not phase my own mother much because that special day is not celebrated until the end of the month in France. However she enjoys the fact that with my being here and celebrating Bill’s mom, I can’t wait another two weeks to tell her anyway. And I realized while making these lemon-basil infused lemon tartelettes that there was a whole of "mothers" going into them.

My mother-in-law is "mama Ruth" to me. She welcomed me to the family like a daughter and she treats me as such and never refrains anything, the good, the bad and the ugly, just like a mom does. She also has what I call a very acute "pantry 6th sense". I can be thinking that I need sugar and Bill comes home with a bag courtesy from his mom (they live 10 minutes away). It’s downright freaky some days. Sometimes we shop in doubles like we did last week and I found myself with three big bags of lemons which is why you get one more strawberry free – not yet blackberry post. "Mother moment #1".


I started coming up with various recipes to use all these lemons and since I had some pate brisee left from another project, "tartes au citron" easily came to mind. I have a recipe typed up in my brain from the restaurant menu but I also like to try new ones and it was a good opportunity to flip through the pile of cookbook I own but rarely have time to open. I picked up Pierre Herme’s Larousse Des Desserts that my mom sent me last year, figuring that he, of all people would have what I needed. "Mother moment #2".

Lemons


I settled on a very simple and 100% lemon recipe for the tarts but changed a couple of things around nonetheless. PH uses a shorbread crust but I had pate brisee in the freezer and used it instead. I also wanted to had a little depth to the lemon filling by infusing the melted butter called for in the recipe with lemon basil. I almost wished I had added more than I did. It really gave the filling a lovely grassy quality. I had to refrain though as I am trying not to deplete too fast that lovely lemon-basil plant Mama Ruth picked out at the nursery for me. "Mother moment #3".

As I was baking, I started to think about all these "mother moments" and began to smile bigger and bigger with each step of the process. From prepping and baking to photographing. A lot of you send emails asking me about the props I use and the answer is almost always "mom". My mom. The best personal shopper a food stylist could ever dream of. Rolling pin, tart rings, microplane, pretty lemon bowl…Mom. Care packages with ingredients, tablecloth, napkins, jars, cups and spoons…Mom. She really gets a kick out of it and I am always floored by the cool stuff she finds in the most unexpected places.

So you see, even if I did not intend to make the lemon tarts for Mother’s Day, it became quite clear that they really ought to be blogged about this weekend. Thank you Mama Ruth and Maman for all the things you say and do. All the love and forgiveness. Happy Mother’s Day to all of you reading this and being celebrated this Sunday!

I also want to thank Suzanne from S.HopTalk for including one of my pictures in this amazing Why Moms Matter video. Pass it along to any mom you know! I hear an ebook is soon to follow…

Lemon Tart-2


One year ago: Lemon and Honey Tangerines Gratins.
Two years ago: Meet My Sugar Daddy.

Lemon Basil Tartelettes, adapted from Pierre Herme:

Makes six 4-inch tarts

For the pate brisee:

1 1/4 cups all purpose flour
1/4 tsp salt
5 tablespoons butter, cold and cut into small slices
3 to 4 tablespoons ice cold water

For the filling:
5 tablespoons (80gr) unsalted butter
1/4 cup lemon basil, chopped
3 eggs
1/2 cup (100gr) sugar
5 lemons, zested and juiced

Prepare the dough:
Mix together the flour and salt in a large mixing bowl. Cut in the butter with a pastry cutter or a fork until the mixture forms pea-sized pieces. Sprinkle 2 tablespoons of water over the flour mixture and toss with fork until moistened. Repeat with the remaining water, one tablespoon at a time and gather the dough into a ball with your hand. Do not handle the dough too long. Wrap into a sheet of plastic wrap and refrigerate for 30 minutes. This will allow the dough to relax and make it easier to roll, keeping it from becoming tough. Roll dough on a lightly floured surface, applying pressure from the center to the edges until it is about 1/4-inch thick. Cut out six 6- inch circles onto the dough and press them into the tartlet molds or rings (or one 9 inch pan if making a larger tart). Place the rings or molds on a baking sheet. Prick the dough with a fork, apply a piece of parchment paper inside the molds and fill with dry beans or pie weights. Refrigerate 30 minutes. Preheat oven to 350F and when ready, bake for 10-12 minutes. Let cool completely and remove the pie weights and paper. Keep the oven at 350F.

Prepare the filling:
In a small saucepan set over medium heat, cook the butter and lemon basil until the butter is just melted. Let cool and strain to remove the lemon basil. In a large bowl, whisk together the eggs, sugar, the juice and zest from the lemons and the melted butter. Divide evenly among the tarts and bake for 15 to 20 minutes. Serve room temperature.

At The Flower Shop

In The Kitchen With Lemonpi

TheAnzacTart6[1]


To say that I am thrilled to have Yuie from Lemonpi guest blog today is an understatement. I am honored that she jumped right in when I asked and look at that dessert she made for the occasion!
We don’t know each other much outside our blog but I have been following hers for quite some time and it is always a feast for the eyes and a delight for the brain. I love her sense of humor and the girl is extremely talented. Her ideas are always fresh and her plating is exquisite. Could I have a little bit of a blog crush? Oh yes…Everytime I visit her blog I want to scream "Somebody give this gal prime position in a pastry kitchen!" She is too good to be someone’s assistant!
Let your eyes wander upon her latest creation and recipe right after the jump, and please tell me you agree: talent…


Where is your country? he said.
I dont know, said John Grady. I dont know where it is.
I dont know what happens to country.

–All the Pretty Horses by Cormac McCarthy

I’ve been feeling nervous about guest-posting for Helen this week. It’s a little like being asked to do a jig to entertain the crowd before Michael Jackson turns up to do the moonwalk. You just know it’s going to be a tough crowd.

Add my fear of public speaking into that mixing bowl, and you have one big cake of anxiety. In fact, I still clearly remember the last time I was required to give a presentation. It was at school, and the topic was Conflict Resolution. I was so fearful of having to stand in front of a whole class, that I didn’t. Instead, I gave my presentation using sock puppets, so that I could hide under the desk and let my hands do the talking instead. My sock-puppet-chefs, fought, exchanged strong words, came to blows and finally resolved their conflict. I even stapled turkey frills to each sock, to indicate chef hats.

But anyway.

For this guest appearance, I thought I would come up with something that I hope embraces the spirit of 'Tartelette'. One of the reasons why I love Helen’s blog is because she has a really strong sense of self. Her desserts are firmly embedded in the seasons from which they’re conceived and they lovingly recall aspects of her childhood and her current life.

AnzacTartdip3b


I was born in a tropical country and didn’t exactly spend my early childhood surrounded by rustic baking or elaborate pastries (I wish). Now that I have been living in Australia for so many years however, I feel so much a part of the culture and way of life. This is home.

I’ve made something in honour of Anzac Day which is observed every year in Australia on the 25th of April. My dessert, 'The Anzac' essentially consists of a sticky oatmeal tart topped with a layer of coconut bavarian and Anzac 'streussel'. Bursting with coconut, oats and golden syrup, it celebrates the textures and flavours of the famous Anzac biscuit/cookie.

Hope you enjoyed the brief sugar rush, and thank you for bearing with me. Don’t worry, Michael Jackson won’t be too long now. (Helen? Helen?? …)

anzatartdip1bc


One year ago: Polka Dot Matcha Tea Cake.
Two years ago: Litchee Rose Parfaits and Orange Blossom Macarons.'The Anzac' Recipe :
(makes two 6 ½” tarts)

For the Anzac biscuits/cookies:
Recipe is here. Either bake as cookies and later crumble what you need into pieces to use as the tart topping, or scatter the raw mixture on a baking tray as you would a streussel, and bake it that way.

For the tarts:
2 x 6 1/2” tart cases, blind baked

310g golden syrup
85g quick-cooking rolled oats
60g ground almonds
1 large egg
150ml thick cream
½ teaspoon vanilla extract (or ½ a vanilla bean, scraped)
2 tablespoons strawberry jam

Preheat the oven to 350F (180C).
Place the tart cases on a baking sheet. Spread a thin layer of jam into each tart case. Put the rest of the ingredients in a food processor. Process until smooth. Divide the filling between the tart cases. Bake for 10 minutes, then lower the temperature to 300F (150C) and bake for a further 20 minutes until the browned and set. Remove from the oven and allow to cool on a wire rack.

Helen’s recipe for coconut bavarian:
1 tablespoon (7gr) powdered gelatin
3 tablespoons water
4 egg yolks
1/4 cup (50 gr) sugar
1 cup (250 ml) coconut milk
1 cup (250ml) heavy cream, cold

In a small bowl, sprinkle the gelatin over the water and let stand to soften while you prepare the cream. In a large bowl, whisk the egg yolks with the sugar until very pale. In the meantime, in a medium large saucepan set over medium heat, bring the coconut milk to a simmer. Slowly pour the milk over the yolks, whisking constantly to prevent them from curdling. Pour the mixture back into the saucepan over medium low heat and cook until the cream coats the back of a spoon (as if making creme anglaise). Add the softened gelatin and stir until melted completely into the cream. Let cool to room temperature. In a stand mixer fitted with the whisk attachment, whip the cream to soft peaks on medium speed and fold it into the cooled cream base. Pour this mixture into two
6” rings (1 1/4” high) lined with acetate. Chill overnight.

To assemble:

Unmould the bavarians and place it on top of the tarts. Top each bavarian with the crumbled Anzac biscuits/cookies. Dust with icing sugar and serve..