
mousse

Fontainebleau: Faisselle Mousse With Fresh Berries

Fontainebleau


My parents flew back to France yesterday and everyone in the house woke up a little different. Even the pups who kept going up and down the stairs looking for them. We made coffee, went on the back deck and sat in silence. Heard the clap of the oysters around us. Something my mom would have inquired about. Something my father would have turned into a story.

We had a wonderful time together. It always takes a few days for everyone to find their marks and settle into a groove. That’s a given. Each of us has a different schedules, different responsibilities and timing. We all have one thing in common though: we like food. More importantly, we like everything about it.

Strawberries


We like to head out early to the farmers market and get our groceries for the week. We like to prepare it, chop it, cook it, grill it, all the while catching up about the rest of the family news. We like to sit down and share a meal together where we have put forth the textures, scents and flavors of the foods we made.

By doing do, we pay homage to the people who cared to grow it and the people who taught us how to love it and share it with friends and family. So even if my parents and I need a little adjusting at first, we know we always have meals to come together around something we all understand and appreciate.

Faisselle


I was happy to make some time to truly enjoy my parents' visit, after the last few months of a frantic schedule. It’s sometimes difficult to explain that time spent on the computer writing proposals and looking over shooting schedules is not time spent noodling around. That’s a generation thing. That’s part of sharing space and time for a few weeks. It requires patience and understanding from everyone.

Cooking and baking also requires patience and understanding, reinforcing this idea of a common ground for everyone to share.

Fontainebleau


Nothing is truer in my opinion than when making fresh cheese, yogurt or fromage blanc. Anything with live cultures (bread too) has a wonderful way to show us how to slow down a bit and enjoy the process, the evolution and transformation of what we make.

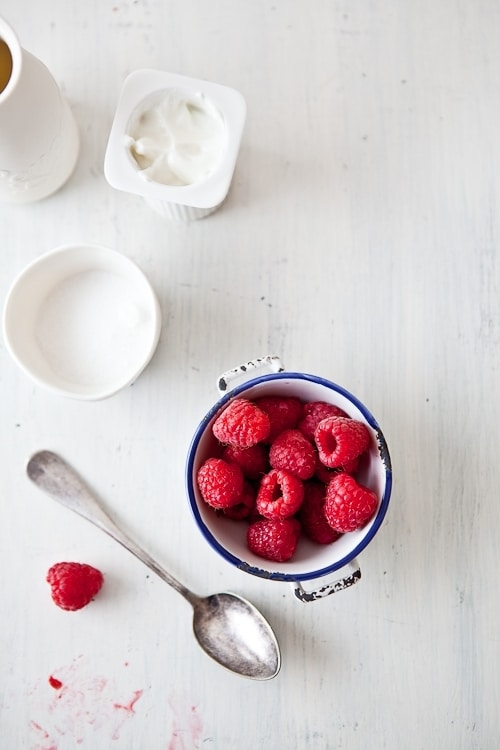
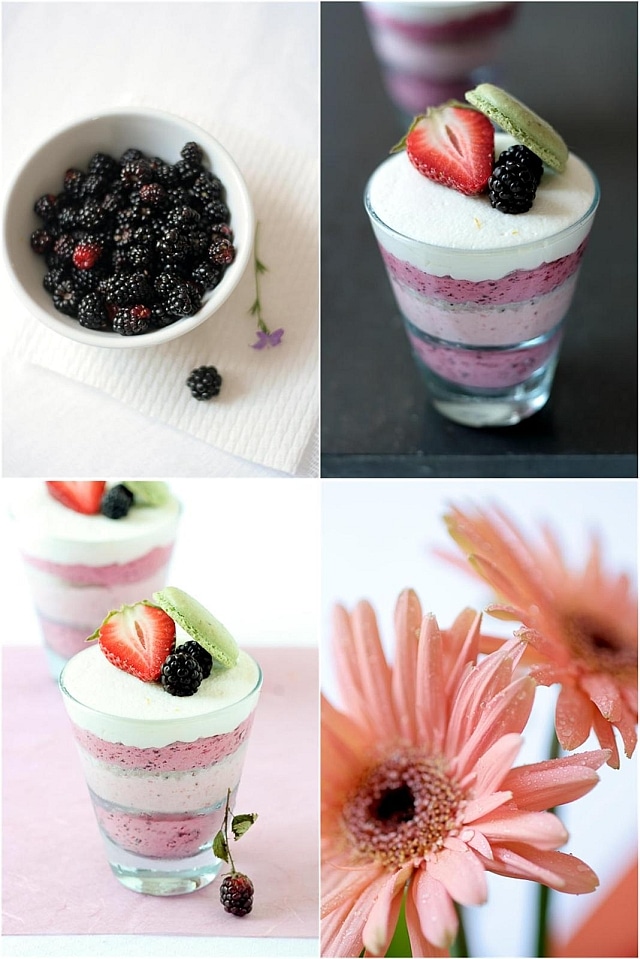
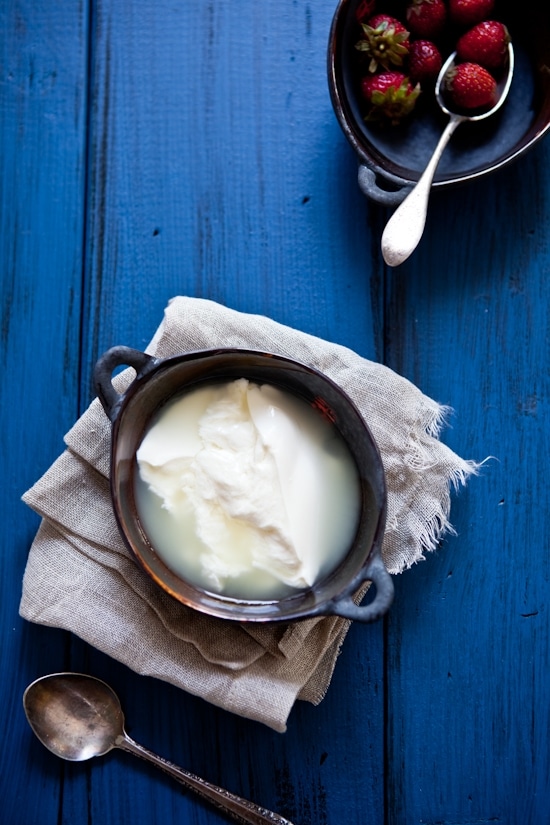
Everytime my parents are here, I make faisselle for my dad. I often try to describe it properly but it is truly one of those dairy products that is unique. Not yogurt, not fromage blanc, not cottage cheese. Faisselle refers to both the fresh cheese made as well as the container used to make it. The molds have lots of tiny holes in which the milk mixture is placed to drain as much whey as desired. Some people like their faisselle drier than others so the container allows you to control how much moisture to keep.

Fontainebleau


The making process of faisselle is really darn easy and can be made with either cow or goat milk, a few drops of rennet, and a bit of fromage blanc or Greek yogurt for more live cultures. That’s it! Once mixed, I let it do its thing overnight and we wake up to wonderful big curds of faisselle. So far I have not tried with non-dairy milk but if you do let me know how it turned out.

Some people like it at the end of the meal with some salt, pepper and freshly chopped chives, some appreciate it with some brown sugar or a touch of honey. With us, it all depends on our mood. Sometimes we drain the heck out of it and end up with something very close to fresh crumbly cheese. Sometimes we’ll just grab a bigger spoon and eat as moist as possible.

Fontainebleau


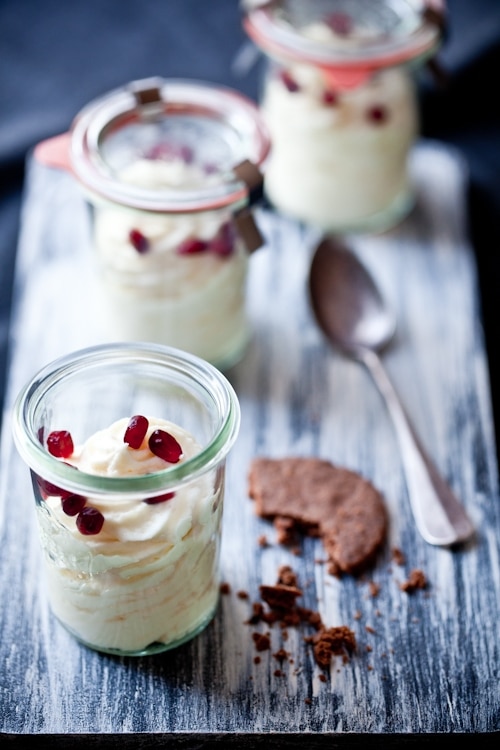
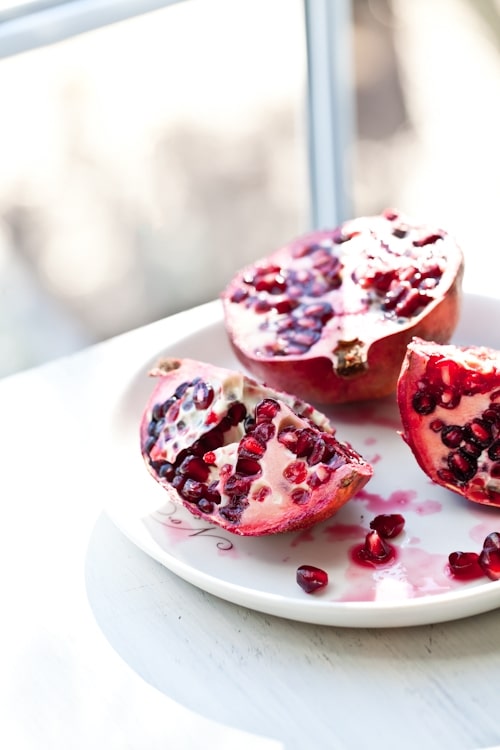
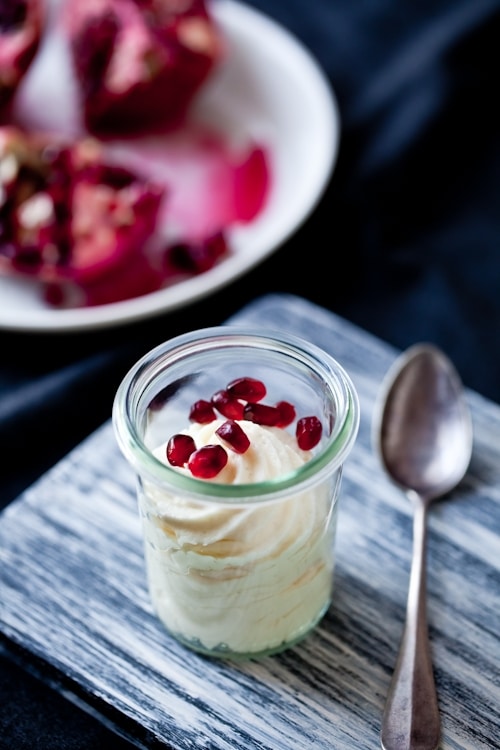
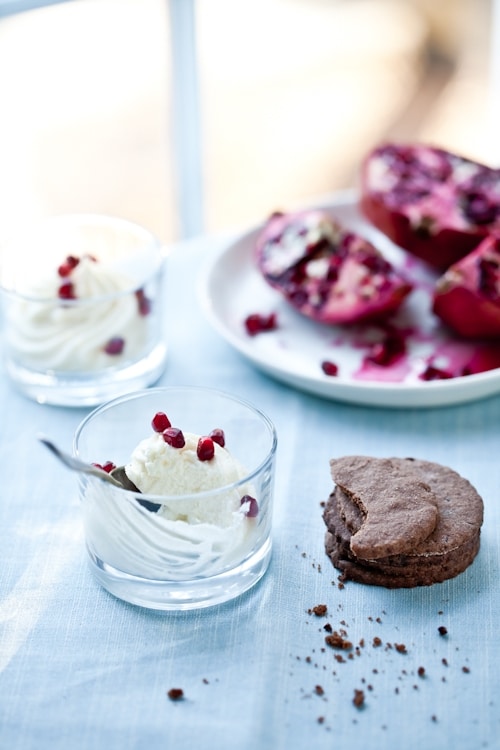
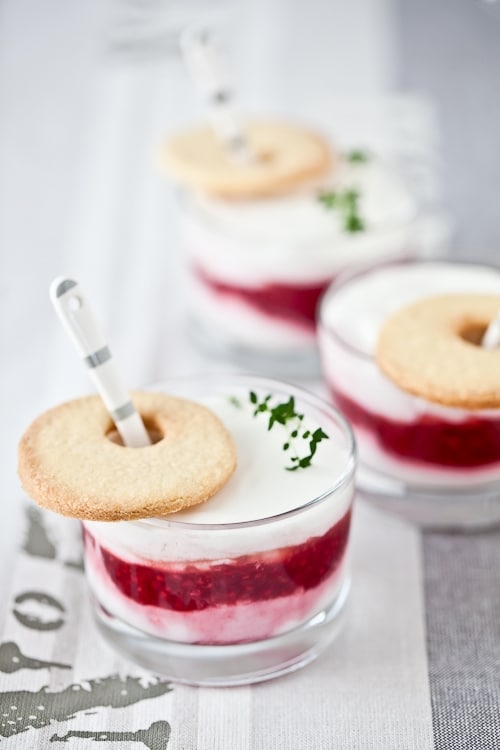
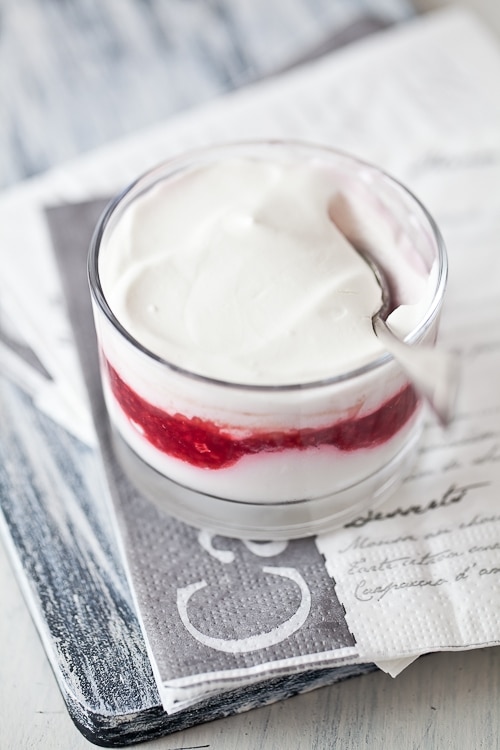
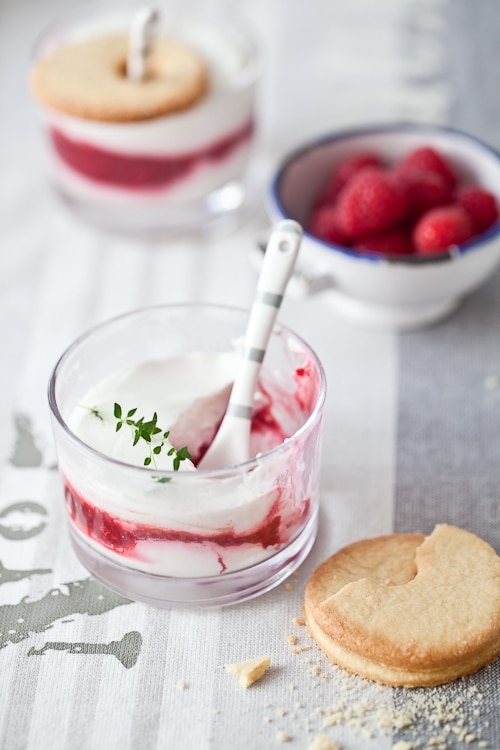
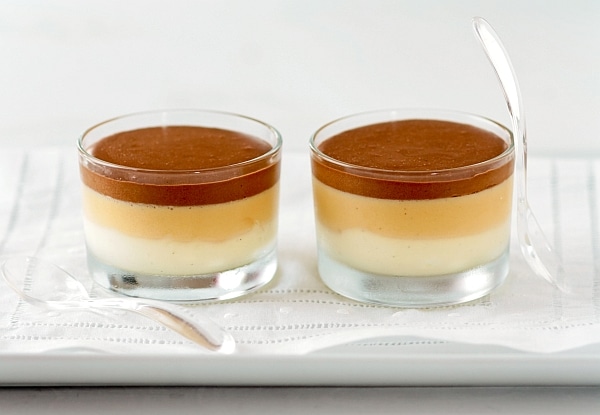
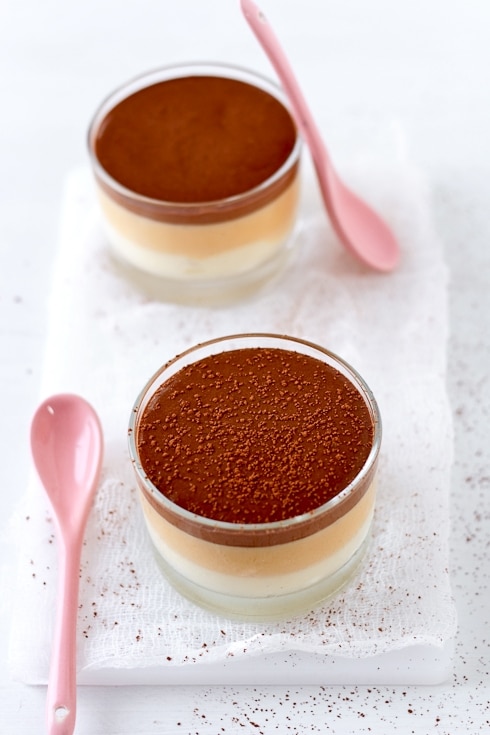
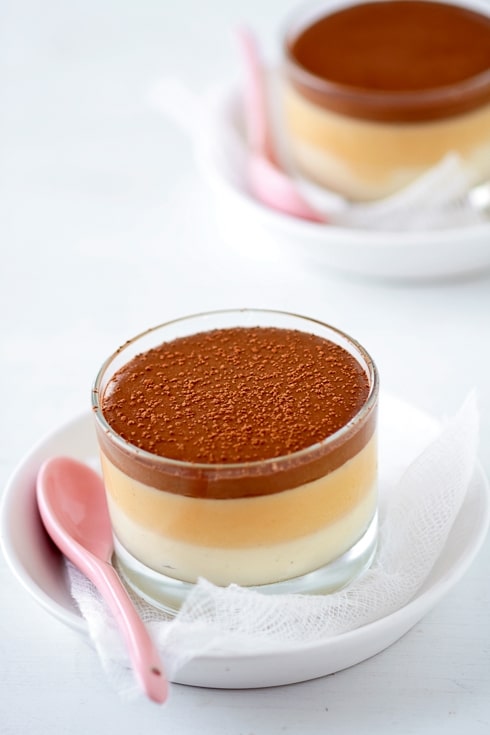
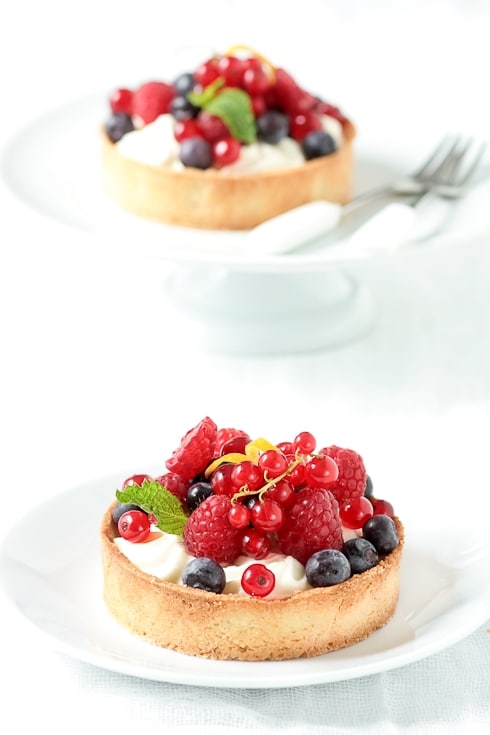
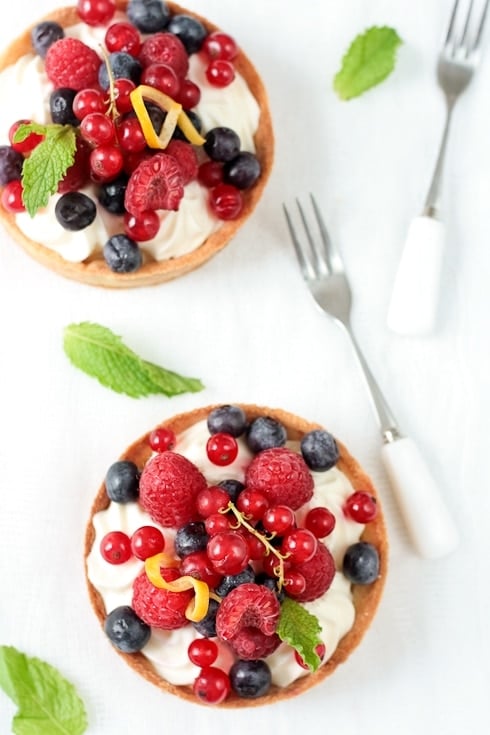
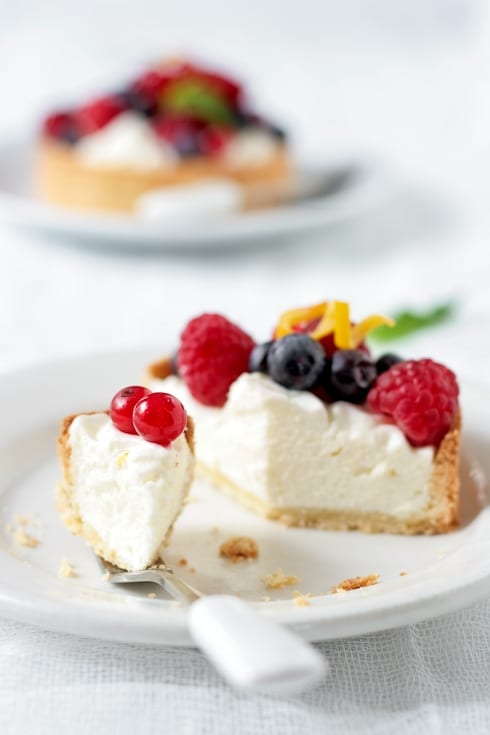
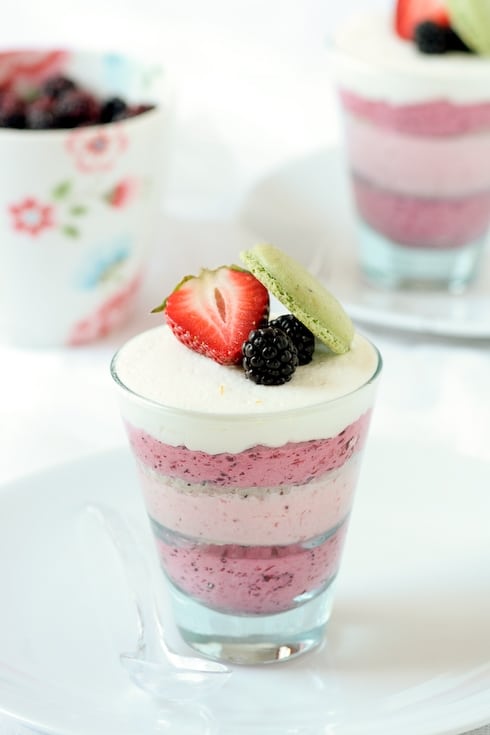
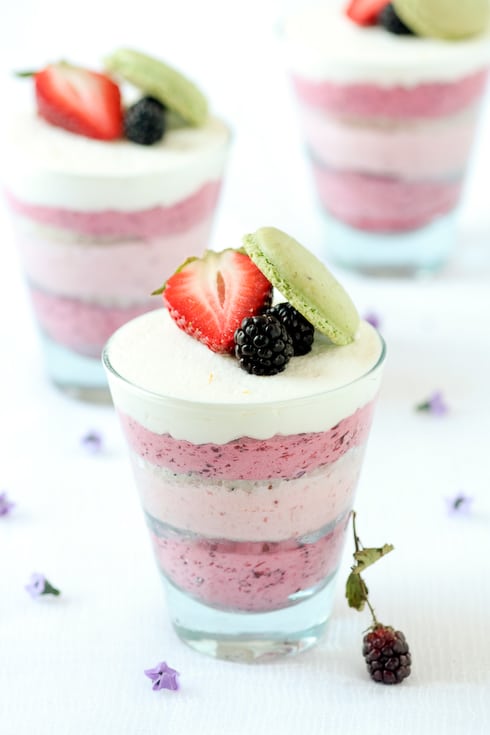
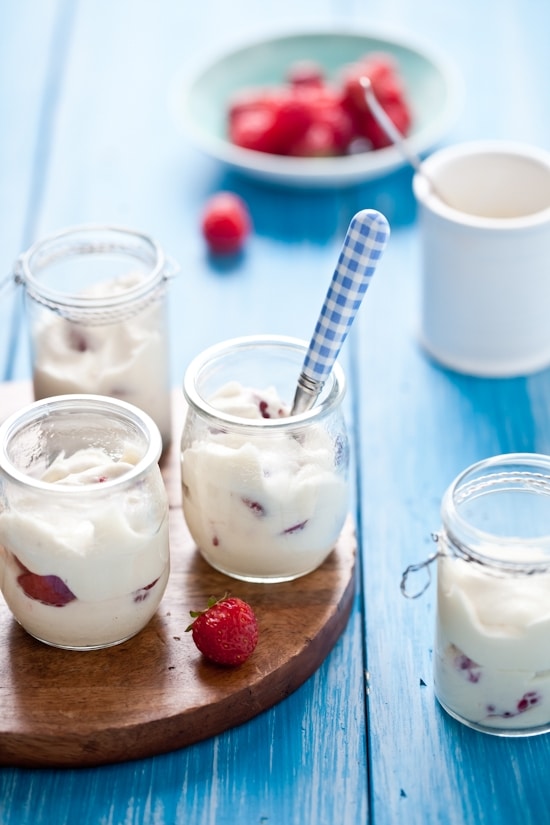
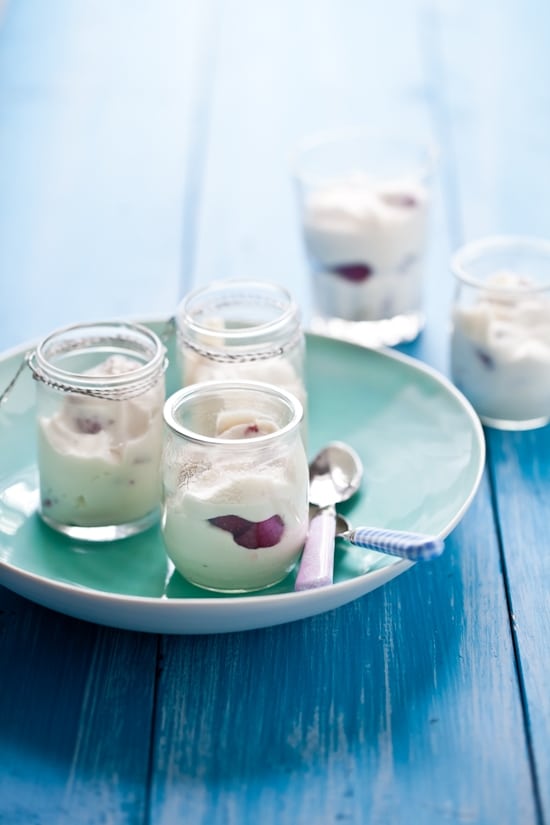
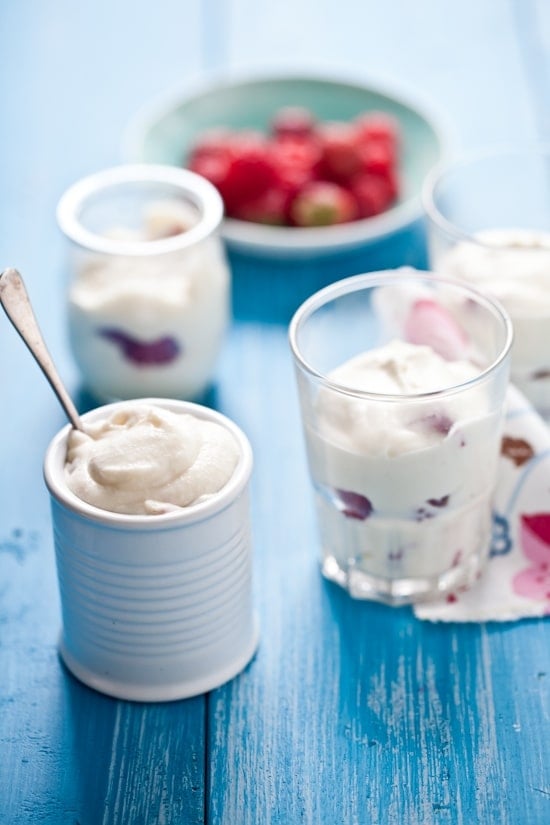
Sometimes, I sneak around and put some faisselle aside to make something special like these little jars of Fontainebleau, a mousse made with faisselle, whipped cream and fresh berries. It is really the kind of dessert we enjoy all year long by letting the seasons guide our choice of fruit. Caramelized pear or bananas easily replace fresh berries during the winter months and fresh figs with a touch of honey make a perfect topping in the deep of summer.

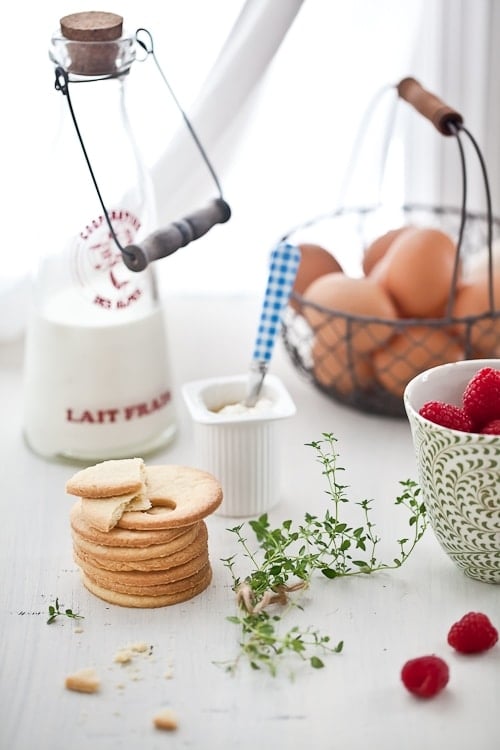
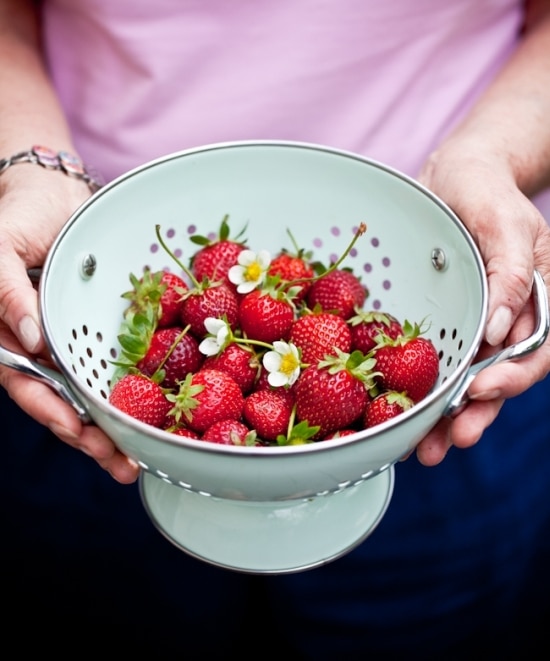
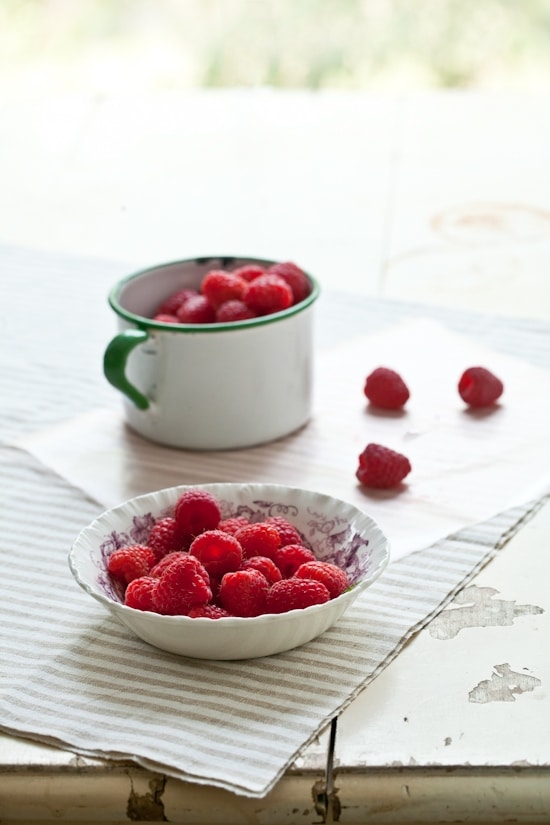
We went strawberry picking one day with my parents and even after jamming 16 pounds worth of berries, we still had extras that we used in the Fontainebleau along with some freshly picked raspberries from a friend’s garden. Feel free to use any fruit, berries or addition that strike your fancy. Crumbled shortbread on top is darn good too…!

By the way, these are also fantastic frozen, poured in shot glasses or lollipop molds. Trust me…

Fontainebleau


Fontainebleau:

Makes 6 to 8

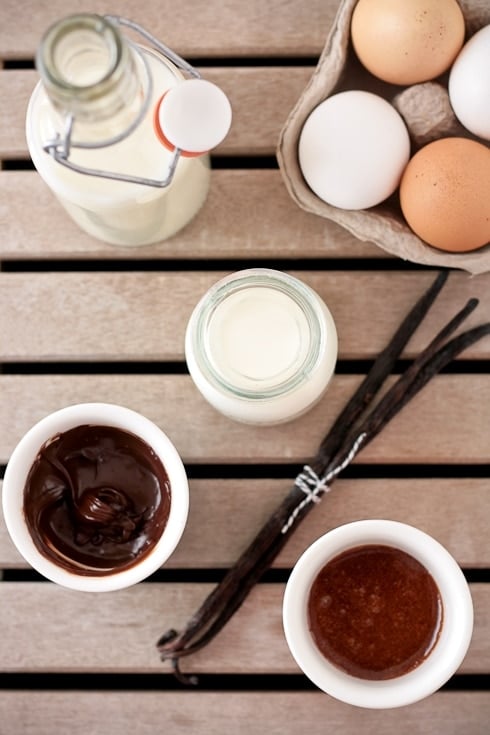
Notes: when our farmers market is open (April through December) I will use raw goat’s or cow’s milk. The rest of the time, I use whole, non homogenized, organic milk. I use liquid vegetarian rennet by habit but tablets work just as well.

Ingredients:

For the (fresh cheese) faisselle:
8 drops liquid rennet
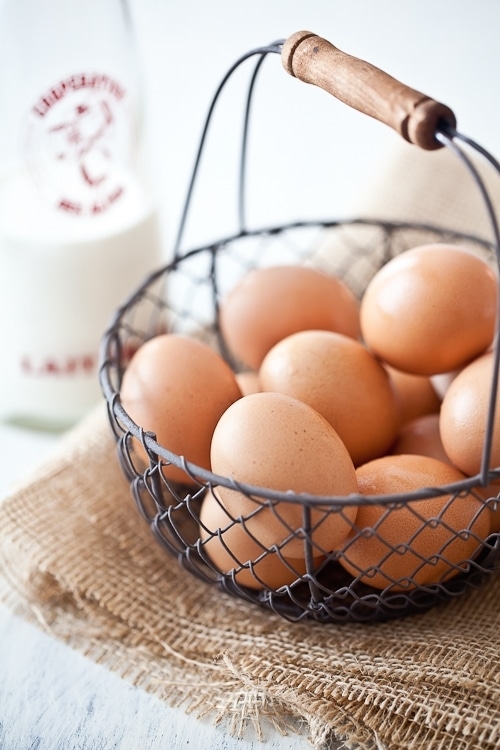
1 quart whole milk ( 4 cups – 946ml)(I like to use raw when I can but that is up to your own preference) (goat or cow)
100 gr Greek yogurt or fromage blanc (a little over 3 oz)

Remaining ingredients:
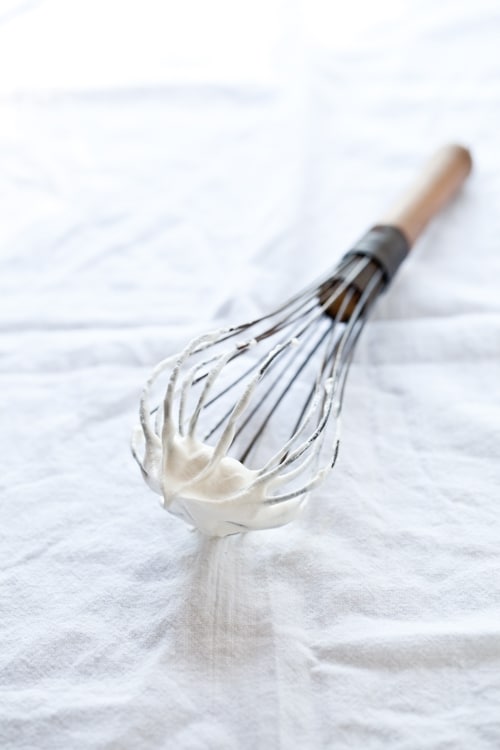
1 cup heavy cream, whipped to medium stiff peaks
1 to 2 cups fresh berries

Directions:
Place the rennet in a clean glass or ceramic large bowl. In a heavy saucepan, combine the milk and Greek yogurt and bring the mixture to 85F. Remove from the heat and slowly pour over the rennet. Do not stir. Let cool, cover with a clean kitchen towel and let sit undisturbed for 4 hours. Place in the refrigerator and let sit overnight to develop more taste.

The next day, take out about 2 cups of the faisselle and drain in a cheesecloth over a pan or the sink (attached to the faucet works great) until most of the liquid is gone (takes anywhere from 2 to 4 hours). When ready to use, slowly fold in the whipped cream and divide in jars by layering the mousse and the berries. You can also, mix the berries as you mix the faisselle and whipped cream. Keep refrigerated until ready to use.

White Chocolate Mascarpone Mousse & Cocoa Nibs Shortbread Cookies

White Chocolate & Mascarpone Mousse With Cocoa Nib Shortbread Cookies


When I started this post yesterday I had no idea how fast the day would get away from me. Not because of work. Not because of play. I heard news of someone dear to me passed away. And I hit a wall. I could not put two thoughts together without having memories rush through my head.

I know we all experience the loss of someone dear many times in our lives and I certainly don’t write about all the sad stuff here. I try the opposite actually. But I want to tell you about Francoise. I must. You see, without Francoise, this blog would not be exactly what it is today.

 White Chocolate Mousse & Cocoa NIb Chocolate Cookies


A lot of us today have a pinch in our hearts knowing that Francoise is gone. She was, along with her husband Peter, the owner of Mistral, a French restaurant here in town which closed last year. To visitors she was a favorite cousin you see on vacation once a year. To her staff she was a surrogate mom, a favorite auntie and a royal pain in the butt too and we would not have changed that for the moon.

She gave me my first position as Pastry Chef. She hired me one day I was looking at a very small offering of dessert choices. Finally I put the menu down and said "Such a shame! Baking is so much fun!". I was working the line at another establishment at the time and she said "quit there! Come work for me! The guys don’t have time to make desserts. You’ve been baking all this stuff since you were a kid. You’re French! Me too! Let’s try!"

 White Chocolate Mousse & Cocoa NIb Chocolate Cookies


And that’s how I got the job. Really. We said we would try for a month. I stayed there five years. Just like many restaurant kitchens around the world, there were some pretty hard moments, some words that flew across the halls a little faster than they should have. There were long nights, tired feet and broken backs. But there was also that extremely exhilarating moment of 4 chefs starring at each other after a long New Year’s Eve of cooking and plating knowing that they had done it. And done it well. And they had passion pouring out of their tired hands. And they were ready to do it all over again.

The core people at Mistral did it day in and day out but few worked as hard as Peter and Francoise who were there seven days a week, fourteen hours a day. They had our backs and we had theirs. Francoise did not give second chances. She gave thirds and fourths. I can’t tell you how many waiters and cooks left and came back. Not because there wasn’t better in town. There wasn’t better in town to make you feel at home. Mistral was like the mafia. Once you were in, you were in.

Cocoa Nib Chocolate Shortbread Cookies


Francoise was like my favorite auntie. She made me smile, she worked me hard, she never let anything be second grade and she was driving me up the wall at times. Trust me, she was taking no nonsense for an answer and boy was she hard at negotiating with but once you were in the family, your family and the family of your family was in too. That’s hard to find. Oh man. The church for her funeral on Tuesday is going to be packed. As it should be.

Bill and I had our first drink together there on the first day we met. We had our wedding rehearsal there too. Our first anniversary. Bill and his band played there for 20 years. Way before we met. Way before we knew each other existed. For the first 10 years we were married, we never had a date on a Friday or a Saturday because he was at Mistral playing music. I’d go sit at the bar from time to time. I liked New Years Eve the best though. Bill and the band at the front of the house and me in the kitchen with the guys. Midnight would come around and they would push me toward the front to get kissed. And then they would cuss me back in to finish my shift.

 White Chocolate Mousse & Cocoa NIb Chocolate Cookies


Francoise is so instrumental to this blog it’s incredible now that I let all the words come out of me. She helped me get my credentials as a chef. She listened to my ideas. She taught me how to put value and worth to everything I did. I remember one day she asked for an estimate on a side gig and when I handed her the figures, she looked at me and said "great, now multiply that by 3. That’s what you’re worth." Every time a photo client asks me for a quote now, I can hear her say "and multiply that by 3"! She was tough. I am glad she shared some of that with me.

Speaking of photo, she’d let me take polaroids of my desserts all the time. She knew I wanted to keep some sort of record of the things I was creating. I think she saw I was getting that in my blood but I did not know what to do with it. She did not want me to do anything with it. I was her pastry chef. She had little use for a photographer!

Whipped Cream


Of course, it was not all rosy and wonderful. Gosh there were days my eyes would be glued to the back of my head from rolling so much! But anyone masochistic enough to work restaurant kitchens or photography would tell you that’s what we do. That’s what we know to do and what we are passionate about. It takes a good bit of forgetting about oneself to be able to do what Peter and Francoise achieved for so long. To be a pillar of the Charleston restaurant scene for over 20 years is no small affair. They gave and sacrificed more than the general person would for their business. That’s what they knew.

I remember asking Francoise one day she looked tired and restless if they could close for a few days and go somewhere to relax. She looked at me and said in her thick French accent "Oh…sweeeeettieee!"

That was Francoise. Rest came too fast to those who love her. She gave us all she was until she could not anymore. She gave Bill and myself some of the best memories of our private, social and professional lives. She is missed. Damn Franny…

 White Chocolate Mousse & Cocoa NIb Chocolate Cookies


The dessert that comes with this post is actually a take on the first special she let me run at the restaurant. I had made nougatine cups (like these) and filled them with a mascarpone and white chocolate mousse. It was served with a few cocoa nib shortbread cookies to offset the rich mousse. She loved it so that she asked me to make it again for my first New Year’s Eve at the restaurant. Except it’s Charleston and it was unpredictably hot and humid that day. I literally stood over the nougatine cups with a blow dryer set on cool to prevent them from melting away. And thus came about the first of many eye rolls in my career there.

"Oh….sweeeetttieee!"

White chocolate Mascarpone Mousse and Cocoa Nib Shortbread Cookies:

Serves 6

For the mousse:
1 cup white chocolate chips
4 oz mascarpone (can sub cream cheese)
1 1/2 cups heavy cream

For the cocoa nib shortbreads:
1 stick unsalted butter at room temperature
1/4 cup granulated sugar
2 egg yolks
1 cup millet flour
1/4 cup potato starch
1/4 cup cocoa powder
1/3 cup cocoa nibs

Prepare the mousse:
In a large bowl set over a pan of simmering water, melt the white chocolate and mascarpone together. Remove from the heat and let cool to room temperature.
Once cooled enough, whip the heavy cream to medium stiff peaks. Carefully incorporate the heavy cream into the white chocolate mixture. Try to go fast or the white chocolate will have greater chances to seize on you and become grainy. I don’t add any extra sugar to this as the white chocolate is already pretty sweet to my liking but feel free to add up to 1/4 granulated sugar to the heavy cream as you whip it.
Pipe or spoon the mousse into glasses or ramekins.

For the cookies:
In the bowl of an electric mixer, beat the butter and sugar on medium speed. Add the yolks, one at a time and scrape the sides of the bowl if necessary to make sure everything is well blended. Turn the speed to low and add the millet flour, potao starch, cocoa and cocoa nibs and mix just until incorporated. Gather the dough into a ball, wrap in plastic wrap and refrigerate for an hour.
On a well floured surface or between two sheets of parchment paper, roll the dough to 1/4-inch thin and cut out cookies with your preferred cookie cutter. Bake for 8-10 minutes on parchment lined baking sheets. Let cool in the baking sheet or on wire racks.

Honey Yogurt Mousse With Raspberry Coulis & Shortbread Cookies

Shortbread Cookie Break


Time flies. Let’s face it, the only time when it doesn’t is when we twirl our thumbs. And even then, I have seen people twirl they thumbs long enough to realize how time flew by – along with life – as they were doing so. The only thing I’ve twirled this week were my hair while sitting at the computer to edit pictures and lastly the spoon in my verrine of Honey Yogurt Mousse with Raspberry Coulis. And cookies! I have twirled a cookie around my little finger. My life is now complete…

Ok, you know that’s sarcasm. There is more to life than mousse and cookies… although…Simplicity has been the motus operandi lately around the house and will remain for a little while (more on that later) and as such, these fit the bill perfectly. I could not help but giggle as I was spooning the different layers in the glasses. I kept thinking of my niece Camille who looked at me with wide open eyes one morning I was twirling honey and yogurt for my cereals.

Honey Yogurt Mousse W/ Raspberry Coulis


She’s at the age of food discoveries and adventures. Foods that look good touching, separated, stacked. Textures that play well together. Or not. Colors. Foods that fly on spoon to get into your belly. Those especially rock. And I was happy to oblige and fly that spoon for her. I’ll always treasure those moments alone just as much as those spent with her sister or with her sister alone. These two are just beautiful inside-out and I am proud of my brother for that. Awesome parenting.

The little things that are second nature to an adult like mixing honey and yogurt mean a great deal to her right now. Other food related questions were pretty entertaining too. How do you make the air bubble up in a mousse? Why do you turn your spoon in your cup as you eat? Our morning rituals were about the essentials of food. Came four o’clock and we were into Disney Princesses and their lack of fashion sense. Go figure.

Honey Yogurt Mousse W/ Raspberry Coulis


All these moments came rushing back in my head as I was making these and taking great care in separating the layers of yogurt mousse and raspberry sauce. Why? No idea since it would all turn into a giant swirly twirly mess once we’d start digging. It reminded me of the day Camille spent 15 minutes separating her steak from her tabouleh salad only to mix it all up in the end. It’s food. It’s fun. And if you don’t mind eating cold, play along.

When I say we have to do simple these days, I am not exaggerating. I don’t usually talk a whole lot about work here (that’s what the "tear sheet" section of my portfolio is here for – needs an update too) but the next few weeks, months, will be trying my energy to come here to post. Right before leaving for France I signed a contract with Gibbs Smith Publisher to do the photography and styling for Holly Herrick's new book on Tarts. Holly is wrapping up the writing and I have started the photography as we speak (Fall/winter 2011 release). I am completely psyched about it!

Honey Yogurt Mousse W/ Raspberry Coulis


It’s Holly’s third book as an author, my second as photographer & stylist and our first together. With a blog titled Tartelette, I also think it was kismet…

It is as rewarding as it sounds. It’s a lot of hard work too. I am doing the shopping, cooking, styling, photographing, post processing, etc… Holly is an accomplished recipe writer (and food stylist – team work!) so I do work with the assurance that the recipes will work. I just take extra steps since we only have one shot to tell you a thousand thoughts. So yes, there is necessary tweezer action in pulling that piece of tomato forward to even out colors or tucking that slice of peach sticking out like a cowlick on a baby’s head.

Honey Yogurt Mousse W/ Raspberry Coulis


Some of you have emailed wondering about another book. I can tell you that Carrie’s book that I styled and photographed, Deliciously Organic will be released in November. I just got the chance to look at the final manuscript and I got such a strong pinch in my heart. I am so honored to have participated in Carrie’s vision and message and at the same time worked with such a professional team. And the food…ah the food! It will knock your socks off!

Just thinking about the pile of work ahead makes me reach for one of those yogurt mousses. Soft, creamy, tangy from the raspberry and with that soft touch of honey through and through. Exactly what the doctor should prescribe on a Friday night. Make mine a double!! The cookie is a necessary icing on the cake so to speak. Trust me. Makes it even better…

Honey Yogurt Mousse W/ Raspberry Coulis


Honey Yogurt Mousse With Raspberry Coulis:

Makes 4 to 6

Notes: the gelatin amount used in the mousse is small enough to help stabilize the whipped cream and prevent the liquids from separating but is not enough to gel it completely so the texture remains soft and silky.
You can use 1 1/2 cups all purpose flour instead of the rice, millet and potato flour used in the gluten free shortbread recipe.

For the coulis:
2 cups (500gr) fresh or frozen raspberries
a few springs of lemon thyme (or lemon verbena, lemon balm, mint, lavender, etc…)
1/4 cup honey

For the mousse:
1 teaspoon powdered gelatin
2 tablespoons water
1 cup (250ml) Greek yogurt
1/4 cup (60gr) honey (I use a lavender honey from the Hautes Alpes)
1 cup (250ml) heavy whipping cream

For the shortbread cookies:
1 stick (115 gr) unsalted butter, at room temperature
3/4 cup (95 gr) powdered sugar (unsifted)
1 large egg yolk
1/2 cup superfine white rice flour
1/2 cup millet flour
1/2 potato flour
(or replace the rice, millet and potato flour with 1 1/2 cups all purpose)
2 tablespoons milk
pinch of salt

Prepare the raspberry coulis:
Place the raspberries, lemon thyme and honey into a heavy saucepan. Cook on medium heat until the raspberries start to break down, about 10 minutes. Remove from the heat, let cool and discard the lemon thyme if using. Set aside until ready to layer with the mousse.

Prepare the mousse:
In a small bowl, sprinkle the gelatin over the water and set aside.
In a medium bowl, whisk together the yogurt and honey. In the bowl of an electric mixer fitted with the paddle attachment, whip the cream to medium stiff peaks. Set aside.
Heat the gelatin in the microwave for 12 seconds or melt on top of a double boiler. Working quickly, pour the melted gelatin over the yogurt and whisk thoroughly. Gently fold in the whipped cream until everything is blended.

To assemble: layer about 1/4 to 1/3 cup of mousse and 2-3 tablespoons coulis in glasses and repeat the layers one more time. Serve with shortbread cookies if desired.

Prepare the shortbread cookies:
In a stand mixer fitted with the paddle attachment, whip the butter and sugar together until light and fluffy on medium speed, 2-3 minutes. Add the egg and mix until combined. Add the flours, milk and salt and mix briefly to incorporate. Dump the whole mixture onto a lightly floured board and gather the dough into a smooth ball. Do not work the dough while in the mixer or it will toughen up. Flatten the dough into a disk, wrap it in plastic wrap and refrigerate for an hour.
Preheat the oven to 350F and position a rack in the middle. Line a baking sheet with parchment paper. Set aside.
When the dough is nice and cold, roll it out on a lightly floured board or in between sheets of plastic wrap to about 1/4 – inch thick. Cut out rounds with a pastry ring or cookie cutter of your preferred size. Place them on the prepared baking sheet and bake for 10-12 minutes. Let cool.

Vanilla,Salted Butter Caramel and Chocolate Mousse And A Giveaway

Vanilla, Caramel & Chocolate Mousse


When I asked Bill what he would like me to prepare for him while I am gone for a few days, his answer was an unequivocal "Mousse please!". Yes, he is a softee and I know his mom spoiled him with homemade desserts pretty much all his life so his answer did not come as a surprise. I did prepare a few things to warm up after work during the five days I’ll be gone but I know Bill. When I showed him where everything was in the fridge, his eyes immediately landed on these Vanilla, Salted Butter Caramel and Chocolate Mousses. And they were all the way in the back. Of course.

So where am I going for 5 days that he needs a fridge full of goodies? San Francisco! I am attending the 2009 BlogHer conference which will be held on Saturday. I am also one of the speakers at the conference! I am so psyched about this event for so many reasons. For starters just take a look at the program here. All these amazing bloggers giving of their experience and expertise, I am honored to be among them and hope to contribute as much as they are.

Then there are all these attendees that I will finely get to meet in person and finally hug silly until they call security because Tartelette is cutting their air supply from excitement! Friends kept tweeting they wanted to meet me, well I want to meet them just as much.

Making Mousse


Last May, I was supposed to join Bill on a working trip near Jen from Use Real Butter and we immediately made the plan that I’d stay with her a few days while he’d work. That plan fell through. We were both upset at the circumstances and she asked if I’d be coming to San Francisco for BlogHer. She was. Maybe we could meet up there. This summer has been financially sucky so we were pretty much tied down not going anywhere for a long time. She emailed back the same day and said in her usual ways "Damn it Helen! You’re going! Here are Frequent Flyers miles we are not using and you are sharing a room with me. Get a conference ticket and we’ll figure something out."

Yes. That is the kind of chick Jen is and I am proud to call her my friend. She rocks. Period.

Man! Those tickets were hotter than the best Nutella crepes on a street cart in Paris. They sold out before I could even log on the computer. So waitlist it was. Drats! Then my name got tossed in the hat for potential speaker and the wait began. Either a ticket would come open or I’d be a speaker in which case I would not need one. Nothing happened on either front for a very long time. Then, I finally scored a ticket and three days later got an email about being a speaker (in case you are wondering, that ticket went back in the ticket pool).

Vanilla, Caramel & Chocolate Mousse


So here we are…On Friday I get to squeeze silly one of the best gals I know and on Saturday I will be talking about "Your Blog is Great…now what? Letting your blog lead the way to new opportunity". I am honored, ecstatic and nervous all at once. Sharing this panel with Jaden and Amy gives the chance to see three different people with different opportunities, different paths and at different pit stops on their careers. I have no doubt this panel will be informative and fun. Did I say I was psyched already? Ok, ok….

Well, I am not done being psyched because my friend Anita from Married With Dinner extended an invite to stay with her a couple for a few days passed the conference and of course I jumped on it! Finally we get to hang out! We have plenty of fun things planned and I can’t wait to tell you about it through pictures and emotions. There will be plenty of dinners, lunches and stories shared with friends and strangers and I hope to post a few fun shots while I am gone.

I know by now you must be pretty tired about me gushing about the next five days, so I will shut up and give you back some of the "good schtuff" I am lucky to experience everyday by hosting a little giveaway.

Aprons sample, for more colors and motifs, check The Hip Hostess website.

To win one of these adorable demi style aprons by The Hip Hostess (winner’s choice) all you have to do is leave a comment on this post between Thursday September 24th and Sunday September 27th, midnight Eastern Time. My dear husband will draw the winner at random and I will put her/him in contact with The Hip Hostess to pick the preferred demi style apron. But that’s not all! Deborah from The Hip Hostess generously offers all the readers of Tartelette a 15% discount on any order throughout October 15th 2009. Use the promo code TART (all caps) at check out. Very cool!

Enter Jen’s to win an Ipod Nano and enter here to win a fabulous apron handmade by The Hip Hostess, so you can bake and groove in style. And no, we did not plan it, would not have worked, ahah!

Now you can understand why I loaded the fridge with tons of good things for Bill to eat while I am gone. I am sad he won’t be able to walk around SF with me but I know he is not yet prepared for a room full of people saying "Oh my god it’s you!" and hugging you every 5 minutes. He said mousse was just fine. Especially one that starts with a soft and silky Bavarian cream and combines delicious layers such as vanilla, salted butter caramel and chocolate…

Vanilla, Caramel & Chocolate Mousse


Vanilla, Salted Butter Caramel and Chocolate Mousse:

Serves 4 to 6 depending on the size of your ramekins

Notes: you want to prepare the caramel part of this triplr mousse first as it needs to cool down properly before being incorporated to the rest of the base.

For the caramel:
1/2 cup (100gr) sugar
2 tablespoons (30ml) water
1/2 teaspoon fleur de sel or fine sea salt
1/4 cup (60ml ) heavy cream
2 teaspoons (10gr) unsalted butter

For the chocolate:
4 oz (120gr) dark semisweet chocolate

For the vanilla mousse base:
4 egg yolks
1/4 cup (50 gr) sugar
1 cup (250 ml) whole milk
1/2 vanilla bean
1 Tb (7gr) powdered gelatin, sprinkled over 3 Tb water
1 cup (250ml) heavy cream

Prepare the caramel:Place the sugar and water in a medium heavy bottomed saucepan and bring to a boil over high heat. Continue to cook until caramel in color. Remove from the heat and add the salt, heavy cream and butter. Stir with a wooden spoon until completely smooth. Let cool to room temperature.

Prepare the chocolate:
In a medium bowl set over a pan of simmering water, melt the chocolate until smooth. Remove from the heat and let cool to room temperature.

Prepare the mousse base:
In a large bowl, whisk the egg yolks with the sugar until very pale. In the meantime, in a large saucepan set over medium heat, bring the milk and the vanilla bean (split open and scraped over the milk) to a boil. Slowly pour the milk over the yolks, whisking constantly. Pour the mixture back into the saucepan over medium low heat and cook until the cream coats the back of a spoon (as if making creme anglaise). Add the softened gelatin and stir until melted completely into the cream. Let cool to room temperature.
Whip the heavy cream to soft peaks and fold it into the cooled cream base. Divide the base into three equal portions (one will stay untouched).

Assemble:
Add a couple of tablespoons of the base to the caramel to lighten it a bit and stir with a spoon. Gently fold the rest of the alloted mousse base into the caramel with a spatula.
Do the same for the chocolate portion.
Layer all three parts evenly into dishes or ramekins and refrigerate for an hour.

Raspberry And Vanilla Dobos Torte With The Daring Bakers

Summer Dobos Torte


I realized as I was starting to write down the recipe for this post that it was actually my 550th post. Wow…That made me a little proud and left me slightly amazed at the same time! I think I even said "oh la vache!" (holy cow!). That’s a whole lot of stories, words, laughs, tears and just as much sugar, butter, flour and eggs! What could be more fitting to celebrate post #550 than a Daring Bakers Challenge? A very sweet and very rich one: a Dobos Torte.

I wrote last time that I hadn’t had an ounce of craving for chocolate lately and when I set out to make this challenge, things turned out just about the same. I looked at the recipe and could not chase the images of sweet sugared berries floating in my head. Or was it sugar made saber equipped raspberries fighting off little chocolate critters? Hmmmm…Still, not an ounce of chocolate was calling my name yet. Too hot, too humid and a fridge full of raspberries thanks to my mother – in – law who always buys for 8 when there are just the 2 of them.

Spatulating...


A Dobos Torte is traditionally a rich layer sponge cake layered with chocolate buttercream and topped with caramel pieces. I respected all the components of the challenge while changing things around a bit for a few reasons: the season, the plentitude of raspberries and mascarpone I had (mother – in – law again) and the weather.

I baked the sponge layers in a sheet pan, cut out disks in the cake to form several 3-inch cakes in dessert rings. I layered the disks with a super light (but rich) mascarpone mousse and fresh raspberries. For the buttercream, I kept a similar method as the one given by the hostesses and made vanilla bean Swiss meringue buttercream where the egg whites are heated on the stove prior to being whipped. On a side note, the specks you notice on the cakes are neither caused by a problem with your vision or your computer screen. It’s not dirt either as my 5 year-old neighbor thought earlier. It’s the pure goodness of a vanilla bean.

Summer Dobos Torte


I thought about that caramel topping long and hard and knew it was just not going to happen as it was written given our heat and humidity. I made pulled sugar ribbons because I could make just what I needed for the cake before they’d disintegrate in sugar puddles. Going back on previous posts, I realized there had been bubble caramel, caramel circles, caramel strands, caramel corkscrews, caramel window panes, caramel plates but never good old pulled sugar. Ah! No more! Here it is!

Before you say you will never ever do it because it’s caramel-and-oh-my-god-it’s-just-too-hard-because-it’s-caramel let me tell you why you could make it tomorrow and neither glue your entire kitchen nor burn all your pots and pans trying to get it to "the proper shade of amber". First, there is a high enough ratio of water to sugar for the liquid not to turn to caramel before you reach the desired temperature for pulled sugar. Then, your mission is NOT to let it turn color. You boil, add coloring or not, take it to a certain temperature, pour it off, let it cool a bit and start playing.

Summer Dobos Torte


See? One more cool pastry thing to try one quiet evening. Do not fear the sugar!

We loved this version and I have already bookmarked the original one given by our hostesses to make this Fall and Winter. Thank you ladies for hosting and to Lisa and Ivonne for being such incredible Daring Bakers Founders! There are plenty more Dobos Torte to be seen from around the globe here.

The August 2009 Daring Bakers' challenge was hosted by Angela of A Spoonful
of Sugar
and Lorraine of Not Quite Nigella. They chose the spectacular Dobos
Torte based on a recipe from Rick Rodgers' cookbook Kaffeehaus: Exquisite
Desserts from the Classic Caffés of Vienna, Budapest, and Prague.

Summer Dobos Torte

One year ago: Chocolate Eclairs with the Daring Bakers
Raspberry And Vanilla Dobos Torte:

Makes eight 3 – inch cakes

For the sponge cake layers
6 large eggs, separated, at room temperature
1 1/3 cups (162g) confectioner’s (icing) sugar, divided
1 teaspoon (5ml) vanilla extract
1 cup plus 2 tablespoons (112g) sifted cake flour
pinch of salt

For the mascarpone mousse:
For the mousse:
3 egg yolks
1/2 tablespoon powdered gelatin
1/2 cup (125ml) honey
3 oz (90gr) mascarpone, at room temperature
1 cup (250ml) heavy cream

For the buttercream:
1 cup (200gr) sugar
4 large egg whites
3 sticks (340gr) unsalted butter, at room temperature

Prepare the cake layers:
Position the racks in the top and centre thirds of the oven and heat to 400F (200C). Line a half sheet pan with parchment paper and spray lightly with cooking spray. Set aside.
Beat the egg yolks, 2/3 cup (81g) of the confectioner’s (icing) sugar, and the vanilla in a medium bowl with a mixer on high speed until the mixture is thick, pale yellow and forms a thick ribbon when the beaters are lifted a few inches above the batter, about 3 minutes. (You can do this step with a balloon whisk if you don’t have a mixer). In another bowl, using clean beaters, beat the egg whites until soft peaks form. Gradually beat in the remaining 2/3 cup (81g) of confectioner’s (icing)sugar until the whites form stiff, shiny peaks. Using a large rubber spatula, stir about 1/4 of the beaten whites into the egg yolk mixture, then fold in the remainder, leaving a few wisps of white visible. Combine the flour and salt. Sift half the flour over the eggs, and fold in; repeat with the remaining flour. Pour the batter into the prepared half sheet pan and bake for 8 to 10 minutes or until slightly brown.

Prepare the mousse:
Whisk the egg yolks to break them up in the bowl of stand mixer (or with hand held beaters).
Sprinkle the gelatin over 2 Tb of cold water in a small cup and let it bloom.
In a heavy saucepan set over medium high heat, bring the honey to a boil and cook until it reaches 240F. Remove the pan from the stove and pour it carefully into a cup with a spout (easier to pour) .
Dissolve the gelatin in the microwave for 10 seconds, or in a bowl set over a pan of simmering water.
While still whipping the yolks, slowly pour in the hot honey, being careful to temper them and not cook them. Pour the gelatin over the egg/honey and whip together for a few seconds and add the mascarpone, one tablespoon at a time. Whip until cooled to room temperature and has tripled in volume
In another bowl, whip the cream to soft peaks or if you are using a stand mixer, pour the mousse into a large bowl and clean the mixer bowl thoroughly, or use another mixer bowl if you have one. Gently fold the whipped cream into the mousse trying to deflate the whole thing as little as possible. Use immediately.

Prepare the buttercream:
Place the sugar and egg whites in a large heatproof bowl over a saucepan of simmering water and whisk constantly, keeping the mixture over the heat, until it feels hot to the touch, about 3 minutes. The sugar should be dissolved, and the mixture will look like marshmallow cream (temperature should be about 235-238F). Pour the mixture into the bowl of a stand mixer fitted with the whisk attachment and beat the meringue on medium speed until it cools and forms a thick shiny meringue, about 5 minutes. Switch to the paddle attachment and add the butter, one tablespoon at a time, beating until smooth. Once all the butter is in, beat in the buttercream on medium-high speed until it is thick and very smooth, 6-8 minutes. Proceed per recipe or store for up to a week in the fridge or 3 months (well wrapped in the freezer).

Assemble the cakes: like eight cake rings with rhodoid or plastic protector sleeves cut to fit (yes, like the ones in the office)and place them on a baking sheet. Place a cake round at the bottom, place a layer of raspberries on the outside, fill with mousse to the top of the raspberries, top with one round of cake, more mousse and a final round of cake. Place in the refrigerator and let set 2 hours or overnight. When the mousse is set, cover with the buttercream and refrigerate.

For the pulled sugar ribbons:
1 1/4 cup (250gr) sugar
100 ml water
1 teaspoon lemon juice
5-8 drops red food coloring

In a heavy saucepan set over high heat, bring the sugar and water to a boil (do not let it turn into caramel). Once it is boiling, add the lemon juice and coloring. Bring the syrup to 298F on a candy thermometer. Immediately pour the caramel onto a silicone mat. You might want to wear some pastry gloves at this point because the caramel is extremely hot. Little tip: I have found myself with not one glove in the tool box so I used a new pair of dishwashing gloves instead.
Let it harden until it is pliable and carefully start folding the mat back and forth onto itself to work the sugar mass a bit. Take small pieces of the mass and start pulling, twirling or even make rose petals and other flowers with it. Beware that pulled sugar cools as fast as it gets hot so if it becomes harder and harder to work with you have different options available. If you have a heat lamp, place the pulled sugar underneath until pliable again. If you are like me (sans heat lamp) you can either place the pulled sugar on the silicone mat on a baking sheet directly on the stove on low heat until pliable or in a low heated oven. Be careful and watch it carefully: it can turn into "real" caramel very fast this way so do not walk away while you reheat.

Goat Cheese And Fresh Berries Tarts

Fresh Berries Tartelettes


Bill says that he is over the whole "birthday week" idea and that he’s been feeling that way since his last 30th birthday. Good thing I am not because as it gives me the opportunity to post about these Goat Cheese and Berries Tarts that were part of his dessert table a couple of weeks ago. Actually, I made these on three separate occasions prior to his birthday. Each time they disappeared as fast as the donuts.

They are good. They are pretty. They are a breeze to make. Simple pleasure. Sexy too. Indeed, as soon as I put these on the table the other day, our dear friend T. exclaimed "sexy tarts for SPOC!" And this is where I have to backtrack a little and explained why the entire room bursted out laughing, except Bill.

A couple of years ago, my dear husband was voted "SPOC", short for Sexiest Professor On Campus, by the College newspaper. (makes me wonder if the writers of Star Trek had something else in mind). That evening, Bill walked through the door furiously waving the paper in the air, red as a carp and exclaiming "I am SPOC! I am SPOC! I am ruined!"

Berries Before The Rain


I picked up the paper from his hand and started reading, half smiling, half laughing the whole way through. Actually, I thought it was pretty darn cool! I was married to the Sexiest Professor On Campus! Hello?!! Mine is what younger women refer to as "seasoned gentleman", you see. Told him I totally agreed with their hotness rating and that it was just a light topic to read during exams. No one said it was international news they were writing about. I could not figure why he was so upset.

"People voted for my looks and not my academic capabilities. How will I ever be taken seriously by my peers now? Looks over content! That’s terrible!" (notice the drama bit here). He went on and on like that for a couple of minutes until I broke his rant by saying "Is that all? You don’t find it demeaning? You don’t feel cheated, cheap?" He looked at me completely surprised by my last comment, adding "well, geez! Thanks! You sure know how to make me feel better!"

I called him over to the kitchen, handed him a slice of cake and said "Dude! First, by looking at the other professors in the running, they would have been out of their minds not to pick you! Second, it’s all meant in good fun. Third, well, shiz Bill, you are sexy so shut up and eat! Dang you make it really hard to pay you a compliment!"

Goat Cheese And Berries Tarts


I thought we were done with this mini crisis (Oy! My girlfriends' seem easy all of a sudden!) until his bestfriend T. put his hands on a copy of the paper, circled SPOC in red, framed the article and presented it to Bill for his 50th birthday that same week. We knew it was meant as a joke but I could hear Bill sigh as he tore open the wrapping paper. I quickly brought over a piece of cake, said "shushh and eat up! You sexy thing" and made a popping "SPOC" sound with my hand and my mouth. He did not find funny. At all.

To this day, whether we want to brush his ego or push his button, depending on the mood and occasion, we all insert SPOC anywhere we can in the conversation and make popping SPOC sounds whenever we can throughout the day. And most often we like to add "shushh and eat up!" And you know what, even after a gazillion desserts, Bill still retains his sexy figure. Men…Not fair!

One thing he asks me to make about every other week is these tarts, filled with a mild goat cheese mousse and topped with berries during the Spring and Summer or caramelized apple during the winter (they would be great with roasted quince too, come to think of it). We love goat cheese and berries together, especially goat cheese ice cream and cherries so we tend to use medium bodied cheese but if you are hesitant regarding the final taste, try with a mild one first. I have tried all sorts of different pastry doughs for these but I always go back to a short crust. It tends to stay crisper longer while filled with moist cheese or mousses.

Goat Cheese And Berries Tarts


Two years ago: Marbled Ricotta Cheesecake Brownies

Goat Cheese And Berries Tarts.

Makes 4

For the pate sablee:
2 tablespoons (20gr) slivered almonds
1/4 cup (50gr) cup sugar, divided
1/2 stick (56.5gr) unsalted butter, at room temperature
pinch of salt
3/4 cup (90gr) all-purpose flour
1 egg yolk
1/2 teaspoon vanilla extract

For the goat cheese mousse:
200 ml heavy cream, cold
4 oz (120gr) goat cheese, at room temperature
2 tablespoons (25gr) to 1/4 cup (50gr) sugar, depending on your preference
juice and zest of half a lemon

2 cups assorted berries such as raspberries, red currants, blueberries, etc…

Prepare the pate sablee:
Preheat oven to 350F.
Place almonds and 2 tablespoons (25gr) sugar in a food processor. Pulse until the nuts are finely ground. In bowl of electric mixer fitted with paddle attachment, cream butter, vanilla bean seeds, ground nuts and salt on medium speed until well-combined. Slowly add remaining 2 tablespoons of sugar and flour and mix well. Add the egg yolk and vanilla extract and mix until incorporated. Shape the dough into a ball and flatten into a disc. Wrap with plastic wrap and refrigerate for two hours or overnight.
Place the dough in between two sheets of plastic wrap or parchment paper and roll it out to about 1/8-inch thick. Cut out four 6- inch rounds and fit them inside four 4- inch tartlet rings, patting the dough in with your fingertips if it breaks on you as you transfer the rounds. Gather the scraps and set aside.
Prick the dough with a fork and refrigerate 30 minutes.
Preheat the oven to 350F. Place a piece of parchment paper inside the tart shells, fill with beans or pie weights. Bake the shells for 12 to 15 minutes. Let cool completely on wire racks and remove the pie weights.

Prepare the goat cheese mousse:
In the bowl of a stand mixer fitted with the whisk attachment, whip the cream to medium stiff peaks and reserve it in the refrigerator while you prepare the mousse.
In a medium bowl, whisk together the goat cheese and sugar with a spatula (if the goat cheese is soft enough there is no need to put your mixer to use on that one). Add the lemon zest and juice and mix thoroughly until incorporated.
Carefully fold the reserved whipped cream into the goat cheese base by placing your spatula in the center of the bowl, scooping the bottom over the top. Give your bowl a 45 degree turn and repeat until the batter is smooth. Fill a pastry bag with the mousse and divide it evenly among all tart cooled tart shells.

Divide the berries evenly over the mousse and refrigerate the tarts until ready to serve.

Pumpkin Seed Mascarpone Mousse And Raspberry Tartelettes

Pumpkin Seed Mascarpone Mousse Raspberry Tartelettes


I realized a couple of years into our marriage that the occasions to take out our china and break into grandma’s pretty silveware were going to be limited if we did not expand the meaning of "occasions". Even a simple and casual dinner with friends is now considered one. A moment to celebrate friendship, time set aside to connect or reconnect, all made special by the conversations and the people around them. Even a simple dinner calls for a special dessert like these Pumpkin Seed Mascarpone Mousse And Raspberry Tartelettes and my grandmother’s vintage dessert spoons. Just because.

I like to set a pretty table and make a special meal when we have company and you can guess that there is a treat awaiting them for dessert. We are not stuck into fussy table settings and usually end up taking our plates to the back deck during Spring and Summer or cozy up in front of the fireplace during the winter. I also love the fact that I can take the dogs to the dock around 7pm and sit there watching the sunset while the porpoises give us a little show. Pretty idyllic. Something to take in and make time for.

Pumpkin Seed Mousse & Raspberry Tartelette


We had friends over the other night and decided to get some crabs at the dock and have a simple crab boil for dinner. I knew we’d have to cover the deck table with layers of newspaper and just get ready for things to get messy. But oh so much fun! What I did not expect was for B. to call me from the dock and ask us to bring the party over there. I trust him and I knew there was a reason. We were not disappointed. The sea was at full tide, the sunset gorgeously pink, yellow and red and the porpoises were giving us the funniest game of hide and seek. Good company, good food, delicious surroundings. I don’t know how I got so lucky and I tried to take it all in since I know we won’t be here forever.

I wish my dad would have been there with us that night because it would have been the perfect setting to wish him a Happy Father’s Day (he also had a birthday just a few days ago!). I know he would loved it and he would have loved the whole meal, complete with these tarts. And I know my grandma would have loved to see her pretty silverware hanging out at the dock in a very informal setting. She was cool like that.

Pumpkin Seed Mousse & Raspberry Tartelette


My intentions were to make pistachio and mascarpone mousse tarts but I was already using all of my pistachio stash for another project. I am stubborn though. I wanted something green to contrast with the red of the raspberries I intended to use. I looked around in the pantry and remembered a container of raw pumpkin seeds. Hmmm…would it work? Well, there is no better way to find out than to just do it, right?


Oh yes…it does! The tartelettes start with basic shortcrust rounds (or sable dough) set at the bottom of a tart ring and topped with a layer of almond cream. The pumpkin seeds are finely ground before being mixed in with mascarpone and whipped cream to make the mousse. To finish the tarts are studded with plump and tasty fresh raspberries. I admit there is a new store opening up nearby and with opening specials running all week, I got ingredients for close to nothing but if either mascarpone are hard to find or cost prohibitive where you live, you can substitute cream cheese and other berries like strawberries .

Pumpkin Seed Mousse & Raspberry Tartelette


Pumpkin Seed Mascarpone Mousse and Raspberry Tartelettes:

For the tart shells:
1 stick (115 gr) butter, at room temperature
3/4 cup (93 gr) powdered sugar, unsifted
1 large egg
1 1 /2 cups (190gr) flour
2 tablespoons (20 gr) cornstarch (makes for a lighter crumb)
pinch of salt

For the almond cream:
1 stick (115 gr) butter, softened
1/2 cup (100 gr) granulated sugar
1 cup (100 gr) ground almonds
2 eggs
1/4 cup (60gr) heavy cream

Pumpkin Seed Mascarpone Mousse:
200 ml heavy cream
4 oz (120gr) mascarpone, at room temperature
2 tablespoons (25gr) sugar
1/3 cup (80gr) raw pumpkin seeds, ground

2 cups fresh raspberries

Prepare the tart shells:
In a mixer, whip together the butter and sugar together until light and fluffy. Add the egg and mix until incorporated. Add the flour, cornstarch and salt and mix briefly. Dump the whole mixture onto a lightly floured board and gather the dough into a smooth ball. Do not work the dough while in the mixer or it will toughen it up. Flatten the dough into a disk, wrap it in plastic wrap and refrigerate for an hour.
When the dough is nice and cold, roll it out on a lightly floured board or in between the sheets of plastic. You will need half the amount of dough to make the tartelettes. The other half can be kept in the fridge for up to 5 days or frozen, well wrapped for up to 3 months. Cut out eight rounds with a 3-inch pastry ring. Place them on a baking sheet lined with parchment paper and bake at 350F for 8-10 minutes. Let cool.

Prepare the almond cream:

Place the butter, sugar, almond powder, and the eggs in a large bowl and whisk until smooth (can also be done in a food processor). Add the cream but stir it in carefully instead of whisking it (you do not want to emulsify it or it will rise while baking). Refrigerate for 30 minutes. Place the 8 baked rounds of dough in eight 3-inch pastry rings, divide the cream evenly among the rings and bake 20 minutes at 350F. Let cool.

Prepare the mousse:
In the bowl of a stand mixer fitted with the whisk attachment, whip the cream to medium stiff peaks and reserve it in the refrigerator while you prepare the mousse.
In a medium bowl, whisk together the mascarpone and sugar with a spatula (really no need to put your mixer to use on that one). Add the ground pumpkin seeds and mix thoroughly until incorporated.
Carefully fold the reserved whipped cream into the mascarpone base by placing your spatula in the center of the bowl, scooping the bottom over the top. Give your bowl a 45 degree turn and repeat until the batter is smooth.

Assemble the tarts:
Place the mousse in a pastry bag fitted with a star tip and pipe a large dollop of mousse right in the center of the tartelettes, leaving a small border all around. Place raspberries all around the mousse. Refrigerate until ready to serve.

I need to end this post by telling you that I feel like the luckiest girl on my block lately and I’ll tell you more about it during the week when I am done rubbing my eyes in amazement. All I can say is that you will see a group of bloggers doing a bunch of fun and food related things in a pretty cool place. All in the name of research. Of course. Which reminds me I need to start packing…

Peach Chamomille Mousse Cakes

Peach Chamomille Mousse Cakes


There are times in your life when you need to pull out all the stops, set up a special table, make an extraordinary tasty meal and just twirl some caramel strands around pretty mousse cakes. When crap hits the fan outside of my comprehension I just try to deal with it the best way I can: doing the things I know, doing them with dedication and focus. Yes, like twirling caramel strands around Peach and Chamomille Mousse Cakes.

Granted, my normalcy may not be yours but we all deal differently with stress and incredible circumstances. You might set out to clean your closet or reorganize your files. B. takes the house on a vaccum marathon. I usually go to the dock, take a huge breath in and go home to try to find some way to reconnect and it always ends up with the kitchen counter covered in sugar and flour. I also forge ahead in the photography and writing projects I have (portfolio is up!) happy not to have a minute to think too much about the telephone ringing. (I did previously established that I had a weird sense of logic, didn’t I?!)

Peach Chamomille Mousse Cake


I have been quite open here in the past, sharing painful sentiments and emotions, bringing you to share with me the positive in rather difficult moments. But there are circumstances that only a handful of people (if that many) have been made aware of and I wish to keep for ourselves for now. Sorry to tell you that things are not always as they seem without elaborating but not having to formulate yet again things into words here is such a relief.

All day long we make plans, rationalize, explain, and I find peace knowing that I can come here and just hint at stuff and then tell you in the lightest manner possible to go bake a cake because things are prettier all wrapped up in sugar. Thank you for allowing me to do that. Being here with you and sharing what I am passionate about whether it be pastry, baking, photography, ingredients is one of the best part of the day. Thank you.

Peach Chamomille Mousse Cake


One thing I am passionate about when Spring comes around is going down to the farmer’s market and get all my produce fresh and at ridiculously low prices. Egss, raw milk, vegetables and fruits galore. Happy, happy! I got so excited the other day when I got the first local peaches of the season. Velvet skin, rich colors and intoxicating scent. Happier, happier!

With peaches this fresh and juicy in my basket, I could only think about making ice creams and mousse. I wanted to create something soft and subtle, something that makes you want to close your eyes and focus on what it is you are eating and not only just eating it. I made a simple lemon and olive oil cake for the base, opting for a grassy flavored oil to play up with the peaches. The two different mousses start with the same base, a pate a bombe for which I flavored the sugar syrup with a good handful of dried chamomille buds (organic, usually by the bulk teas), and added pureed peaches to half of the mousse base. You can simply refrigerate the cakes until set and enjoy them chilled or freeze them and let them soften a bit for 10-15 minutes. We had them both ways and enjoyed them equally.

Peach Chamomille Mousse Cakes


One year ago: Snickers Macarons

Peach Chamomille Mousse Cakes:

Makes four 3-inch cakes
Notes: I build these cakes in 3-inch wide entremet or mousse cake rings but you could build one single cake in a 8-inch round or 8×8-inch cake pan. Only the look will be different. Instead of using rhodoid to line the rings, (nothing against it, just did not have any on hand), I used a much less expensive medium: plastic proctector sheets (yes the ones used around the office to protect documents) and cut them to fit the inside of the rings.
I did brush the cake base with Limoncello but you can skip this step if you wish.

For the lemon olive oil cakes:
1 1/2 cups (185gr) all purpose flour
1 cup (200gr) sugar
1 tablespoon (14gr) baking powder
1/4 (1.5gr) teaspoon salt
1/2 cup egg whites (about 3-4)
3/4 (175ml) cup milk
1/4 cup (62.5ml) lemon juice
grated zest of one lemon
6 tablespoons (80gr) olive oil

For the chamomille and peach mousses:

1.5 tablespoons powdered gelatin
7 Tablespoons (130gr water), divided
2 cups (500 ml) heavy cream
6 egg yolks
1/2 cup (100 gr) sugar
2 tablespoons dried organic chamomille buds
3/4 to 1 cup peach puree (I process 2-3 cut peaches until finely pureed)

For the caramel decorations, please read here and here. I just twirled the caramel around a large tin can instead of a wooden spoon.

Prepare the cakes:
Preheat oven to 300F and position a rack in the center.
In a bowl, stir together all the dry ingredients for the cake. Set aside.
In a separate medium bowl, whisk the egg whites and the milk. Make a well in the center of the flour mix and slowly add in the egg white mixture while stirring with a whisk. Add lemon juice, zest and the olive oil. Mix with a whisk until smooth. Line a quarter sheet pan with parchment paper, lightly spray with cooking spray and pour in the batter. Bake for 20 minutes or until a toothpick inserted in the center comes back clean. Let cool and cut out four 3-inch rounds to fit your cake rings (extra cakes freeze well for up to 3 months). Line 4 cake rings with rhodoid or plastic sheets cut to fit and place your cake bases at the bottom. Place the rings on a baking tray and set aside.

Prepare the mousses:
In a small bowl, sprinkle the gelatin over 2 tablespoons of water and let stand while you prepare the pate a bombe.
In the bowl of a stand mixer fitted with the whisk attachment (or hand held beaters), beat the cream until it holds soft peaks. Chill it while you prepare the mousse base. Wash your bowl and whisk attachment.
In a heavy saucepan, stir together 5 tablespoons of water, sugar and chamomille buds. Bring to a boil over medium heat. Since you are not making caramel, it is ok to stir occasionally until the sugar is dissolved. Let it boil and bring the mixture to 238°F on thermometer (soft-ball stage). Strain the syrup to remove the chamomille over a container with a spout (makes it easier to pour over the egg yolks)
In the clean bowl of your mixer, still using the whisk attachment, beat the yolks slightly to break them up. Increase the speed to medium high and slowly pour the hot syrup over the yolks. Go fast enough to prevent the eggs from scrambling but not so fast that you end up with most of the syrup on the wall of the bowl or the whisk. Dissolve the gelatin in the microwave for 10-12 seconds and quickly add it to the pate a bombe. Continue to whip until the mass is completely cold and airy.
Fold about one third of the pate a bombe base into the chilled whipped cream to loosen it up and make it easier to incorporate homogeneously. Fold in the remaining pate a bombe.

Assemble: Divide the mixture in half and carefully fold the peach puree into one part. Spoon or pipe the chamomille mousse over the cake base and do the same with the peach mousse. Refrigerate or freeze until set.

Pistachio And Strawberry Mousse Mille Feuilles And A Giveaway

Pistachio Strawberry Mille Feuilles


I just laughed and giggled at all the comments about the Pistachio Creme Brulee Macarons from last week and your thinking that I can take Pierre Herme any day. Clearly an interesting idea but sadly one that will never take place because the man is king in the pastry department. I did get an email from Pierre Herme though, well ok, more precisely from La Maison Pierre Herme. And it was not personal at all. But I loved it all the same. It actually inspired me to make these Mille Feuilles filled with mascarpone, pistachio and strawberry mousses.

I like staying close to home by subscribing to French cooking magazine, watch French news feeds anytime I can, and also by receiving PH’s monthly newsletter in my inbox. An attractive list of all the seasonal goodies coming up in his shops. And there it was, the whole PH House of Pastry, tempting with more amazing tastes and textures than before. I read it carefully and sighed at their current signature flavor: all PH’s creations in pistachio and strawberry. The "Montebello" line was attractive and indeed perfectly seasonal, even for an expat like me, three thousand miles away from home.

Pistachio Strawberry Mille Feuilles


In my last post, I mentionned how a client needed an anniversary dessert with cherries and how I was not completely satisfied with their flavor yet. I care about my craft too much to keep silent if something is not 100% up to par. With a head filled of PH' Montebello desserts and a nose intoxicated with the fragrance of strawberry, I settled on creating something along those lines (no recipes come with the newsletter). A mascarpone – pistachio mousse sharing space in between two sheets of "rough" puff pastry with a mascarpone – strawberry mousse

I do receive a lot of cookbooks for preview and in March I received Pastry by Michel Roux. With little time on my hands, I figured his "rough" puff pastry recipe would be perfect to try for this dessert. As much as I love the process of traditional puff pastry, I was positively surprised at the results I got with this one. Flaky, tender, fast. Precisely what I need now that the heat is back. For the mousses, I made a simple mascarpone base and used half with finely ground pistachios and half with pureed strawberries, some whipped cream and that was it. Rich, light, flavorful all at once.

Pistachio Strawberry Mille Feuilles


If you ever want to master all sorts of pastry doughs, this is the book to get. Clear instructions with plenty of pictures along the way and a myriad of examples and recipes both sweet and savory to go along. His "rough" puff pastry yielded such great results that I decided to give away one of the two copies I have.

To win a copy of Michel Roux’s Pastry (and who does not want a free book, especially on this fine Memorial Day weekend?), all you have to do is leave a comment between today, Sunday May 24th and Tuesday May 26th at midnight. The winner will be chosen at random by my better half. No anonymous comments please, just sign Zorro if you must.

Pistachio Strawberry Mille Feuilles


Two years ago: Gateau Saint Honore – Daring Bakers

Pistachio and Stawberry Mousse Mille Feuilles:
Makes 4

For the rough puff pastry, adapted from Michel Roux.
2 1/4 cups (300gr) all purpose flour
1 1/4 cup (300gr) unsalted butter, cold and cut into 1/4-inch cubes
1/2 teaspoon (3gr) salt
1/2 cup (125ml) ice-cold water

Place the flour in a large bowl and make a well in the center. Add the butter and salt right in the well and work them together with the flour, using your fingertips, gradually drawing in more flour into the center. When the butter pieces have reached pea sized pieces and the mixture appears grainy, gradually add the ice water and mix until it is all incorporated. Do not overwork the dough. Roll it into a ball, cover with plastic wrap and refrigerate 20 to 30 minutes.
On a lightly flour work area, roll the dough to an 8×4-inch rectangle. Fold it into three and give it a quarter turn. Roll it into another 8×4-inch rectangle again and fold it in three again. These are the first 2 turns. Cover with plastic wrap and refrigerate again for 30 minutes.
Give the chilled dough 2 more turns, rolling and folding as previously described. The pastry is ready then. Cover with plastic wrap and refrigerate for 30 minutes.
When ready to use, roll the dough to a 1/8- inch (3 mm) thick rectangle and cut out eight 4×2 pieces. Place them on a parchment paper lined baking sheet. Dock the dough with a fork to let the steam out while baking so your rectangles will be evenly puffed. Bake at 350F until golden brown. (if they puff too much, cover with a sheet of parchment paper and place a small baking sheet on top). Let cool completely before filling with the mousses

For the pistachio and strawberry mousse:
8 oz (240gr) mascarpone cheese, at room temperature
1/2 cup (100gr) sugar
1/4 cup (30gr) finely ground raw pistachios
1/2 cup pureed fresh strawberries
1 1/2 cups (375ml) heavy cream, kept cold, divided

In a large bowl, whisk together the mascarpone and sugar until completely smooth. Take half the mixture and place it in another large bowl. Add the pistachios to one of them and mix until incorporated. Add the pureed strawberries to the other mascarpone mixture. In a mixer, whip the heavy cream to stiff peaks. Fold half into the pistachio mascarpone mix and the other half with the strawberry one. The pistachio mousse is probably stifff enough to be used right away but you might have to refrigerate the strawberry one until the mascarpone hardens a bit otherwise it might be too soft to pipe easily. Divide the mixture into piping bags fitted with medium plain tips (I use Ateco pastry tips) (or do the pistachio mousse first, wash your bag and tip and then do the strawberry one). Pipe dots of mousse onto half the puff pastry sheets, alternating the pistachio and strawberry. Top with another sheet of puff pastry and refrigerate at least 30 minutes.

Have a wonderful Memorial Day Weekend…No barbecue for us but brunch with friends this year.

During Breakfast


Berry Mousse and Lemon Poppy Seed Cake Verrines

Berry Mousse - Lemon Poppy Seed Cake Verrines

"Whatcha making?" Bill asked when he stepped into the kitchen area on Sunday. "My birthday cake" I replied, scraping the last bit of batter onto a sheetpan. He then pointed at the two bowls filled with strawberries and blackberries, the couple of lemon and the bottle of Limoncello. "Yes, yes, yes…all those for my cake". His eyes lit up in anticipation and he left the room uttering "hmmhmmhmm".

A few hours later, he tried to sneak a peak into the refrigerator to see the final product and opened and closed the refrigerator door a couple of times. "Where is it? Are you done yet? I can’t see it!". I pulled out a tray of glasses and handed him a spoon. "It’s not a cake! Wait…I am sorry. It’s your birthday, I should have known better…"

Lemon poppy seed cake brushed with straight Limoncello and layered with strawberry and blackberry mousse. There is cake, there is cream and there is enough space to stick a candle in it. I am ready to celebrate!

Berry mousse - Lemon Poppy Seed Cake Verrines


Yes, it’s my birthday and since I like to make myself something I really want, it is most often one of three things (and sometimes all at once): it usually contains lemons, it must be small and preferably in a verrine (glass). The sound of spoons digging that last bit of dessert in the bottom of a ramekin or glass is music to my ears. It doesn’t mean the end. It means everybody reached the bottom and "cling-cling" wishes for more. Happy sound.

With the abundance of local strawberries and the hot days we have been having, I started craving something light and refreshing. Everyday I’ve also been getting wild blackberries from the woods across the street and my mere one cup harvest grew to a whopping 1 pound on Sunday morning. I don’t think the new neighbors have realized yet the treasure laying at their feet just a few yards away. I am already scheming blackberry pies, cobblers, sorbet and secretly wish they don’t figure out what I am doing in the morning, reaching down into the bushes. I want it all….I promise to share the results of my baking though. Promise. Yes, really!!

As I was eating my (early) birthday treat, I started thinking about Bea, Anita and Jeannette, also celebrating another year this month and Kate to-day! There is also one tiny person who now can be added to the list of May babies and that is Kristin's newest addition, Leah Katherine, born on Monday night. This dessert is for you all!

Berry Mousse - Lemon Poppy Seed Cake Verrines


One year ago: Lemon Meringue Cake with Lemon Ice Cream.Two years ago: Birthday Girls and a chocolate cake.

Berry Mousse and Lemon Poppy Seed Cake Verrines:

Makes enough for ten to twelve 6 to 8 oz ramekins or glasses

For the cake:
1 1/2 cups (185gr) all purpose flour
1 cup (200gr) sugar
1 tablespoon (14gr) baking powder
1/4 (1.5gr) teaspoon salt
1/2 cup egg whites (about 3-4)
3/4 (175ml) cup milk
1/4 cup (62.5ml) lemon juice
grated zest of one lemon
1 tablespoon (9gr) poppy seeds
1 stick (113gr) unsalted butter, melted and cooled

For the strawberry mousse:
2 teaspoons powdered gelatin
1 tablespoon water
8 oz (210gr) strawberries, pureed
1/4 cup (50gr) sugar
1/2 teaspoon lemon zest
1 tablespoon lemon juice
3/4 cup (6oz – 190ml) heavy cream

For the blackberry mousse:
2 teaspoons powdered gelatin
1 tablespoon water
8 oz (210gr) blackberries, pureed
1/4 cup (50gr) sugar
1/2 teaspoon lemon zest
1 tablespoon lemon juice
3/4 cup (6oz – 190ml) heavy cream

Limoncello

Prepare the cake: preheat oven to 300F. In a large bowl, stir together all the dry ingredients for the cake. Set aside. In a separate medium bowl stir together the egg whites and the milk. Make a well in the center of the flour mixture and slowly add in the egg white mixture while stirring with a whisk. Stir in the lemon juice, zest, the poppy seeds and the melted butter. Mix with a whisk until smooth. Line a quarter sheet pan with parchment paper, lightly spray with cooking spray and pour in the batter. Bake for 20 minutes or until a toothpick inserted in the center comes out clean. Let cool completely and cut out as many disks as you need to fit inside your ramekins or glasses.

Prepare the strawberry mousse: sprinkle the gelatin over the water in a small bowl and set aside to bloom (soften).
In a medium saucepan set over medium heat, stir together the strawberries and sugar just until hot. Add the gelatin and stir until it is completely melted. Let cool to room temperature. In the meantime, whip the heavy cream to soft peaks. Once the strawberries are at the right temperature, carefully fold the whipped cream into the fruit base.

Prepare the blackberry mousse the same way.

Assemble the verrines: brush Limoncello on each of the cake pieces or rounds that are going to be used in the glasses. Place a cake round at the bottom of the glass, top with blackberry mousse, one cake round, strawberry mousse, one cake round, blackberry mousse. Finish with more wipped cream if desired (I added lemon zest to mine).