
cream

Lavender Panna Cotta With Poached Rhubarb

Lavender Panna Cotta With Poached Rhubarb


There are very few things that say Spring to me like a few stalks of rhubarb do. I am not alone sharing that sentiment just from seeing all the rhubarb recipes posted by fellow bloggers out there. That makes me happy. I do have a little love affair with "la rhubarbe" each year.

This complex, fibrous and tart plant is probably one I remember the most vividly about my childhood. I literally grew up on that stuff every Spring and Summer. I can’t recall a sunny day without my mother compote de rhubarbe or a vacation without my grandmother tarte a la rhubarbe.

Lavender Panna Cotta With Poached Rhubarb


I got an early start on my rhubarb baking (crumbles) when I got giddy finding hothouse cultivated rhubarb. But last week’s venture to the farmers market with my parents was a success with a bunch pretty stalks of wild rhubarb making their way into our basket.

I really wanted to use it before their return to France and thought that a go at rhubarb sorbet would be a good one to whirl but we did not have nearly enough. I was going to acquiesce to my mother stewed rhubarb but I knew B. would never put a dent in it. The mushy texture of stewed rhubarb is something the man cannot stand. I like it on plain yogurt or fromage blanc.

Lavender Panna Cotta With Poached Rhubarb


As much as I wanted to make my grandmother’s rhubarb tart it would have to wait until I am completely happy with the results. There was one elusive whiff of a scent whenever she’d pull hers out of the oven and I have yet to nail it down but I am getting close. Ha!

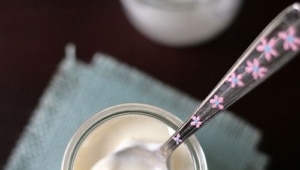
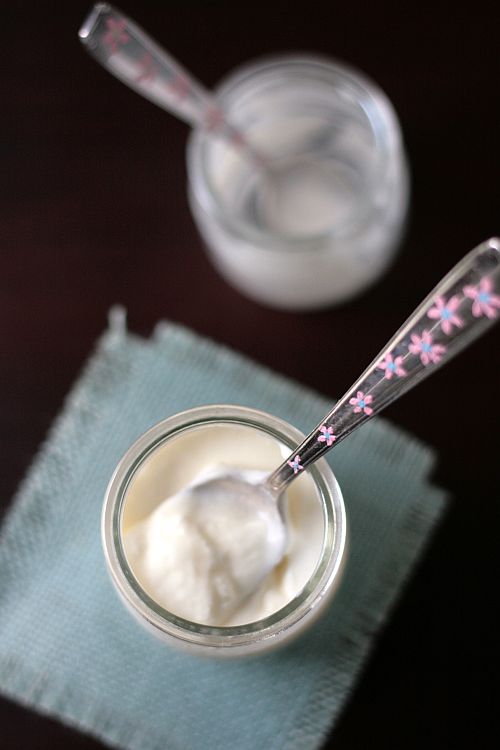
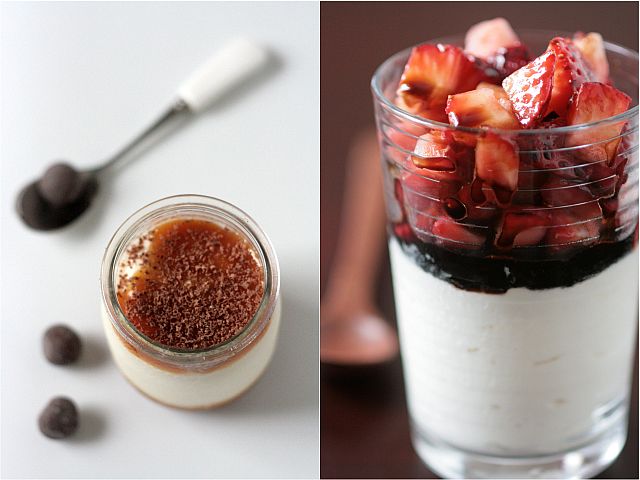
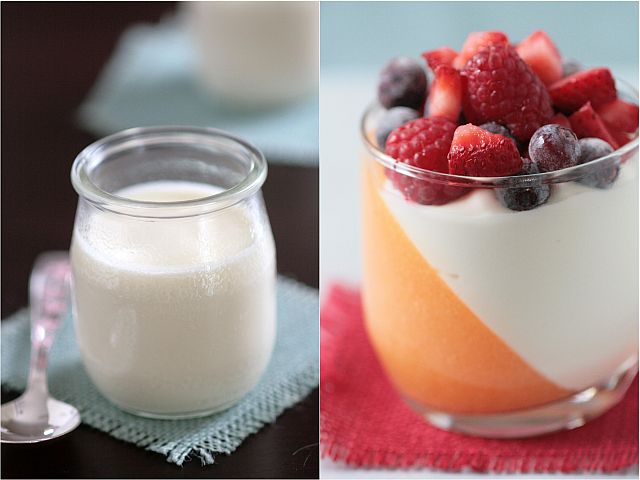
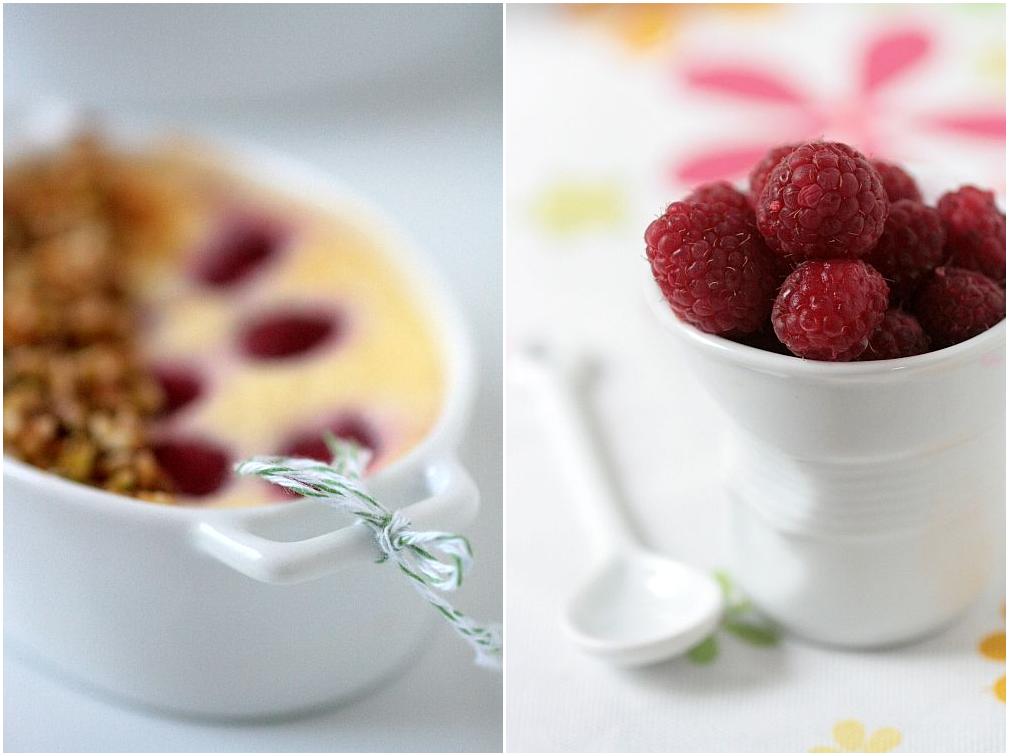
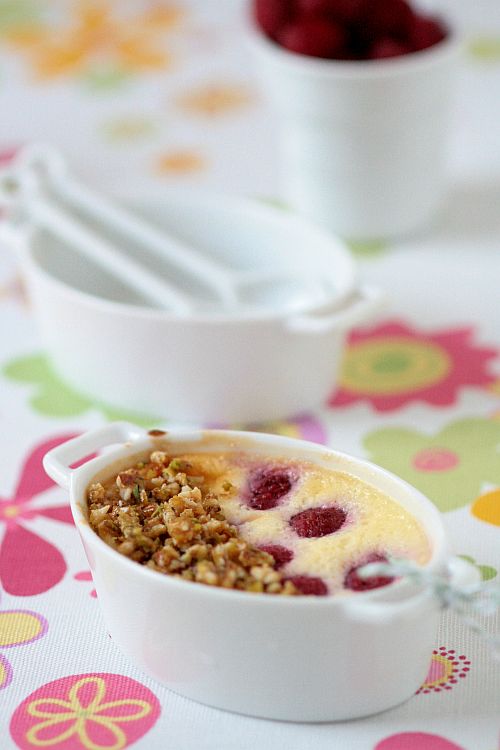
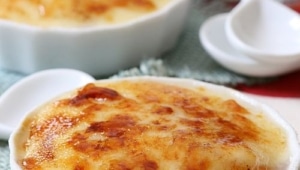
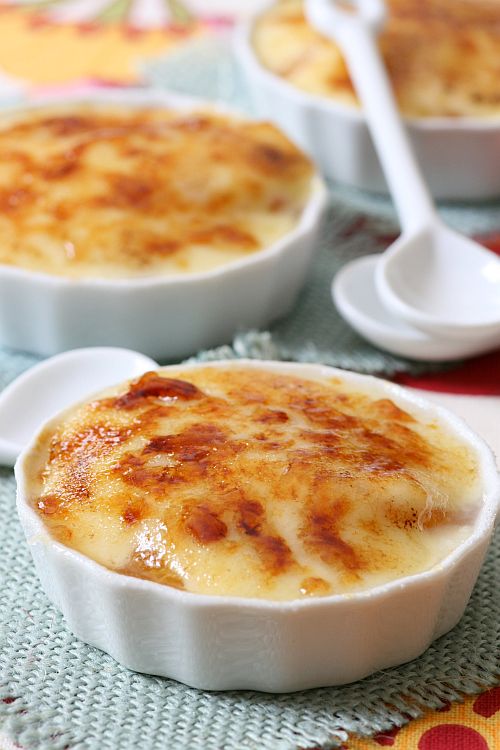
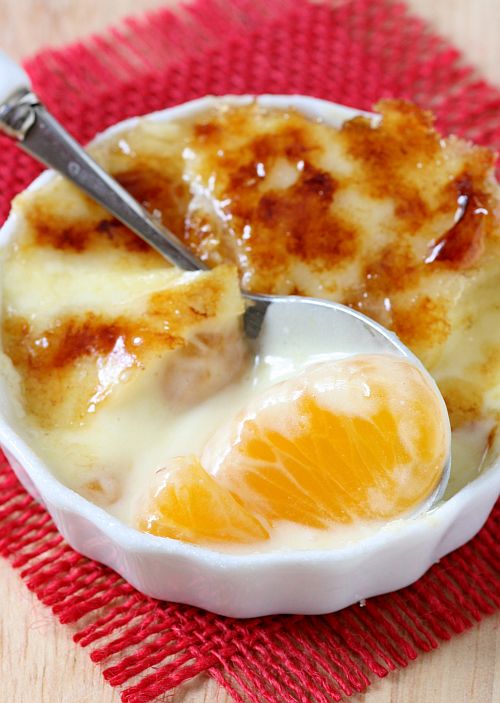
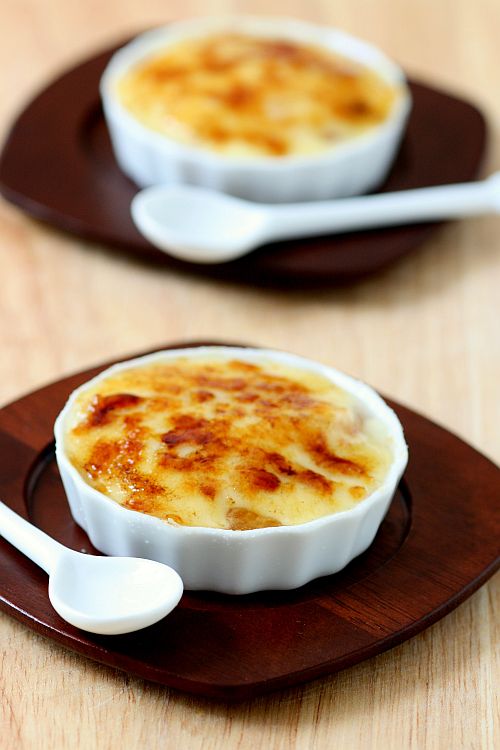
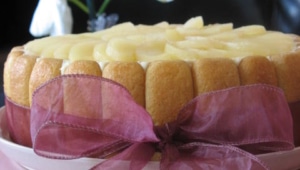
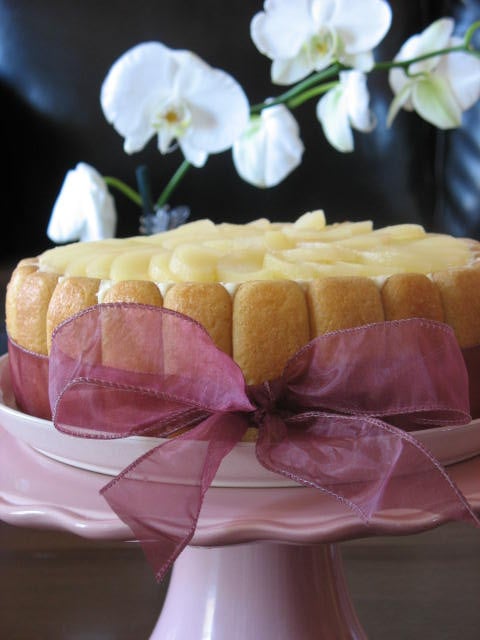
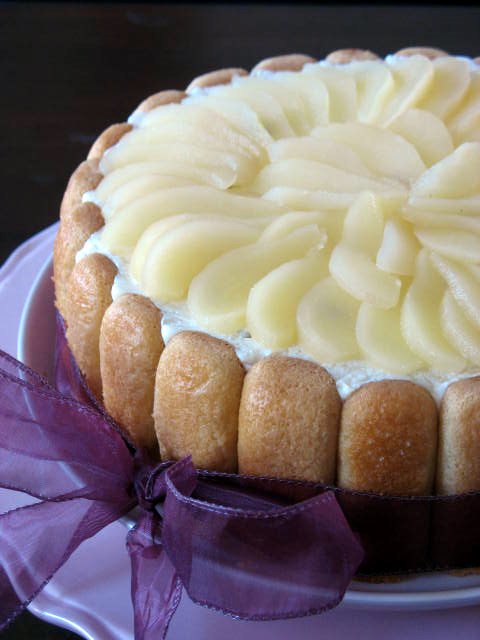
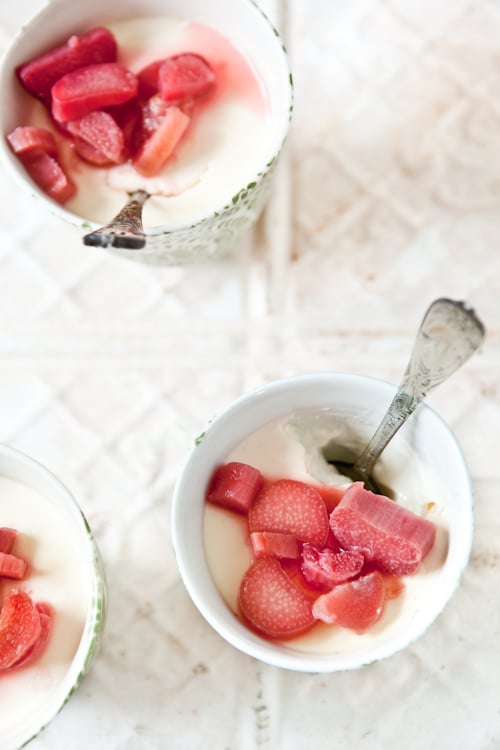
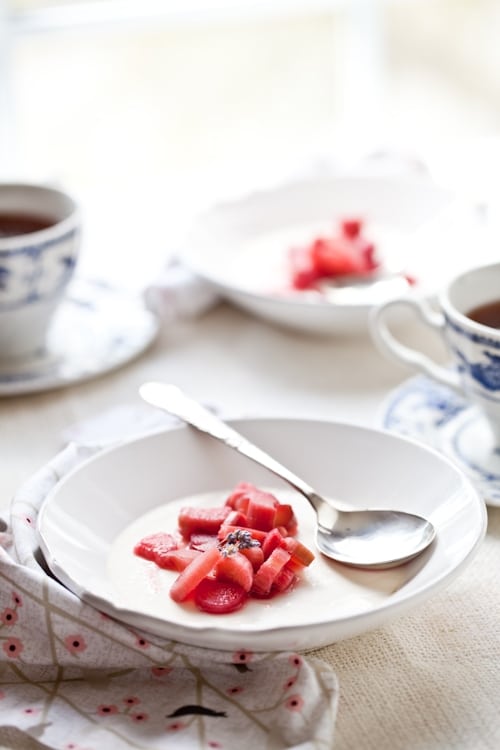
In the meantime, I made one of the desserts I knew would make everyone happy, Lavender Panna Cotta with Poached Rhubarb.

There is something about lavender that I can’t never grow tired of. I grew up in Provence, surrounded by lavender and mimosa. One look at a lavender bud and I feel like I am six again. Once the scent hits my nose I can almost hear the cicadas in the background and my mom yelling from the patio to get down from the apricot tree. Yes, it was a rather idyllic upbringing. One I wish to share with B. when we move back home eventually one day in our old age.

Lavender Panna Cotta With Poached Rhubarb


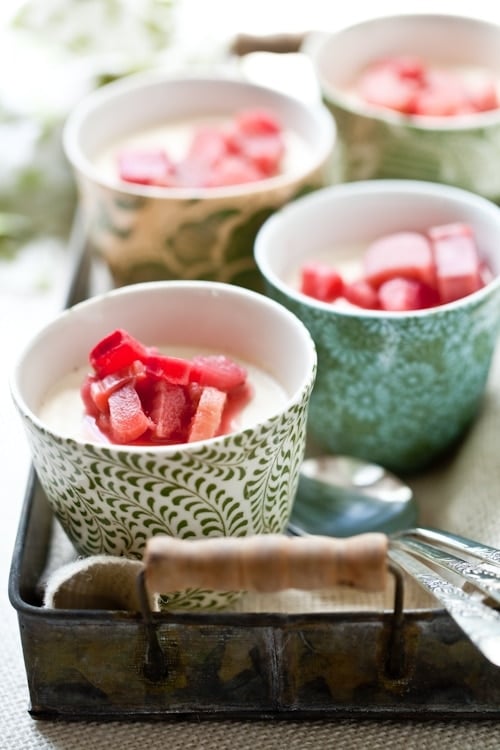
Beside sorbet, this is one of our favorite ways to eat rhubarb, gently poached in lemon juice and a touch of honey until barely fork tender to preserve most of the texture that would be lost otherwise. The contrast with the silky panna cotta both in texture and flavor elicited lots of oohs and ahhs from the table the other day. Lots of fidgeting and eying the kitchen for second too!

I had made more panna cotta and had gotten some more rhubarb ready to be chopped and poached for when Tami came to visit but we never got around to it. Too much fun was being had on the town. The house was so quiet after a month of visitors that both B. and I were glad to have a couple of these to dig into to chase the blues away.

Lavender Panna Cotta With Poached Rhubarb


By the way….if you are in Charleston this week, do not miss Cabaret at the Sottile Theater. Great cast, great performances! And I am not just saying that because B. plays in the orchestra (although I am kind of very proud he is!)

Green cups: Anthropologie
Low bowls: Anthropologie
Blue tea cups: vintage gift from
Tami
Tray: vintage find
napkins: remnant pack from
Cicada studio


Lavender Panna Cotta with Poached Rhubarb

Serves 4-6

For the panna cotta:
1 tablespoon powdered gelatin (2 sheets gelatin)
1/4 cup water
2 cups heavy cream
1/4 cup honey
1 tablespoon edible lavender buds
2 cups full fat buttermilk

For the poached rhubarb:
Juice of one lemon
1/2 cup water or sweet white wine or blush wine
2 tablespoons honey
5 stalks rhubarb, chopped into small pieces (1/2 inch)

Prepare the panna cotta:
Place the water in small bowl and sprinkle the gelatin over it. Reserve.
In a large heavy bottomed saucepan placed over medium heat, bring the heavy cream, honey and lavender buds to a simmer. When the cream is hot, remove from the heat and whisk in the reserved gelatin until it is completely dissolved. Add the buttermilk and whisk until well blended.
Divide the mixture among 4-6 cups or ramekins. Let stand at room temperature for 20 minutes and then refrigerate for at least 4 hours before serving to let the cream set properly. Top with the poached rhubarb just before serving.

Prepare the rhubarb:
Place the lemon juice, water (or wine) and honey in a heavy bottom saucepan over high heat. Bring to a boil and add the pieces of rhubarb. Poach for 2-3 minutes then gently remove the rhubarb from the poaching liquid and set aside (they will continue to soften as they cool). You can reduce the poaching liquid to a syrup over medium heat and use to drizzle over the panna cotta, it’s fantastic.

————————————————————————————-

Le P’tit Coin Francais:

Pour les panna cotta:
2 feuilles de gelatin
1 verre d’eau
500ml de creme liquide
60ml de miel
1 cs de lavende
500ml de lait ribot (babeurre)

Pour la rhubarbe:
5 tiges de rhubarbe, coupees en des
jus d’un citron
250ml d’eau ou de vin blanc sucre ou de rose
2 cs de miel

Preparer les panna cotta:
Mettre la gelatine a ramollir dans l’eau.
Dans une casserole a fond epais, chauffer la creme avec le miel et la lavende jusqu’a fremissement. Hors du feu, ajouter la gelatine refroidie et bien melanger pour qu’elle fonde. Ajouter le lait ribot et bien melanger de nouveau.
Verser dans des coupes ou des ramequins et laisser refroidir a temperature ambiante pendant 20 minutes. Placer ensuite au refrigerateur de preference 2 a 4 heures.

Pour la rhubarbe pochee:
Porter a ebulition le jus de citon, miel et eau (ou vin) a chauffer dans une grande casserole. Ajouter la rhubarbe et faire pocher 2-3 minutes. Prelevez les morceaux du liquide et mettre de cote. Reduire le liquide de pochage de moitie et verser sur les panna cotta avec la rhubarbe.

Cardamom and Saffron Ice Cream

Saffron&Cardamom Ice Cream


I am usually pretty excited when Mondays roll around. New week, new things happening, new people to meet and things to discover. It’s never quite the same and I look forward to the things learned and observed. Except this Monday. It has been such a splendid weekend, I hardly want it to end. We did have an Easter egg hunt for the kids next door and an improvised picnic in the yard with the neighbors. It just filled me with joy, hope and laughter. An instant battery charger for the soul.

I am usually in charge of desserts when we get together but this time I only had ice cream ready. Actually, I could have cut tiny pieces of what was left of a chocolate coconut and mango cake I had made but that would have been like giving an elephant a thimble to drink from. (more on the cake this week). Instead, I brought down the container of Cardamom and Saffron Ice Cream I was saving for such warm and pleasant days.


Can The Weekend Last All Week?


If I had shown you the inside of the cabinets during Jen’s Kitchen Tour series, it would have confused everybody. I have what B. called "kitchen bougeotte". (To have "la bougeotte" = to be fidgety). With my parents and almost all their sibblings born an raised abroad, there was no standard for cuisine types in the family. Wherever they were they would learn some local dishes and ultimately pass them on to us. Along with all the pots and pans specific to each culture. I realized the tour would quickly require a two-page extension if I included them and I could not subject you and Jen to that. It was long enough already!!

Being here in the States is close to cuisine paradise with some many different nations in one spot, so you can bet my "kitchen bougeotte" is greatly satisfied! I am under heavy French, Asian and Indian flavors. In the pantry, each culture tends to have a specific bin. There is however a couple of spices with their own prime real estate in the pantry. Cardamom and saffron.

I love, love, love cardamom. In baked goods, mousses, cakes, you name it I am there. I use green cardamom for baking while I keep black cardamom for savory dishes. I don’t usually think of saffron when baking but I am pleasantly surprised each time I do. While I don’t pretend to be fluent in Indian cooking, I do enjoy the knowledge and recipes from other bloggers out there. I also have the loveliest of friend who prepared this ice cream the last time I saw her and from the first spoonful, I knew I would have to make it at home….quickly! This ice cream made me week in the knees, literally.

Saffron&Cardamom Ice Cream - All Dressed Up...

No saffron was harmed during the photo shoot…it all went back in its jar. Now everybody can relax."

The flavors of this ice cream are reminiscent of kulfi although the method used here is a bit different than in traditional kulfi recipes. Oh trust me, next on my list is to get me a set of kulfi molds and to try Deeba’s recipe…hmmm… Nothing could be simpler than this refreshing ice cream: cardamom infused cream, pinch of saffron and a handful of pistachios (check your sources given the recent news). Churn and dig…

Cardamom and Saffron Ice Cream Recipe:

2 cups (500ml) heavy cream
1 cup (250ml) whole milk
1 cup (200gr) granulated sugar
4-5 green cardamom pods
pinch of saffron
1/3 cup (40gr) raw pistachios

In a large saucepan, stir together the cream, milk and sugar. On a flat surface, or with a mortar and pestle, gently crush the cardamom pods and add both seeds and pods to the cream mixture. Bring the mixture to a simmer over medium low heat, stirring occasionally to dissolve the sugar. Remove from the heat and let steep as it cools to room temperature. Refrigerate, preferably overnight.
Once infused, strain the mixture and remove the crushed cardamom pods. Add a few threads of saffron and stir.
Coarsely chop the pistachios and add them to the mix.
Process the mixture into your ice cream maker according to the manufacturer’s intructions.
No ice cream maker? No problem! Pour the cream into a freeze proof container and freeze for a couple of hours. Take it out and whip it with an electric mixer or immersion blender, freeze it again, whip it again….do that four or five times. The mixture won’t be quite the same but pretty darn close.

A Pavlova And A Guest

Pavlova5

It’s "Share Your Space Friday" here again!! I have never posted that much in a week and the fun part is that I only had to write an intro!!

I am loving having guest bloggers and not only because it gives me time to frolic in the sun (ugh…no not really…!) but mainly because it is like having a friend stop by and share with you a bit of their day, their personality, etc… And if personality had a name, it would be Kelly from Sass and Veracity. I knew from the first post that I’d be reading forever…I think it was her post on creme brulee and I found myself almost hugging the computer screen just staring at her stove. Meeting her last Fall was the icing on the cake….if only my mom and mother-in-law would let me be adopted by this sassy gal…sigh… She’s got verbage, she’s got class, she’s got ethics and an amazing sense of humor. Most of all, I don’t know better person to cheer anybody on in anything they venture doing.

I am thrilled to have Kelly pop by and share with you this amazingly refreshing pavlova. Read on for the recipe.
Now….doesn’t this look amazing for Spring! Happy Easter everyone!


I’m one of those cooks who is notorious for preparing recipes I’ve never tried before when there’s a special occasion looming. It doesn’t matter whether it’s for family, close friends, or a party for 40, I can guarantee that everything I make will be new to me. I’m sure that to some, I’m either grossly egotistic, or to others, a complete fool. I’d say adventuresome — or a glutton for punishment. The thrill of discovery during the planning process far exceeds any worry I could have about screwing something up. I love sifting through my magazines, cookbooks, and favorite web sites looking for the perfect recipe — especially if it’s something totally new.

So when Helen contacted me about doing this guest post, after initially grinning like a sap, I felt as if I’d been given permission to create the biggest planning mess I’ve made in a while. Cookbooks and magazines everywhere. A bookmarking frenzy on my Mac. Silly questions about "which recipe would be best" posed to my 16-year-old son who patiently indulged me with a more than one-syllable response. It was as if I’d been invited to a lovely party and then realized I didn’t have anything to wear. Even if I actually had a particular recipe in mind, and said recipe came out perfectly, I’d have to take photos.

Ah, the photos. I’ve all but swooned over Helen’s ethereal photos at one point or another. Light and airy, softly beckoning me to linger over what she has prepared, each photo taunts me with a "just you go ahead and try to make this, girlie!" And I think, in time — all in good time after kicking my procrastination skills into high gear. I met Helen last last Fall at the wedding of a mutual friend, and it took no time at all to learn just why her work is as flawless as it appears. She’s patiently persistent, works hard, is extremely focused, works hard, and has a seemingly bottomless reservoir of energy. Did I mention how hard she works? Meeting her was an absolute pleasure. Clearly, I had to make something that would have a chance of gracing the page, right?

Pavlova

Ironically, I came very close to baking a Paris Brest, something I’ve made before, but at the last minute, changed my mind. I’m sure it has nothing to do with the fact that the last time I made pate a choux, I was less than thrilled with the outcome. Instead, I’ll blame it on the photograph I saw in this month’s issue of Gourmet of the "Pavlova with Lemon Curd and Berries." Its imperfect, simple appearance reminded me of a galette and prodded me to reconsider the long standing issue I’ve had with meringue. Not the meringue on pies — meringue that’s baked. For some reason, I’ve always steered clear of it, not quite relishing the sensation it causes in my teeth when I bite into it. Or maybe it’s the near weightlessness of it. Surely something so light can’t have much substance. Excuses, excuses.

But I was mesmerized by the Pavlova, a dessert named after the famous Russian ballerina who, after touring Australia and New Zealand in the 1930’s, is said to have had this dessert named after her. Although it’s the "light and airy" aspect of her dancing that the dessert was created to mimic, I’m reminded more of a flouncy tutu, fluffed high with tuille. Just beautiful.

I’ve been savoring this dessert since yesterday, marveling over extreme contrasts in texture and flavor. The meringue crust, so delicate that touching it causes it to shatter, melts on my tongue. In the center, the meringue is a creamy, marshmallow treat, its sweetness tempered by the tartness of the lemon cream. The combination of the berries and grapes add a perfect crunch that brings it all together. Whimsical, unpredictable, and oh so delicious.

Here’s to you, Helen. You’re an inspiration to me in many ways and I’m quite honored to have done this for you.


Pavlova7

Pavlova with Lemon Cream, Berries, and Grapes

For the meringue…
1 cup superfine granulated sugar
1 tablespoon cornstarch
3 large eggs at room temperature 30 minutes
3 tablespoons cold water
1 teaspoon distilled white vinegar

For the filling…
2/3 cup granulated sugar
1 tablespoon cornstarch
1/8 teaspoon salt
1/3 cup fresh lemon juice
1/2 stick unsalted butter
3 large egg yolks, lightly beaten
2 teaspoons grated lemon zest
1 cup heavy cream
2 cups mixed berries
2 cups grapes

Preheat oven to 300ºF and position a rack in the center.
To prepare the lemon cream, stir sugar, cornstarch, and salt in a saucepan. Add the lemon juice and butter, bringing the mixture to a simmer over medium high heat. Continue to whisk at a simmer, about 1 minute. Whisk about 1/4 of the mixture into the beaten egg yolks, then transfer the egg yolk mixture back into the saucepan. Over low heat, continue to cook, but make sure not to boil, whisking constantly until the lemon curd is thick, about 2 minutes. Scrape into a shallow bowl, stir in the lemon zest, and place a piece of parchment over the surface. Refrigerate for about 1-1/2 hours.

To prepare the meringue, line a baking sheet with parchment and trace a circle about 7″ in diameter in the center. Turn the parchment over.
Whisk superfine sugar and cornstarch together in a small bowl. In the bowl of an electric mixer, beat whites with a pinch of salt at medium speed until soft peaks form. Add the water and beat until whites hold soft peaks once again.
On medium-high, beat in sugar mixture 1 Tbsp at a time. After all sugar has been added, beat 1 minute longer. Add vinegar, then beat at high speed until glossy and stiff peaks form, about 5 minutes (longer if using hand-held mixer). The meringue will be extremely thick.
Spread meringue carefully to cover the circle on the parchment, creating a cavity in the center (for the filling). Bake until meringue is pale golden and has a crust, about 45 minutes. Avoid opening the oven door! Turn oven off and prop door open slightly with a wooden spoon. Cool meringue in oven 1 hour. The exterior will be dry and possibly cracked, the inside more like the consistency of marshmallow.

To assemble the pavlova, beat the heavy cream just as it holds stiff peaks, then 1/4 cup at a time, whisk cream into the lemon curd. Check consistency each time before adding more cream. It should be able to mound. Spoon lemon cream into cooled meringue and mound fruit in the center. Serve with extra whipped cream if desired.


Cassata Alian Sicilian – Baking With Friends

Cassata Cake-Copyright©Tartelette 2008As promised, here is one of the desserts Chris and I tackled while she was visiting this past weekend, a Cassata Cake, as part of another Bakenista get together. I have to admit that I would have probably passed on this Bakenista shing-ding if Chris had not been in my kitchen. Not much time left for "fun baking-just because" these days and not much room left in the fridge for a big cake like this. We had not really planned to bake that early together again but it looks like the folks at King Arthur got word of our little Skype chats and got interested to check out how we were baking live while spread across the US. Halley, from the King Arthur Test Kitchens blended right in and seemed to enjoy the experience, and it seems that we were all trying to be on our best behaviour!!

From my end, the experience was even better since I had another Bakenista in the kitchen and Italian to boot…how fitting when making an Italian classic, isn’t it?! I hope that Chris posts her step by step pictures of the cake making while I post the finished product. We started around 9am, a littler earlier than our scheduled Skype chat, but we were aligning ourselves on "puppy time" and Bailey was falling back asleep then. It was a wonderful morning of tag teaming making the cake and working the keyboard to chat with the others. I started with the cake batter, I think… not that I am getting old or anything but between lack of sleep, puppies, and a rum soaking syrup at 10 am, I somehow found myself scratching my head at 4pm that I was still in my jammies! Chris prepared the ricotta, pistachio, and chocolate filling and layered the cake with it while I was trying to pull Bailey away from Tippy’s tail. When we looked at the clock, it was already noon…Wow…time does fly when you are having fun!!

While Chris was here, she asked me to give her a couple of lessons on basic pastry methods, like making macarons (her firsts and a success!), cream puffs (not her first but a little recap), dry sugar caramel (her fear), etc…Showing her the different consistency of things as we went along was a lot of fun. In spite of the humidity I made some caramel corkscrews to decorate the cake and to show her the right consistency to play easily with caramel and they lasted about the time of the photo shoot it was so humid. Later in the afternoon, I covered the cake with a stabilized whipped cream frosting and decorated it wishing she were still around to share a slice with us, not to mention that she was a fantastic and very patient photo assistant all weekend and somehow taking pictures of the cake without her felt kind of empty. Stay tuned for other installment of our baking fest!

Cassata Cake-Copyright©Tartelette 2008 The recipe for this Cassata Alian Sicilian comes from Dolce Italiano by Gina De Palma and originally includes orange zest and almond extract which we skipped as the filling was flavorful as is, spread on rum soaked cake trimmings so we figured it might be overkill. The icing called for is a basic powdered sugar icing but somehow that seemed super sweet to us so we decided to go for a simple whipped cream frosting stabilized with some gelatin…crucial in high humidity settings if you do not serve the cake right away so you avoid the risk of ending with a pool of water on your cake plate. It seems like a really long recipe but it is very detailed…granted it is not a cake you start at 5pm for dinner at 8pm, but it is extremely complicated and comes together quickly.

Cassata Alian Sicilian:

makes one 9-inch cake, 10 servings

Sponge Cake Layers:
2 cups bleached cake flour, sifted
2 teaspoons baking powder
1 teaspoon salt, plus a pinch
8 large eggs, separated
1 1/2 cups granulated sugar
2 teaspoons pure vanilla extract
1/2 cup (1 stick/4 ounces) unsalted butter, melted and cooled

Rum Soaking Syrup:
2 cups granulated sugary
3/4 cup cold water
1/2 cup rum

Cake Filling:
3 ounces bittersweet chocolate
3/4 cup shelled whole unsalted pistachios
3 cups fresh, whole-milk ricotta
1 cup confectioners' sugar, sifted
1/2 teaspoon ground cinnamon

Stabilized Whipped Cream Frosting:
2 cup heavy cream
1/4 cup powdered sugar
1 1/4 tsp powdered gelatin dissolved in 3 Tb. cold water

Preheat the oven to 350°F and position a rack in the center. Lightly grease two 9-by-2-inch round cake pans with butter or nonstick cooking spray, line them with parchment paper, then grease the parchment.
Sift together the cake flour, baking powder, and 1 teaspoon salt into a medium bowl and set aside.
In the bowl of an electric mixer fitted with the whisk attachment, beat the egg yolks and sugar on medium speed until very light and pale yellow in color and doubled in volume. Beat in the vanilla extract, followed by the melted butter. Transfer the egg mixture to a large, clean mixing bowl. Fold in the dry ingredient-quickly and lightly, stopping just before they are fully incorporated. Clean the whisk attachment and mixing bowl.
Place the egg whites and the pinch of salt in the cleaned bowl of the electric mixer. Using the whisk attachment on medium-high speed, beat the egg whites until firm peaks form. Fold the egg whites into the batter quickly and lightly, incorporate any streaks of dry ingredients that remain.

Evenly divide the batter between the prepared pans, rap the pans against the counter top to eliminate air bubbles. Bake for 35 to 40 minutes, or until they are golden brown, a cake tester inserted in the center comes out clean, and the cakes have begun to pull away from the sides of the pan. Allow the cakes to cool for 5 minutes in the pan, then carefully unmold and set them out to cool on a a wire rack.

While the cakes are cooling, prepare the rum syrup: In a medium saucepan, stir together the sugar, water, and rum. Place the saucepan over medium heat and bring the contents to a boil. Lower the heat and allow the syrup to simmer for 5 minutes. Remove from the heat and let it cool.

Filling: using a microplane or box grater, grate the chocolate into fine, feathery shreds. Using a sharp knife, finely chop the pistachios. Place the ricotta, confectioners' sugar, and cinnamon in the bowl of an electric mixer and, using the paddle attachment, beat until the ricotta is creamy and soft (it will remain slightly gritty due to its original consistency). Add the grated chocolate, chopped pistachios, and beat just until combined.

Assembling the cake: Have ready a 9-inch springform pan. Using a serrated knife, carefully split each cake layer in half horizontally to make four layers. Place one of the layers in the bottom of the pan and, using a pastry brush, moisten it generously and evenly with some of the rum syrup. Spread the cake layer evenly with one third of the ricotta mixture. Repeat twice with another cake layer, more of the rum syrup, and another third of the ricotta mixture. Place the final cake layer on top and generously brush with the rum syrup. Wrap the springform pan tightly in plastic wrap; this helps the layers fit snugly on top of each other. Chill the cake in the refrigerator for at least 4 hours or overnight.

Whipped Cream Frosting:
In the bowl of a stand mixer fitted with the whisk attachment, whip the cream with the sugar until soft peaks. In the meantime, dissolve the gelatin in the microwave for 10 seconds. Mine broke so I set the cup where the gelatin was in a large saucepan filled with a couple of inches of water, brought the water to a simmer and waited for the gelatin to melt. Slowly pour the gelatin in one steady stream over the whipped cream and continue to whip until firm. If you add your gelatin a little cooled and before the whipped cream is still at soft peaks stage, it should not clump on you.
Decorate your cake with the whipped cream and return the cake to the refrigerator to chill until you are ready to serve it, at least 3 hours.

Cassata Cake-Copyright©Tartelette 2008 So, who else is left with a huge hunka chunka of Cassata? Well, that would be Lisa, John, Ivonne, Stephanie, Ben, Kelly, Marcela. Chris can only look at her work and my hips are not too happy about that! It can easily serves 12, needless to say that after we kept a couple of slices for a little afternoon break, I took the rest to the neighbors! It is a special occasion cake but having Chris around was special enough to make me turn the oven on in the morning on a very hot day!

Words about friendship, even ones formed over the internet never rang truer learning about the sudden passing of one Daring Bakers, Sher from What Did You Eat? I can’t say I "knew" her but I was a fervent reader and loved her recipes and wit. You will be missed Sher and always remembered.

Cassata Cake-Copyright©Tartelette 2008

The Petit Suisse – Fresh Yogurt Experiments

Petit Suisse-Copyright©Tartelette 2008 Not quite Petit Suisse…more like yogurt bulgare…a recipe in progress. Read the rest to find out.

One thing that every European expatriate residing in the States will tell you is that dairy products are different. Let’s take France for example since it is my home country: cottage cheese? Ugh…no not that present. Sour cream? Ugh…no again, we have "creme fraiche" which no matter how hard you try to convince me it is "like" sour cream….it ain’t. Yogurts are different too, some are even so creamy we call them "cremes bulgare". Finally you have my two favorites, fromage blanc and petit suisse. You can find fromage blanc and creme fraiche pretty easily nowadays at health food store like Whole Foods but they cost a pretty penny for what they are. I make my own creme fraiche if I really crave it (recipe below), not to mention that the odds were against me trying to take the easy route, the store was out of it, but I have not tried my hand at fromage blanc….yet!

When expats get together they start talking about everything and nothing and you guessed it, food. Dairy in particular and exchanging recipes on how to recreate them sharing  the same recipes but going a little differently about it.

With friends, we finally put our heads together and came up with a base recipe: creme fraiche, milk, buttermilk and heavy cream. This first experiment we did on our journey to crack down the petit suisse code produced some tasty thick dairy, very close to thick yogurt bulgare. Still….not petit suisse. You will find the recipes for this "yaourt bulgare" below. I encourage you to try it out, very good on its own, but you know what two women with a craving do to satisfy it, right? They keep at it. Back to the drawing board.

Not Quite Petit Suisse: Yogurt Bulgare

1/2 cup creme fraiche (to make your own: mix one cup heavy cream with 1/4 cup sour cream and let sit overnight in the oven with the pilot light on, uncovered, refrigerate after that)

2 cups whole milk

2 cups heavy cream (40% fat)

1/4 cup buttermilk

In a thoroughly cleaned bowl, mix all the ingredients together with a wooden spoon and incubate in a yogurt maker (read the manufacturer’s instructions).

If you do not have a yogurt maker, set the mixing bowl in the oven with the pilot light one, uncovered and let set overnight. Divide into containers and refrigerate.

Petit Suisse-Copyright©Tartelette 2008Left: Petit Suisse with Xocomeli Chocolate Pearls (explanation below) and salted butter caramel sauce

Right: Petit Suisse, Strawberries and balsamic reduction

While working on a dessert one day, she found out that the taste was really close to what we remembered by adding heavy cream to fresh cheese. Further reading about the making of petit suisse, we realized that was the right track to follow. We had the taste figured out but what about the texture. We could not find any details on how drained the fresh cheese should be before adding the cream but it would not be problem to add whey back in if need be (whey being the liquid that drains out of curds or dairies, like the one in your big yogurt container right now).

Trying to make a long story short: on Monday last week I went and got my gallon of whole milk and my rennet to make fresh cheese. The fact that I chose vegetarian rennet is purely accidental since that was all that was available at the store the day I went.

Petit Suisse:

1 gallon whole milk

5 drops vegetarian rennet

1 Tb water

1 cup heavy cream

Heat the milk to 112F in a large pot or Dutch oven. Remove from the heat. Mix the rennet into the water and add to the milk. Cover with a clean towel. Place the large pot in the oven with the pilot light on. Leave it alone overnight. You should have large big curd chunks after that time. Line a strainer with cheesecloth over another large bowl to save some whey just in case you drain your curds to much. Let the curds drain for about 40-45 minutes. I tie all four corners of my cheesecloth to the faucet for that part and take away the strainer. It just helps the manoeuvre at first. Pass the cheese through a strainer if you want ultra smooth petit suisse over a bowl and then slowly whisk in the heavy cream. Divide in between containers and let set for a few hours (2-4).

 Thick and creamy at the same time. A spoon would stand straight in it but so creamy it melts in your mouth. After that….I did have a little fun with the toppings for my newly made petit suisses as you can see from the pictures. Will I do another batch? I am as we speak, eheheh…It may not be the exact original and while many consider that children’s food, I consider it one of those wonderful little things in life. Digging into one is like putting your head on a soft pillow, savouring is bite is like the first sip of a cold cold beer on a hot day…heaven!

Petit Suisses-Copyright©Tartelette 2008Plain Petit Suisse and Petit Suisse with Praline Sauce

I was working on a few sweet sauces for recipes in the book and thought I’d try them out with the petit suisse. I am evil to tempt you with them right now and not being able to write them out for you….arghhhh! Really it’s hard but I got to keep them hidden for a little while longer.

What I can talk about is the "Xocomeli" that I grated on top of one petit suisse. They were sent to me by a French blogger friend of mine, Mercotte, one of the French authorities on macarons and product tester extraordinaire. She had the chance to try out two of Valhrona’s newest chocolate releases: Xocopili and Xocomeli created by one of my favorites chefs, Frederic Bau. Xocopili is Venezuelan chocolate with 72% cocoa, with different spices such as curry and chili pepper while the Xocomeli is 57% cocoa with spices such as cinnamon, star anise, cardamom, etc… While I had an item she was looking for (package leaving tomorrow), I was really intrigued by the Xocomeli and once in my possession, very eager to grate on of those little pearls on my petit suisse. It brought a taste subtle taste of chocolate but gave the salted butter caramel sauce to a complete different level of intensity.

For the Cantaloupe Sensation Satine, I revisited this post and changed the mango jelly to cantaloupe and left the petit suisse in its original form (no gelatin necessary since it was thick enough). The diagonal layers are explained in that post.

Petit Suisse-Copyright©Tartelette 2008 Left: it all started with milk
Right: Revisiting the Sensation Satine: Petit Suisse and Cantaloupe, Fresh Berries.

Mascarpone Raspberry Gratins

Mascarpone Raspberry Gratins-Copyright©Tartelette 2008 I always seem to have a story don’t I? Well, bloggers are like that…they like stories: to read, to tell, to share and to write about. Somehow there is always a story behind the desserts I make , sometimes it is a long drawn explanation and sometimes something that popped in my head while experiencing one of those stories. Today is no exception…these gratins almost did not happen. Glad they did in the end though because they were mighty good.

Let’s see…it all started last night when B’s mom called and asked if I wanted to go blueberry picking with her in the morning…at the crack of dawn to avoid the heat. Yes, yes, yes….provided there are a few coffee stops along the way please….Then she threw raspberries in the mix so I jumped fell out of bed! There are a few things that make my heart skip on a hot June morning (well, B. is one of them, of course) and among my favorites are berries, stone fruits and spending a few hours with my mother in law and her stories of my husband when he was wee high. I am about to digress again so I’d better get right on to the rest of the day…

After our little berry picking frenzy (I basically needed her to keep some of my stash in her extra freezer), I pulled in the driveway with a huge basket of raspberries just in time to see one of the twins holding a puppy and walking towards me. Now for those new here (Hello, hello!), we do not have children, we jokingly say that all we have to do is walk next door and borrow C’s twins for the day…or they borrow us, there are days one can’t tell…Anyways… Her husband had sent her to get new tires and she came back with the wrong tires and a "free" puppy (read no shots or tags and probably younger). Her husband was red as a poppy, the kids were beaming and in her usual Southern nonchalance she just walked up to me and said "help us give him a bath"

I spent a good part of the day taking work breaks to go play with the puppy which we finally named Sullivan. At some point we got distracted by the rest of the brood, a cat, another dog and a turtle (yep, they needed another dog like I need another bill) and did not pay much attention to Sully until we heard is whimpering. We turned around and burst out laughing. He had found a way to climb up the crate full of raspberries and was barely holding his balance not to fall off the tiny ledge and take a dive into it. I guess he got a little too impressed with his Cirque du Soleil capacities and fell head first into the raspberries! I ran over and picked him up, all red and happy licking his paws, face and tail. Once back on the ground he ran back to the crate and tried to climb it again! He surely enjoyed his first baptism by raspberries and was ready for a little more!

I did manage to save quite a bit of the berries after the puppy dive (thank God, they don’t weigh much at 8 weeks) and proceeded to make these little Mascarpone Raspberry Gratins. They made me think of Sully: light as feathers, wickedly cute and they really put a smile on my face! The fresh raspberries retain their fresh factor and the cream is rich and smooth without leaving that buttery coating on your tongue.

For the nut topping I have to thank one of my faithful readers, Bina, who sends me the most thoughtful gifts. Last winter, she had sent me an Indian specialty called Chikki, close to a toffee but this almonds, pistachios and cardamom. She emailed saying that her mom had made some more and brought it to the States and she would love to send me some more. Yes please!! So before the stash disappeared completely I did hide a few pieces and crushed them to top the gratins with. She also stitched me the cutest little kitchen towels but I am afraid to get the dirty! To top it all, her packaging is as precious as the gifts…. and since she only lives in the next state over I really hope e get to meet one day soon. Thank you and stop being shy, you are among friends!

Allright, allright, I am done….on to the recipe!

Mascarpone Raspberry Gratins-Copyright©Tartelette 2008 Mascarpone Raspberry Gratins:

Serves 4-6 depending on the size of your ramequins.

1/2 cup (4 oz) mascarpone, at room temperature
1/4 cup sugar
1 tsp vanilla bean paste or 1 tsp vanilla extract or 1/2 vanilla bean, seeded
1 egg + 1 egg yolk
3/4 cup heavy cream
1 cup fresh raspberries

In a large mixing bowl, whisk the mascarpone with the sugar until smooth. Add the vanilla, the egg and the egg yolk. Whisk until fully incorporated and add the heavy cream. Make sure everything is well combined and divide between your ramequins, not filling them all the way to the top, about 3/4 full. Divide the raspberries among the gratins and set the dishes in a deep roasting pan. Fill the pan with water, half way up the sides of the dishes and bake at 340 for about 20-25 minutes or until they seem to be barely set: still giggling a little when you move the pan but not completely wobbly. They will continue to bake and set as they cool. Let cool and serve either chilled or at room temperature.

Mascarpone Raspberry Gratins-Copyright ©Tartelette 2008

Lemon And Honey Tangerine Gratins

Everyday I wake up I count my blessings. Everynight I go to bed I think about the things I need to improve and realize that both my blessings and my shortcomings are numerous which makes me a standard-normal human being, and I am ok with that. What I am not ok with is being helpless when faced with death or diseases and wish I were a rocket scientist or super duper doctor working on some cure to help people. There are days I want to kick for not being a brainie and there are days I am fulfilled to focus on the things I know how to do, we all have to find our strong points and should stick to them. Being envious is a waste of time: maybe a rocket scientist can’t make as good a pie as my grandma’s?!!

Last Monday we had a couple friends of ours over for dinner, and as usual they came early in the evening so we could sit on the back porch and watch the sunset over the water (one of those blessings I am counting). We like to open a bottle of wine and get dinner ready together. He is an excellent cook and she has a personality to keep you entertained all evening. The evening started as usual until she announced she had pancreatic cancer, advanced stage. Silence fell upon us and B. went over her and just hugged her for a while, then him and finally said "Anything you guys need, anytime, day or night". I was not so quite vocal for the first couple of minutes. Flashbacks of my grandma and my brother dealing with chemo and radiation came rushing back and I kept starring at my feet. Clearly, you can’t say "it’s all going to work out", and "I’m sorry" seems so little.

She poured me another glass of wine and they started talking about their medical plans of attack. Invasive, long, painful…She talked about losing grip on the future, not knowing who she was anymore, that none of this fit in with being with their kids and grand kids. I finally broke my silence and said "Sometimes you don’t have to know the bigger picture or know for sure where you are heading. Sometimes it’s enough to know what’s next". She looked at me like I had become the Dalai Lama in the blink of an eye, then she said "So, what’s next?". The only words that came out were "Peeling tangerines for dessert". Silence again. "Oh crap, I have offended her" I thought. Everybody turned to me and bursted out laughing and she added "You have a funny and lovely way to put things in perspective"…Ah well, always count on me to put my foot in it!

I am kicking off this month Sugar High Friday with these light and refreshing Lemon tangerine Gratins. Honey tangerines are super juicy and quite flavorful and if you can’t find them where you are, feel free to substitute regular tangerines, clementines or even mandarins. We peeled the fruit and got most of the white membranes out and cut them in segments for the dish. The gratin part is sort of a cross between a custard and a creme brulee with its touch of flour and cream cheese. The original recipe called for mascarpone but the tub was being used for another purpose so cream cheese was the perfect substitute. For the top "gratin" part, I used half part brown sugar and half part white sugar and the blow torch to caramelize them but you could just as well put them under the broiler for a few minutes (keep your eyes on them though, they burn fast).

Lemon And Honey Tangerine Gratins:

Printable Recipe

Serves 4

1 1/4 cup milk
1/3 cup finely grated lemon zest
4 large egg yolks
1/2 cup sugar
1/4 cup all purpose flour
pinch of salt
3 Tb fresh lemon juice
1/2 cup heavy cream
1/2 cup cream cheese, at room temperature
4 honey tangerines (or 8 clementines or mandarins) peeled and cut into segments
14 cup brown sugar mixed with 1/4 cup white sugar for the top.

– Bring the milk and the zest to a simmer over medium heat. Remove from the heat and let stand to infuse for 10 minutes. Strain through a fine mesh sieve.
– Whisk the egg yolks with the sugar until pale yellow in a large mixing bowl. This can be done totally by hand. Add the flour and salt and whisk until just blended. Slowly add the warm milk to the egg mixture, whisking as you go along to prevent the eggs from curdling. Return the mixture on the stove and cook, stirring constantly over medium high heat until it becomes thick. Remove from the heat as soon as you see the first boiling bubbles on the surface. Pour the custard into a bowl, stir in the lemon juice and let cool to room temperature, whisking from time to time.
– Beat the cream with an electric mixer until soft peaks form, add the cream cheese and whisk until both are well combines. Add the whipped cream mixture to the cooled custard and fold gently to bring both masses together.
– Divide the tangerine segment among 4 dishes. Divide the custard mixture over each gratin dish. Sprinkle all evenly with the brown sugar/white sugar mixture and use a blow torch to caramelize the tops.
– If using the oven: preheat the oven to 425F and broil the custards 2 to 4 minutes depending on the strength of your oven.


Finally I would like to dedicate this post to another wonderful lady, Bri from the wonderful blog Figs With Bri who is right now fighting for a life trying to beat cancer. Though we have never met, Bri, from the moment I started reading, you made me laugh, you made me think, we visited and cheered each other and I just want to send your way a gazillion hugs and good vibes. I keep your family and husband in my daily thoughts, counting my blessings in the morning and trying to improve on my faults at night.

Ice Cold Lemon Strawberry Fraisier

An abundance of gorgeous strawberries and extra Grand Marnier Mousseline led me to create this little thing. I called it a Fraisier because it looks like one but that’s where the resemblance stops….although by taste it was just as good. Like the choux, a Fraisier is one of my favorite desserts, one I would push my mother to buy for Easter it looked so Spring-like. It usually is compose of a genoise, pastry cream, strawberries and topped with a thin layer of marzipan. Rich in composition and ingredients but light in texture like most French desserts tend to be. It seems like we have a knack to pack a million calories in a bite that seems as light as air!!

Here I was with the strawberries, the mousseline cream and no base but a serious hunkering for Meyer lemon. Lemon genoise? Lemon meringue?….hmm…decision, decision, hesitation….That was until I remembered a recipe for "The Best Damm Meyer Lemon Pound Cake" on the Saveur Magazine website. With a claim like that I had to check it out for myself!! I made the cake, patiently waited for it to cool so I could cut slices and then rounds to fit into pastry rings to build the cake, and then a very common thing happened: we started cutting into it like mad and before I knew it half of it was gone!! I managed to sneak it away from Mr.Tartelette promising an even better dessert made with it (better not mess up, right!). I have to tell you that in itself, the cake is indeed pretty damm good, and the Meyer lemon really made a difference from usual lemon pound cake but my favorite still is The Ultimate.

The weather has been really quite hot and humid lately thus I decided to go for a very cold, icy cold really, version of my beloved dessert with the ingredients I had on hand. To build the dessert I used my trusted 3 inch diameter pvc pipe rings lined with parchment paper, and all I had to do to unmold them was to slide them out and let them sit, covered, on the countertop for 20-30 minutes. It is indeed best to take them out of the freezer ahead of time so the cake has time to soften up a bit and you don’t chase your dessert around trying to break into the ice. The mousseline was perfectly thawed but still icy cold and holding its own while the cake was at the right consistency for you not to break your spoon on it.


I am sending this to Meeta’s Monthly Mingle, Spring Fruit Sensations, hosted this month by Abby of Eat The Right Stuff. Once you have the Meyer lemon pound cake and the Grand Marnier Mousseline then it is just a matter of assembly.

Ice Cold Lemon Strawbery Fraisier: Serves 4

8 thin slices from the Meyer Lemon Pound Cake
1/2 recipe for Grand Marnier Mousseline
1-2 cups sliced strawberries

Using the 3 inch rings or cut pipe as a guide, cut 8 rounds from the lemon cake. Line your ring with parchment paper, place them on a parchment line baking sheet, put a slice of cake in each ring at the bottom. Line the walls if the rings with the sliced strawberries. Divide the mousseline in half and divide one half evenly among the rings and tap the sheet on the countertop to make sure it settles in the rings. Top with another slice of lemon cake, pressing gently on the cream, top with the remaining cream and freeze.
To serve, take the rings out of the freezer, slide the cakes with the parchment paper out, remove the paper gently and set the cakes to thaw for 20-3o minutes. Decorate with cut strawberries (I added some coconut when B. was not looking)

Fraisier-Copyright Tartelette 2008
I also wanted to thank the judges in the March edition of Does My Blog Look Good In This, hosted by Sabra of Cookbook Catchall for awarding this picture (just to clarify, not the one above, click on the link to fnd out) with First place. I am amazed, happy beyond belief given the gorgeous photographs that were entered in the contest. Go check out the other winners, pretty nice eh?!! Thank you, thank you….I take great pleasure shooting the desserts I feature here and I constantly learn from all the amazing talents out there 🙂

Last thing before I forget again: a lot of you email me everyday about baking and lately a lot about macarons. I am not holding back on purpose but a tutorial with tips and steps by steps will be available soon. This is one of the trickiest item to trouble shoot through a computer screen and although I have helped already a few of you out there with those and other desserts, I wanted you to know that I appreciate your patience. You guys make my day!

Pear White Chocolate Bavarian Charlotte

This Charlotte would be great for Spring or Summer but it just happened that I made it for our New Year’s Day dinner with my parents-in-law. Really, I could not be a luckier girl having Bill and Ruth as my in-laws. I will always remember the first time we broke bread and sat together over dinner. I had known B. a little over a week and already I was taken in by his family as if I had always belonged. They were offering a place at their table but also a place in their hearts, completely trusting their son that this young woman of 19 years his junior and potential wife number 2 was the one who would stick around. Oh, we had our moments Ruth and I, but mostly due to misunderstandings, differences in traditions and cultures, but nothing that could not get solved around a batch of cookies and a big hug. My father in law is the looser one of the couple, a free spirit, a joker, and a talented drummer. Both in their eighties, they never miss a bit, are always on the go and exercise religiously. They are also true Southerners.

Although I try to cook items from my country and from Bill’s childhood, I know better than to attempt his mom’s squash casserole, her tomatoes and okra and her spinach souffle. Mom Ruth is also the one gathering up the troops for New Year’s Day every year, so I was really surprised not to hear from her right after Christmas to tell us what time lunch would be on January 1st. Hmmm, strange…While grocery shopping, I could not helped being sidetracked by all the people shopping for the different things traditionally cooked that day: pork, hoppin' Johns and collard greens. I called Ruth and told them that I would love to have them over for New Year’s Day if they did not have other plans. Invitation accepted…now what have I thrown myself into? I know how to cook, (thank you mom) but "Southern cooking served to your Southern mother in-law" is a whole different ball game!!! That’s when Beverly came to my rescue and put all the necessary items in my cart, with all the necessary how-to’s and off I went! Once home, B. told me I was brave to venture into his mom’s territory and I quickly replied "don’t worry! she is bringing the rice with tomatoes and okra". Sigh of relief from my husband…

So, with everything in pots Monday afternoon, ham hocks included, my biggest preoccupation was of course what dessert to serve to the in-laws. I know they like creamy things, fruits chocolate and mousses. How can I turn that into something that would bring both our cultures and continents together as we celebrate the New Year? I immediately thought about a Charlotte filled with a light white chocolate Bavarian cream and topped with pears. The cake base is a layer of ladyfingers at the bottom and surrounding the mousse. To make the cookies more manageable to handle, you need to dip them quickly in some liquid. I usually do water and Grand Marnier but you can use another liqueur or do water and orange juice if you wish. I used jarred pears for the top because the ones I found at the markets were either rock solid or mush, and the stove was already too crowded to start poaching fruit. The Charlotte has to be started the day before to allow the Bavarian cream to set, which gives you less things to think about as you’re getting the house ready for company. Choose the best white chocolate you can find, not only will it make a difference in the final product but you will also avoid little bits and lumps in the mousse.

I don’t know if my in-laws were giddy from the Champagne or the wine or the meal, but we had a great time, just the four of us. It reminded us of the 15 months we went to live with them while we were building our house. No casualties, and we were a little sad to leave them as they can be a hoot! Youwee! Mission accomplished…I passed that test! Mama Ruth complimented me on the savories (and that is a big deal!) while Papa Bill had seconds of the cake. I made Kalyn's wonderful soup the day after with the leftover peas,hams and greens, and I am enjoying a bowl right now as I type this.

Pear White Chocolate Bavarian Charlotte:

2 packs ladyfingers cookies
1 jar of pear halves (16 oz)
2 cups heavy cream
3 (1/4-ounce) envelopes unflavored gelatin
1/3 cups cold water
6 egg yolks
2/3 cup sugar
2 cups whole milk
6 oz (3/4 cup) white chocolate
1/4 cup water
1/4 cup Grand Marnier

In a shallow dish, mix the water and Grand Marnier. Dip the ladyfingers in the liquid and quickly set them around the inside of an eight inch spring form pan lined with plastic wrap. Layer about 12 in a flower like patter at the bottom of the pan. Set aside in the refrigerator.

For the Bavarian:
Sprinkle the gelatin over the 1/3 cup of water and set aside. Whip the cream to soft peaks and refrigerate until ready to use.
Pour the milk into a medium saucepan and bring to a boil. In a separate bowl, whisk the eggs and sugar together until thickened and a pale yellow color. Slowly but steadily add the hot milk, stirring constantly to temper the yolks. Pour the mixture back into the saucepan and cook over low heat, stirring constantly, until the mixture is thickened (much like creme anglaise). Remove from the heat and add the chocolate, let it sit for a minute and whisk until incorporated.
Heat the gelatin 10 seconds in the microwave, add it to the white chocolate batter whisking constantly. Strain if necessary to make sure there are no chocolate lumps. Let the mixture cool to room temperature.
Remove the whipped cream from the refrigerator and fold it into the white chocolate cream.
Carefully pour it into the spring form pan. Put the cake back into the refrigerator and allow to set overnight.
The day you plan to serve the cake, carefully unlock the spring form pan and slide the cake out. Put a plate on top, invert, remove the spring form bottom, the plastic wrap. Put a plate on top of what will be your cake bottom and invert again. Proceed with a steady hand, but do not worry, the mousse is set so you won’t smoosh it down.
Cut the pear halves into thin slices and fan them out on the top of the cake. Leave it in the refrigerator until ready to serve.

Caramel Cardamom Mousse


Happy New Year! I hope you all had a wonderful holiday filled with family, friends, good times and laughter. We did, kind of mellow some days, kind of crazy some others…waiting for that cold weather to come our way so we could cozy up in front of the fireplace. Well, after temperatures in the 60s and the 70s, we finally have some cold weather. Of course it occurs on January 2nd, Mother Nature scoffing at us now that Santa is long gone and New Year’s Eve is simply but a page turned. But you know what? It does not really matter anymore as I did not need the fireplace to make me feel cosy this Christmas season. Nope. I had the warmth of looking at cards every morning upon waking up, looking at my really weird looking Norfolk pine tree. Some were too kind to tell me it looked good….I did not care for it, but it was a gift and it got "prettified" as one of neighbors kids said.

Anyways, I was also blessed one Christmas Eve morning when I received a box full of cookies and gifts for the house, (look Lisa! the stars are giving my dessert some spice), a cookbook, The Sweet Life by Kate Zuckerman (see Veronica! already put to good use), and the softest fleece robe courtesy of my mother in law. The correlation with Cardamom Caramel Mousse? Well, that Christmas morning I felt really blessed that I could eat one of my friend’s cookies, while reading the other friend’s cookbook, and all wrapped up in my surrogate mom’s gift….Really, it just dawned on me that very minute: "gosh, this is pretty special"…and as I was lost in all things metaphysical (ya’ll know I am kidding, right?!), my hand stopped the pages of the book from turning by pushing on page 106, where Kate Zuckerman wrote the Caramel Mousse.

I can see why her recipe is at the backbone of so many of her desserts and the applications and variations on it are almost endless. A hot caramel syrup is whipped into egg yolks to create a safe cream to which some gelatin and whipped cream is added. The end result sets rather quickly but the taste is out of this world and the texture…well…soft as a pillow…really. In her original recipe Kate uses cinnamon to spice up the taste, and although I have nothing against cinnamon, I will go for cardamom first if given the choice. I thought about infusing the caramel syrup for the mousse with some barely crushed open pods. I started looking at the variations given when I noticed that she had a cardamom one, but used just the pods in their original form. Granted they are fragrant on their own, but I feared that the flavor would get lost in the boiling syrup, (even with the 10 pods she uses) so I went for a tiny bit more complication (one day I might play with caramel in a simple way, maybe!). I opened the pods, let them boil with in the caramel, strained the caramel over a bowl and quickly added it to the egg mixture for the mousse. It won’t cool the caramel syrup long enough to weaken its emulsifying power for the mousse part.

Will I make the mousse again? You bet! The cardamom was such a good match for the caramel that it makes me want to experiment. The texture makes you believe it is light as air but if you’re here reading this you know better: cream, sugar, eggs…And tomorrow? Butter, flour, sugar and cream….My New Year resolutions: small quantities of lip smacking desserts because life is too short to have less than the best! I am not saying I never use a box or a can of anything once in a while, I’d be lying and non-human, but there is nothing like the real thing! The pictures in the book are so crisp and drool-inducing that I’ll probably feed off her concepts and try some other great associations she came up with. Now, how can see why Veronica and Anita kept pushing me to give it a look. If only we could share a Kate Z. baking session now!!!! Allright, on to the recipe:

Cardamom Caramel Mousse, adapted from the Sweet Life, by Kate Zuckerman:

Yields 5 cups

6 egg yolks
pinch of salt
1 packet unflavored gelatin
3/4 cup water, divided
1 cup sugar
5 cardamom pods, cracked open
2 cups heavy cream

In the bowl of a stand mixer, whisk the egg yolks and the salt. In a small bowl, sprinkle the gelatin over 1/4 cup water, and let it sit while you make the caramel.

Combine the sugar, cardamom pods and 1/4cup water in a heavy saucepan. Cover and bring to a rapid boil over medium high heat (prevents crystallization of the sugar on the side of the pan). Once boiling, uncover and cook the sugar until deep golden brown. Turn off the heat and carefully pour 1/4 cup water into the hot caramel. The syrup will bubble and spurt, so stand back.Make sure the water incorporates fully to the syrup. Return to the heat if you get caramel bits and stir until it is one smooth liquid.

Strain the pods and seeds in a container with a spout, it will be easier to add the to the yolks. Pour the caramel slowly and into a steady stream into the egg yolks with the machine running on medium high. Melt the gelatin in the microwave for 10 seconds or into the (now empty) saucepan until dissolved. Add it to the yolk mixture and continue to whisk on medium high until it triples in volume and cools to room temperature.

In a separate bowl, whip the heavy cream to soft peaks. Add it to the mousse base and fold the two gently together. Divide the mousse into cups, ramequins, dishes, etc…and let it set, covered in the refrigerator for at least 2 hours.