I don’t do wedding photography. It’s not that I can’t. I just enjoy photographing food a lot more. Except when it comes to friends. My husband used to be a wedding photographer back in the 70s and 80s. Some of our friends are sought after portrait and wedding photographers. I am still doing food and have no desire to change. But…once in a while, close friends ask me to photograph an engagement session. Or their wedding.
Last weekend, my assistant and friend Laura got married to Alex. I love them both. I photographed their engagement session and had a total blast. As a wedding present, I offered to photograph the wedding. It was a true friendship and family affair since they asked my husband’s band to play at the reception (he’s the one with the trombone).
Their wedding was a true Southern affair. A thoughtful and reflective ceremony and a reception in a gorgeous antebellum house. A perfect mix of sophistication, handmade, European elegance and simplicity. A lovely way to embrace the town and flair of our beautiful city, Charleston.
Here are some of my favorite pictures from the day. Thank you Laura for entrusting me with making your memories last a lifetime through a few (many) shots.
Never in my wildest thoughts would I have imagined forming such a strong relationship with somebody met online. Yet, over the past two and a half years, Lisa has become just that: my bestfriend. I would have done (almost) anything, even singing badly at the corner bar to pay for my fare. No way I was going to miss that. They had decided to cater their own wedding and we quickly started exchanging emails about the how’s and what’s of the project. She mentionned getting her wedding cake from a bakery she liked and my first thought was "Yeah! I get to be in the wedding instead of baking for it!". My second thought was "Geez! I could save them so much money if I did it myself!" It would be my wedding gift and yes, that’s how it all got started.
Since I was baking for a close friend, at her house, right there in the middle of 6 other women preparing all the food, I expected something to go wrong. And it did….to a small extent since nobody saw it, but it was staring me in the face everytime I was working on the layers. Hence my constant "spatulating"….to say that the cakes got enough "massage" time is an understatement. I remember Lisa’s friend Kim stopping her work to stare at me with that look of "OMG, you’re patience is without limit, you are kind of loopy though". Yes, I was loopy (wouldn’t you be after a few nights with a 5am bed time?) and yes, I have endless patience.
It all started just fine really. We had trouble finding the right pan size but that is nothing that can’t be fixed so instead of doing a 12 inch – 9inch – 6 inch tiered cake. We bought one 12 inch pan for the bottom, I used one of Lisa’s 8 inch square for the middle and trimmed another 8 inch into a 6 inch for the top. I started at 4pm on thursday and I turned the oven off at 2am…10 hours of oven time. Yeehaaww! While the cakes were baking, I was doing other things like the fillings, the buttercream, getting the next batches ready, making sure they would all stack to the same height, etc…. I made all the buttercream I needed that same night to free some room in the kitchen for Friday’s savory preps. Kelly, Lisa and I marveled how gorgeously silky and soft it was, pure white…I just wanted to kiss it!
By 10am the next day, I just wanted to kill it…well, not all of it….It got really humid and rainy that night and one batch of buttercream (and I am not talking 2 cups here…think industrial quantities!!!) was breaking, terribly, but I doctored it and moved on. Murphy’s Law: out of time, out of room and as I went to apply it to the middle tier, it broke on the cake…not as bad as in the mixing bowl and everybody was saying it looked fine….but if you have been in charge of a project you cared for deeply, you will understand why all the imperfections of that middle tier just kept staring me in the face (and it’s not like I don’t know my way with Mrs. Buttercream!), I had no option but to keep going. I proceeding with the decorations with a pinch in my heart…I hated it. It was not until I took it to the reception hall and started putting the ribbon and flowers around it that I got excited again. W. was there helping out and when he saw it coming together, he got all tiery eyed. I let out a big sigh of relief. Lisa had seen the baking and building but I was keeping the final decorations out of her sight, for the real moment of surprise later. I think it worked, she said it did. Except for the ribbon that started to bubble because of the humidity in the walk-in refrigerator where the cake was waiting next to a small water leak. Murphy’s Law….again!
Before I proceed with a little explanation of the picture below, let me recap the tiers for you and run down a fun list:
– bottom tier: carrot cake with cream cheese frosting
– middle tier: pumpkin cake with butterscoth filling – top tier: dark chocolate cake with vanilla buttercream
– the whole cake was covered with the same buttercream.
– ten hours of oven time, 7 pounds of butter, 11 pounds of sugar, 43 eggs, 16 cups of grated carrots, 3 batches of carrot cake, 3 batches of pumpkin cake, 5 batches of chocolate cake (2 of those were used to make chocolate cupcakes), 2 batches of cream cheese filling, 2 batches of butterscoth filling.
– Sleep on the plane back home: priceless….
Sorry if the quality of the pictures is touch and go but I borrowed from three different people what I needed to illustrate the "making of" the cake. No set ups…almost real life feed. I had brought minimal equipment and lenses and left my flash gear at home (doh!). I did have to doctor the cake picture by brushing off a garbage can that was right behind it, one arm and a couple of wires. Hopefully you get a good feel of how interesting those 5 days were at Casa Lisa!!
Once the layers are cut, the buttercream is applied in between each, then the cake is stacked and waiting for a little coating.
I am only showing you one tier and not all of them because it is just a matter of repeating the same steps for each layer. Tip: To prevent your cake from forming a dome and having to level each layer, lower your oven temperature. I baked all the cakes at 340F instead of 350F and did not have to level any of them (I did however cut a small layer off for Lisa to sample!). Tip: make sure to clean as you go and have plenty of cardboard to move your cakes around. Cut your cost like I did by recycling shipping boxes which work just as well as specialty made cake squares or rounds. I did however bought the final cake boards in the exact dimensions I needed as they are less thick and better looking for the finished product.
The cake gets a first "crumb coat", a thin layer of buttercream is applied all over then the cake gets refrigerated until the buttercream is hard. This prevents cake crumbs from mixing into your final buttercream coat. Simple 5 petal "flowers" are randomly piped on each side.
I don’t always crumb coat cakes but when it comes to wedding cakes or party cakes, I automatically do. It really traps all the crumbs from getting into your buttercream as you spread it on the cakes. Cover with a thin and relatively smooth layer but do not worry about it being even or perfect. It is going to get covered anyway. Tip: apply large dots of buttercream to the sides and play a connect the dots game to spread the buttercream evenly as you run your spatula over the sides and top. Tip: if you have uneven corners or edges, do not worry. Refrigerate the cake until the buttercream is hard and work with your spatula dipped in hot water and wiped dry to smooth things out.
The cake is all decorated with piped flowers then refrigerated until the buttercream gets hard so it will be easy to paint on the flowers later on. I trimmed one layer of the cake for a visual of what the final layer would look like. Also gave Lisa an idea of where on earth I was headed!!
Before piping the flowers, I ran the ribbon around the cake to mark its height and I stopped piping the flowers right above that line. Saves you time and assures you that the ribbon will stay nice and flat…usually (read above).
Lisa made me happy by choosing a very simple piping design since I had told her how much I disliked buttercream flowers and roses. I don’t dislike seeing them, I dislike making them…to each his/her own.
White pearl dust is mixed with small amount of clear vanilla extract to make a semi liquid paste, then each flower gets painted over with it to add a little shimmer to the final cake.
I used the same shimmer dust from Wilton I used to paint on the Poire D’Eve cake, but in pearl white which came out slightly lighter than silver and added the perfect accent to the cake. Tip: use clear vanilla or another clear alcohol (type vodka) to form a paint and add more as it dries as you paint..or talk.
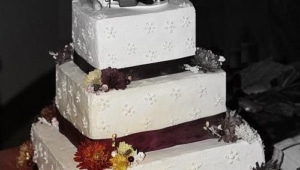
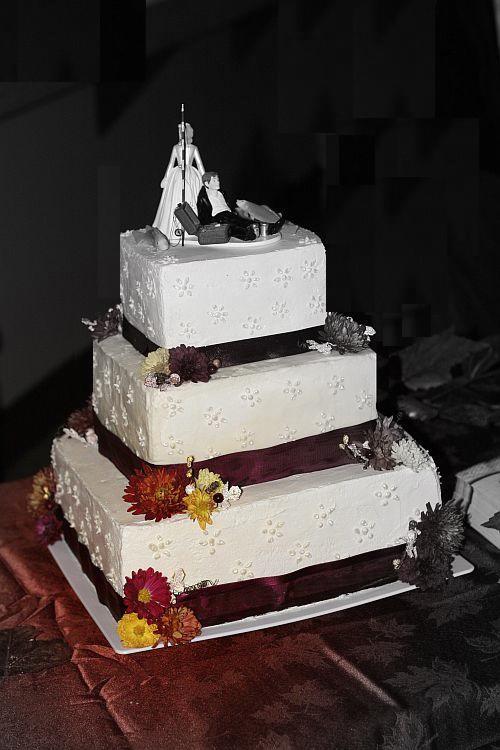
Each cake layer gets a trim with a purple ribbon (thinner at the top layer for optical effect), fresh mums and artificial frosted berries, twigs and leaves are applied at each corner. Finally the cake topper gets positionned on the cake and Helen lets out a deep breath.
Since the theme of the wedding was Fall Extravaganza, the hall and tables were decorated with fresh mums of the most beautiful shades and I had a lot to chose from the ones not used for the room. I accented the flowers with artificial frosted berries, twigs, etc…cut from a wreath bought at a craft store that I cut apart.Since the flowers were positioned just a couple of hours before serving I just soaked the stems in water to hydrate them well and clean them up. Tip: if you use fresh flowers on a cake that remains at room temperature for a long time in the middle of summer, use specialty made tubes that you fill with water and stick in the cake.
Homemade wedding cake topper: the bride dragging the groom was cute but plain, so Lisa had a friend glue on the "gone fishing" trunk, the beer cans and the fishes were just positionned on the buttercream. Fresh mum and berries details on the right.
The topper was flat so I just set it on the cake with a dab of buttercream on the bottom but that was not even necessary. Depending on what topper you chose, you can secure it with buttercream or toothpicks, extra flowers, etc… Do not be afraid to get crafty and make your own if you don’t find excatly what you need, like Lisa did.
As it is customary, the top layer was set aside for Lisa and Wayne’s first anniversary. Double and tripled wrapped in their freezer. Display of macarons sent by Veronica. Love those distressed cake stands!!
So, taking the top tier off may not be the cleanest or easiest job to do but it came off without a hitch (Murphy had to much to drink and left us alone!).
Veronica from Veronica’s Test Kitchen took time out of her busy baking and selling schedule (check out her online store!!) and sent Lisa 8 dozens macarons (I think, I lost track after the 5th box) to add to the dessert table and they were all gone (except for the bridal dozen) by the end of the evening. Who would not jump on passion fruit-milk chocolate, rose buttercream and salted butter caramel?!!!
16 cups of freshly grated carrots went in the cake…See, it was healthy after all..hmmhmm. My bridesmaid bouquet.
Not much to add there except that all the flowers and bouquets were exquisite and perfectly arranged for a Fall wedding.
I turned the cake pictures into black and white ones with a color focal point to minimize the glare from the flashes as about 20 people were taking the same pictures at the same time.