Thank you Joanna for having me again. It was a lot of fun to be participating in this series!
You can catch up on the first recipe I contributed, Roasted Tomato Soup With Parmesan Croutons, here.
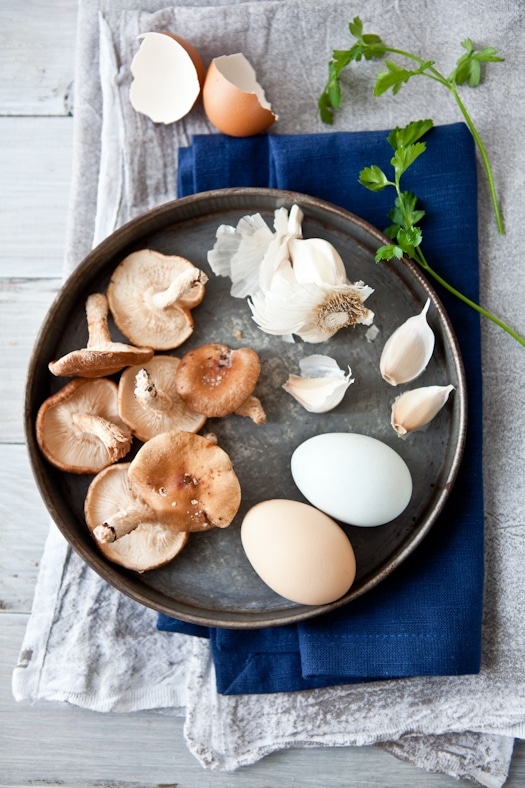
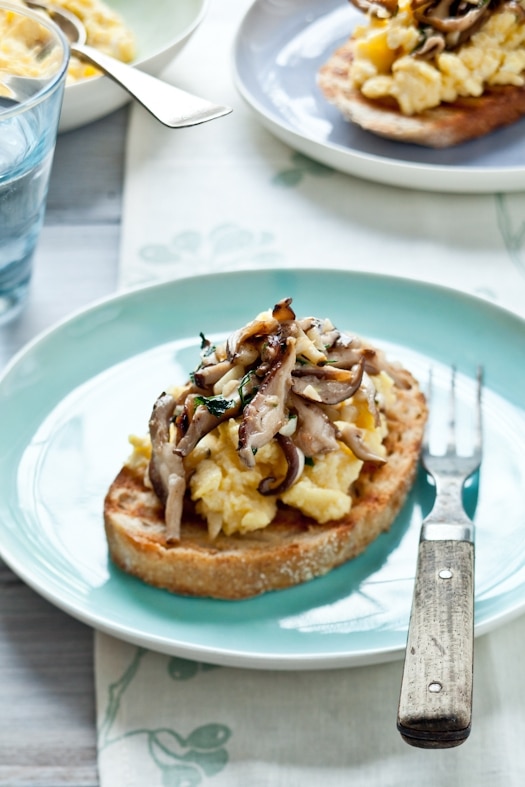
These tartines? They just feature my favorite way to eat mushrooms and eggs together. With plenty of parsley and garlic. Tender soft scrambled eggs and buttery warm toasts.
I am curious. What is your favorite way to eat eggs? I like scrambled but I prefer poached eggs to tell you the truth. You?
Saturday Scrambled Eggs With Parsley & Garlic Mushrooms
Serves 2
Ingredients:
For the mushrooms:
2 teaspoons olive oil
1 cup mushrooms of your choice (we like shitake or chanterelles, but any earthy mushroom will do), chopped
1 garlic clove, minced
2 tablespoons fresh parsley, finely chopped
Salt and pepper to taste
For the eggs:
4 large eggs
2 tablespoons crème fraiche or sour cream
1 teaspoon olive oil or butter
Salt and pepper to taste
Remaining ingredient:
Fresh or toasted bread
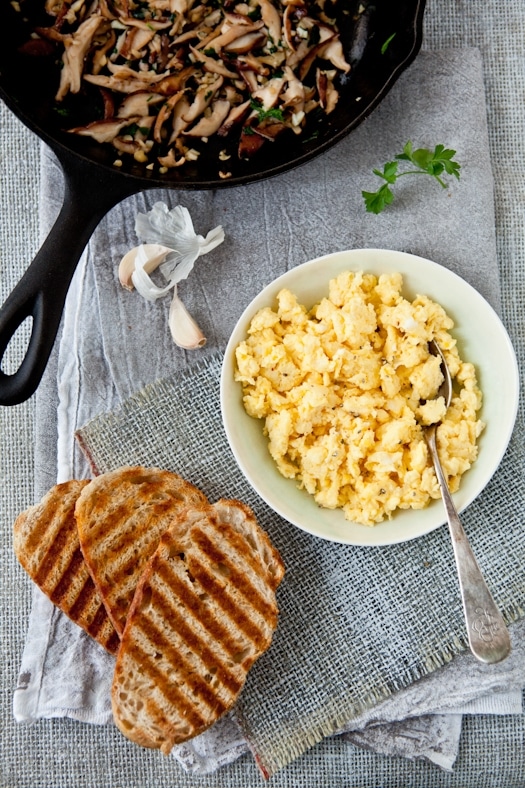
In a large sauté pan, heat the olive oil over medium heat and cook the mushrooms, with the garlic, until the mushrooms are just beginning to soften. Remove from heat, add the parsley and toss with a wooden spoon. Make sure not to burn the garlic or it will become really bitter.
Crack the eggs over a medium bowl and scramble them a few times with a fork. Mix in the crème fraiche (or sour cream). Season with salt and pepper. In a smaller sauté pan, heat the olive oil (or butter) over medium heat, add the scrambled eggs and gently stir them with a wooden spoon as they cook. You can decide to cook them until dry but we like them a bit soft and runny.
Serve the scrambled eggs over fresh or toasted bread and spoon a generous amount of sautéed mushrooms over each toast. Enjoy!
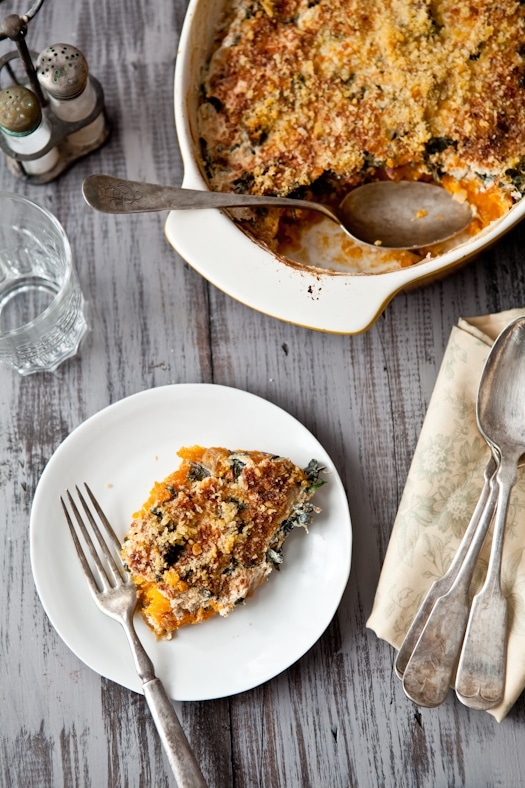
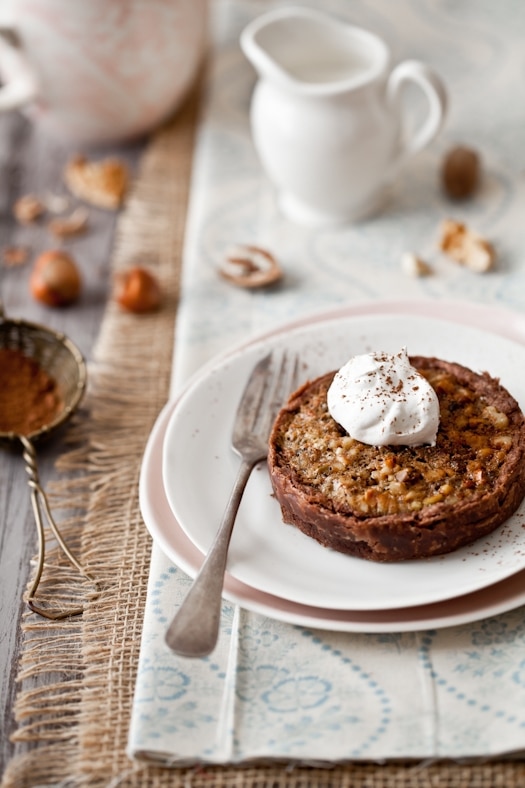
This close to the American holiday of Thanksgiving, I figured it was high time I shared some of the eats that we will have with friends this coming Thursday. It’s not all that we are preparing but when trying these recipes out for the big day, they really stood out. Tomato And Roasted Garlic Tartines as little bites with cocktails. Winter Greens and Squash Gratin as one of the sides and Mixed Nuts Tartelettes instead of the traditional pecan pie.
These recipes were the kind that made B. proclaim "please-please-please-put-these-on-the-Thanksgiving-menu-or-I-will-pout-and-throw-a-temper-tantrum". No, he didn’t really say that. He gestured it while eating another spoonful. So, while planning the menu with my friend Laura, I penciled these down along with tried and true favorites and this Cider Brined Turkey from Bon Appetit. It’s mildly concerning how excited I am about this one!
Yes. I am cooking. Yes. I want to. Yes. I am completely thrilled about it. Nothing makes me happier than gathering good friends and family around a good meal, good wine and good conversation. That also has me wildly excited about the day. It’s not about buying into the hype. It’s not about food. It’s about making a meal for people you love. It’s about sharing. Making dishes that honor traditions as well as making new ones.
The fact that this meal is centered around Thanksgiving is just icing on the cake. Like many of you, I give thanks everyday for the good fortune I receive and the lessons I learn, bitter or sweet. I think it’s nice however to have another chance to give thanks it out loud. To others. To yourself. There are never too many opportunities for gratefulness and wishing good upon others.
While not making a big production of it, I am very thankful that my friends, here or far, love cooking and prepping this much. Every year has brought a different group together and a different flair.
A while back, we decided to do have Thanksgiving with friends and Christmas with family. It seemed a lot easier on our sanity given B’s family dynamic and the fact that we do have a close knit group of friends we absolutely love hanging with during the holidays. Of course we compare weird family stories! But most importantly, we can keep our shenanigans up and no one will get offended. We can let loose and do exactly what we want. No pressure. I am grateful for that…
I do count my blessings. Everyday. And one of these is to be able to come here and unwind with you guys. What a blessing it is when things go array. Thanks for being part of the stories I write on this blog, the recipes. Thank you for your feedback, your questions and your love of food and photography.
On a separate note, but one for my mama in particular, the newspaper did a full spread feature about my outlook on life, photography, work, etc.. in their Saturday printed issue that they also posted online here. See mom … I am not always noodling around…ahahah!
Have a wonderful Thanksgiving!
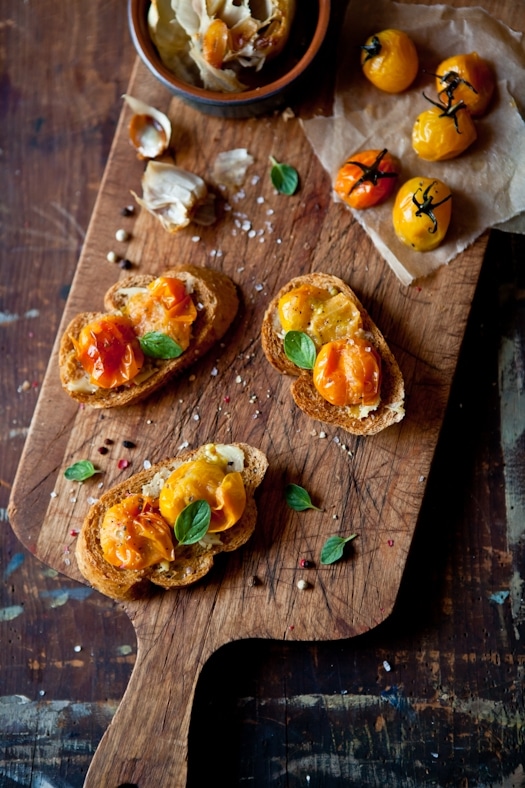
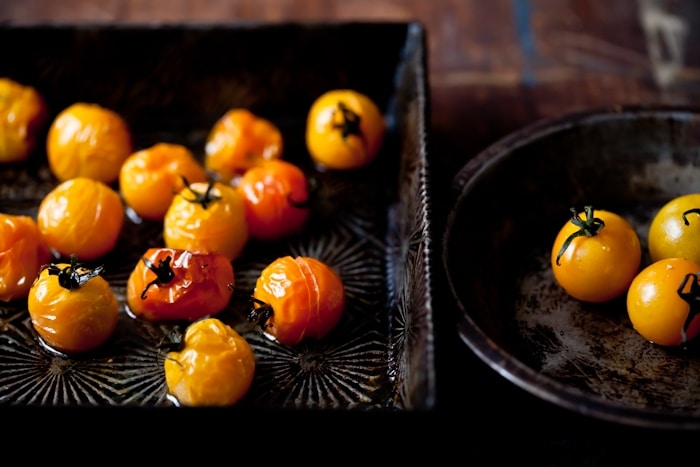
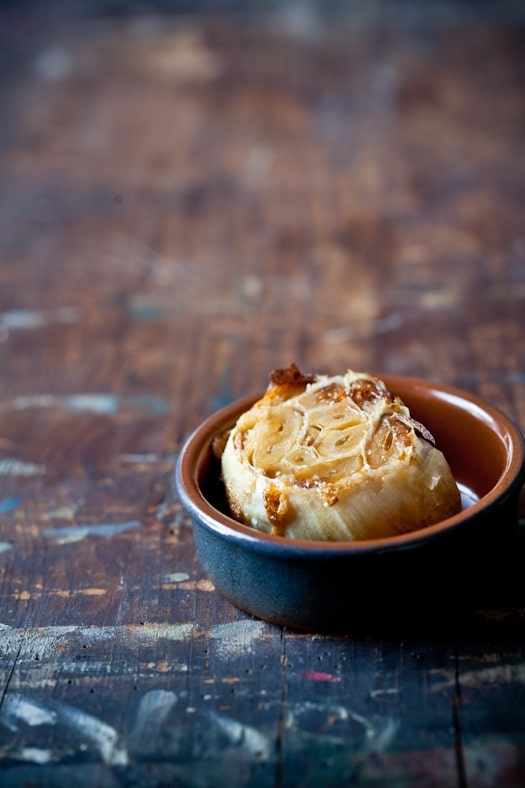
Tomatoes And Roasted Garlic Tartines:
Makes enough for 6 to 8 people as an appetizer/nibble
Ingredients:
2 cups cherry tomatoes (gold or red)
1 whole head of garlic
1 tablespoon olive oil
salt and pepper
baguette toasts (gluten free or regular slices of bread, toasted to your liking)
oregano or other herb of your liking
Directions:
Preheat the oven to 375F (convection) or 400F (normal). Position a rack in the middle.
Place the cherry tomatoes in a baking pan and drizzle about half a tablespoon of oil over them. Season with a pinch of salt and pepper and toss to coat. Set aside.
Cut the top of the head of garlic, place it in a piece of baking foil. Drizzle the remaining half tablespoon of oil. Close the piece of foil over the garlic head.
Place both the baking pan with the tomatoes and the foil with the garlic in the oven at the same time. Remove the tomatoes after 20 -25 minutes and the garlic after 30-40 minutes (it should be soft). Let cool.
Rub each piece of toast with some roasted garlic, add a couple of tomatoes on top and sprinkle with some more salt and pepper if desired. Add some oregano to taste.
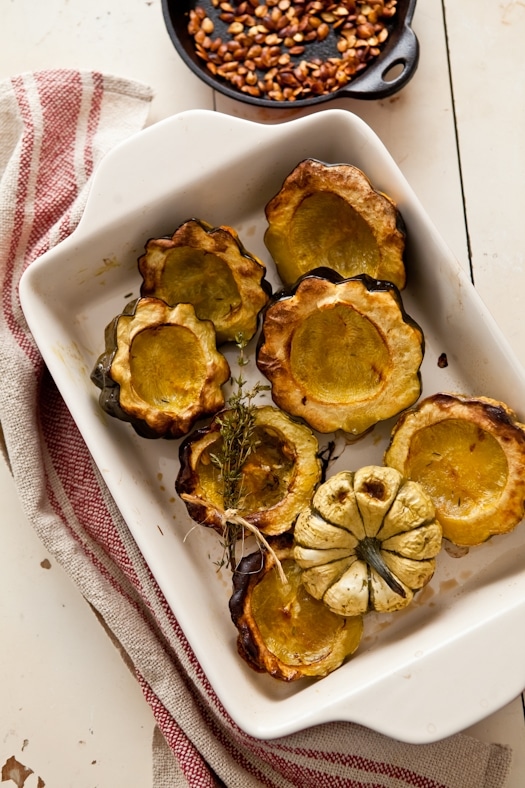
************************************************************************** Winter Greens and Squash Gratin, adapted from Virginia Willis’s Basic To Brilliant Y’all (see the original here)
Ingredients:
2 teaspoons unsalted butter, plus more for the gratin dish
1 butternut squash + 2-3 acorn squash, (about 3 pounds total), cut in half lengthwise and seeded
1 tablespoon olive oil
1 small onion
6 cloves garlic, minced
1 large bunch of Swiss chard, cleaned, stems removed and chopped
salt and freshly ground black pepper
1 /2 teaspoon freshly grated nutmeg
1 tablespoon freshly chopped thyme
1 cup milk
1/2 cup heavy cream
3 tablespoons regular or gluten free panko breadcrumbs
2/3 cup freshly grated Parmesan
Directions:
Preheat the oven to 375F (convection) or 400F (normal). Position a rack in the oven.
Place the squash, cut side up on a baking sheet and roast in the oven until soft and slightly golden brown. Let cool.
In the meantime, heat the oil in a large sauté pan over medium-high heat. Add the onion, garlic and cook for about 5 minutes. Add the chopped Swiss chard and cook until the greens are wilted, another 5 minutes or so. Season with salt and pepper to taste. Add the nutmeg and thyme and stir well. Remove from the heat and reserve.
Scoop the flash of the different squashes in a medium sized gratin dish. Sprinkle with a pinch of salt and pepper. Top with the reserved greens.
Pour the milk and cream over the vegetables and cover with aluminum foil. Bake for 25 minutes.
Meanwhile, stir together the breadcrumbs and cheese in a small bowl. Season with some salt and pepper. Decrease the oven temperature to 350F (convection) or 375F. Remove the foil from the dish and sprinkle the breadcrumbs over the top. Continue baking for another 15 minutes.
Ingredients:
For the crust:
1 cup Jeanne’s all purpose gluten free mix
1/4 cup cocoa powder
1 stick (115g) unsalted butter, kept very cold
pinch of salt
2-3 tablespoons ice cold water
For the filling:
1/2 cup unsalted pistachios
1/2 cup hazelnuts
1/4 cup waluts
4 tablespoons unsalted butter
1 cup raw honey
1 teaspoon kosher salt
1 teaspoon vanilla extract
3 large eggs
Directions:
Prepare the pastry. In the bowl of a food processor, (or follow the same instructions if doing by hand), pulse together the flour and the cocoa powder until incorporated. Add the butter and pulse until the butter resembles small peas and is evenly incorporated. Add the salt and pulse on more time. Gradually, stream in the cold water until the flour just comes together. Turn the mixture out onto your work surface and form into a 2-inch thick, round disk. Wrap with plastic wrap and refrigerate at least 30 minutes (or overnight) before rolling out.
Flour your working surface with tapioca flour (if gluten free) or regular flour and start rolling out the dough to about 1/4-inch thick adding more flour as you feel the dough starts to stick. You can also roll it out in between two sheets of plastic wrap of parchment paper, especially with working with the gluten free version. Cut eight 5-inch rounds of dough and place them inside eight 3 to 4-inch tartlet pans. Place a small piece of parchment paper inside each of them, fill with dried beans and refrigerate for another 30 minutes.
Preheat the oven to 350F (both convection and not) and position a rack in the middle.
Place the tart shells on a baking sheet and bake the tartlets for about 15 minutes (with the dried beans inside). Remove from the oven, let cool for 5 to 10 minutes and remove the beans and parchment paper.
In the meantime, prepare the filling:
Place all the nuts on a baking sheet and toast until golden for about 10-12 minutes.
Remove from the oven and let cool. Remove the skin from the hazelnuts (see my tip at the end of the recipe). Coarsely chop all the nuts. Reserve.
Melt the butter in a small saucepan over medium-high heat until brown bits form on bottom of pan, about 5 to 8 minutes. Remove from heat and let cool.
Stir together the honey, salt, and vanilla in a medium bowl. Whisk in the eggs, then the brown butter. Fold in the nuts with a spatula or wooden spoon. Divide the filling among the tartlet shells. Bake tartelettes until filling is set around edges and jiggles slightly in the middle, about 30 minutes. Cover with foil over tart if the crust gets too dark. Remove from the oven and let cool.
Tip to skin the hazelnuts:
Place the nuts in a mesh bag like the one you purchase citrus in (lemons, grapefruit) or onion. Over the sink, rub the nuts together in the bag until all the skins have fallen through the holes in the mesh bag. Easy peasy…
I seriously feel like starting this post with "oh what a week…!" to the tune of "oh what a night.." At least, just listening to it makes my feet move under my chair. That’s a good thing. I am allowing myself to make room for a giggle and a laugh. It’s been such a week for friends and family, near and far. And us trying to navigate the waves and splashes.
Today my heart is a complete split of heavy and light. I guess I could spend the next couple of paragraphs telling you why. But honestly, I am tired of those funky vibes I have experienced all week. Mine included. These twoposts will update you on why I have been quiet and reflective lately. And why today I still can’t put the broken pieces of heart back together. I’ve done my kicking and screaming, even if only in my head but I have also welcome every opportunity to change my mind today. That much funk always drives me up the wall. Or to the kitchen actually!
I cooked a lot over the last few days. Always therapeutic. I’ve made a bunch of good for the soul comforting foods. I also made some pretty aromatic dishes to soothe my bronchitis. I packed a few containers full of good and healthy recipes for Bill while I am gone this week. Stirring soup very effectively took my mind away on vacation for a few minutes. Zesting and juicing lemons filled the space with invigorating energy.
Whisking batters, roasting vegetables, hearing the motor of the food processor happily whirl away. Listening to the sizzle of the oil when my friend Laura and I made lemon fritters one night she came over for dinner. It never gets easier, it just gets different. One thing for sure is that friends and keeping busy are always great ingredients to make things better.
I hate that work is taking me away this week and I won’t be home with the husband and the pups for a good ten days. I also love that my kind of work gives me the chance to do something a bit different than my usual week. See, I am leaving in the morning and heading out to Seattle for a shoot. My friend Clare Barboza is shooting Jeanne Sauvage’s (from The Art Of Gluten Free Baking) first cookbook on gluten free holiday baking and she asked me to come do the styling. As I told them both earlier, I am very much looking forward to rest my photographer’s eyes and put my styling goggles on for a week!
I love Clare and her photography, I love Jeanne’s recipes (and I get to meet her chickens!), the publisher (Chronicles) and it’s Seattle! My last visit was a bit short there so I am looking forward to a longer stay and some fun happenings! Our shooting and baking/prep schedule is packed (just as my suitcase!) but you can bet I’ll do my best to find time for a little fun!
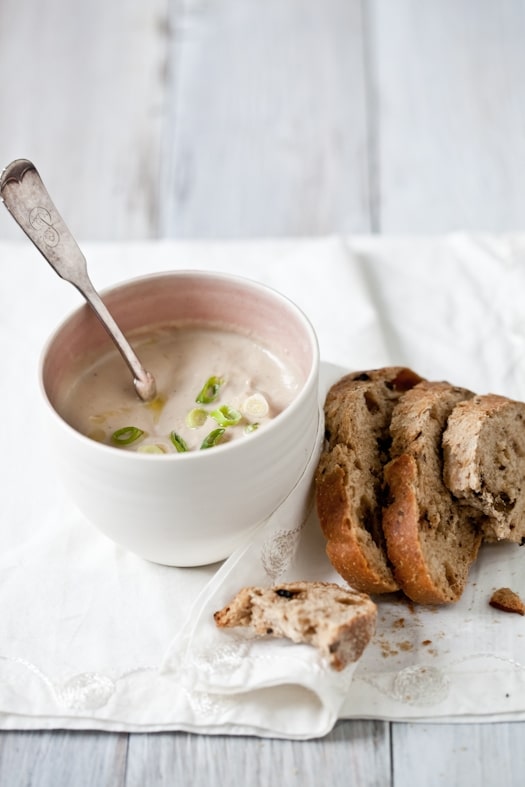
I hate to leave Bill with the pups, that’s a given, but I hate to leave him without something comforting to eat, especially the first night I am gone. When I made a Roasted Cauliflower, Leek and Garlic Soup the other day, he asked that I made another batch to store away while he’d be alone with his books. I am kinda sad I can’t sneak a cup on the plane with me. It’s really good. Don’t let its creamy grey color fool you…there is nothing bland or blah about this soup. Creamy, toasty, garlicky. Silky.
When I wasn’t feeling good this past weekend, I texted Laura that I had absolutely no appetite. She texted me back a very worried "really? nothing?"I know.…worried me too actually. I am never one without an appetite, even sick. I paused for a second and thought "actually…lemon fritters sound really really good right now!". We rarely do fried anything but that fried little pieces of dough were always in my grandmother’s arsenal remedy when we were sick. It worked back then. And it worked again this time!
Good friends, good food, good drinks and tons of good laughs sure made me feel better on all front this past week. I wish mending the world troubles would be as easy as writing a prescription for each but that’s always a start… Roasted Cauliflower, Leek and Garlic Soup:
Serves 6-8 as an appetizer, 4 as an main dish
Ingredients:
1 small head of cauliflower
1 whole head garlic
2 leeks
2 tablespoons olive oil
1/2 teaspoon kosher salt
1/4 teaspoon freshly ground pepper
1/2 to 1 cup water, or veggie or chicken stock
Directions:
Preheat oven to 375F (convection) and position a rack in the middle.
Trim the outer leaves from the cauliflower head. Cut in quarters, remove the core, and cut the cauliflower into medium size florets. Place on a large baking sheet.
Cut the garlic head in half, place on the baking sheet with the cauliflower.
Trim the white part from the green stalk of the leeks. Keep the white part and cut into medium sized chunks. Wash well under water and place also on the baking sheet.
Drizzle with the oil, salt and pepper. Roast for about 20-25 minutes.
Let cool slightly. Place in a food processor, start running the machine and add enough water to have a creamy soup. Re-season if necessary with salt and pepper. Serve.
————————————————————————–
Lemon Fritters:
Make about 20 to 30 small fritters
Ingredients:
1 -2 cups canola oil
1 cup sugar
zest and juice of one lemon
2 eggs
1 cup millet flour
1 cup rice flour
1 teaspoon baking powder
3/4 cup milk
Heat oil in medium large cast iron pan until temperature reaches 375F.
In a large bowl, whisk the sugar, lemon zest, juice and eggs until well blended. Add the millet, rice flour and baking powder, along with the milk. Mix well until the mixture is smooth. Drop by large spoonfuls into the hot oil. Do not over crowd the pan or it will lower the heat too much and you will end up with soggy fritters. Let cook for 2 minutes on each side. Drain on paper towels and sprinkle with powdered sugar.
As I have said before, summers here are hot and muggy. Very. And usually hot, muggy and wet in the late afternoon when thunder rolls in and we get caught by quick rain showers. Except these past few days. Rain has been around pretty much from sunset ’til dawn.
And we love it. Our backyard loves it. Our pecan tree is digging it. Bailey is literally jumping in and out of the creek to catch rain drops. On the other hand, Tippy gives me this look of "Hey! Can you do something about this rain? Really cramping my style now" every time we go for a walk. I suspect though that he enjoys the towel drying time afterwards.
The sun will trick you into forgetting your umbrella. The heat will convince you that you don’t need to take your rain coat. We have gotten soaked more than once lately and we really just laugh it off. It actually feels good. Being neither hot or cold feels darn appropriate after our temperatures were steadily hovering between 100F-110F down here. Sunny with a side of rain? We’re in!
The only problem with this weather is what it does to our eating habits. Braising, stewing, roasting are very much kept to a minimum. We love to be reminded that seasons are here for a reason and to take full advantages of the changes and new rituals they bring about. Thus, we are grilling and enjoying cold or warm fares a lot. Our favorite lentil salad is now served cold. Cooked and cooled rice gets a boost from freshly chopped basil and some feta chunks.
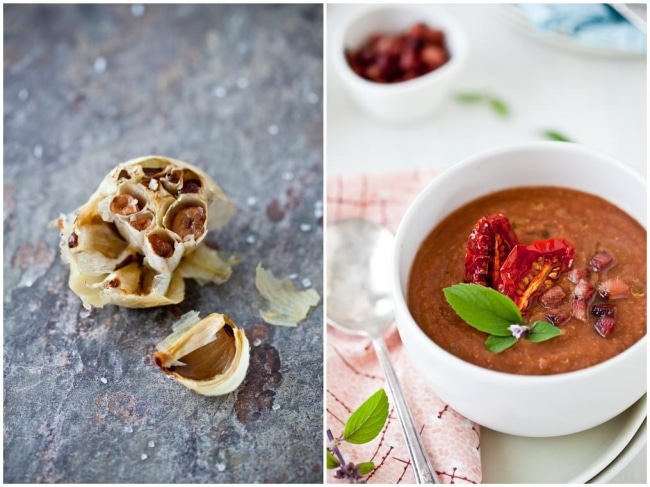
When the weather turns to rain as it has these past few days, all we really want is to sit down in front of a warm bowl of soup. B’s favorite, tomato soup, quickly became mine too when I started making it from scratch with some basil and cream. As years went on I replaced the cream with eggplant which gave the same creamy results as well as a boost of nutrients and flavor.
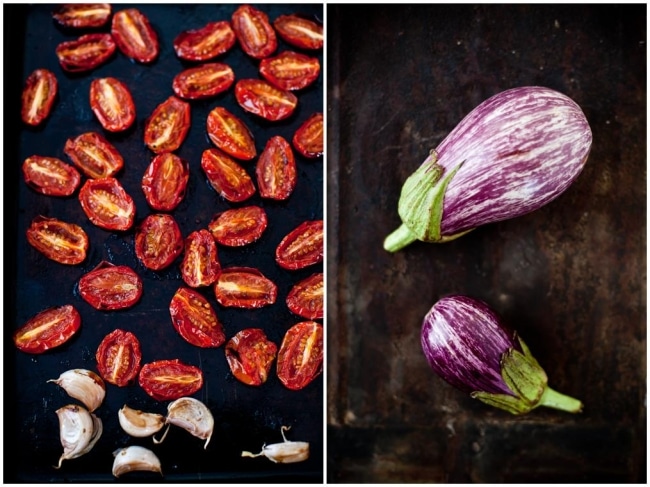
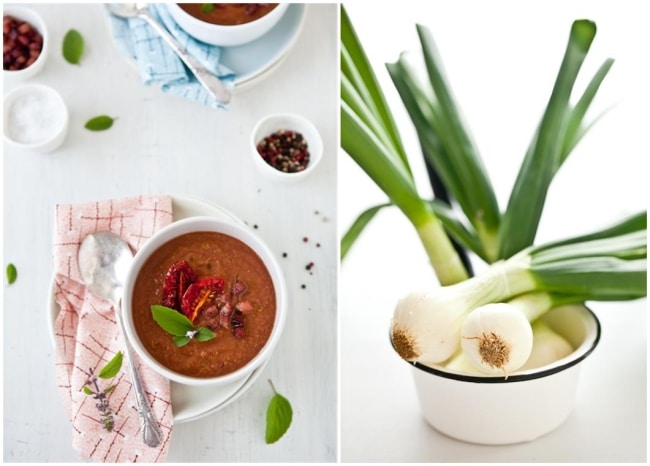
This time, I picked up loads of local San Marzano tomatoes at the market, as well as some zebra eggplant, baby Vidalia and garlic, roasted them all together one evening and pureed them the next day into a soup. I served it at room temperature with some homegrown basil and a splash of tea seed oil (gift).
We have a wonderful pork purveyor at the market, Meathouse, operated by Jason and his wife Katie who always have freshly made Butifarra, Italian and andouille sausages, fresh cut applewood smoked bacon, and one of our favorites, freshly smoked and perfectly seasoned tasso ham. It is perfect with the creamy soup and you could substitute thick cut bacon if it’s easier. I think it took us every bit of restraint not to polish off the entire pot on our own.
Before I head out, congratulations to J M. Smith from Do It All for winning the Threadless tee-shirt and BlogAid Cookbook! Send me your mailing address at mytartelette [at] gmail [dot] com. Thank you!
Roasted Tomato and Vegetable Soup With Tasso Ham
Serves 4-6
2 pounds fresh tomatoes
2 small zebra eggplants or one medium regular eggplant
1 head of garlic, cut in half
4 small vidalia onions, cut in half
2-3 tablespoons olive oil
2-4 cups water
salt and pepper to taste
fresh basil
olive oil or tea seed oil, avocado, walnut or pumpkin (optional)
1/2 cup diced tasso ham or thick cut/slab bacon, cooked and drained
Preheat the oven to 450F.
Slice the tomatoes and eggplants and place them on a baking sheet. Drizzle with 1-2 tablespoons olive oil. Place the garlic and onions on a separate baking sheet and drizzle with 1-2 teaspoons olive oil (if you have room left in the first pan, skip that step and add the garlic and onion to the tomatoes and eggplant). Season with salt and pepper to taste. Place both baking sheets in the oven and roast the veggies until golden brown, about 30 minutes.
Remove from the oven and let cool.
Peel the garlic off its skins and place with the rest of the vegetables, saving a few tomato slices for garnish, in a food processor. Add about 1 to 2 cups of water and puree until smooth. Add enough water to reach your preferred consistency. Adjust the seasoning with salt and pepper if desired.
Ladle into bowls and garnish with reserved tomato slices, drizzle of your favorite oil and some basil. Add some tasso ham as desired and serve.
Before I talk about this soup, let me announce the winner of the Heavenly Cakes book giveway: congrats to Diane from Spice Sisters. Email your mailing address at mytartelette{at}gmail{dot}com and the book is on its way to you. Now back to our regular programming…
What an amazing five days I just had in Atlanta! The city sure knows how to do sugar! The Sugar Coma tour I was part of was nothing short of outstanding. Shameeka, hostess with the mostess of The Broke Socialite proved everyone that planners and vendors can go above and beyond everyone’s idea of a good time without robbing a bank. I will do a full recap of the weekend, macaron workshop included as soon as I properly sift (pun intended) through all my pictures.
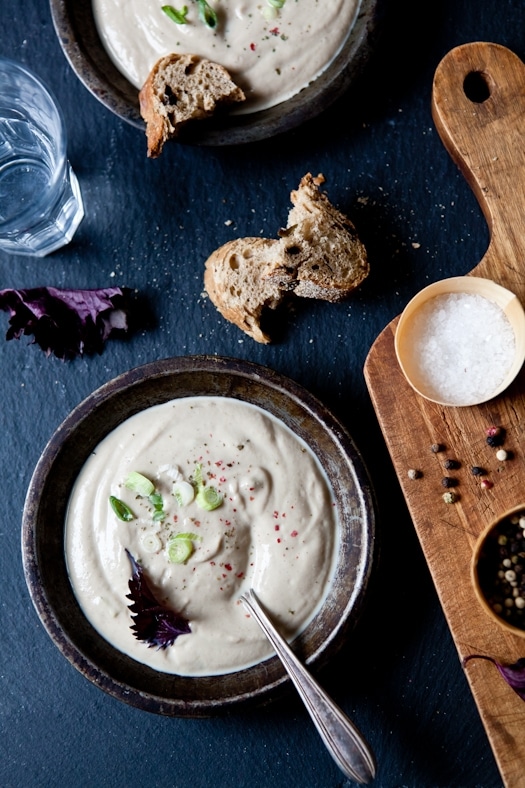
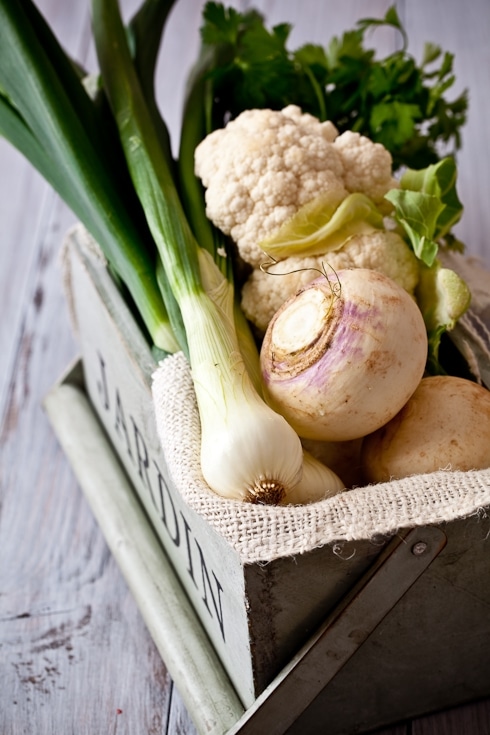
After two tours of some of the best sweet spots of the city, I was seriously craving vegetables on my way home. And salt! I must say I was impatiently awaiting dinner so that I could have a bowl of this Roasted Vegetable Soup. We liked it so much that I even called B. from the airport this morning to make sure he had not eaten the last bit I had tucked away in the freezer. No clue what he’d eat. I would have this. Not sure I’d share either. But I did. I can’t be the only one moaning at the dinner table now can I?!
There is something about roasted vegetables that sets them in a category completely apart. I can’t tell between the natural sugar from the vegetables being released as they roast, the slightly brown and crispy edge they get, or the deep aroma permeating my kitchen, which one sends my senses in a frenzy. Something does. I guess it’s the whole package. Roast anything and you’ll be a happier human being. I’m serious.
What I love about this soup beside its simplicity of preparation is the tremendous versatility it offers you as far as flavoring and textures. One night we had it on the chunky side, with a little drizzle of avocado oil and a dash of freshly cracked peppercorn and a few parsley leaves. The day after I served it for lunch a little bit smoother with oregano and thyme and some chorizo salt from Secret Salt Sea Salts. Always with some gluten free polenta croutons. They really helped round up the flavors and textures of the soup.
Seems like Spring came in early while I was away but that will not deter me from making soups. Good for the soul and easiest lunch or dinner to make when you’re pressed for time because leftovers are always better the next day, right?!
If you want a sneak preview of what we did during the morning session of the Sugar Coma Tour, check out Mark's pictures from the morning session and Bakerella’s post on the afternoon session.
Warming up a bowl of soup as I get ready to edit my pictures. It’s always fun to revisit a trip…
Roasted Vegetable Soup:
Serves 4 to 6
1 head cauliflower, broken off into small chunks
4 small-medium turnips, quartered (don’t worry about peeling them)
4 cloves of garlic, smashed with the back of your knife
4 baby onion (or 1 small onion), sliced lenghtwise
2 small potatoes (mine were the size of a clementine)
2-3 tablespoons olive oil
salt and pepper
1/2 cups – 1 cup water (or chicken or veggie stock)
Garnishes: flavored sea salts, herbs, croutons, drizzle of oil (almond, avocado, pumpkin – your preference).
Preheat the oven to 375F. Place all the vegetables on a baking sheet or in a pan in one single layer and drizzle with olive oil. Season with salt and pepper. Roast until golden brown, about 30-40 minutes. Let cool to room temperature.
Add about 1/2 cup water or stock and puree in a blender or with an immersion blender. Check if the consistency and seasoning are to your liking and adjust accordingly.
Serve with croutons and garnishes of your choice.
Le P’tit Coin Francais:
Soupe de legumes
Pour 4 a 6 personnes
1 petit chou-fleur, coupe en petits morceaux
4 petit navets, coupes en quatre (la peau y passe aussi)
4 gousse d’ail, ecrasee (peau y passe aussi)
4 petits onions nouveaux ou 1 petit onion
2 petite pommes de terre
filet d’huile d’olive
sel et poivre
Prechauffez le four a 190C. Mettre tous les legumes dans un plat ou sur une plaque a cuisson avec rebords. Ajoutez un filet d’huile et assaisonnez.
Faites cuire les legumes pendant 30-40 minutes ou jusqu’a qu’ils soient bien dores.
Laissez les refroidir un peu. Ajouter un petit verre d’eau et passez au robot pour mouliner.
Ajustez la texture en ajoutant plus d’eau si vous desirez. Assaisonnez de nouveau si necessaire.
Last month I posted about a Gruyere stuffed loaf that I had baked during a live Skype baking session with a bunch of flour obsessed gals and gents. We did not intend to make it a monthly thing, we are not even a baking group, Lord knows we are all super busy with, work, life, blogging, etc…We just decided to take one morning here and there to bake in our comfies and just let our mouths get a little loose and our minds in the gutter and I somehow get blamed for this each time (wink wink I also teach them how to type in Helenese but that is for another post). Ok, I’ll admit that last time I did say out loud that the loaves looked like female genitals or breasts implants gone wrong. This time I am glad to report that I passed on the baton to Kelly who formed little turdy things with little funny things sticking out.
We had not really planned to get together again so soon but then Lisa started to email us with visions of garlic rolls she recently had at a restaurant and you know that if you mention rolls and yeast, I lift an eyebrow and Mary sends you the recipe within 12 hours so after a little scheduling we were on for this past Sunday. We decided to pick between two different recipes and although I plan to do the King Arthur one soon, it just was not going to happen that weekend for various reason I will get to another time. I got to give it to Mary though for elaborating blindly on a Bon Appetit recipe based on Lisa’s description, the end product may not have been exactly what she remembered but the rolls were inhaled eaten in three days, no neighbor involved.
I don’t often post about breads unless it is a Daring Baker challenge or another event but Sunday is bread baking day at the house so B. did not find anything unusual in my baking behaviour that day execpt for running back and forth to the laptop and giggling and laughing every other minute. A couple of times he came wondering why I was staring at the screen, with my arms crossed holding my ribs. "They’re writing too fast, I have a missing wobbly w, a missing h, and a wandering m…" When you bake bread, there is some downtime (dough rising) and some fun time (dough shaping, which proved me that I can’t have Lisa on the phone and make a bread knot at the same time!) so bread, cooking, laundry, grocery shopping were also accomplished by some or all while we left the chat window opened.
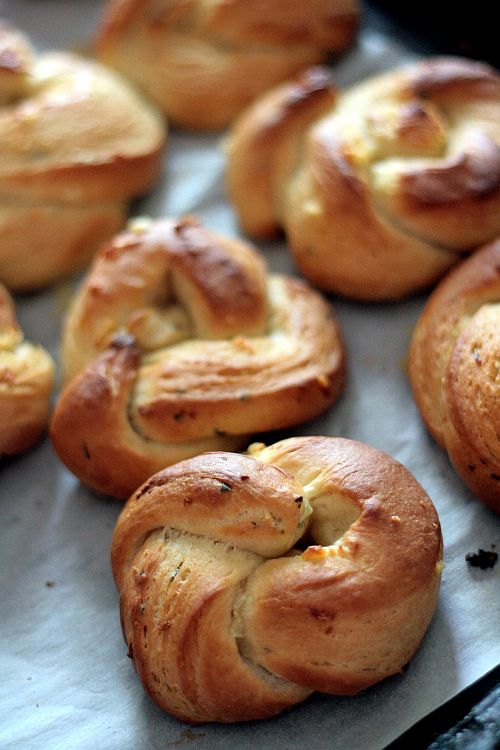
Beside the three ladies mentionned above, Tanna, Chris, Marcela, Sara, and John, joined in the fun to make the garlic knots.
The rolls? Good…no, very good! A little too sweet but since I had made a half batch that day, I made another half batch with my correction later Monday evening and those worked better for our taste. European yeast rolls are not as sweet as they are here so B. was happy with the first batch as I was with the second. The shaping was fun if not strange, I did some just fine and dandy and some had me think I had glued fingers and a stalling brain but it’s dough….gather your mess into a ball and do it again, no biggie. I have to say that the more I was looking at the post on the KA blog, the more confused I was getting…step away from the computer and just knot.
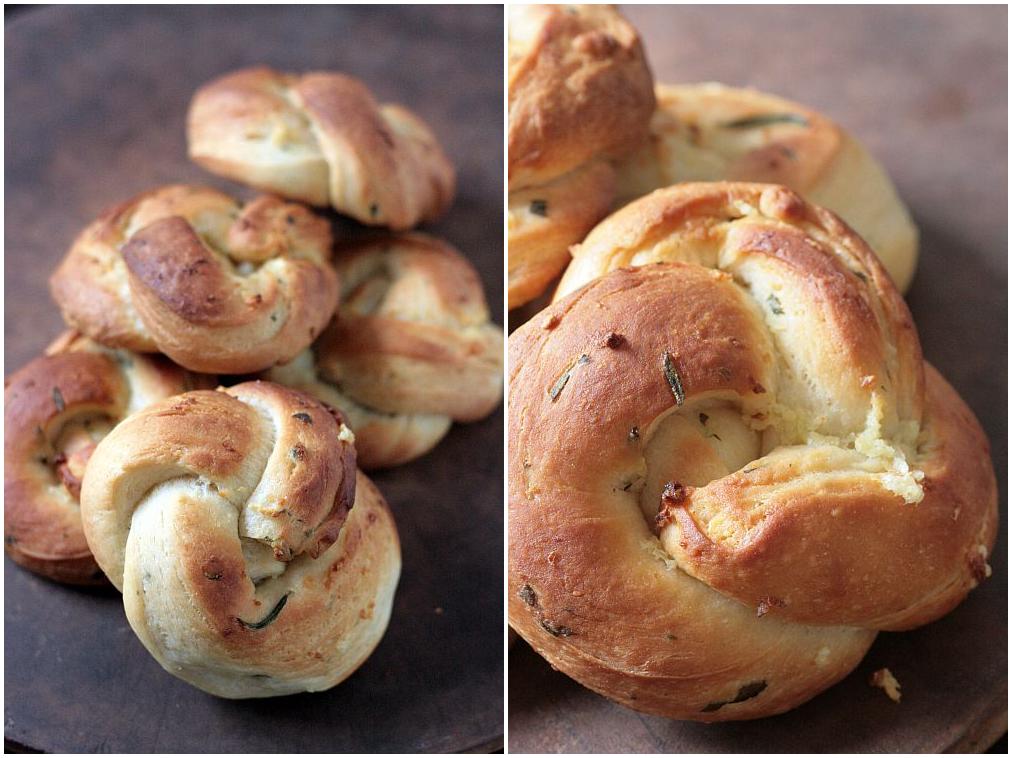
Once the knots were formed, the instructions were to brush them with melted butter and crushed garlic. I had planned to use some fermented black garlic that I had received as a gift but I had a foggy brain that morning and just chopped regular garlic before I remembered. Another reason to do these again. They got brushed before, during and after baking and all that butter soaking in the rolls gave them a really moist texture without making them greasy. I did add fresh chopped basil and rosemary to the dough. The house smelled like a pizza parlor the whole day, and with the neighborhood males gathered in the garage "watching" the thunderstorms and drinking beers, I guess it did feel like one!
Butterhorn Garlic Knots (originally from Bon Appetit, worked on by Mary and reworked by me)
Makes 18
1/2 cup whole milk
6 Tb unsalted butter cut into pieces
1/4 cup warm water
1/2 tsp plus 1Tb sugar, divided
1 Tb dry instant yeast
1 large egg, room temp
3 to 3 1/2 cups, AP flour
1tsp salt
1/2 Tbsp melted butter
1/3 cup unsalted butter, melted
3 cloves garlic, minced finely
In heavy medium sized sauce pan over low heat, heat milk and 6 Tb of butter until the butter is melted. Do not let it boil. Let cool to 115F degrees. Combine warm water, 1/2 tsp sugar, and yeast in small bowl and let stand for 5 minutes (this is for flavor not to proof yeast, unless you are using active yeast in which case you are proofing and getting flavor)
In large bowl of stand mixer using the whisk attachment, beat egg and remaining sugar at low speed until blended. Beat in milk mixture. Gradually add 2 cups of flour, 1/2 cup at a time until blended smooth. Replace the whisk with dough hook. Add yeast mixture, salt, and 1 cup of flour (1/2 cup at a time), beat at medium low speed. You will have a very wet and loose dough that climbs the dough hook but falls back down the bowl by this time. One Tb at a time, add enough remaining flour to form a firm but sticky dough ball. The dough balls will pull away from the sides of the bowl and not flop back to the sides.
Pour 1/2 Tbsp melted butter in large bowl that can be fitted with a lid or that plastic wrap clings to well. On very lightly flour covered counter and with lightly floured hands, give dough 3 – 5 quick hand kneads to form good dough ball and then put in buttered bowl, turning dough over to coat with butter. Cover bowl with lid or plastic wrap and let rise in a warm, draft free place (I like the oven turned off with the pilot light light on…or the laundry room when the dryer is on!) until doubled, about 1 1/2 hours. Punch down dough, fold dough over in half and then half again, and brush with melted butter. Cover bowl again and let rise again in same warm draft free place until doubled (about 1 hour).
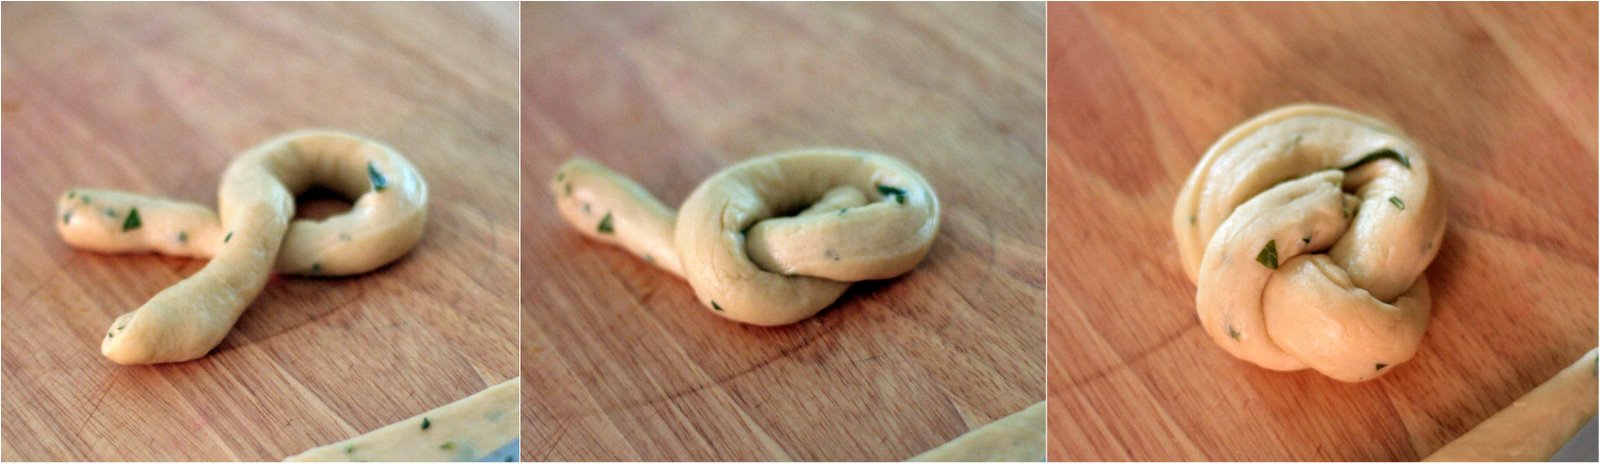
From here follow the directions for making the knots as shown on the KA website . Just don’t tuck the ends in to get the shape you want.
Cover and let rise until double, brush with melted butter and garlic and bake in 350F preheated oven for 15 -20 minutes.