
coconut

Cooking My Way Through Super Natural Everyday By Heidi Swanson: Macaroon Tart and Shaved Fennel Salad & A Giveaway

Macaroon Tart

Macaroon Tart.

*******************GIVEAWAY ENDED APRIL 14TH************************************
Last night, as I was waiting for my flight in Orlando for my flight back home, all I could think about was the serving of Heidi’s Macaroon Tart awaiting me back in Charleston.

Wild Blackberries


I have had a great time teaching at Food Blog Forum on Friday and I can’t wait to share pictures and information of what was shared a little later next week. My head is still full and my heart is bursting at the seam. I knew it already, but let me say it again, Food Bloggers Rock! Thanks to Julie who helped plan the whole weekend, I was able to teach a photography and styling workshop today before my flight. Awesomeness again…

Wild Rice Casserole

Wild Rice Casserole.

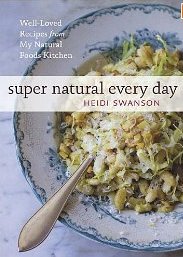
Today, I really want to talk about Heidi Swanson's book Super Natural Everyday except everything I want to say never seems enough. Everytime I get a book for review, I make sure to devote a chunk of the week to cook from it. It helps see the thread use by the author to build the book. the stories, the photography. All the dishes I cooked this past week from her book led me down the same path: practical, satisfying, energizing, good and good for the soul.

Black Bean Salad

Black Bean Salad.

In one word. I can’t wait to cook from it even more. The food is tasty, fresh and Heidi’s personality and wonderful soul shows at every turn of the page. A beautiful soul with a wonderful message to share. Good food, made with wholesome ingredients does not have to come in gargantuan portions nor is it difficult or time consuming to make. The flavors in all of Heidi’s dishes are a burst of everything that is good with eating and cooking in this world.

Tomatoes


And the photography…always loved how Heidi’s lets her readers eat with their eyes first. Her photography is authentic and hers. Just as she is. Just as her food.

Millet Muffins & Strawberry Jam

Millet Muffins & homemade strawberry jam.

I emailed her publicist a few days ago and asked if I could hold a giveaway of a copy of Heidi’s book for you guys. To my delight, I am happy to be able to share two copies with you guys! If you need a little enticing, check out the recipes for her Shaved Fennel Salad and Macaroon Tart after the jump!

Frittata & Millet Muffins

Millet Muffins and Frittata.

heidi cover


To enter the giveaway:
leave a comment on this post starting today until Thursday April 14th midnight Eastern time.
– one comment per person
– no anonymous comment please
– two winners will be picked randomly by the hand of the wise, my husband
Note: it may take up to 24 hrs for your comment to appear on the page.

Pixie Tangerines


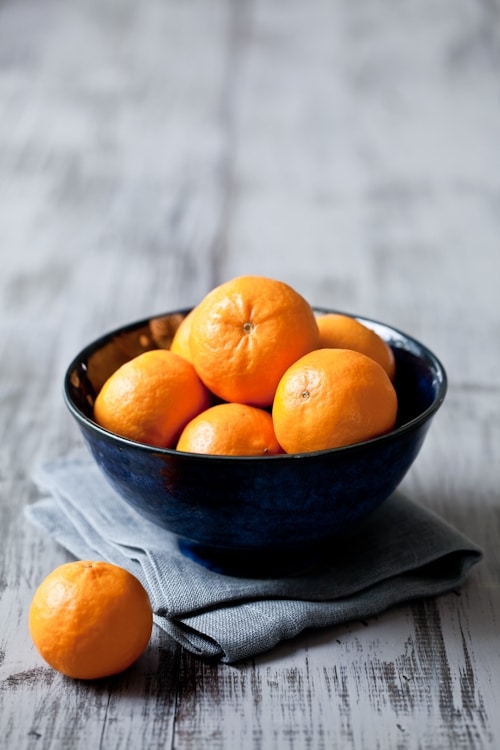
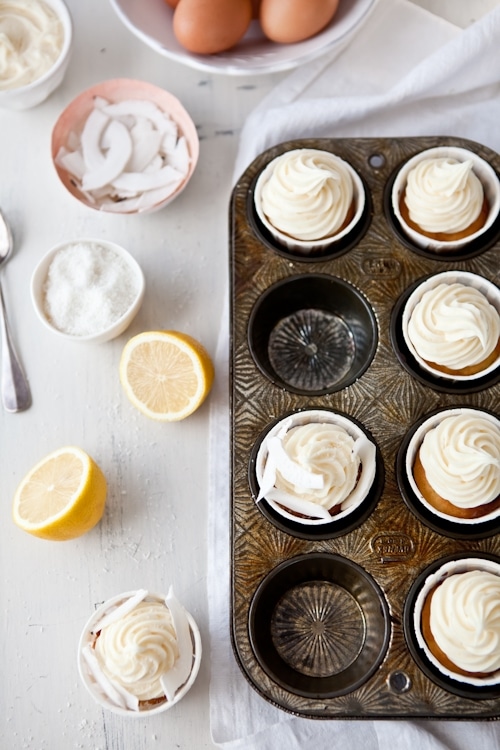
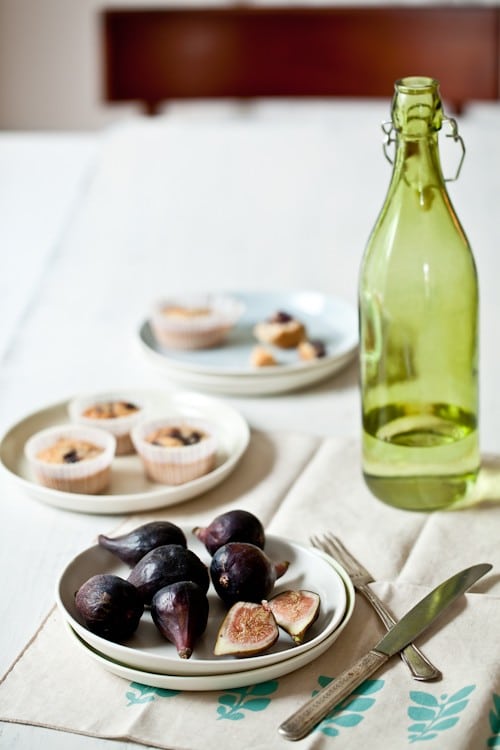
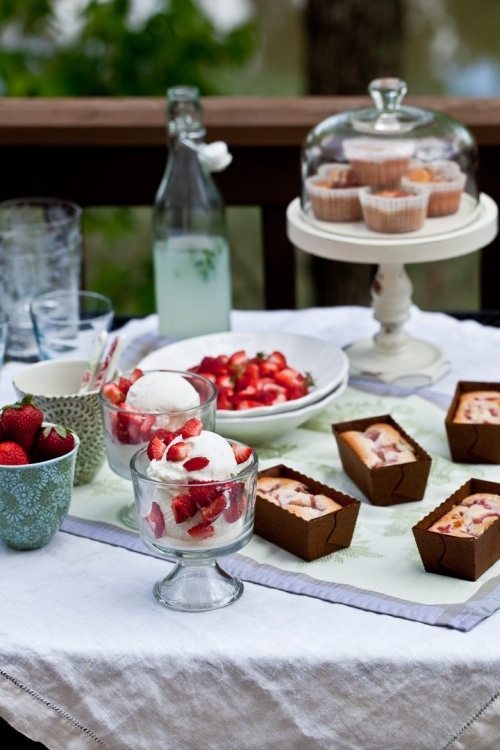
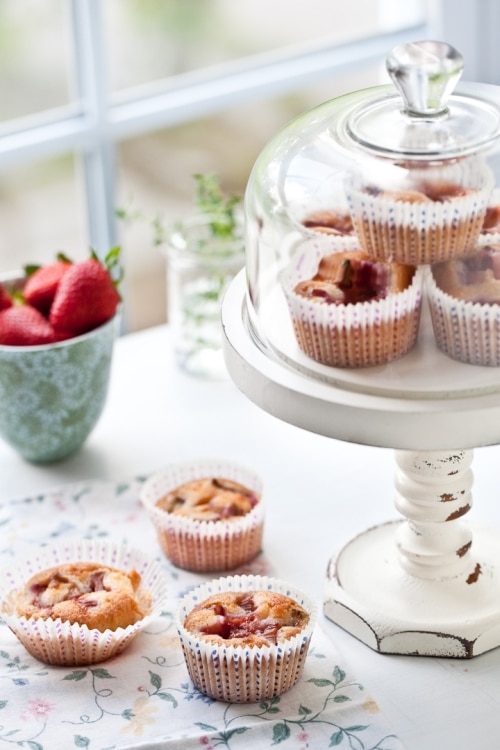
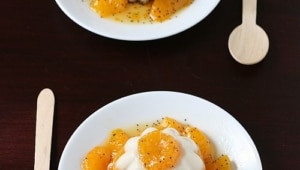
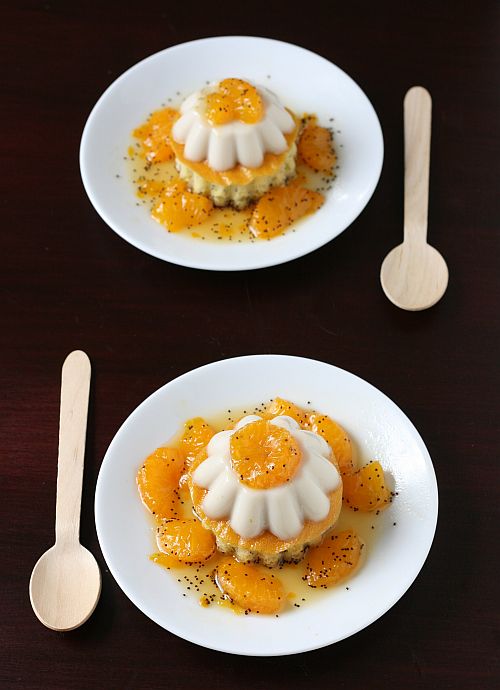
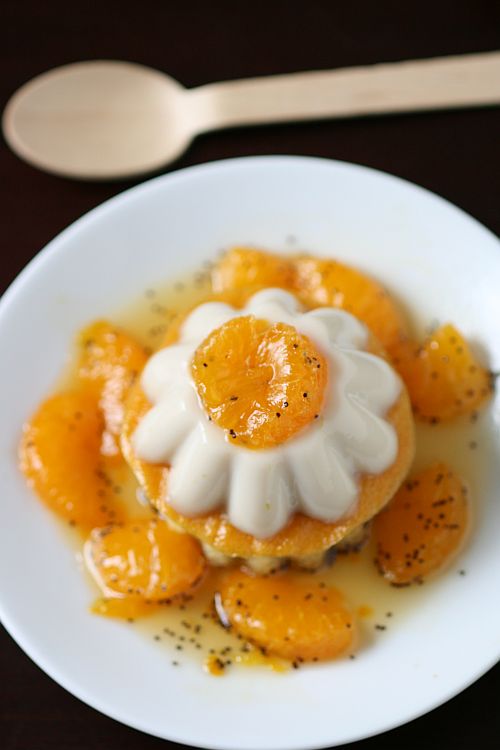
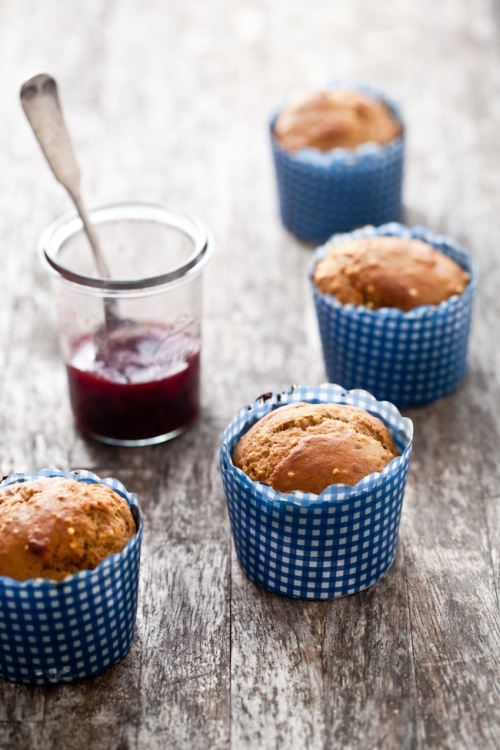
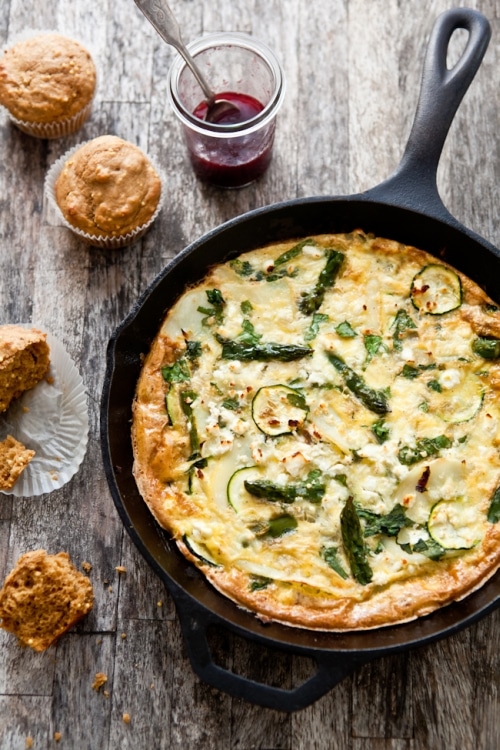
Heidi has this fabulous Buttermilk Cake recipe that she makes with plums but I used Pixie tangerines since they were in season.

Buttermilk Cake With Pixie Tangerines

Buttermilk Cake.

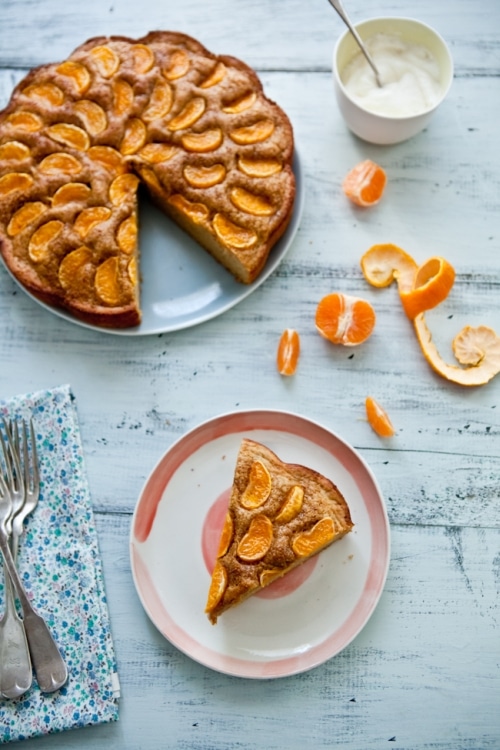
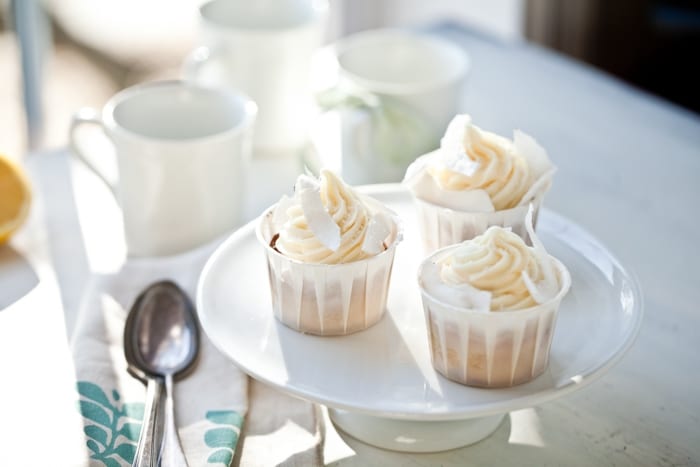
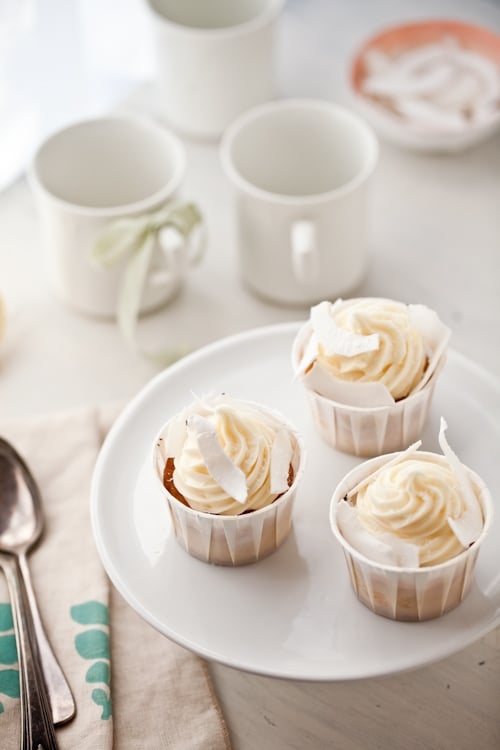
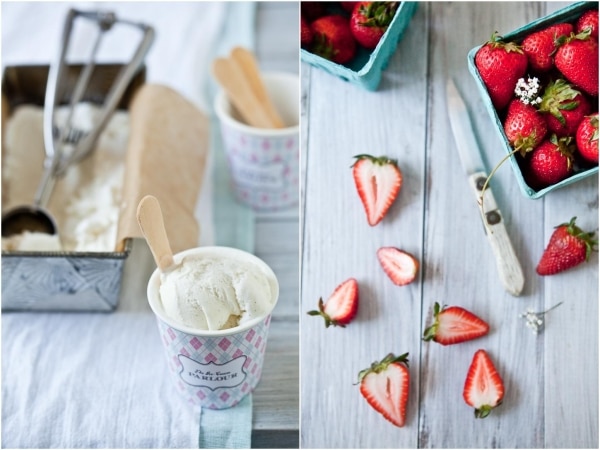
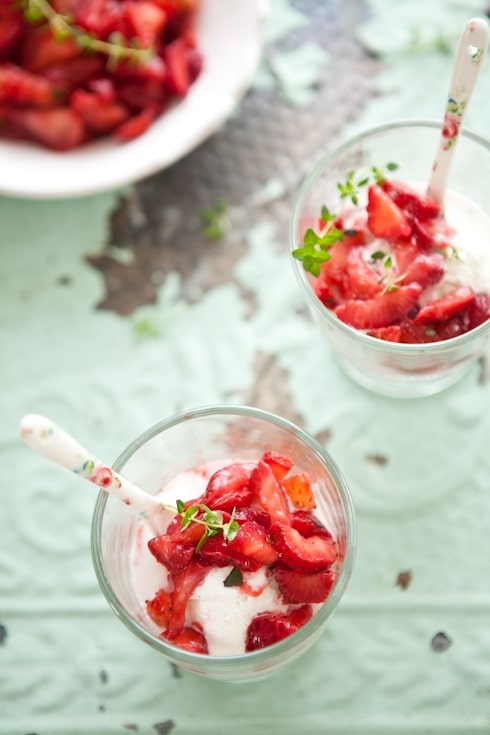
I had such a blast cooking, eating and photographing her recipes. I take immense pleasure at shooting other people’s recipes and Heidi’s was not exception. When it comes from the heart, the photography part becomes a source of intense joy. I hope the next few shots entice you to get her book and start cooking from her book soon.

Fennel, Zucchini, Dill & Arugula Salad

Shaved Fennel Salad.


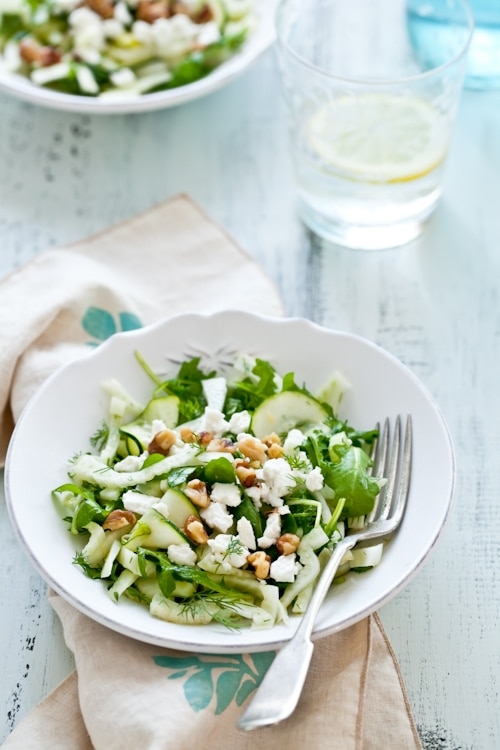
Shaved Fennel Salad, with permission of Ten Speed Press:

Serves 4 to 6

1 medium large zucchini, sliced into paper thin coins
2 small fennel bulbs, trimmed and shaved paper-thin
2/3 cup/.5oz/15g loosely chopped fresh dill
1/3 cup/80ml fresh lemon juice, plus more if needed
1/3 cup/80ml extra virgin olive oil, plus more if needed
fine grain sea salt
4 or 5 generous handfuls arugula
honey, if needed
1/2 cup/2 oz/ 60g pine nuts, toasted (I used walnuts)
1/3 cup/2 oz/ 60g/ feta cheese, crumbled

Combine the zucchini, fennel and dill in a bowl and toss with the lemon juice, olive oil and 1/4 teaspoon slat. Set aside and marinate for 20 minutes, or up to an hour.
When you are ready to serve the salad, put the arugula in a large bowl. Scoop all of the zucchini and fennel onto the arugula, and our most of the lemon juice dressing on top of that. Toss gently but thoroughly. Taste and adjust with more of the dressing, olive oil, lemon juice, or salt if needed. If the lemons were particularly tart, you may need to counter the pucker-factor by adding a tiny drizzle of honey into the salad at this point. Let your taste buds guide you. Serve topped with pine nuts and feta.

*******************************************************************************
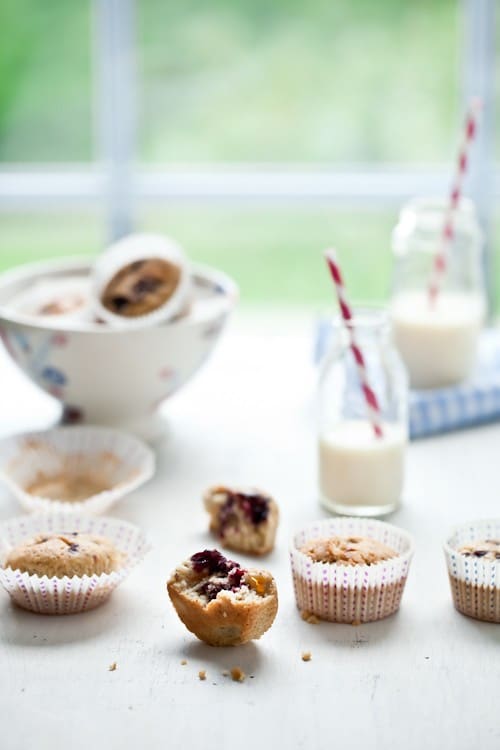
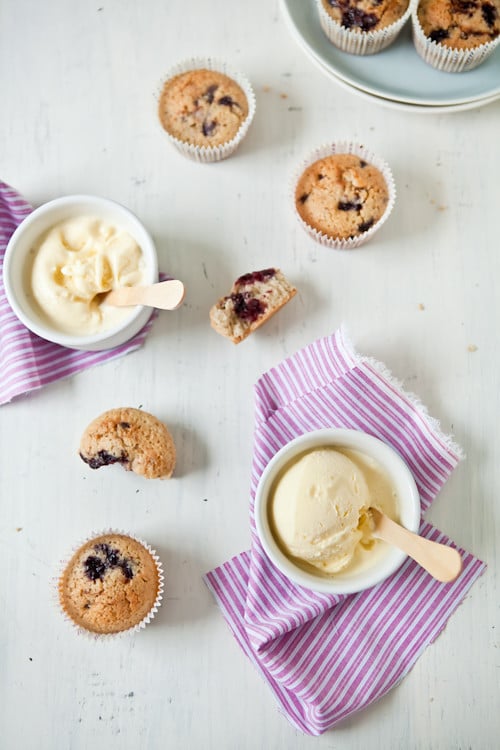
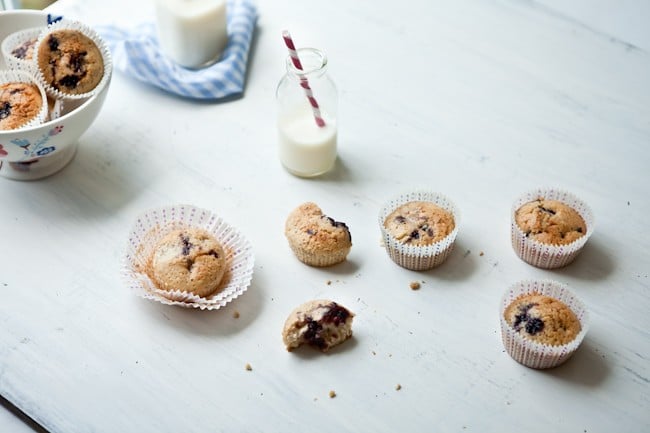
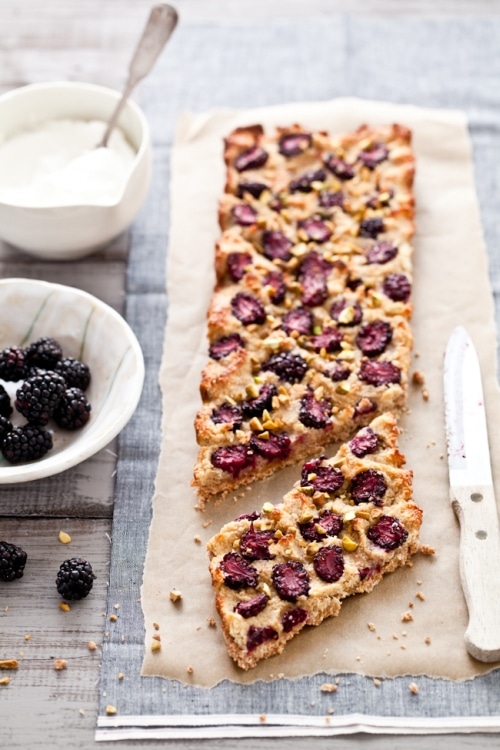
Macaroon Tart, with permission of Ten Speed Press

Makes 24 bite size servings (I made 2 rectangular tarts with one recipe)

Crust:
1 1/2 cups/6oz/ 170g white whole wheat flour (I used 1 cup brown rice flour and 1/2 cup millet flour)
3/4 cup/ 2 0z/ 60g unsweetened finely shredded coconut
3/4 cup/ 3.75oz/ 106 g sifted and lightly packed natural cane sugar
Scant 1/2 teaspoon fine grain sea salt
10 tablespoons/5oz/140g unsalted butter, melted

Filling:
2 cups/50z/140g unsweetened finely shredded coconut
1/2 cup/2.5oz/70g sifted and lightly packed natural cane sugar
4 large egg whites
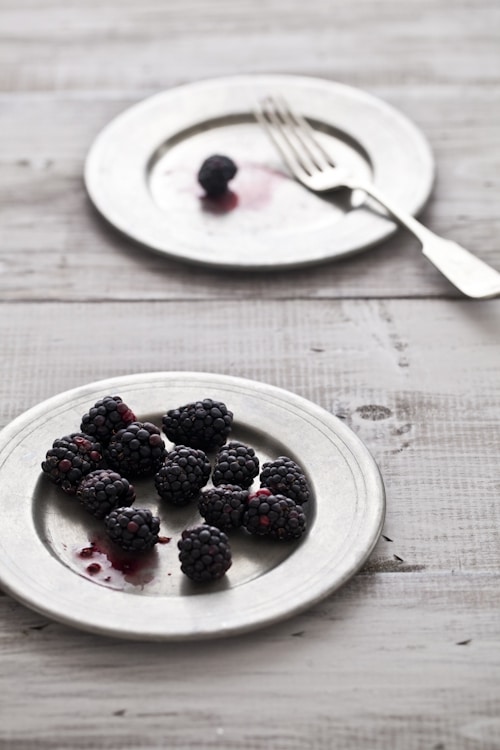
8 ounces/225g fresh blackberries, halved
1/3 cup/1.5oz/45g pistachios, crushed

Preheat the oven to 350F/180C with a rack in the middle of the oven. Butter an 8×11-inch tart pan (I used two 14×5 ones) and line the bottom and sides with parchment paper.
To make the crust, in a large bowl, combine the flour, coconut, sugar and salt. Stir in the melted butter and mix until dough is crumbly but no longer dusty looking. Firmly press the mixture into the bottom of the prepared pan (it should form a solid, flat layer). Bake for 15 minutes, or until golden. Remove and set aside to cool for a few minutes.
In the meantime, prepare the coconut macaroon filling by combining the coconut, sugar, and egg whites. Mix until well combined.
Evenly distribute the blackberries across the tart base. Now drop little dollops of the macaroon filling over the tops of them (dirty up your hands for this part), and mush and press the coconut topping around into the spaces behind the berries. Be sure to let at least some of the colorful berries pop through for visual flair.
bake for 20 to 25 minutes, until the peaks of the macaroon filling are deeply golden brown. Let the tart cool, then garnish with the crusted pistachios before slicing into small squares.

Pecan Coconut Cherry Granola and A Deliciously Organic Giveaway

Pecan Cherry Granola


*** Per the instructions in this post, the giveaway ended on Sunday night, 01/23/2011.***
It’s not often that I cook from a cookbook from beginning to end. It’s not often that I do it twice. Three times. And it’s not often that a cookbook becomes like the postcard of a very dear friend. Something you read over and over for fun, to learn, because it touched you somehow. That’s how I feel about Carrie’s book, Deliciously Organic. That’s how I feel about Carrie.

A year ago, I had no idea who Carrie Vitt was. I had no idea I would be privileged to bring her recipes, her family and her words to photographs. I had no idea, just a faint and distant skip in my heart, that we would become friends. When work allows you to connect beyond the image, to understand someone’s journey and decisions, you can’t be anything but grateful.

Granola


I know, I know. I am biased. Of course I am! Not only was I given a tremendous "first" cookbook to shoot, her first to write, but all the hard work and the hours spent dissecting recipes and looking over hundreds of images really paid off. Huge thanks to IFP, her publisher, for putting the highest quality demands on both of us. And to the amazing crew of people working on it.

We ate well for the two weeks I worked on her book. We ate very well. Carrie came during the shoot and her recipes took on an even greater dimension. We talked about her reasons for going organic and non processed. We discussed and commented. We established a dialogue and an area of mutual quiet respect. Through food. As it should be.

Tomato Chive Quiche


If you are looking for organic, unprocessed, wholesome ingredients, Carrie’s recipes are simply put just pure gourmandise whether you are making Sour Cream and Lemon Pancakes with Blueberry Puree, Grandma’s Crawfish Etouffee, Roasted Red Onion and Pear Salad, or the Pecan Coconut And Cherry Granola and the Tomato Basil Quiche in the pictures here. (click on continue for recipes at the bottom to get the granola recipe.)

If you are puzzled with the what/why/where of going organic, Carrie’s story and subsequent journey and discoveries will provide some pointers and ways to explore. Carrie’s tone is never preachy or condescending. It can’t be. You realize that when you meet her in real life, trust me. So you listen or read. And you learn. And you share.

Of course I want her to do well! I loved photographing this book! I can’t wait to start on her second! I loved the work but first and foremost it’s not everyday that you first cookbook shoot turns out to be one you handle from ingredient shopping to post processing all by yourself and still leave you elated and rubbing your belly for more good food.

Tomato Chive Quiche


Every dish in this book was photographed, then eaten. That chicken on the back cover? Man…it came out hot from the oven, we set it down on my table, photos were taken and we ate it but a big salad simply dressed of lemon juice and olive oil. I have dreams about that chicken. Yep, I planned every work day around a set menu: one breakfast, one entree, two sides, one dessert. Oh yes…

Again. We ate well. Very well.

And we still do. And now you can too! In honor of Carrie’s book release, I have one copy to giveaway to a lucky reader among you! All you have to do is leave a comment on this post and a winner will be picked at random on Sunday night 01/23/2011, midnight eastern time. One entry per person, no anonymous please. I will ship anywhere in the world.

Carrie….I am so flipping proud of you! Virtual flowers and Champagne to celebrate!

Wishing...


Notes: I know…where’s the quiche recipe, right? In the book….we can’t give you all that’s inside the book but I urge you to try it as you as you can. That recipe alone will make for better Sunday mornings…trust me!

Pecan, Coconut and Cherry Granola, printed with permission of Carrie Vitt.

Makes about 8 cups
1 cup (185gr) whole cane sugar or sucanat
¾ cup (180ml) organic maple syrup
4 cups (440gr) rolled oats
1 ½ cups (130gr) coconut, unsweetened
1 ½ cups (150gr) dehydrated whole pecans, or pecan halves
1 cup (160gr) dried cherries, lightly chopped

Preheat your oven to 350º and adjust the top rack to the middle of the oven.
Whisk sugar and maple syrup in a small saucepan over medium heat until almost smooth. Pour the oats, coconut, pecans into a large bowl and then pour the syrup over them. Stir gently until the syrup coats everything. Spread mixture onto a large baking tray lined with parchment paper. Bake for twenty minutes. Remove from oven and cool completely. Break into pieces and add the dried cherries. Add dried fruit after you break up the granola into loose bits and large pieces. Sore in an airtight container.

Making Time For Tea & Lemon Coconut Cupcakes

Lemon Coconut Cupcakes


I hope everyone is having a great start to the New Year and feels refreshed and ready to enjoy 2011 to the fullest. B. and I don’t really make resolutions as we know what works and what does not, what needs to go and what needs to be and always keep those in mind. Not just because it is the New Year. It’s refreshing to think of beginnings though. Possibilities.

This past Sunday, we pulled out the big calendar and jotted down our respective commitments so far. We got to July and looked at each other with a big smile and circled August three times and wrote with capitals "vacances a deux". There’s been a lot of traveling but it’s been too long since we traveled just the two of us and we absolutely love it. We’d love to go to Ireland and Scotland where he is from. It’s not a definite yet but we’ll work hard to make it happen. Got to dream big right? Right!

Lemon Coconut Cupcakes


The second thing I wrote down in my internal calendar was to make an effort to put myself on pause for tea time. I’ve mentioned this family tradition before where would gather at the dinner table around 4 or 5 o’clock and have a cup of tea and a couple of cookies or a slice of pie. It was a good way to talk about anything. It was the perfect way to breathe and make plans, laugh and banter.

The cooler days in Winter are perfect just to curl up on the sofa, and take a little time to just be. No disturbance or interference. I am all about a sweet little nosh with my tea and I love making our favorite family treat back home, a simple lemon and olive oil yogurt cake. Everyone, boy or girl, in the family has been taught this cake as soon as they were able to handle a mixing spoon. So easy, so good, so comforting.

cupcake


This time I changed it up a bit and turned the cake into cupcakes with cream cheese frosting left over from making carrot cake macarons. I also used desiccated coconut as part of the gluten free flour mix I used for no the reason that although he likes the flavor of coconut, B. can’t stand the shreds. I bumped the citrus for good measure and the cupcakes were a hit.

Perfect with a hot cup of tea on a sunny Winter afternoon…

Lemon Coconut Cupcakes


Lemon Coconut Cupcakes:

Makes 14

For the cupcakes:
2 large eggs
1/2 cup granulated sugar
3/4 cup olive oil (don’t skimp on the quality)
1 cup plain yogurt (low or full fat)
zest and juice of a lemon
1 cup rice flour
1/2 cup millet flour
1/2 cup desiccated coconut
1 tablespoon baking powder
pinch of salt
shaved coconut to decorate (optional)

Preheat the oven to 350F and line cupcake tins with cupcake liners, slightly brush the inside olive oil.
In a large bowl, whisk together the eggs and sugar for about 2 minutes. Add the olive oil, yogurt, lemon juice and zest and whisk again so that everything is well mixed. Add the rice flour, millet flour, coconut, baking powder and salt and mix until the batter is smooth. (You can do this in a stand mixer if desired)
Divide among the muffin tins, filling no more than 2/3 of the way up. Bake for about 15-20 minutes or until a toothpick inserted in the middle comes out free of crumbs.
Let cool completely before frosting. Once frosted, add a few pieces of shaved coconut if desired.

Cream cheese frosting:
From this post.

French Word A Week: L’ete – Les Cerises – Les Vacances!

Summertime...And The Living Is Easy


Summer….easy living, easy going. When the casual becomes upscale and the impromptu becomes routine. I love that. Summer evenings around here are something to be savored, never rushed. In that regard, I have retained a great deal of my home country in the way friends and family gather around our dinner table. Long evenings with simple, fresh and seasonal dishes, something cold to sip on and a light summer dessert to end.

Growing up, summer desserts rarely consisted of cakes or pastries and chocolate was pretty much forgotten until the Fall. Not always but often. Instead we would always have some fruit, either raw or slightly grilled, a drizzle of lavender honey and maybe a dollop of fresh cheese. Sometimes it was ice cream. Sometimes it was sorbet. Sometimes it was just a plate of cherries and some cheese.

Coconut Cherry Ice Cream


This week French Word feature is all about l’ete (summer), les cerises (cherries) and les vacances (vacation) (lucky you!)

Taking advantage of the bounty of summer. Letting your senses get their fill of fragrant peaches, apricots, lavender, your taste buds get tickled with tart raspberries and red currant while your eyes can’t get enough of all the colors around. Red. Yellow. Green. Orange. I can easily get lost in everything that the season brings forth. Hurricanes and heat waves included.

All Cherried Up...


After a busy workday, I find myself craving simplicity. A lot. Summer is perfect for that. The South is prefect for that too. I love bumping into neighbors and settling on their or our front steps, talking for hours. Often times, I make a quick run to the house and bring back some ice cream, some cones and some bowls and we just sit there in the magic hour of the sunset and laughing life away.

I am dipping (pun intended) into the archives today to bring you a recipe I’ve made about every other month since I first posted it: Cherry Rose and Coconut Ice Cream. It’s got all my favorite in one nice scoop: coconut flavor, cherry bits, and a hint of rose. Sometimes I skip the latter but this is by far the most requested ice cream flavor I get from my friends and I am far from complaining. Hehehe!

Hope you have a wonderful weekend!

Coconut Cherry Ice Cream


Cherry, Rose and Coconut Ice Cream:

Makes a little less than a quart.

Notes: don’t just go use any dried rose for this! Make sure to get food grade, organic and non treated rose petals or rose buds. Most can be food at health food store in the bulk spices and tea section and are quite cheap. I got about 1 cup for $1.50.

For the rose infused cherries:
1 cups (145gr) pitted and halved cherries
1/4cup (60ml) water
1 tablespoon lemon juice
1/2 cup (100gr) sugar
6-8 food gradedried rose buds (more or less depending on your own liking)

For the ice cream:
1 cups (250ml) heavy cream
1 cup (250ml) whole milk
1 cup (250ml) whole coconut milk
1 cup (200gr) granulated sugar

Prepare the cherries:
Place all the ingredients in a heavy saucepan and bring to a simmer over medium heat. Turn the heat off and let steep one hour (longer for an even intense rose flavor). Remove the rose buds and refrigerate until ready to use.

Prepare the ice cream:
In a large saucepan set over medium low heat, bring the cream, milk, coconut milk and sugar to a simmer, stirring occasionally until the sugar is dissolved. Remove from the heat and let it cool to room temperature. Refrigerate, preferably overnight.
Process the mixture into your ice cream maker according to the manufacturer’s intructions.
Once the ice cream has reached soft serve consistency, pour into a freezable container. With a spatula, swirl in the cherries and a few tablespoons of their liquid. Freeze a couple of hours.
No ice cream maker? No problem, but really it is worth the $50 investment. Pour the cream into a freeze proof container and freeze for a couple of hours. Take it out and whip it with an electric mixer or immersion blender, freeze it again, whip it again….do that four or five times. The mixture won’t be quite the same but pretty darn close.

Ollalieberry Financiers & Toasted Coconut Ice Cream

Olallieberry Financiers


It only took twelve years to admit this but I must say that in spite of the heat and humidity I really love summers here in the South. Yes. I’ve said it. Love them. You might wonder what else is to summer here that would make me forgive the mosquitoes, head bashing heat and stick-to-your-clothes-like-frosting-on-a-cupcake humidity. Well…Thunderstorms! Rain! Afternoon showers! Tea breaks and evening swims!

Olallieberry Financiers


It was not until a recent conversation with my parents that I realized what summer here was like versus what I thought it should be: it’s like back home. Just a tad stronger. Every afternoon around 4pm the skies darken and the rain slowly moves in. Thunder. Lightning. The skies get a thick cloud cover and the house is nothing but shadows. It reminds me so much of the summer months of my childhood that it makes it bearable.

Fresh Figs & Financiers


This weekend was no exception and we gladly took the opportunity to do as much as early as possible and cozy up in the afternoon. That’s the thing to do during summers here, start early and keep going until the rain stops you or the craving for a cold drink and a sit down become too strong. We set up on the dining room table and started working on our respective tasks, facing each other. Looking up once in a while. Bouncing ideas off of each other as they came along. Drawing directions and paths to the life we want to live.

Olallieberry Financiers


We did just that on Saturday in the later part of the afternoon just as the rain was starting to fall against the window and we sat there quietly listening. A new summer ritual. A good cup of French press coffee or a cold glass of milk, a plate of still warm tea cakes or a handful of cookies. I suddenly got a hunkering for the coconut ice cream I had made specially for profiteroles to celebrate our anniversary the next day. Instead of a snack we stayed true to the past 12 years being married and did the opposite of what was planned. We had dessert before dinner.

Olallieberry Financiers & Coconut Ice Cream


Toasted coconut ice cream from David Lebovitz via my friend Jen, financiers made with the olallieberry jam that Anita had given me in Boulder, a plate of fresh figs. The first we’ve had this season.

I like summers here after all…

Olallieberry Financiers


Olallieberry Jam Financiers:

Makes 12

Note: you can substitute any type of jam for the one I used here. You can also use about 3/4 cup of fresh cut fruit or 3/4 cup fresh berries instead.

1 stick (115g) unsalted butter, at room temperature
1 cup (100gr) unsifted powdered sugar
1/2 cup (60gr) ground almonds
1/4 cup (30gr) rice flour
pinch of salt
4 large egg whites
1/2 cup olallieberry jam

Preheat your oven to 375F and position a rack in the center. Lightly butter the inside of 12 financiers molds or muffin tins and place them on a baking sheet. Set aside.
In a medium saucepan set over medium high heat, melt the butter until it turns to a rich hazelnut brown color. Remove from the heat and let it cool for 5 minutes. Strain and reserve.
Mix together the powdered sugar, flour, ground almonds and salt in the bowl of a stand mixer fitted with the paddle attachment. Add the egg whites and mix on low speed until all the ingredients are coming together. Add the brown butter, increase the speed to medium and beat until smooth.
Divide the batter among your molds, drop about 1 to 2 teaspoons of jam in the middles and swirl with the tip of a knife. Bake for about 15 to 20 minutes or until golden brown.

Toasted Coconut Ice Cream, adapted from The Perfect Scoop by David Lebovitz.

1 cup (230gr) dried shredded coconut, preferably unsweetened
1 cup (250ml) whole milk
2 cups (500ml) heavy cream
pinch of salt
5 large egg yolks
1/2 cup (100gr) sugar
1 teaspoon rum

Preheat the oven to 350°F (175°C). Spread the coconut on a baking sheet line with parchment paper and bake for 5 to 8 minutes, stirring frequently to prevent it from burning. Keep a close eye on it as it toasts rather fast and goes from perfect to burnt even faster. Remove from the oven when it is golden brown and let cool completely.
In a large saucepan set over medium high heat, warm the milk heavy cream, salt and add the toasted coconut. Cover, remove from the heat, and let steep at room temperature for 1 hour.
Re-heat the cream mixture over medium heat until hot. In the meantime, whisk the egg yolks and sugar until pale and thick. Slowly pour the cream mixture over the egg yolks, stirring as you do. Whisk well. Place the mixture back into the saucepan over medium and cook until the mixture thickens and coats the back of a spatula. Remove from the heat and pour it through fine mesh strainer set over a large bowl. Press the back of your spoon against the coconut to extract as much liquid and flavor as possible. Add the rum and let cool to room temperature (you can place a piece of plastic wrap and poke holes through it to prevent condensation if you are concerned about leaving things uncovered at your house).
Once cooled, refrigerate the mixture until completely cold (I let mine in the fridge overnight) then freeze in your ice cream machine according to its manufacturer’s instructions.

———————————————————————————–
Props:
– flower bowl: GreenGate
– cupcake liners and paper straws: Bake It Pretty
– plates: Gleena
– green bottle: Stein Mart
– stamped flatware: Monkeys Always Look on etsy
– linen napkin: Jewelweeds on etsy

Design*Sponge Feature: In The Kitchen With

Rhubarb Financiers & Coconut Ice Cream  In The Kitchen With


Thanks for the birthday wishes, emails, ecards and presents you sent. You made my day – week – month! It’s been a week full of work which suits me just fine since I don’t really know how to relax and take it easy. Seems like I am playing a game of "Catch me if you can" this summer and you know what? I am loving it. I am loving the work, the pressure and the adventures. I’ve never felt this alive and this happy . Our household depends on it too. It’s not just for the fun ya’ll. Although… hot dang, this much fun on the job should be illegal!

Coconut Ice Cream And Strawberries


What’s even more fun is to do a little feature for the gals of Design*Sponge. Grace and Kristina are always so thorough and dedicated to their craft that it’s always a pleasure to work for them. Kristina asked if I wanted to do something gluten free this time and I had no problem coming up with a few items making the best use of some of my favorite seasonal fruits.

Strawberries & Cream


For some reason we have been hooked on vanilla and coconut ice cream lately and as soon as the first strawberries showed up at the market we started having ice cream and lemon-thyme marinated strawberries almost every other night for dessert. That alone satisfies my better half just fine. I, on the other hand, always desire something else to sink my teeth into so I usually make a quick batch of gluten free shortbread cookies but with my crazy habit to load up on rhubarb at the market, I decided to use some of the poached one I prepared for the panna cotta and tart and use it in financiers.

Local Strawberries


Financiers, or friands in some parts of the world, have to be one of the easiest tea cakes to adapt gluten free and pretty hard to mess up too. And who can resist the addictive smell of browned butter? Obviously not us because these did not last long once all the shots were in the box. Maybe five minutes because we had to drink the ice cream first it was melting so fast?!

Our lemon-thyme and lemon balm plants have been growing wildly and we try our best to include them in most of the foods we eat this Spring. Salads, berries, spring rolls, marinades, etc… and we have been throwing whole stems in homemade lemonade a lot lately for a little extra flavor boost. Lemon thyme is milder than regular thyme and obviously on the citrus-y side which makes it a good substitute, replacement, change from mint. Hope you can give it a try one day!

Rhubarb Financiers


Head over to Design*Sponge for the recipes and more pictures and say "hello" if you can!

Chocolate Mango And Coconut Cream Cake

Chocolate Coconut & Mango Entremet


When others were painting eggs for Easter last week, I was busy painting a cake. Well, applying brush strokes to a birthday cake would be a more accurate description. Carol and Fifi paint, very well I might add. I just fiddle with a pastry brush because I am short on time to come up with other things to decorate this delicious Chocolate Mango And Coconut Entremet Cake.

I know, I know, being short on time and making a multi layer cake does not seem right in the same sentence. Well, welcome to my logic! It’s true I am not the most logical person for "real life" things although I am improving with each year that passes. The only domain for which I am extremely logical is in the kitchen and with food. Do not ask why. And just in case you needed proof, let me tell you a little story…


I was about 10 or 11 and learning maths and how to solve logical problems starting such as "if train A leaves the station at 11.35 and train B…" and this was about as far as my brain would register. Two trains, two times, one station…oy! My favorite though was the "mantel problem" (yes, yes, I did say mental mantel). It always went something like "if your mantel measures x across by y across, how much fabric do you need to go around it, leaving k amount for the corners as well as the top and bottom" (or something like that). I would just stare at my dad and feel really sorry for it that I could not wrap my head around the solution. Did not make sense. Long minutes of complete silence during which I could hear my dad shoes start to tap the floor under the dining room table. Oh that awful feeling of letting him down…

Most time it would end in excruciating diagrams and long line of equations that burried me further into maths and logic oblivion. Until one fine day when my dad finally understood that if I were going to learn that kind of language, he would have to translate it into my own. Instead of lining that darn mantel piece with fabric, he proclaimed we would line it up with chocolate bars! Yeah!! I can relate to that! Within a few minutes, my eyes lit up and I could start to hear some big motion happening inside my head…I was on a roll…

Chocolate Coconut and Mango Entremet


We did have birthday over Easter weekend in the family and a request for a summery-tropical-beach cake. When I mentionned coconut as part of the cake layers, a few raised their hand in protest. Ah yes, I had forgotten we had "coconut shreds haters" in the family. No problem. No shreds anywhere, just plenty of coconut milk in the Bavarian cream would do. I had just the right amount of Alfonso mango puree leftover from the panna cottas I made recently so it got turned into a lovely and silky mousse and let’s not forget the usual suspects like flour, butter, eggs, cocoa.

When someone asks for a multi layer entremet cake for a birthday, my logic is to say yes even if work is busy because I know I can make the task easy by spreading the job over a couple of days without fretting. You can make the cake layers ahead of time and keep them well covered in the fridge or refrigerator. The mousses will set up rather fast so make them the day you are ready to put it all together. Since I can’t paint, I gave up on the idea of doing a beach scene on top and used some matcha dissolved in water to brush some strokes on top of the cake.

I was a bit worried of combining so many different layers into one cake but it actually worked perfectly! The coconut milk in the Bavarian cream gave it a very soft flavor and not at all artificial (no one likes to eat flavored SPF 50) while the mango finished up that lovely tropical theme. Since the cocoa genoise was a little too simple on its own, I added some rum flavored simple syrup to flavor it a bit. It was an adult affair anyway. See…I am logical after all!

Chocolate Coconut and Mango Entremet


Chocolate – Mango and Coconut Cream Cake Recipe:

Serves 10-12

For the vanilla genoise:
3 large eggs
3 large egg yolks
1 teaspoon (4gr) vanilla extract
pinch of salt
¾ cup (150gr) of sugar
½ cup (70gr) cake flour
¼ cup (30gr) cornstarch

Preheat the oven to 400F and set a rack in the middle.Lightly spray a 12×17 baking sheet with cooking spray or lightly brush with melted butter. Set aside
Whisk the eggs, egg yolks, vanilla, salt and sugar together in a large bowl over a pan of simmering water. Whisk gently until the mixture is just lukewarm, about 100F on a candy thermometer(or test with your finger – it should be warm to the touch).
Transfer the mixture to the bowl of a stand mixer fitter with the whisk attachment (or hand held beaters) and whip on medium-high speed until the egg mixture is cooled and tripled in volume. The mixture will be thick and will form a slowly dissolving ribbon falling back onto the bowl when the whisk is lifted.
Over a medium bowl or a piece of parchment paper, sift together the flour and cornstarch.
Add one-third of the flour mixture to the beaten egg mixture. Use a rubber spatula to fold in the flour mixture, making sure to scrape all the way to the bottom of the bowl to prevent the flour mixture from making lumps. Repeat with another third of the flour mixture and finally with the remainder.
Pour the batter into the prepared pan and smooth the top with an offset spatula.
Bake the genoise for about 10 to 12 minutes. Make sure the cake does not over bake and become too dry or it will not roll properly. Let cool on a rack. Remove the cake from the baking sheet and invert it on a larger piece of parchment paper. Peel of the parchment paper that was lining the baking sheet. Set the cake aside.

For the cocoa genoise:
Same process but replace the amount of cornstarch with the same amount in cocoa powder and proceed with the recipe the same way.

For the coconut Bavarian cream:
1 tablespoon (7gr) powdered gelatin
3 tablespoons water
4 egg yolks
1/4 cup (50 gr) sugar
1 cup (250 ml) coconut milk
1 cup (250ml) heavy cream, cold

In a small bol, sprinkle the gelatin over the water and let stand to soften while you prepare the cream.
In a large bowl, whisk the egg yolks with the sugar until very pale. In the meantime, in a medium large saucepan set over medium heat, bring the coconut milk to a simmer. Slowly pour the milk over the yolks, whisking constantly to prevent them from curdling. Pour the mixture back into the saucepan over medium low heat and cook until the cream coats the back of a spoon (as if making creme anglaise). Add the softened gelatin and stir until melted completely into the cream. Let cool to room temperature.
In a stand mixer fitted with the whisk attachment, whip the cream to soft peaks on medium speed and fold it into the cooled cream base. Use within one hour.

For the mango mousse:
1.5 teaspoons (3.5gr) powdered gelatin
1 tablespoon (15gr) water
4 oz (120gr) mango puree (to make your own, see here)
2 tablespoons (25gr) sugar
1/2 cup (125ml) heavy cream, cold

In a small bowl, sprinkle the gelatin over the water and let it soften while you prepare the fruit.
In a medium saucepan, bring the mango puree and sugar to a simmer. Remove from the heat and add the softened gelatin. Stir until the gelatin is completely melted.
Transfer the fruit puree to a large bowl and let it cool to room temperature.
In a stand mixer fitted with the whisk attachment, whip the cream on medium speed until soft peaks form. Fold about 1/3 of the whipped cream into the fruit puree to lighten it up (do not worry about losing air at this point). Carefully fold in the rest of the whipped cream. Use within one hour.

Rum simple syrup:
1/2 cup (125ml)water
1/4 cup (50gr) sugar
2 tablespoons (30gr) rum

In a small saucepan set over medium high heat, bring all the ingredients to a simmer until the sugar dissolves, stirring occasionally. Let cool to room temperature.

Lemon glaze:
1.5 teaspoons (3.5gr) powdered gelatin
1 tablespoon (15gr)water
1/4 cup (62.5ml) water
1/4 cup (62.5ml) lemon juice
2 tablespoons (25gr) sugar

In a small bowl, sprinkle the gelatin over the water and let it soften.
In small saucepan set over medium high heat, bring the water, lemon juice and sugar to a simmer, stirring off and on to make sure the sugar dissolves properly. Add the gelatin and stir until completely dissolved. Let cool to room temperature (if the mixture gels, warm up over low heat until barely melted again).

To assemble:
Line an 8×8 baking pan with parchment paper of foil, leaving a border on the sides to make it easy to remove when set. You can also use a cake frame of the same dimensions.
Cut two 8×8 cake layers in each of the genoises. Place one layer of the chocolate genoise at the bottom of your pan and brush with some rum syrup. Pour half the coconut Bavarian on top and smooth with an offset spatula. Top with a layer of vanilla genoise, brush some rum syrup on top. Pour half the mango mousse and smooth with an offset spatula. Repeat the process with the second half of cakes and creams. Refrigerate until set. Pour the lemon glaze over the cake and let set in the fridge.
Cut through the cake with a knife dipped in hot water to prevent breaking the glaze instead of slicing through it.

Toasted Coconut And Berries Charlottes

Toasted Coconut And Berries Charlottes


"I want a bouquet of berries!"
That’s what my friend Laura exclaimed when we met at the florist to talk bouquets for her upcoming wedding.
"You mean…for real..or on your cake, as a separate flavors, as favors? What? What?"…

Can’t you just sense the panic in my voice? Lord knows I love Laura, I laugh with her, cry with her, call her crazy and yet, I never know when she is joking when she is in charge of making decisions. See, Laura has already changed her mind 3 times for her dress…after it was bought. The ceremony has been changed just about everytime the wind changed direction, the vows?…typed, backspaced, saved, erased, and started over countless times. A couple of things have remained: the groom is still "The Original One" as we have nicknamed Jason, her husband to be, and as always her group of friends has vowed to throw her into the pool after the big event.

I met her while at the restaurant, she was waiting tables and quickly volunteered to be my dessert guinea pig. Laura loves to organize big parties, Halloween bashes, fundraising dinners, etc…and she is good at it. She knows to bring people together, her diplomacy is impeccable and she never loses her cool…but she ended up in the pool more times than she remembers. Over the years we have learned to let her talk and scribble away and wait a couple of days for the finalized plan.

So when she said she wanted a bouquet of berries, I, on the other hand saw a big blue pool… I should have trusted her and let her finish her sentence instead. Had I paid attention, I would have noticed that she was on the phone with Old Chef telling him she did not want a wedding cake but a couple of plated desserts. There will be a mini version of Jason’s favorite, Carrot Cake, made by our friend C., the other pastry chef in the group, and I would make Laura a dessert that represents her. Except nothing really "represents" Laura given her ever changing nature. I threw some ideas to her and finally drew sketches of charlottes made of thin toasted coconut ladyfingers, filled with a raspberry mousse and topped with whipped cream to evoke the white of her wedding dress and topped with berries….a bouquet of berries. One decision made, 85 of these to make for her wedding this coming Saturday.

When I make charlottes at home for the family, I like to use savoiardi cookies, not that I am lazy to make my own but they remind me of my grandparents who always kept a box in their pantry. My grandma would give us some to dunk in our tea or hot chocolate and we had a contest to see who could dip the longest without the cookie disintegrate on them. My grandfather would give us some whenever the adults had Champagne so we could get a little taste. I have to admit though that eating freshly made ladyfingers ranks as high as eating freshly cooked sables or shortbreads…very high. Before you run away when you look at the recipe: once again I am a big advocate of spreading plated desserts preparationover a couple of days if you need. Make the ladyfingers one day and store them in the fridge in a tight container and tackle the mousse the next.

For Laura’s dessert, it was easier to make them and pipe the batter thin to mimic flower stems. The mousse base is a quick Chiboust cream where instead of the traditional Italian Meringue, whipped cream is added to a creme anglaise base and held with some gelatin. There are also two kinds of Chiboust, one with creme anglaise, one with pastry cream, I went for the former. We went for raspberries but strawberries or other would work quite well. For work production purposes I purchased frozen organic raspberries, let them thawed and mashed them before adding them to the mousse base. I like to fold the fruit base into the whipped cream and not the other way around. I find it more consistent, faster and more reliable, but you will read different directions on the subject so experience to find the one you like best.

Toasted Coconut And Berries Charlottes


Toasted Coconut And Raspberry Charlottes:

Makes 6, 3 inch wide charlottes

For the ladyfingers:
1/2 cup (65 grams) cake flour
3 large eggs yolks
1/2 cup (1oo grams) sugar, divided
3 egg whites
1 teaspoon orange blossom water
pinch of salt
1/2 cup to 3/4 grated coconut (both unsweet or sweet are fine)

– Preheat the oven to 350 degrees F and line two baking sheets with parchment paper.
– Fit your mixer with the paddle attachment and beat the egg yolks with 1/4 cup of the sugar until thick and pale yellow at high speed for about 5 minutes. Add the orange blossom water and give the mixer another quick whirl to combine.
– Transfer the batter to a bowl, and sift the cake flour over it but do not fold it in yet.Wash your mixer’s bowl thoroughly before proceeding with the egg whites.
– Fit your mixer with the whisk attachment and whip the egg whites until foamy. Add the pinch of salt and increase the speed and whip until soft peaks form. Gradually add the remaining 1/4 cup of sugar and whip until stiff peaks. Fold the whites into the egg yolk and flour mixture in three additions, mixing just until incorporated. Do not over fold or you will loose air and the cookies will turn flat.
– Transfer the batter to a pastry bag fitting with narrow tip (I used Ateco #807) and pipe the batter into 6 3 inch circles first, then continue with the remaining batter to make 4 inch long ladyfingers.keeping one inch space in between them. Feel free to draw circles and lines on the parchment paper and to invert it prior to baking (so you don’t get ink or pencil lines on your cookies) as a guide.
– Sprinkle as little as 1/2 cup to as much as 3/4 cup of grated coconut, depending on your taste.
Bake for 8 to 10 minutes or until the ladyfingers are firm but only slightly browned and are spongy when pressed with a finger.
– Remove them from the oven and let the baking sheets cool on wire rack for a few minutes. It will be easier to remove the cookies from the parchment paper if you do so when they are still a little warm. Once lifted from the paper, let the cookies cool completely on wire racks before using them.


For the raspberry mousse:
250 ml (1 cup) milk
1/4 cup (55 grams) sugar
3 egg yolks
2 tsp Chambord
2 tsp powdered gelatin + 1/4 cup cold water
1 1/2 cups frozen raspberries, thawed and mashed with a fork
3/4 cup heavy cream

Sprinkle the gelatin over the water and set aside to bloom.
In a medium bowl, whisk the sugar and egg yolks until pale yellow. In the meantime time, in a medium saucepan, heat the milk to boiling point. Slowly pour some of the hot milk over the egg yolks to temper them. Add the remaining milk in one steady stream, whisking well. Pour the liquid back into the saucepan, and cook over medium low heat until it thickens enough to coat the back of a spoon. Remove from the heat, add the Chambord, raspberries and gelatin and stir until the latter is completely dissolved.
Let cool to room temperature. In a large bowl or in a stand mixer fitted with the whisk attachment, whip the cream to soft peaks. Incorporate the raspberry base in 2 additions into the cream. Use immediately.

To assemble the charlottes:
Place 6 rings onto a parchment line baking sheet. Line 6 rings with parchment paper, place a disk of ladyfinger cookie at the bottom and line the inside with as many fingers as will fit in them. Divide the mousse evenly in between the rings. Refrigerate until completely set.
When ready to serve, unmold the charlottes and top with whipped cream and fresh berries.

Toasted Coconut And Berries Charlottes

Coconut Cake And Cream Cheese Buttercream

Coconut Cake-Copyright©Tartelette 2008 First of all, let me start by saying that your comments and emails about the book were a wonderful balm for the soul. Ya’ll rock! It won’t be for a while that you’ll be able to put it on your shelves but I will make sure to keep the whole journey somewhat interactive. I am sure that in a couple of months, I will need some recipe testers….for the 3rd or 4th time I verify everything works.

Now, I hope you all had a great 4th of July with fireworks a plenty and good times with family and friends. We decided to gather the neighborhood at the dock and make a day of it. We caught crabs, grilled, took rides on the boat, and throughout the day we came and went as we pleased, refilling on sunscreen or beverages. I got to tell you, finishing with the fireworks over the water was quite a snapshot to engrave in one’s memory! B. made the joke that I should savour the moment since I won’t be having any of that next week for Bastille Day…ah yes…well, I am here now. And happy. And licking my fingers off the last piece of coconut cake I brought back from our little get together.

As often goes on the weekends here, I did not know until this morning how the day would unravel, I only knew that I was supposed to bring cake. They asked for an all American dessert, possibly cake, and please none of that Opera thing or Saint Honore wheel….Sheesh….Okay, okay…I get it already! I have been craving this good old American staple, Coconut Cake for ages but since B. hates the texture of coconut I always made a pass. Hmmm….since there will be a large group, I now had a reason and he could have brownies instead.

Now here are the funny parts of this story, well at least to me. Early in the afternoon his mom called needing his help in the yard, she asked about our plans and inquired about my dessert. I could taste the coconut on my lips as I was telling her about the cake only to hear her reply "But B. doesn’t like coconut!". I told her what I wrote above"he’ll have brownies instead". He got home couple of hours later with a freshly baked apple pie! His mom had also written "B.’s Pie" on it and he proudly carried it to the dock with that "Look what my mama made me" kind of step. Everytime someone asked for pie, I would hear "may I have some B.’s Pie?" "is there any of B.’s Pie left?"….and the man cannot bake!!

What seemed rather comical to everybody but me as I seem to have misplaced some of my head lately (if you find it, let me know) is that I intended to make a 4 layer cake only to realise when we cut into it that the 4th layer was still on the countertop back at the house…Oops! The worst being that I first walked all the way to the dock without the cake. Bigger oops! My excuse is that I was being distracted by this adorable creature.

Allright…the cake. It is a pretty straightforward but super moist sponge cake flavored with coconut milk and the layers get a good dousing of coconut liqueur (I am giving you to conservative amount, feel free to add). For the buttercream, I could not decide between a plain buttercream or a cream cheese frosting so I changed things around and mixed softened cream cheese to an Italian meringue buttercream. And.Oh.My! Turned out deliciously smooth and rich without being cloyingly sweet. Loved it!

I need to mention that the pink topping is not sanding sugar but rather pink and white fairy floss that a reader, Sadiya, sent me all the way from Bahrain a few weeks ago, along with some wonderful local pastries and chocolate. With the heat and humidity here, the poor floss has become a big chunk of sugar so I took the mortar and pestle and crushed some up to top the cake with.

Coconut Cake-Copyright©Tartelette 2008 Coconut Cake:

Seves 8-10
Printable Recipe

For the cake:
6 large eggs, separated
2 1/2 cups all purpose flour
2 teaspoons baking powder
1/2 teaspoon baking soda
1/4 teaspoon salt
3/4 cup butter, at room temperature
1 1/4 cups sugar, divided
1 teaspoon vanilla extract
1 cup buttermilk
1/2 cup coconut milk
1/2 cup coconut liqueur such as Malibu for soaking in the layers

Separate the egg whites from the yolks in 2 different (well cleaned) bowls.
Sift together the flour, baking powder, baking soda and salt in a separate bowl or over a piece of parchment paper that you can easily pick up when the time comes to add the flour to the batter in progress.
In the bowl of an electric mixer, cream 1 cup of the sugar and butter together until light and fluffy. Add the egg yolks, one at a time, beating well after each addition. Mix in the vanilla.
In a small bowl, or a measuring bowl with a spout (easier to pour), combine the buttermilk and the coconut milk. Set aside.
Turn the mixer to low speed and alternately add the flour mixture and the buttermilk mixture to the butter, in three additions, beginning and ending with the flour.
If you have only one KA bowl, pour this mixture into a large mixing bowl while you whip the egg whites.
In a clean bowl, whisk the egg whites until foamy. Add the remaining 1/4 cup of sugar until you get nice stiff peaks. Stop before the meringue becomes dry.
Gently fold the egg whites into the flour/butter mixture.
Pour the cake batter into 2 separate 9X9 square inch pans and bake for about 35 to 40 minutes at 350F or until a skewer inserted into the center of the cake comes out clean.
Place the cakes on a wire rack to cool, in their pans, for about 10 minutes. Invert onto a greased cooling rack and allow to cool completely before frosting.

Cream Cheese Buttercream:
3 sticks butter at room temperature
8 oz cream cheese, softened
5 egg whites
1 cup sugar divided
1/4 cup water
2 tsp. coconut extract
1 cup coconut flakes

In the bowl of stand mixer, whip 5 egg whites until they have soft peaks. Slowly add 1/4 cup of sugar until you get a glossy meringue. In the meantime, combine 1/4 cup water with 3/4 cup sugar to a boil in a heavy saucepan and bring the syrup to 250F. Slowly add the sugar syrup to the egg whites. If you use hand beaters, this is even easier and there is less hot syrup splatter on the side of your bowl and in the whisk attachment of the stand mixer. Continue to whip until the meringue is completely cooled. Slowly add the butter, one tablespoon at a time. The mass might curdle but no panic, continue to whip until it all comes together. Add the cream cheese, the same way, a little at a time until everything is smooth. Whisk in the vanilla extract.
Slice each cake square into 2 pieces horizontally. Brush the bottom layer with some coconut liqueur, spread 1/3 cup of the buttercream over and add another layer of cake and repeat the soaking and layering. Finish by frosting the entire surface of the cake and sprinkle coconut flakes all over…..and eat!

Coconut Pana Cotta – Warm Lemon Poppyseed Cake, Yuzu Mandarin Sauce

Coconut Panna Cotta-Copyright©Tartelette 2008 In both my jobs, I work freelance, which means that on Sunday night, the upcoming week on the calendar looks one way and by Tuesday night all the little blocks are filled, scratches and arrows everywhere. By Wednesday morning one side of the fridge (B. has an aversion for magnets and other knickknacks on the front) is completely covered with "production sheets" such as menus, sitting charts,plating,order forms, invoices,…. One could say that my fridge is my office. Where am I going with this?

On Sunday night I looked at the calendar and thought this week would be nothing as busy as the week before, which left me a little uncomfortable. I get paid by the event, the gig, the class, the training, which means that a slow week gives me some rest but does not help the pocket book. I admit, I needed a break, it helps regenerate the creative juices and there are a ton of household things awaiting my attention. I am also trying for some extra greens as I have a certain VIB (Very Important Blogger) coming to visit in a few weeks and I want to be free to spend on foods and shopping while she is here. I looked at the schedule and said out loud "now is when I need that one easy high paying dinner party…Oh a girl can dream!" That sort of things never happen to me usually, well, maybe once or twice, like when Andie McDowell had dinner at the restaurant and left the staff a huge tip for the "exquisite" (her words) meal she had…and that was years ago! Let me tell you, men and women alike in the restaurant were in awe of her beauty…gosh that hair!!

Anyway,back to this Coconut Pana Cotta-Warm Lemon Poppy Seed Cake and Yuzu Mandarin Sauce. Quite a long title I know, and not something I would make for us during the week unless I were working on a project, which I was by Monday night. I got a call from one of my favorite clients who decided to celebrate his and his wife 25th wedding anniversary with a dinner for 30 under the theme "East Meets West", as he is American and she is Vietnamese, and would I want to take care of the desserts? I love working at their house, big, equipped to the ceiling, modern yet cozy and rarely used because they eat out more than anything. They are also very generous and fun which made me look at the sky, say "Thank you Big Guy" and promptly accept.

Two minutes afterwards, I started getting a little anxious: I don’t know that much about Asian desserts, I read a lot of Asian blogs, I know Asian flavors but I had to incorporate Eastern ones with it, and hopefully do it tastefully. Instead of marrying one dessert of each continent on a plate and hope for the best, I drew my inspiration from flavors and textures. What you see in this pictures is what will be served Friday night and after the initial test run with B., the client, and the other chef working the main, I think we are on track. If I could put my hands on fairy floss, I would use it to decorate the top of the panna cotta but no such luck here.

I realised at the same time that the dessert fits in with the latest Sugar High Friday, themed "Asian Sweet Invasion" hosted by Amrita from La Petite Boulangette. On with the recipe…

Coconut Panna Cotta-Copyright©Tartelette 2008 You can make all the elements separately and eat them as such, and although it seems like a lot to do for desserts, they come together quickly and you can spread your work over a couple of days if you want. The pana cotta is a cinch to make and I let the coconut milk infuse with a bag of white tea for extra flavor and one chopped lemongrass stalk. The lemon poppy seed cake is made with a mix of all purpose flour and semolina which gives it a nice crunchy bite. The sauce is puckery and sweet at the same time with extra poppy seeds which soaks into the warm cake making sure you get a soft bite and not a mouth full of cake against the panna cotta. Yuzu juice is not difficult to find online and goes a long way but you can substitute a mix of lemon and lime juice for it. If you want to read more about Yuzu, go check the article Kalyn wrote for Blogher a couple of days ago. The panna cotta rests on a peach chip since I had leftover peach puree from the peach ganache for the macarons I made the other day. For the technique to make fruit chips, read this post where I made raspberry one the exact same way.

Coconut Pana Cotta-Warm Lemon Poppyseed Cake and Yuzu Mandarin Sauce:
Serves 8
Printable recipe

For the Pana Cotta:

2 cups coconut milk
2 cups heavy cream
1 cup sugar
zests of 1 lemon and one lime
2 stalks lemongrass, roughly chopped
1 teabag white tea
4 teaspoons powdered gelatin bloomed in 1/4 cup water (means to pour the water over the gelatin and let it sit while you prepare the panna cotta)

Combine all the ingredients, except the gelatin, in a saucepan over medium high heat and bring to a boil. Remove from the heat and let the cream to steep for 20 minutes. Pass the mixture through a sieve or a chinois, heat the gelatin in the microwave for 15 seconds and quickly stir it in the cream mixture. Divide it evenly among small dishes (I used brioches molds). Refrigerate and allow to set at least 3 hours or overnight. To unmold, dip the bottoms in hot water for a minute and invert to unmold onto a piece or parchment paper, they will be easier to scoop.

For the Lemon Poppy seed Cake:

1 cup semolina flour
1 cup all purpose flour
1 cup sugar
1 Tb baking powder
1/4 tsp salt
1/2 cup egg whites (about 3-4)
3/4 cup milk
1/4 cup lemon juice
grated zest of one lemon
1 Tb poppy seeds
1/2 cup butter, melted

Preheat oven to 300F. In a bowl, combine all the ingredients for the cake, except the butter. Mix with a whisk until smooth. Add the butter and nix until it all comes together. Pour the batter into 8 small buttered molds, or 3 inch metal tart shells. I used scalloped silicone cake forms. Bake for 20 minutes or until a knife inserted in the center comes back clean. To reheat before serving, pop them in the microwave or back at 300F for 5 minutes.

For the Yuzu Mandarin Sauce

1/2 cup Yuzu juice
1/2 cup orange juice
1/2 cup water
1/3 cup sugar
1 tsp poppy seeds
1 Tb butter
1 cup mandarin section (although I used fresh, you can sub. canned if you wish. Grapefruit or tangerine sections work nicely too)

Combine all the ingredients in a saucepan and bring to a boil. Boil for 10-15 seconds and remove from the heat. Add the mandarin sections. Use at once. Make it at the last minute and serve it hot with the dessert so that you get a wide spectrum of temperature.

To Assemble:
Pour some sauce at the bottom of each plate, place a warm cake in the center, top with a peach chip, top with a pana cotta and decorate with a mandarin section if desired.

See, it looks a lot more labor intensive than it really is, which works great for me when I make 30 for my client’s "intimate dinner" (!) or 8 for us and a few friends. Ok, so next post will be cupcakes…just because I don’t want to scare you away!!

Coconut Panna Cotta-Copyright© Tartelette 2008