
cherry blossom extract

Raspberry Rhubarb Tapioca Puddings & Lemon Poppy Seed Muffins

Raspberry Rhubarb Tapioca Pudding With Poppy Seed Lemon Muffins


I got to say, social media and the way we interact is pretty phenomenal. And I mean that in all possible ways. I do love it. Being able to connect fast and furiously with people. Meeting new and interesting folks all the time. Being able to exchange links to pictures, recipes, news almost instantly. I like hearing my phone send me a little ring-a-ding "you got mail". Really I do!

Tapioca Puddings & Lemon Poppy Seed Muffins


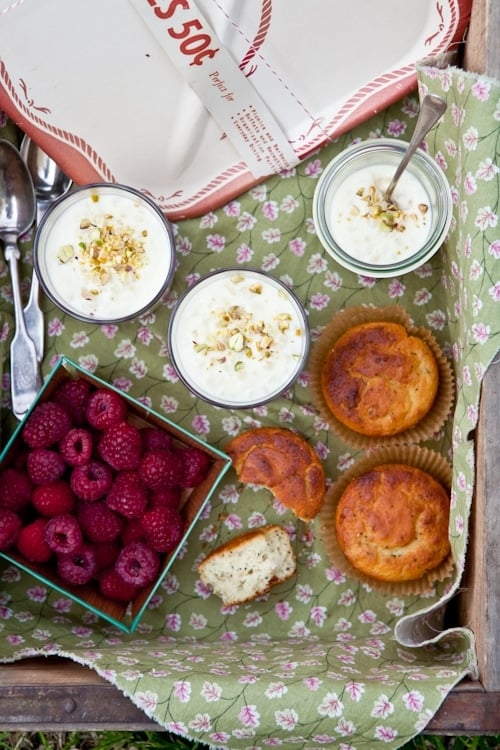
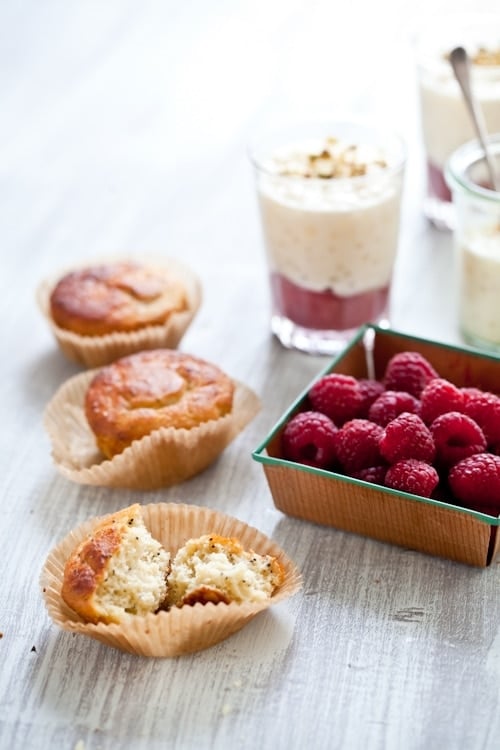
Last week, I posted on Flickr a photo of tapioca puddings and lemon poppy seed muffins I was taking to our neighbors for dinner. I linked that to Twitter and then closed the computer and went next door. My phone in my pocket. Then my phone had a party. All by itself. It started ring-a-dinging with intensity. Tweets back and emails started coming in asking me to please share the recipes for the puddings and the muffins.

To tell you the truth I had not really planned on it but I had made more than enough to share with more friends. Here. One spoonful deep in that dessert, one whiff of lemon and poppy seed later and I was secretly giddy to have an opportunity to sample them again.

Rhubarb


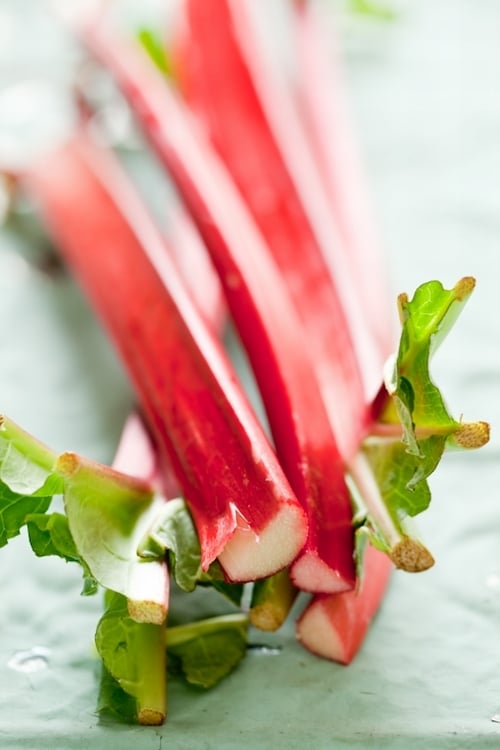
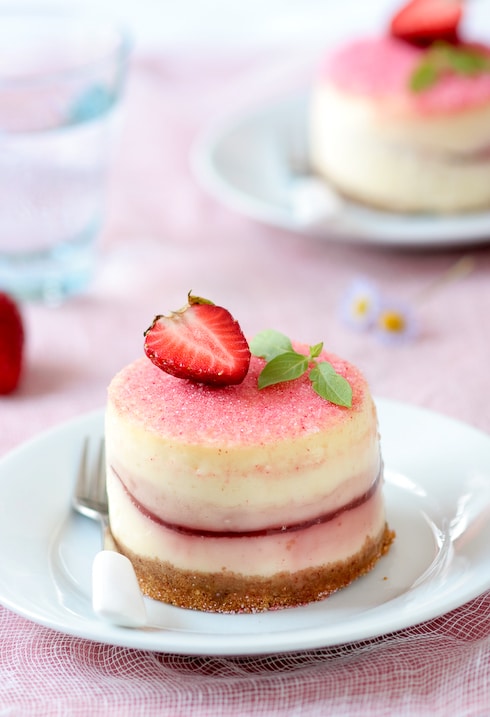
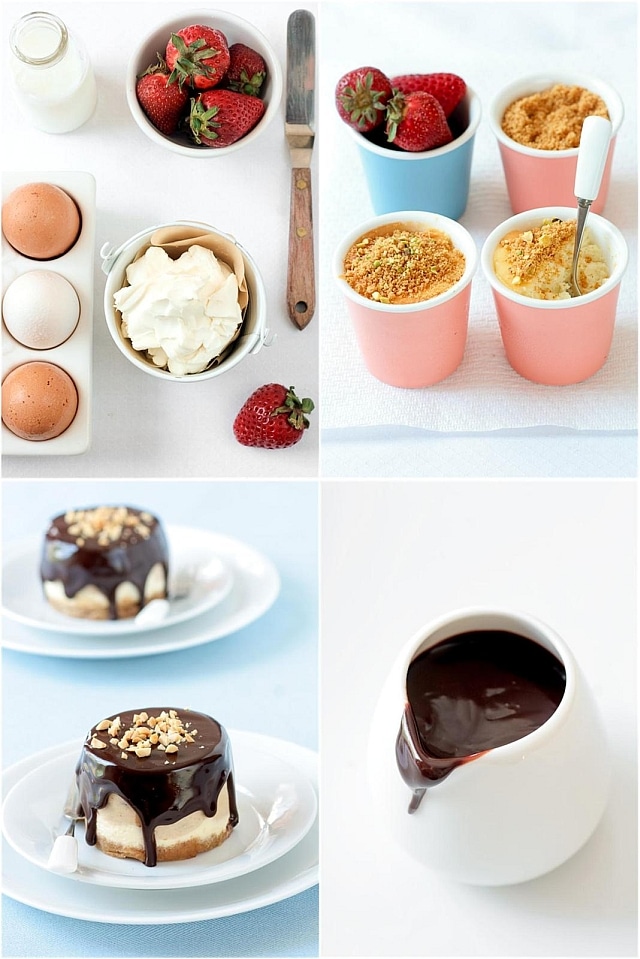
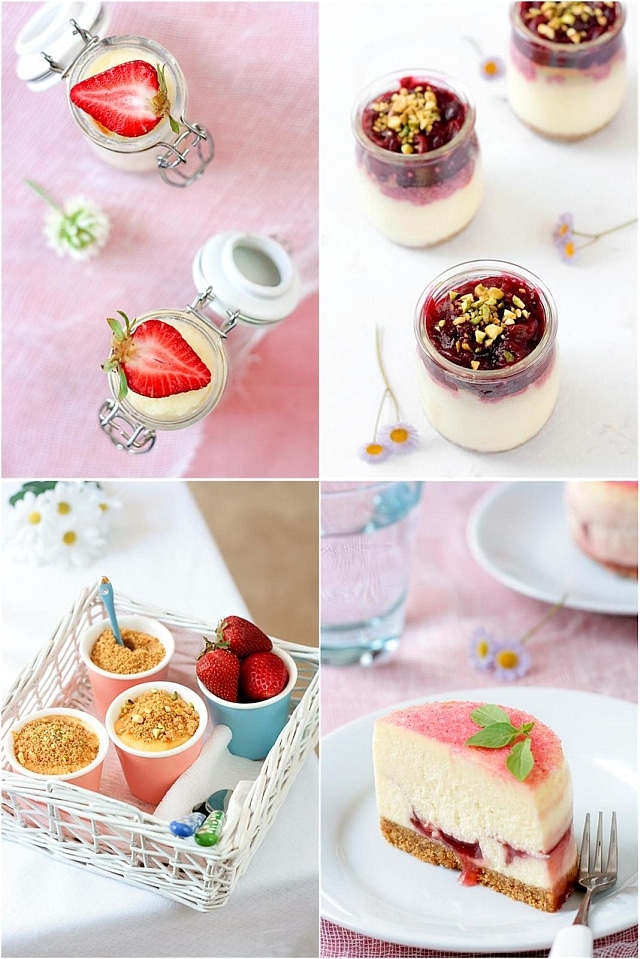
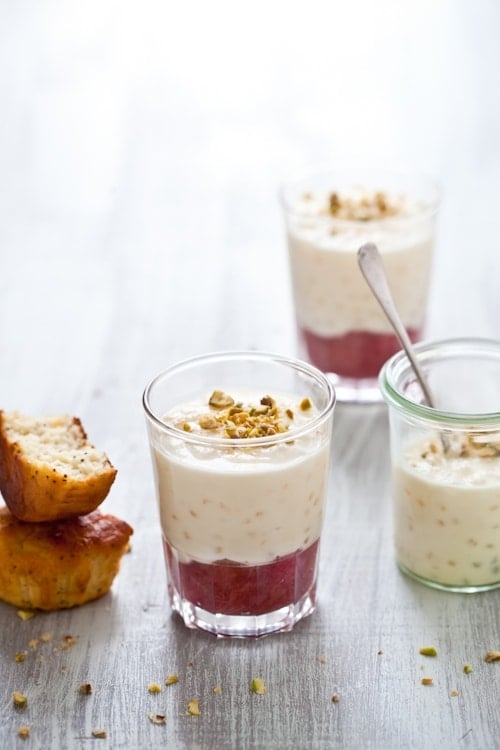
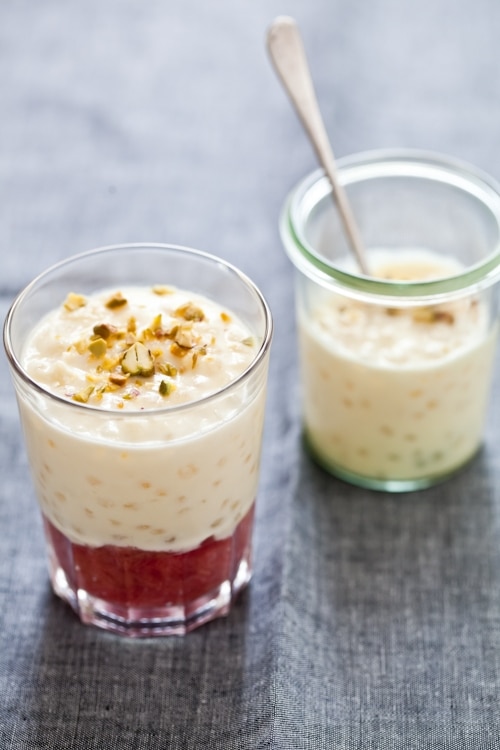
The Raspberry Rhubarb Tapioca Puddings are so good. Soothing. Little beads of tapioca rolling off your tongue. Smooth. Rhubarb and raspberries gently cooked until just barely soft. The distant scent of cherry blossom extract. The perfect crunch of lightly roasted pistachios.

And the muffins. Ah…gobbled up in a flash. Good thing I tend to cook and bake like my grandmother. Doubling a recipe, or more, is just a normal thing happening here. What can I say? I love to give and see the smile on someone’s face when they receive. The lovely part with these muffins is you can built upon the base any way your heart desires. Oranges, instead of lemons, nuts instead of poppy seeds, vanilla, rose, caramel…anything.

Raspberry Rhubarb Tapioca Pudding


Quite a few many events are shaping up for this Spring and Summer (actually up ’til January…ugh!) that have me jumping up and down with excitement! I will make sure to keep everyone updated on workshops or conferences.

Right now I must get the house and studio tidied up a bit since Taylor is coming tomorrow and staying a few days to shoot the promo video of my book "Plate To Pixel". I heard the book was officially shipping out next week! I am extremely nervous but glad we practiced a little a few months ago. Remember this? I can’t believe this is all happenings. Months of hard work just about to see the light!

Raspberry Rhubarb Tapioca Pudding With Poppy Seed Lemon Muffins


Another fun little tidbit that I forgot to post here: last month the printed issue of Elle Magazine published a feature "Cooking In Code" for which I was interviewed along with Heidi of 101 Cookbooks and Molly of Orangette as well as Eddie Gehman Kohan, Krista Garcia, Amanda Kludt. Extremely honored. Well, now the online version is live on the Elle magazine website. Click on any of our pretty mugs and you’ll be able to catch up on our interviews.

Ok…now I must really go clean the house for Taylor. I’ll try to post sneak peeks of the shoot with Taylor throughout the weekend. Should be fun!

Raspberry Rhubarb Tapioca Pudding


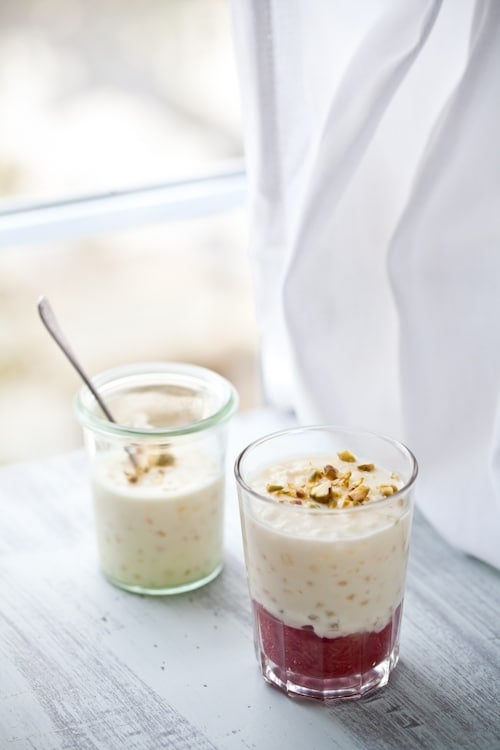
Raspberry Rhubarb Tapioca Pudding With Lemon Poppy Seed Muffins:

Serves 6

For the pudding:
1 cup chopped rhubarb
1 cup raspberries
1/4 cup lemon juice
2 tablespoons honey
1 cup small pearl tapioca (not instant)
2 cups milk
1/4 cup honey
1 teaspoon cherry blossom extract (or rose, or vanilla)
Toasted pistachios for garnish

In a large saucepan, combine the rhubarb, raspberries and lemon juice and bring to a boil. Reduce heat to low, to a simmer, add the honey and stir briefly. Cover the saucepan and let cook for about 10 minutes. Uncover and check the fruit. If there is a lot of liquid, cook a bit longer over low heat, uncovered until very little liquid remains at the bottom of the pan. Let cool to room temperature and then divide evenly among 6 ramekins or glasses.
In a separate and large saucepan, combine the tapioca, milk and honey over medium high heat. Bring to a boil then reduce the heat to low and let the mixture cook until the tapioca looks translucent (about 20-30 minutes). Let cool to room temperature and divide in between the ramekins or glasses with the raspberry/rhubarb mixture. Top with chopped pistachios.

For the lemon poppy seed muffins: (makes 12)
2 eggs
1/2 cup honey
1 cup yogurt
zest and juice of one large lemon
1/2 cup olive oil
2 tablespoon coconut oil (or melted butter)
1 cup millet flour
1/2 cup brown rice flour
1/2 cup potato flour
pinch of salt
1 tablespoon baking powder
1 tablespoon poppy seeds

Preheat the oven to 350F. Line the inside of 12 muffin cups with muffin liners and grease slightly with melted butter or cooking spray. Set aside.
In a large bowl, whisk the eggs and honey until smooth. Add the yogurt, lemon juice and zest, olive oil, coconut oil and whisk until combined. Add the millet, brown rice, and potato flour, salt, baking powder and poppy seeds. Whisk until fully incorporated. Divide evenly between the muffin liners and bake 15-20 minutes.

Daring Bakers: One Cheesecake, Two Cheesecakes, Three Cheesecakes….

Cherry Blossom Strawberry Cheese Cake


I giggle everytime I look a the picture above. It’s Daring Bakers time today and my Cherry Blossom Strawberry Cheesecake looks like it is smiling. Maybe it’s just me as I am eating some while typing this and smiling to know there is plenty left in the fridge.

And when I mean plenty, I am not exaggerating! For a household of two people this month challenge just kept on giving and we had no problem with it! We were given a simple cheesecake recipe and let loose with our creativity. If you let me loose in the kitchen on a Daring Baker’s challenge this can happen, or this.

It might look like I did again but really I did contain myself (no snorting Jen). Somewhat…

Daring Bakers Cheesecake Challenge


This recipe was really straightforward and the end result was smooth, creamy and not overly sweet which I really like. I started by making the entire recipe and used half to make 4 individual cheesecakes. Two were Cherry Blossom and Strawberry Lava Cheesecakes and two were Peanut Butter topped with a chocolate ganache. I piped the remaining batter in different cups and jars and played a bit.

I drew my inspiration from Spring since cherry trees are still blooming and used cherry blossom extract that Rachael from La Fuji Mama sent me while she was still in Japan. For the strawberry lava center, I cooked about a cup of fresh strawberries with some sugar, strained it and thickened it on the stove before spooning it in between the cheesecake layers.

Daring Bakers Cheesecake Challenge
For the Peanut Butter ones, I just followed B’s strong desire to have a peanut butter and chocolate dessert. I mixed some of the batter with chunky peanut butter and added a few tablespoons of heavy cream and poured a simple bittersweet chocolate ganache on top with chopped roasted peanuts.

For the remaining batter, I spooned some of the graham cracker crumbs in different jars and topped with some plain cheesecake batter. The others were topped with a quick cranberry compote using frozen cranberries, sugar and lemon zest. And some were baked without crust and topped with a sprinkle of graham cracker crumbs and chopped pistachios.

Peanut Butter & Chocolate Cheesecake


One year ago: Daring Bakers – Cheesecake Pops.
Two years ago: Outrageous Brownies

The April 2009 challenge is hosted by Jenny from Jenny Bakes. She has chosen Abbey’s Infamous Cheesecake as the challenge.
Abbey’s Infamous Cheesecake:

Helen’s Kitchen Notes: For the cheesecakes baked in individual dessert rings, I lined them with parchment paper and wrapped them around a couple of layers of foil to prevent leaking since they were to be baked in a water bath. Just don’t be shy with the foil or you will have some leakage. I lowered the oven to 275F (convection) and baked them for the same amount of time. I also baked all the jars and cups in a water bath at 275F. The possibilities are endless with such an easy going recipe thus I including the recipe as given by the host and my variations and tips at the end.

crust:
2 cups / 180 g graham cracker crumbs
1 stick / 4 oz butter, melted
2 tbsp. / 24 g sugar
1 tsp. vanilla extract

cheesecake:
3 sticks of cream cheese, 8 oz each (total of 24 oz) room temperature
1 cup / 210 g sugar
3 large eggs
1 cup / 8 oz heavy cream
1 tbsp. lemon juice
1 tbsp. vanilla extract (or the innards of a vanilla bean)
1 tbsp liqueur, optional, but choose what will work well with your cheesecake

Preheat oven to 350 degrees F (Gas Mark 4 = 180C = Moderate heat). Begin to boil a large pot of water for the water bath.
Mix together the crust ingredients and press into your preferred pan. You can press the crust just into the bottom, or up the sides of the pan too – baker’s choice. Set crust aside.
Combine cream cheese and sugar in the bowl of a stand-mixer (or in a large bowl if using a hand-mixer) and cream together until smooth. Add eggs, one at a time, fully incorporating each before adding the next. Make sure to scrape down the bowl in between each egg. Add heavy cream, vanilla, lemon juice, and alcohol and blend until smooth and creamy.
Pour batter into prepared crust and tap the pan on the counter a few times to bring all air bubbles to the surface. Place pan into a larger pan and pour boiling water into the larger pan until halfway up the side of the cheesecake pan. If cheesecake pan is not airtight, cover bottom securely with foil before adding water.
Bake 45 to 55 minutes, until it is almost done – this can be hard to judge, but you’re looking for the cake to hold together, but still have a lot of jiggle to it in the center. You don’t want it to be completely firm at this stage. Close the oven door, turn the heat off, and let rest in the cooling oven for one hour. This lets the cake finish cooking and cool down gently enough so that it won’t crack on the top. After one hour, remove cheesecake from oven and lift carefully out of water bath. Let it finish cooling on the counter, and then cover and put in the fridge to chill. Once fully chilled, it is ready to serve.

Pan note: The creator of this recipe used to use a springform pan, but no matter how well she wrapped the thing in tin foil, water would always seep in and make the crust soggy. Now she uses one of those 1-use foil "casserole" shaped pans from the grocery store. They’re 8 or 9 inches wide and really deep, and best of all, water-tight. When it comes time to serve, just cut the foil away.

Prep notes: While the actual making of this cheesecake is a minimal time commitment, it does need to bake for almost an hour, cool in the oven for an hour, and chill overnight before it is served. Please plan accordingly!

Variations I used:
For the strawberry lava center: cook down 1 cup of clean strawberries with 1/4 cup of sugar and 1 tablespoon of lemon juice. Strain and cook the syrp until reduced by half. Let cool. Spoon some cake batter over the crumb crust, add some strawberry juice and seal with more batter.

For the peanut butter cheesecake: I added 1/3 cup of peanut butter to 1/4 of the recipe and added 3 tablespoons of heavy cream to make sure the batter would remain smooth.

For the chocolate gananche: I heated up 1/3 cup of heavy cream over medium heat and poured it over 2/3 cup of bittersweet chocolate. Let stand 2 minutes and stir to smooth.

For the cheesecake in souffle cups: I just buttered the cups and baked them without the crust which I sprinkled later on with some chopped pistachios.

For the cranberry topped ones: I poured some crumb crust at the bottom of glass jars, topped with the batter and baked them like that. Once cooled I added the cranberry compote that I made by cooking 2 cups of frozen cranberries with 1/4 cup of sugar, a dash of cinnamon and some lemon juice.


Cherry Blossom and Hibiscus Macarons & A Giveaway

Mcarons-Copyright©Tartelette 2008 Thank you all for your kind words after my last post, you are all amazing to give your support and wishes like you do. I am sad for his family but relieved that the pain and suffering are over for him. I am no saint but faced with the grief that his family is going through I just do what I do best, I facilitate: I run errands, I make phone calls, etc…which really is nothing so I transmitted all your thoughts to his wife who was really amazed at the food blogging community and its strong spirits.

This makes me think, and before I tell you about the macarons, that I may not be around visiting blogs much in the next couple of weeks because my aunt and uncle are coming to visit us for the first time and I will of course play that facilitator role again…I 'll be here to update and of course post the Sugar High Friday round up but I apologize for my ghostly presence elsewhere.

Now that I have this bit out of the way, let me tell you how these macarons came about. I have had the idea of using hibiscus tea leaves in macarons ever since B. brought them back from his archaeological trip to Egypt a few years ago. He brought back a giant tin of it that I keep in the freezer and make tart hibiscus iced tea in the summer. I love its deep pink color and its intoxicating scent. It’s rather hard to describe its taste but think fruity without the froo-froo, tart without being puckery and floral without being heady. Once I made the buttercream I made a very strong small cup of tea, strained the leaves out and reduce it with some sugar on the stove until I got an extract. Once cooled, I mixed it with the buttercream and it added flavor and color in one second.

The cherry blossom macarons were made possible thanks to Rachael of La Fuji Mama in Japan. She posted about some she had one day while right in the mist of the cherry blossom season and mentionned that cherry blossom was an extract easily found over there. It is so difficult to translate a scent into a taste sometimes that I told her I was really curious about it. She quickly replied in awesome food blogger fashion that she would be happy to send me some and I agreed only if I swapped something in return….and here we are. I made some when Marcela was here but I could not wait to make them again and play with the shell designs. Obviously my attempts at drawing cherry blossoms are not that great but the taste was there for sure.

I know hibiscus tea can be found pretty well here in the US but I am not that sure about cherry blossom extract and I realise that I might have made some of you curious…this is why I decided to give one of the bottles Rachael sent me (I hope she won’t mind that I share the love!) to one of you. All you have to do is leave a comment between today and saturday and one bottle might be on its way to your home….anywhere in the world (or where there is a shortage of cherry blossom extract!) The bottle is small (see her post) but the flavor goes a long way, and I just can’t keep this great taste all to myself…

UPDATE 5/22/08: I am so tickled to add that Rachael wrote yesterday wanting to add a second bottle of cherry blossom extract. You read right: One person…2 bottles! Lucky you’s!!

Macarons-Copyright©Tartelette 2008 Cherry Blossom and Hibiscus Macarons:

Macarons tutorial available here, starting page 36.

For the shells:
3 egg whites (I like to use 1-2 day old egg whites)
50 gr. granulated sugar
200 gr. powdered sugar
110 gr. ground almonds
2-3 drops pink food coloring or 1 Tb powdered
For the hibiscus macarons I sprinkled some leaves on top before baking.

For the whites: the day before (24hrs), separate your eggs and store the whites at room temperature on a covered container. If you want to use 48hrs (or more) egg whites, you can store them in the fridge.
In a stand mixer fitted with the whisk attachment, whip the egg whites to a foam, gradually add the sugar until you obtain a glossy meringue. Do not overbeat your meringue or it will be too dry and your macarons won’t work. Combine the ground almonds and powdered sugar in a food processor and give them a quick pulse. It will break the powdered sugar lumps and combine your almonds with it evenly. Add them to the meringue, give it a quick fold and remove some of the batter that will remain uncolored. Add the food coloring to the rest and fold the mass carefully until you obtain a batter that flows like magma or a thick ribbon. Give quick strokes at first to break the mass and slow down. The whole process should not take more than 50 strokes. Test a small amount on a plate: if the tops flattens on its own you are good to go. If there is a small beak, give the batter a couple of turns. Fill a pastry bag fitted with a plain tip (Ateco #807 or #809) with the batter and pipe small rounds (1.5 inches in diameter) onto parchment paper baking sheets. Preheat the oven to 300F. Let the macarons sit out for an hour to harden their shells a bit and bake for 8-10 minutes, depending on their size. Let cool.
If you have trouble removing the shells, pour a couple of drops of water under the parchment paper while the sheet is still a bit warm and the macarons will lift up more easily do to the moisture. Don’t let them sit there in it too long or they will become soggy. Pipe or spoon some ganache on one shell and sandwich with another one.
If you use fresh whites, zap them up in the microwave on medium high for 20 seconds to mimic the aging process.
To draw on the macarons: color the small amount you set aside previously and add more food coloring to make a darker color. Use a toothpick that you dip into the dark color and draw on the macarons.

For the buttercream:
3 sticks butter at room temperature
5 egg whites1 cup sugar divided
1/4 cup water
2 tsp. vanilla bean paste

1-2 teaspoons cherry blossom extract

In the bowl of stand mixer, whip 5 egg whites until they have soft peaks. In the meantime, combine 1/4 cup water with 3/4 cup sugar to a boil in a heavy saucepan and bring the syrup to 250F. Slowly add the sugar syrup to the egg whites. If you use hand beaters, this is even easier and there is less hot syrup splatter on the side of your bowl and in the whisk attachment of the stand mixer. Continue to whip until the meringue is completely cooled.Slowly add the butter, one tablespoon at a time. The mass might curdle but no panic, continue to whip until it all comes together. Add the vanilla bean paste. Divide the batter in 2.

For the cherry blossom buttercream, add extract to taste.

For the hibiscus buttercream: boil 1/2 cup of water, add 1 Tb hibiscus tea leaves and 2 Tb sugar. Let steep, strain the leaves. Return to a boil until reduced to a thick syrup. Let cool, add enough to taste to the buttercream.

Macarons-Copyright©Tartelette 2008