
WTSIM

Honey Panna Cotta and Raspberry Terrine

Right around mid December, I had that feeling something somewhere was not right but I could not really put my finger on it. Something was missing every time I’d turn on the computer but I could say what. The filling lasted a few days more when suddenly it hit me, "WTSIM…" was missing! Peeps, that’s bad when your body has become so trained to certain cycles that it knows when something is out of place. And that’s even worse when it is in your "other" life, your blogging life that is. Unless they ask us to make stew or barbecue I am always there to go play with Johanna, Jeanne and Andrew. January’s theme is "Terrine" and as I was reading Johanna’s directions I almost sighed in disappointment when she said that sweet terrines were welcome. Oh good! Now what?!!

I thought about steamed puddings in terrine molds and about nice layered fruit gelatin layers. The former seemed a little heavier than I wanted to bring to our weekly gathering with the neighbors and the latter was going to be received as this weird jello-type dish no matter how sophisticated the layering and fruits would be. I was in the mood for layers of cream and fruits and decided to pair them with a light genoise and assemble the terrine that way. I got lucky at the farmers' market that Saturday and came home with some very ripe and fresh raspberries and homemade yogurt, thick and wholesome.

The yogurt is the base for a light and creamy panna cotta flavored with honey. I was inspired by a recipe from The Sweet Life by Kate Zucherman. I was intrigued by this recipe as the other element is a egg white custard. Like most of us out there I am used to egg yolks based custard so this was an interesting play on a basic. I have to say that on its own, it is very eggy tasting…not something I would want to eat by the spoonful like creme anglaise. However, once mixed in with the yogurt and honey, the strong egg flavor disappear completely and one is left with a very silky panna cotta. Something I can eat by the spoonful!!

The genoise is the same used in the December Daring Bakers' challenge as the cake is moist and fluffy and works perfectly cut up in log strips to layer the cream and the fruit. My little play on the cake is that I brushed each layer with some Saint Germain Elderflower liqueur that my sweet friend Anita sent me a few weeks ago. It took the whole terrine from "excellent" to "awesome". I have to hide the bottle from myself because it is truly addictive! You can skip the alcohol part or substitute with Kirsch or white rum. Feel free to use something else than raspberries like strawberries, peaches, etc…

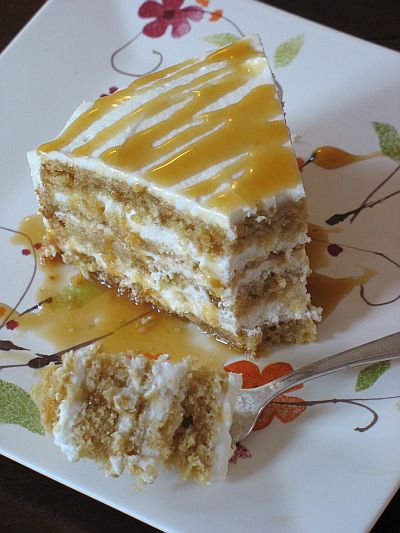
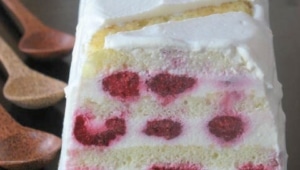
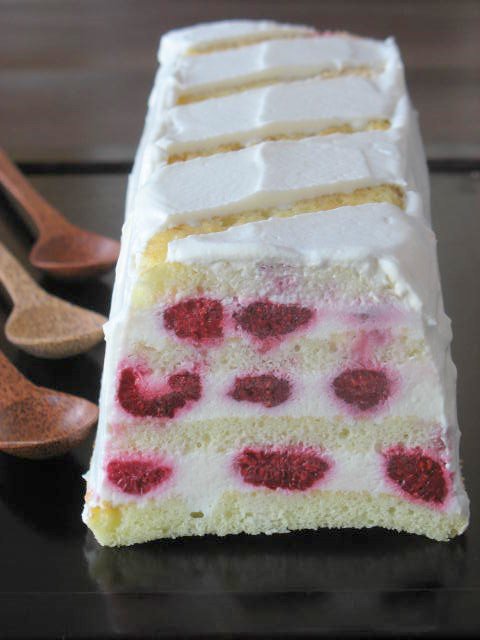
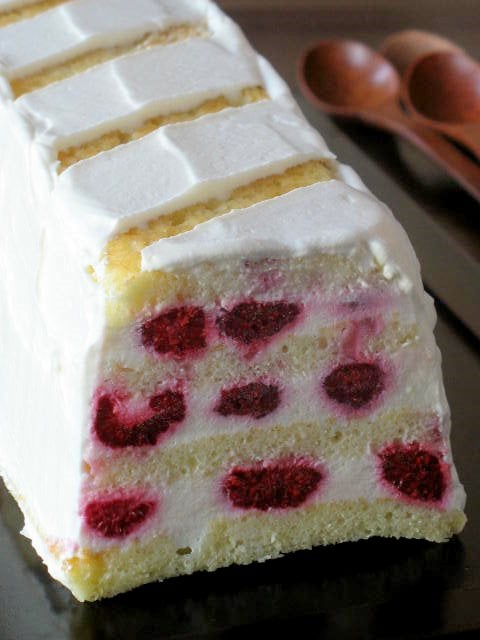
Honey Panna Cotta and Raspberry Terrine:

For the Genoise (recipe from the Yule Log Daring Baker Challenge):

Note you will only need about half the sheet pan. I wrap the leftover really well and freeze it for other uses (layered cake and mousse or instant cake Napoleons, etc…)

3 large eggs

3 large egg yolks

pinch of salt

¾ cup of sugar

½ cup cake flour

¼ cup cornstarch
one (1) 10 x 15 inch jelly-roll pan that has been buttered and lined with parchment paper and then buttered again.

Set a rack in the middle of the oven and preheat to 400 degrees F.
Half-fill a medium saucepan with water and bring it to a boil over high heat. Lower the heat so the water is simmering.
Whisk the eggs, egg yolks, salt and sugar together in the bowl of a heavy-duty mixer. Place over the pan of simmering water and whisk gently until the mixture is just lukewarm, about 100 degrees if you have a thermometer (or test with your finger – it should be warm to the touch).
Attach the bowl to the mixer and, with the whisk attachment, whip on medium-high speed until the egg mixture is cooled (touch the outside of the bowl to tell) and tripled in volume. The egg foam will be thick and will form a slowly dissolving ribbon falling back onto the bowl of whipped eggs when the whisk is lifted.
While the eggs are whipping, stir together the flour and cornstarch.
Sift one-third of the flour mixture over the beaten eggs. Use a rubber spatula to fold in the flour mixture, making sure to scrape all the way to the bottom of the bowl on every pass through the batter to prevent the flour mixture from accumulating there and making lumps. Repeat with another third of the flour mixture and finally with the remainder.
Scrape the batter into the prepared pan and smooth the top.
Bake the genoise for about 10 to 12 minutes. Make sure the cake does not over bake and become too dry or it will not roll properly.
Once the cake is done (a tester will come out clean and if you press the cake lightly it will spring back), remove it from the oven and let it cool on a rack. Remove the cake from the baking sheet and invert it on a larger piece of parchment paper. Peel of the parchment paper that was lining the baking sheet. For the Panna Cotta (start the day before) (adapted from Kate Zuckerman)
16 oz plain whole milk yogurt
1/2 cup sour cream
2 Tb honey
1/2 Tb unflavored gelatin
1/3 cup whole milk
1/3 cup heavy cream
1/4 cup sugar
3 egg whites

8 to 24 hours ahead of time: line a fine mesh strainer with cheesecloth or coffee filter and place it over a bowl so that it is suspended. Scrape the yogurt in the lined strainer and let it drain, refrigerated.
After 8-24 hours (I strain mine overnight), combine the yogurt, sour cream and honey. Whisk well and set aside at room temperature.
In a small bowl, sprinkle the gelatin over 1 1/2 Tb water and set aside to bloom for 10 minutes.
Make the egg white custard: In a small saucepan, heat up the milk, cream and 2 Tb of the sugar, until the sugar is dissolved and the mixture is almost boiling.
In a small bowl, whisk together the egg whites and the 1/4 cup of sugar. Slowly whisk in some of the hot milk to temper the eggs. Add the remaining milk, whisk well, and pour the whole thing back into the pot. Stir constantly over medium heat until the mixture thickens like for a regular egg custard (should coat the back of a spoon).
Remove from the heat and stir in the gelatin. Stir well until the gelatin is completely dissolved. Strain the custard through a sieve if necessary. Let cool to room temperature. You can speed up this process by putting your bowl over an ice bath. Once the custard is cooled, stir in the yogurt mixture. Set aside a room temperature until ready to use. Remaining ingredients:

2 cups fresh or frozen raspberries.

1/2 cup heavy cream, whipped to soft peaks with 1-2 Tb sugar.

To assemble:

Line a terrine mold with plastic wrap, making sure that it extends over the edges of the pan as it will give you a better grip when you unmold it. Cut one strip of genoise the same width as the bottom of your terrine. Mine gets wider as you reach the rim of the mold so my pieces are going to get a little wider each time.

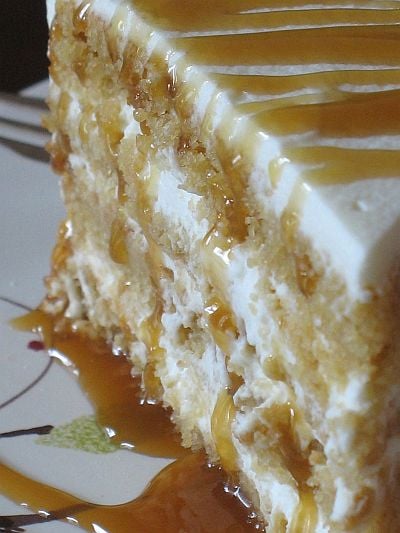
Spoon about 1/4 cup of the honey panna cotta on top of the cake layer, carefully place raspberries the whole length of the mold, right on top of the panna cotta. Cover with another 1/4 cup of the cream. Cut another piece of the cake and repeat with the panna cotta and raspberries. Repeat the process until you reach the top. Make sure that your last layer ends with a piece of cake as it will be your base when you unmold the pan. Cover with plastic wrap and refrigerate for at least 2 hours or for up to 2 days before serving. To serve:

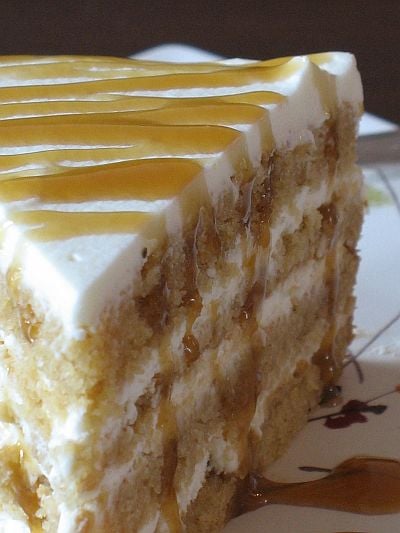
Remove the terrine from the refrigerator as well as the plastic wrap on top. Invert the pan onto a serving plate and peel of the plastic wrap that was lining the inside of the mold. Cover the cake with the whipped cream and keep refrigerated until ready to serve.

To make strips: cut out strips of paper the width you desire and lay them on top of the terrine while you spread the whipped cream. Go slow and steady or you will move them at the same time. Peel the strips off and voila!

Waiter There Is Something In My…Butterscotch Mascarpone Cream Layer Cake!

It seems like an eternity since I have participated in a WTSIM event, and that is not for lack of ideas, recipes or just plain desire to get in the kitchen and cook, but pure and simple lack of time. Oh sure, there are lots of baking going on in the house, but with all the visitors we have had lately I rely on tried and true, easy to come together desserts, most of which have already been published here…except this one Butterscotch Mascarpone Cream Cake…..And it has been a long time coming believe me!

Let’s see if I can make a long story short about that one (can I do that?!)…When I first visited Lisa last July, she had received a an issue from the magazine Wicked, a special publication from The Australian Women’s Weekly dedicated to pastries and sweets. I remember looking at every recipe and drooling over them and the pictures. Her printer had a little malfunction that time, believe me it was all my fault, I just have to stare at anything plugged or battery operated for it to break down,….anyway, life took over and we both forgot about the pages I had marked in the magazine. This time around though, I went ahead and copied them by hand. I always do that, not that I don’t trust the machine, but over the years I have developed my own recipe writing pattern, especially if I am at someone’s house or the library and have minimal space to write them on. Back home this week, I quickly flipped my notebook to the Butterscotch Cake recipe..what’s not to love in caramel, mascarpone and tender flaky cake? Nothing, trust me!!

I thought it was also a tasty cake to add to Waiter There Is Something In My ….Layered Cakes, hosted this month by Andrew from Spittoon Extra


Butterscotch Mascarpone Cream Layer Cake:

Serves 10-12

For the Cake:
250 gr. butter, softened
1 cup packed dark brown sugar
2 eggs
1 Tb. honey
1 1/4 self rising flour (I used 1 1/4 cup all purpose flour and 1 1/2 tsp. baking powder)
1/2 cup milk

Cream together the butter and sugar. Beat in the eggs, one at time. Add the honey and flour. Add the milk slowly and mi until combined. Pour into 2 8-inch cake pans and bake at 350F for 45 minutes, or until a knife inserted in the middle comes out clean. Let cool and unmold. Cut each cake in half.

For the Mascarpone Cream:
250 gr. mascarpone, at room temperature
300 ml. heavy whipping cream
1/4 cup powdered sugar

Whip the heavy cream and sugar to soft peaks. Fold it into the mascarpone and spread 1/4 on one cake layer, repeat with all the cake layers, finishing with the cream on top.

For the Butterscotch Sauce:
60 gr. butter
1/4 cup dark brown sugar
1/4 cup milk
1 1/2 cups powdered sugar

Heat the butter, sugar and milk until dissolved. Remove from the heat and add the powdered sugar, stir until smooth.

Salted Butter Caramel Sauce and Banana Chocolate Crepes

Salted Butter Caramel Sauce
Under other circumstances I would have started this post with the title "Banana Crepes and Salted Butter Caramel Sauce", but Andrew wanted sauces to be the center of attention in this month "Waiter There Is Something In My…" so my favorite caramel sauce took center stage.

There are very few things I love more than crepes in the desser category. Summer or winter I do not mind standing in front of the cooktop and flipping a batch. Oh yeah, I am a flipper! As soon as that crepe is pulling out from the side and loose from the bottom, I will flip it. There is enough batter for a couple to end up on the floor (makes the dog happy) or stuck to the ceiling (makes the husband worried). I like them sweet with a spritz of lemon juice and sugar or filled with my mother’s strawberry jam. That’s when I am being good….When I am being bad, I will load them up with Nutella, bananas, drizzle some caramel sauce, a good amount of whipped cream and some chopped nuts. Maybe just some chocolate, coconut sorbet and again that awesome sauce.

Allright there is obviously something that I love as equally as my sweet crepes and it is that heavenly and damned salted butter caramel sauce. It is heaven on a spoon, soft and good, it is evil on your thighs, especially if you eat it at the rate we do! Try it once and there is no going back!! I noticed I always have jar of it in the fridge and it is one of the first things I put in goodie baskets for friends and family. It was not always so and I can’t believe I have let such a long time pass by before making it! I was first introduced to it while reading one of my favorite blogs, Chocolate and Caetera. Guillemette makes the most tempting creations and when I read her post about the sauce, I was hooked. I am sure that caramel sauce also helped win HHDD #10 Cheesecakes.

Now that everybody has been introduced, let’s proceed with the fun. If you read French, head over to Marmiton where you will find the crepe recipe under (I translated) "the best crepe batter in the world". Now if you post such a title, you’d better have some back up or a strong faith in your recipe! Well….It became "the best" I had made so far after I added 1/2 cup light beer to the batter. See, to me there is no crepe without beer or cider. It helps the dough relax better, it helps it become airy and light without adding too much butter or oil to the batter.
The banana filling pretty much came together as I was going along….can’t mess up too much cooking nanners in butter, sugar and rum now can you?!! Once the crepes were flipped and filled I tied them up in little bundles with cut strings of licorice. The sauce served alongside really gave them another dimension. Can’t you tell we enjoyed dessert that evening?!

Salted Butter Caramel Sauce

240 gr. sugar
80 ml water
115 gr salted butter
150 ml heavy whipping cream

In a heavy saucepan set over low heat, combine the sugar and water and heat just until the sugar is dissolved. Add the butter. Let it come to a boil and cook until it reaches a golden caramel color. Remove from the heat and add the cream ( it will splatter and get crazy, but do not fear and trust the recipe). Whisk to combine and put back on the stove. Let it come to a boil again over low heat and cook 10-15 minutes until you reach a nice creamy consistency. Pour into a jar and try to refrain yourself from drinking it!

Crepe Batter

Makes 12 crepes

250 g flour
2 cups milk
3 eggs
1 Tb. oil
pinch of salt
1/2 cup light beer

In a blender or food processor, combine all the igredients and pulse until fully incorporated and no lumps remain.
If you decide to do it by hand: combine the flour and salt in a bowl. Make a well in the center and add the eggs, oil and a little bit of milk. Work the batter with a whisk, and slowly add the remaining milk, until the batter comes together and the lumps disappear. Add the beer.
No matter what method you used, strain the batter if necessary. Refrigerate, covered for an hour.
In a saute pan set over medium high heat, laddle 1/4 -1/3 cup batter (depending on the size of your pan) and cook 1-2 minutes on each side.

For the filling:
This is not a recipe per se because I only made enough for 4 crepes:
Cut 4 bananas into thin slices. In a pan, melt 4 Tb sugar with 4 TB butter, add 1/4 cup rum and cook until the sugar is melted. Add the bananas and cook them until soft. Remove them fom the pan. Let cool.
Melt 1/2 cup of dark chocolate with 1/4 cup heavy cream in the microwave.

To Assemble:
Fill each crepe with about 2 Tb. melted chocolate and 14 cup bananas. Gather the edges of the crepe together and tie up with a string of licorice. Serve with plenty of caramel sauce.

Waiter, There Is Something In My Nutella Ravioli…!


Yes, I know…it may sound weird but they were utterly delicious! What prompted me to venture into the world of dumplings, ravioli and other dough wrapped around a filling was this month’s installment of Waiter, There’s Something In My…Dumpling, hosted by Johanna from The Passionate Cook. The directives were very generous with the definition of "dumpling" so it enabled your little Tartelette to go ahead and make one of her favorites: Toasted Hazelnut Ravioli.

It all started one winter weekend that we hosted a crepe party with our neighbors and I made my favorite crepes by filling them with Nutella and smothering them with a Frangelico Caramel Sauce. After the guests were gone and our plates licked clean, I started looking for a way to make sweet ravioli. I have made pasta dough before, painstakingly rolling it out by hand since B. said no to a pasta machine (he likes his countertops bare…like that is possible with a baker in the house!!), so that process was not new to me. I love toasted and grilled everything and very often end up toasting leftover savory ravioli and topping my salads with some and some cubed mozzarella and freshly cut basil..yumm..But I disgress, this is a sweet blog after all…

The sweet ravioli dough comes together very fast in a food processor and beside the rolling (very thin) part, it is a cinch to make. I thought about serving them with a dark chocolate ganache on the side, but after everybody had a couple of bites, the general consensus was that the Frangelico caramel sauce was quite enough. It is a multi step recipe but the dough needs to rest for a couple of hours and up to one day. You can make it, roll it out, fill and boil the ravioli later on and toast them right before serving. They are great with a scoop of vanilla ice cream and more caramel sauce drizzled on top!

Toasted Nutella Ravioli:

5 oz. semolina flour
1 ½ oz almonds
1 oz flour
1 oz. sugar
1 egg
¼ cup to 1/3 cup milk

Put all the dry ingredients into a food processor and pulse until the nuts are finely ground. Add the eggs and ¼ cup milk and pulse until the dough comes together. If it does not seem smooth, slowly add the remaining milk, one tablespoon at a time, until soft and smooth but not sticky. If your dough seems to wet, you can add some flour, one tablespoon at a time until it becomes a little dryer. The dough is versatile enough to let you play around until you get it to the right consistency.
Place it a bowl and cover with plastic wrap. Refrigerate for at least 2 hours, up to one day.

When ready to use, roll it out very thin on a lightly floured surface. If you have a pasta machine, I’ll let you decide the setting since I am not familiar with them, but it want the dough to be paper thin. Cut out rounds with a cookie 3 inch cookie cutter, fill with a heaping teaspoon of Nutella. With a pastry brush, lightly brush some water around the edges, place another round of dough on top, smooth out any air pocket and seal gently with your fingertips.

Boil the ravioli like you would fresh savory ones, about 5 minutes, drain. At this point you can layer them in between sheets of parchment paper and refrigerate until you are ready to toast and plate them.

For the sauce:
Melt together 2 Tb. butter, 2 Tb brown sugar ad 2 Tb Frangelico until the sugar melts and the sauce becomes thick. Set aside.

To assemble:
Melt some butter in a sauté pan (or coat with cooking spray) and toast the ravioli until golden brown. Plate them and drizzle some caramel sauce over and enjoy!

Waiter There’s Something In My… Citron

I almost missed that one, all entangled that I was in webs of spun sugar! This month’s edition of "Waiter There’s Something In My…" focuses on stuffed fruits or vegetables and is hosted by Jeanne from Cooksister.

There are those challenges when two or three recipes come to my mind and I keep oscillating between them for days…not for that one. For some reason only known to my brain (and trust me sometimes we don’t communicate very well), the only thing that came to my mind and stayed there was "Citron Givre", or Frozen Lemon, another typical bistro dessert in France back in th 70s and 80s: a hollowed lemon filled with lemon sorbet. This was my dessert of choice when I was a child, really, it never failed that anywhere we went with my parents I would either have "vacherin" (a dessert of meringue and ice cream) or citron givre. Imagine: a whole lemon stuffed with more refreshing tart and sweet lemon flavored! How fitting for the theme and the hot days we are having now!

As an adult, I did not lose my love for anything lemony but I also added a repertoire of spices, herbs and other ingredients to my palate. This particular sorbet falls more on the line of a sherbet as it contains milk but the French only have one word for "sorbet". The ice cream was inspired by Pierre Herme’s Lemon sorbet (sherbet) and kicked up a notch with crystallized ginger. The only downfalls to this particular dessert are that you don’t want to share and you wished you had more!!

Citrons Givres:

Serves 4

4 lemons
150 ml lemon juice (some coming from hollowing out the lemons + extra if needed)
150 gr. (2/3 cup) sugar
150 ml whole milk (less fat makes it curddle)
150 ml water
1/4 to 1/2 cup chopped crystallized ginger (your taste)

Slice a tiny bit off of the bottoms of the lemons so that they can sit straight (relatively speaking). Slice the top off and keep that "hat".
Scoop as much of the flesh out of each lemon and set in a fine mesh strainer set over a bowl. With your hands or the back of a spoon press as much of the lemon juice as you can and measure 150 ml. Add extra lemon juice if needed.
In a saucepan over medium high heat, bring the water and sugar to a bol. Add the ginger and let cool completely. Add the milk and the lemon juice, stir and process in your ice cream machine according to your manufacturer’s directions.
If you do not have an ice cream machine: freeze until soft serve consistency and mix with an immersion blender or whisk in a stand mixer. Put back in the freezer and repeat the operation 2-3 times, leaving enough time in between whippings for the mixture to get frozen.

Once your ice cream is ready, fill the lemon cavities and keep frozen until ready to serve.
The presentation always makes people happy and you have just made an easy bistro dessert in almost no time!!


Head over to Jeanne’s blog in a few days for a tasty roundup!

Previous Tartelette’s participations:
Waiter, There’s Something in My Brioche
Waiter, There’s Something in My Easter Basket
Waiter, There’s Something in My Pie

Sunflower Bulgarian Bread: WTSIM Easter Basket

Do you ever get stuck on one picture and its recipe while reading your favorite blogs and you go back to it many many times? The minute I saw this bread, I hit the "add to favorite' button, and stared at it several times a day while reading emails or researching items on the computer. The recipe comes originally from Zapbook and has already traveled the French blogosphere quite a bit during this past month. I have been fond of Petite Lolie’s blog from the day I stumbled upon it. There is something aboout her site…it is beautiful, that’s what it is. Full of life, warmth, knowledge, know hows ans how tos…It’s fresh and abundant in lip smacking recipes.

Although the exact source of the bread is unknown, the recipe delivers a sunflower looking like brioche. I followed Petite Lolie recommendation and added a bit more sugar. I don’t think I kneaded the dough quite enough as the the texture of the dough was not as soft as my previous brioche. Always room for improvement. The actual shaping of each roll may seem time consuming but it took me about 15-20 minutes and the end result (look wise) is well worth it.

Sunflower Bulgarian Bread, adapted from Zapbook and Petite Lolie:

200 gr. milk
1/4 cup sugar
1 tsp. salt
2 eggs
500 gr. flour
2 tsp. dry yeast
50 gr. melted butter
extra melted butter for shaping the rolls

Put the yeast in a non reactive bowl. Heat the milk to lukewarm, and pour it over the yeast. Stir with a fork or spoon to make sure it dissolves properly. Add 2 Tb. sugar and slat and let the yeast proof for 10 minutes.
In a stand mixer fitted with the dough hook attachment, combine the flour, eggs, remaining sugar, melted butter. Turn the mixer on slow and slowly pour in the yeast mixture. Let the dough come together and continue the kneading either by hand or with the mixture for a good 5-8 minutes.
Put the dough into an oiled bowl and let rise for 1 hour or until doubled in size.

Shaping of the bread:
Once the dough has risen, divide it into 16 equal portions. Roll each portion out into a circle or oval. Take one piece, brush with melted butter, stack another piece on it, brush with melted butter again and repeat with 2 other portions. You are actually making 4 stacks of 4 portions each. Roll each stack tightly. Cut each into 4 triangular pieces. Position the rolls in a 10 inch round pan, with pointy ends facing toward the center.
Let rise for another 45 minutes. Preheat the oven to 375. Once the dough has risen, brush with an egg wash (egg beaten with some milk) and bake for 30 minutes.

End result…one could argue that brioche is brioche and this is yet another recipe. But come on, look at those plump folds! Every nation has its version of the basic brioche dough and I like exploring other cultures through bread baking. I am looking forward to making this one again, probably for the only reason that it looks gorgeous, tastes great, behaves well, and made my morning brighter! Yep, I am not complicated…making bread fuels my fire! I am wondering if such a bread exists in Bulgaria so I am on the lookout for a source, let me know if you have one.

One thing for sure: I am definetely putting this in my Easter Basket to be delivered to The Passionate Cook as part of this month’s Waiter There’s Something In My…(and because my dear mother in law is organizing brunch next sunday, as a pre-Easter menu testing).