My life in Birmingham is nothing but a series of first. Fall. Winter. Friday nights. Weekends. Dinner with friends. Neighborhood. All a first. Living a long distance relationship with my husband. Definitely a first. Having one puppy at home as my companion. How we have come to rely on each other, the old pup and me. Another first. Which is quite nice knowing that at 16 years-old, he is giving me some precious last moments together.
Everything about settling here as been new and wonderful. I am exploring a lot on my own every chance I get. I have also started a little fun side notebook in which I jot down the places I want to discover as a first with Bill and not just on my own. They can be restaurants, parks, places…I just know him, and I know us, and I know how much more fun and meaningful it would be to do those as a couple.
Spring would definitely be one of the seasons I would want us to experience together here. But, we all know one cannot stop Mother Nature. It will be Summer before he moves here for good. I just have to find the right words, the most descriptive ones to tell him how gorgeous Birmingham is in the Spring. And it is. I know one can say "but it’s the South! You know the South!" Yes. But it is a completely different South. One with seasons, tornadoes instead of hurricanes. One with a different past. One with a different food culture.
A series of first everywhere and all the time…
The first time I turn my favorite sponge cake recipe into Lemon Cakelets With Vanilla Bean Cream. The first time I add deep rich and robust olive oil (from the family batch) to Bittersweet Chocolate Pots de Creme.
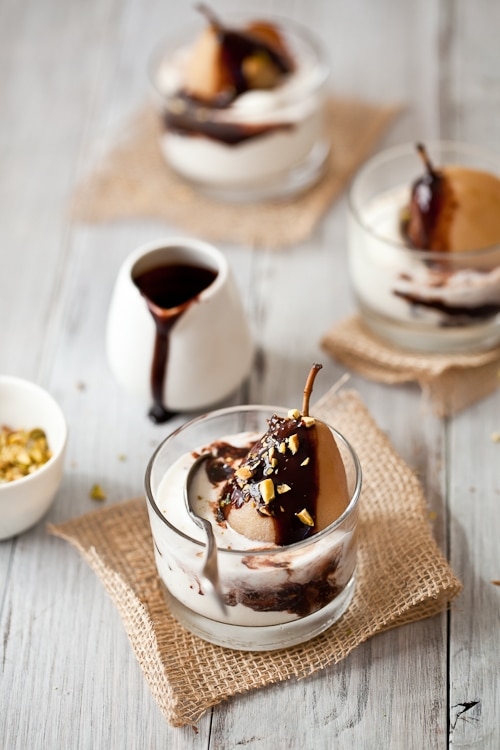
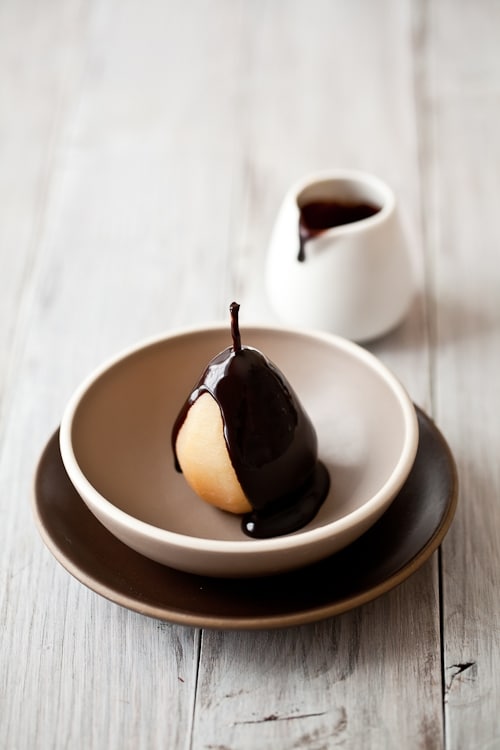
If you read this from France or are an expat anywhere in the world, you’re probably looking at this picture and thinking "Oh! Helene made Poire Belle Helene!" and move on to the rest of the post. If you had never had such a dessert and read a title like this, you’d think I’d blown a fuse by naming a dessert after myself. And as if that weren’t enough, adding the adjective "belle" to describe it all. Hmmmm….No.
I did not come up with name, heck I did not even liked the dessert this much until in my late twenties! Auguste Escoffier created the Poire Belle Helene in 1870, naming it after one of Offenbach’s operette, La Belle Helene. Yes. 1870. Makes me wish Escoffier had had a blog in 1870. Or a twitter account. I bet his updates would be of the most delectable kind. Seriously.
This is probably one of the core desserts of French cuisine. At least of bistros and restaurants when I was growing up. Funny thing is that I never did make much of it though because it bears only half my name. Indeed, I was born and baptized Marie-Helene like some are named Marie-Louise or Jean-Luc. However computers here in the States don’t seem to recognize hyphens and cut my first name in half. If I was going to be halved somehow, at least I’d get to pick which one, darn it. So I’m Helene. Except when I am in trouble, ehehe!
So, there is part of the little story. Or at least part of the reason why I never really appreciated Poires Belle Helene until well into my twenties. Why this late? I have an aversion for fruits and chocolate combined. There, I said it! I love nuts and chocolate. I love lemon and chocolate. I used to hate all fruits with chocolate. My most least favorite pairing was orange and chocolate. My less least favorite (!) was pear and chocolate.
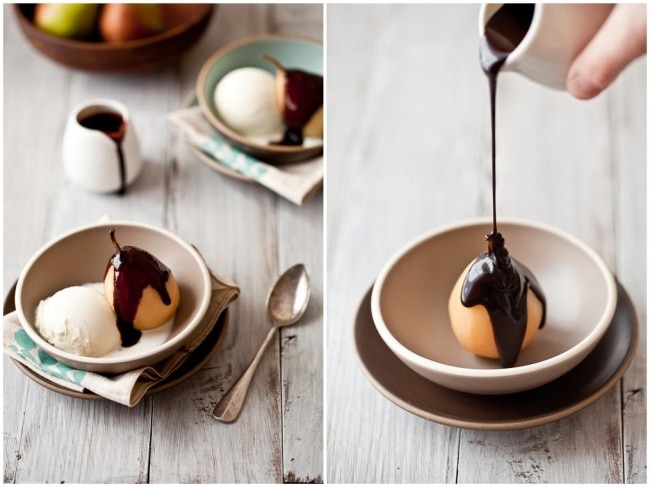
There is something about the soft fragrance of pears that plays well with chocolate and either brings it forth and mellows it just so. Poached pears and hot chocolate sauce especially. They like each other, it’s obvious. They’re not sure on who should lead though and artfully play that up. And much like two people attracted to each other, poached pears and hot chocolate sauce are kind of the ultimate in sexy when it comes to dessert.
It’s the only fruit – chocolate pairing that enthused me this much. Add a good scoop of vanilla bean ice cream and the combination hot chocolate, cold vanilla, soft fruit just has me weak in the knees. There are indeed moments of bliss to be experienced with the simplicity of certain flavors, textures and temperatures. Poire Belle Helene is just that. Hot and cold, creamy, crunchy, soft. We did a few "hmmmm" and "aaaahhhs" with the first spoonfuls. I even caught one of my friends sashaying her hips around the living room the night we shared these for dinner.
Poire Belle Helene won’t bring on World Peace but I guarantee it’ll make everyone at your dinner table a tad bit happier inside…It won’t cure whatever ails you but it won’t give you a brain freeze. It will just super activate all your senses…
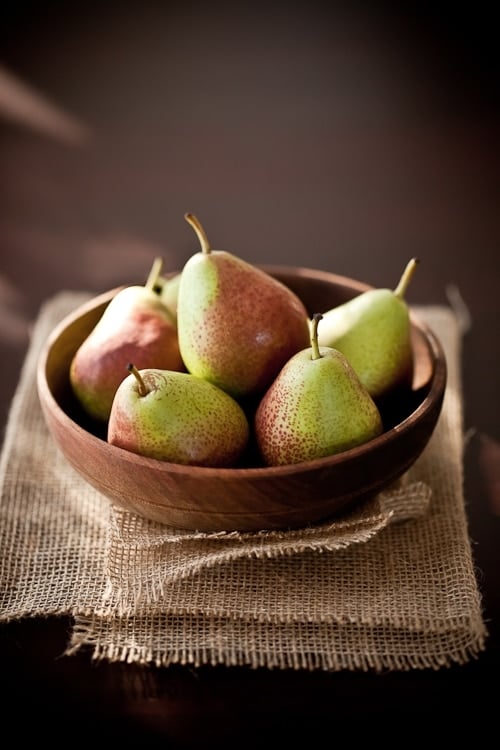
Tiny Forelle pears make it remarkably easy to plate and portion out but you can use any of your favorite pear variety. As I have three major deadlines all coming to a clash for November 1st, this dessert has been the easiest thing to fix myself for a little midnight reward. That’s my sly way of saying "I know I suck big time at posting right now and wait, you ain’t seen nothing yet. It might get worse!…"
Please send chocolate…
Poires Belle Helene – Spiced Poached Pears with Chocolate Sauce and Vanilla Ice Cream
Serves 6
For the poached pears:
6 Forelle pears (or other small-ish pears)
2 tablespoon mulling cider spice mix
juice of one lemon
For the chocolate sauce:
4 oz semisweet best quality chocolate
1 cup heavy cream
1 teaspoon honey
For the ice cream:
2 cups (500ml) heavy cream
1 cup (250ml) whole milk
1 cup (200gr) granulated sugar
1 vanilla bean
Prepare the pears:
Place the pears, spice mix, lemon juice and enough water to cover them in a tall saucepan and bring to a boil over medium high heat. Lower the heat and let them simmer for 15-20 minutes or until the pears are just soft (poke with a toothpick to check).
Remove from the water using a slotted spoon and allow to cool on paper towel or baking rack.
Prepare the sauce:
Place the chocolate in a non reactive bowl and set aside.
In a heavy saucepan set over medium high heat, bring the cream and honey to a strong simmer. Remove from the heat and pour over the chocolate. Let sit for 5 minutes then slowly stir until the mixture comes together.
Prepare the ice cream:
In a large saucepan, stir together the cream, milk, and sugar. Cut the vanilla bean in half and scrape the inside with the tip of a knife. Add that pulp (the seeds) to the pot. Bring the mixture to a simmer over medium low heat, stirring occasionally to dissolve the sugar. Remove from the heat and let steep as it cools to room temperature. Refrigerate, preferably overnight. Strain if desired.
Process the mixture into your ice cream maker according to the manufacturer’s intructions.
B. jokes that every four years, he loses me to the World Cup. I smile and add "and the rugby Six Nations Championship, the Tour de France and the Formula One races throughout the year. Let’s not forget the 24 hours of Le Mans". That’s the environment I was raised in. I grew up with Platini, Maradona, Sella, Camberabero, Prost, Schumacher, Fittipaldi, Bernard Hinault, Laurent Fignon. All year long. All these years.
And yet no one in my family actually played a sport past 16 years old! That is unless you consider four or five- hour long dinners a sport, which my husband happens to do, especially after many a Sunday dinners shared back home. Competitive longest meals followed by competitive moonshine. My uncle Jacques is still reigning supreme in the "moonshine so strong it will bleach your coffee cup" department.
I have mentioned Sundays in passing with my grandmother’s apricot tart but they were much more than that. They usually started with a trip to the market behind our house where my grandmother would get tiny grey shrimp and peppery radishes. Getting flowers, setting up the table, cutting saucisson for the aperitif. Waiting for everyone to finally start lunch around 12.30pm and linger all afternoon in between the TV room and the dessert plates. Coffee, petits fours, chocolates. Heaven.
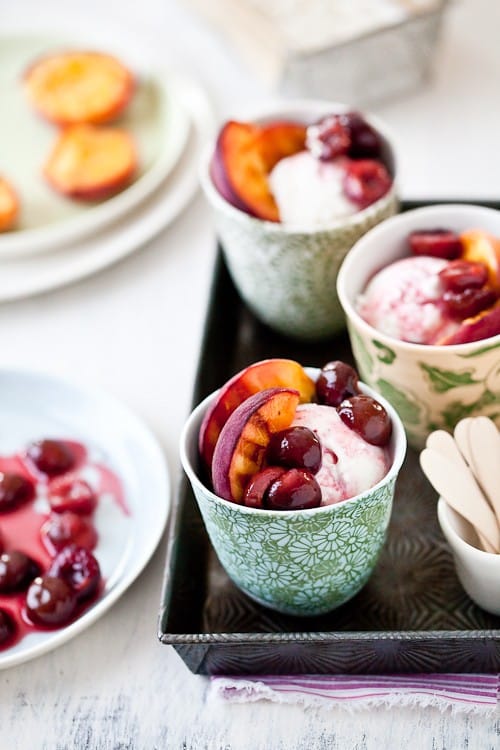
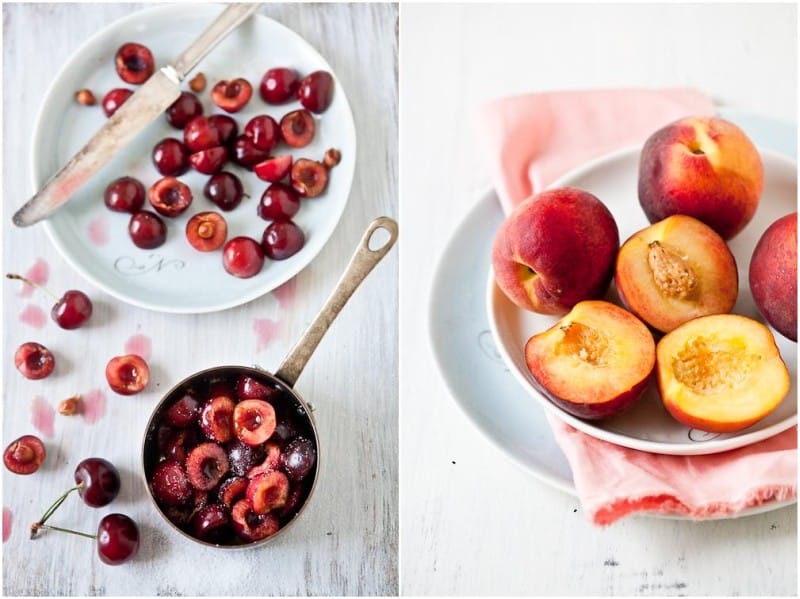
Desserts were most often kept very simple with a big bowl of fruit salad. Some cookies. Some ice cream. Came summer, the table was graced with an abundance of deep dark cherries and juicy peaches. Two of my favorite summer fruits.
Perfect French Word A Week opportunity if you ask me. And that’s two words to boot.
If you ever travel to the South of France, they will quickly become crucial to know as they are everywhere in those parts. Perfectly kissed by the Provencal sun.
Click on the words Peche (click on word for the pronunciation).
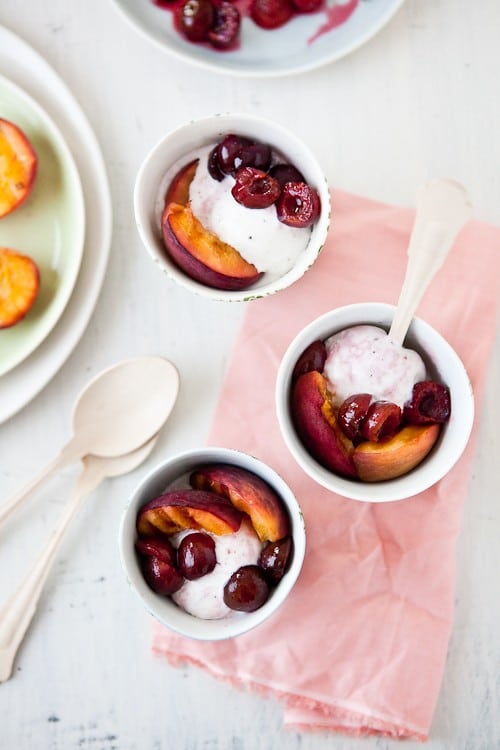
When sports start to tie up the little bit of free time I have, especially in the summer time, I’d better have something quick and easy ready for us, whether we dine alone or get together with friends. I have a strong affinity for ice cream paired with fresh fruits when warmer and sunnier days roll around and things happen a lot more in a impromptu manner.
If they are perfectly juicy, ripe and a bit tangy, then I am in heaven. Sometimes, dessert needs to remain this easy. Sometimes, it needs a little pimping out and it gets even better. Over the years, I have become completely addicted to grilling stone fruits and serving them with fresh yogurt, fresh cheese or ice cream. The combo is just brilliant. When it comes to cherries, B. is not a big fan unless I poach them with honey until soft and tender.
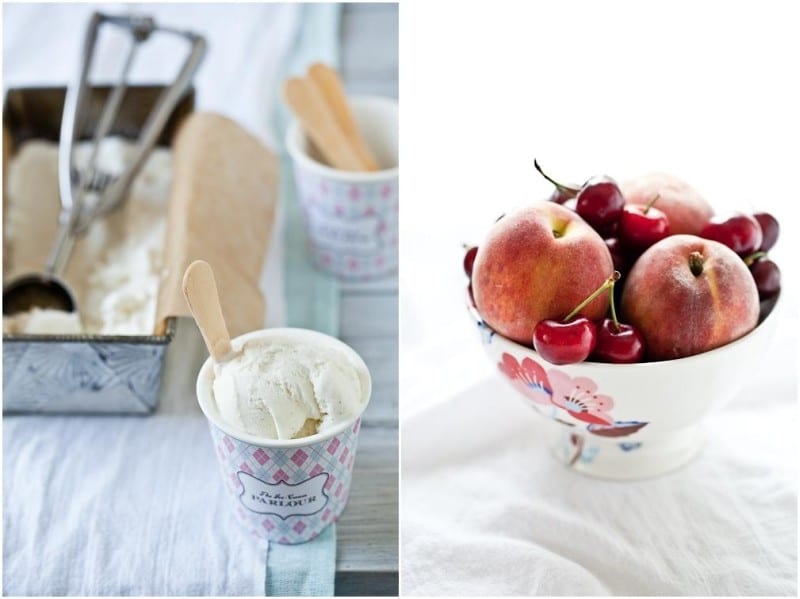
Such a simple combination and so easy to put together with friends around the barbecue one summer evening. Homemade vanilla bean ice cream, grilled peaches and warm juicy poached cherries. Next time I think I’ll pair lavender ice cream and grilled apricot. Non?
When I combined the two the other day, it got me a two-day free pass to not have to walk the dogs during a World Cup game. I took it. Right now, it’s better than a free laundry pass to me, eheheh!
So…what is your secret culinary weapon to earn yourself some "house points"?
Before I forget: Thank you Mom for the pretty plates from Asya at www.gleena.com for my birthday! They arrived still warm from the kiln. Kidding. Just about.
Grilled Peaches, Poached Cherries and Vanilla Bean Ice Cream:
Serves 6-8
Notes: once the ice cream is set, everything else comes together in less than 20-30 minutes. You can also start with the cherries and let them cool while you prepare the peaches.
For the ice cream:
4 egg yolks
1 cup (100gr) + 2 tablespoons (25gr) sugar
1 cup (250ml) whole milk
1 cup (250ml) heavy cream
1 vanilla bean, split open and seeded
In a large bowl, whisk the egg yolks and one cup of sugar until pale and thick. In a saucepan set over medium heat, bring the milk, cream and vanilla bean to a simmer, without letting it come to a full boil. Slowly pour the hot cream over the egg yolks mixture while whisking to temper the egg yolks. Pour the whole mixture back into the saucepan and cook over low heat, stirring constantly, until the cream coats the back of spoon. It should register 170F on a candy thermometer. At this point you have made a custard sauce, also known as "creme anglaise". Let cool completely, strain and refrigerate until cold.
Once the custard is cold, process it according to your ice cream maker manufacturer’s instructions and freeze for 2 hours or more.
For the fruits:
4 peaches (preferably not completely ripe so they don’t disintegrate)
1 to 1/2 cups cherries
1/4 cup honey
1/4 cup orange juice
Prepare the peaches:
Wash them thoroughly but do not peel them. Cut them in half and remove the pit. Preheat the grill to medium-high heat and lightly oil the grill grate. Place the peaches cut side down on the prepared grate, and grill for about 5 minute. Remove and set aside.
Prepare the cherries:
Wash them thoroughly, cut them in half and remove the pits with the tip of a sharp knife. Place them in a large saucepan with the honey and orange juice over medium heat and cook for about 10 minutes until soft. Remove from the heat and let cool a bit. Too warm and it will melt the ice cream way too fast.
To assemble, simply layer the ice cream and the fruits in bowls, cups and ramekins.
It’s the little things lately that fuel me up. The details. Paying attention. So much is out my hands that it’s all in the little things. Maybe it’s the renewed warmth of Spring doing that to me with very much intensity. Maybe it’s the rhythm of the work days that intensified lately. It makes me crave finding my grounds, keeping them and taking care of us.
Food is naturally part of that equilibrium. Roasted chicken and mixed greens enjoyed with friends during a lazy Sunday lunch. A simple salad of heirloom tomatoes shared with B. in between his classes and his music. A classic nosh of French cheeses and pate downtown at a new favorite hang out. A simple plate of lentils and kale topped with a friend egg on a weeknight. Simple. Details. Seasonings. Spices. Balance.
When it comes to dessert, you can bet I am right around the corner with a big plate and large smile! I rarely want a slice of cake or a dozen cookies. Fresh. Seasonal. Textures. Aromas. These words resonate strongly when it comes to picking desserts. There are things I can’t have anymore and ingredients I need to pay attention to so desserts need to pack a punch in a few bites. They need to make me weak in the knees or I’ll pass. I am a gourmande. I’d like to enjoy that for a while and not feel worse because I am not keeping tabs of what I do.
Most nights dessert is a bowl of strawberries or raspberries and a dollop of whipped cream (my absolute weakness), a handful of cherries, a baked apple. Simple. Then there are the simple but planned out desserts we enjoy a couple of times a week. The ones I come to tell you about here. The ones which flavors dance in my head long before I actually make them.
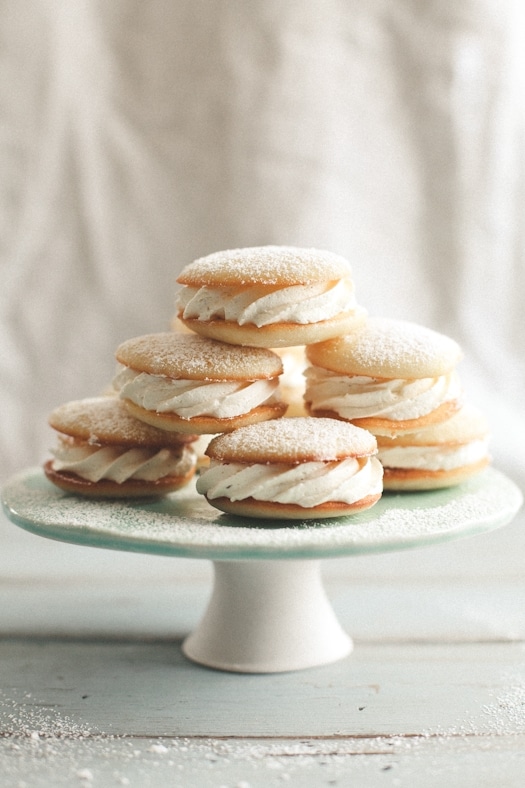
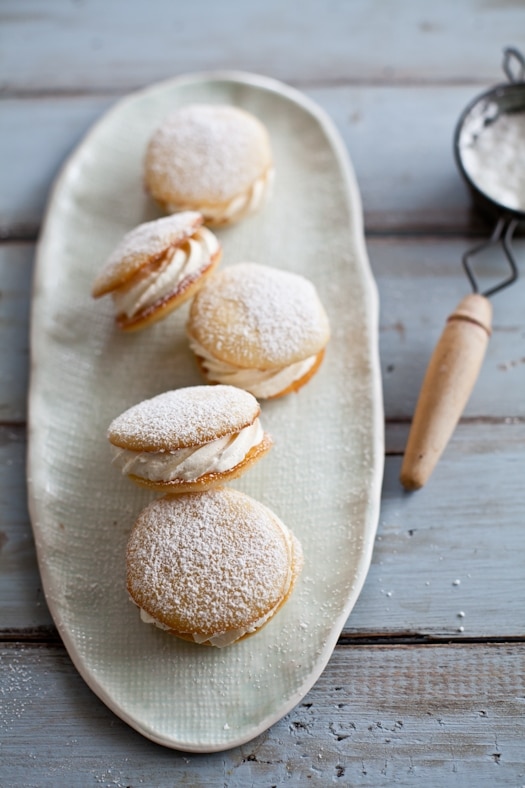
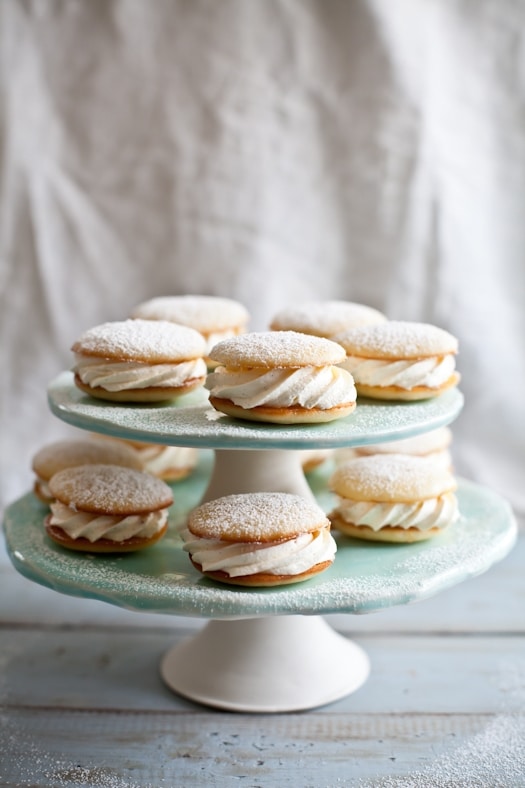
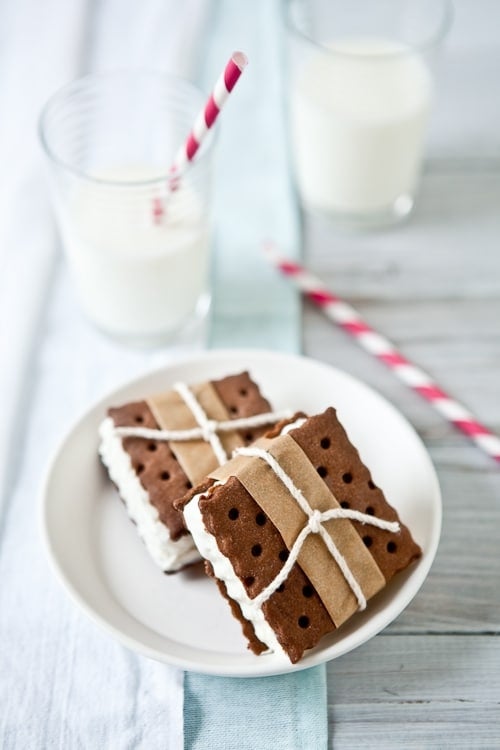
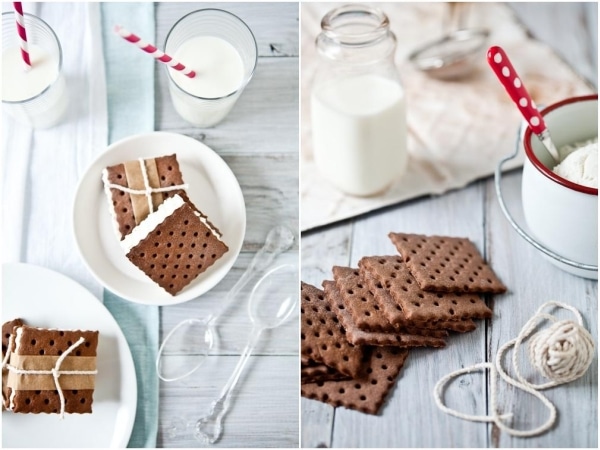
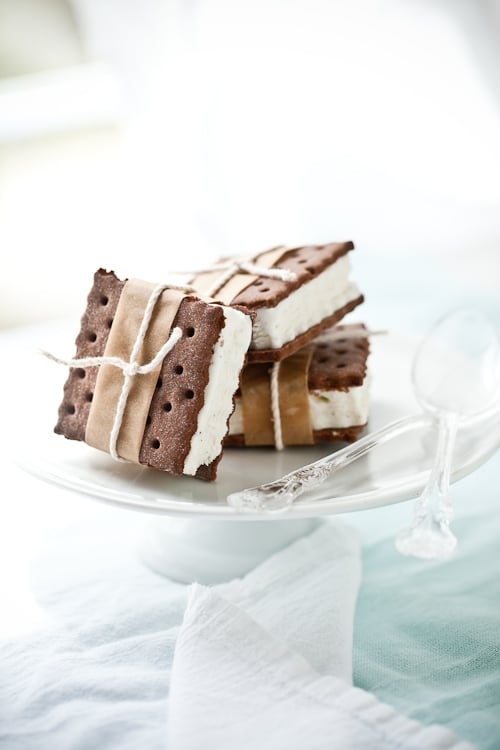
Like these Vanilla Ice Cream Sandwiches. They were not just good. They were simple. They were made from scratch with good stuff like homemade vanilla ice cream. And they were gluten free. I know! You’re thinking "Stop the healthy stuff Helen or we’re going to throw you a cookie.""Ice cream! Portable! Yes!".
I could fit one in my hand without a problem. I could do a 3 bite dance just as easily. I could also carry one in my pocket. I am sure the pups would follow me to the end of the earth with such a trick, ahahah! B. simply loved the taste of the wafers which always make me happy as I bake more and more gluten free that he can’t point out the switch. He grabbed a handful of plain wafers on his way out earlier. Just like that.
I took the cookie recipe used on a job last week and modified to be gluten free and I was really pleased to see the end products behaved the same while being prepared, baked and stacked. The original recipe called for margarine which I subbed for half butter and half coconut oil (see reasons and how to’s in recipe section here) but feel free to use all butter. For the ice cream, I kept it pretty simple and did an eggless base loaded with good vanilla seeds.
Here’s what I like about making ice cream sandwiches from scratch beside the obvious "they’re better for us": it gives me an excuse to make fresh ice cream for some other night of the week. I don’t have to fill all the cookies at once and can do so as we please since they too can be kept in the freezer and I can keep some cookies plain on the side when a chocolate cravings comes knocking at midnight. As it is now….
Why is the freezer door this loud this time of night when everyone is asleep but me? Ha!
————————————————————————————
One more thing before I go: If you are curious to read about more about the whys/whats/wheres of this blog, check out an interview I just completed on Bizymoms by going here. Thanks! Props:
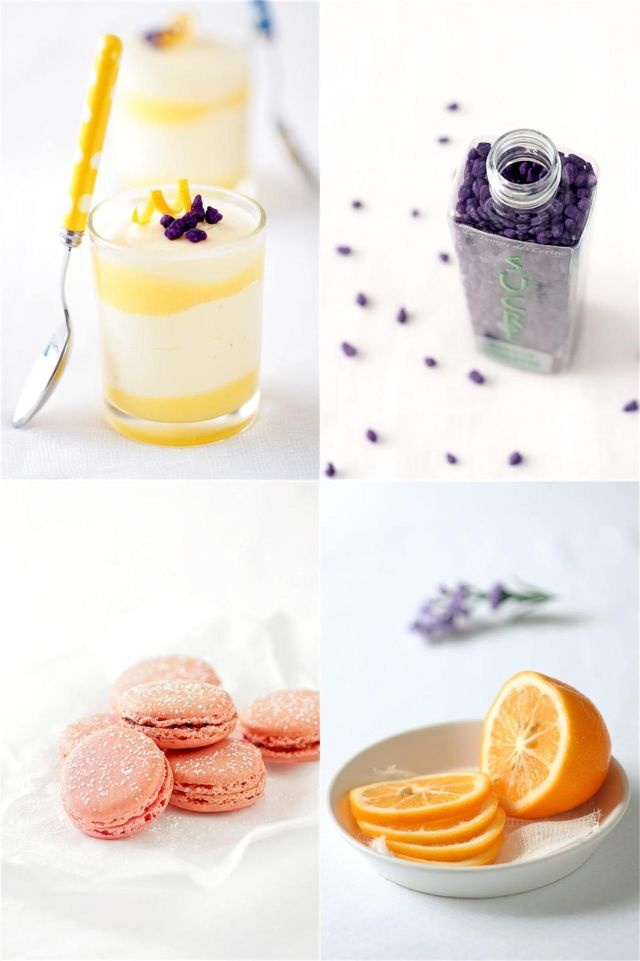
– milk bottle and various plates: ebay
– flatware and straws: Kikkerland on amazon.com
– paper straws: Bake It Pretty (I hear Anthropologie also has them)
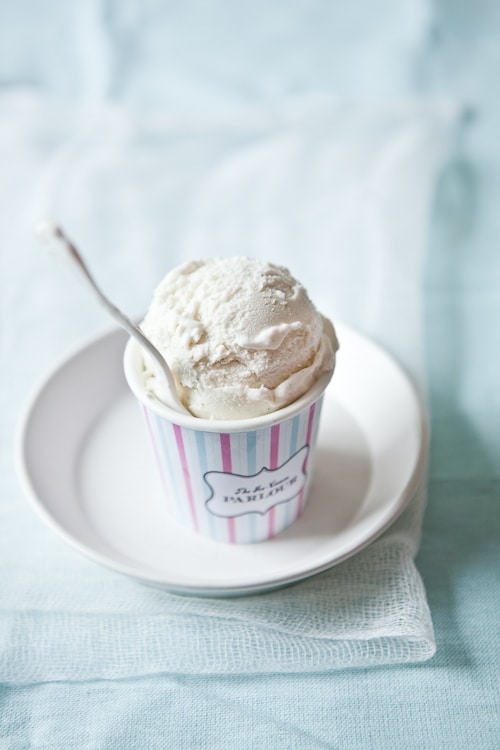
– "Ice Cream Parlor" cup (2nd picture): cup outfitted with a DIY pattern from Eat Drink Chic.
Vanilla Ice Cream Sandwiches:
Makes twelve 3-inch square sandwiches
Notes:
– you can use 2 cups all purpose flour instead of all the combined gluten free flours (sweet rice through cornstarch)
– for the dotted look on the sandwiches, I used one of the tools comprised in this set that I received as a gift years ago.
For the cookies:
4 tablespoons (55gr) unsalted butter, at room temperature
4 tablespoons coconut oil (55gr), at room temperature
1 cup sucanat (organic cane sugar) muscovado or brown sugar
2 large eggs
1 tsp. vanilla extract
1/2 cup cocoa powder
1/2 cup superfine or regular sweet rice flour
1/2 cup superfine or regular brown rice flour
1/2 cup millet flour
1/2 cup cornstarch (use tapioca flour if allergic to corn)
1/2 tsp xanthan gum
1 tsp. baking powder
1/4 tsp. salt
Prepare the cookies:
In the bowl of a electric mixer fitted with the paddle attachment, beat the butterm coconut oil and muscovado sugar on medium speed until fluffy, about 2-3 minutes. Lower the speed and add the eggs, one at a time, beating well after each addition. Add the vanilla extract.
In a separate medium bowl, combine the cocoa powder, all the flours, baking powder, and salt. Still with the mixer on low speed, at the dry ingredients to the butter mixture and mix until the dough starts to come together. Gather the dough into a ball and refrigerate at least 1 hour.
Preheat the oven to 350 degrees and line a pan with parchment paper or a silicone mat.
On a lightly floured surface or a Silpat, roll out the dough to about 1/4-inch thick. Use your preferred cookie cutter to cut out as many pieces as you can. Gather and re-roll the scraps if necessary. Make patters on cookie with a fork or other tool (see notes) if desired. Place on lined baking sheet and bake 8 – 10 minutes. Cool completely before sandwiching them with ice cream.
For the vanilla ice cream:
1 cups (250ml) heavy cream
1 cup (250ml) whole milk
1 cup (250ml) whole coconut milk
1/2 cup (125gr) mild honey
1/2 vanilla bean, split open and scraped – seeds set aside
Prepare the ice cream:
In a large saucepan set over medium low heat, bring the cream, milk, coconut milk, honey and vanilla bean seeds to a simmer, stirring occasionally. Remove from the heat and let it cool to room temperature. Refrigerate, preferably overnight.
Process the mixture into your ice cream maker according to the manufacturer’s intructions.
Once the ice cream has reached soft serve consistency, pour about half into a 9×9 freeze proof dish lined with plastic wrap (try to get about 1 to 1.5 inch thickness for the ice cream to sandwich later on) and the other half into a freezable container. Freeze until firm.
No ice cream maker? No problem! Pour the cream into a freeze proof container and freeze for a couple of hours. Take it out and whip it with an electric mixer or immersion blender, freeze it again, whip it again….do that four or five times. The mixture won’t be quite the same but pretty darn close.
Assemble:
With the same cookie cutter, cut through the ice cream that was poured into the 9×9 inch pan and sandwich in between two cookies. Keep frozen. The cookies will keep well wrapped in the freezer for up to 3 months.
————————————————————————————-
I’ll upload the recipe in French either tonight or Wednesday – ran out of steam tonight!
La recette en Francais ce soir ou demain au plus tard. Le boulot ca fatigue – ahahahah!
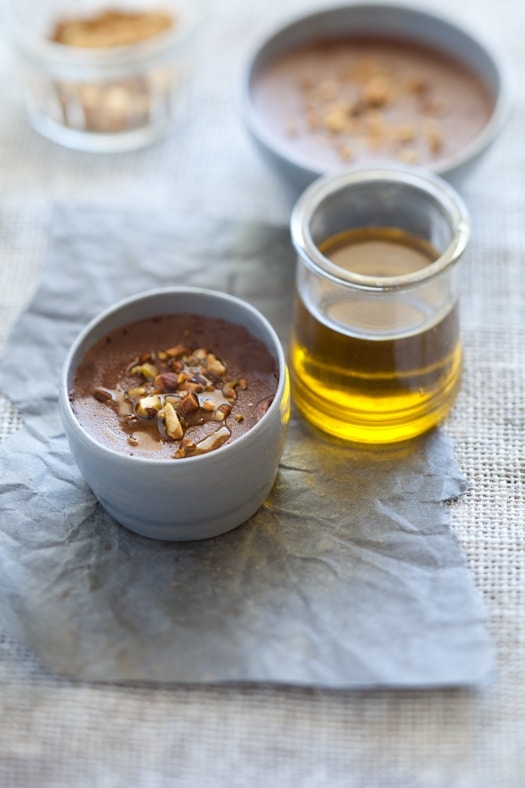
I realized as I was starting to write down the recipe for this post that it was actually my 550th post. Wow…That made me a little proud and left me slightly amazed at the same time! I think I even said "oh la vache!" (holy cow!). That’s a whole lot of stories, words, laughs, tears and just as much sugar, butter, flour and eggs! What could be more fitting to celebrate post #550 than a Daring Bakers Challenge? A very sweet and very rich one: a Dobos Torte.
I wrote last time that I hadn’t had an ounce of craving for chocolate lately and when I set out to make this challenge, things turned out just about the same. I looked at the recipe and could not chase the images of sweet sugared berries floating in my head. Or was it sugar made saber equipped raspberries fighting off little chocolate critters? Hmmmm…Still, not an ounce of chocolate was calling my name yet. Too hot, too humid and a fridge full of raspberries thanks to my mother – in – law who always buys for 8 when there are just the 2 of them.
A Dobos Torte is traditionally a rich layer sponge cake layered with chocolate buttercream and topped with caramel pieces. I respected all the components of the challenge while changing things around a bit for a few reasons: the season, the plentitude of raspberries and mascarpone I had (mother – in – law again) and the weather.
I baked the sponge layers in a sheet pan, cut out disks in the cake to form several 3-inch cakes in dessert rings. I layered the disks with a super light (but rich) mascarpone mousse and fresh raspberries. For the buttercream, I kept a similar method as the one given by the hostesses and made vanilla bean Swiss meringue buttercream where the egg whites are heated on the stove prior to being whipped. On a side note, the specks you notice on the cakes are neither caused by a problem with your vision or your computer screen. It’s not dirt either as my 5 year-old neighbor thought earlier. It’s the pure goodness of a vanilla bean.
I thought about that caramel topping long and hard and knew it was just not going to happen as it was written given our heat and humidity. I made pulled sugar ribbons because I could make just what I needed for the cake before they’d disintegrate in sugar puddles. Going back on previous posts, I realized there had been bubble caramel, caramel circles, caramel strands, caramel corkscrews, caramel window panes, caramel plates but never good old pulled sugar. Ah! No more! Here it is!
Before you say you will never ever do it because it’s caramel-and-oh-my-god-it’s-just-too-hard-because-it’s-caramel let me tell you why you could make it tomorrow and neither glue your entire kitchen nor burn all your pots and pans trying to get it to "the proper shade of amber". First, there is a high enough ratio of water to sugar for the liquid not to turn to caramel before you reach the desired temperature for pulled sugar. Then, your mission is NOT to let it turn color. You boil, add coloring or not, take it to a certain temperature, pour it off, let it cool a bit and start playing.
See? One more cool pastry thing to try one quiet evening. Do not fear the sugar!
We loved this version and I have already bookmarked the original one given by our hostesses to make this Fall and Winter. Thank you ladies for hosting and to Lisa and Ivonne for being such incredible Daring Bakers Founders! There are plenty more Dobos Torte to be seen from around the globe here.
For the sponge cake layers
6 large eggs, separated, at room temperature
1 1/3 cups (162g) confectioner’s (icing) sugar, divided
1 teaspoon (5ml) vanilla extract
1 cup plus 2 tablespoons (112g) sifted cake flour
pinch of salt
For the mascarpone mousse:
For the mousse:
3 egg yolks
1/2 tablespoon powdered gelatin
1/2 cup (125ml) honey
3 oz (90gr) mascarpone, at room temperature
1 cup (250ml) heavy cream
For the buttercream:
1 cup (200gr) sugar
4 large egg whites
3 sticks (340gr) unsalted butter, at room temperature
Prepare the cake layers:
Position the racks in the top and centre thirds of the oven and heat to 400F (200C). Line a half sheet pan with parchment paper and spray lightly with cooking spray. Set aside.
Beat the egg yolks, 2/3 cup (81g) of the confectioner’s (icing) sugar, and the vanilla in a medium bowl with a mixer on high speed until the mixture is thick, pale yellow and forms a thick ribbon when the beaters are lifted a few inches above the batter, about 3 minutes. (You can do this step with a balloon whisk if you don’t have a mixer). In another bowl, using clean beaters, beat the egg whites until soft peaks form. Gradually beat in the remaining 2/3 cup (81g) of confectioner’s (icing)sugar until the whites form stiff, shiny peaks. Using a large rubber spatula, stir about 1/4 of the beaten whites into the egg yolk mixture, then fold in the remainder, leaving a few wisps of white visible. Combine the flour and salt. Sift half the flour over the eggs, and fold in; repeat with the remaining flour. Pour the batter into the prepared half sheet pan and bake for 8 to 10 minutes or until slightly brown.
Prepare the mousse:
Whisk the egg yolks to break them up in the bowl of stand mixer (or with hand held beaters).
Sprinkle the gelatin over 2 Tb of cold water in a small cup and let it bloom.
In a heavy saucepan set over medium high heat, bring the honey to a boil and cook until it reaches 240F. Remove the pan from the stove and pour it carefully into a cup with a spout (easier to pour) .
Dissolve the gelatin in the microwave for 10 seconds, or in a bowl set over a pan of simmering water.
While still whipping the yolks, slowly pour in the hot honey, being careful to temper them and not cook them. Pour the gelatin over the egg/honey and whip together for a few seconds and add the mascarpone, one tablespoon at a time. Whip until cooled to room temperature and has tripled in volume
In another bowl, whip the cream to soft peaks or if you are using a stand mixer, pour the mousse into a large bowl and clean the mixer bowl thoroughly, or use another mixer bowl if you have one. Gently fold the whipped cream into the mousse trying to deflate the whole thing as little as possible. Use immediately.
Prepare the buttercream:
Place the sugar and egg whites in a large heatproof bowl over a saucepan of simmering water and whisk constantly, keeping the mixture over the heat, until it feels hot to the touch, about 3 minutes. The sugar should be dissolved, and the mixture will look like marshmallow cream (temperature should be about 235-238F). Pour the mixture into the bowl of a stand mixer fitted with the whisk attachment and beat the meringue on medium speed until it cools and forms a thick shiny meringue, about 5 minutes. Switch to the paddle attachment and add the butter, one tablespoon at a time, beating until smooth. Once all the butter is in, beat in the buttercream on medium-high speed until it is thick and very smooth, 6-8 minutes. Proceed per recipe or store for up to a week in the fridge or 3 months (well wrapped in the freezer).
Assemble the cakes: like eight cake rings with rhodoid or plastic protector sleeves cut to fit (yes, like the ones in the office)and place them on a baking sheet. Place a cake round at the bottom, place a layer of raspberries on the outside, fill with mousse to the top of the raspberries, top with one round of cake, more mousse and a final round of cake. Place in the refrigerator and let set 2 hours or overnight. When the mousse is set, cover with the buttercream and refrigerate.
For the pulled sugar ribbons:
1 1/4 cup (250gr) sugar
100 ml water
1 teaspoon lemon juice
5-8 drops red food coloring
In a heavy saucepan set over high heat, bring the sugar and water to a boil (do not let it turn into caramel). Once it is boiling, add the lemon juice and coloring. Bring the syrup to 298F on a candy thermometer. Immediately pour the caramel onto a silicone mat. You might want to wear some pastry gloves at this point because the caramel is extremely hot. Little tip: I have found myself with not one glove in the tool box so I used a new pair of dishwashing gloves instead.
Let it harden until it is pliable and carefully start folding the mat back and forth onto itself to work the sugar mass a bit. Take small pieces of the mass and start pulling, twirling or even make rose petals and other flowers with it. Beware that pulled sugar cools as fast as it gets hot so if it becomes harder and harder to work with you have different options available. If you have a heat lamp, place the pulled sugar underneath until pliable again. If you are like me (sans heat lamp) you can either place the pulled sugar on the silicone mat on a baking sheet directly on the stove on low heat until pliable or in a low heated oven. Be careful and watch it carefully: it can turn into "real" caramel very fast this way so do not walk away while you reheat.
I think I have quite possibly turned this site into an ode to strawberries just by looking at my latest posts. Hmmm…Hope you’ll still tune in for one more next week and then I might tempt you with the lovely wild blackberries I see appearing on the edges of the yard. Gosh I love Spring! It would be a shame not to take advantage of what is at my fingertips and right now the fridge is about to burst with local strawberries and lemons.
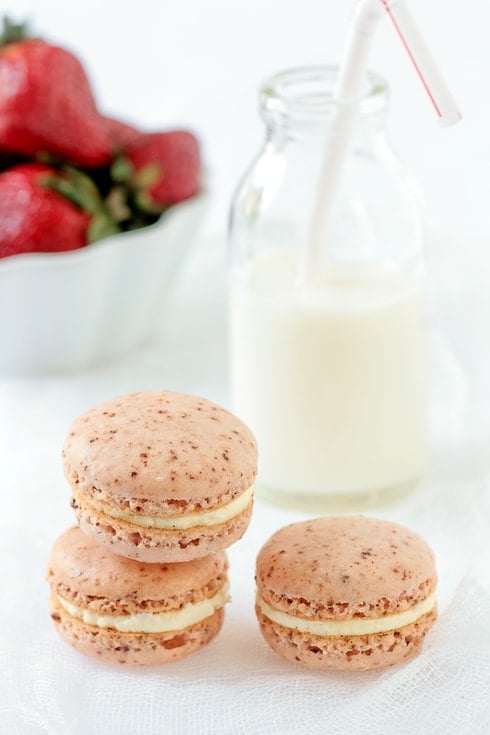
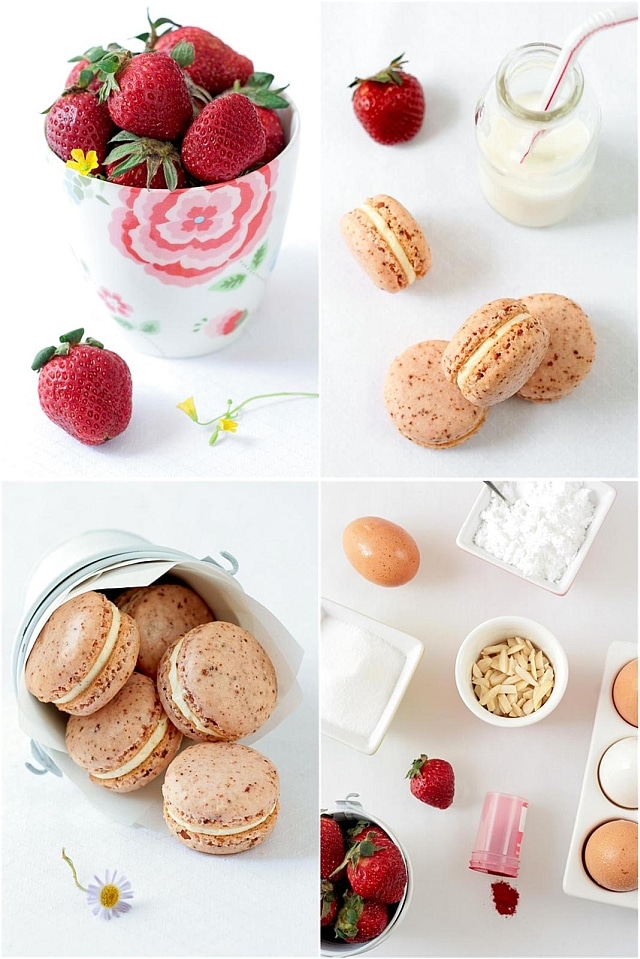
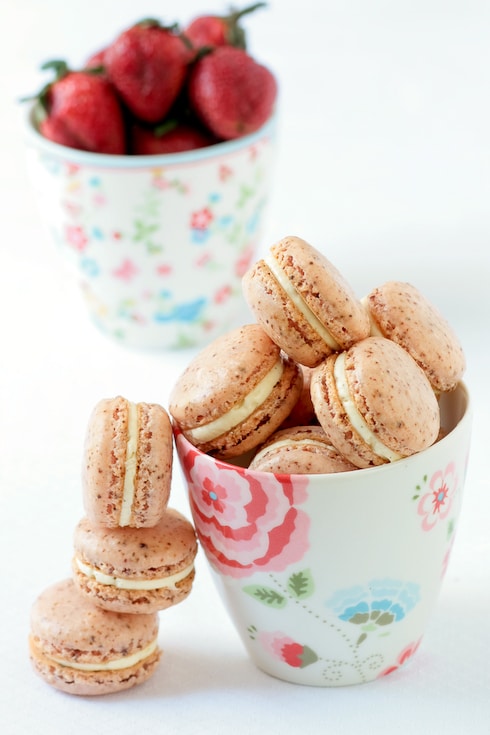
It seems like I have a magic fridge these days. Just when I think I am reaching the bottom of the bowl of strawberries there is another one appearing from the other side. I did find out from B. that his mom dropped off some, as did a neighbor because "{I} would know what to do with them." I did ponder that thought while I was slicing strawberries for a tart. What to do with all these ugly little end pieces that I was not going to use? That’s when the idea of dried strawberries popped into my head again and how to incorporate that into another dessert, a macaron especially.
One of the trickiest thing to do with macarons is to flavor the shells without messing up the texture. Adding liquid to the batter is to me like jumping off a plane wishing your parachute is going to work properly. In that regard, I stick to things I know are not going to interfere with the final result like citrus zest, dried and fresh herbs, etc…
And here I was staring at my sheet pan of dried strawberry slices, my sudden urge to make some macarons and well you can pretty much guess how the rest went…
I ran the dried strawberries through a coffee grinder I use only for spices and seeds. I then added that powder to the almonds and powdered sugar before running those through the food processor. That extra grinding step makes the powder super fine and smooth to fold into the macaron batter. The fragrance was wonderful but the color was a little bland so I added just a touch of cherry pink coloring, to bring out the specks from the strawberry powder. For the filling I used some leftover vanilla bean buttercream from a previous batch that I had kept in the freezer and just let it thaw at room temperature before filling the macarons.
I did want to make something special to introduce you to my new adoptee, Anja from Deelish Dish. For the past 3 years, Kristen from Dine And Dish has been the Master mind behind "Adopt A Blogger" in which she pairs novice bloggers with more seasoned ones. I mentored the first year, totally spazzed on the second and got lucky to catch up with her on the night she was making the pairs and volunteered my help again.
When Anja sent me an email to introduce herself I could not but catch her enthusiasm and joie de vivre. Her food, well, let’s just say that right now she has me at Banoffe Pie and Chocolate Gingerbread Bars. If you must have dessert last, then why not start with her Spinach and Ricotta Pastries? Et voila, I am hungry again…
So here’s to you Anja, a virtual batch of Powdered Strawberry and Vanilla Bean Macarons. Let’s hope I don’t fall short as a mentor.
Powdered Strawberry Macarons and Vanilla Bean Buttercream Recipe:
For the strawberries: 1/2 cup strawberries, hulled and thinly sliced
For the macaron shells: 90 gr egg whites (about 3) preferably aged 3-5 days in the fridge
30 gr granulated sugar
200 gr powdered sugar
110 gr almonds
powdered strawberries
powdered pink food coloring
Prepare the strawberries: preheat your oven to 250F and position a rack in the center. Place the strawberry slices in a single layer on a parchment paper lined baking sheet and let them dry in the oven for about one hour. Let them cool completely. Process until extremely fine. Reserve.
Prepare the macarons: in a stand mixer fitted with the whisk attachment, whip the egg whites to a foam, gradually add the sugar until you obtain a glossy meringue. Do not overbeat your meringue or it will be too dry. Place the almonds, powdered sugar, reserved powdered strawberries and food coloring in a food processor and give them a good pulse until the nuts are finely ground. Add them to the meringue, give it a quick fold to break some of the air and then fold the mass carefully until you obtain a batter that falls back on itself after counting to 10. Give quick strokes at first to break the mass and slow down. The whole process should not take more than 50 strokes. Test a small amount on a plate: if the tops flattens on its own you are good to go. If there is a small beak, give the batter a couple of turns.
Fill a pastry bag fitted with a plain tip (Ateco #807 or #809) with the batter and pipe small rounds (1.5 inches in diameter) onto parchment paper or silicone mats lined baking sheets.
Preheat the oven to 280F and position a rack in the center. Let the macarons sit out for 30 minutes to an hour to harden their shells a bit and bake for 15 to 20 minutes, depending on their size. Let cool. If you have trouble removing the shells, pour a couple of drops of water under the parchment paper while the sheet is still a bit warm and the macarons will lift up more easily do to the moisture. Don’t let them sit there in it too long or they will become soggy. Once baked and if you are not using them right away, store them in an airtight container out of the fridge for a couple of days or in the freezer. To fill: pipe or spoon about 1 big tablespoon of butterceam in the center of one shell and top with another one.
Vanilla Buttercream: see recipe here but ommit the violet.
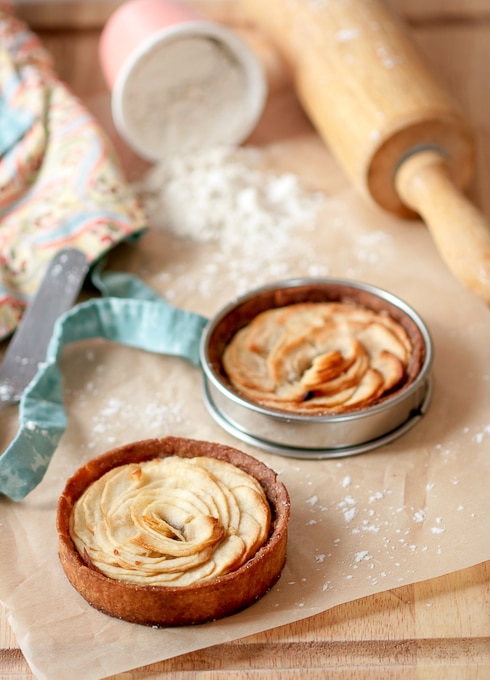
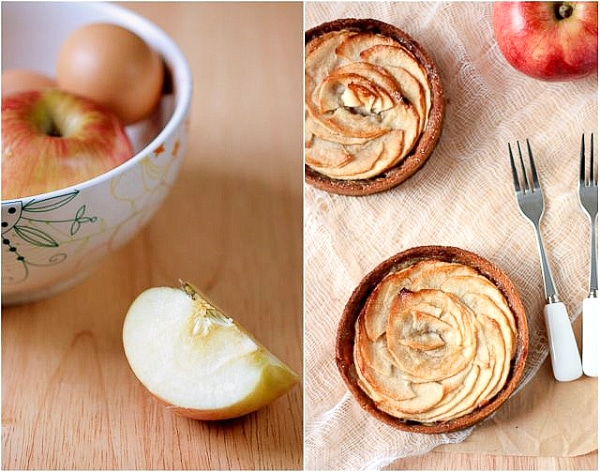
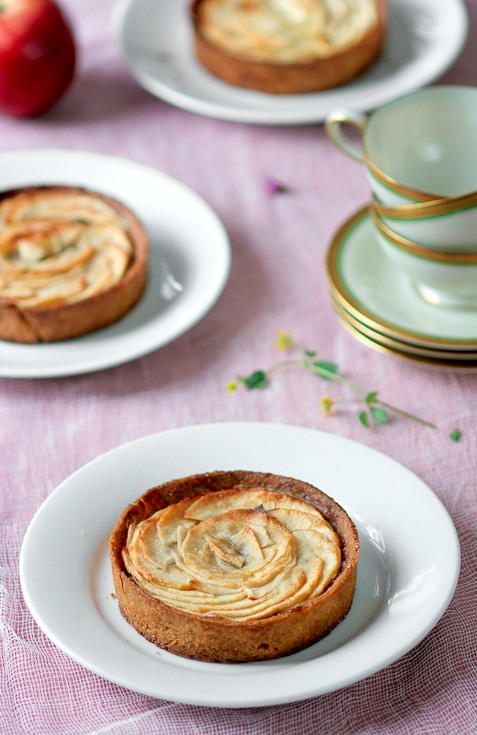
I know I have kept building this up since my mother’s ratatouille and wrote a couple of other things in between. Part of me is thrilled to share my grandma’s apple tart with you and part of me wants to keep it inside just a little longer. It’s unlike me not to share so these past few days I kept wondering why it was so dang hard to write this very simple, very humble yet delicious recipe. A simple pate sucree topped with a vanilla bean apple compote and thin slices of apples. A sprinkling of sugar.
You can guess that it is just not about the tart. It’s the mamie behind it and telling "her" in a few paragraphs in a blog can’t possibly explain why this recipe means so much to us and why we absolutely love to make it. I am willing to try though, because I know that my grandmother is very much like yours. Comforting, simple and sometimes complex.
What can I say that could possibly do justice to my grandmother’s heart and personality? She was married to my grandfather for 71 years (love their wedding picture). This year they would have celebrated 75 years of marriage and I get all choked up when I think know what my grandfather truly wants nowadays. I know he wishes to see her again soon. It never saddens me when I hear him say that. I smile instead. I want to make him her apple tart so that he can smell the wonderful aromas of vanilla beans and apple "compoting" together. So that he can hear the swishing of her apron as I roll the dough for the crust. So that he can pass beside me as I am slicing the apples and say "listen to your grandmother. She knows when they are too thick".
Following her thought that a recipe is a canvas for the baker to give a recipe his or hers personality, she never wrote the ingredients or recipe down. To anyone who asked her about it she would simply jot down "pate sucree – compote de pommes – tranches de pommes". Basically, if you use what you know you like, you can’t go wrong even if it changes every time you make it. I did just that. I added some almonds to the dough for a little earthy flavor. I combined vanilla and cardamom for the cooked apple and I sprinkled the sliced apple with some sugar rubbed with lemon zest. To me that was Mamie. A little bite, a little spice, a good bit of delicious and a touch of pizzaz.
Apple Tartelettes Recipe:
Makes four 4- inch tartlets
Pate Sucree:
2 tablespoons (20gr) slivered almonds
1/2 (60gr) cup powdered sugar, unsifted, divided
1/2 stick (56.5gr) unsalted butter, at room temperature
pinch of salt
3/4 cup (90gr) all-purpose flour
1 egg yolk
Preheat oven to 350F.
Place almonds and 1 tablespoon powdered sugar in a food processor. Pulse until the nuts are finely ground. In bowl of electric mixer fitted with paddle attachment, cream butter, ground nuts and salt on medium speed until well-combined. Slowly add remaining powdered sugar and flour and mix well. Add the egg yolk and mix until incorporated. Shape dough into a ball and flatten into a disc. Wrap with plastic wrap and refrigerate for two hours or overnight.
Place the dough in between two sheets of plastic wrap or parchment paper and roll it out to about 1/8-inch thick. Cut out four 6- inch rounds and fit them inside four 4- inch tartlet molds, patting the dough in with your fingertips if it breaks on you as you transfer the rounds. Gather the scraps and set aside.
Prick the dough with a fork and refrigerate 30 minutes.
Preheat the oven to 350F and bake the shells for 12 to 15 minutes. Let cool on wire racks.
Apple Compote: 1/2 vanilla bean
1 teaspoon (2gr) ground cardamom
2 tablespoons sugar
4 medium apples (your preference. I went with Fuji)
1/4 cup to 1/3 cup (60 to 80ml) water
On a flat surface, cut the vanilla bean in half lenghtwise without cutting all the way through and scrape the seeds from the pods with a pairing knife. Place them in a large saucepan along with the cardamom and sugar. Set aside.
Peel, core and roughly chop the apples. Add them to the vanilla and sugar mixture along with the water. Bring the mixture to a simmer over medium heat. Turn the heat down, cover and let the apples stew for 30 to 45 minutes. Check every 20 minutes to and add water to the mixture if the liquid evaporates faster than the apples can cook. I tend to cook mine just unti soft so that they keep a bit of texture under the tooth. Remove from the heat and let cool to room temperature. Divide the mixture evenly among the tart shells.
Apple Topping:
2 tablespoons (15gr) granulated sugar
zest of half a lemon
2-3 medium apples
In a small bowl, rub together the sugar and lemon zest so that the citrus natural oils can flavor the sugar.
Peel, core and thinly slice the apples (the thinner the prettier. Decoratively arrange the slices over the compote and sprinkle evenly with the sugar.
Bake at 350F for 20 to 25 minutes or until the top appples are golden brown.
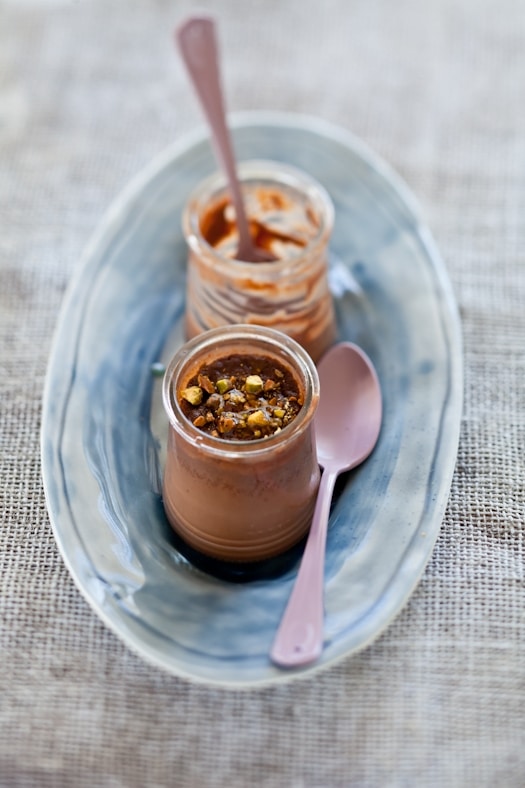
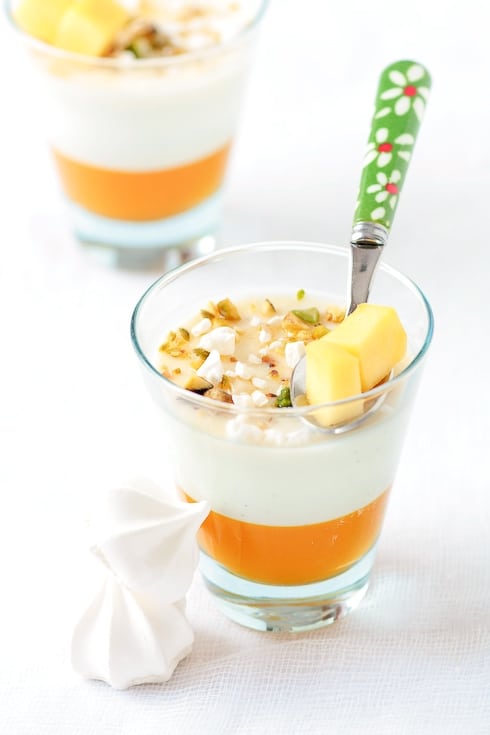
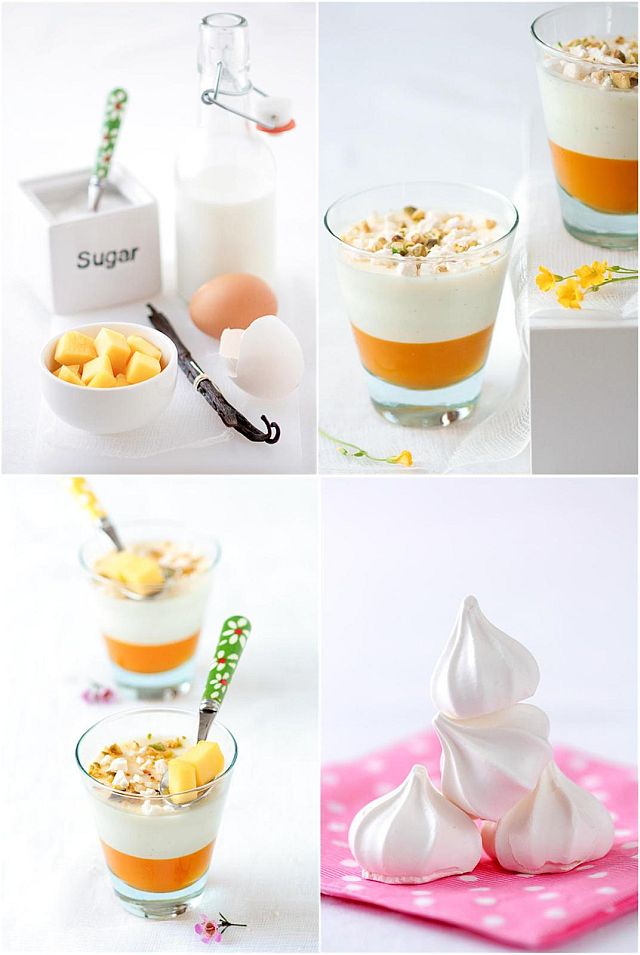
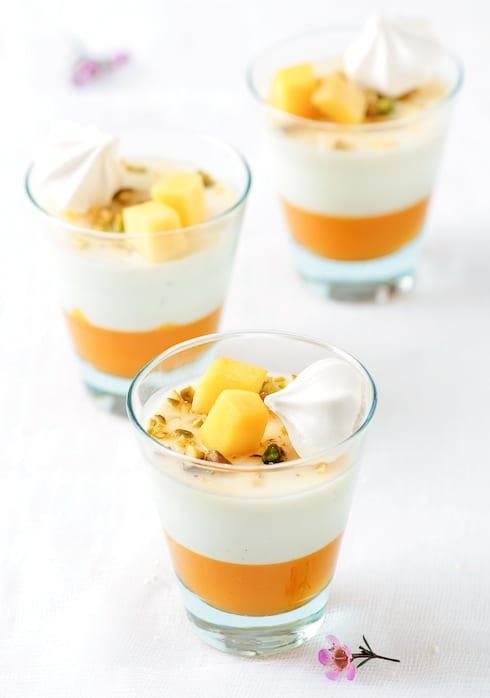
Interesting how even past 30 years old I still want mommy when I spike a fever and walk around with a box of tissues. Wondering why I never catch a 24 hour bug or never lose my appetite when sick. Sad to see my parents leave after such good times. Amusing to see the dogs go back and forth between both bedrooms looking for them. Funny how little mishaps can turn into creamy deliciousness like these Mango And Vanilla Bean Buttermilk Panna Cottas.
The morning of my parents' departure, my father and I were up before anyone else as usual. We were reminiscing about the last few weeks spent together. We like to talk food while preparing meals. Surprise, surprise! When we were kids, my father taught us how to crack and juice a coconut, introduced us to the wonders of papaya simply sprinkled with lime juice, cooked the most fabulous Osso Bucco or rice pilaf. I guess he will be my other guest blogger when they come back!
This past Sunday morning, the conversation fell on the wonderful meal my dear friend Bina prepared the last time we visited her and her family. After taking me to the Indian market so I could stock up on my usual and new favorites, she also sent me home with a whopping big can of Alfonso mango puree. We were happily surprised to find out that it was the same kind we would scout at the exotic market when I was a kid. We kept dipping our spoons in the can while getting breakfast ready. I poured some of the puree in 4 glasses for everybody to have a taste and proceeded to make breakfast.
We decided to send them off with a hearty good old American breakfast and I decided to use the last bit of buttermilk I had to make pancakes. I went ahead and whisked buttermilk, vanilla bean seeds, sugar. I am not sure what exactly went array after that or when it did. Pressing needs of sleepy puppies, checking and re-checking and nothing had been left out of the suitcases, phone calls to and from relatives and friends,… I stood over the stove, poured some batter in the pan and turned around. Two minutes later, I heard "Aren’t pancakes similar to crepes?" …Hmmm…Yes they could be instead of the gunky burnt mess that was in the frying pan. I had forgotten the eggs and flour.
"Oh dear…I am losing my mind!"…I looked at my parents and pulled out the croissants and toasts. Not much time left to fix anything, finally get in the shower and leave for the airport. I could feel my dad travelling nerves getting sharper by the minute but I hated to waste a vanilla bean anything. Panna Cottas quickly came to mind. I bloomed some gelatin in water, froze everybody’s glass of pureed mango and heated up some cream and the vanilla infused buttermilk. Why freeze the fruit? I wanted clean layers for the fruit and panna cotta and once frozen you can easily pour your cream base without it falling straight to the bottom of the puree because of its heavier weight. It also quickens the setting process of the panna cottas but alas it was high time we left for the airport.
So here we are now, parents sound and safe in France and us with two extra Panna Cottas. I served them with little Swiss meringue cookies (same as in Floating Island but piped and baked on a sheetpan) and chopped pistachios. They are so good I wish I could share with you!
Note: I am aware of the pistachio recall here in the States and I am keeping up with the grower involved. Mine were from another farm but please check your stashes and sources.
Mango And Vanilla Bean Buttermilk Panna Cottas:
Serves 4
Kitchen Note: for the recipe I used one cup (250ml) of canned mango puree which I know is not available everywhere. According to the National Mango Board, you would need 2 medium sized mango to obtain one cup of puree. You can substitute with any soft fruit reduced to a puree like apricot, peach, pear, etc…
1 cup (250ml) mango puree
1 tablespoon (15gr) water
1 3/4 teaspoons (4gr) powdered gelatin
1 vanilla bean
1 cup (250ml) heavy cream
1/4 cup (50gr) sugar
1 cup (250ml) whole buttermilk
Divide the mango puree evenly among 4 glasses or ramekins.
Place the water in a small ramekin and sprinkle the gelatin over it. Let it bloom while you prepare the cream.
On a flat surface, cut the vanilla bean in half lengthwise without cutting all the way through. With a pairing knife, scrape the seeds from the pods. Set aside.
In a medium saucepan, heat the heavy cream with the sugar and vanilla bean seeds until the cream is just about to boil, stirring occasionally to make sure the sugar dissolves completely. Remove from the heat and stir in the gelatin until it is completely melted. Let cool for about 10 minutes and add the buttermilk. Let cool to room temperature. You can speed up the process by placing your saucepan over a bowl filled with ice but keep and eye on it as it will thicken faster. Once the cream is cooled, slowly pour it over the frozen fruit and let set in the fridge, at least two hours, preferably overnight.
Serve with chopped pistachios and meringue cookies if desired.
I know, in my last post I asked you what my mom should make as an upcoming guest blogger, ratatouille or apple tart and here I am giving you macarons! Remember discombobulated? We did make the ratatouille, … and ate it so it will have to wait for a redo.
Discombobulated…New favorite word. It’s always a bit of a struggle getting things organized with long term guests but there has been a lot of good work getting done. A lot of good meals and good times too. My parents are happily relaxing, talking walks in town, going to the beach, reading,.. with no particular agenda or schedule. Even the pupps are learning "discombulated". There is no telling who is going to walk them, feed them, play with them. All they know is that there are 4 more hands to pet them. Bliss…
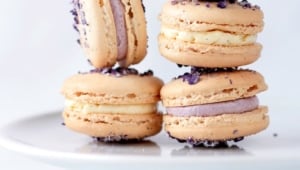
Even here it is bit "sans queue ni tete", posting the raspberry mousse tarts with pink macarons before posting about the macarons first. Indeed, a couple days after my parents arrived I made a small batch of pink macarons to go along with a verrine of Meyer lemon curd and chamomille – vanilla bean mousse. Then with the leftover macarons, I made the tarts. I think the mud cake cookie sandwiches were in their right place though. Imagine that!! See…discombobulated again.
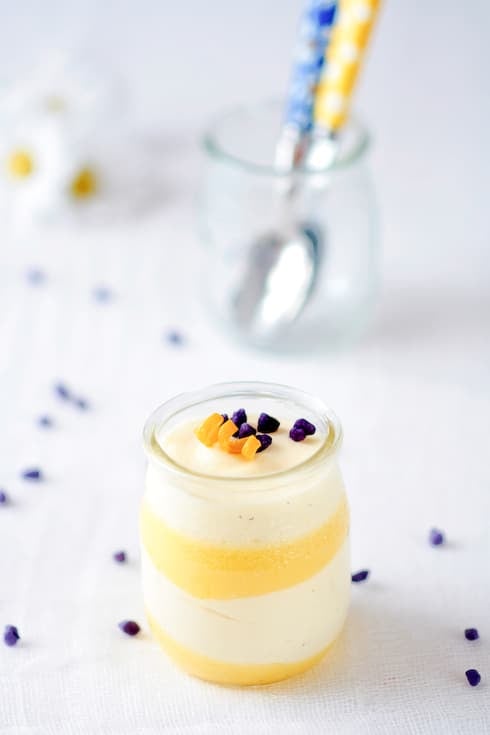
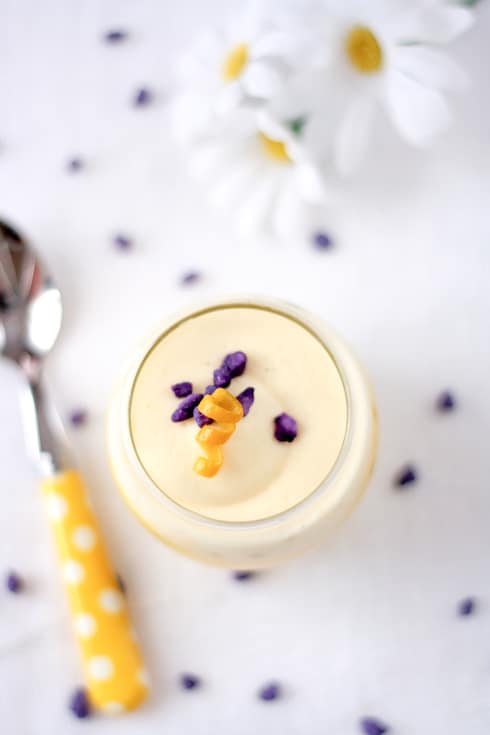
With one celiac at home right now, there have been a lot of cremes brulee, cremes caramel, macarons and mousses for desserts. Gluten does sneak everywhere but so far I have been able to keep everybody’s sweet tooth happy and healthy. We love citrus. We love colors. We love Spring. I especially love yellow if it is in the form of lemon curd. I am not sure Meyer lemons will be around here much longer so I have been juicing, zesting and freezing away!
Meyer lemons always have a slight cardamom note to me and the curd was very aromatic on its own, but took on a whole other dimension when layered with silky smooth mousse. The mousse itself starts with a pate a bombe which is lightly infused with chamomille leaves and vanilla bean seeds and lighten with some whipped cream. My lovely sister in law sent over a bottle of violet sugar pearls that I sprinkled on top of the verrines. It added a wonderful light flowery Spring note to the verrine and I am looking forward to using it again.
Meyer Lemon Curd and Chamomille Vanilla Mousse Verrine Recipe:
For the Meyer Lemon Curd:
½ cup (125 ml) lemon juice
1 tablespoon (4gr) lemon zest
1/2 cup (100gr) sugar
3 eggs
2 tablespoon (28gr) butter
In a saucepan set over medium heat, combine the lemon juice, zest and sugar and bring to a simmer. Stir occasionally to make sure the sugar is dissolved. In the meantime, whisk the eggs in a medium bowl just until combined. Once the lemon mixture is hot, slowly pour it over the eggs to temper, continuously whisking to prevent the eggs from scrambling. Return the mixture to the pan set over medium low heat and cook until thick. Do not let it come to a full boil or it might separate. Remove from the heat, stir in the butter and whisk until it is fully melted. Cover the surface with plastic wrap to prevent a skin from forming and let cool to room temperature.
For the chamomille-vanilla bean mousse:
3 egg yolks
pinch of salt
1 1/2 teaspoons powdered gelatin
1/4 cup (60ml) cold water, divided
1/2 cup (100gr)sugar
1/4 cup chamomille buds (flowers), chopped
1/2 vanilla bean, split open and seeded
1 cup (250ml) heavy cream
In the bowl of a stand mixer, whisk the egg yolks and the salt. In a small bowl, sprinkle the gelatin over 2 tablespoons of water, and let it sit while you make the syrup base of the mousse.
Combine the sugar, chamomille leaves and the remaining 2 tablespoons of water in a heavy saucepan. Cover and bring to a rapid boil over medium high heat (prevents crystallization of the sugar on the side of the pan). Once the syrup comes to a boil, uncover and cook until the mixture reaches 238F.
Strain the leaves over a container with a spout, it will be easier to add to the yolks. Pour the syrup slowly and into a steady stream into the egg yolks with the machine running on medium high. Melt the gelatin in the microwave for 10 seconds or until dissolved. Add it to the yolk mixture along with the seeds from the vanilla bean and continue to whisk on medium high until it triples in volume and cools to room temperature.
In a separate bowl, whip the heavy cream to soft peaks. Add it to the mousse base and fold the two gently together. Pour the mousse in a pastry bag fitted with a plain tip (I use Ateco #807).
Layer the Meyer lemon curd and the mousse in jars or ramekins and refrigerate if not eaten right away.
I almost forgot…My mom agreed to be a guest blogger here. Yeah! She is however hesitating on what to make. So, which recipe would you like her to make: her famous "ratatouille" or a tart?