It’s been a week clearly balanced with working and nesting. I am heading out of town next week again to shoot Le Cordon Bleu cookbook and have been spending a good portion of my free time baking, cooking, preserving, etc.. I clearly manifested an intense homemaking phase which I believe to be only normal since I am incessantly on the go this summer.
I feel I won’t be touching ground for a while and spending time in the kitchen, mixing, kneading, chopping, gives me time to think, make plans, draw list, organize thoughts and priorities. Some good music in the background and the undivided attention of the pups and I spent a couple of days stocking the fridge and freezer with some good meals and treats for Bill to enjoy while I’m away.
I like to believe a sweet treat once in a while makes the distance a little more bearable (and thank you Skype inventor!). He also gets invited left and right everytime I go away, no matter how stocked up the fridge is. His parents, the neighbors, our close friends…They all seem to take pity on him! At least, I know he never arrives empty handed to a dinner…
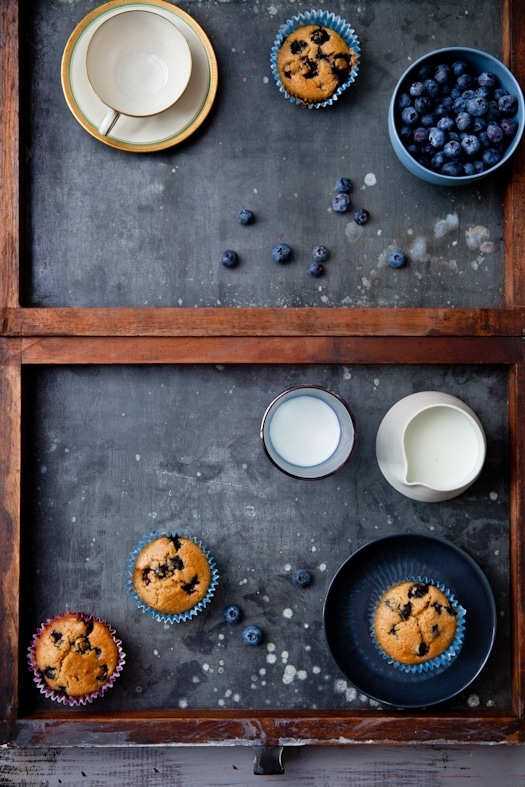
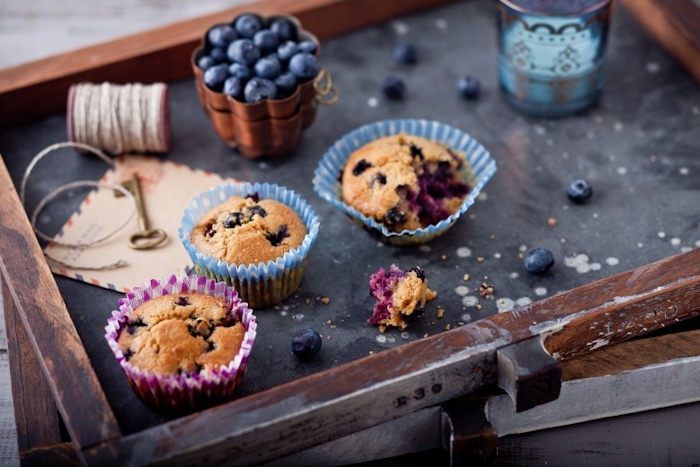
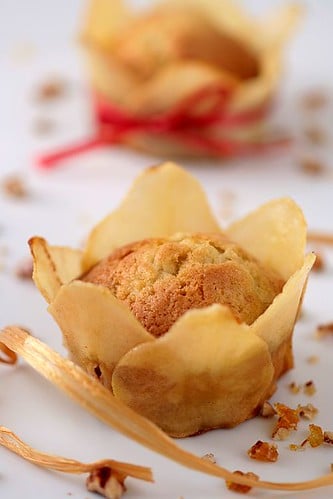
These little tea cakes may be the most simple things to bake but there is value in the essentials, the basics. I know that I can freeze plenty for us to have one morning over brunch, to keep in the fridge for a little four o’clock pick me up with a cup of tea. I can pack a couple in his bag before he heads to work in the morning. They are full of good nutrients, blueberries, coconut sugar, whole grains and the addition of Key limes provides just the right amount of pop from the limes.
Nothing like a good basic tea cake fresh out of the oven to make you feel like the chaos around you can indeed slow down…even if only for a few minutes.
Blueberry Key Lime Tea Cakes:
Makes 24 muffin size tea cakes.
Ingredients:
2 cups Jeanne’s gluten free flour mix (or cake flour)
2 teaspoons baking powder
1 teaspoon salt
1 cup whole milk
2 teaspoons vanilla extract
zest and juice of 6 Key limes (or 1 lime)
1 cup (2 sticks – 8 oz) unsalted butter, at room temperature
1 cups coconut sugar (or brown sugar)
4 large eggs
2 cups blueberries
Directions;
Preheat the oven to 350F and line the inside of 24 muffin cups with cupcake or muffin liners. Grease with some melted butter or cooking spray. Set aside.
In a large bowl, combine the flour, baking powder and salt. Reserve.
In another large bowl or container, combine the milk, vanilla extracts, zest and juice from the Key limes (the milk will curdle but do not worry – it’s normal).
In the bowl of an electric mixer fitted with the paddle attachment, mix the butter and coconut sugar until smooth and creamy (medium high for about 3 minutes). Beat in the eggs, on slow speed, one at a time until everything looks well combined. The mixture won’t be smooth but make sure all the eggs look mixed in.
On low speed, beat in the flour mixture alternately with milk mixture in 3 additions, just until the batter comes together. Fold in blueberries with a spatula and give the batter another 10-12 strokes to finish mixing it all together. Divide the batter equally among the muffin tins.
Bake for about 25 minutes or until a knife inserted near the center comes out free of raw batter.
I love this time of year for so many reasons. They hit me with a bit of nostalgia in the afternoon but they all revolve around the same flavors and scents. I found myself humming our favorite Christmas story. He caught me starring at the skyline while my mom was describing the snow back home. He noticed I let the cardamom pods linger on the countertop a little while. That’s the holidays too. So I close my eyes and just imagine.
Chocolate. Thick as ganache and strong as coffee hot chocolate. Cardamom. My mom’s Swedish cardamom rolls, Roasted chestnuts. Piping hot snack we would get on the streets of Paris while visiting my grandparents. Oolong tea. The perfect cup to warm you up in the afternoon. Clementines and kumquats. One of my favorite Winter dessert.
A yogurt and a clementine or a handful of kumquats was by far the most common dessert at our house during Winter. My mom has this gigantic wooden fruit bowl for everyday dinners that I love. Not because of what it is but because of what it promises. Comes Winter and it is a cornucopia of lychees, citrus, pears, nuts and dates. Snapping the citrus skin to smell their natural oils to feel instantly energized was however my favorite part.
With all the hustle and bustle of the holidays, it only took a glance over the kumquats at the store to instantly feel the promises of clean, fresh and vibrant desserts. It brought about the biggest skip in my step and the urge to come home and start baking. I know, I know…it’s all about the chocolate this time of year but I got to tell you, after rolling 3 pounds of truffles, I needed a break.
I started slicing and seeding a couple of pints of kumquats and was almost instantly transported back to my parents' home. I had no idea what I was going to make for sure. I only had the beginning of a plan you see. My mind had stopped at poached kumquats. Once I had done those, I started popping them in my mouth like they were candies and figured I’d better come with a plan fast or there would not be many left to share with B.
Fate would have it that I had decided to explore some of my favorite dessert book again and had bookmarked pretty much the entire citrus section in Hidemi Sugino’s The Dessert Book. I can easily bookmark all the recipes in the book actually. There are handful of pastry chefs I would follow blindly in the kitchen. Sugino is definitely one of them. His desserts are clean and yet complex, refined and yet simple. His recipe bring out the inquisitive quality of each of us and makes you wan to imagine dishes like he did.
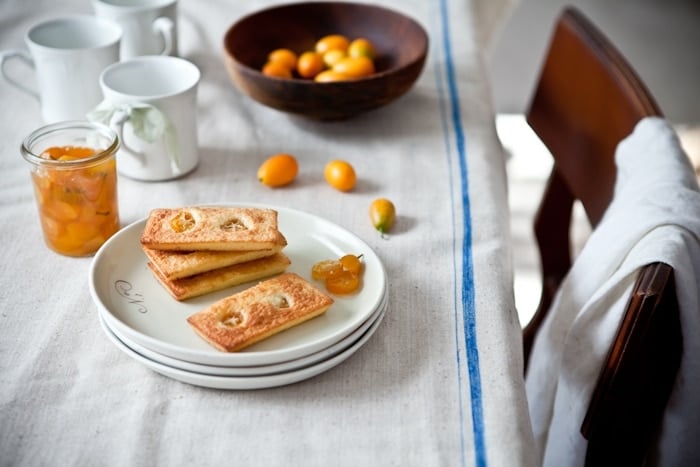
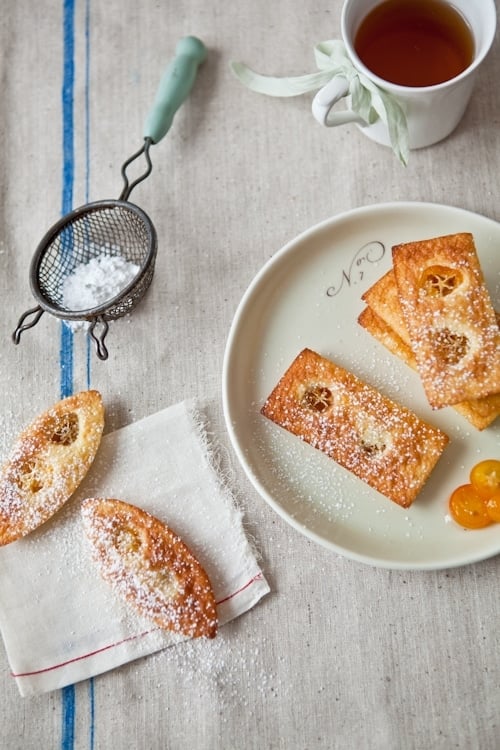
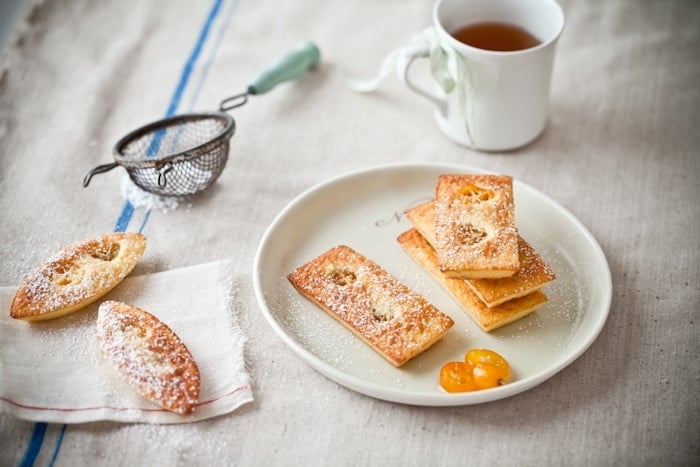
My mind quickly settled on a promising recipe for little tea cakes chock full of kumquat compote, poached kumquats and almonds. The compote is made by poaching sliced kumquats until tender and pureeing the whole thing, rind and pulp, together which adds the perfect hint of bitterness to cut down the sweetness of the cakes. Every bite makes made us slow down, close our eyes and just sigh.
Because we wholeheartedly approve. Hope you do to!
Kumquats and Almond Tea Cakes, adapted from Hidemi Sugino:
Makes 12
For the cakes:
1/2 cup (70gr) millet flour
1 teaspoon baking powder
pinch of salt
1 stick (113gr) unsalted butter at room temperature
1 1/4 cup (150gr) powdered sugar, unsifted
4 medium eggs
1 cup (100gr) ground almonds
1/2 cup reserved kumquat compote (recipe follows)
Sift together the flour, baking powder and salt. Reserve.
Butter the insides of cake tins (your preference) and place on a baking sheet. Reserve.
Heat the oven to 350F.
In the bowl of an electric mixer fitted with the paddle attachment, beat the butter and powdered sugar. Add the eggs, one at a time, beating well after each addition. Add the flour mixture and ground almonds and mix another 30 seconds. Fold in the kumquat compote with a spatula. Divide the batter in between your prepared tins, top with either fresh or poached kumquat slices and bake for 10-15 minutes until golden brown(the larger the tins the more baking time will be needed)
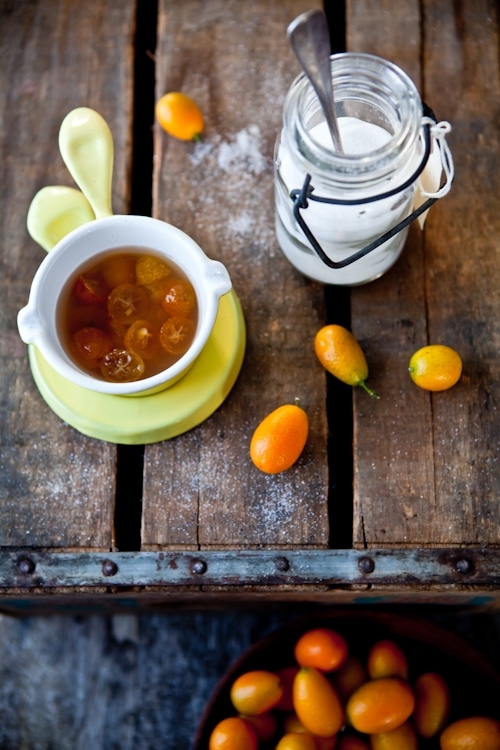
For the kumquat compote:
1 cup kumquats, halved and seeded
1 cup sugar
3/4 cup water
Place the kumquats, sugar and water in medium saucepan over medium high heat and slowly bring to a boil, stirring to dissolve the sugar. Turn the heat down and simmer for about 10 minutes, covered, until the kumquats are translucent. Remove from the heat and cool to room temperature.
Once cooled, drain the kumquats from the syrup, reserve a few slices and puree in a food processor adding 2 tablespoons to 1/4 cup of the reserved syrup as you go along. (it should look and feel like thick marmelade). Reserve.
Many days of the week, I wish I could just call up my friend Bina to come and have tea or coffee with me. I know my afternoons have never been sweeter as since she shared her Mava Cakes recipe with us. I am very fond of a little tea break and I am very fond of Bina. We "met" when she emailed about her macarons issues. We just went through every problem, one by one, laughing along the way. Like with most friendships, it is difficult to explain how the pieces of the puzzle just fell into place. We started sharing a bit more each day, her about India and me about France.
We finally met in person and confirmed our friendship went deeper than a computer screen. We cook the same way, from memory, from family, for others, always worried people are going to enjoy themselves and have enough. Our cultures are miles away from each other and yet we relate by cooking like our ancestors did. Our way to keep alive the generations before us and pass it on to the ones after us.
Bina is funny, talented, attentive and generous. There is no better guide than her when going grocery shopping at an Indian grocery store which is precisely what I did on my last visit. A lot of dishes and treats were mentionned on that last trip but nothing prepared me to the little box she sent me last month.
"I am sending you some mava cakes I just made. It’s a recipe I have been working on for a while". As soon as the package arrived, I ripped the wrapping to shreds and stared at the container, wondering if I should wait on B. to sample one. I did not, and a moment of sheer bliss quickly followed. I started counting the mini cakes wondering how many I could eat before B. would find it strange she sent so little…
Hints of butter, milk and cardamom hit me all at once sending my senses in a very happy dance. I quickly shut the box closed and sent her an email "please, please, please, tell me how to make those! What’s the story behind them? What’s mava?"
Turns out mava is a reduction of milk and/or cream that gives a thick spread complementing the butter and other ingredients in the cakes. Her recipe calls for evaporated milk and heavy cream and I am sure there are others out there but this is the one that makes Bina feel closest to home and that sounds perfect to me! On a side note, she tops hers with cashew halves but I ran out on my last batch and plopped a pitted cherried right in the middle instead.
Thank you dear Bina for adding your words and memories to this post. I am just the one telling people "you must make this!".
Mava cakes bring back all the wonderful memories I have of growing up in Mumbai– my family, friends, college, monsoons, red double-decker buses, Marine Drive, amazing food, wonderful bakeries…
The bakeries were not the trendy places more common now, but simple Irani/Parsi ones which had the best mava cakes! Our family favorite was the City Bakery which was a ‘must-stop’ for us, often around 5 am, on our way back from the airport after helping a friend or relative catch an international flight (which always left at some crazy hour like 3 am!). The city always looked so quiet and peaceful at that hour and as we approached the bakery, we would be greeted with the amazing aroma of freshly baked bread. Next to the breads, piled high on a tray were the mava cakes. Not particularly impressive to look at, plain looking almost, occasionally dressed with a sprinkle of cashews or almonds. One bite of these delicious cakes was all it took to get hooked! We would return with our stash of baked goodies and sit in our balcony overlooking the Arabian Sea, sipping hot tea and munching on these cakes, watching the sky get brighter. Home for me is now over here but whenever I make these cakes, I feel like I am back on that balcony and that always makes me smile.
Mava Cakes:
Makes about 12-18 depending on the molds Notes: I used canele molds but feel free to use anything that you have, like muffin tins or cupcake liners.
Make sure to use a large pot so the milk and cream cook down properly.
For the mava:
2 cans (14oz each) evaporated milk (not low fat)
1 cup (250ml) heavy cream
For the cakes:
1 1/4 cups (155gr) all purpose flour
1/2 teaspoon (2gr) baking powder
1/4 teaspoon cardamom
pinch of salt
1/2 cup (100gr) mava, at room temperature
6 tablespoons (85gr) unsalted butter, at room temperature
1 cup (100gr) sugar
2 eggs
6 tablespoons whole milk
cashew halves (optional)
Prepare the mava:
Place the evaporated milk and heavy cream in a large stainless steel pot or wide saucepan (12-inch) with tall sides. Bring the mixture to a boil over high heat. Reduce the heat to medium high and let it cook, stirring more than occasionally for about 10 minutes. Turn the heat to medium and let the mixture cook for another 10-15 minutes, stirring occasionally, until the mixture starts to thicken. Turn the heat to medium low and cook another 10 minutes. At this point, the mixture starts looking like a grainy butterscotch pudding. No worries, everything is going according to plan. Turn the heat down to low and continue cooking another 10-15 minutes. Do more than stirring occasionally there too: there is very little moisture left and the higher risks of scortching happen at that point.
The whole process should take about 50 minutes, pay close attention to the mixture during the first and last 10 minutes of cooking. The final consistency is that of a very thick pudding.
Let cool to room temperature. Refrigerate if not using right away. The mava can also be frozen for up to 3 months. With this mava recipe, you have 3/4 cup to 1 cup of mava, enough for 3 batches of cakes.
Prepare the cakes:
Preheat the oven to 350 and position a rack in the middle. Lightly spray with cooking spray (or brush with melted butter) small cupcake, muffin tins or other mini cake moulds. Set aside.
In a large bowl, stir together the flour, baking powder, cardamom and salt. Reserve. In a stand mixer fitted with the paddle attachment (or with hand held beaters), beat together the mava, butter and sugar at medium speed until light and fluffy. Turn the speed to low and add the eggs, one at a time and beating well after each addition. Still with the motor running on low, add the reserved flour mixture and the milk. Turn the speed back up to medium and beat until the mixture is smooth. Divide evenly among the prepared cake tins, top each with a cashew half if using and bake for 20-25minutes.
I’d like to dedicate this post to another great lady, Bri who passed away last night. My sincere condolences to her husband and her family.
A post I was reading the other week prompted me to take out my grandmother’s china and silverware out of their cases and bring them to life for a little while. The time of a dessert, a picture or a post. The time of a memory I might give my mother about a certain time in her past. I know I’ll never be as creative as Pia in styling and setting the mood for the pieces I inherited but the moment was right to polish those spoons and dust off those cups.
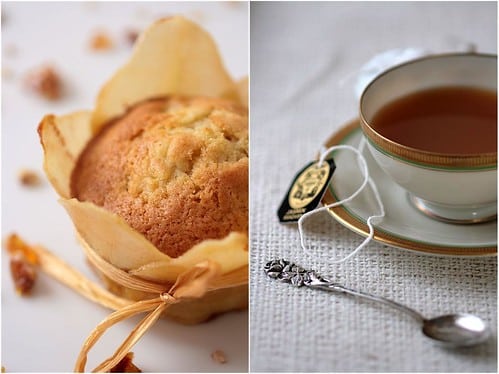
I started to take pictures of the spoons on their own and although pretty, something was missing. I made some tea and hoped that the smell and relaxing atmosphere would inspire me a little. It was allright…not bad, there was still that little "je ne sais quoi" missing. I took a step back and tried to remember the last time I had seen my grandmother use those pieces. Had I? Ever? No, not really….So I tried to imagine grandma holding that cup of tea in one hand, swirling her sugar and lemon slice, spoon in the other. That’s when it hit me! Cake! The one thing missing was one of my grandmother’s tea cakes!
I cannot remember a day without going to her house for a 4 o’clock cup of tea and a slice of cake! There was never a shortage of pretty china and silverware, although I strongly suspect she had secretively put these cups and spoons away for me. Yes, they are just things….and they fell on my lap pretty much the same way they did on hers: they were all handed down from many women before me. If they weren’t in our family, well eh, no big deal. But they are, and they are old, and they speak a little bit of my past and the women in the family every time I take them out, to me it is a big deal. I find it magical that every time I look at them, I can’t wait for 4 o’clock to come around so I can make myself a cup of tea and have some cake.
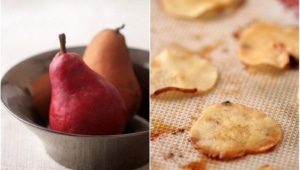
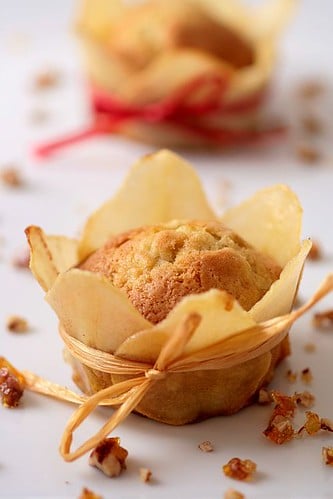
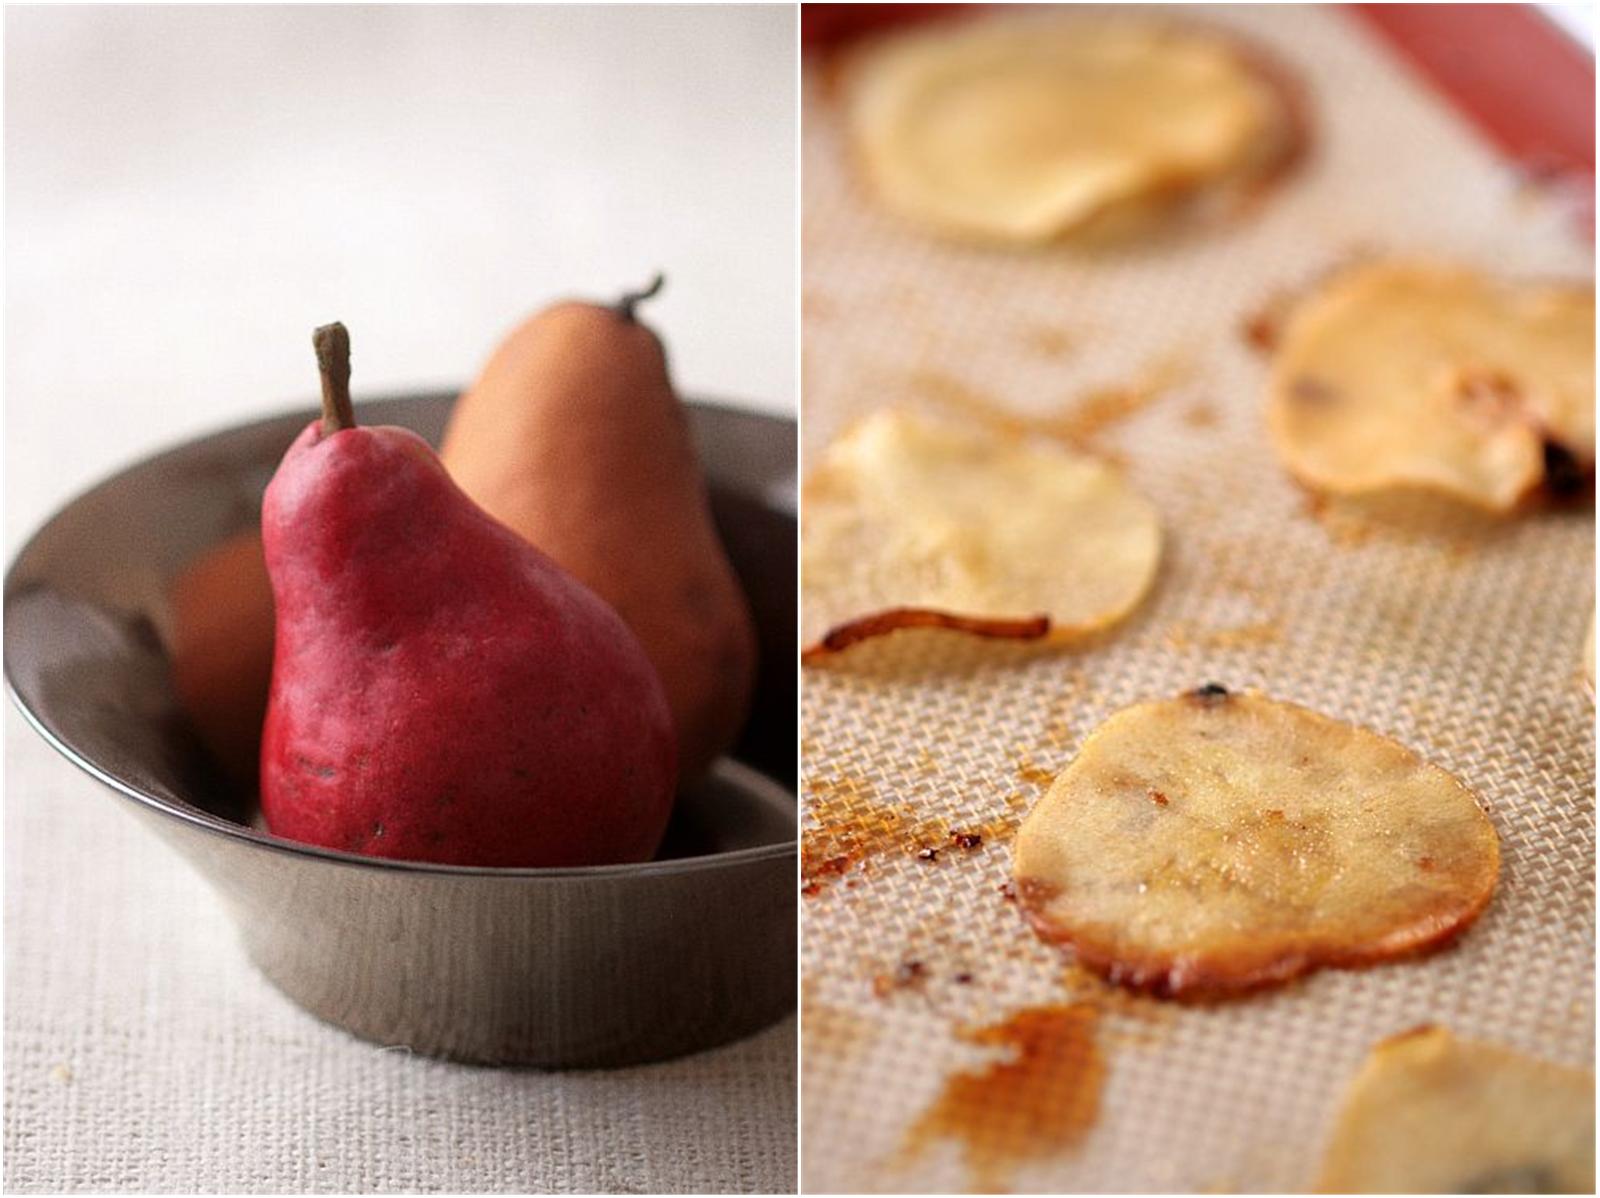
I started to think about the cake that would reflect the mood around grandma’s table at tea time. Tense! Really! It seems like we were always planning some kind of event, party, celebration, vacation..something. It was also very warm and playful. Mamie Paulette was indeed a study in contradictions. Tense, but with a great sense of humor and a joyous personality. Those little pear and pecan cakes with their little skirt of roasted pear slices are just that. They are a little tense if you don’t bake often but they do not require major scientific knowledge (we all know I would not be baking them if they did!), no intricate technique (nothing wrong with that, just short on time these days!), or special ingredients (nothing wrong here either, grandma just happened to love pears). They also tend to look like roses….like the ones on grandma’s little spoons.
The pear cakes start with a basic cake batter in which I threw chunks of pears and chopped pecans but feel free to use the same dessert with plums, apples, peaches, etc…. For the pear slices, make sure to cut them thin and choose pears of the same size if you can. Slice them first and use the end pieces and short slices, chopped, in the cakes. I used regular size muffin pans but one cup capacity ramequins or baking dished work well too. The tense part of the dessert comes when you position the pear slices around the cakes. Arm yourself with patience and have some bakery twine or rafia strings close by, wrap them around the slices, tie them up and let the cakes sit for 20 minutes. After that time, you can either remove the twine if you think you guests won’t like it, and the slices will stick to the sides of the cakes on their own, of if your friends like ribbons as much as mine do, by all means, leave them be. Well, I did use some hot sugar (I guess I can’t help myself) as I sprinkled some pecan praline on the plates before serving, but you can skip that step of course.
Pear And Pecan Tea Cakes With Pecan Praline:
Makes 8 muffin size tea cakes.
For the roasted pear slices:
8 pears
1/3 cup of sugar
Preheat the oven to 300F. Peel the pears and cut them in thin slices. Reserve the small slices and meaty pieces from what is left on the stem for the cake batter. Place the pear slices on parchment line baking sheet and sprinkle them with the sugar. Bake for 15 minutes or until golden brown. Remove from the oven and let cool.
For the tea cakes:
1/2 cup sugar
1/2 cup olive oil
1 egg
1 1/2 cups all purpose flour
1/2 teaspoon baking soda
1/2 teaspoon cinnamon
1/4 cup milk
1/3 cup pecans, coarsely chopped
remnant pear slices and pieces from the pears used in the previous step, chopped, plus more if needed to make one cup.
In a mixer, combine the sugar, oil, and egg and whisk with the paddle attachment until light and fluffy. Add the flour, baking soda and cinnamon and whisk until the batter starts to come together. Add the milk and whisk until smooth. By hand, fold in the pecans and pears. Divide the batter evenly among 8 muffin cups sprayed with cooking spray and bake at 350F for 15-20 minutes, until a toothpick inserted in the middle comes back free of crumbs. Let cool.
Arrange the cooled roasted pear slices around the cake and secure with bakery twine (use butcher twine if you don’t plan on serving them tied up). Refrigerate if not ready to serve within the hour. All the elements will keep fine for 3 days in the fridge but they are easier to assemble and nicer to eat at room temperature.
For the pecan praline:
1/2 cup sugar
3/4 cup chopped pecans
Place the pecans on a baking sheet covered with parchment paper or a silicone mat. Place the sugar and 2 tablespoons of water in a heavy saucepan on high heat and cook until you get a golden caramel. Immediately pour it over the pecans and let sit until cold and hard. Chop into small pieces.
I know I am not the only one in this case and it might come as no surprise to you if I say that my husband rarely reads my blog. It’s not that he does not care but I talk about the post the moment I make the cake, dessert, pastry, etc…so by the time I take the said dessert out of the oven or off the stove, he already knows what I am going to write and talk about. You can imagine that the last post about the "faisselle" my father loves so much brought back a lot of memories and we spent a couple of evenings reminiscing about our childhood favorite summers.
It made me realize that I was a deeply nostalgic person, but not a sad nostalgic always wishing it were still the good old days. No, I am a content nostalgic. Memories appease me, wrap me up like a soft blanket and give me a sense of direction. It is hard to find the calm when words and events hurt you or saddened you and instead I try to find a way to let them in, to let them show me a missing key to that big puzzle that is life. August is a tough month for me, remembering my grandmother and my brother, missing granpa’s 98th birthday and as he said himself "statistics start to look less and less optimistic at that age"…now that just about cracked me up! But I have found comfort in continuity as I was observing C’s twins playing in the creek, fishing, riding their bikes through the neighborhood, perpetrating the same pranks and tricks we used to do with my cousins at the same age.
Some people need to touch things to feel connected, to visit places again…I can’t do any of that. I did not bring "things" to the US, just two suitcases, I can’t go home for a long weekend escapade. But I can remember and talk and with this grew my ever growing love for interactions with people. I am not one of those intruding neighbors always poking my head through the fence or stopping whomever and whatever on the street just to have a conversation. No, I am not saying I am shy either…I just think my brain is always turned on to the "outside/out there" mode. This may not be news for you, but after so many years, I feel actually quite wise (hmm, hmm!) that I have discovered one of my inner mechanisms: memories ground me in being and taking in the present.
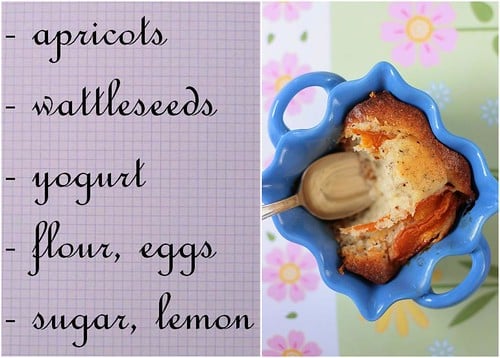
When I wrote this post, one new(er) terrific blogger, Christy, emailed me with concerns and questions about moving far away from "home". We emailed back and forth and I tried to reassure her that it is looks more daunting that it actually is. With a good head on your shoulder, a sense of curiosity, an open mind and a good smile, (ok that is the condensed version of the expat "must haves"), it all goes pretty smoothly. She insisted on sending me something as a thank you for answering her questions and since she lives in Australia I thought about light stuff that would not cost her an arm and a leg to ship: the famous Tim Tam cookies, (check her generosity) and ground wattleseed.
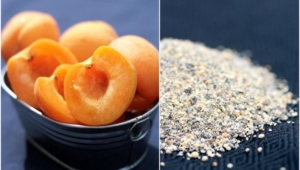
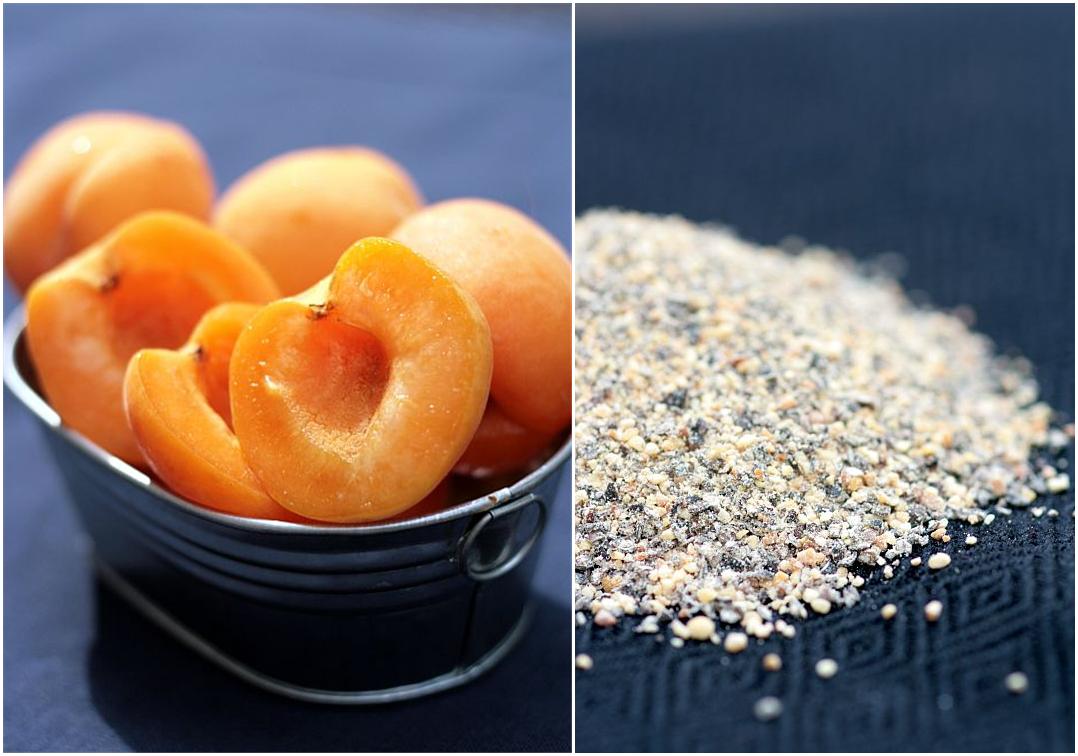
Wattle – what? Ha! I blame my Aussie neighbor Liz down the street for that one since she was listing its origins, properties and many different uses. Wattleseed refers to the edible seeds from Australia Acacia (loose term because they are over 100 varieties), and ground acacia flour known as wattleseeds is not only use in baked goods, but also as a replacement for coffee or chocolate, nuts. Moreover it is completely gluten free, has a low glycemic index but a high nutritious content. I just wished they’d sell it by the bucket here because from the moment I took some tiny granules to my nose I was hooked. Nutty and toasty like hazelnuts with a texture similar to ground flax seeds. Guess after the tomatoes and ever growing wild lemongrass I will be growing acacia next!!
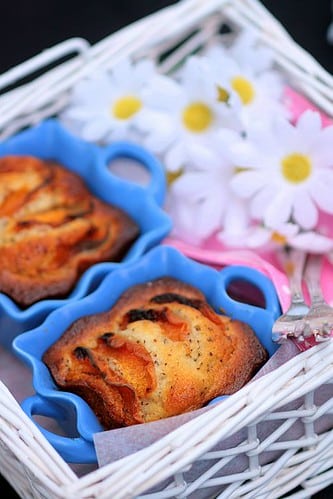
It did not take me long, once I tried tasted a tiny little bit, to figure out how I wanted to use them. That nutty aromas is perfect with juicy apricots and the flour aspect of wattleseeds made me think of tea cakes and substituting some of the all purpose flour with it. Next thought was about the kind of tea cakes I wanted. In my family, Sunday lunches often turned into tea times with my aunt Agnes famous yogurt cake. You can guess that tea breaks inevitably turned into light dinners before my grandparents would send everybody in their respective abodes…lucky us we lived next door! See…memories…So yogurt cake it was, with apricots, wattleseeds and the usual yogurt cake suspects (say that 3 times fast). The result was just the softest, nuttiest, apricot-est mini bites we had Sunday afternoon while the twins were playing fetch with Bailey who was too hot to be bothered!
Apricot And Wattleseeds Tea Cakes:
Makes about 12 (can be made in any dish/mold you have like regular muffin tins)
6 apricots
2 large eggs
6 oz (on standard US container) (about 180 gr) whole milk plain unsweetened yogurt
1/2 cup sugar (100g)
zest of one lemon
1/3 cup (80ml) vegetable or olive oil
1 1/2 cups all-purpose flour
1/2 cup (115gr) ground wattleseeds
1 1/2 teaspoon baking powder
1 teaspoon pure vanilla extract
1/4 Tb lemon juice
Preheat your oven to 350° F, spray a muffin pan or 12 molds of your preference with cooking spray and set aside while you prepare the cake batter.
Cut the apricot in half and slice each half in thin slices, you will use about one half for each tea cake. Set aside. In the bowl of a stand mixer fitted with the paddle attachment, whip the eggs and sugar until pale. Add the yogurt, oil, vanilla, lemon zest and juice. Whip to combine and add the flour, wattleseeds and baking powder. Whip on medium speed for 30 seconds to make sure all the ingredients are combined and the batter is smooth. Scrape the bottom of your bowl if necessary and give the batter another 10 seconds whirl. Do not overwork the batter or your cake will turn out gummy. Divide the batter into the prepared tins, arrange the apricot slices on top and bake for 30 to 35 minutes, until a cake tester (skewer or tip of your knife) inserted in the center comes out clean. Let stand for ten minutes, and transfer onto a rack to cool.
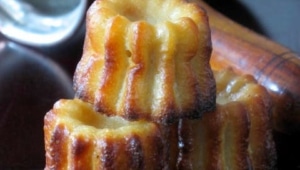
A lot has been said about Canneles [kah-nuh-leh] : they taste like a fudgy bite of crepe, they are moist on the inside and crispy on the outside, they have a faint hint of rum, etc… I need to add that they are hands down good and truly addictive! I am on batch number 3 and the neighbors only got to try a dozen…Yes, my name is Tartelette and I am a canneles addict.
Actually, I am blaming Veronica for this week’s thigh expansion! You see, every Sunday I tutor her in French for an hour and we usually start our lesson with a rundown of the recipes we tried the past week and we end it with a exchange of the recipes we plan on trying. This past Sunday we prolonged the hour by talking baking resources online, utensils and molds. It reminded me of the silicone canneles molds my parents brought me last September that had not been used yet. Tragedy!!! So you all can guess what I did right after we said goodbye…and again the next night!
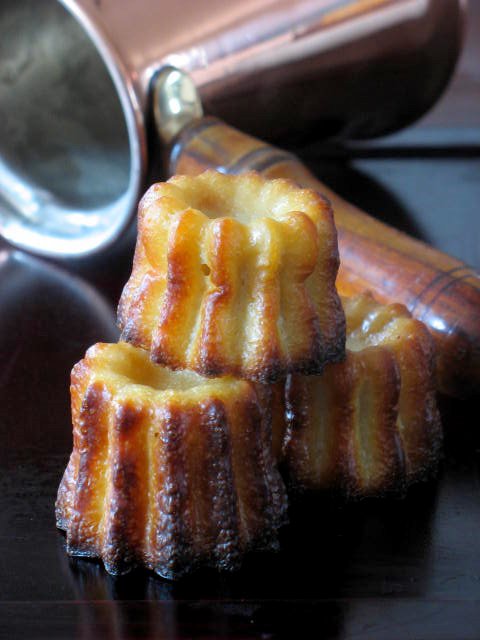
I blogged about Canneles last year when I could not wait to get the proper molds and decided to use muffin tins. The experience was successful, after all, appearances are one thing, taste is what matters. However, I could not resist their dainty cute shape and decided to rework the first recipe I made. They are a specialty from the South West town of Bordeaux, but you can bet that good as they are they finally made their way to most bakeries in France, especially Paris. When we were home last year, we got half a dozen (come on people, that’s three each! See, I can show restraint!!), from my favorite Patissier Gerard Mulot. I liked his a lot more than most I tried (and believe that for the sake of blogging I did try quite a many half dozen that time), because they retained their freshness the day after unlike most canneles out there. One characteristic of the canneles is that they crust while extremely buttery and crispy fresh from the oven will get moist and soft as the day goes by. Although I could eat an entire batch in one sitting, I was also attempting to share with the neighbors gathered on the patio! I suspected that a little bit more flour than usual would do the trick and I adapted the recipe accordingly. They were still best right out of the oven but even the next day, the moisture had not seeped out and the crust had remained beautifully crispy. Mission accomplished!
Most if not all pastry shops in France will coat the molds with beeswax as it does not burn at the high temperature they cook them in as fast as butter and sugar and gives the cakes a nice shiny crust. You can’t taste the beeswax at all, but I make canneles when the craving strikes me and I do not usually keep beeswax on hand, plus I was using silicone molds and not copper molds so I figured that part would not work the same! I reduced the oven temperature to avoid burning and bitter caramelization of the butter and sugar and that did the trick. I like canneles on the lighter color side, just my preference versus feeling like I am about to pop a morsel of coal in my mouth, but feel free to push the cooking time a little longer if you are so inclined. One last thing I strongly recommend is to refrigerate the batter at least 4-6 hours or to make it the night before. I started it at noon and we had them to go with coffee and cordials that evening. Funny thing is that I ran out of rum and used Calvados for the second batch…and people around me failed to understand the irony of making a Southern French treat with an alcohol from Normandy. Yes, I know, I am easily amused!
Canneles:
Makes 18 to 24 depending on your molds
750 milk (2 1/2 cups)
50 gr butter (2 TB)
3 eggs plus 3 egg yolks
200 gr granulated sugar (1 cup)
1 Tb vanilla extract
1/4 cup rum
155 gr flour (1 1/4 cups)
In a saucepan, bring the milk to a simmer, add the butter cut into dices. Mix well and let cool to lukewarm. In a bowl, mix the eggs, egg yolks, sugar and vanilla and whisk until foamy. Slowly add the rum and flour. Add the milk slowly and whisk until smooth. Pass it through a sieve if necessary. Let the batter rest in the fridge for a few hours or overnight. When the batter has rested, preheat the oven to 375F, position a rack in the center. Divide the batter evenly among the canneles molds, generously coated with cooking spray or well oiled if you use copper. Bake for 35-45 minutes. The will be scortching hot right out of the oven, so let them cool 20 minutes or so before enjoying them.
Note about the molds:
Last time they came my parents brought many of my favorite Demarle silicone pans (a bit pricey but so worth it) as well as a couple others they did not have on stock, called Moulflex, cheaper, bright red and a little bit lighter. I was skeptical but grateful at the same time as I did not want to pay for copper canneles molds…Oh trust me I could…they are so pretty and shiny…but I can’t justify such an expense to my beloved! The Moulflex ones worked like a charm! The only copper thing I owned is the hot chocolate pot in the top picture that I found at an antique store.
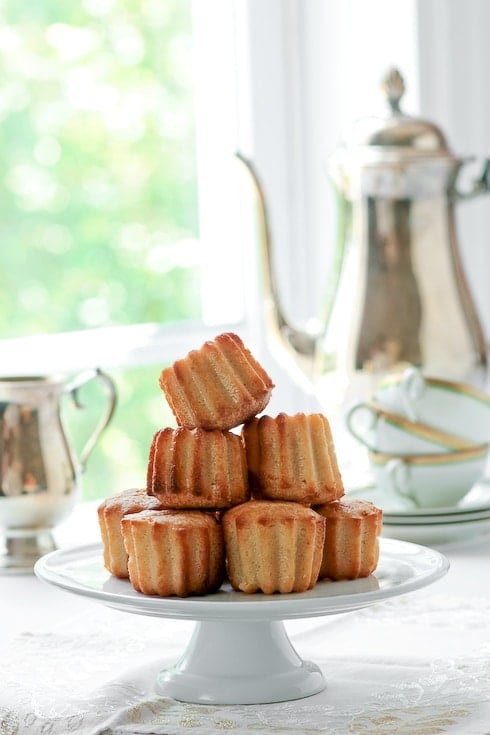
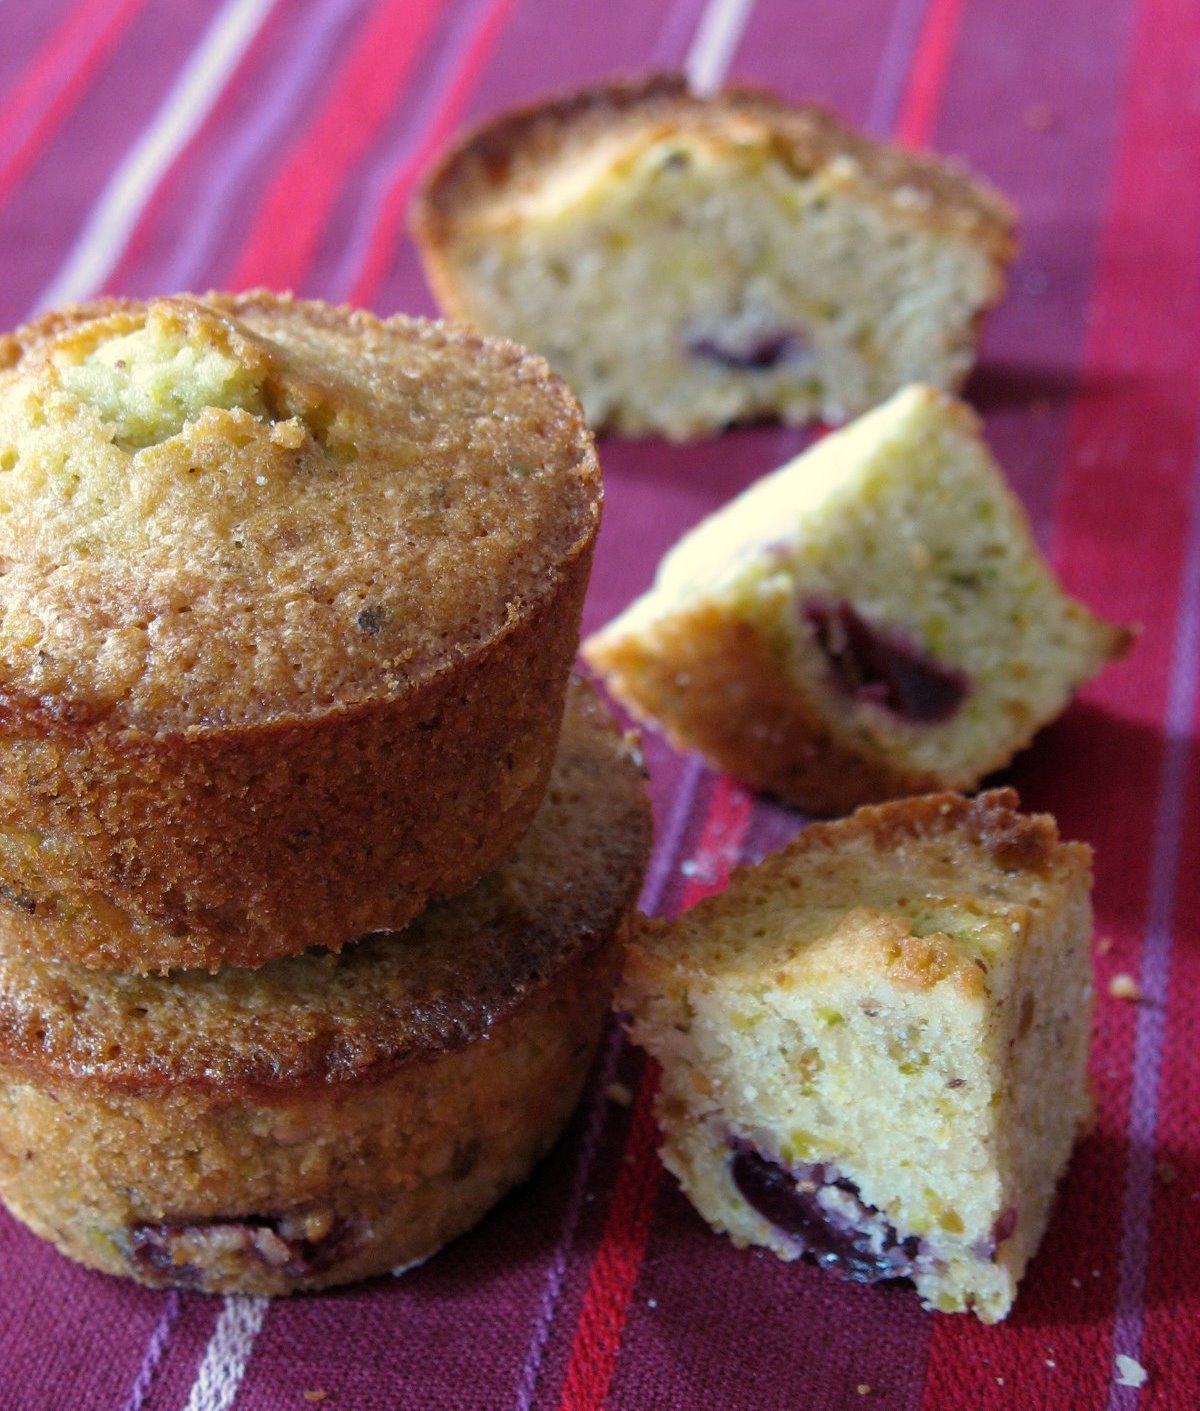
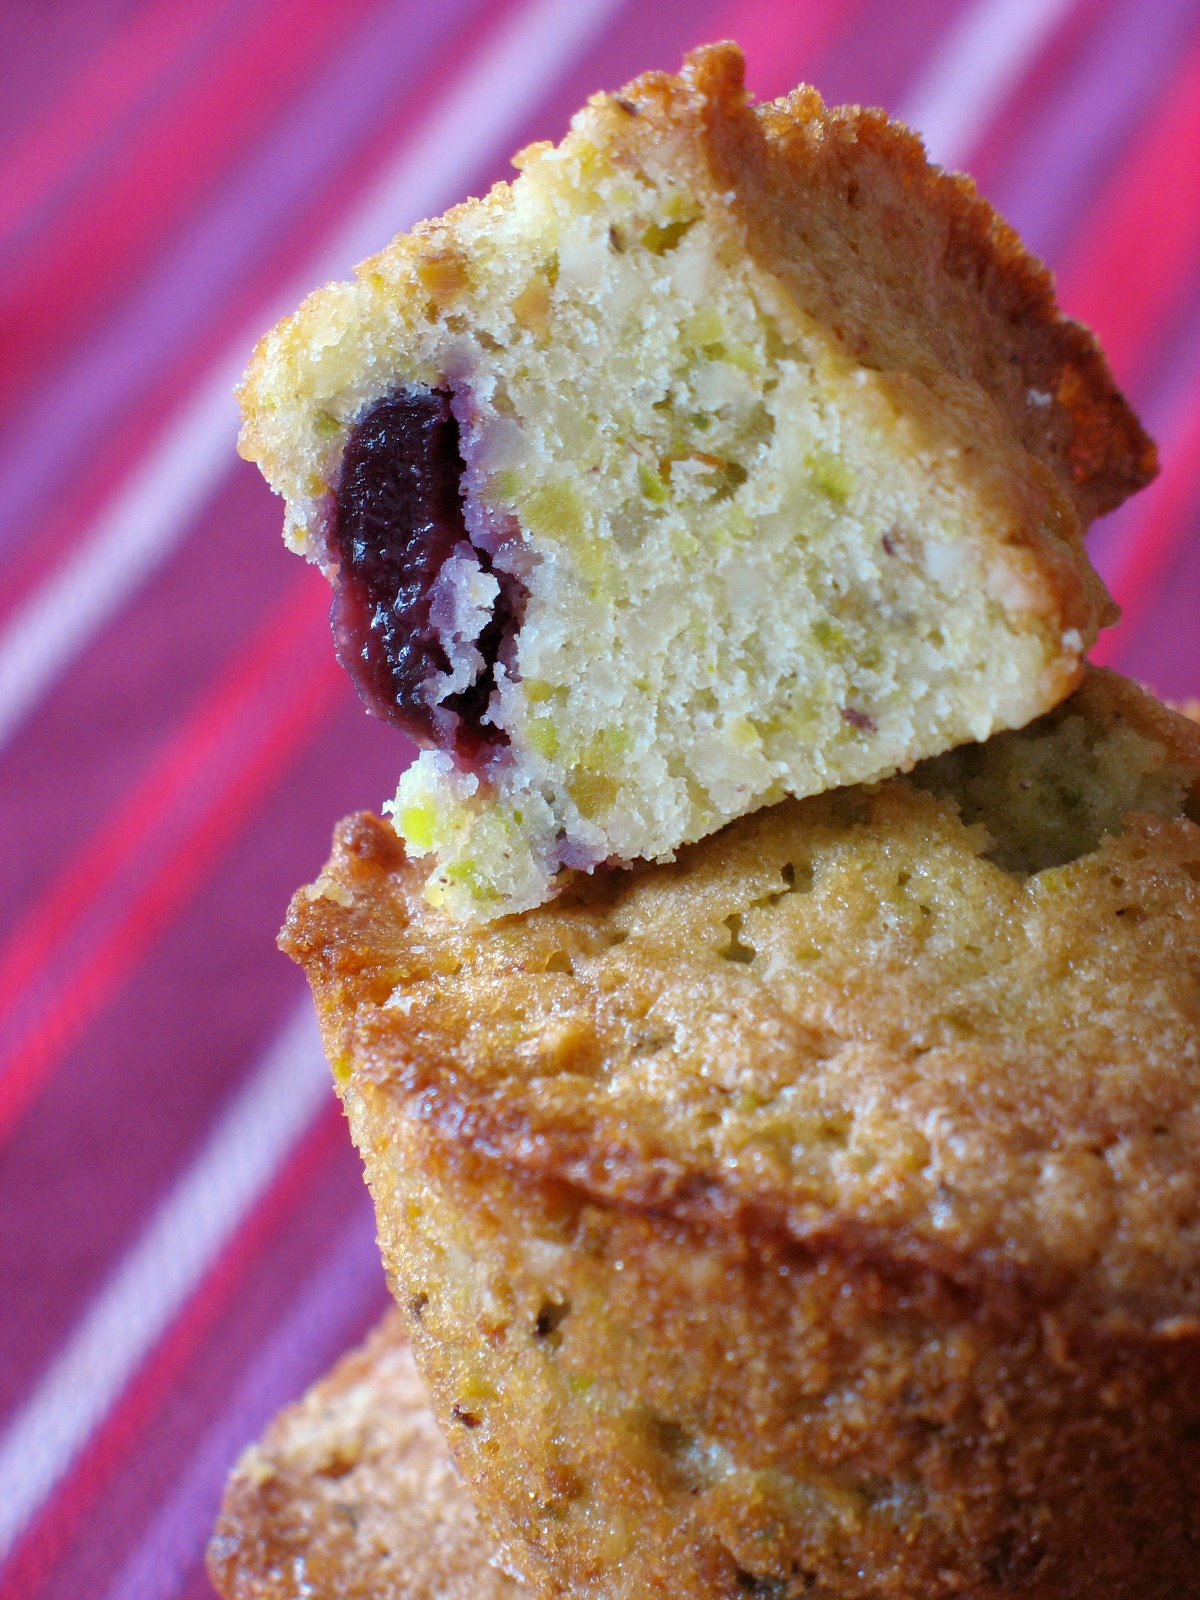
When I went home last Christmas, B. and I decided to spend 4 days in Paris alone and away from the family just to breathe a little and spend some time "en amoureux" (lovey-dovey). While we were walking our way through countless galleries and museums we also ate our fair share of pastries and scrumptious delicacies. One of them being the "cerisai" from Gerard Mullot, located in the 6th "arrondissement", a stone throw away from our hotel. I tried to duplicate that little cake as soon as I got home and although my first attempt did not rise to my expectations, this one came pretty close. The taste was there, the flavor too but I suspect that Mr. Mullot grinds his almonds and pistachios to a finer constistency, almost like powdered sugar.
I got an email last week from a reader asking for a recipe and some help in makeing financiers and especially chocolate kinds. I was actually reading her email while baking these…ah the powers of the internet!!! While one can easily find a lot of chocolate financiers recipe with a quick Google search, I shall, for the purpose of finding the best one for her, make a few batches in the coming weeks (twist my arm) and give you the details of my search/quest/homework.
So, dear Anora, I am not ignoring your request, but I am waiting until my guest leaves next week to devote myself 100% to your questions. In the meantime I hope you accept a token of my appreciation for your nice comment by offering you these.
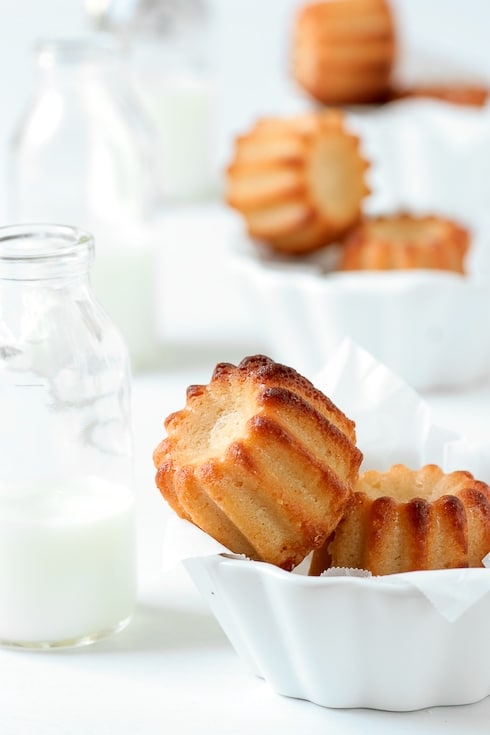
Financiers will keep well for up to 5 days, and they also freeze beautifully so it’s easy to make a big batch and keep some tucked away for impromptu guests. As a matter, these were made sunday night and Sophie has been impatiently waiting for her godmother to finally take some pics for the blog so she could have a couple. Well, the boy situation is a little iffy so I figured these with a good cup of coffee would help change her mind….and since I am not totally uncool, shoe shopping came next!
Pistachio Cherry Financiers , adapted from Foodie Froggy
Pre-heat oven 160°C (325°F).
In a mixing bowl, combine the almonds, pistachios, flour and sugar, using a whisk. Add melted butter and the orange blossom water. In another mixing bowl, beat the whites very slightly, with a whisk.
Add the whites to the pistachio/almond mixture.Mix well.
Fill up finanicer pans or muffin tins with half the batter. Drop 1 pitted cherry (2 halves) in the center and cover with the reamining batter.
Bake for 15 to 20 minutes, until slightly golden.