
ricotta

Heirloom Tomato Galette & Feeling At Home

Heirloom Tomato Galette


I was going to start this by saying that I had not married into a typical Southern family but to tell you the truth, I can’t think of one typical Southern home. Here in the South you can be from the Lowcountry, the Midlands or the Mountains. Three different ways of life, three different Southern twang lingering after each word. Three different ways of seeing the sun shine bright and to make a tomato pie.

Homemade Ricotta


I married into a Southern family with history and well, more history. My family is nomad in comparison with a history of adaptation, made colorful by the people in it and the countries we come from. I married a guy with a keen ability to retain only the goodness of the past to move into the present. He understands that I will adapt both our traditions to keep connected to my family and call his, my home. The Lowcountry does feel like home to me now. I have embraced its food, its ingredients, the seasons (sort of) that bring picnics at the beach in December and ripe juicy tomatoes in March. And tomato pies.

Heirloom Tomato Galette


I had never had a tomato pie until I met my mother in law. Actually, I met the pie first. Bill brought it to a picnic date and I also fell in love with my future family that day. If she wanted to tie me up to South Carolina through its culinary traditions, she had me at "another slice honey?" Juicy tomato slices in a buttery crust, happily nested in a creamy filling with plenty of basil, garlic and topped with a generous handful of sharp cheddar.

Heirloom Tomato Galette


Nothing that my doctor would be thrilled about. Nothing that my brain, deeply anchored in its own culinary ways, could compute. Nothing that I would admit craving as soon as Spring rolls around. And yet, I could not control my will power and had another generous slice. I felt completely and utterly happy, satisfied and calm. Giddy from my brain to my toes. From a tomato pie. Alright…and from the man before me.

Heirloom Tomato Galette


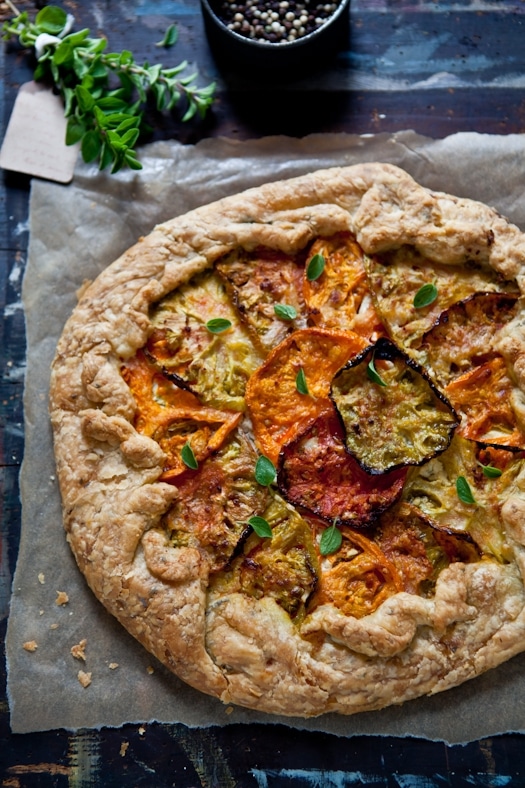
That very same day, I vowed to do something my grandmother and mother had advised years before: never ever, under any circumstance try to replicate that pie. I had now entered the potential "it’s not quite like when my mom makes it" territory. I ain’t no fool…Instead I decided to create my own version. The one adapting ingredients we have here to flavors and tastes from back home. A different approach to the same theme. A Tomato galette with homemade ricotta and plenty of oregano. A drizzle of olive oil and a sprinkle of parmesan.

Heirloom Tomato Galette


Heirloom Tomato Galette:

Serves 4 to 6:

Ingredients:
For the crust
:
1 1/4 cup Jeanne’s all purpose gluten free flour mix (or regular all purpose flour if not gluten free)
1/2 teaspoon salt
1/2 teaspoon dried oregano
110 gr cold butter (1 stick)
1/4 cup icy cold water

For the ricotta filling:
1 cup ricotta (I use this recipe to make homemade ricotta)
1 garlic clove, minced
1 tablespoon finely chopped fresh oregano

Topping:
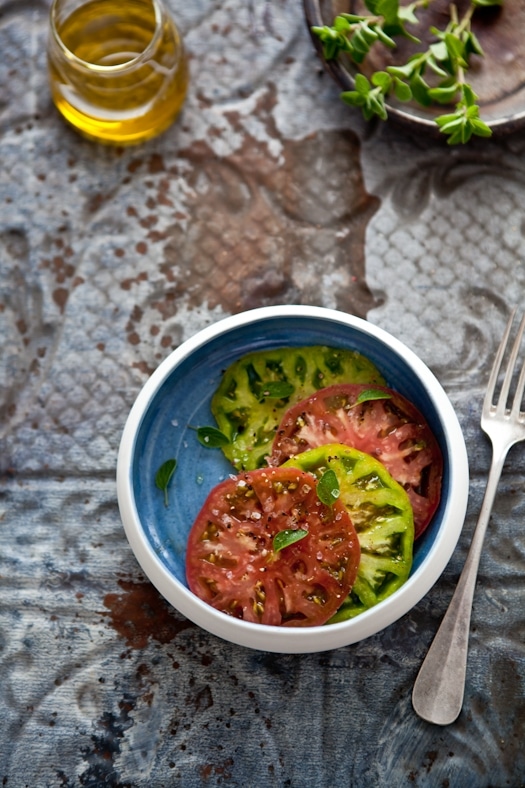
3 to 4 heirloom tomatoes
1 tablespoon parmesan
2 teaspoons olive oil

Directions:
Prepare the crust:

In the bowl of a food processor, (or follow the same instructions if doing by hand), pulse together the flour, salt and oregano until incorporated. Add the butter and pulse until the butter resembles small peas and is evenly incorporated. Gradually, stream in the cold water until the flour just comes together. Turn the mixture out onto your work surface and form into a 2-inch thick, round disk. Wrap with plastic wrap and refrigerate at least 30 minutes (or overnight) before rolling out.

Preheat the oven to 350F and position a rack in the center.

Prepare the filling:
In a large bowl, mix all the ingredients together and keep refrigerated until ready to use.
Slice the tomatoes and spread them out on layers of paper towels to drain some of their moisture out while you roll out the pastry.

On a large surface area, well floured, roll out the pastry dough to a 10-inch circle, spread the ricotta filling but not all the way to the edge. Leave a 2-inch border of pastry all around. Layer the tomatoes on top. Gather the edges of the pastry dough, pleating as you go with your fingertips (don’t worry about being even – these are free form. Imperfections are wonderful anyways…). Sprinkle the tomatoes with parmesan. Bake for about 40 to 50 minutes. Let cool slightly, drizzle with the olive oil, some more oregano and serve.

Cassata Alian Sicilian – Baking With Friends

Cassata Cake-Copyright©Tartelette 2008As promised, here is one of the desserts Chris and I tackled while she was visiting this past weekend, a Cassata Cake, as part of another Bakenista get together. I have to admit that I would have probably passed on this Bakenista shing-ding if Chris had not been in my kitchen. Not much time left for "fun baking-just because" these days and not much room left in the fridge for a big cake like this. We had not really planned to bake that early together again but it looks like the folks at King Arthur got word of our little Skype chats and got interested to check out how we were baking live while spread across the US. Halley, from the King Arthur Test Kitchens blended right in and seemed to enjoy the experience, and it seems that we were all trying to be on our best behaviour!!

From my end, the experience was even better since I had another Bakenista in the kitchen and Italian to boot…how fitting when making an Italian classic, isn’t it?! I hope that Chris posts her step by step pictures of the cake making while I post the finished product. We started around 9am, a littler earlier than our scheduled Skype chat, but we were aligning ourselves on "puppy time" and Bailey was falling back asleep then. It was a wonderful morning of tag teaming making the cake and working the keyboard to chat with the others. I started with the cake batter, I think… not that I am getting old or anything but between lack of sleep, puppies, and a rum soaking syrup at 10 am, I somehow found myself scratching my head at 4pm that I was still in my jammies! Chris prepared the ricotta, pistachio, and chocolate filling and layered the cake with it while I was trying to pull Bailey away from Tippy’s tail. When we looked at the clock, it was already noon…Wow…time does fly when you are having fun!!

While Chris was here, she asked me to give her a couple of lessons on basic pastry methods, like making macarons (her firsts and a success!), cream puffs (not her first but a little recap), dry sugar caramel (her fear), etc…Showing her the different consistency of things as we went along was a lot of fun. In spite of the humidity I made some caramel corkscrews to decorate the cake and to show her the right consistency to play easily with caramel and they lasted about the time of the photo shoot it was so humid. Later in the afternoon, I covered the cake with a stabilized whipped cream frosting and decorated it wishing she were still around to share a slice with us, not to mention that she was a fantastic and very patient photo assistant all weekend and somehow taking pictures of the cake without her felt kind of empty. Stay tuned for other installment of our baking fest!

Cassata Cake-Copyright©Tartelette 2008 The recipe for this Cassata Alian Sicilian comes from Dolce Italiano by Gina De Palma and originally includes orange zest and almond extract which we skipped as the filling was flavorful as is, spread on rum soaked cake trimmings so we figured it might be overkill. The icing called for is a basic powdered sugar icing but somehow that seemed super sweet to us so we decided to go for a simple whipped cream frosting stabilized with some gelatin…crucial in high humidity settings if you do not serve the cake right away so you avoid the risk of ending with a pool of water on your cake plate. It seems like a really long recipe but it is very detailed…granted it is not a cake you start at 5pm for dinner at 8pm, but it is extremely complicated and comes together quickly.

Cassata Alian Sicilian:

makes one 9-inch cake, 10 servings

Sponge Cake Layers:
2 cups bleached cake flour, sifted
2 teaspoons baking powder
1 teaspoon salt, plus a pinch
8 large eggs, separated
1 1/2 cups granulated sugar
2 teaspoons pure vanilla extract
1/2 cup (1 stick/4 ounces) unsalted butter, melted and cooled

Rum Soaking Syrup:
2 cups granulated sugary
3/4 cup cold water
1/2 cup rum

Cake Filling:
3 ounces bittersweet chocolate
3/4 cup shelled whole unsalted pistachios
3 cups fresh, whole-milk ricotta
1 cup confectioners' sugar, sifted
1/2 teaspoon ground cinnamon

Stabilized Whipped Cream Frosting:
2 cup heavy cream
1/4 cup powdered sugar
1 1/4 tsp powdered gelatin dissolved in 3 Tb. cold water

Preheat the oven to 350°F and position a rack in the center. Lightly grease two 9-by-2-inch round cake pans with butter or nonstick cooking spray, line them with parchment paper, then grease the parchment.
Sift together the cake flour, baking powder, and 1 teaspoon salt into a medium bowl and set aside.
In the bowl of an electric mixer fitted with the whisk attachment, beat the egg yolks and sugar on medium speed until very light and pale yellow in color and doubled in volume. Beat in the vanilla extract, followed by the melted butter. Transfer the egg mixture to a large, clean mixing bowl. Fold in the dry ingredient-quickly and lightly, stopping just before they are fully incorporated. Clean the whisk attachment and mixing bowl.
Place the egg whites and the pinch of salt in the cleaned bowl of the electric mixer. Using the whisk attachment on medium-high speed, beat the egg whites until firm peaks form. Fold the egg whites into the batter quickly and lightly, incorporate any streaks of dry ingredients that remain.

Evenly divide the batter between the prepared pans, rap the pans against the counter top to eliminate air bubbles. Bake for 35 to 40 minutes, or until they are golden brown, a cake tester inserted in the center comes out clean, and the cakes have begun to pull away from the sides of the pan. Allow the cakes to cool for 5 minutes in the pan, then carefully unmold and set them out to cool on a a wire rack.

While the cakes are cooling, prepare the rum syrup: In a medium saucepan, stir together the sugar, water, and rum. Place the saucepan over medium heat and bring the contents to a boil. Lower the heat and allow the syrup to simmer for 5 minutes. Remove from the heat and let it cool.

Filling: using a microplane or box grater, grate the chocolate into fine, feathery shreds. Using a sharp knife, finely chop the pistachios. Place the ricotta, confectioners' sugar, and cinnamon in the bowl of an electric mixer and, using the paddle attachment, beat until the ricotta is creamy and soft (it will remain slightly gritty due to its original consistency). Add the grated chocolate, chopped pistachios, and beat just until combined.

Assembling the cake: Have ready a 9-inch springform pan. Using a serrated knife, carefully split each cake layer in half horizontally to make four layers. Place one of the layers in the bottom of the pan and, using a pastry brush, moisten it generously and evenly with some of the rum syrup. Spread the cake layer evenly with one third of the ricotta mixture. Repeat twice with another cake layer, more of the rum syrup, and another third of the ricotta mixture. Place the final cake layer on top and generously brush with the rum syrup. Wrap the springform pan tightly in plastic wrap; this helps the layers fit snugly on top of each other. Chill the cake in the refrigerator for at least 4 hours or overnight.

Whipped Cream Frosting:
In the bowl of a stand mixer fitted with the whisk attachment, whip the cream with the sugar until soft peaks. In the meantime, dissolve the gelatin in the microwave for 10 seconds. Mine broke so I set the cup where the gelatin was in a large saucepan filled with a couple of inches of water, brought the water to a simmer and waited for the gelatin to melt. Slowly pour the gelatin in one steady stream over the whipped cream and continue to whip until firm. If you add your gelatin a little cooled and before the whipped cream is still at soft peaks stage, it should not clump on you.
Decorate your cake with the whipped cream and return the cake to the refrigerator to chill until you are ready to serve it, at least 3 hours.

Cassata Cake-Copyright©Tartelette 2008 So, who else is left with a huge hunka chunka of Cassata? Well, that would be Lisa, John, Ivonne, Stephanie, Ben, Kelly, Marcela. Chris can only look at her work and my hips are not too happy about that! It can easily serves 12, needless to say that after we kept a couple of slices for a little afternoon break, I took the rest to the neighbors! It is a special occasion cake but having Chris around was special enough to make me turn the oven on in the morning on a very hot day!

Words about friendship, even ones formed over the internet never rang truer learning about the sudden passing of one Daring Bakers, Sher from What Did You Eat? I can’t say I "knew" her but I was a fervent reader and loved her recipes and wit. You will be missed Sher and always remembered.

Cassata Cake-Copyright©Tartelette 2008