
redcurrants

Salmon Bisque & A Pistachio Pear Gratin

Salmon Bisque


I hope you all had a fantastic holiday weekend. We kept it low key having dinner with a good friend on Christmas Eve and with family on Sunday. Yesterday was spent with friends again over a light lunch and a relaxing afternoon.

Salmon Bisque


Thank you everyone for the sweet and kind words of condolences about my grandfather’s passing. It made this weekend a little easier to navigate. Oh there were tears, trust me…but they were immediately followed with a feeling of peace. My heart was full of all the goodness one can give and receive in a lifetime. Thank you again for your patience and care.

Salmon Bisque


Let me play Santa a little bit longer and announce the winners of the Christmas giveaway. I asked my dear and only to give me three numbers at random among all the valid entries. Yes, he’s my random number generator.
The two winners of Plate To Pixel are Jenny Mendes and Adrienne from A Big Mouthful.
The winner of Girl Hunter is Wen from Journal Through Lens. Congrats! Please send me your snail mail addresses at mytartelette AT gmail DOT com.

Now on to the recipes…

Pear Gratin


Every year at Christmas, smoked salmon has to be part of the appetizer offerings at my parents'. It’s tradition. Salmon, blinis and foie gras with brioche toasts. Since we started last week without any firm plans for Christmas Eve, I was making my own plans to prepare a nice dinner for two and relax on the back deck watching all the docks decorated with Christmas lights. A sight to be seen…for sure.

Pear Gratin


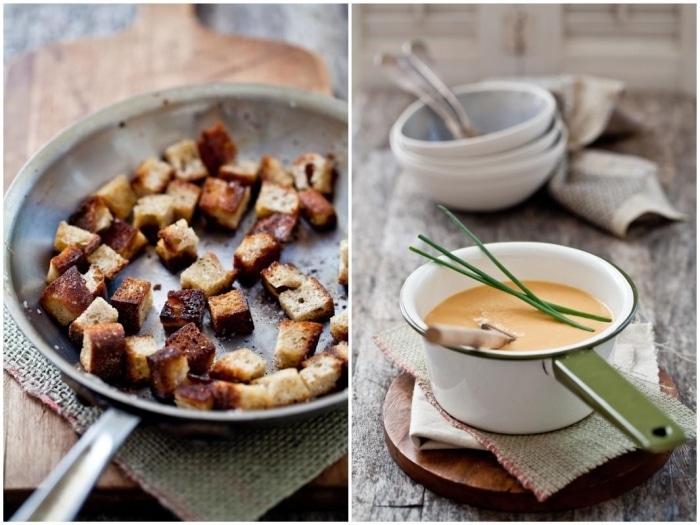
On the menu was a Salmon Bisque, followed by crab cakes and finished off with a Pistachio and Pear Gratin. As the soup was simmering, my inbox started buzzing and within minutes our plans had changed for the 24th. Not a problem. From the scents wafting through the kitchen, we would not be disappointed to have it for lunch the next day. The soup was a cinch to put together, light and tasty. Everything one can ask for during busy times and especially in between a few copious meals.

Red Currants


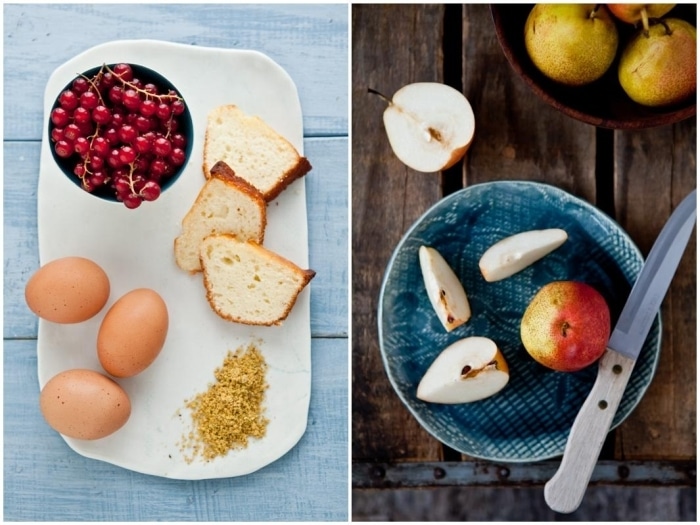
The gratin was a unexpected hit with Bill and one I will repeat soon and with other fruits too. I had a surplus of tiny cute Forelle pears from a couple of projects and was trying to find other ways than tarts and tartlets to use them. Nothing wrong with those…trust me. I am the first one to slow down for a slice of pear tart!

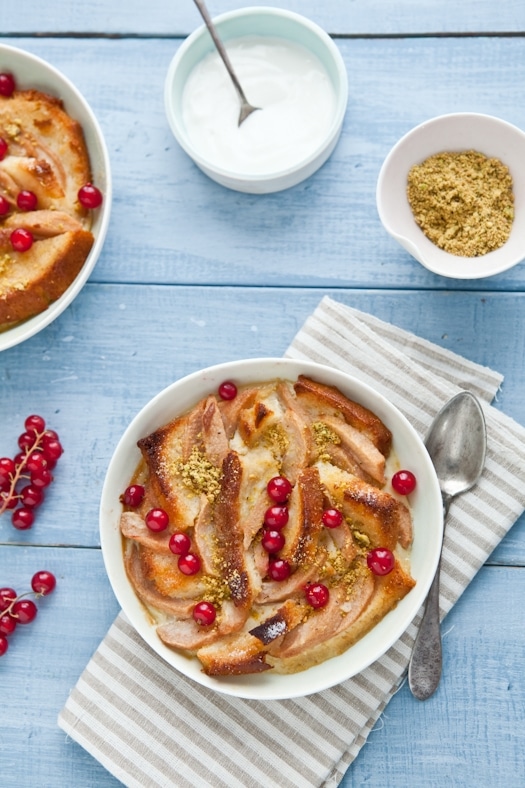
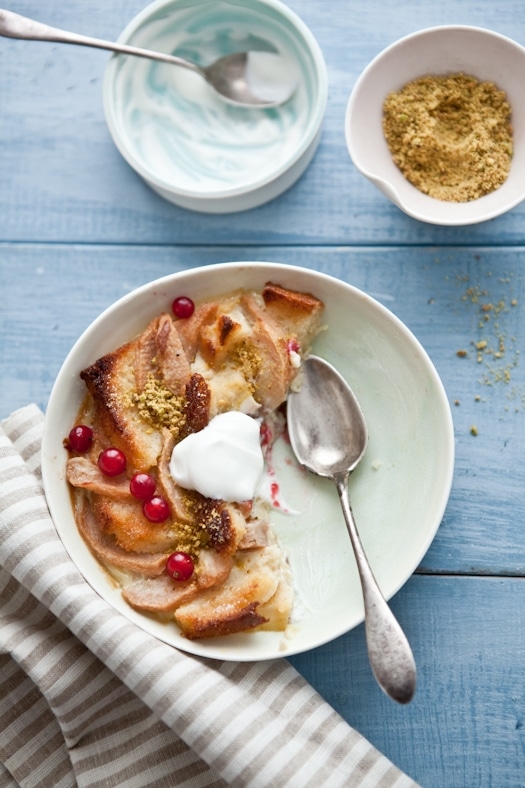
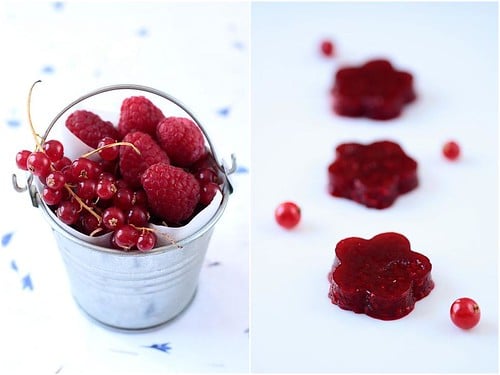
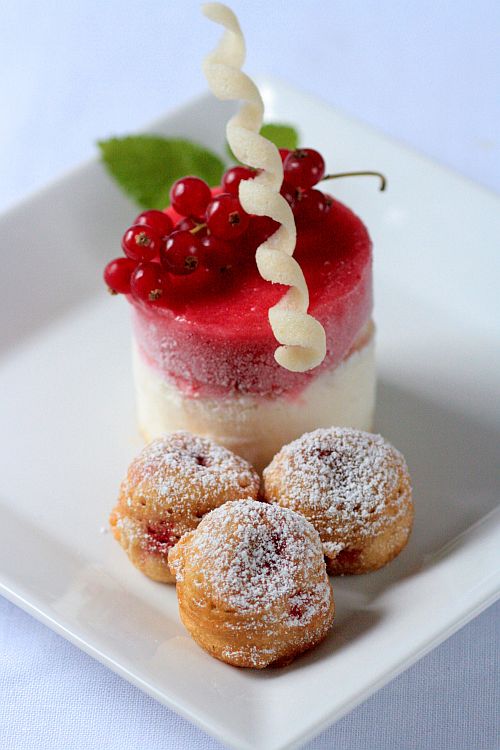
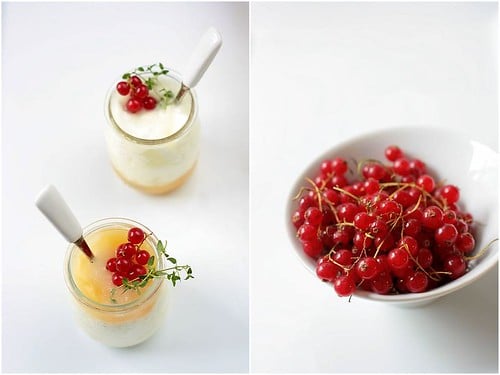
This dessert is the perfect results of many kitchen happenings all coming together at once. Too many pears, red currants finally being available now that the temperatures had dropped, a pound cake made on a whim one night I could not find sleep and there you have it. A light, fragrant, cozy and comforting vanilla custard blanketing thin slices of cake with tart little pops of red currants every other bites.

From the look of immense delight at the dinner table the other day, I can safely say these two recipes were a huge hit. Making another batch of soup today!

Pear Gratin


Salmon Bisque, adapted from Saveurs France:
Serves 4 to 6

Notes: do not worry about how fine a dice, cube or chop, the ingredients are since they are all going to be pureed. Croutons are somewhat of a tradition in my family with soups and I simply toss some cubed day-old bread with a little bit of olive oil, salt and pepper and toast that over the stove. Crème fraiche is a perfect topping for the soup but sour cream is a fine substitute.
Salmon can be expensive, so I usually ask my fish guy at the store to give me the good scraps they cut off when filleting whole fish. They are most happy to find a taker and usually give me half price on those.

Ingredients:
1 tablespoon olive oil
2 leeks, white parts only, well cleaned and sliced
2 garlic cloves, minced
2 carrots, sliced
2 small red potatoes, peeled and diced
½ cup dry white wine
3 cups vegetable stock
1 pound skinless salmon fillets, cubed
salt and pepper to taste
croutons, crème fraiche and chives to garnish

Directions:
In a large stock pot, heat the oil over medium. Add the leeks, garlic, carrots and potatoes and sautee for about 10 minutes, stirring occasionally. Add the white wine, stock and salmon. Season with a little salt and pepper. Bring to a boil then immediately reduce the heat to a simmer and cook for about 30 to 40 minutes. Remove from the heat, let cool and puree until smooth (see notes). Check the seasoning and serve. Top each bowl with some croutons, crème fraiche and chives if desired.
Earlier this year, the nice folks at Blendtec gifted me with one of their mixers and this is what I now use all the time to puree and blend soups. Takes less than a minute for super smooth bisques and soups. A immersion blender or any good capacity and sharp bladed food processor will also do great here.

~~~~~~~~~~~~~~~~~~~~~~~~~~~~~~~~~~~~~~~~~~~~~~~~~~~~~~~~~~~~~~~~~~~~~~~~~~

Pistachio and Pear Gratins, adapted from Saveurs France.

Serves 6

Notes: I love my friend Jeanne’s recipe for pound cake. I had the pleasure this summer to work with my friend Clare on Jeanne’s gluten free baking cookbook and had to make about 75% of the recipes for photography. I got to tell you, Jeanne is about the only person I now trust for gluten free baking anything. Everything is always tasty, correct and of great texture. The recipe she came up with years ago for her gluten free all purpose flour blend is super easy and substitute cup for cup with regular all purpose flour so feel free to go gluten free or not without fear.
Once the pound cake is made and cooled (feel free to prepare it a day in advance), the assembly comes together in no time.

Ingredients:
6 small Forelle pears (or 2-3 medium pears)
12 thin slices of Jeanne’s pound cake (minus the glaze)
1 cup whole milk
1 teaspoon vanilla extract
3 eggs
½ cup sugar
½ cup red currants or other berries
2 tablespoons finely ground pistachios

Directions:
Butter a 9×13 gratin dish or individual ones and preheat the oven to 350F. Position a rack in the center.
Peel, core and thinly slice the pears. Set aside (don’t worry about oxidization too much since the dessert assembly is fast but you can always sprinkle them with a bit of lemon juice if you wish).
Cut the pound cake slices in triangles. Set aside.
In a large bowl, whisk together the milk, vanilla, eggs and sugar until smooth.
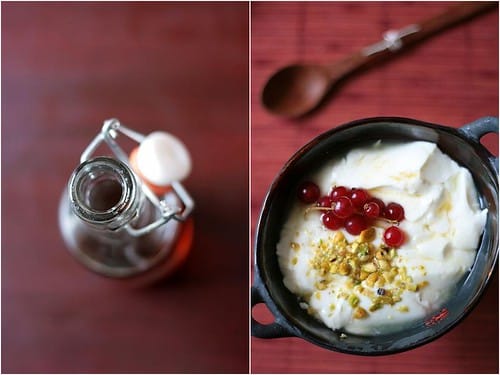
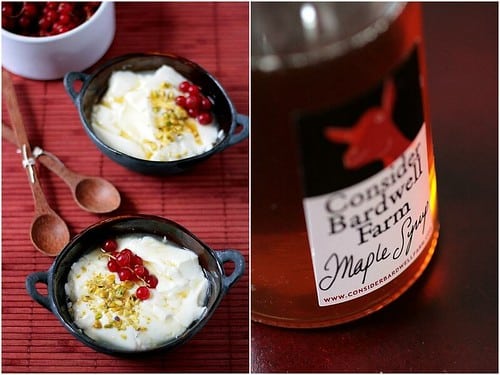
Layer the pear and pound cake slices in your gratin dish(es). Slowly pour the custard batter on top. Bake for about 30 minutes or until golden brown. Serve warm with some red currants and ground pistachios scattered over the top.

Red Berry Almond Milk Panna Cottas

Red Berry Almond Milk Panna Cottas


I need to start with an apology…or two. First, as you can tell my blog posting schedule has slowed down to 2 posts a week instead of every other day. Hmmm…wonder why?!!! I really wanted to thank you for keeping on reading and checking back, especially right now that I have noticed some stressed induced grey hair. Ok, only two..but still! Second, I wanted to apologize for being such a ghost commenter on your blogs. I sometimes have to pack a whole week’s worth in one evening so do not worry if it seems like I am stalking your blogs on Friday night….whole pages at a time. In that regard, I wanted to thank you for coming here and leaving comments, you have no idea how supportive I find them, especially at midnight when I am tweaking a recipe for the third time and recalculating metrics one more time.. just to be safe. So peeps….from the deep dark corners of my kitchen, thank you!

It is funny how things happen in series. Right after I posted the Daring Bakers challenge on gluten free crackers and vegan dips, a close friend of ours told us that he had been diagnosed with an allergy to dairy. While not an immediate concern since we do not live together, it became one fast since we had just invited them over for dinner. My initial thought was to look closely at the menu and remove all dairy from it until he called and asked if I could help him come up with dairy free options of his favorite foods. Absolument! Avec plaisir! Yes, it would be my pleasure!

Red Berry Almond Milk Panna Cottas


One of his favorite desserts is panna cottas, this delectable Italian concoction of cream, sugar and milk and precisely what he thought he would have to give up on this new eating regimen. I reassured him that there were tons of dairy free milks and creams available nowadays that it would not be difficult to satisfy his sweet tooth. He had just bought a carton of soy milk that tasted just like cardboard and he was starting to have serious doubt he’d find something he’d like. I reassured him that he had probably picked up the only cardboard tasting one in the bunch and pushed him to persevere and try rice milk, oat milk, hazelnut milk and my personal favorite, almond milk.

I actually think he gave me an easy one to tweak first. There are so many ways to approach panna cottas: milk, cream, yogurt, buttermilk, sour cream, creme fraiche, fromage blanc. All can be used in making this dessert. I like yogurt based ones a lot but I have a fondness for rich "creamy cream" ones, so does our friend. Problem with almond milk is that it tends to be on the thin side consistency wise so I added some dairy free creamer to the base, like I would in my usual recipe (whole milk and cream). I was a little concerned that the overall taste would be to his liking so I came up with a little diversion just in case: a little raspberry and redcurrant pureed at the bottom of the glasses.

The end result could have fooled the best dairy lover out there (hmmm that might be me!) and the almond milk added a little extra nutty flavor that was perfect with the berries. No grittiness, no cardboard after taste, no "fake" taste lingering after that last bite. Feel free to substitute your favorite dairy free milk and cream as well as fruits to go along. On the other hand if you’d rather stick to regular dairy full panna cottas, click here to get some ideas.

Red Berry Almond Milk Panna Cottas


Red Berry Almond Milk Panna Cottas:

Serves 4-6 depending on the size of your glasses or ramequins

Kitchen Notes:
1/ When you pour the liquid over the fruit, you will notice that the fruit and liquid mass have a tendency to get a little mixed and some of your fruit starts to float in the milk. One way to remedy that is to freeze the glasses once they are filled with the fruit puree while you prepare the panna cotta. Make sure the liquid is at room temperature before pouring it into the glasses or you will shatter your glass.
2/ I used Almond Breeze milk.

1 cup raspberries
1 cup red currant
1 cup almond milk
1 cup dairy free creamer
1/2 cup sugar
2 teaspoons powdered gelatin bloomed in 2 Tb water (means to pour the water over the gelatin and let it sit while you prepare the panna cotta)

In a food processor, puree the raspberries and redcurrant together and divide the mixture among 4-6 glasses. Freeze (see Kitchen Note).

Combine all the ingredients, except the gelatin, in a saucepan over medium high heat and bring to a boil. Heat the gelatin in the microwave for 8 seconds and quickly stir it in the cream mixture. No microwave at our house so I set the cup with the gelatin in large saucepan with enough water to come up halfway up the sides of the gelatin bowl, on medium heat and let the gelatin melt that way. Let the panna cotta mixture cool to lukewarm. Remove the glasses from the freezer and slowly pour the cream over the red berry puree and let set in the refrigerator for at least 3 hours. Decorate with fresh berries if desired.

To make your own almond milk, you can check this recipe here, I have not tested it.

Red Berry Macarons

Red Berry Macarons


More berries! It’s not that I won’t find stone fruits and other summer fruits living in a Southern state, it’s just that they will probably taste bland and by the time Fall hits, I know my baking mind will be ready for apples and pears. I have been freezing and preserving a ton these past few days so if I get a craving for juicy roasted peaches and creme anglaise in the middle of November, one trip to the freezer and I am set!

Friday afternoon when B. went to put bottles of water in the freezer as part of our preparations for Tropical Storm Hanna, he was amazed to find the bottom drawer full of halved peaches, halved plums, raspberries, blueberries, watermelon for quick sorbet, not to mention doughs of various kinds, etc… Tucked in a corner he noticed a small box with a few red berry macarons that I had saved "just" for him. He exclaimed "It almost makes me wish we lost power with that storm!" to which I replied "take a peak out the window and tell me that with a straight face!". We live on a tidal creek, our house is 12 feet off the ground so if the water keeps getting up into the yard with the midnight tide, we might get up to see a natural pool in the garage. I took hour by hour pictures this afternoon as I was cooped inside baking and making soup. A tropical storm calls for chocolate cake don’t you think?

Why keep macarons in the freezer? Well, last weekend our friend D. came over and helped me out of a little situation and as a thank you I made her and her husband some macarons for their get together on Labor Day. I tell you what, there are many special moments in life but getting together with close friends, grilling, chilling, playing croquet and eating macarons is definitely one of them! Hard to think that this beautiful sunny day would lead to such a downfall of rain by friday, but such is Mother Nature. It is a very humbling feeling to know that one only can surrender to its plan and go with the flow. It’s kind of appeasing to me, in a weird sort of way. I saw people giving in that collective movement of stress all day long, at the store, the gas station and I just wanted to go up to them and offer them a macaron to help them relax! I think I’ll need a truckload of macarons if we get a hurricane this season (knock on wood real quick, thank you!).

Red Berry Macarons


Since I had a lot of egg whites left from making ice cream and other custards, I made a double batch of macarons, filled them and tucked the away in the freezer, well wrapped for when a little cravings hits us these stormy days. I did do my little rituals of turning the fridge and freezer to the lowest settings and hopefully we won’t lose power for long if at all. Our hosts this past Labor Day love chesecakes and that was the inspiration for the filling, a cream cheese buttercream with a center of quick raspberry and redcurrant jelly. I call it "quick jelly" because it is not a jelly in the traditional sense of the term, it does not cook for long and contains gelatin to help it set, as well as the whole berries and not just their juice. I needed a small quantity for the macarons, hence the rapid method instead of the whole jelly making and ensuing canning. Feel free to subsitute with your favorite berry jam, homemade or not.

I get quite a few emails about macarons and I do not consider myself an authority in the matter, there are indeed quite a few bloggers sharing the same passion, and a quick Google search can quickly lend to macaron heaven as far as choices. I do recommend reading the tutorial in Desserts Magazine: not because I wrote it but because I tried to gather a lot of tips, ideas and methods from other chefs, home cooks and bloggers. It is by no means a comprehensive guide to macaron making but I think it is a great place to start demystifying as well as understanding some key points in the method (regardless of the type of meringue you use). I mostly use the French meringue method with great results but if you want to try your hand at the Italian meringue method, my friend Mercotte in France has written (in English) a great tutorial on the subject.

Red Berries and Jelly


Red Berry Macarons:
Makes about 15-18 depending on size

For the shells:
3 egg whites (about 90 gr)
30 gr granulated sugar
200 gr powdered sugar
110 gr almonds
2 Tb powdered red food coloring

For the whites: the day before (24hrs), separate your eggs and store the whites at room temperature in a covered container. If you want to use 48hrs (or more) egg whites, you can store them in the fridge. In a stand mixer fitted with the whisk attachment, whip the egg whites to a foam, gradually add the sugar until you obtain a glossy meringue. Do not overbeat your meringue or it will be too dry and your macarons won’t work. Combine the almonds and powdered sugar in a food processor and give them a good pulse until the nuts are finely ground. Pass through a sieve. Add them to the meringue,with the coloring and give it a quick fold to break some of the air and then fold the mass carefully until you obtain a batter that flows like magma or a thick ribbon. Give quick strokes at first to break the mass and slow down. The whole process should not take more than 50 strokes. Test a small amount on a plate: if the tops flattens on its own you are good to go. If there is a small beak, give the batter a couple of turns. Fill a pastry bag fitted with a plain tip (Ateco #807 or #809) with the batter and pipe small rounds (1.5 inches in diameter) onto parchment paper lined baking sheets. Preheat the oven to 300F. Let the macarons sit out for 30 minutes to an hour to harden their shells a bit and bake for 8-10 minutes, depending on their size. Let cool. If you have trouble removing the shells, pour a couple of drops of water under the parchment paper while the sheet is still a bit warm and the macarons will lift up more easily do to the moisture. Don’t let them sit there in it too long or they will become soggy. Once baked and if you are not using them right away, store them in an airtight container out of the fridge for a couple of days or in the freezer.

For the cream cheese buttercream:
1 1/2 sticks (170 gr) butter at room temperature
4 oz (120gr) cream cheese, softened
3 egg whites
1/2 cup (100gr) sugar
2 Tb water
1 tsp vanilla extract or vanilla paste or 1/2 vanilla bean split open and seeded.

In the bowl of stand mixer, whip the egg whites until they have soft peaks. In the meantime, combine 2 Tb water with the sugar to a boil in a heavy saucepan and bring the syrup to 250F. Slowly add the sugar syrup to the egg whites. If you use hand beaters, this is even easier and there is less hot syrup splatter on the side of your bowl and in the whisk attachment of the stand mixer. Continue to whip until the meringue is completely cooled. Slowly add the butter, one tablespoon at a time. The mass might curdle but no panic, continue to whip until it all comes together. Add the cream cheese, the same way, a little at a time until everything is smooth. Whisk in the vanilla extract, or paste or bean. Keep it to spreadable consistency for the macarons and refrigerate the leftover for cupcakes or mini toast in the fridge up to 3 days or in the freezer.

For the quick red berry jelly:
1 cup raspberries (250ml)
1 cup redcurrant (250ml)
1/2 cup sugar
1 Tb lemon juice
1 Tb lemon zest
2 tsp powdered gelatin
3 Tb cold water

In a small bowl, sprinkle the gelatin over the water and let it bloom.
In a heavy saucepan,combine the berries, sugar, lemon juice and zest. Bring to a boil, reduce the heat and let simmer 10 minutes to let the fruits release their juices. Remove from the heat, add the gelatin and stir until completely melted into the fruits. Pour into a small plastic container line with plastic wrap, let cool to room temperature and refrigerate until set. Can be kept in the fridge for up to 5 days or in the freezer.

To assemble: pipe or spoon a small amount of macarons on one shell, position some jelly right in the center and top with another shell.

Red Berry Macarons

Redcurrant Sorbet And Faisselle Ice Cream With Fried Strawberries

Redcurrant Sorbet and Faisselle Ice Cream With Fried Strawberries


Sounds complicated right? Well, really it’s not…trust me. If I have so little time these days that I forget to take my apron off before heading out of the house, then you can trust me when I say that this is nothing short of delicious but not intricate. I like multi layered, multi component desserts because they allow my brain to relax and my stress level to go down since I know I can plan and assemble them over several days.

Did I just say that I went out with my apron on? Yep…I really laughed because I had mentioned to some of you that it might happen and it did. I did walk the dogs and went to the grocery store with my apron still tied around my waist. The funny part is that the neighbors did not act surprised nor did the personnel at the store! That grocery store around the corner from our house sees me just about everyday. The cashiers know my name, my habits, the produce guy even offered me a job on more than one occasion. I had to fess up and explain that no, one person did not eat that much food in a week and that I had a job at hand, but yes I would probably the one customer with the odd requests.

When I arrived at the store with my apron on, no one looked surprised at all, I think they were betting on how long it would take for me to forget something like that! What they really wanted to know is why I had not brought them some goods and samples instead!! I regretfully told them that I had been working on ice creams lately and that it was not an easy item to bring them to try. Nor is it to take pictures of in this darn heat! After 5 minutes I had to stop and admit defeat the day I shot this dessert and that’s why I only have a couple of pictures to show for it. I stood there looking at the plate with an ever growing pool of goodness with mixed feelings of anger and frustration!

I take pictures upstairs in the guest bedroom where the light is better throughout the day on a table set at the foot of the bed. After a minute of wondering if it was worth it to take another one of these ice creams out of the freezer, plate and shoot again, I figured I’d try one more shot of a spoon full of ice cream. I dug in, set in down, looked at it but never took the camera to shoot it. No….instead I took the spoon, the whole plate and sat on the bed and ate it. The whole thing, all by myself, something I rarely do. I instantly felt better! I felt bad for two seconds that I did not shoot more but the guilt melted away as fast as the ice cream in my mouth….

Mise En Place


With summer reaching its end I have been loading up on fresh berries as much and as fast as I could lately and I had enough redcurrants to turn them into a refreshing sorbet. I still had a good amount of faisselle left so I turned it into ice cream and spooned both inside rings (I use cut pvc pipe). Feel free to use any other soft and smooth dairy like fromage blanc, petit suisse, goat cheese, cream cheese, etc…The main concern here is to drain it thoroughly before adding it to the ice cream base so I recommend draining it overnight until it becomes fresh cheese or yogurt cheese if you want. Feel free to use any other soft and smooth dairy like fromage blanc, petit suisse (both drained overnight), goat cheese, cream cheese, etc…

I like contrasting textures and flavors a lot in desserts and I also like to contrast temperatures, hence the fried strawberries. I was a little worried that they would lose a lot of their quality in the frying process but they held up nicely. While the outside was hot and crunchy the strawberries just barely got warm and retained their texture. I used rice flour for the batter in order to be light and smooth but all purpose flour works too, I just found it a little overwhelming to fry fresh fruits. You can make the ice creams and pipe them into molds one day and take care of the strawberries just before serving, even if that time comes days later….ice cream will wait…if you can! Don’t throw away your egg whites….you can always try your hand at macarons!
Redcurrant Sorbet and Faisselle Ice Cream with Fried Strawberries.

Redcurrant Sorbet:
1 cup water
3/4 cup sugar
2 1/2 cups redcurrants, picked over

Bring the water and sugar to a boil in a small saucepan over medium heat. Make sure the sugar is dissolved and remove from the heat. Let the sugar syrup cool to room temperature.
Puree the redcurrant in a food processor with the cooled syrup. Strain the puree through a sieve into a bowl. Refrigerate the puree until thoroughly chilled and then freee in an ice cream maker according to the manufacturer’s directions. Makes about 2 cups.

Faisselle Ice Cream:
2 cups whole milk (50o ml)
1/3 cup heavy cream (100 ml)
3/4 cup sugar (170 gr)
3 egg yolks
1 Tb vanilla bean paste or 1/2 vanilla bean, seeded
3 oz drained faisselle (90gr)

Whisk the egg yolks with the sugar. In a saucepan set on medium heat, bring the milk and the cream to boiling point, slowly pour a small amount on the egg yolks to temper. Pour the remaining over the yolks and sugar. Stir well then pour back in the saucepan and cook over medium low heat until the cream thickens and coats the back of a wooden spoon. Remove from the heat and whisk in the faisselle until completely incorporated. Cool to room temperature. Cover and refrigerate until cold. Process in an ice cream maker according to your machine’s manufacturer’s instructions.

Once both ice creams are ready, pipe the faisselle into 4 rings lined with parchment paper (makes is easier to unmold) and freeze again until set. Proceed the same way with the redcurrant sorbet. Cover the tops with plastic wrap. Unmold just before serving and plate with the fried strawberries.

Fried Strawberries:
12 small strawberries, hulled and wiped clean with a paper towel
1 1/4 cups rice flour
1/2 cup sugar
1 teaspoons baking powder
1 Tablespoon lemon zest
1 cup water
vegetable oil for frying
powdered sugar for dusting

Heat the oil to 350F.
In a large bowl, whisk together the flour, sugar,baking powder and lemon zest. Slowly add the water until the batter is smooth and without lumps. Dip the strawberries into the batter and then drop them into the oil until they are golden brown. Drain on paper towels and dust with powdered sugar. Serve hot or warm with the ice creams.

The Faisselle Experiments – Part Two…And Three

Faisselle and Maple Syrup


Allright, so let’s start this off the right way before I lose my mind. We all gathered today and read all your suggestions for a name for the dessert in the previous post and it was not easy making a decision…ya’ll are good!! But….the overall favorite was "Transatlantic" from Miss Lillas who said "Salted butter caramel from Normandy, American chocolate brownie. An elegant bringing together our 2 continents"….So Miss, please send me your mailing address so I can send this wonderful book your way! Congratulations!

A couple of weeks ago I took a long trip down memory and you were so kind to indulge me and read about my attempt to recreate a fresh cheese that my dad loves. The outcome was not "faisselle" like I remembered but something closer to fresh ricotta. The desire to recreate this unique product came from a conversation I was having with expat friend Aran from Cannelle Et Vanille after our first foray into re-creating desserts from our childhood and cultural heritage. She had a hankering for mamia and so did B. and I after we had a most delicious one on a trip back home at L’Ami Jean, a Basque restaurant in Paris. We started talking about making it right before she left on vacation so in the meantime that got me thinking about trying my hand at "faisselle" and when she came back we both agreed that it would be more logical and more fun to give you two experiments instead of one. Fast forward to last week, when my favorite Basque experimented with mamia and I with faisselle.

Much like her first batch of mamia, my first batch of faisselle for this post did not turn out as I hope for. After the batch I made last month, I decided to take away the added yogurt and to get straight for heating the milk, adding the rennet and letting it sit, until nice floppy large chunks of curd form and separate from the whey. Well, I got zippo zippeedee zip….I got liquid and tiny curds which once drained gave me about 1 cup of ricotta. For one gallon of milk you can expect that it did not cut it. I did not use raw milk this time and I don’t think it was the local homogenized whole milk I used…nope…just could not put my finger on it. In one email she mentioned she was trying another batch of mamia adding cream and dry milk and I went back to the drawing board with mine. Then I had the "genius"(self sarcasm) idea to call my dad and have him read the ingredients on a jar of store bought faisselle…Guess what?….Yep, added cream and dry milk, a little ratio working and I was back in !

Faisselle and Lemon Thyme Lemon Curd


I heated the milk again, added the dry milk, cream and rennet. Let it sit for a couple of hour and the result was exactly what it was supposed to be: large floppy and soft curds slowly separating from the whey. The first spoonful made me think I was definitely on the right track but it needed to develop a little character and an overnight stay in the fridge fixed that. Traditionally, faisselles are drained in molds set in larger containers so that the whey pooling at the bottom keep the cheese moist. I just drained the cheese with a large slotted spoon and scooped the cheese in containers. It did continue to render a lot of whey but I was too happy to have succeeded to be bothered!! The texture is soft but firm enough to separate into curds as you dig your spoon in it and the flavor is really not comparable to any dairy found here, neither sour nor tart.

My dad likes his with chopped fresh chives and fresh cracked pepper, which I have come to like, but I also love it on the sweet side. I served some with some lemon thyme lemon curd and some with chopped pistachios, redcurrants and maple syrup. Deborah from Bonbon Oiseau sent me a bottle of a local Vermont maple syrup producer and it arrived the day I was finishing the faisselle. My bottle of "maple crack" as she refers to it could not have come at a better time! Thank you! I played around with the remaining faisselle and used in some other pastry applications. It’s been a busy couple of weeks so I have not come around to sift through those pictures or even put them in a proper post yet…soon though.

Faisselle and Maple Syrup

Faisselle:

1 quart whole milk ( 4 cups – 946ml)
1/2 cup heavy cream (118ml)
1/4 cup dry milk powder (60 gr)
8 drops liquid rennet

In a heavy saucepan, combine the milk, heavy cream and milk powder and bring the mixture to 120F over medium heat. Let cool to room temperature and add the rennet. Stir once with a wooden spoon, transfer to a clean bowl (porcelain, glass or plastic), cover with a clean kitchen towel and let sit undisturbed for 2 to 4 hours. Place in the refrigerator and let sit overnight to develop more taste. Drain and used as desired the next day.

Lemon Thyme Lemon Curd:

3 large eggs
1/3 cup (80 ml) lemon juice
1 Tb freshly grated lemon zest
1/4 cup fresh lemon thyme
1/4 cup (60gr) granulated sugar
4 tablespoons (55 grams) unsalted butter, at room temperature, cut into small pieces

In a bowl placed over a pan of simmering water, whisk together the eggs, sugar, lemon thyme, lmeon zest and lemon juice until blended. Cook, stirring constantly until the mixture reaches 160F. Remove from the heat and strain the mixture over a bowl. Cut the butter into small pieces and whisk into the mixture until the butter has melted. Cover with some plastic wrap directly in contact with the curd to prevent a skin from forming. You can refrigerate it for up to a week. Makes about 1 1/2 cups.
Note: I used liquid vegetarian rennet that I found at the health food store near me, but you can also find it here.

Faisselle And Lemon Thyme Lemon Curd