A little update before I talk Salmon Bisque and Rhubarb Tarte Tatin…The workshop in Ireland sold out so fast that we decided to exceptionally open up four more spots.There are three remaining. So, if you missed registration and would love to be able to join us for an amazing three day- four night food photography workshop on the grounds of Belle Isle Castle and Belle Isle Cookery School (all details here), here is your chance! Follow this link to the registration page. Hope to see you there!
Back to today’s recipes…
Let’s back track to a couple of weeks ago when I had tooth issues. Bear with me, something incredibly tasty came out of one little inconvenience. Well, it did not feel "little" at the time but in the grand scheme of things and with two more family members in bad shape, you won’t hear me complain of anything. It was just a tooth and one minor setback not the end of the world…
I could not eat more than two or three spoonfuls of soup at at time. I started dropping weight. If you know me, you know this is the last thing I need. I was starting to lack energy while my gigs were getting more intense. Not a good combination. I knew I could easily fix this by making meals that packed a punch in nutrients. I could eat soups. I devised a plan to make a big batch of a super nutritious soup and to keep a bowl by my side at all time during the day. A few spoonfuls there, another couple here and within the course of the morning, I would finally have eaten a normal lunch. Same thing for dinner.
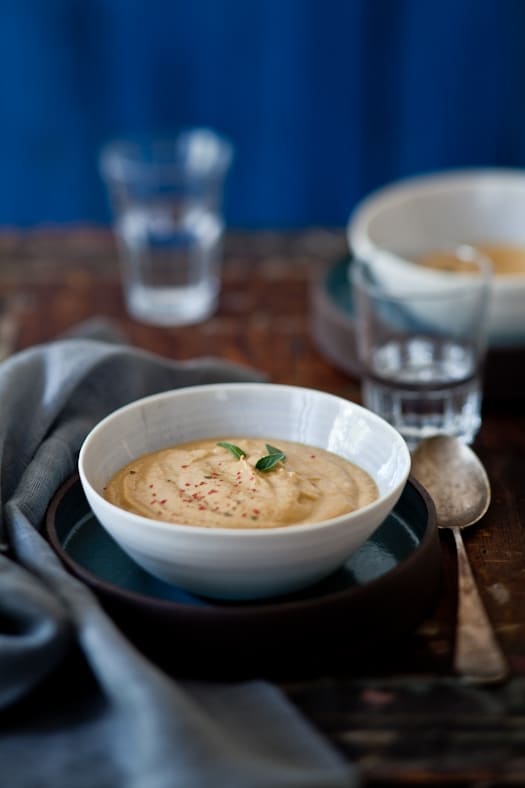
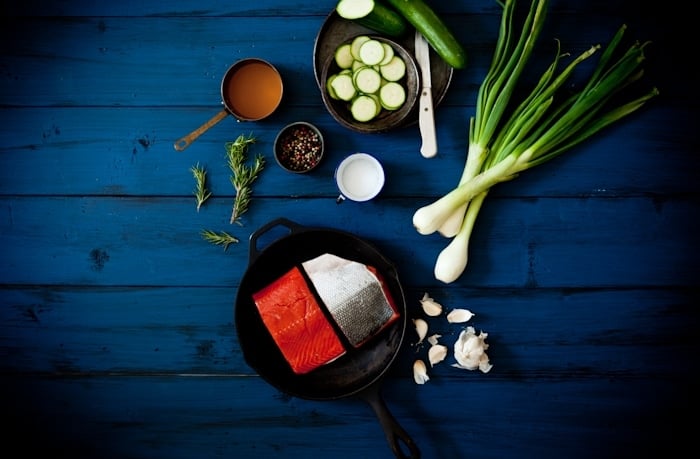
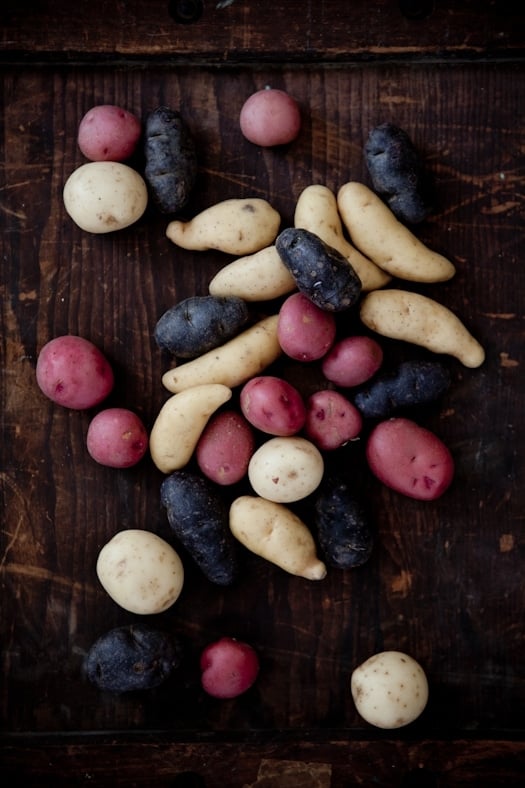
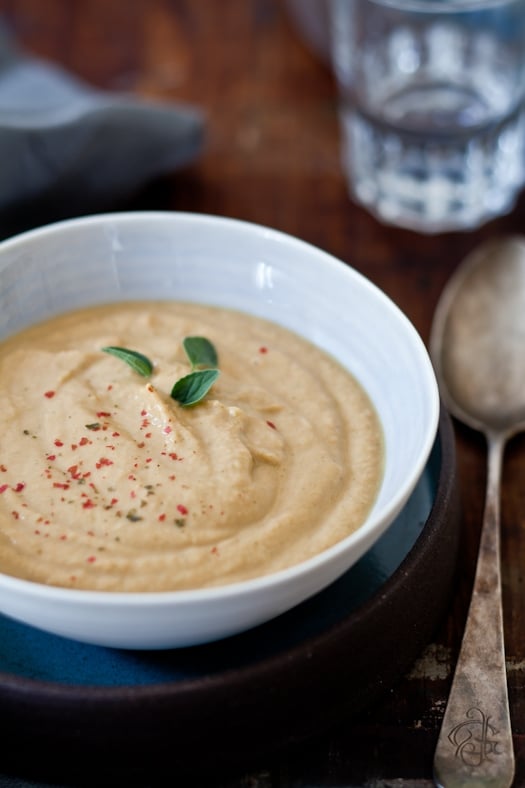
What soup did it? A Salmon Bisque, full of good-for-you wholesome ingredients such as wild pacific salmon, potatoes, Vidalia onions, zucchini, garlic, fish stock and herbs. I could make it thin, chunky. I could change the vegetables with whatever was in the fridge such as subbing carrots for the zucchini, lefover rice instead of potatoes, etc… As long as I had a good combo of protein, carbs, fat and veggies, I was good to go. Getting all my nutrients helped heal at a normal pace. I did that for five days and it worked. Hooray!
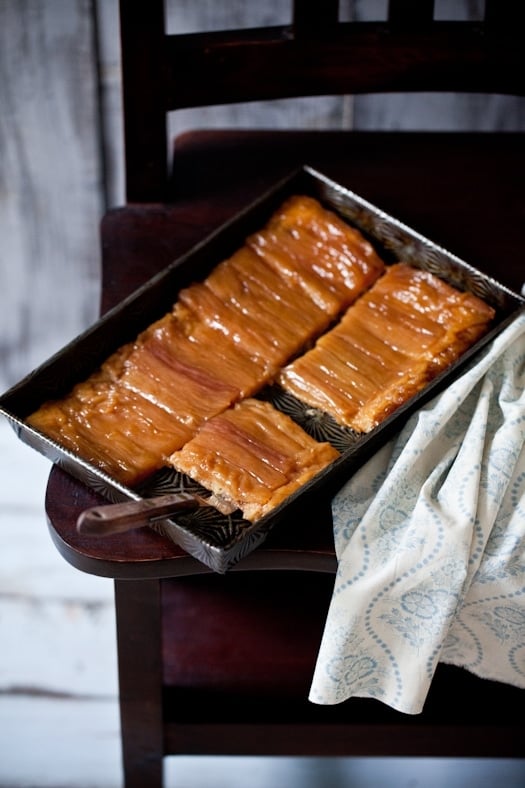
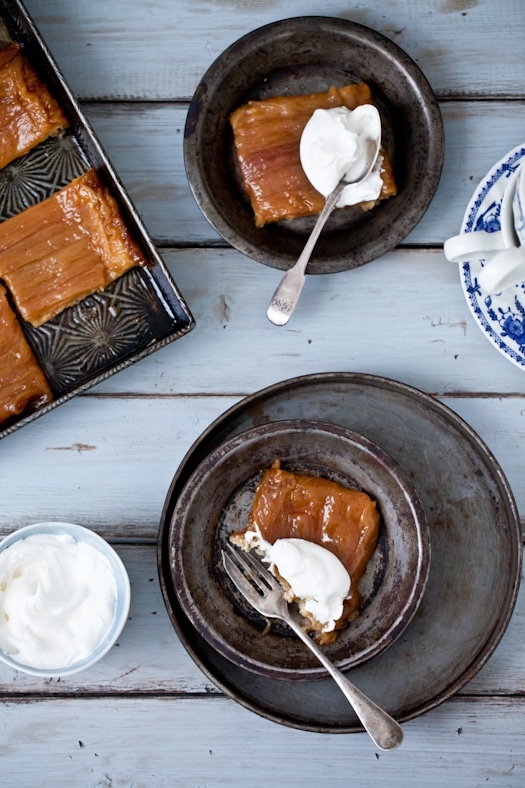
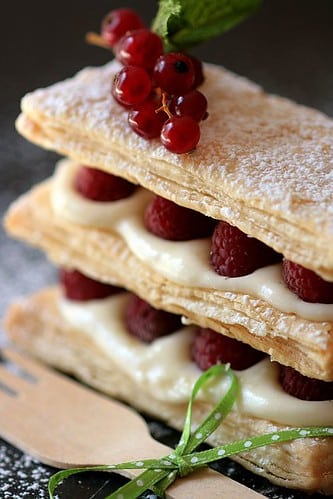
Not going to lie, but the first thing I sank my teeth into after that episode was a big plate of crunchy radishes, a plump kebab of local shrimp and a big slice of tarte tatin. Rhubarb tarte tatin. With plenty of buttery goodness from the puff pastry crust and long pieces of caramelized rhubarb that just melted in your mouth. The latest edition of Donna Hay magazine was just chock full of tatin recipes with puff pastry. And well, those two words tend to make weak in the knees as soon as I see them..
Since I can occasionally eat gluten (once or twice a week without showing signs of Meniere’s) I figured a Tarte Tatin would be a darn good way to go for it. And it was. And I have one in the oven as we speak. I wish I were kidding. But this one is for my in-laws. Because they can’t ever have too much tarte tatins. Or rhubarb.
After a nice bowl of soup. This tarte is definitely melt in your mouth decadence of the best kind.
Creamy Salmon Bisque:
Makes enough for 6 to 8 large portions.
Ingredients:
1 tablespoon olive oil
3 small baby Vidalia onions (sweet onion) or 1 large onion, sliced
1 tablespoon chopped fresh rosemary
3 zucchini, sliced
1/2 pound small potatoes
3 garlic cloves, minced
1 pound wild salmon, boned, skinned and cut into large cubes
4 to 6 cups seafood stock
salt and pepper to taste
Directions:
In a large stock pot, heat the olive oil over medium high heat and sautee the onions and rosemary for 2 to 3 minutes or until the onion is translucent. Add the zucchini and potatoes and sautee another 2 minutes. Add the garlic and salmon and saute for a couple of minutes, making sure not to burn the garlic. Add about 4 cups of seafood stock and pinch of salt and pepper. Bring the mixture to a boil, reduce the heat and simmer, uncovered for 10 minutes. Remove from the heat, let cool for about another 10 minutes and puree in a food processor or blender (immersion blender works great too) until completely smooth. Add more stock to adjust the consistency to your liking. For example, we like thick soups but some don’t – adjust accordingly. Salt and pepper to taste if needed. Serve warm.
——————————————————————————————
Rhubarb Tarte Tatin, very slightly adapted from Donna Hay magazine:
1 1/2 pounds rhubarb, cut into 10cm long pieces (4 inches long)
Directions:
Preheat oven to 375F. Roll the puff pastry to 1/8-inch thick. Cut out a 22cmx32cm (8.5 inch x 12.5inch) rectangle from the pastry and set aside.
Place the sugar and the water in a small saucepan over medium low hear and cook, stirring until the sugar dissolves. Increase the heat to medium high and cook for 8 minutes, until the sugar turns to a caramel color Add the butter and cardamom and stir until the butter is completely melted and combined with the caramel.
Pour the caramel into a 20cmx30cm (8×12-inch) baking pan and arrange the rhubarb pieces over it.
Top with the puff pastry and tuck the edges under a little. Place on a larger baking sheet and bake for 30 to 45 minutes. or until the puff pastry is cooked through. Allow to cool for five minutes or so. Loosen the edges with a knife. Invert the tart onto a serving tray.
It’s no secret that I love tarts. Obviously with a nickname like Tartelette. Oh you thought it was just the name of this site didn’t you? Well, not entirely. My family gave me the moniker of Tartelette when my age was still in the single digit category. I love tarts. Sweet or savory. Square or round. Rectangular or triangular (have yet to make that one!). The sky is the limit when you make a tart. I just happen to like them all…
And it really bugs me that I can’t register the domain "tartelette" but have to put "my" in front because someone grabbed it already (and is just sitting on it). This is not "my tartelette" ya’ll, it’s yours, it’s everybody’s. It’s a place to come satisfy all your senses, your eyes, your tastebuds, your brain. Read a little, smile a lot. I don’t know. I hope it feels as much of an open invitation to come sit at my table as I hope to convey.
That’s probably why we love to have friends come visit. Stay for a while or just in passing. We live in such a gorgeous city. We love to walk the old cobblestone streets with them, have dinner on the patio or go to the dock to get some crabs for dinner. You can’t help being in a good mood with all this sun year round and beauty of the city. We may not have all the stores and convenience of a big city but we are truly spoiled by the richness of the history and the spirit of the people.
I think Tami felt that when she visited us a couple of weeks ago. She came to relax after some grueling days at work and we had also made plans to contribute on a project together. I’d say our friends have varied personalities and lives but one common trait is that they all love food and they all love to eat good food. So you can bet that in the midst of working hard and playing harder, Tami and I made sure to eat fresh and satisfying foods to keep us going.
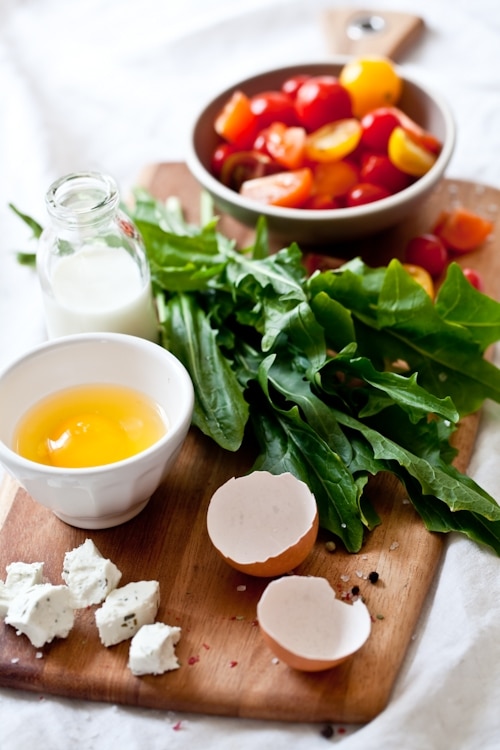
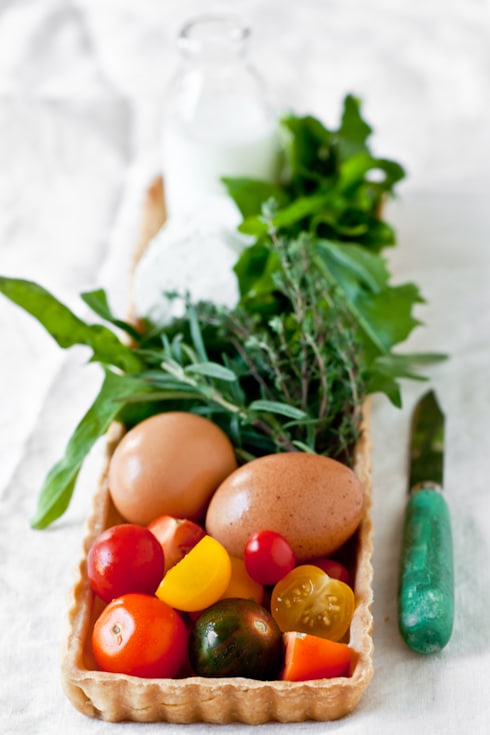
She came at the right time too! I had just made a couple of batches of gluten free puff pastry, to find the combination of flours we liked best and to make sure that the results were consistent each time. I had plenty of leftover dough but no real desire for anything sweet. I ended up blind baking and freezing three tart shells instead. At least, if I did not use them right then and there, I’d have them ready to whip up a quick quiche or tart for a light lunch or an impromptu gathering.
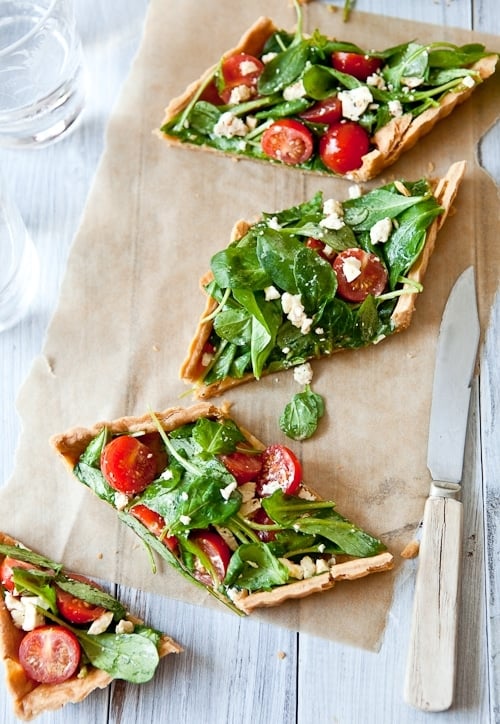
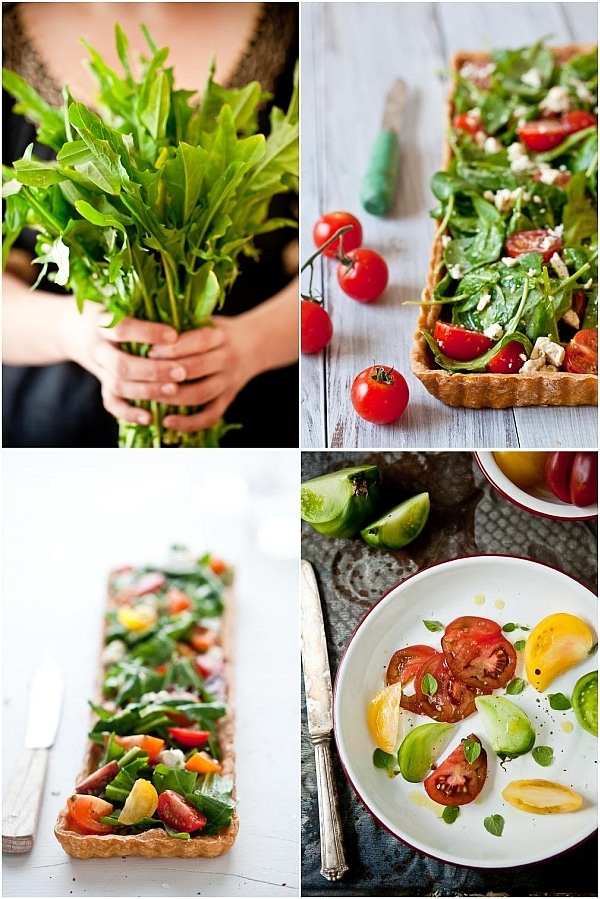
Tami and I shared a tart filled with a light custard filling and topped with fresh dandelion greens (she’s hand modeling for me too!, heirloom tomatoes and goat cheese. We devoured it. Almost all of it. I saved a couple of slices for B. and he wanted more. He made me promise to make more. Soon. So I did.
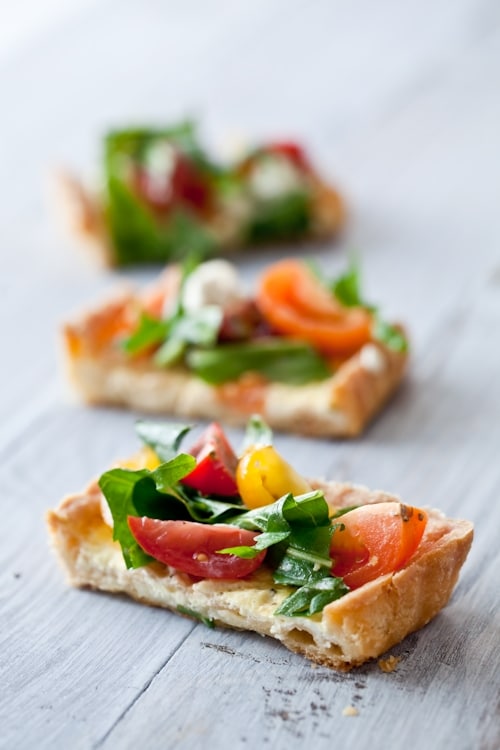
The second one I made shortly after was filled with a simple salad of arugula, goat cheese and cherry tomatoes tossed in a simple vinaigrette. Score once again. I literally could have eaten it all by myself but the pleasure of sharing with Bill just to see his face light up as mine did was priceless. Gosh it was good! The world goes rounder with tarts. That is all…
Check out Shauna’s Rough Puff Pastry that she just posted here. Such determination… Props:
Someone asked me where I found the wooden spoon shown with these cakes. It’s a picnic set that my mom got on Sprout Home but Anthropologie announced today they now carried them (price gauging them too).
– vintage knives: etsy & antique store
– enamel plate & Bowl: Pottery Barn
– cutting board: World Market
– glasses: Pier 1 (on sale for $1)
Filling:
1 egg
3/4 cup whole milk
salt and pepper to taste
1/2 teaspoon Dijon mustard
1 cup heirloom tomatoes, halved
2 cups chopped dandelion greens (or other strong greens)
3/4 cup goat cheese, crumbled
2 tablespoons to 1/4 cup vinaigrette (depends how soaked you like your salad)
Prepare the crust:
Preheat oven to 350F.
On a lightly floured board, roll out the dough to 1/4-inch thick and line it into a 9 or 10-inch round tart pan or rectangular, etc… Place the tart on a baking sheet and line it with a piece of parchment paper on top and fill with dried beans or ceramic weights. Bake for 15 minutes. Let cool.
For the filling:
In a medium bowl, whisk together the egg and the milk until well combined. Add the salt, pepper and mustard and whisk to incorporate. Pour the filling inside the shell and bake for 10-12 minutes. Let cool completely.
Mix all the tomatoes, greens and goat cheese in a large bowl. Toss with as little or as much vinaigrette as you like and spoon the salad on top of the tart. It’s ready! C’est pret!
As I was picking Tami for the airport this morning I was thinking "I got to go home and finish this puff pastry post already. Kind of ready to move on" Now that I sit at the computer putting words to my thoughts, it feels a little like Christmas morning. I am getting giddy all over again.
I know I know. It’s dough. But I am staring at a block of layer upon layer of buttery goodness. And it’s all gluten free. And it’s good. And it puffs. And it makes me stand up and say "heck yeah we can do this!" I’m obstinate and stubborn you see.
It took quite a few tries to get to what I did consistently for the past two weeks. Five times now to be exact. Yep, even if it meant eating puff pastry for two weeks straight just to make sure I did not just get lucky on the first try. I got lucky all five times. That’s not luck anymore – that’s a recipe ready to roll. Pun intended. Oh yes!
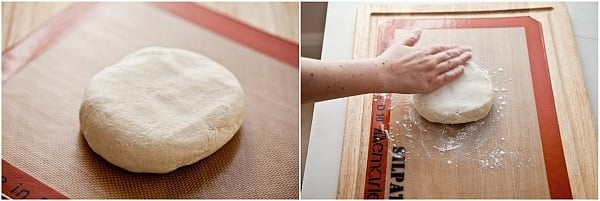
Dough "detrempe" ready to roll before butter block.
I could not have done it without Shauna and Danny. It was high time for a classic puff pastry recipe that would not make anybody cuss up and down their street "it was hell-ish to work with" and they just "managed a substitute". While I am finally happy with this one, I can’t wait for the rough puff pastry version that Shauna and her husband have been working on these past few weeks! Check her site soon for that version. I know their dedication. You’ll want to read it.
From the gluten free point of view, this ain’t no substitute! This is not hell-ish to work with. It actually feels as good under my fingers as my favorite puff pastry recipe from Martha Stewart. I want to rest my head on it and take a nap it is that soft.
It bends and it moves. It has dimples and ripples. It rolls and folds. It stretches just enough and never pulls away. That’s the joy of gluten free baking.
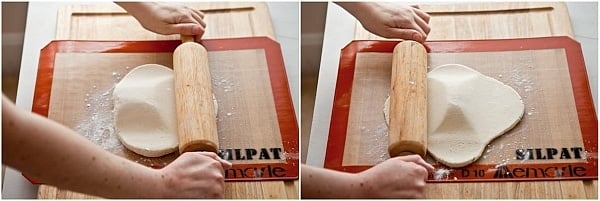
Rolling the "detrempe" before the butter block.
I used to think while working on the recipe that people who could bake with gluten had it easy because of the elasticity pertinent to each strand of gluten. Now that I am "getting" gluten free baking each day a little/lot more, I realize that we have a serious advantage: I can flour the heck out of my counter top to roll my dough and never worry about adding too much flour. I never worry about a batter becoming to stiff, too stretchy because I overworked the gluten. There is joy in this people. There is calming effect to that notion.
But, I am glad you were not there in the kitchen the very first time I tackled gluten free puff pastry. That was sometime last September. It did not work. It worked just enough to make me want to get it right though!
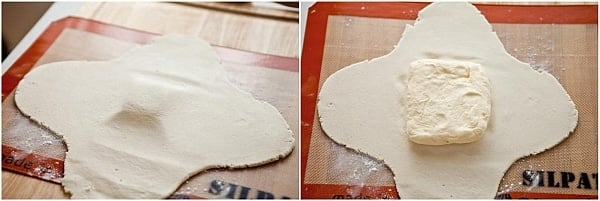
Creating a cushion mat before the butter. Just enough butter.
I uploaded a picture and my recipe and send it off to Shauna. Her response was immediately "too much butter – but look at those layers" See…I knew it. It was possible. As much as it pains me to say, there was too much butter indeed for something gluten free. We bounced back a few thoughts: maybe add an egg, maybe change the flours. All valid thoughts. And then I sat on it for a few months.
There was something that bugged me from those first experiments. Handling that dough, with the proportions and recipe I had in front of me, was like being on the brink of a cliff on a tight road in a big old truck. Nerve wracking. It cracked everywhere. It did not bend. It did not look good or felt good under my hand. I have the tenacity of a bull so I didn’t give up but the whole time I kept thinking that I did not want any of my readers left alone with this dough. You would have hated it with every fiber of your being. I sure did.
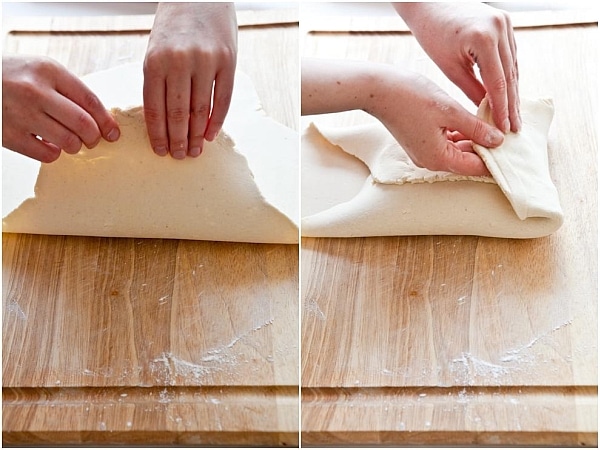
Folding dough flaps over butter. Most pliable dough ever.
As months went by of gluten free baking, I have started to acquire a more comfortable handle of the flours, which ones were softer in my hands or were nicer to our palate. I started picking my puff pastry recipe again and jotting down my favorite flours and possible ratios for them.
Then I remember Shauna’s words "too much butter" and started working on the butter part of the recipe. This one left me puzzled. Classically trained. French. And now I had to do this Holy Grail of pastry with less butter. Oooohhh… I stripped it down to the very minimum and I went to work. And it worked. And I did this. Really.
Butter block encased and ready to be rolled in with the dough.
From the classic puff pastry point of view: this still bears a higher degree of difficulty than other tart dough but trust me when I say it’s not rocket science. Just like most things in pastry though, you have to pay attention. A little of that goes a long way. And some time to set aside to give your day enough chilling time between each turn. Not because it needs to rest its gluten strands, obviously but because this dough is a bit wetter than usual and the cold helps with all the rolling and handling.
Just like with regular puff pastry, one other critical step is to have your dough block and butter block at the right temperature before starting the layering/rolling process. I like for my butter block to still be firm to the touch but for the top to slightly give under my fingers. It might take you a couple of tries though whatever type you chose to work with (gluten or gluten free). One thing for sure is that there is such a thing as too cold butter and too soft butter. If you have the latter case, just place your dough block as the recipe indicates but refrigerate for 20-30 minutes before attempting to roll it out.
Rolling and layering – doing the turns.
The possibilities once you have your dough ready to go after all your turns are done, just make sure to refrigerate the dough once more before rolling and cutting and using. It will thank you a plenty.
See the first picture with the tart shells filled with all these beautiful ingredients? That’s going to be lunch for my friend Tami from Run With Tweezers who is visiting for a week and myself. That’s why I am late posting this today. We had a "no work all play" kind of day. Bill might have some leftovers…if he gets home at a decent hour. Otherwise he’ll just have to be happy with some chocolate mousse and Raspberry Mille Feuilles. Tough. I know. I am super strict with his diet.
Classic Puff Pastry – Gluten Free
Notes: rolling the dough on a piece of silicone mat is very helpful if you are new to baking gluten free or new to baking puff pastry. You don’t have to if you flour your pastry board generously but I do it even now. Makes cleaning up way easier!
This is the flour combination that we liked best but feel free to experiment. I did try it twice with tapioca flour instead of cornstarch and although the consistency was the same – we did not care much for the strong tapioca taste so I tried a few times with cornstarch and it worked better for us. One day I replaced the millet with cornmeal(I was tired, not paying attention) and it worked out well also.
This dough is wetter than what you would expect, for a good reason: it really rolls soft and beautifully with a greater ratio of water than most BUT refrigerating is crucial with it. Each grain will soak in some of the moisture which will work to your advantage as it chills. Use plenty of gluten free flour to roll it out or use a silicone mat.
For the dough block:
1/2 cup superfine sweet rice flour
1/2 cup brown rice flour
1/2 cup millet flour
1/2 cup cornstarch
1/4 teaspoon salt
1 teaspoon xanthan gum
1/4 teaspoon guar gum
3/4 cup cold water
For the butter block:
1 1/2 sticks unsalted butter, soft but not room temperature just yet
1 tablespoon superfine sweet rice flour
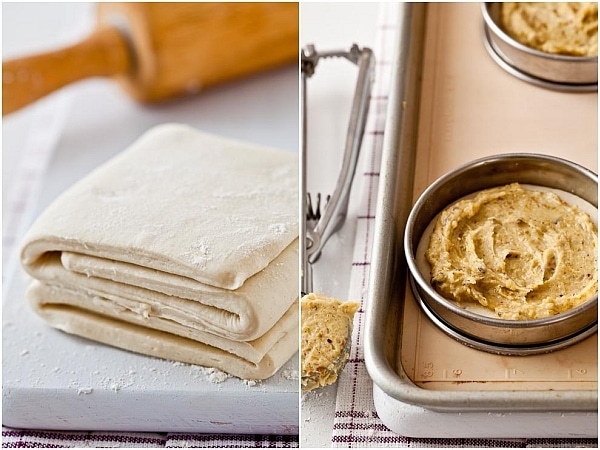
Make the dough package: In a large mixing bowl, combine all flours with the salt and both gums.
Form a well in center of mixture, and pour the water into well. Using your hands, gradually draw flour mixture over the water, covering and gathering until mixture is well blended and begins to come together. Gently knead mixture in the bowl just until it comes together to form a dough. Pat dough into a rough ball, and turn out onto a piece of plastic wrap. Wrap tightly, and place in refrigerator to chill 1 hour.
Make the butter package: Sprinkle 1/2 tablespoon flour on a sheet of waxed or parchment paper. Place uncut sticks of butter on top, and sprinkle with remaining 1/2 tablespoon flour. Top with another sheet of paper; using a rolling pin, pound butter to soften and flatten to about 1/2 inch. Remove top sheet of paper, and fold butter package in half onto itself. Replace top sheet of paper, and pound again until butter is about 1 inch thick. Repeat process two or three times, or until butter becomes quite pliable. Using your hands, shape butter package into a 4-inch square. Wrap well in plastic wrap, and place in refrigerator until it is chilled but not hardened, no more than 10 minutes.
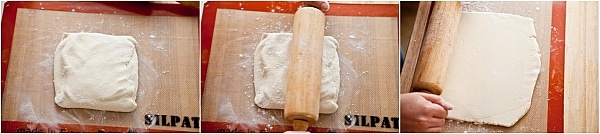
Assemble and roll the dough: Remove dough package from refrigerator, and place on a lightly floured work surface. Using a rolling pin, gently roll dough into a 9-inch round. Remove butter package from refrigerator, and place it in the center of the dough round. Using a paring knife or bench scraper, lightly score the dough to outline the butter square; remove butter, and set it aside. Starting from each side of the center square, gently roll out dough with the rolling pin, forming four flaps, each 4 to 5 inches long; do not touch the raised square in the center of the dough. Replace butter package on the center square. Fold flaps of dough over the butter package so that it is completely enclosed. Press with your hands to seal.
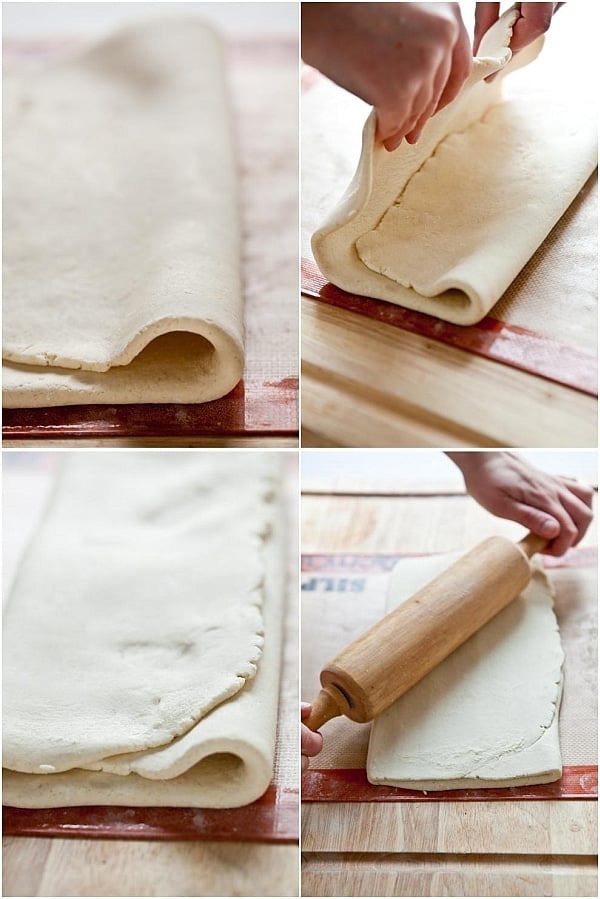
Using the rolling pin, press down on the dough at regular intervals, repeating and covering the entire surface area, until it is about 1 inch thick. Gently roll out the dough into a large rectangle with one of the short sides closest to you. Be careful not to press too hard around the edges, and keep the corners even as you roll out the dough by squaring them with the side of the rolling pin or your hands. Brush off any excess flour. Starting at the near end, fold the rectangle in thirds as you would a business letter; this completes the first single turn. Wrap in plastic wrap; place in refrigerator 45 to 60 minutes.
Remove dough from refrigerator, and repeat process, giving it five more single turns. Always start with the flap opening on the right as if it were a book. Mark the dough with your knuckle each time you complete a turn to help you keep track. Chill 1 hour between each turn. After the sixth and final turn, wrap dough in plastic wrap; refrigerate at least 1-2 hours or overnight before using.
For the chocolate mousse in the raspberry – chocolate mousse Mille Feuilles:
See recipe here.
For the recipe for the lemon mascarpone cream:
See recipe here. (minus the rhubarb)
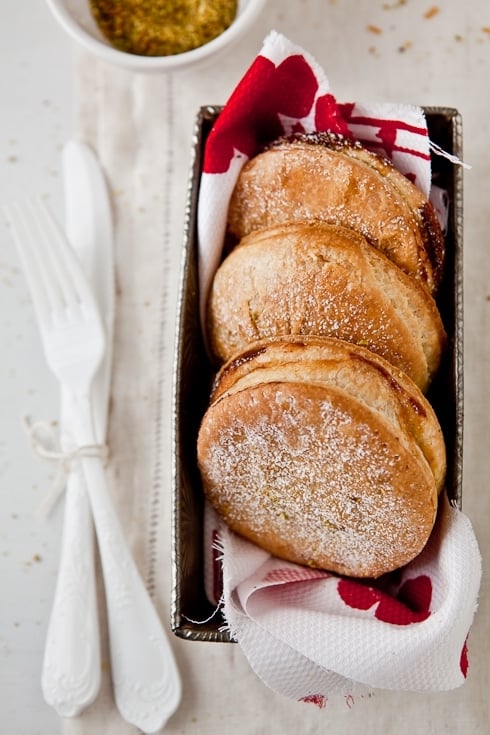
Time flies like mad these days! I really thought this week would be calmer than the ones ahead. I even said it outloud. With a satisfactory smile on my face and a head full of light hearted things to do. So you can guess what happened. It got a wee bit crazy. One night that I was trying to sort it all out, my dear B. sat next to me with mugs of tea and a couple of tartelettes. I knew we were simultaneously feeling how wonderful it is to be able to rely on the simplicity of seasonal baking when there’s combobulation around.
As my family back home was gathering around my grandfather to celebrate Epiphany, we were virtually sharing the moment with individual "Galette des Rois", the traditional frangipane filled puff pastry tarts served for the occasion. B. is well aware of my family’s "must dos" and how they translate into my baking and cooking as definite advantages for him even this far away, like truffles at Christmas and galette or brioche for Epiphany.
Like in many a French person, galettes des rois are a big deal. A lot of families take this opportunity to gather together one last time towards the end of the holidays, have a glass of Champagne and wish one another a Happy New Year before things go back to their usual "metro-boulout-dodo" (commute-work-sleep). Since most years we were visiting my grandparents in Paris for the holidays, we would have "galette des rois" there and, once back home in Provence, we would have "brioche des rois". And sometimes both which was perfect for the gourmande in me!
When I mentioned the possibility of not baking any galette this year, you should have seen the look on my husband’s face. As if I was taking his favorite toy away. My symptoms have been so greatly improved by removing gluten entirely from our diet that I did not really want to make a full batch of puff pastry and galettes. I can’t stand being that selfish either but from the previous results I’d had turning puff pastry gluten free, a complete gf galette des rois was not going to happen. So I made them anyway, the regular way. I only had one bite too many to know I shouldn’t have but he was happy and that makes up for a lot of things.
Back in September, I tried a couple of times to come up with a gluten free puff pastry for a Daring Bakers challenge but none of the attempts left me satisfied. I came up with a ratio for the flours I wanted to use, ran it by Shauna for confirmation and was elated to see my dough was flexible enough to roll and to fold and bake into beautiful crispy layers. Each time though I had the same problem: too much butter if I followed traditional ratios and, as Shauna pointed out, not enough protein. Shauna, Danny and I are actively working on that project again and more decided than ever to come up with a gluten free puff pastry so good and fluffy you will be proud to point out it is gluten free.
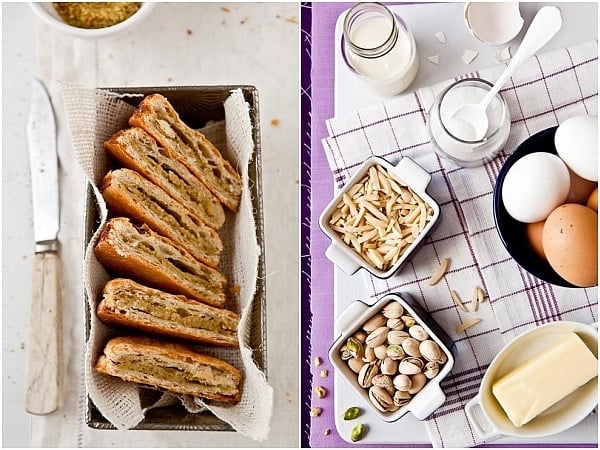
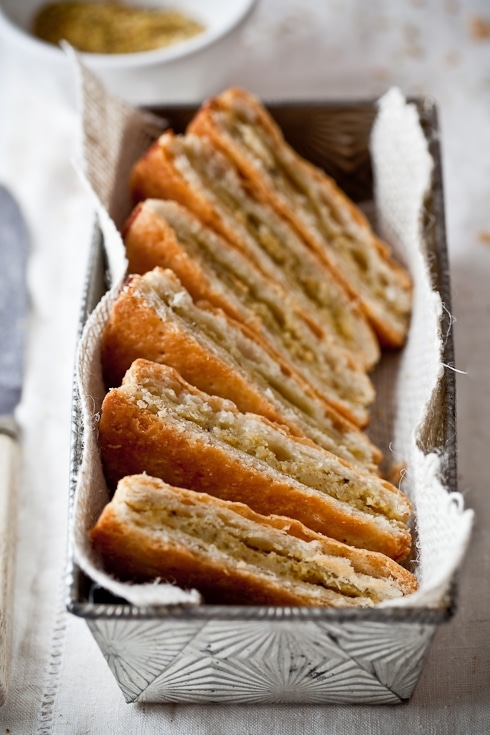
The most traditional filling for these tarts is almond frangipane (almond cream) but it’s never a bad thing to change things up so this time around I replaced half the almonds with pistachios and it could well be my favorite flavor so far for these. I used tart rings to form and bake them so the filling would stay neatly encased but you can most definitely make these free form as long as you keep careful to seal the edges tight.
I prepared and baked the tarts, set the tray to cool on the countertop and just starting giggling like a child. It came to absolutely no surprise to my dear husband that I completely forgot to sneak inside that little ceramic trinket designating the King or Queen of the day. I declared him King anyway and we happily cut into a warm frangipane galette right away.
Twitter people might already know this but I must tell you of an awesome event planned by Jen, event planner extraordinaire and writer of the blog Devour The World, Rachael of La Fuji Mama and Gaby, personal chef and author of What’s Gaby Cooking. They have arranged to fly me out to Los Angeles and secure enough space and time for me to teach two macarons classes at the Academy of Culinary Education on Friday March 5th and Saturday March 6th. Zoink!
So, if you live in the area and have always wanted to know how to bake the perfect macaron here is your chance to do so in a professional but relaxed atmosphere. I just can’t wait to be there and be able to help 1 on 1. Come join us! Please email Rachael rachael{at}lafujimama {dot}com for all the details as I hear both classes are filling up rather fast. Working also on another surprise for that trip…
Thanks for the positive feedback on giving out the recipes in both English and French. Starting with a salad was quite easy and I almost said "forget it" when I realized I would have to translate a recipe for puff pastry on this post but there it is after the jump!
Have a great weekend! Galette Des Rois:
Makes four or eight 4-inch tarts
Notes: I hope you’ll try your hand at puff pastry soon. It sounds harder than it is. Really. But I understand and you can get very close by using a simpler Rough Puff Pastry.
For the puff pastry:
3 cups (420gr) all-purpose flour, plus more for work surface
3/4 cup (105gr) cake flour
1 1/2 teaspoons salt (7 gr)
4 tablespoons (60gr) unsalted butter, cut into 1/2-inch pieces, well chilled
1 1/4 cups (300ml) icy cold water
1 tablespoon (14gr) all-purpose flour
1 3/4 cups (3 1/2 sticks)(405gr) unsalted butter, well-chilled
Make the dough package:
In a large mixing bowl, combine both flours with the salt. Scatter butter pieces over the flour mixture; using your fingers or a pastry cutter, incorporate butter until mixture resembles coarse meal.
Form a well in center of mixture, and pour the water into well. Using your hands, gradually draw flour mixture over the water, covering and gathering until mixture is well blended and begins to come together. Gently knead mixture in the bowl just until it comes together to form a dough, about 15 seconds. Pat dough into a rough ball, and turn out onto a piece of plastic wrap. Wrap tightly, and place in refrigerator to chill 1 hour.
Make the butter package:
Sprinkle 1/2 tablespoon flour on a sheet of waxed or parchment paper. Place uncut sticks of butter on top, and sprinkle with remaining 1/2 tablespoon flour. Top with another sheet of paper; using a rolling pin, pound butter to soften and flatten to about 1/2 inch. Remove top sheet of paper, and fold butter package in half onto itself. Replace top sheet of paper, and pound again until butter is about A inch thick. Repeat process two or three times, or until butter becomes quite pliable. Using your hands, shape butter package into a 6-inch square. Wrap well in plastic wrap, and place in refrigerator until it is chilled but not hardened, no more than 10 minutes.
Assemble and roll the dough:
Remove dough package from refrigerator, and place on a lightly floured work surface. Using a rolling pin, gently roll dough into a 9-inch round. Remove butter package from refrigerator, and place it in the center of the dough round. Using a paring knife or bench scraper, lightly score the dough to outline the butter square; remove butter, and set it aside. Starting from each side of the center square, gently roll out dough with the rolling pin, forming four flaps, each 4 to 5 inches long; do not touch the raised square in the center of the dough. Replace butter package on the center square. Fold flaps of dough over the butter package so that it is completely enclosed. Press with your hands to seal.
Using the rolling pin, press down on the dough at regular intervals, repeating and covering the entire surface area, until it is about 1 inch thick. Gently roll out the dough into a large rectangle, about 9 by 20 inches, with one of the short sides closest to you. Be careful not to press too hard around the edges, and keep the corners even as you roll out the dough by squaring them with the side of the rolling pin or your hands. Brush off any excess flour. Starting at the near end, fold the rectangle in thirds as you would a business letter; this completes the first single turn.Wrap in plastic wrap; place in refrigerator 45 to 60 minutes.
6/ Remove dough from refrigerator, and repeat process in step 5, giving it five more single turns.Always start with the flap opening on the right as if it were a book. Mark the dough with your knuckle each time you complete a turn to help you keep track. Chill 1 hour between each turn. After the sixth and final turn, wrap dough in plastic wrap; refrigerate at least 4 hours or overnight before using.
For the frangipane filling:
1 stick (110 gr) unsalted butter, at room temperature
1/2 cup (100 gr) sugar
1/2 cup (50 gr) ground almond
1/2 cup (50 gr) ground pistachios
2 eggs
1/4 cup (60ml) heavy cream
Place the butter, sugar, almond powder and the eggs in a large bowl and whisk until smooth (can also be done in a food processor). Add the cream but stir in it instead of whisking so as not to emulsify it or it will rise while baking. Refrigerate for at least an hour.
To assemble the tarts (4 at a time).
Divide the dough in half and keep one half refrigerated.
Preheat the oven to 350F and line a baking sheet with a piece of parchment paper or a silpat.
Roll the puff pastry to about 1/4 inch thick on a lightly floured countertop. Using a 4 inch tart rings, cut out 8 rings into the dough. Place four dough circles into 4 tart rings. Top with about 2 tablespoons of the frangipane filling. Top with 4 dough circles and seal the edges well by pressing your fingertips inside the rings onto the dough edges.
If you wish to use the rest of dough and filling right away, just repeat those steps or you can refirgerate both for a week or freeze for up to 3 months and thaw overnight in the fridge.
Bake for about 20-30 minutes or until the tarts are golden brown.
————————————————————————————- Le P’tit Coin Francais:
Pour 4 a 8 tartes.
Pour la pate feuilletee:
420gr de farine
105gr de farine a gateau (fine)
7gr de sel
60gr de beurre non sale, tres froid et coupe en petits des
300ml d’eau tres froide (glaciale a la limite)
405 gr de beurre non sale bien froid
Faire le paton:
Dans un grand bol. melangez les deux farine et le sel. Ajouter le beurre et servez vous de vos doigts ou de deux fourchettes pour incorporer le beurre au farines jusqu’a ce que le melange ressemble a de gros grains de sable.
Formez un puit au milieu et ajoutez l’eau. A l’aide de vos mains, commencer a ramener la farine vers l’eau jusqu’a ce que la masse devienne homogene. Ramassez la masse en boule assez vite de facon a petrir le moin possible. Couvrez d’un linge ou de film plastique. Refrigerez la pate pendant une heure.
Faire le bloc de beurre:
Saupoudrez une feuille de papier sulfurise avec la moitie de la farine restante. Deposez-y le beurre et saupoudrez du reste de farine. Placez une 2eme feuille de papier sulfurise au dessus du beurre et avec votre rouleau a patisserie, frappez le beurre de facon a le ramollir et l’aplatir sur une epaisseur de 1.5cm environ. Levez la feuille de papier du dessus, et a l’aide de celle du dessous, rabattez le beurre sur lui meme. Remettez la feuille de papier au dessu et recommencez l’operation 2 a 3 fois jusqu’a ce que le beurre soit bien maleable. A l’aide de vos mains et en vous aidant des feuilles de papier, formez un carre de beurre d’environ 15cm. Refrigerez le pendant 10 minutes (pas plus).
Assembler la pate:
A l’aide de votre rouleau a patisserie, etalez la pate en un cercle de 23cm de diametre. Placez le beurre au centre du cercle et a l’aide d’un couteau fin, deligner l’emplacement du beurre sur la pate, sans faire de coupure directement dans celle-ci. Enlevez le beurre et mettez le de cote. Demarrez de chaque cote du carre et roulez la pate pour obtenir 4 grandes oreilles d’au moins 10 a 12 cm de long. Vous devez obtenir un petit carre plus epais au centre de cette facon. Placez y le beurre et rabattre les oreilles dessus. Pressez du bout des doigts pour bien enfermer le paquet de beurre.
Etalez la pate a intervals reguliers de facon a bien distribuer le beurre jussqu’a ce que la pate soit de 2cm d’epaisseur environ. Farinez votre plan de travail si necessaire au fur et a mesure. Etalez la pate en un rectangle de 23 cm de large et 50cm de long, en gardant le cote de plus court pres de vous. En partant a peu pres du milieu, pliez la pate en trois de facon porte-feuille. (1er tour) Refrigerez la pate pendant 45min a 1 heure.
Apres ce premier temps de repos, repetez l’operation 5 fois de plus pour un total de 6 tours. Refrigerez entre chaque tours au moins une demi heure. Une fois le dernier tour effectue, refrigerez la pate pendant au moins 4 heure, toute la nuit si voud pouvez.
Pour la frangipane:
100 gr de beurre non sale, et a temperature ambiante
100 gr de sucre
50 gr d’amamde en poudre
50gr de pistache en poudre
2 oeufs
60ml de creme entiere liquide
Dans un bol, melangez au fouet le beurre et le sucre jusqu’a ce que le beurre soit pale et aere. Ajoutez les amandes et melangez. Ajoutez les oeufs un a un et bien melangez au fouet. Ajoutez la creme et donnez quelques coups de fouet ou de spatule pour rendre le melange homogene.
Assembler les galettes:
En supposant que l’on se sert de 4 cercles a tarte individuels a la fois.
Prechauffez le four a 350F/175C. Preparez une plaque de cuisson avec une feuille de papier sulfurise.
Quand la pate feuilletee est prete a etre utilisee, divisez la en deux, gardez une moitie au refrigerateur et etale l’autre moitie sur un plan de travail legerement farine. Servez vous de 4 cercles a tartelette de cm de diametre et decouper 8 cercles. Deposez un cercle dans chacun des cercles. Deposez une grosse cuilliere de frangipane. Ajoutez un cercle de pate et du bout des doigts fermer bien les bords. Laissez les tartes dans les cercle, et les placez delicatement sur votre plaque de cuisson. Repetez l’operation avec le reste de pate et de frangipane.
Faites cuires les tartes pendant 20 a 30 minutes jusqu’a ce que le dessus soit bien dorer.
I am never comfortable with scheduling blog posts to go up while I am away playing working. Oh yes…this conference is maximum work: all that shaking hands, exchanging business cards, hugging, eating, discovering, laughing, all this pretty much on loop. Tough job. Alright, so you don’t buy it. Wouldn’t either (check on Twitter) What you can believe is that my dear and better half is certainly enjoying the last bit of this month Daring Bakers’ challenge, Vols Au Vent and other puff pastry based items.
I remember back in the 80s when these were the hottest appetizers on restaurant menus, at cocktails parties, often topping over with cream and rich fillings. As a child I did get my share of them, happily volunteering my tastebuds to my mother’s latest puff pastry creation. I often associate these with memories of Christmas dinner, with a house filled with cousins, parents and pets, each of us sliding our fork in a pillow of layers upon layers of puff pastry, letting my grandmother’s morels, sweetbreads and cream filling ooze out on the plate. Yes, I just closed my eyes and sighed just now….
As much as I would have loved to recreate that particular food memory, sweetbreads and morels are pretty hard to find this time of year in my parts. Thus, I pretty much stuck to sweets for this challenge with a little savory diversion as shrimp season is in full swing here in South Carolina.
I started by divided the recipe in half and making one chocolate while the other remained plain. Having made mille-feuilles many times here and having hosted a Daring Baker challenge including puff pastry, I was really happy that we had to do something else this time and it had been a long while since I had last made vols au vent.
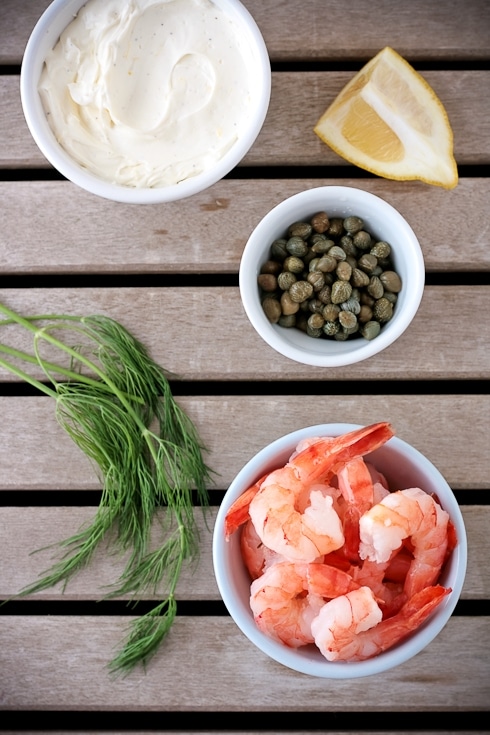
We go shrimping just about every other day lately and my freezer and fridge are bursting. Friends come over right now and leave with a couple of pounds of shrimp and a couple of vols au vent. The savory rounds were filled with soft fresh goat cheese whipped together with dill, lemon zest, salt and pepper then topped with a steamed shrimp and garnished with capers .and dill springs. So easy and so fresh! Makes me want to keep a dozen of these ready in the fridge at all time.
My brain is on chocolate and caramel lately so once the chocolate vols au vent were baked and cooled, I filled them with a salted caramel mousse. I know. I am so predictable. “Yep!” is all I have to say about that. With a huge smile on my face of course. These were just perfect. The bittersweet cocoa powder coming through from the pastry mixed with the sweet and creamy caramel….oh that was good!
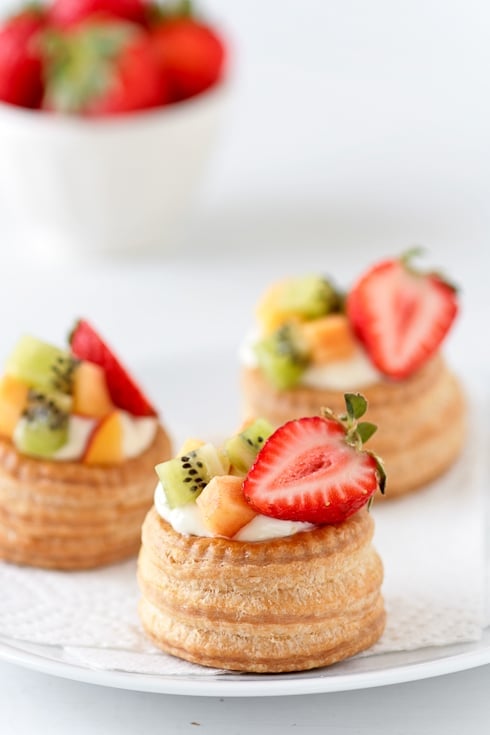
I still had a lot of lemons (in frozen juice form by now) from that case that fell on my lap a couple of weeks ago and so I filled the plain vols au vent with a tart lemon curd mousse and topped them with kiwi, nectarine, and strawberries. A little burst of summer still since it won’t feel like Fall for a very long time around here.
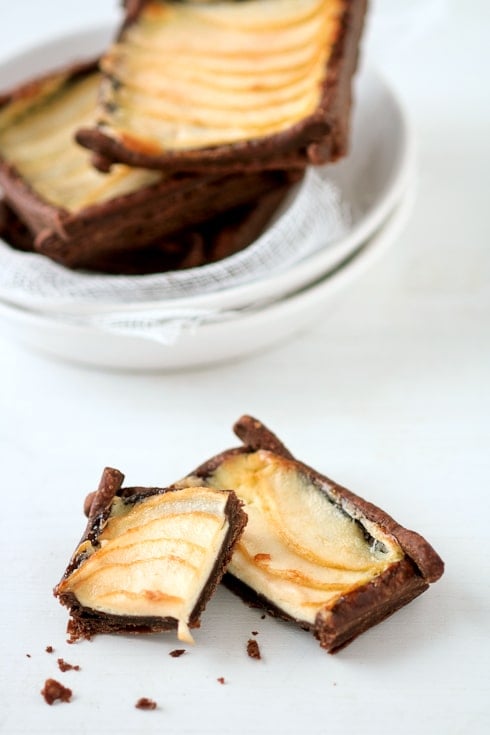
I did play with the scraps of dough a bit and made what Bill called Tiramisu Pear Tarts. The chocolate puff pastry was rolled thin and topped with a mascarpone marsala filling and thin slices of pears. I have to say these go down way too easily with an after dinner espresso! Trust me, they are all gone.
It’s good when everything is a bit crazy to be able to rely on a technique that you have done many times but I did enjoy playing around this month. If you take care of your first two turns when making puff pastry, you are set to go. These are crucial. Make sure to keep your butter pliable. Firm and it will no roll and will tear into your dough. Too soft and it won’t layer as you fold but create pockets and puddles at the bottom of your oven. Once you get the first two turns, you can pretty much put your brain on cruise and keep on.
The September 2009 Daring Bakers' challenge was hosted by Steph of A Whisk and a Spoon. She chose the French treat, Vols-au-Vent based on the Puff Pastry recipe by Michel Richard from the cookbook Baking With Julia by Dorie Greenspan.
Vols Au Vent:
Notes: I will update with all the recipes for the fillings when I get back from BlogHer Food 2009.
Michel Richard’s Puff Pastry Dough
From: Baking with Julia by Dorie Greenspan
Yield: 2-1/2 pounds dough
Notes: for the chocolate puff pastry, I just added 2 tablespoons to half the recipe for the regular puff pastry.
Ingredients:
2-1/2 cups (12.2 oz/ 354 g) unbleached all-purpose flour
1-1/4 cups (5.0 oz/ 142 g) cake flour
1 tbsp. salt (you can cut this by half for a less salty dough or for sweet preparations)
1-1/4 cups (10 fl oz/ 300 ml) ice water
1 pound (16 oz/ 454 g) very cold unsalted butter
plus extra flour for dusting work surface
Mixing the Dough:
Check the capacity of your food processor before you start. If it cannot hold the full quantity of ingredients, make the dough into two batches and combine them.
Put the all-purpose flour, cake flour, and salt in the work bowl of a food processor fitted with a metal blade and pulse a couple of times just to mix. Add the water all at once, pulsing until the dough forms a ball on the blade. The dough will be very moist and pliable and will hold together when squeezed between your fingers. (Actually, it will feel like Play-Doh.)
Remove the dough from the machine, form it into a ball, with a small sharp knife, slash the top in a tic-tac-toe pattern. Wrap the dough in a damp towel and refrigerate for about 5 minutes.
Meanwhile, place the butter between 2 sheets of plastic wrap and beat it with a rolling pin until it flattens into a square that’s about 1″ thick. Take care that the butter remains cool and firm: if it has softened or become oily, chill it before continuing.
Incorporating the Butter:
Unwrap the dough and place it on a work surface dusted with all-purpose flour (A cool piece of marble is the ideal surface for puff pastry) with your rolling pin (preferably a French rolling pin without handles), press on the dough to flatten it and then roll it into a 10″ square. Keep the top and bottom of the dough well floured to prevent sticking and lift the dough and move it around frequently. Starting from the center of the square, roll out over each corner to create a thick center pad with "ears," or flaps.
Place the cold butter in the middle of the dough and fold the ears over the butter, stretching them as needed so that they overlap slightly and encase the butter completely. (If you have to stretch the dough, stretch it from all over; don’t just pull the ends) you should now have a package that is 8″ square.
To make great puff pastry, it is important to keep the dough cold at all times. There are specified times for chilling the dough, but if your room is warm, or you work slowly, or you find that for no particular reason the butter starts to ooze out of the pastry, cover the dough with plastic wrap and refrigerate it . You can stop at any point in the process and continue at your convenience or when the dough is properly chilled.
Making the Turns:
Gently but firmly press the rolling pin against the top and bottom edges of the square (this will help keep it square). Then, keeping the work surface and the top of the dough well floured to prevent sticking, roll the dough into a rectangle that is three times as long as the square you started with, about 24″ (don’t worry about the width of the rectangle: if you get the 24″, everything else will work itself out.) With this first roll, it is particularly important that the butter be rolled evenly along the length and width of the rectangle; check when you start rolling that the butter is moving along well, and roll a bit harder or more evenly, if necessary, to get a smooth, even dough-butter sandwich (use your arm-strength!).
With a pastry brush, brush off the excess flour from the top of the dough, and fold the rectangle up from the bottom and down from the top in thirds, like a business letter, brushing off the excess flour. You have completed one turn.
Rotate the dough so that the closed fold is to your left, like the spine of a book. Repeat the rolling and folding process, rolling the dough to a length of 24″ and then folding it in thirds. This is the second turn.
Chilling the Dough:
If the dough is still cool and no butter is oozing out, you can give the dough another two turns now. If the condition of the dough is iffy, wrap it in plastic wrap and refrigerate it for at least 30 minutes. Each time you refrigerate the dough, mark the number of turns you’ve completed by indenting the dough with your fingertips. It is best to refrigerate the dough for 30 to 60 minutes between each set of two turns.
The total number of turns needed is six. If you prefer, you can give the dough just four turns now, chill it overnight, and do the last two turns the next day. Puff pastry is extremely flexible in this regard. However, no matter how you arrange your schedule, you should plan to chill the dough for at least an hour before cutting or shaping it.
Forming and Baking the Vols-au-Vent
Yield: 1/3 of the puff pastry recipe below will yield about 8-10 1.5” vols-au-vent or 4 4” vols-au-vent
In addition to the equipment listed above, you will need:
-well-chilled puff pastry dough (recipe below)
-egg wash (1 egg or yolk beaten with a small amount of water)
-your filling of choice
Line a baking sheet with parchment and set aside.
Using a knife or metal bench scraper, divided your chilled puff pastry dough into three equal pieces. Work with one piece of the dough, and leave the rest wrapped and chilled. (If you are looking to make more vols-au-vent than the yield stated above, you can roll and cut the remaining two pieces of dough as well…if not, then leave refrigerated for the time being or prepare it for longer-term freezer storage. See the “Tips” section below for more storage info.)
On a lightly floured surface, roll the piece of dough into a rectangle about 1/8 to 1/4-inch (3-6 mm) thick. Transfer it to the baking sheet and refrigerate for about 10 minutes before proceeding with the cutting.
(This assumes you will be using round cutters, but if you do not have them, it is possible to cut square vols-au-vents using a sharp chef’s knife.) For smaller, hors d’oeuvre sized vols-au-vent, use a 1.5” round cutter to cut out 8-10 circles. For larger sized vols-au-vent, fit for a main course or dessert, use a 4” cutter to cut out about 4 circles. Make clean, sharp cuts and try not to twist your cutters back and forth or drag your knife through the dough. Half of these rounds will be for the bases, and the other half will be for the sides. (Save any scrap by stacking—not wadding up—the pieces…they can be re-rolled and used if you need extra dough. If you do need to re-roll scrap to get enough disks, be sure to use any rounds cut from it for the bases, not the ring-shaped sides.)
Using a ¾-inch cutter for small vols-au-vent, or a 2- to 2.5-inch round cutter for large, cut centers from half of the rounds to make rings. These rings will become the sides of the vols-au-vent, while the solid disks will be the bottoms. You can either save the center cut-outs to bake off as little “caps” for you vols-au-vent, or put them in the scrap pile.
Dock the solid bottom rounds with a fork (prick them lightly, making sure not to go all the way through the pastry) and lightly brush them with egg wash. Place the rings directly on top of the bottom rounds and very lightly press them to adhere. Brush the top rings lightly with egg wash, trying not to drip any down the sides (which may inhibit rise). If you are using the little “caps,” dock and egg wash them as well.
Refrigerate the assembled vols-au-vent on the lined baking sheet while you pre-heat the oven to 400ºF (200ºC). (You could also cover and refrigerate them for a few hours at this point.)
Once the oven is heated, remove the sheet from the refrigerator and place a silicon baking mat (preferred because of its weight) or another sheet of parchment over top of the shells. This will help them rise evenly. Bake the shells until they have risen and begin to brown, about 10-15 minutes depending on their size. Reduce the oven temperature to 350ºF (180ºC), and remove the silicon mat or parchment sheet from the top of the vols-au-vent. If the centers have risen up inside the vols-au-vent, you can gently press them down. Continue baking (with no sheet on top) until the layers are golden, about 15-20 minutes more. (If you are baking the center “caps” they will likely be finished well ahead of the shells, so keep an eye on them and remove them from the oven when browned.)
Remove to a rack to cool. Cool to room temperature for cold fillings or to warm for hot fillings.
Fill and serve.
*For additional rise on the larger-sized vols-au-vents, you can stack one or two additional ring layers on top of each other (using egg wash to "glue"). This will give higher sides to larger vols-au-vents, but is not advisable for the smaller ones, whose bases may not be large enough to support the extra weight.
*Although they are at their best filled and eaten soon after baking, baked vols-au-vent shells can be stored airtight for a day.
*Shaped, unbaked vols-au-vent can be wrapped and frozen for up to a month (bake from frozen, egg-washing them first).
On this eve of a brand new year, (edit: I was writing this last night) I have spent a good part of this last week reflecting on the year gone by while helping our best and dearest neighbors move. We dealt with it the only way we have handled life in the past three years on our street: a long table in the backyard, lots of oysters and a bucket of cold beers, all hurdled around a big fire, watching the kids run around, the dogs chase each others and the adult pretend they were still twenty and carefree. No, it wasn’t all rosy but not everything is and as we went around the table and gave personal highlights of the year passed, I exclaimed "It’s been a pretty fantabulastic year!".
Professionaly for sure as I am currently buckling down in finishing the manuscript for the cookbook and working on a couple of surprises for you. But looking at all these friends gathered around the table hugging, laughing and reminiscing, my heart was soring for having formed stronger ties will all of them and all of you in the past year. I love and live hard and you listen…
As a last get together in the tradition of 2008, we each brought our own specialty and as you can imagine, I brought dessert. We decided to go all out and have a pre New Year’s Eve celebration since much like Christmas our little nucleus would be spread out on Wednesday night. Candles and garlands were hung around the yard, Champagne replaced beers and toast and smoked salmon replaced chips and dips. In my family, we share a slice of Galette des Roison New Year’s Day but I decided to change things around keeping the main components of the galette, puff pastry and almond frangipane cream and layering poached quince and pear slices that I had in the freezer. I did tuck in a little ceramic figurine inside one of the tartelette as the tradition calls for and one of us was indeed crowned king that night. Good cheer and good fun.
Poached Pear and Quince Frangipane Tartelettes Recipe:
Serves 6
For the puff pastry:
1/3 puff pastry (recipe here)
On a lightly floured board, roll the puff pastry into a 15×6 rectangle, cut out 6 rectangles (5×3). Prick them with a fork, lay them falt on a parchment lined baking sheet and refrigerate while preparing the fruit and the frangipane.
For the poached pear and quince:
1 quince, peeled, cored and sliced
1 pear, peeled cored and sliced
4 cups water
1/2 cup (100gr) sugar
6 cloves
2 star anise
2 cinnamon sticks
2 teaspoons lemon zest
In a large saucepan set over medium high heat, place the quince only and the remaining ingredients and bring to a boil. Reduce the heat to a simmer and continue to cook for about 45 minutes, or until soft. Remove the quince from the liquid and let cool to room temperature. Proceed the same way for the pear but only cook it for 15-20 minutes.
For the frangipane cream:
1 stick (115 gr) butter, softened
1/2 cup (100 gr) granulated sugar
1 cup (100 gr) ground almond
seeds from one vanilla bean or 2 teaspoons vanilla paste or extract
2 eggs
1/4 cup (60gr) heavy cream
Place the butter, sugar, almond powder, vanilla bean seeds and the eggs in a large bowl and whisk until smooth (can also be done in a food processor). Add the cream but stir in it instead of whisking not to emulsify it or it will rise while baking.
To assemble:
Preheat oven to 350F.
Evenly spread the frangipane cream over the puff pastry rectangles and layer the quince and pear slices over it. Sprinkle with chopped almonds or pistachios if desired. Bake for 35-40 minutes.
I am looking forward to 2009! You might see some new and familiar faces come and tend the fort while I wrap things up writing. They illustrate what 2008 has been for me: discovery after discovery of talents, creativity and friendships. A year in which the support and art of others have pushed me to get better, live better, breathe stronger.
You all have made 2008 a wonderful year for me and this site. I will continue to give back to you the best way I can through baking and photographing it of course but also by being more regular on your blogs as soon as things calm down a bit.
I finally made it to Lisa’s house today and after many hours of chatting with her and Kelly, I find myself thinking about B. back home and how sick with a bad cold he is and how I am not there to help him feel better. Hmmm, maybe that’s not such a bad thing considering he is a terrible a "sickie". Well, I did feel bad leaving him at the worse of bouts of coughing and sneezing and figured that I’d make us a nice pot of soup and a flavorful and comforting dessert before I left. You know, so he’d miss me terribly and not feel like I left him cold for five days while I was having a grand time with the girls. To say that we have already started is an understatement!!
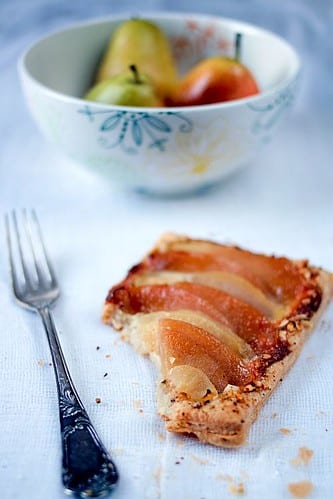
I have always find tartes tatin to be comforting with their soft apples and caramel goodness all blanketed by a soft pillow of dough. Since B. is on a heavy tea drinking regimen, I wanted to infuse the apples with the soft and soothing scent of Chai tea. Since I was in the middle of packing I did not really have much time to put the proper chai spices quantities together, but I did focus on the main ones such as nutmeg, cardamom and ginger. For a proper chai spice mix, you can find one here at the bottom of the page.
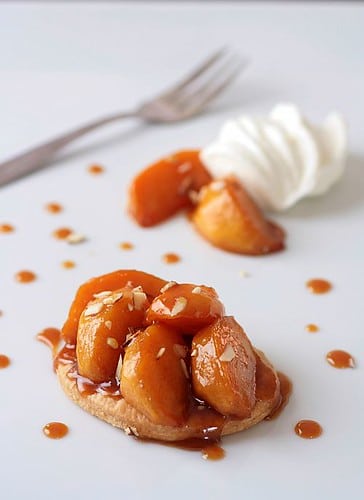
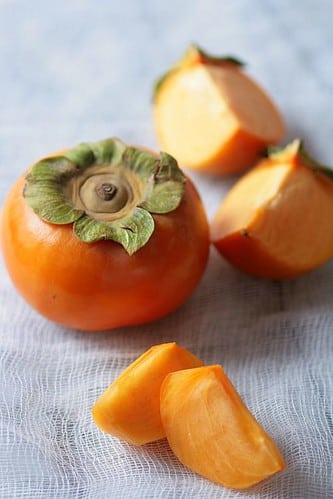
In my last post I was telling you about the tasty raspberries that fell out from the back of a truck, well not literally it was more a matter of don’t ask, don’t tell". The persimmons that I used for the tarts were also part of that loot. The guys know how much I love them and can’t wait for the fall and winter to get my hands on them. It was such a nice surprise to find 4 gorgeous ones in my basket the other day that I could not resist using them in the tatins instead of apples. I love how their flavors cannot really be described, their texture and shape are so unusual and how well they behave in any kind of roasting or cooking. They sometimes taste like a bit of apples and pears mixed into them, sometimes with a hint of papaya. Simply delicious!
I usually make my tartes tatin with a basic pate brisee, like my grandma did but there are various recipes out there calling for puff pastry, so you are good either way. I had some leftover puff pastry from the Millefeuilles, I opted to be frugal (packing-time issue) and use that instead of trying to run around the house with my head running ten feet behind me. I cooked the persimmon slices with the chai spices in a little butter and honey and once they were nice and caramelized, spooned them in tart shells, topped them with the puff pastry and baked them until it was golden. Once out of the oven, we impatiently waited 5 minutes to flip them over and dig in. The persimmons together with the spices were "the perfect medication" according to B.
Persimmons Tarte Tatins:
serves 4
2 persimmons, peeled, cored and sliced in 8 pieces each
2 Tb butter
1/3 cup honey
1/8 tsp ground cardamom
1/8 tsp nutmeg
1/8 tsp ginger Puff pastry (you will need 1/4 of the recipe)
or pate brisee
In a large saute pan, melt the butter with the honey and bring to a simmer. Add the persimmon slices and the spices and cook until fork tender and caramelized, about 5 minutes. Divide the fruit slices evenly in 4 tart shells (mine are about 4 inches wide). Reserve the cooking liquid.
Roll out your dough and cut 4 circles the same circumference as your tart shells. Lay one piece over each tart shell and bake at 350F until golden brown (15 minutes).
Remove from the oven and let cool a few minutes before inverting onto your plates. Spoon any remaining juices from the pan over the fruits.
I know, I know, it is Fall…so why all the raspberries? And now the lemon? Store diplays, magazine covers and tv shows "fall season" premieres are doing a great job at convincing me it is Fall. Yet, one step outside in the middle of the afternoon keeps telling me otherwise, time and time again. Still wearing flip flops and shorts so I hope you will indulge me for a couple more raspberry posts. I promise the next one will have an autumnal twist.
We are enjoying quite a few dinners outside with the neighbors and the summer grill outs have finally given way to wonderful oyster roasts. It is hard to believe the way our street functions but if you spend one week here it’d be easy to see why I wish I could take the whole street with me if we ever move. It is not uncommon to harbor someone else’s dog while they help you run after your own, have about 3 strollers and 8 dogs walking alongside your own crazy little-big ones. A walk up to the dock usually turns into a crabbing or shrimping fest while 2 of the above mentionned dogs decide to go for a swim without giving you notice first.
These are the moments that my soul swell with life and good feelings, the ones that make you wish your arms were big enough to grab a hold of it all. So you let your heart do it. You let all the wonderful strangers in. There will be moves and departures, goodbyes and boxes of macarons dropped at the doorstep of new neigbors. Just let them in…because they never ask why and what.
Our little nucleus likes to gather on the front steps of C&H and the twins. It is much easier to monitor the pets, the kids and we literally can throw a head of lettuce in direction of the picnic table if someone forgot the greens. I have not tossed anything like cakes and desserts, although the twins are polishing their receivers' skills for that very purpose. This past weekend we celebrated A’s first time without training wheels, AJ’s first three teeth (all or nothing kind of baby!), a tiny peaceful newborn, a kittie and a new neighbor. Somebody rented the house next to ours for the next few months and C. and I started to joke around that she might run away scared after one weekend spent around here. Loud. Busy. Open doors. Skateboards. Loud. Treehouse. S’mores. Frisbees. Did I say loud? I was feeling bad for this poor lady but I remembered the phrase "baptism by fire"…
Saturday night, the steamer started going full blast, we dragged the long narrow table upfront and set out buckets, oyster knives, crackers, wine, cocktails, etc… The kids really wanted to meet this new neighbor and were wondering if she might ever come out and say hi. I laughed and said "don’t worry, she will…and fast I bet. If she comes down fast and smiling that means she is hungry and wants to meet you. If it is fast and fuming, run!!!" Within 20 minutes, L. was among us, glass of wine in one hand and my dog licking her other hand clean.
I am just in charge of desserts here. C. has a talent for making a yard or a driveway feel like the front steps of a magical kingdom. She laid down a huge and almost brand new rug she had found on the side of the street a couple days prior, a couple of newly painted red lawn chairs picked up from an army depot store and the kids were watching movies projected on a oversized curtain on the side of the house while the adults were seriously entertaining.
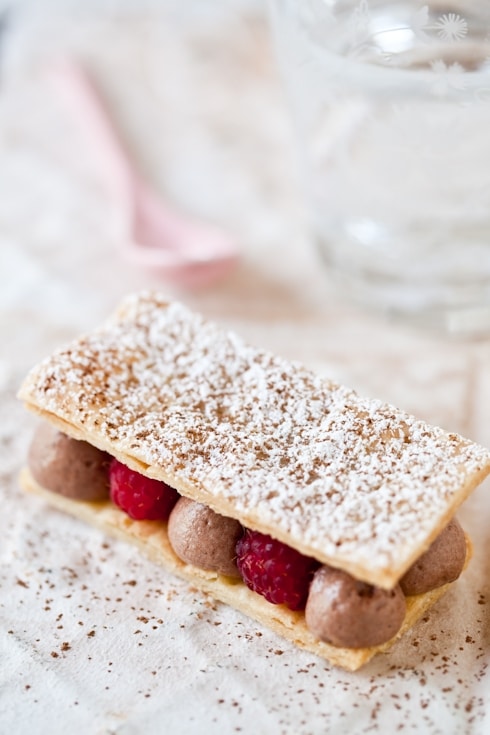
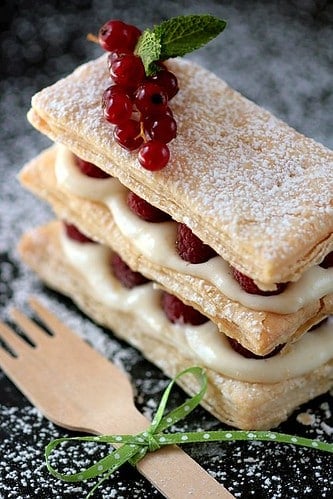
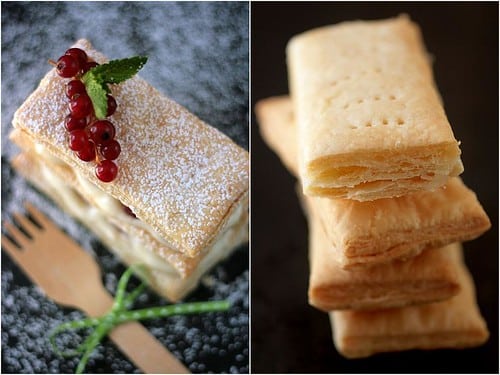
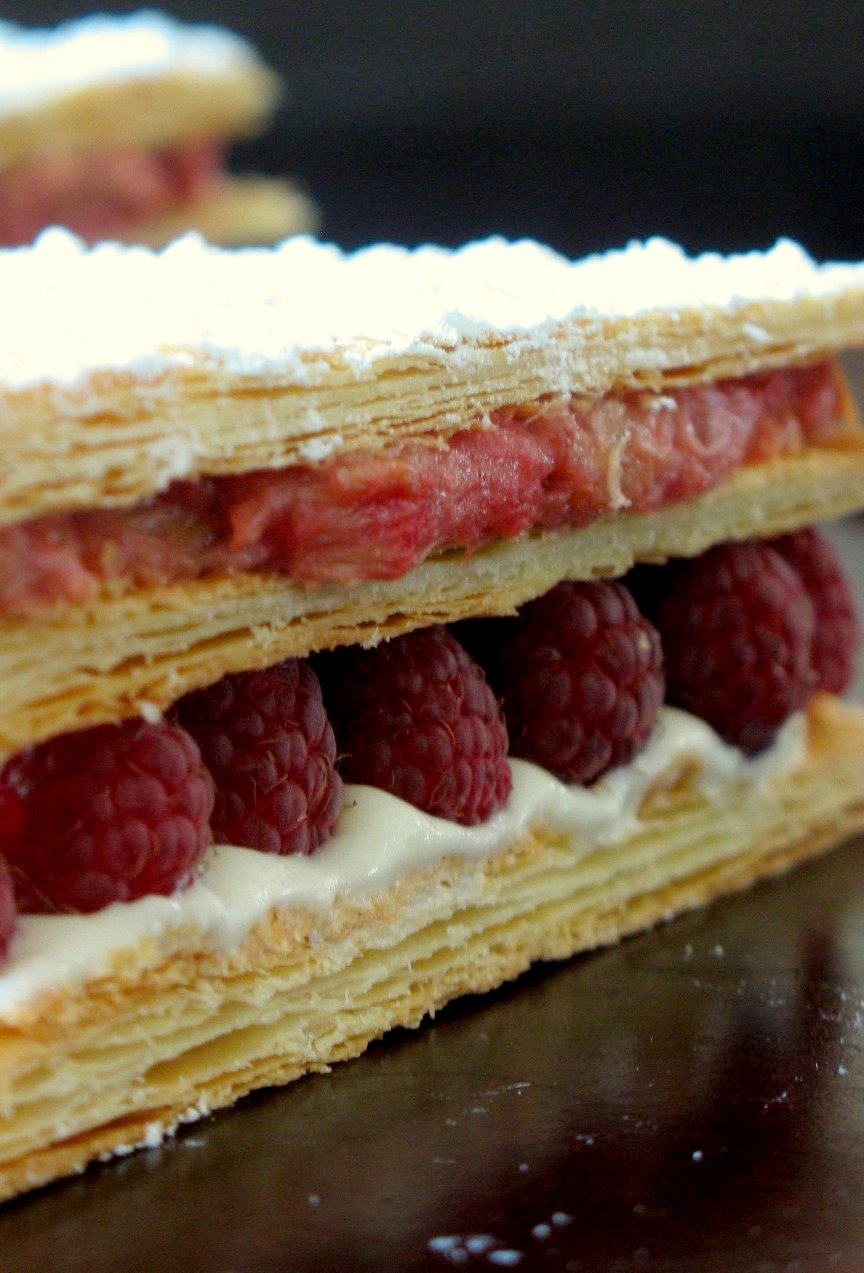
Since the mood was light and the temperatures still in the upper 80s, I decided to bring a summer-ish dessert to our picnic table. The children love to eat what the Pretending-To-Be-Grownups eat, preferably without plates or utensils, and the messier the better. While we delicately forked into our Lemon and Raspberry Mille Feuilles, sometimes separating layer for more of that flaky effect, they exercised perfect gluttony by eating these in two bites, flat. Good thing they were light and not too tangy and that I had made twice the amount necessary!
Light is the word. Mille Feuilles takes its name from the numerous layers puff pastry and although the traditional one, well, the one I grew up on, is filled with vanilla custard and topped with chocolate fondant, once you get the hang of it, the possibilities are endless. Puff pastry is not that difficult to do. No really, I am not just saying that. It requires patience and time, so yes, it best left for a day you are around the house doing other things. Make sure your kitchen is not blistering hot and that you let the dough rest the require amount of time in between each turn. Not only is it crucial to relax it but it also prevents the butter from turning to mush and running out of your dough while you roll.
What you see in the pictures is a quick puff pastry I have been working on and I am really excited of the way it turned out, but I can’t give you the recipe quite yet. I will however re-direct you to another one I absolutely love, from Martha Stewart. Works like a charm and make the most tender, flaky dough, and if you have to learn one basic, well hers is a great start. Each layer is filled with a lemon curd mousse and topped with rows of raspberries. Again, feel free to change the fruit as any would work great with lemon. There is plenty of chocolate coming up with the holidays so a little lemon-berry slice is a welcome lighter sight (that is if you forget all the butter in the dough!)
Lemon Raspberry Mille Feuilles:
Makes 6-8 depending on the size of your rectangles.
Kitchen Note: the dough makes more than you need but double wrap it in plastic film and freeze for a later use. You won’t regret it.
For the puff pastry:
Makes about 2 1/2 pounds.
3 cups all-purpose flour, plus more for work surface (420 gr)
3/4 cup cake flour (105 gr)
1 1/2 teaspoons salt (7 gr)
4 tablespoons unsalted butter, cut into 1/2-inch pieces, well chilled (60 gr)
1 1/4 cups cold water (295.5 ml)
1 tablespoon all-purpose flour (14 gr)
1 3/4 cups (3 1/2 sticks) unsalted butter, well-chilled (405 gr)
– Make the dough package: In a large mixing bowl, combine both flours with the salt. Scatter butter pieces over the flour mixture; using your fingers or a pastry cutter, mix in the butter until it resembles coarse meal.
-Form a well in center and pour in the water. Using your hands, gradually draw flour mixture over the water, covering and gathering until mixture is well blended and begins to come together. Gently knead mixture in the bowl just until it comes together to form a dough, about 15 seconds. Pat dough into a ball, and turn out onto a piece of plastic wrap. Wrap tightly, and refrigerate 1 hour.
– Make the butter package: sprinkle 1/2 tablespoon flour on a sheet of parchment paper. Place uncut sticks of butter on top, and sprinkle with remaining 1/2 tablespoon flour. Top with another sheet of paper; using a rolling pin, pound butter to soften and flatten to about 1/2 inch. Remove top sheet of paper, and fold butter package in half onto itself. Replace top sheet of paper, and pound again until butter is about 1 inch thick. Repeat process two or three times, or until butter becomes quite pliable. Using your hands, shape butter package into a 6-inch square. Wrap well in plastic wrap, and place in refrigerator until it is chilled but not hardened, no more than 10 minutes.
-Assemble and roll the dough: Remove dough package from refrigerator, and place on a lightly floured work surface. Roll dough into a 9-inch square. Remove butter package from refrigerator, and place it in the center of the dough square. Fold each corner of dough square over the butter package so that it is completely enclosed. Press with your hands to seal.
– Using the rolling pin, press down on the dough at regular intervals, repeating and covering the entire surface area, until it is about 1 inch thick. Gently roll out the dough into a large rectangle, about 9 by 20 inches, with one of the short sides closest to you. Be careful not to press too hard around the edges, and keep the corners even as you roll. Brush off any excess flour. Starting at the near end, fold the rectangle in thirds as you would a business letter. This completes the first single turn. Wrap in plastic wrap and refrigerate 45 to 60 minutes.
– Remove dough from refrigerator, and repeat the rolling and folding process, giving it five more single turns. Always start with the flap opening on the right as if it were a book. Mark the dough with your finger each time you complete a turn to help you keep track. Chill 1 hour between each turn. After the sixth and final turn, wrap dough in plastic wrap; refrigerate at least 4 hours or overnight before using.
-Divide the dough in half, double wrap one half with a sheet of parchment paper and plastic wrap and freeze for a later use. The dough can be frozen up to three months.
-Roll one half to a 1/8 inch (3 mm) thick 18×10 or so rectangle and cut out 4×2 rectangles and place them on a parchment paper lined baking sheet. Dock the dough with a fork to let the steam out while baking so your rectangles will be evenly puffed. Bake at 350F until golden brown. Let cool completely before filling with the mousse.
For the lemon mousse:
grated zest of 1 lemon
1 cup (250 ml) lemon juice
1/2 cup (100gr)sugar
2 eggs
1 cup (250 ml)heavy cream
2 pints fresh rapsberries (about 2 cups)
Combine the zest, sugar, juice in a saucepan, and bring to a simmer. In a small bowl, beat the eggs until light. Beat some of the lemon mixture into the eggs to temper. Scrape the mixture back into the saucepan and cook stirring constantly until it thickens up, about 5 minutes. Strain and let it cool to room temperature, covered with plastic wrap until ready to use.
In a stand mixer, whip the cream to medium stiff peaks. Incorporate the cooled lemon curd in three additions. Place in a piping bag and pipe (or spoon) onto the puff pastry rectangles. Top with raspberries and repeat to obtain two or three sheet stacks.
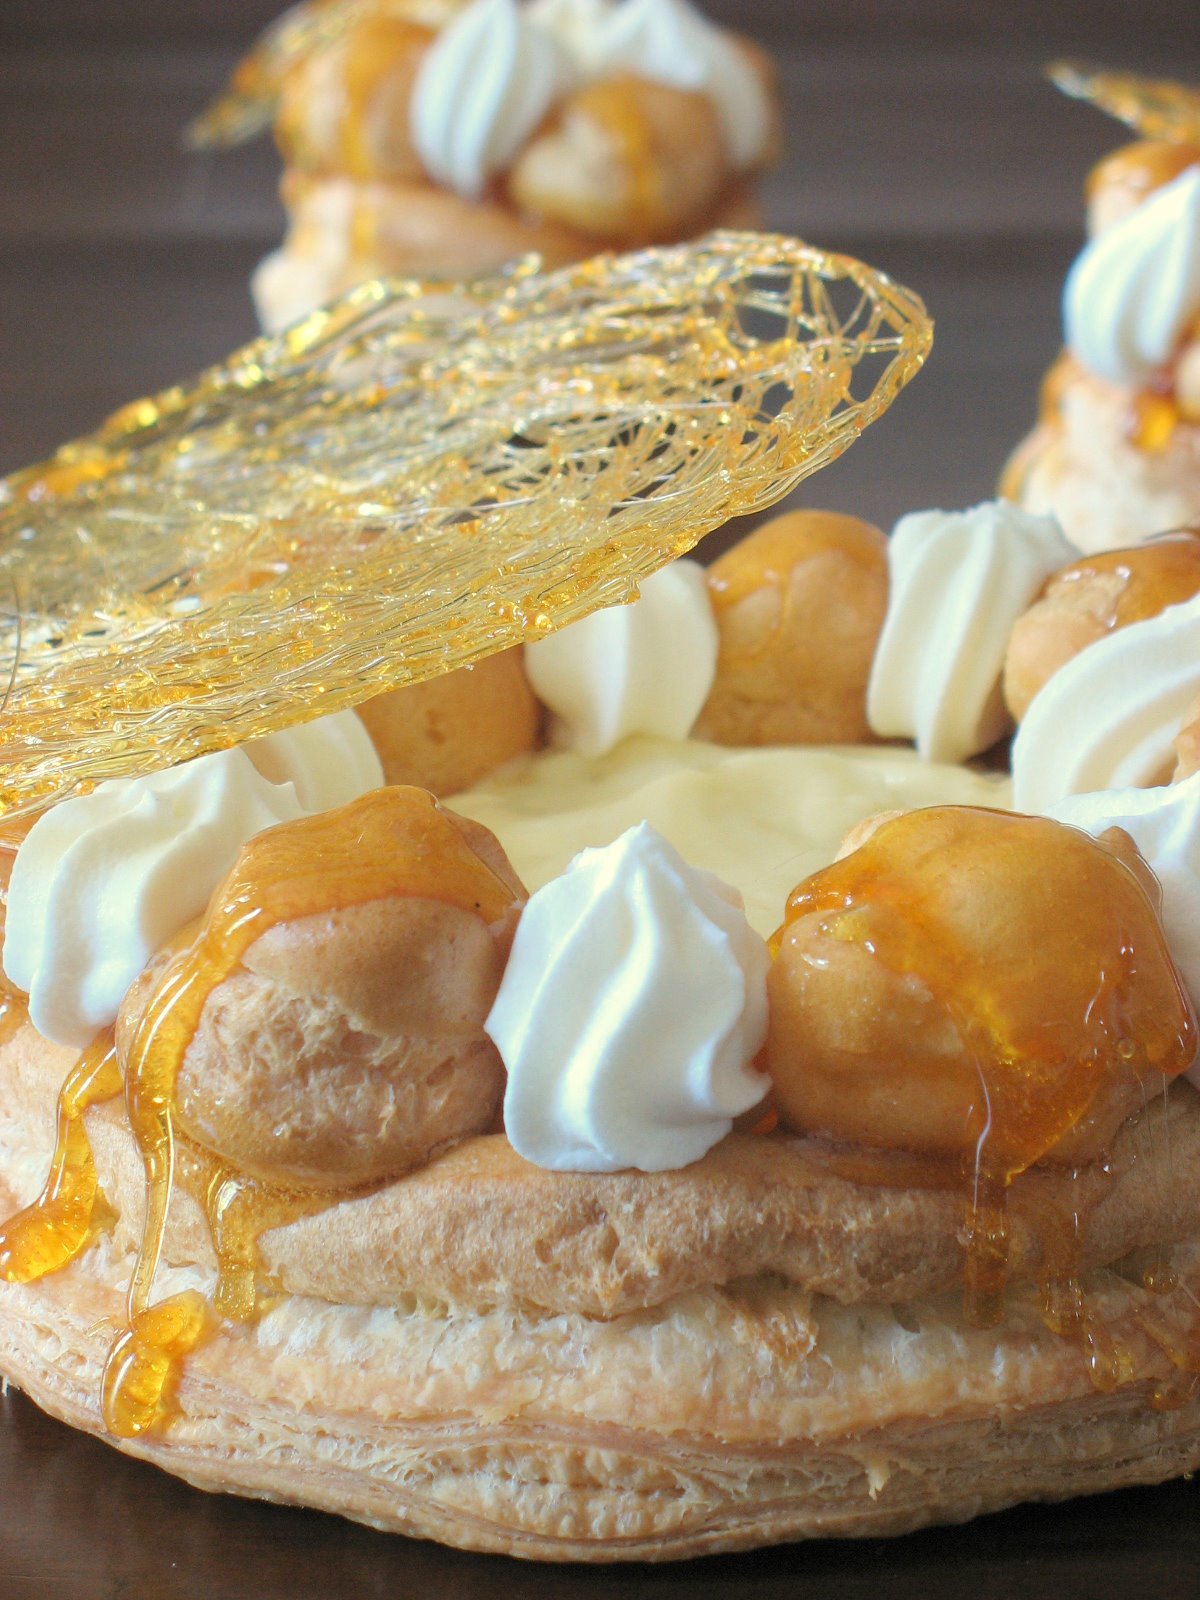
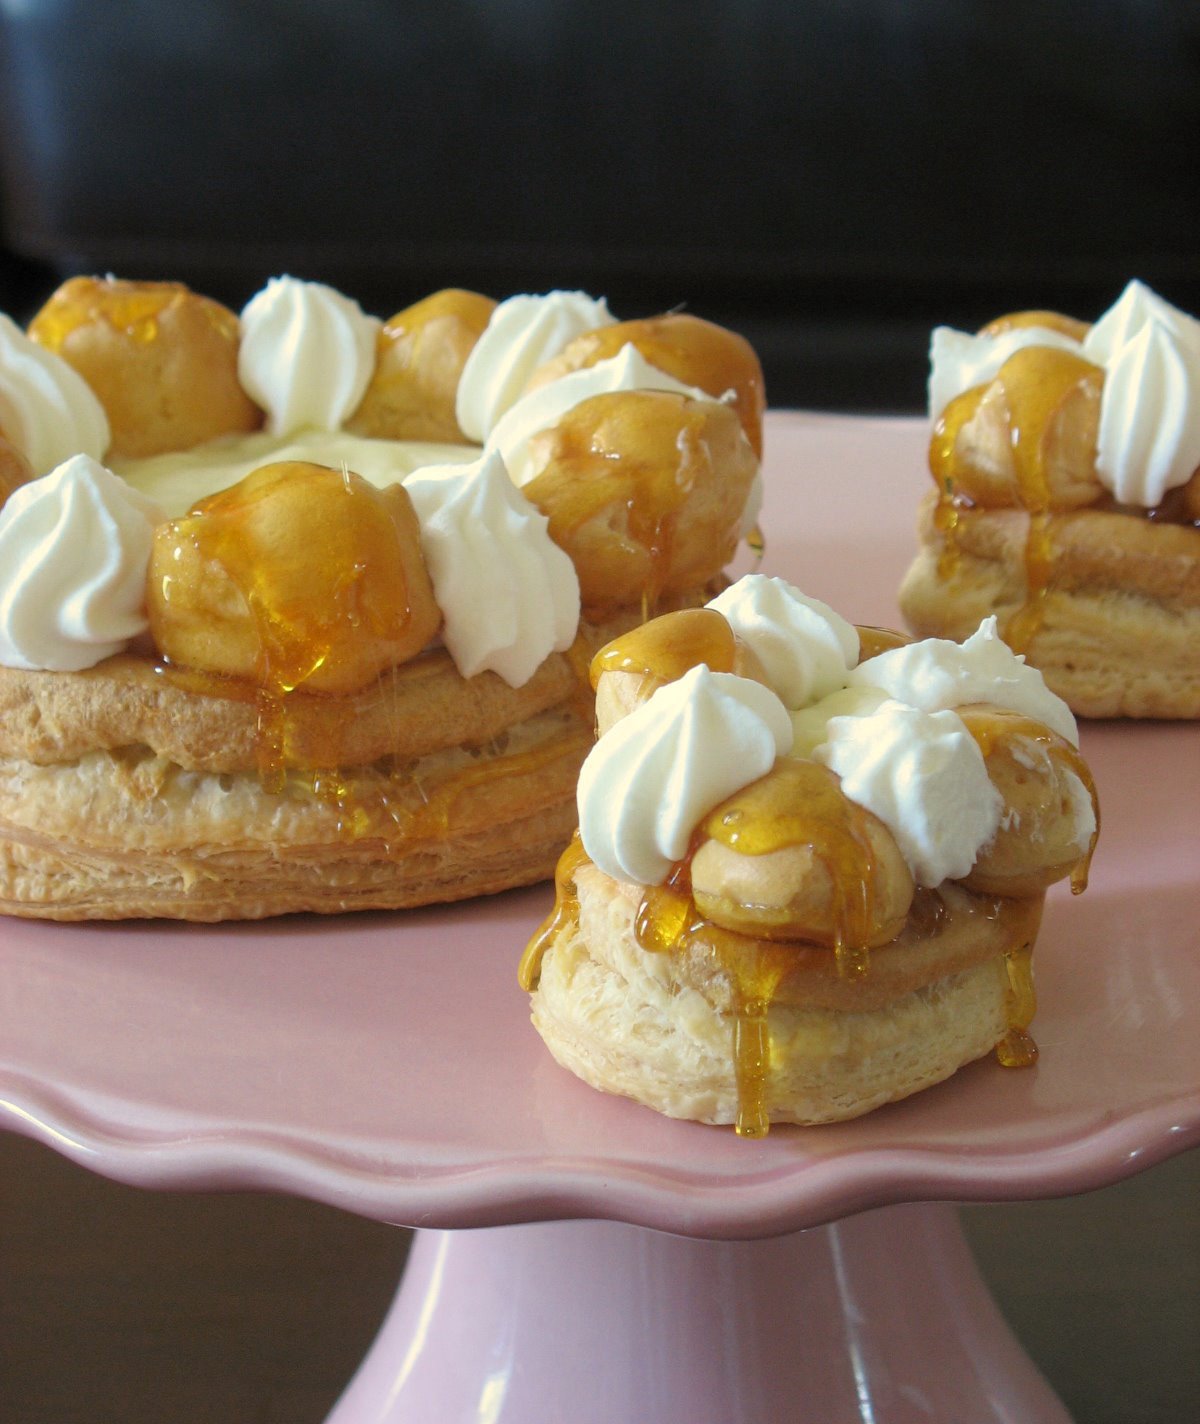
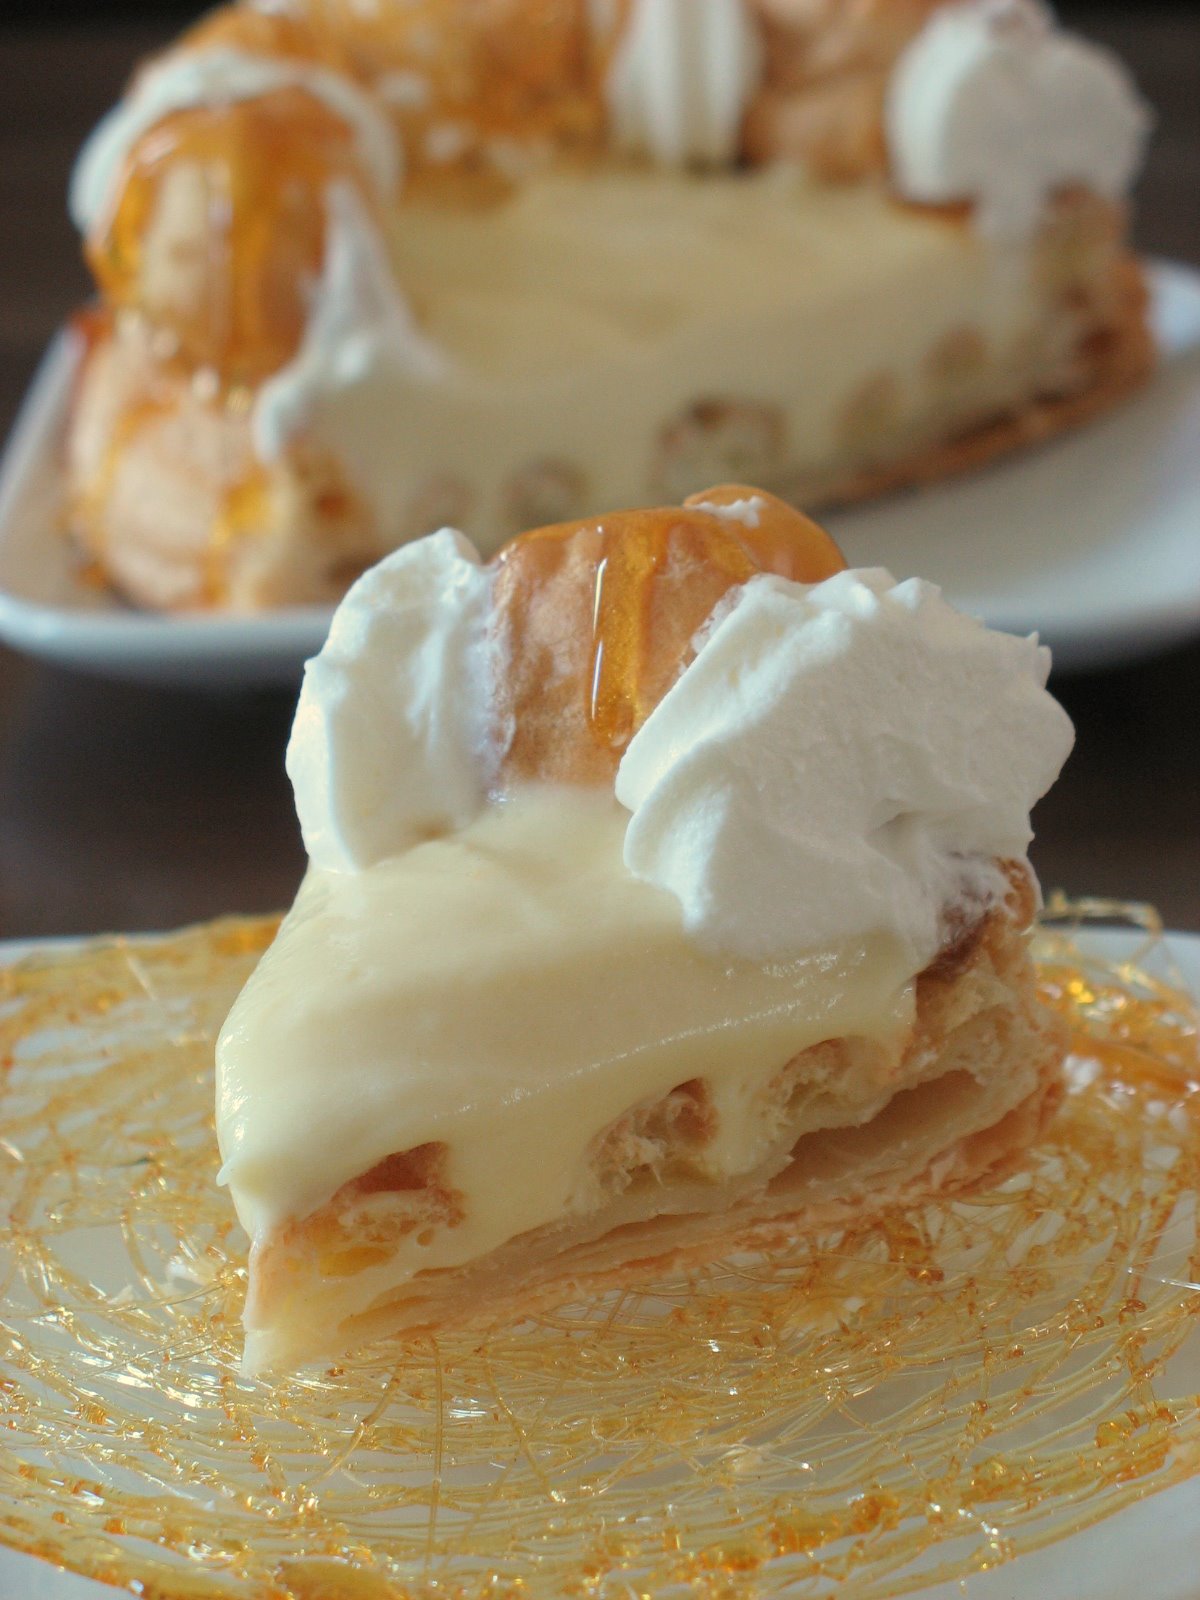
It’s time for the May installment of the Daring Bakers’ production, created by Ivonne and Lisa. It was my turn to pick a recipe and risk a minor stone throwing if it did not work out. After last month somewhat hair pulling Crepe Cake (and yes, Brilynn we still love you), I was really worried about presenting the recipe I had chosen: Gateau Saint Honore. I knew that some of us had previously made it either in their jobs or pastry school, some had baked parts of it for other recipes or had been tempted by makin some aspects of it without taking the plunge. There were several reasons behind my choice but primarily:
– Turns out that May 16th was Saint Honore (pronounced o-no-ray) Day, patron Saint of pastry chefs and bakers.
– It is the “must pass” element of pastry school students and it is a cake that includes several elements and techniques that bakers should try at least once: puff pastry, cream puff dough, caramel and pastry filling.
– We are Daring Bakers after all!
Since there is an ever growing number of Daring Bakers, I asked Anita to co-host with me and you will find half of the Daring Bakers’s links to their creation on this blog and half on hers. We will be updating the links as people post throughout the day. There are 48 of us this month, from various baking backgrounds and accomplishments, with various jobs and trades and we have our first male Daring Baker too! On to the nitty-griddy of the recipe:
There are many fillings as they are bakeries: chiboust cream, pastry cream, Bavarian cream (aka Diplomat cream). The cake building goes like this:- base of puff pastry- rings of cream dough baked on top (so that the cream sticks)- cream puffs set on the pastry filling or hooked to the base with hot caramel- cream filling to fill everything
I compiled recipes from Bo Friberg’s books “The Professional Pastry Chef” editions 3rd and 4th, and "The Advanced Pastry Chef". It is straightforward and very close to what you would find nowadays walking on the streets of Paris and popping into a bakery (close our eyes, you’re there). I realize it calls for time consuming puff pastry so you can use store bought, but if you have never made it why not try? It is just a long process, but the recipe given below makes more than you need so you can freeze it and use it later for something else. The recipe for the Saint Honore cream is flavored with rum and that may not appeal to you, so substitute an alcohol that you like more (Grand Marnier, White Godiva, Kirsch,…), or vanilla.
Gateau Saint Honore is built upon the followwing pastry items:
Puff pastry, Pate a Choux (Cream Puff Dough), Saint Honore Cream, caramel and whipped cream.
Pate a Choux – Cream Puffs Dough
4 ¾ oz. all purpose flour (135 gr)
1 cup water ( 240 ml)
2 oz unsalted butter (58 gr)
¼ tsp. salt (1 gr)
1 cup eggs (240 ml)
Sift the flour and set aside. Heat the water, butter and salt to a full rolling boil, so that the fat is not just floating on the top but is dispersed throughout the liquid. Stir the flour into the liquid with a heavy wooden spoon, adding it as fast as it can be absorbed. Avoid adding it all at once or it will form clumps. Cook, stirring constantly and breaking up the lumps if necessary, by pressing them against the side of the pan with the back of the spoon until the mixture comes away from the sides of the pan, about 2-3 minutes. Transfer the dough to a mixer bowl. Let the paste cool slightly so that the eggs will not cook when they are added. You can add and stir the eggs by hand but it requires some serious elbow grease.Mix in the eggs, one at a time, using the paddle attachment on low or medium speed. Do not add all the eggs at once. Check after a few, the dough should have the consistency of thick mayonnaise.Transfer the dough to a piping bag and use as desired.
Pate Feuillete – Puff Pastry:
Makes about 2 1/2 pounds.
3 cups all-purpose flour, plus more for work surface (420 gr)
3/4 cup cake flour (105 gr)
1 1/2 teaspoons salt (7 gr)
4 tablespoons unsalted butter, cut into 1/2-inch pieces, well chilled (60 gr)
1 1/4 cups cold water (295.5 ml)
1 tablespoon all-purpose flour (14 gr)
1 3/4 cups (3 1/2 sticks) unsalted butter, well-chilled (405 gr)
1/ Make the dough package: In a large mixing bowl, combine both flours with the salt. Scatter butter pieces over the flour mixture; using your fingers or a pastry cutter, incorporate butter until mixture resembles coarse meal.
2/ Form a well in center of mixture, and pour the water into well. Using your hands, gradually draw flour mixture over the water, covering and gathering until mixture is well blended and begins to come together. Gently knead mixture in the bowl just until it comes together to form a dough, about 15 seconds. Pat dough into a rough ball, and turn out onto a piece of plastic wrap. Wrap tightly, and place in refrigerator to chill 1 hour.
3/ Make the butter package: Sprinkle 1/2 tablespoon flour on a sheet of waxed or parchment paper. Place uncut sticks of butter on top, and sprinkle with remaining 1/2 tablespoon flour. Top with another sheet of paper; using a rolling pin, pound butter to soften and flatten to about 1/2 inch. Remove top sheet of paper, and fold butter package in half onto itself. Replace top sheet of paper, and pound again until butter is about A inch thick. Repeat process two or three times, or until butter becomes quite pliable. Using your hands, shape butter package into a 6-inch square. Wrap well in plastic wrap, and place in refrigerator until it is chilled but not hardened, no more than 10 minutes.
4/ Assemble and roll the dough: Remove dough package from refrigerator, and place on a lightly floured work surface. Using a rolling pin, gently roll dough into a 9-inch round. Remove butter package from refrigerator, and place it in the center of the dough round. Using a paring knife or bench scraper, lightly score the dough to outline the butter square; remove butter, and set it aside. Starting from each side of the center square, gently roll out dough with the rolling pin, forming four flaps, each 4 to 5 inches long; do not touch the raised square in the center of the dough. Replace butter package on the center square. Fold flaps of dough over the butter package so that it is completely enclosed. Press with your hands to seal.
5/ Using the rolling pin, press down on the dough at regular intervals, repeating and covering the entire surface area, until it is about 1 inch thick. Gently roll out the dough into a large rectangle, about 9 by 20 inches, with one of the short sides closest to you. Be careful not to press too hard around the edges, and keep the corners even as you roll out the dough by squaring them with the side of the rolling pin or your hands. Brush off any excess flour. Starting at the near end, fold the rectangle in thirds as you would a business letter; this completes the first single turn.Wrap in plastic wrap; place in refrigerator 45 to 60 minutes.
6/ Remove dough from refrigerator, and repeat process in step 5, giving it five more single turns.Always start with the flap opening on the right as if it were a book. Mark the dough with your knuckle each time you complete a turn to help you keep track. Chill 1 hour between each turn. After the sixth and final turn, wrap dough in plastic wrap; refrigerate at least 4 hours or overnight before using.
Saint Honore Cream (Rapid Chiboust or Diplomat Cream)
1 envelope unflavored gelatin (7 gr.)
1/4 cup cold water (60 ml)
1/2 cup + 2 Tablespoons sugar (130 gr)
½ cup all-purpose flour (70 gr)
1/4 teaspoon salt
5 egg yolks
2 cups whole milk (500ml)
1 Tb. rum
¼ cup whipping cream (57 gr)
3 egg whitesdash of salt
1/2 cup sugar (105 gr)
Soak the gelatin in the 1/4 cup of cold water.
Put the sugar, flour, and salt into a saucepan and stir together with a whisk. Add the yolks and enough milk to make a paste. Whisk in the remainder of the milk. Place over low heat and stirring constantly, cook until thick. Remove from heat and stir in the rum and the gelatin. Stir until the gelatin is completely dissolved.Stir in the whipping cream. Set the mixing bowl in cold water and stir until the cream is cool. Place the egg whites in a clean bowl and using clean beaters, whip them with the dash of salt. As soon as the whites begin to stiffen, gradually add the 1/2 cup of sugar and beat until they are very stiff. Fold the egg whites into the cooled cream.
Caramel:8 oz sugar (240 gr)Assembly:
Roll the puff pastry out to 1/8 inch (3 mm) thick, 12 inch square (30 cm). Place on a sheet pan lined with parchment paper. Refrigerate covered at least 20 minutes.While the puff pastry is resting, make the pate a choux and place it in a pastry bag with a # 4 (8mm) plain tip. Reserve.Leaving the puff pastry on the sheet pan, cut a 11 inch (27.5 cm) circle from the dough and remove the scraps. (An easy way to cut it is to use a 11inch tart pan as a “cookie cutter”). Prick the circles lightly with a fork. Pipe 4 concentric rings of Pate a Choux on the pastry circle. Pipe out 12 cream puffs the size of Bing cherries onto the paper around the cake. Bake the puff pastry circle and the cream puffs at 400F (205C) until the pate a choux has puffed, about 10 minutes. Reduce the heat to 375F (190C) and bake until everything is dry enough to hold its shape, about 35 minutes longer for the cake and 8 minutes longer for the cream puffs (just pick them up and take them out as they are done)Place about 4 oz (114 gr) of the Saint Honore Cream in a pastry bag with a #2 (4mm) plain tip. Use the pastry bag tip or the tip of a paring knife to make a small hole in the bottom of each cream puff. Pipe the cream into the cream puffs to fill them. Refrigerate.Spread the remaining cream filling on the cake. Refrigerate for at least 2 hours to set the cream.
Caramelize the 8 oz. of sugar:Fill a bowl that is large enough to hold the pan used for cooking the sugar with enough cold water to reach halfway up the sides of the pan. Set the bowl aside.Place the sugar in a heavy bottomed pan and cook until the sugar until it has caramelized to just a shade lighter than the desired color. Remove from the heat and immediately place the bottom of the pan in the bowl of cold water to stop the cooking process. Dip the cream puffs into the hot caramel, using 2 forks or tongues to avoid burning your fingers. Place them on a sheet pan. The caramel must be hot enough to go on in a thin layer. Reheat if necessary as you are dipping, stirring constantly to avoid darkening the caramel any more than necessary. Also, avoid any Saint Honore cream to leak out of the puffs and get mixed in with the caramel while dipping as the cream can cause the sugar to recrystalize.
Whip one cup of heavy cream and teaspoon of sugar to stiff peaks. Place the whipped cream in pastry bag fitted with a #5 (10mm) star tip. Pipe a border of whipped cream around the top of the cake. Arrange the cream puffs, evenly spaced, on top of the filling, next to the cream.
Option: Before filling the cake, take care of the cream puffs, dip them in more caramel, hook them up to the base. Fill with the cream filling and fill the holes with the whipped cream.
From the sneak previews and reports I got, it seems that the majority had a “good time” (it’s all relative with a lengthy recipe), and no major doozies, some had a runny pastry cream filling, some puffs had difficulty rising and we only had minor burnt fingers casualties.
In my love of all things mini I did not go quite as small as last month crepe cake but I made 2 6-inch cakes and 6 3- inches.
What I love about monthly challenges like these is to be able to take one recipe that we all follow and compare notes. 48 bakers means 48 ways to bake and 48 different experiences. I love it!
Well, Lisa and Ivonne are never going to forgive me but it seems like I have an affair with Pierre Herme almost every weekend, at least on sunday afternoons when I finally can sit down and fantasize about him..ok, maybe not "him" but his culinary ventures and creations. Every macaron, gateau, pastry is a poem in itself…so does the man. As I tried to put into words what I felt for and thought if Pierre Heme, I remembered a post I had bookmarked from ubber talented pastry chef Shuna at Eggbeater. Read this and you will understand why we are infatuated!
Instead of my traditional "internet fantasies by P.H", I became completely engrossed in a book my mom gave me for Christmas years ago… I love the book and yet I probably only made a handful of recipes from it, rice pudding, a couple of sorbets, creme brulees, chocolate mousses,etc. I am afraid to touch gold…I am afraid to mess with perfection…Oh what the heck?! I am far from his level so why not…after all, he put his recipes in book, he’s got to be thinking about us and (please say so) can’t be completely narcissistic….
I always read a cookbook from the end first: the materials and ingredient sources, the index, the ingredients and above all the techniques and tips from which I can always learn.
As I was reading the book, my eyes stopped at this recipe : "pate feuilletee inversee"…or…Inside Out Puff Pastry. Yes, you read right. In regular puff pastry, the layers are created by folding pastry dough over a butter block and folding and turning it several times. Well, leave it Pierre Herme to fold the butter block over the pastry dough, folding and turning. The result is fabulous, layers upon layers of soft, airy buttery goodness. I was really curious to see how that butter block (with a minimum of flour) would behave being on the outside. Things turned out perfectly and if I could have kissed my butter right then I think I would have, but the neighbors were around and I did not want to scare anybody off.
I don’t know if Herme created the concept but it would not surprise me a bit given his ability to re-invent classics and techniques.
One particular recipe in the book caught my eyes, a "mille feuilles" also known as "napoleon" with gorgeous red strawberries, rhubarb and vanilla pastry cream. I had the dough, fresh plump raspberries and freshly roasted rhubarb. I favor simple whipped cream with raspberries and I was short on time, trying to put together an impromptu dessert for our weekly friday evening al fresco dinner with the neighbors. In other words, I skipped the pastry cream, and I am glad I did because the finished dessert was light, tart and let the dough shine through instead of taking supporting role.
Raspberry Rhubard Mille Feuilles, adapted from Pierre Herme:
Inside Out Puff Pastry: (enough for 4 napoleons and 1 large tart)
Butter Block:
190 gr soft butter
75 gr flour
Dough:
175 gr flour
7 gr. salt
60 gr melted butter
70 ml water
For the Butter block: mix together the soft butter and the flour and form into a ball, in between two sheets of plastic or parchment paper, roll into a disk 3/4 inch thick. Refrigerate 1 1/2 hours
For the dough: mix all the ingredients together, adding the water little by little until you get a smooth dough. Pat into a square 3/4 inch thick and refrigerate 1 1/2 hours.
Roll the butter block into a 1/2 inch thick disk, put the dough block on top and enclose it with the butter block (by pulling the extra butter dough over the pastry dough).
Roll into a rectangle 16×9 inch. Fold the top and bottom toward the middle, fold the dough in half. Put the folded edge toward your left, lightly press the dough with your hand and refrigerate for an hour.
Repeat one more time and refrigerate 1 hour.
For the third and final turn, roll out the dough into a rectangle again, visually dive your dough in 3 and fold the bottom and top thirds toward the middle tier. Refrigerate another hour before using in your recipe.
The dough makes more than what you might need for one tart or severl Napoleons, but it is easier to work a large quantity of puff pastry and refrigerate or freeze what you don’t use.
Remaining components:
1/2 Inside Out Puff Pastry
1 1/2 cups heavy cream, whipped to soft peaks with 2 Tb sugar
1 pint fresh raspberries. Roasted Rhubarb:
Heat oven to 375. Cut 2 rhubarb stalks into 1 inch slices. Put them in a medium sized roasting pan, sprinkle 1/2 cup brown sugar over it and roast until the rhubarb get caramelized, about 20 minutes. Remove from the oven, let cool, and slightly mash with a fork.
Roll the dough to a 1/2 inch thick rectangle. Line a baking sheet with parchement paper, lay the puff pastry on it, cover with another sheet of parchment paper, put a baking sheet over it and bake at 375 until golden brown. The top baking sheet adds enough weight for your dough to remain under control and yet allows for the layers to puff up during baking. Remove from the oven and let cool completely.
Once cooled, cut the dough into equally sized triangles (decide the size according to your taste. I went for a base of 3 inches).
To assemble:
Put a pastry triangle on a plate, pipe or spoon some whipped cream over it, cover with raspberries. Top with a sheet of pastry, spoon some roasted rhubarb, cover with a final sheet of pastry and dust with powdered sugar.