I have had the images for this post up and ready for words for about a week now. It’s not that I can’t find the words to go along. It’s just that I am ever near long enough the computer to sit down and write.
We had such a great time at the beach with my parents, my brother and his family that diving right back into work mode was a blessing and a curse at the same time. It’s been busy around here but having my parents stay with me here in Birmingham for a couple of weeks shifted the rhythm even further.
It’s good. It’s all good. It’s actually awesome to have them around and see the new house, the new job, the new town. They really get a handle on my new situation and all the questions they had are being answered. My photo schedule, the way we do things, the people I work with, the places I like to go to for dinner, a drink or to shop. Things are about as new to them as they are to me and we share discoveries and new finds everyday.
It’s really nice to come home after a long day and start cooking with my mom. Chopping, dicing, searing, etc… while sipping a glass of wine and watching the end of an old movie or listening to the radio. We have more quiet time for serious talks, or to simply catch up on news about the family at large.
It’s been raining lots lately and we have been enjoying a few comforting and hearty meals. The kind to make you feel instantly better and warm inside after being caught by a heavy rain.
Stews, fish soups, long cooked dishes, and roasted veggie soups have permeated the air around for days now, filling me with a bit of nostalgia. The flavors and spices of my grandmother's stews and roasts come into to our conversation almost at every meal. Her cooking while being so intricately French provincial was so influenced by her life in Northern Africa and encounters with other army wives.
It might be for this reason that I have absolutely loved every page turned in the new cookbook by Ottolenghi, Jerusalem, co-authored with Sami Tamimi. I hear my stomach growl at just about every recipe and my eyes pop out from every stunning picture. I find my family’s cooking in so many of the recipes in the book.
I don’t know if we are atypical or just reflect an era (military, moves, oversea travels, wars, etc…) but some of my most vivid food memories are as much of harissa,Berber couscous and papaya with lime juice as they are of cassoulet and Bouillabaisse.
In that regard, the book completely appeals to me. The way Ottolenghi and Tamimi look at culinary traditions and influences. Understanding that one dish may have the same root but different interpretations in neighboring cultures, civilizations or countries. They understood that cooking is honoring ones traditions as well as sharing common flavors, differences in interpretations. Food travels. It is not one to be of only one people and one culture. It is alive. It reflects peoples, generations and history. It is humanity.
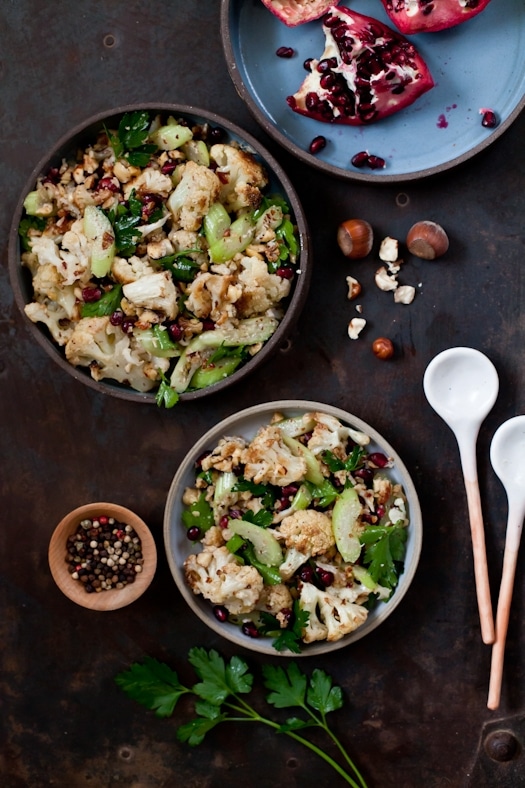
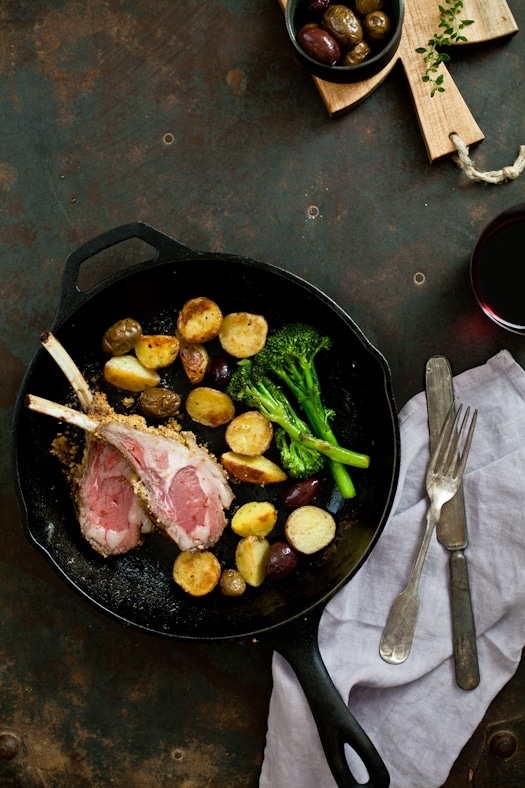
I get that. Especially when sitting down at the dinner table around a plate of Pistachio Crusted Lamb and a side or Roasted Cauliflower & Hazelnut Salad. (recipes after the jump). I get the sharing, the cultural influences, and the roots. The history that brought this plate and the chatter about it, in front of me. I happily grab my fork and ask my mother for one more story about my grandmother. About her own childhood. About mine with her.
Only a few more days and they will be heading back to France. A few more days to revel in the memories and the times we are living in the present. I am grateful for the love and time they give me these few short weeks. It’s been quite nice, indeed…
I got to say, social media and the way we interact is pretty phenomenal. And I mean that in all possible ways. I do love it. Being able to connect fast and furiously with people. Meeting new and interesting folks all the time. Being able to exchange links to pictures, recipes, news almost instantly. I like hearing my phone send me a little ring-a-ding "you got mail". Really I do!
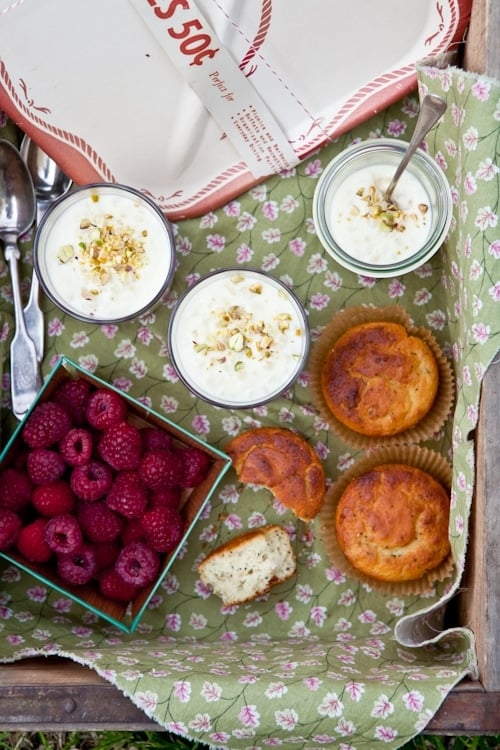
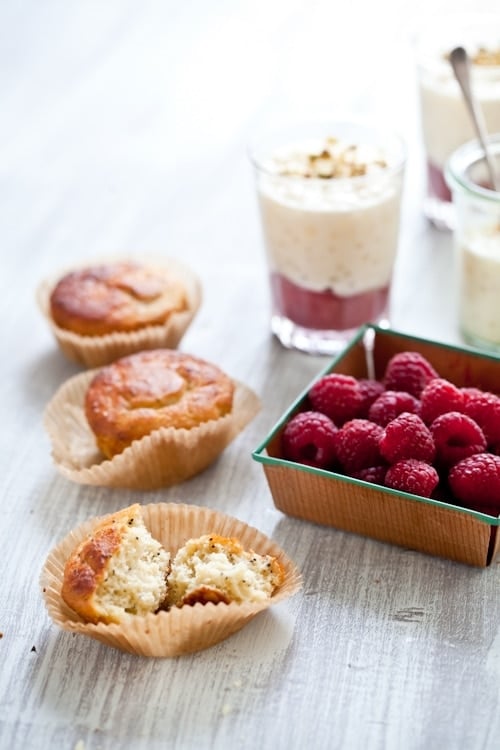
Last week, I posted on Flickr a photo of tapioca puddings and lemon poppy seed muffins I was taking to our neighbors for dinner. I linked that to Twitter and then closed the computer and went next door. My phone in my pocket. Then my phone had a party. All by itself. It started ring-a-dinging with intensity. Tweets back and emails started coming in asking me to please share the recipes for the puddings and the muffins.
To tell you the truth I had not really planned on it but I had made more than enough to share with more friends. Here. One spoonful deep in that dessert, one whiff of lemon and poppy seed later and I was secretly giddy to have an opportunity to sample them again.
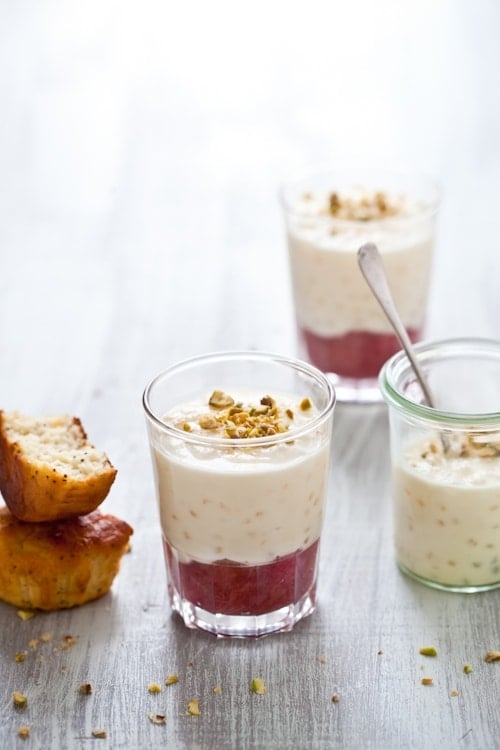
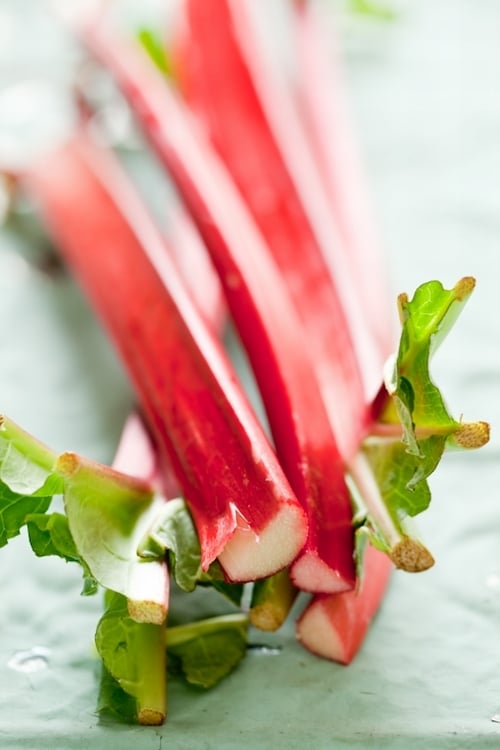
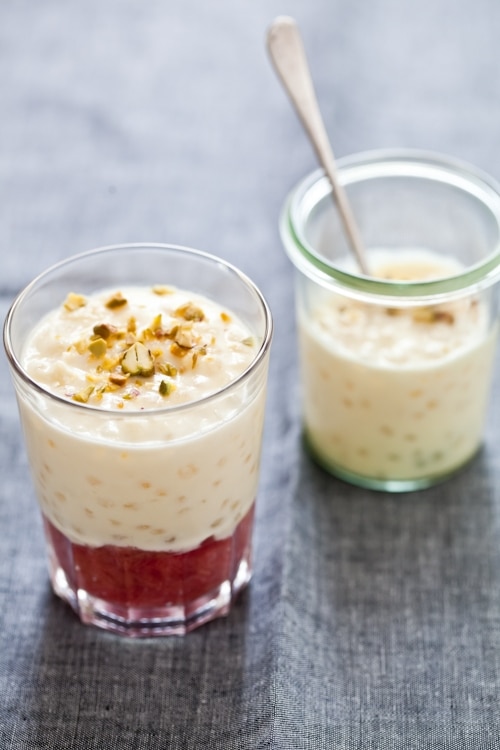
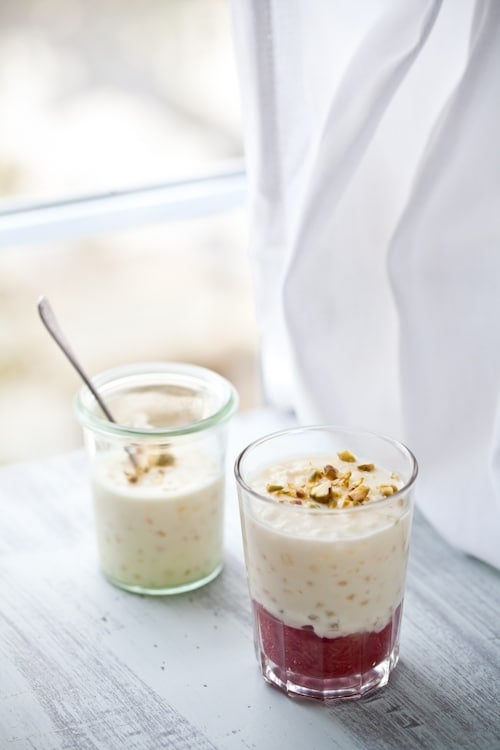
The Raspberry Rhubarb Tapioca Puddings are so good. Soothing. Little beads of tapioca rolling off your tongue. Smooth. Rhubarb and raspberries gently cooked until just barely soft. The distant scent of cherry blossom extract. The perfect crunch of lightly roasted pistachios.
And the muffins. Ah…gobbled up in a flash. Good thing I tend to cook and bake like my grandmother. Doubling a recipe, or more, is just a normal thing happening here. What can I say? I love to give and see the smile on someone’s face when they receive. The lovely part with these muffins is you can built upon the base any way your heart desires. Oranges, instead of lemons, nuts instead of poppy seeds, vanilla, rose, caramel…anything.
Quite a few many events are shaping up for this Spring and Summer (actually up ’til January…ugh!) that have me jumping up and down with excitement! I will make sure to keep everyone updated on workshops or conferences.
Right now I must get the house and studio tidied up a bit since Taylor is coming tomorrow and staying a few days to shoot the promo video of my book "Plate To Pixel". I heard the book was officially shipping out next week! I am extremely nervous but glad we practiced a little a few months ago. Remember this? I can’t believe this is all happenings. Months of hard work just about to see the light!
Ok…now I must really go clean the house for Taylor. I’ll try to post sneak peeks of the shoot with Taylor throughout the weekend. Should be fun!
Raspberry Rhubarb Tapioca Pudding With Lemon Poppy Seed Muffins:
Serves 6
For the pudding:
1 cup chopped rhubarb
1 cup raspberries
1/4 cup lemon juice
2 tablespoons honey
1 cup small pearl tapioca (not instant)
2 cups milk
1/4 cup honey
1 teaspoon cherry blossom extract (or rose, or vanilla)
Toasted pistachios for garnish
In a large saucepan, combine the rhubarb, raspberries and lemon juice and bring to a boil. Reduce heat to low, to a simmer, add the honey and stir briefly. Cover the saucepan and let cook for about 10 minutes. Uncover and check the fruit. If there is a lot of liquid, cook a bit longer over low heat, uncovered until very little liquid remains at the bottom of the pan. Let cool to room temperature and then divide evenly among 6 ramekins or glasses.
In a separate and large saucepan, combine the tapioca, milk and honey over medium high heat. Bring to a boil then reduce the heat to low and let the mixture cook until the tapioca looks translucent (about 20-30 minutes). Let cool to room temperature and divide in between the ramekins or glasses with the raspberry/rhubarb mixture. Top with chopped pistachios.
For the lemon poppy seed muffins: (makes 12)
2 eggs
1/2 cup honey
1 cup yogurt
zest and juice of one large lemon
1/2 cup olive oil
2 tablespoon coconut oil (or melted butter)
1 cup millet flour
1/2 cup brown rice flour
1/2 cup potato flour
pinch of salt
1 tablespoon baking powder
1 tablespoon poppy seeds
Preheat the oven to 350F. Line the inside of 12 muffin cups with muffin liners and grease slightly with melted butter or cooking spray. Set aside.
In a large bowl, whisk the eggs and honey until smooth. Add the yogurt, lemon juice and zest, olive oil, coconut oil and whisk until combined. Add the millet, brown rice, and potato flour, salt, baking powder and poppy seeds. Whisk until fully incorporated. Divide evenly between the muffin liners and bake 15-20 minutes.
Thank you all for the kind thoughts, good vibes and uplifting words. Thank you also for reading what I had to say about our dear friend. Today we officially said goodbye and I can’t stop thinking about what she used to tell me all these years: "Live hard. Love harder. Work the hardest…and always, always eat good food!"
Yes…eating good food that is inevitable with us. If we become friends, you will come over for dinner. And again. And again.I was raised this way. That’s the one thing my grandma did that I knew to count on when I was growing up. Sunday suppers around a full tables of nibbles and sweets were not just tradition. They were second nature happenings. Sometimes there were four people, sometimes ten. Did not matter. Same is true of our Sunday table.
The idea was to end the weekend on a comforting note and to send you off into the new with a warm meal and a handful of sweet treats. In my case, both my pockets…ehehe! Rum babas, petits fours, mini eclairs, financiers, madeleines, macarons...you name it. In my pockets. Good thing we lived across the streets from my grandparents.
Did my grandmother or mother made all these fine treats? Heck no! I think David will confirm this but French people rarely make their babas, eclairs or macarons from scratch. Unless they are foodies. Or unless they have a blog. Or unless they are really into patisserie. If you ask a French person on the street if they make their own eclairs, they’ll probably answer "why the heck would I? That’s why pastry shops were created you idiot!" (side note: have a French friend say "idiot" for you…I hear it makes you smile – not that would know anything about that?!!)
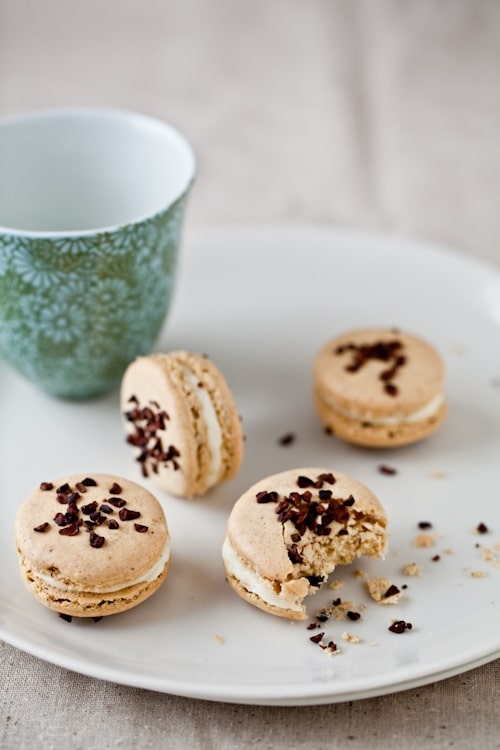
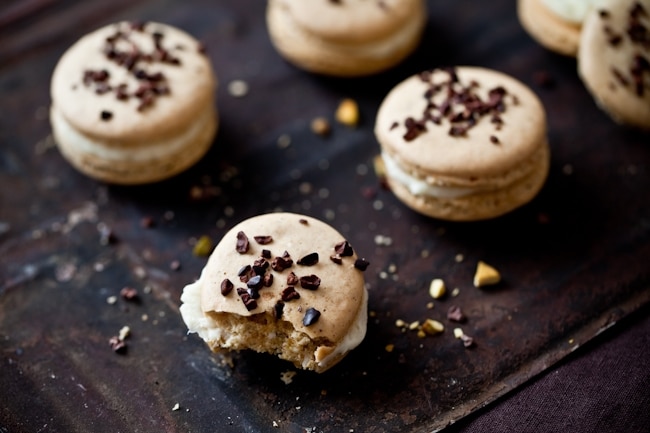
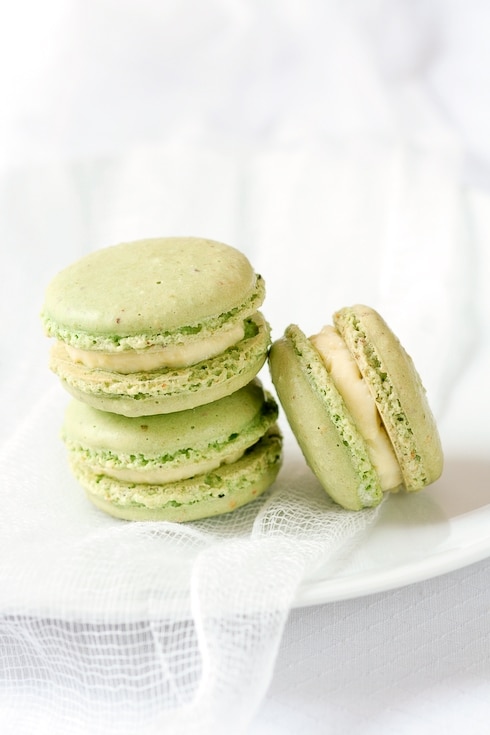
And you can imagine that the last thing on that list of things-people-would-not-make-from-scratch-because-someone-at-the-bakery-will-do-it-better-than-they-would-is…a macaron. And if you ever ventured to master macarons, you can certainly relate. It might have taken quite a few tries to get them right. Or you got lucky the first time and it’s been smooth sailing since. One sure thing, they never leave anyone indifferent. You either love or hate making them or you either love or hate eating them. In my family it’s love on both counts if you wonder.
I love making them during the holiday season. They are the perfect size to finish a meal with, they fit perfectly in treat box and I have never heard anyone exclaim "well look at those ugly little things.." Now, I do see a lot of friends rush with passion to eat a few in one sitting and I have to quickly explain that back home, macarons are treated like confections not cookies. We eat them slowly and one at a time, like a good marron glace, or a crunchy meringue.
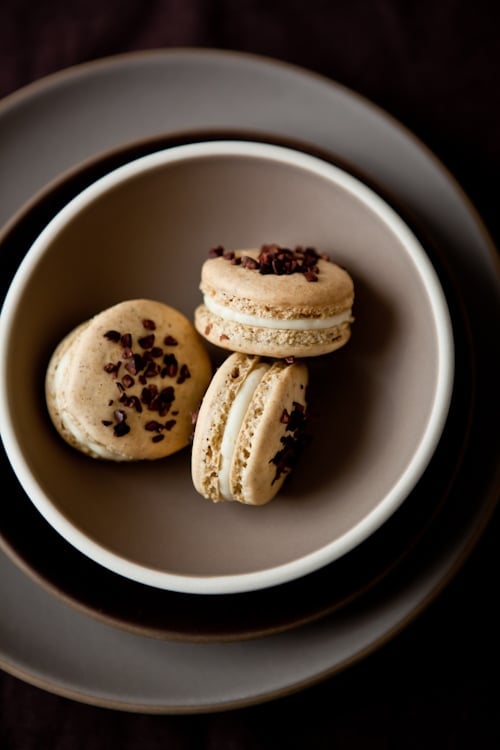
I tend to favor macarons balancing sweet and strong usually keeping the buttercream on the sweeter side while adding citrus zest or spices to the shells. Nothing too crazy but playing well on opposites. This time I got inspired by a cookie I posted a few years ago and that make their way to our Christmas goodie boxes year after year. And for good reason. They are the perfect balance of sweet and salty, buttery and crunchy. The exact play of flavor and texture I like in macarons.
By judging the last two of twenty five made for Sunday supper, I’d say the flavor combination was a success and makes me wonder who among our friends had their pocket full when they left the house….!
Pistachio Cocoa Nib Macaron With Bourbon Buttercream:
Makes about 25 macarons (more or less depending on the size)
Note: having spent the last 13 years in America, I got completely used to using cups while still using grams. There are times I favor one over the other but really, it’s more about ratios than anything else, in either system
To convert easily from one to the other, use this conversion table from Gourmet Sleuth.
For the shells:
200 gr powdered sugar
55 gr almonds (slivered, blanched, sliced, whatever you like)
55 gr pistachios (roasted, unsalted)
90 gr egg whites (use egg whites that have been preferably left 3-4 days in the fridge)
25 gr granulated sugar
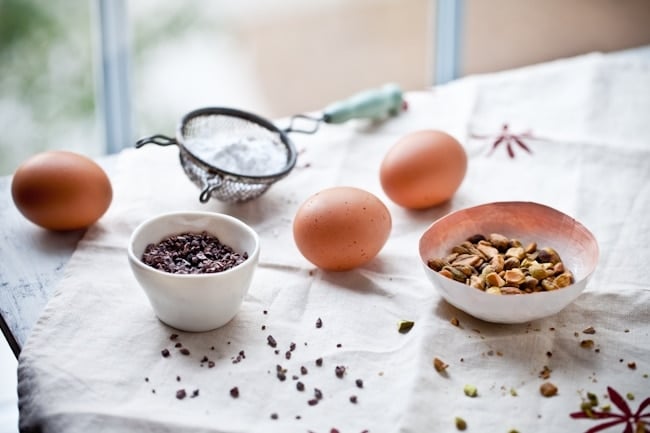
1/2 cup cocoa nibs
For the buttercream:
3 egg yolks
1/2 cup sugar
1/4 cup water
1 1/2 sticks unsalted butter, at room temperature
2-3 tablespoons Bourbon
Prepare the macarons:
Place the powdered sugar, almonds and pistachios in a food processor and give them a good pulse until the nuts are finely ground. Sift if desired.
In a stand mixer fitted with the whisk attachment, whip the egg whites to a foam, (think bubble bath foam) gradually add the sugar until you obtain a glossy meringue (think shaving cream). Do not overbeat your meringue or it will be too dry.
Add the nuts and powdered sugar to the meringue, give it a quick fold to break some of the air and then fold the mass carefully until you obtain a batter that falls back on itself after counting to 10. Give quick strokes at first to break the mass and slow down. The whole process should not take more than 50 strokes. Test a small amount on a plate: if the tops flattens on its own you are good to go. If there is a small beak, give the batter a couple of turns.
Fill a pastry bag fitted with a plain tip (Ateco #807 or #809) with the batter and pipe small rounds onto parchment paper or silicone mats lined baking sheets. Sprinkle with cocoa nibs. Let the macarons sit out for 30 minutes to an hour to harden their shells.
When you are ready to bake, preheat the oven to 280F.
Bake the macarons for 15 to 20 minutes, depending on their size. Let cool.
Once baked and if you are not using them right away, store the shells in an airtight container out of the fridge for a couple of days or in the freezer for up to 2 weeks (longer and the sugar starts to seep out which makes them sticky).
Prepare the buttercream:
Place the yolks in a stand mixer, fitted with the whisk attachment.
Bring the sugar and water to 238F in a medium saucepan set over high heat. Slowly pour the hot syrup over the egg yolks and continue to whisk until cold. Change to the paddle attachment and beat in the butter, one tablespoon at a time. Add the bourbon to the buttercream. Continue to beat for a few seconds until completely smooth.
Assemble the macarons:
Fill the macarons with the buttercream (pipe or spoon about 1 tablespoon per macaron) and store in the fridge for at least 48 hours before eating (the shell should be crisp without shattering in your hands and the center soft without being too mushy).
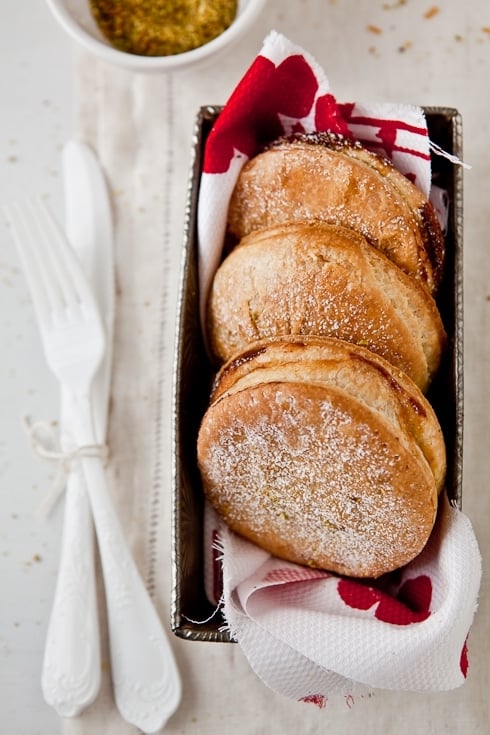
Time flies like mad these days! I really thought this week would be calmer than the ones ahead. I even said it outloud. With a satisfactory smile on my face and a head full of light hearted things to do. So you can guess what happened. It got a wee bit crazy. One night that I was trying to sort it all out, my dear B. sat next to me with mugs of tea and a couple of tartelettes. I knew we were simultaneously feeling how wonderful it is to be able to rely on the simplicity of seasonal baking when there’s combobulation around.
As my family back home was gathering around my grandfather to celebrate Epiphany, we were virtually sharing the moment with individual "Galette des Rois", the traditional frangipane filled puff pastry tarts served for the occasion. B. is well aware of my family’s "must dos" and how they translate into my baking and cooking as definite advantages for him even this far away, like truffles at Christmas and galette or brioche for Epiphany.
Like in many a French person, galettes des rois are a big deal. A lot of families take this opportunity to gather together one last time towards the end of the holidays, have a glass of Champagne and wish one another a Happy New Year before things go back to their usual "metro-boulout-dodo" (commute-work-sleep). Since most years we were visiting my grandparents in Paris for the holidays, we would have "galette des rois" there and, once back home in Provence, we would have "brioche des rois". And sometimes both which was perfect for the gourmande in me!
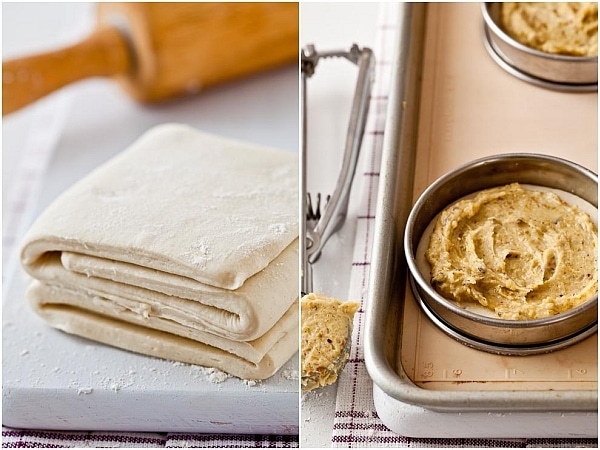
When I mentioned the possibility of not baking any galette this year, you should have seen the look on my husband’s face. As if I was taking his favorite toy away. My symptoms have been so greatly improved by removing gluten entirely from our diet that I did not really want to make a full batch of puff pastry and galettes. I can’t stand being that selfish either but from the previous results I’d had turning puff pastry gluten free, a complete gf galette des rois was not going to happen. So I made them anyway, the regular way. I only had one bite too many to know I shouldn’t have but he was happy and that makes up for a lot of things.
Back in September, I tried a couple of times to come up with a gluten free puff pastry for a Daring Bakers challenge but none of the attempts left me satisfied. I came up with a ratio for the flours I wanted to use, ran it by Shauna for confirmation and was elated to see my dough was flexible enough to roll and to fold and bake into beautiful crispy layers. Each time though I had the same problem: too much butter if I followed traditional ratios and, as Shauna pointed out, not enough protein. Shauna, Danny and I are actively working on that project again and more decided than ever to come up with a gluten free puff pastry so good and fluffy you will be proud to point out it is gluten free.
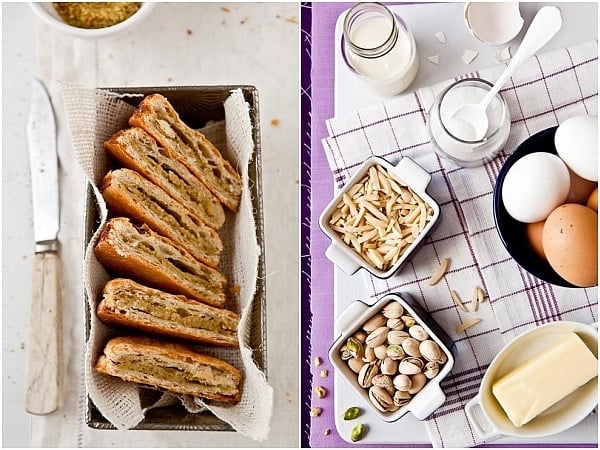
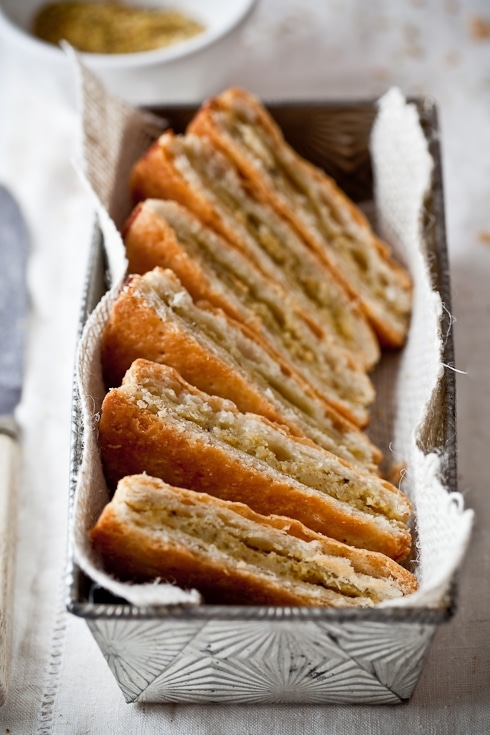
The most traditional filling for these tarts is almond frangipane (almond cream) but it’s never a bad thing to change things up so this time around I replaced half the almonds with pistachios and it could well be my favorite flavor so far for these. I used tart rings to form and bake them so the filling would stay neatly encased but you can most definitely make these free form as long as you keep careful to seal the edges tight.
I prepared and baked the tarts, set the tray to cool on the countertop and just starting giggling like a child. It came to absolutely no surprise to my dear husband that I completely forgot to sneak inside that little ceramic trinket designating the King or Queen of the day. I declared him King anyway and we happily cut into a warm frangipane galette right away.
Twitter people might already know this but I must tell you of an awesome event planned by Jen, event planner extraordinaire and writer of the blog Devour The World, Rachael of La Fuji Mama and Gaby, personal chef and author of What’s Gaby Cooking. They have arranged to fly me out to Los Angeles and secure enough space and time for me to teach two macarons classes at the Academy of Culinary Education on Friday March 5th and Saturday March 6th. Zoink!
So, if you live in the area and have always wanted to know how to bake the perfect macaron here is your chance to do so in a professional but relaxed atmosphere. I just can’t wait to be there and be able to help 1 on 1. Come join us! Please email Rachael rachael{at}lafujimama {dot}com for all the details as I hear both classes are filling up rather fast. Working also on another surprise for that trip…
Thanks for the positive feedback on giving out the recipes in both English and French. Starting with a salad was quite easy and I almost said "forget it" when I realized I would have to translate a recipe for puff pastry on this post but there it is after the jump!
Have a great weekend! Galette Des Rois:
Makes four or eight 4-inch tarts
Notes: I hope you’ll try your hand at puff pastry soon. It sounds harder than it is. Really. But I understand and you can get very close by using a simpler Rough Puff Pastry.
For the puff pastry:
3 cups (420gr) all-purpose flour, plus more for work surface
3/4 cup (105gr) cake flour
1 1/2 teaspoons salt (7 gr)
4 tablespoons (60gr) unsalted butter, cut into 1/2-inch pieces, well chilled
1 1/4 cups (300ml) icy cold water
1 tablespoon (14gr) all-purpose flour
1 3/4 cups (3 1/2 sticks)(405gr) unsalted butter, well-chilled
Make the dough package:
In a large mixing bowl, combine both flours with the salt. Scatter butter pieces over the flour mixture; using your fingers or a pastry cutter, incorporate butter until mixture resembles coarse meal.
Form a well in center of mixture, and pour the water into well. Using your hands, gradually draw flour mixture over the water, covering and gathering until mixture is well blended and begins to come together. Gently knead mixture in the bowl just until it comes together to form a dough, about 15 seconds. Pat dough into a rough ball, and turn out onto a piece of plastic wrap. Wrap tightly, and place in refrigerator to chill 1 hour.
Make the butter package:
Sprinkle 1/2 tablespoon flour on a sheet of waxed or parchment paper. Place uncut sticks of butter on top, and sprinkle with remaining 1/2 tablespoon flour. Top with another sheet of paper; using a rolling pin, pound butter to soften and flatten to about 1/2 inch. Remove top sheet of paper, and fold butter package in half onto itself. Replace top sheet of paper, and pound again until butter is about A inch thick. Repeat process two or three times, or until butter becomes quite pliable. Using your hands, shape butter package into a 6-inch square. Wrap well in plastic wrap, and place in refrigerator until it is chilled but not hardened, no more than 10 minutes.
Assemble and roll the dough:
Remove dough package from refrigerator, and place on a lightly floured work surface. Using a rolling pin, gently roll dough into a 9-inch round. Remove butter package from refrigerator, and place it in the center of the dough round. Using a paring knife or bench scraper, lightly score the dough to outline the butter square; remove butter, and set it aside. Starting from each side of the center square, gently roll out dough with the rolling pin, forming four flaps, each 4 to 5 inches long; do not touch the raised square in the center of the dough. Replace butter package on the center square. Fold flaps of dough over the butter package so that it is completely enclosed. Press with your hands to seal.
Using the rolling pin, press down on the dough at regular intervals, repeating and covering the entire surface area, until it is about 1 inch thick. Gently roll out the dough into a large rectangle, about 9 by 20 inches, with one of the short sides closest to you. Be careful not to press too hard around the edges, and keep the corners even as you roll out the dough by squaring them with the side of the rolling pin or your hands. Brush off any excess flour. Starting at the near end, fold the rectangle in thirds as you would a business letter; this completes the first single turn.Wrap in plastic wrap; place in refrigerator 45 to 60 minutes.
6/ Remove dough from refrigerator, and repeat process in step 5, giving it five more single turns.Always start with the flap opening on the right as if it were a book. Mark the dough with your knuckle each time you complete a turn to help you keep track. Chill 1 hour between each turn. After the sixth and final turn, wrap dough in plastic wrap; refrigerate at least 4 hours or overnight before using.
For the frangipane filling:
1 stick (110 gr) unsalted butter, at room temperature
1/2 cup (100 gr) sugar
1/2 cup (50 gr) ground almond
1/2 cup (50 gr) ground pistachios
2 eggs
1/4 cup (60ml) heavy cream
Place the butter, sugar, almond powder and the eggs in a large bowl and whisk until smooth (can also be done in a food processor). Add the cream but stir in it instead of whisking so as not to emulsify it or it will rise while baking. Refrigerate for at least an hour.
To assemble the tarts (4 at a time).
Divide the dough in half and keep one half refrigerated.
Preheat the oven to 350F and line a baking sheet with a piece of parchment paper or a silpat.
Roll the puff pastry to about 1/4 inch thick on a lightly floured countertop. Using a 4 inch tart rings, cut out 8 rings into the dough. Place four dough circles into 4 tart rings. Top with about 2 tablespoons of the frangipane filling. Top with 4 dough circles and seal the edges well by pressing your fingertips inside the rings onto the dough edges.
If you wish to use the rest of dough and filling right away, just repeat those steps or you can refirgerate both for a week or freeze for up to 3 months and thaw overnight in the fridge.
Bake for about 20-30 minutes or until the tarts are golden brown.
————————————————————————————- Le P’tit Coin Francais:
Pour 4 a 8 tartes.
Pour la pate feuilletee:
420gr de farine
105gr de farine a gateau (fine)
7gr de sel
60gr de beurre non sale, tres froid et coupe en petits des
300ml d’eau tres froide (glaciale a la limite)
405 gr de beurre non sale bien froid
Faire le paton:
Dans un grand bol. melangez les deux farine et le sel. Ajouter le beurre et servez vous de vos doigts ou de deux fourchettes pour incorporer le beurre au farines jusqu’a ce que le melange ressemble a de gros grains de sable.
Formez un puit au milieu et ajoutez l’eau. A l’aide de vos mains, commencer a ramener la farine vers l’eau jusqu’a ce que la masse devienne homogene. Ramassez la masse en boule assez vite de facon a petrir le moin possible. Couvrez d’un linge ou de film plastique. Refrigerez la pate pendant une heure.
Faire le bloc de beurre:
Saupoudrez une feuille de papier sulfurise avec la moitie de la farine restante. Deposez-y le beurre et saupoudrez du reste de farine. Placez une 2eme feuille de papier sulfurise au dessus du beurre et avec votre rouleau a patisserie, frappez le beurre de facon a le ramollir et l’aplatir sur une epaisseur de 1.5cm environ. Levez la feuille de papier du dessus, et a l’aide de celle du dessous, rabattez le beurre sur lui meme. Remettez la feuille de papier au dessu et recommencez l’operation 2 a 3 fois jusqu’a ce que le beurre soit bien maleable. A l’aide de vos mains et en vous aidant des feuilles de papier, formez un carre de beurre d’environ 15cm. Refrigerez le pendant 10 minutes (pas plus).
Assembler la pate:
A l’aide de votre rouleau a patisserie, etalez la pate en un cercle de 23cm de diametre. Placez le beurre au centre du cercle et a l’aide d’un couteau fin, deligner l’emplacement du beurre sur la pate, sans faire de coupure directement dans celle-ci. Enlevez le beurre et mettez le de cote. Demarrez de chaque cote du carre et roulez la pate pour obtenir 4 grandes oreilles d’au moins 10 a 12 cm de long. Vous devez obtenir un petit carre plus epais au centre de cette facon. Placez y le beurre et rabattre les oreilles dessus. Pressez du bout des doigts pour bien enfermer le paquet de beurre.
Etalez la pate a intervals reguliers de facon a bien distribuer le beurre jussqu’a ce que la pate soit de 2cm d’epaisseur environ. Farinez votre plan de travail si necessaire au fur et a mesure. Etalez la pate en un rectangle de 23 cm de large et 50cm de long, en gardant le cote de plus court pres de vous. En partant a peu pres du milieu, pliez la pate en trois de facon porte-feuille. (1er tour) Refrigerez la pate pendant 45min a 1 heure.
Apres ce premier temps de repos, repetez l’operation 5 fois de plus pour un total de 6 tours. Refrigerez entre chaque tours au moins une demi heure. Une fois le dernier tour effectue, refrigerez la pate pendant au moins 4 heure, toute la nuit si voud pouvez.
Pour la frangipane:
100 gr de beurre non sale, et a temperature ambiante
100 gr de sucre
50 gr d’amamde en poudre
50gr de pistache en poudre
2 oeufs
60ml de creme entiere liquide
Dans un bol, melangez au fouet le beurre et le sucre jusqu’a ce que le beurre soit pale et aere. Ajoutez les amandes et melangez. Ajoutez les oeufs un a un et bien melangez au fouet. Ajoutez la creme et donnez quelques coups de fouet ou de spatule pour rendre le melange homogene.
Assembler les galettes:
En supposant que l’on se sert de 4 cercles a tarte individuels a la fois.
Prechauffez le four a 350F/175C. Preparez une plaque de cuisson avec une feuille de papier sulfurise.
Quand la pate feuilletee est prete a etre utilisee, divisez la en deux, gardez une moitie au refrigerateur et etale l’autre moitie sur un plan de travail legerement farine. Servez vous de 4 cercles a tartelette de cm de diametre et decouper 8 cercles. Deposez un cercle dans chacun des cercles. Deposez une grosse cuilliere de frangipane. Ajoutez un cercle de pate et du bout des doigts fermer bien les bords. Laissez les tartes dans les cercle, et les placez delicatement sur votre plaque de cuisson. Repetez l’operation avec le reste de pate et de frangipane.
Faites cuires les tartes pendant 20 a 30 minutes jusqu’a ce que le dessus soit bien dorer.
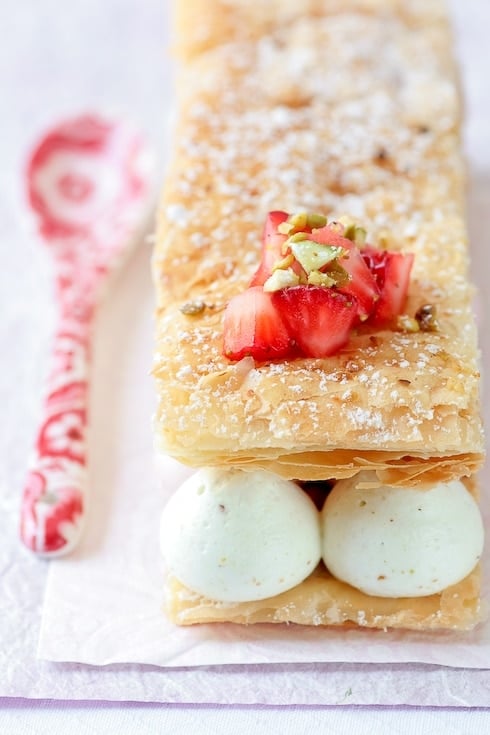
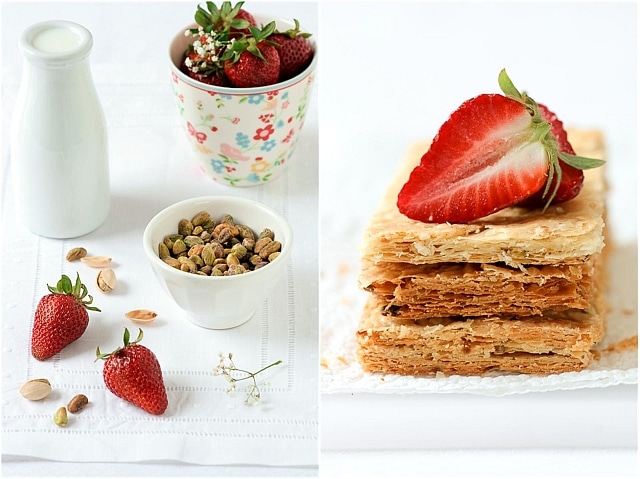
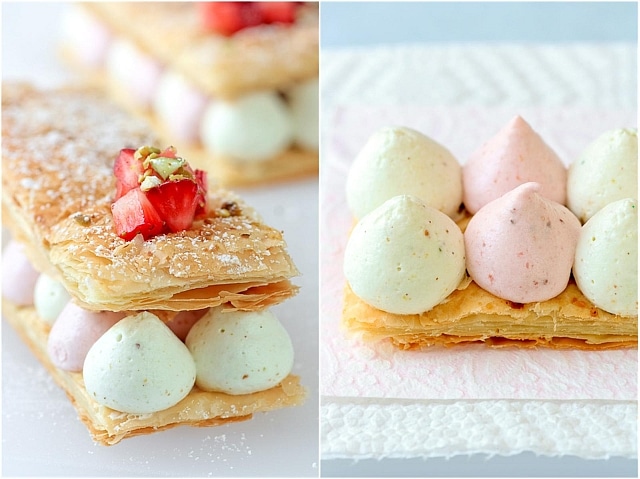
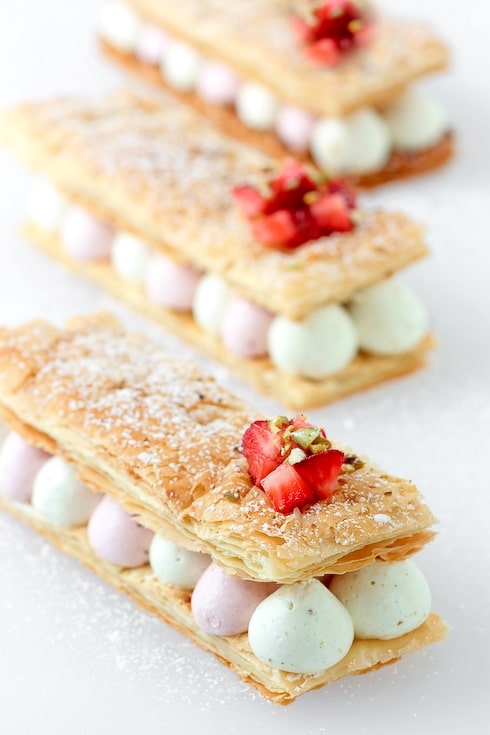
I just laughed and giggled at all the comments about the Pistachio Creme Brulee Macarons from last week and your thinking that I can take Pierre Herme any day. Clearly an interesting idea but sadly one that will never take place because the man is king in the pastry department. I did get an email from Pierre Herme though, well ok, more precisely from La Maison Pierre Herme. And it was not personal at all. But I loved it all the same. It actually inspired me to make these Mille Feuilles filled with mascarpone, pistachio and strawberry mousses.
I like staying close to home by subscribing to French cooking magazine, watch French news feeds anytime I can, and also by receiving PH’s monthly newsletter in my inbox. An attractive list of all the seasonal goodies coming up in his shops. And there it was, the whole PH House of Pastry, tempting with more amazing tastes and textures than before. I read it carefully and sighed at their current signature flavor: all PH’s creations in pistachio and strawberry. The "Montebello" line was attractive and indeed perfectly seasonal, even for an expat like me, three thousand miles away from home.
In my last post, I mentionned how a client needed an anniversary dessert with cherries and how I was not completely satisfied with their flavor yet. I care about my craft too much to keep silent if something is not 100% up to par. With a head filled of PH' Montebello desserts and a nose intoxicated with the fragrance of strawberry, I settled on creating something along those lines (no recipes come with the newsletter). A mascarpone – pistachio mousse sharing space in between two sheets of "rough" puff pastry with a mascarpone – strawberry mousse
I do receive a lot of cookbooks for preview and in March I received Pastry by Michel Roux. With little time on my hands, I figured his "rough" puff pastry recipe would be perfect to try for this dessert. As much as I love the process of traditional puff pastry, I was positively surprised at the results I got with this one. Flaky, tender, fast. Precisely what I need now that the heat is back. For the mousses, I made a simple mascarpone base and used half with finely ground pistachios and half with pureed strawberries, some whipped cream and that was it. Rich, light, flavorful all at once.
If you ever want to master all sorts of pastry doughs, this is the book to get. Clear instructions with plenty of pictures along the way and a myriad of examples and recipes both sweet and savory to go along. His "rough" puff pastry yielded such great results that I decided to give away one of the two copies I have.
To win a copy of Michel Roux’s Pastry (and who does not want a free book, especially on this fine Memorial Day weekend?), all you have to do is leave a comment between today, Sunday May 24th and Tuesday May 26th at midnight. The winner will be chosen at random by my better half. No anonymous comments please, just sign Zorro if you must.
Pistachio and Stawberry Mousse Mille Feuilles:
Makes 4
For the rough puff pastry, adapted from Michel Roux.
2 1/4 cups (300gr) all purpose flour
1 1/4 cup (300gr) unsalted butter, cold and cut into 1/4-inch cubes
1/2 teaspoon (3gr) salt
1/2 cup (125ml) ice-cold water
Place the flour in a large bowl and make a well in the center. Add the butter and salt right in the well and work them together with the flour, using your fingertips, gradually drawing in more flour into the center. When the butter pieces have reached pea sized pieces and the mixture appears grainy, gradually add the ice water and mix until it is all incorporated. Do not overwork the dough. Roll it into a ball, cover with plastic wrap and refrigerate 20 to 30 minutes.
On a lightly flour work area, roll the dough to an 8×4-inch rectangle. Fold it into three and give it a quarter turn. Roll it into another 8×4-inch rectangle again and fold it in three again. These are the first 2 turns. Cover with plastic wrap and refrigerate again for 30 minutes.
Give the chilled dough 2 more turns, rolling and folding as previously described. The pastry is ready then. Cover with plastic wrap and refrigerate for 30 minutes.
When ready to use, roll the dough to a 1/8- inch (3 mm) thick rectangle and cut out eight 4×2 pieces. Place them on a parchment paper lined baking sheet. Dock the dough with a fork to let the steam out while baking so your rectangles will be evenly puffed. Bake at 350F until golden brown. (if they puff too much, cover with a sheet of parchment paper and place a small baking sheet on top). Let cool completely before filling with the mousses
For the pistachio and strawberry mousse:
8 oz (240gr) mascarpone cheese, at room temperature
1/2 cup (100gr) sugar
1/4 cup (30gr) finely ground raw pistachios
1/2 cup pureed fresh strawberries
1 1/2 cups (375ml) heavy cream, kept cold, divided
In a large bowl, whisk together the mascarpone and sugar until completely smooth. Take half the mixture and place it in another large bowl. Add the pistachios to one of them and mix until incorporated. Add the pureed strawberries to the other mascarpone mixture. In a mixer, whip the heavy cream to stiff peaks. Fold half into the pistachio mascarpone mix and the other half with the strawberry one. The pistachio mousse is probably stifff enough to be used right away but you might have to refrigerate the strawberry one until the mascarpone hardens a bit otherwise it might be too soft to pipe easily. Divide the mixture into piping bags fitted with medium plain tips (I use Ateco pastry tips) (or do the pistachio mousse first, wash your bag and tip and then do the strawberry one). Pipe dots of mousse onto half the puff pastry sheets, alternating the pistachio and strawberry. Top with another sheet of puff pastry and refrigerate at least 30 minutes.
Have a wonderful Memorial Day Weekend…No barbecue for us but brunch with friends this year.
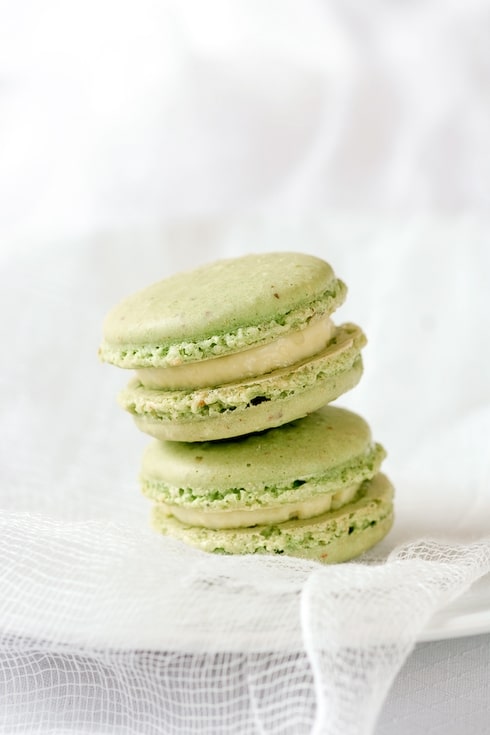
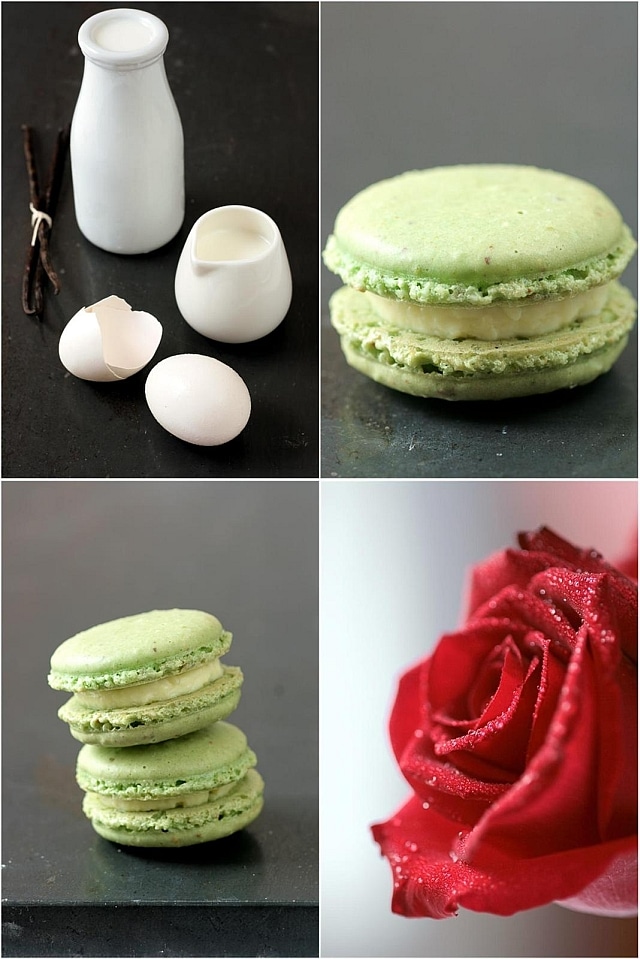
Thank you immensely for the warm birthday wishes and emails. You guys are the best! Phew! This past week was filled with opportunities to take me away from updating more often. Work related issues to ponder, projects, family. I decided to put my mind on a break for a few days. Break is over now. Does that happen to you too? This feeling that the cup is full and you need to just press "pause" for a couple of days? There is always a sweet moment involved for me though. One filled with Creme Brulee Pistachio Macarons for example. As good as a red rose on your birthday.
Jen emailed me recently that she was making macarons and that sent me into a mini brainstorming session. I quickly replied with "I’ve had this idea for a while to make a creme brulee filled macarons. I just need to sit on the logistics for a minute". I pretty much knew how to go about it but there is always this doubt that your idea may be better in your head than the actual production.
When I told Bill about it, he gave me this look of "You and your macaron ideas! Why?". In a cocky French way I simply replied "I want Pierre Herme to personally email me and say "I give up – You win". Yes, just that. I am never that bold about what I do which surprised me a great deal. I am such a dork! I think I even scared Y one evening we were talking about it and she got utterly confused when I said "I am having a throw down with Pierre Herme, except he does not know about it. It’s all in my head".
What can I say? Engineering macarons relaxes my brain cells.
For the filling I used a basic creme brulee recipe, and baked it into an 8×8 square pan lined with foil and set in a larger roasting pan filled with water. I turned the heat lower than for regular creme brulees and watched it carefully. Once baked and cooled to room temperature I refrigerated the pan overnight before using it in the macaron. To fill, I used a small cookie cutter and cut out rounds in the baked creme brulee, gently lifted them onto a macaron shell and topped it with another one. Make sure to refrigerate these a couple of hours before eating so that all the flavors have the chance to meld. Take these out of the refrigerator only 15 to 20 minutes before serving. The creme brulee my turn on you or become too soft to be handled properly.
Speaking of engineering… I’ve got something to share with you that has me so excited I could burst!! Two weeks from now Bill and I will be sitting down with Jen and Jeremy at a table at The Kitchen. In Colorado. Yeah!! B. is going there for work and Jen graciously invited me over so I could spend some time with her in the kitchen, in town and on the trails. When all the oks came in, I started mapping out the drive, getting guides, etc… Yes, you read right, we are driving the 1700 miles or so to get there. We are well aware of all the bumps in the road (no pun intended) with a road trip but I plan on making a bunch of sweet treats to smooth things out if needed. No argument can last long with a macaron in hand!
For the shells:
90 gr egg whites (preferably aged overnight in the fridge or on your countertop if the kitchen is relatively cool)
30 gr granulated sugar
200 gr powdered sugar
55 gr almonds
55 gr raw pistachios
powdered green food coloring (I only used a tiny amount to bump up the green from the nuts)
For the creme brulee filling:
1/2 cup (125ml) whole milk
1/2 cup (125ml) heavy cream
1/2 vanilla bean, seeded (see note)
1/4 cup (50gr) sugar
2 egg yolks
In a stand mixer fitted with the whisk attachment, whip the egg whites to a foam, (think bubble bath foam) gradually add the sugar until you obtain a glossy meringue (think shaving cream). Do not overbeat your meringue or it will be too dry. Place the powdered sugar, almonds and pistachios in a food processor and give them a good pulse until the nuts are finely ground. Add them to the meringue along with some food coloring if using, give it a quick fold to break some of the air and then fold the mass carefully until you obtain a batter that falls back on itself after counting to 10. Give quick strokes at first to break the mass and slow down. The whole process should not take more than 50 strokes. Test a small amount on a plate: if the tops flattens on its own you are good to go. If there is a small beak, give the batter a couple of turns.
Fill a pastry bag fitted with a plain tip (Ateco #807 or #809) with the batter and pipe small rounds (1.5 inches in diameter) onto parchment paper or silicone mats lined baking sheets. Let the macarons sit out for 30 minutes to an hour to harden their shells a bit. In the meantime, preheat the oven to 280F. When ready, bake for 15 to 20 minutes, depending on their size. Let cool. If you have trouble removing the shells, pour a couple of drops of water under the parchment paper while the sheet is still a bit warm and the macarons will lift up more easily do to the moisture. Don’t let them sit there in it too long or they will become soggy. Once baked and if you are not using them right away, store them in an airtight container out of the fridge for a couple of days or in the freezer. To fill: pipe or spoon about 1 big tablespoon of butterceam in the center of one shell and top with another one.
Prepare the creme brulee filling:
Preheat the oven to 300F and position a rack in the enter. Line a 8×8-inch square pan with foil and lightly coat with cooking spray or melted butter. Place this pan in a larger roasting pan and set aside.
In a medium saucepan set over medium heat bring the milk, heavy cream and vanilla bean seeds to a simmer. In the meantime, whisk together the sugar and egg yolk together in a large bowl until the mixture is pale. When the milk/cream is hot, slowly pour it over the egg yolk and sugar, whisking constantly to prevent the eggs from curddling. Let the mixture cool to room temperature, skim the foam on top and pour it into the prepared baking pan. Fill the roasting pan with water so that it comes about halfway up the side of the creme brulee pan. Bake for 20 to 25 minutes. It is ok if the center still appears a little wiggly. It will set as it cools.
Let cool to room temperature before refirgerating preferably overnight.
Note: to seed a vanilla bean: place it on a flat surface and cut it in half lenghtwise without cutting all the way through. Scrape the seeds inside with a pairing knife. You can add both seeds and pods to the milk and cream as they heat up but remove the pod before whisking the liquids into the eggs and sugar.
Do not throw away your bean! Wash it, let it dry and add to some sugar for vanilla scented sugar in a pinch.
When ready to assemble the macarons, cut out rounds smaller than the diameters of the shells into the brulee filling and place it on top of a shell. Top with a second one but do not press down.
Well, I guess there has to be a first for everything…This is my first time missing a Daring Bakers' challenge. Ever. In over 2 years. And does it feel weird!! But there are thousands of wonderfully executed challenges to be seen there. Just too much discombobulation here to do it justice.
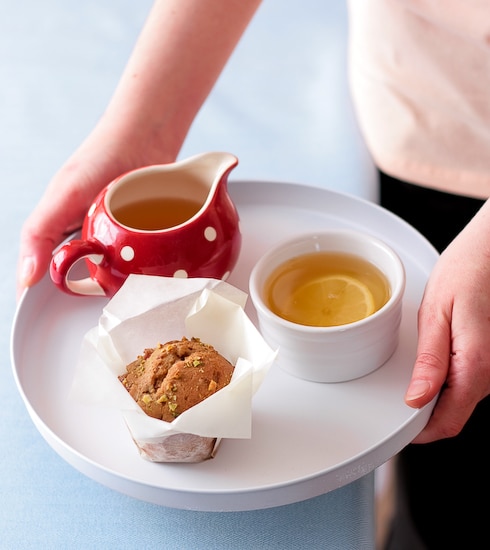
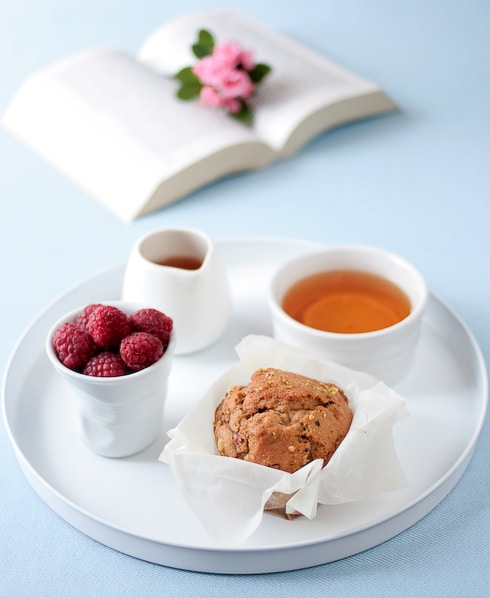
My mother was thrilled to see your enthusiasm regarding her ratatouille and the fear of "being out there" for others to see quickly dissipated with yet another bite of it! My parents are leaving on Sunday and we have been packing activities, visits, friends and family in as much as possible. All this between work, shopping and a few baking sessions of course. Mom and I did find time to bake Grandma’s apple tart as well as these easy and delicious little tea cakes filled with raspberries and pistachios.
One thing we never fail to do as a family is to take time for tea. When 5 o’clock rolls around, the kettle is on and the cookie tin finds its place on the table. Even miles away, this is a little "home away from home" tradition I still have. Helps me stay connected. I can picture my grandfather and my parents sitting together for tea and cookies or cake. Sometimes there are friends dropping by. Sometimes, it is a wordless conversation of comforting gestures. I tend to do the same. I close the notebooks and take a minute to breathe. Sometimes it is a bunch of kids and friends stopping by. Same as home. One thing for sure is that our tea time never goes without a sweet nibble.
These teacakes are pretty straightfoward and lend themselves to all sorts of variations. We went through the pantry and the fridge and prepared mini cakes with fresh raspberries, but you could use strawberries or blueberries just as well. We went for pistachios but almonds, walnuts or hazelnuts would work beautifully here too. I like the flavor that the dark brown sugar imparts to these but feel free to use light brown or granulated sugar instead. I think I’ll try to find time to bake them another batch to take on the plane ride back home and sneak some into their carry-ons!
Raspberry Pistachio Teacakes Recipe:
Makes about a dozen
1 cup (120gr) pistachios, raw, divided
1/2 cup (110gr) dark brown sugar, packed
2 large eggs
1 stick (113gr) unsalted butter, melted and cooled
1 teaspoon (5gr) vanilla extract
1 1/2 cups (205gr) cake flour
pinch of salt
1 teaspoon (4.6gr) baking powder
1 1/2 cups (185gr) fresh raspberries
Preheat the oven to 350F. Lightly spray or butter 10 to 12 muffin cups or tins.
Coarsely chop the pistachios and set aside.
In a stand mixer fitted with the paddle attachment (or with hand held beaters), whisk together the sugar and the eggs on medium speed, until thick, about 2-3 minutes. Lower the speed and with the machine running, add the butter, vanilla extract, cake flour, salt and baking powder. Increase the speed to medium and whisk until just incorporated. By hand, fold in the raspberries, being careful not to break them up too much and half of the reserved pistachios. Divide evenly between the muffin tins (or other small molds). Sprinkle the remaining half a cup of pistachios evenly over the cakes. Bake for 20 minutes or until golden brown. Let cool on wire racks.
I just love December so much I could just wrap my arms around it and hug it so tight it would burst! What gets me so excited in December? Well, Christmas light, Christmas decorations, roasted chestnuts, cranberries, get-togethers, oyster roasts…Oh! I don’t know…a gazillion things. My heart burst, my head spins and my heart swells a little bigger comes December. Time to take a hand, lend a hand, bake a little, bake a lot, send a hug, write a card…ok,ok…you get it..sorry I tend to not filter my emotions come December.
Indeed, I ride high and I ride low…especially if I don’t get to go home for Christmas. B. knows when and how to get the arsenal of chocolate and tissues ready for when I hit my lows and I give him ample warning of long Christmas stories from my childhood are about to leave my lips the moment I start decorating the tree. The creche and the santons, the 13 desserts of Provence, our long dinners and lingering lunches, taking the young ones to a Disney movie on Christmas day, I just start and never stop (like now, oops!)
Like a lot of people away from home during holidays and important celebrations, I like to recreate atmospheres that make me feel closer to the ones I love and like most people they tend to revolve around food or the dinner table. Making homemade cards while having some cake and a cup of tea, making truffles and madeleine as was my "duty" for Christmas Eve as soon as I was able to reach the the counter top perched on my stool. One particular thing I do is make a giant fresh fruit, nuts and dried fruit bowl like my mom has on the dining room table, available at all times. Unshelled almonds, walnuts, hazelnuts, pistachios, dates, dried apricots and prunes, fresh apples, lychees and satsuma oranges. The bowl empties out fast with all the people around, dropping by or simply grazing.
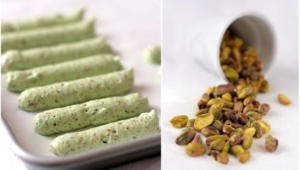
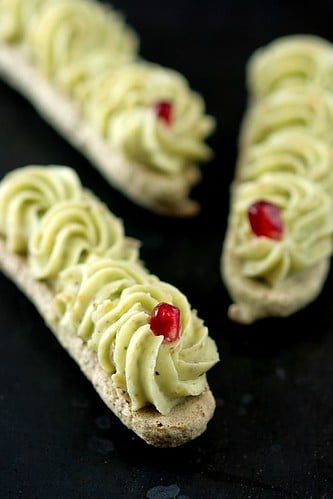
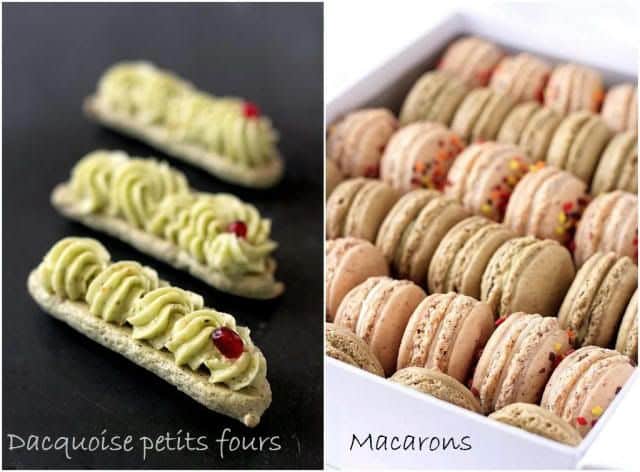
The other day I realized that even with friends visiting, it was mostly the two of us partaking in my mother’s tradition and the fruits would end up ripening too fast before we’d get to them. I wanted to bring something a little festive to our weekly gathering with the neighbors, a little green, a little red, a little citrus. Pistachios, pomegranate, and a little satsuma orange, (zest and juice) one of my favorite scents, thrown together, somehow…At first I thought about making macarons with those flavors and then I decided to take the same batter and turn it into dacquoise petits fours instead.
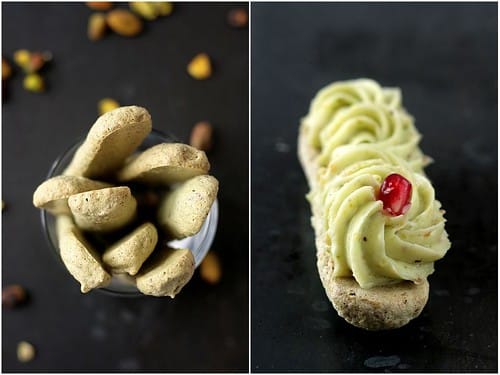
The ingredients are the same for either macarons or dacquoise only your touch in folding will make a difference. Work the batter into a shiny mass and you get macarons. Gently fold your meringue into the nuts and you get a dacquoise. Bake it into disks and you get the base of a yummy cake or pipe into long shapes and you get the perfect two bite dessert to end a meal or to go with a cup of tea. Top with fresh fruits to keep it on the light side, or buttercream for a richer approach as I did here, keep them as one, or like macarons, sandwich two together…the possibilities in flavors and topping are as endless as you want them to be.
Satsuma Pistachio Dacquoise & Satsuma Pistachio Buttercream : Kitchen Note: feel free to substitute any orange, clementine, mandarin that you find for the satsuma orange used here. Same for the nuts, if you don’t like pistachios, replace the amount with any other nut of your liking but as with macarons, keep a certain ratio of almonds to prevent the batter from being too oily. Unlike with macarons, the egg whites do not need to be aged.
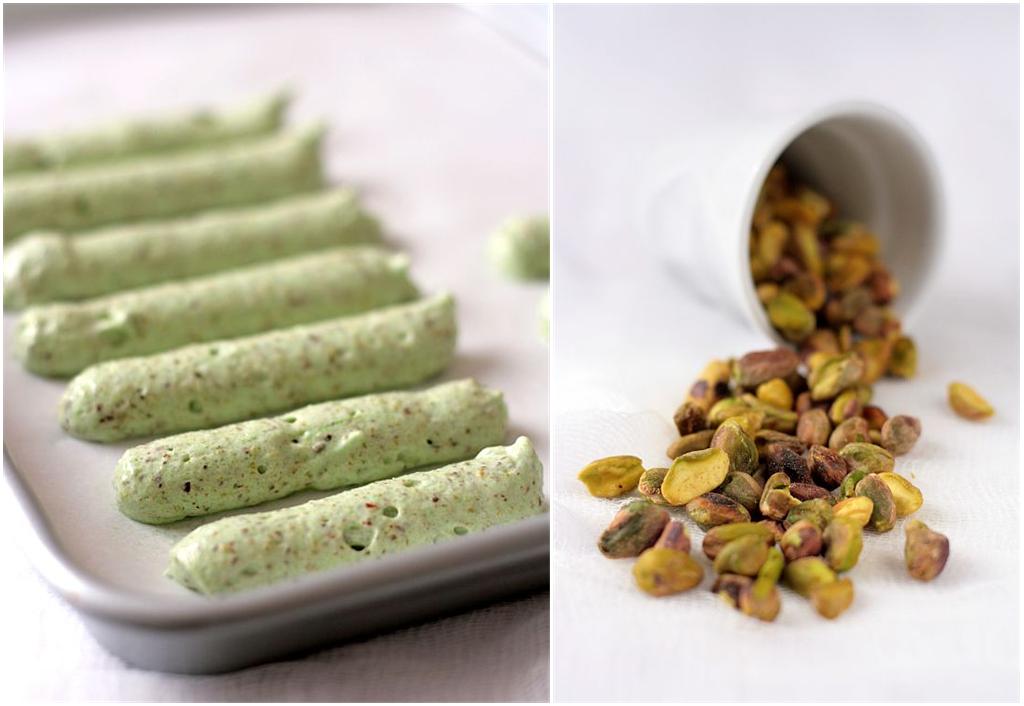
For the dacquoise "fingers":
3 egg whites (about 90gr)
50gr sugar
70 gr almonds
30 gr pistachios
70 gr powdered sugar
1 tsp powdered green food coloring
2 tsp satsuma orange zest
In a stand mixer fitted with the whisk attachment, whip the egg whites to a foam, gradually add the sugar until you obtain a glossy meringue. Do not overbeat your meringue or it will be too dry. Combine the almonds, pistachios and powdered sugar in a food processor and pulse until the nuts are finely ground. Add the coloring and orange zest. Sprinkle the nut mixture over the meringue add carefully fold the two batters together placing your spatula in the center of the bowl, scrape the bottom and bring it over the top. Rotate the bowl 45 degrees and repeat the same motion until both mixtures are fully incorporated. Make sure not to deflate the meringue as you do so. Pipe 3 to 4 inches strips on a parchment paper lined baking sheet and bake for 18-20 minutes at 300F.
For the satsuma pistachio buttercream:
3 egg whites
1/2 cup (100gr) sugar
2 tablespoons water
1 1/2 sticks (170 gr) butter at room temperature
2 tablespoons satsuma orange juice
1 teaspoon satsuma orange zest
1/4 cup finely ground pistachios
1/2 tsp powdered green food coloring
In the bowl of stand mixer, whip the egg whites until they have soft peaks. In the meantime, combine the water with the sugar and bring them to a boil in a heavy saucepan. Bring the syrup to 250F. Slowly add the sugar syrup to the egg whites. If you use hand beaters, this is even easier and there is less hot syrup splatter on the side of your bowl and in the whisk attachment of the stand mixer. Continue to whip until the meringue is completely cooled. Slowly add the butter, one tablespoon at a time. The mass might curdle but no panic, continue to whip until it all comes together. Add the juice and zest from the orange, the pistachios and food coloring.
At this point you can refrigerate the buttercream for a later use up to 4 days or freeze for up to three months. To assemble the dacquoise petit fours, make sure the buttercream is of spreadable consistency and fit a piping bag with a large star tip (or the nuts might clog the flow as you pipe) and pipe on the meringue. Decorate with pomegranate seeds if desired.
Allright, so let’s start this off the right way before I lose my mind. We all gathered today and read all your suggestions for a name for the dessert in the previous post and it was not easy making a decision…ya’ll are good!! But….the overall favorite was "Transatlantic" from Miss Lillas who said "Salted butter caramel from Normandy, American chocolate brownie. An elegant bringing together our 2 continents"….So Miss, please send me your mailing address so I can send this wonderful book your way! Congratulations!
A couple of weeks ago I took a long trip down memory and you were so kind to indulge me and read about my attempt to recreate a fresh cheese that my dad loves. The outcome was not "faisselle" like I remembered but something closer to fresh ricotta. The desire to recreate this unique product came from a conversation I was having with expat friend Aran from Cannelle Et Vanille after our first foray into re-creating desserts from our childhood and cultural heritage. She had a hankering for mamia and so did B. and I after we had a most delicious one on a trip back home at L’Ami Jean, a Basque restaurant in Paris. We started talking about making it right before she left on vacation so in the meantime that got me thinking about trying my hand at "faisselle" and when she came back we both agreed that it would be more logical and more fun to give you two experiments instead of one. Fast forward to last week, when my favorite Basque experimented with mamia and I with faisselle.
Much like her first batch of mamia, my first batch of faisselle for this post did not turn out as I hope for. After the batch I made last month, I decided to take away the added yogurt and to get straight for heating the milk, adding the rennet and letting it sit, until nice floppy large chunks of curd form and separate from the whey. Well, I got zippo zippeedee zip….I got liquid and tiny curds which once drained gave me about 1 cup of ricotta. For one gallon of milk you can expect that it did not cut it. I did not use raw milk this time and I don’t think it was the local homogenized whole milk I used…nope…just could not put my finger on it. In one email she mentioned she was trying another batch of mamia adding cream and dry milk and I went back to the drawing board with mine. Then I had the "genius"(self sarcasm) idea to call my dad and have him read the ingredients on a jar of store bought faisselle…Guess what?….Yep, added cream and dry milk, a little ratio working and I was back in !
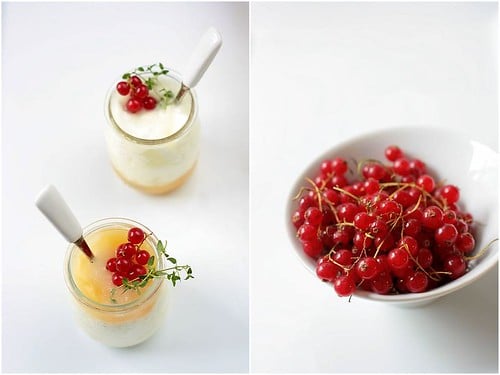
I heated the milk again, added the dry milk, cream and rennet. Let it sit for a couple of hour and the result was exactly what it was supposed to be: large floppy and soft curds slowly separating from the whey. The first spoonful made me think I was definitely on the right track but it needed to develop a little character and an overnight stay in the fridge fixed that. Traditionally, faisselles are drained in molds set in larger containers so that the whey pooling at the bottom keep the cheese moist. I just drained the cheese with a large slotted spoon and scooped the cheese in containers. It did continue to render a lot of whey but I was too happy to have succeeded to be bothered!! The texture is soft but firm enough to separate into curds as you dig your spoon in it and the flavor is really not comparable to any dairy found here, neither sour nor tart.
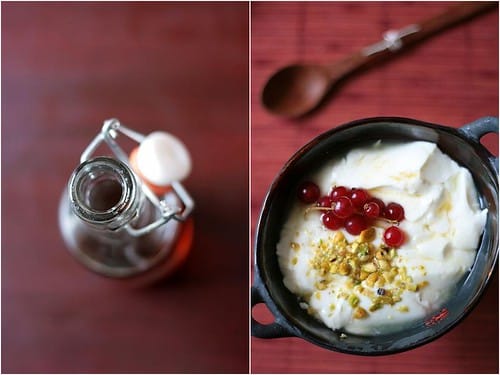
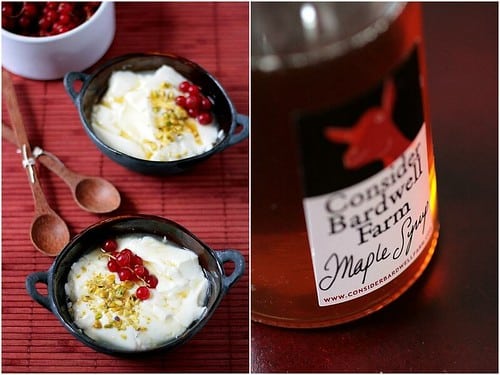
My dad likes his with chopped fresh chives and fresh cracked pepper, which I have come to like, but I also love it on the sweet side. I served some with some lemon thyme lemon curd and some with chopped pistachios, redcurrants and maple syrup. Deborah from Bonbon Oiseau sent me a bottle of a local Vermont maple syrup producer and it arrived the day I was finishing the faisselle. My bottle of "maple crack" as she refers to it could not have come at a better time! Thank you! I played around with the remaining faisselle and used in some other pastry applications. It’s been a busy couple of weeks so I have not come around to sift through those pictures or even put them in a proper post yet…soon though.
Faisselle:
1 quart whole milk ( 4 cups – 946ml)
1/2 cup heavy cream (118ml)
1/4 cup dry milk powder (60 gr)
8 drops liquid rennet
In a heavy saucepan, combine the milk, heavy cream and milk powder and bring the mixture to 120F over medium heat. Let cool to room temperature and add the rennet. Stir once with a wooden spoon, transfer to a clean bowl (porcelain, glass or plastic), cover with a clean kitchen towel and let sit undisturbed for 2 to 4 hours. Place in the refrigerator and let sit overnight to develop more taste. Drain and used as desired the next day.
Lemon Thyme Lemon Curd:
3 large eggs
1/3 cup (80 ml) lemon juice
1 Tb freshly grated lemon zest
1/4 cup fresh lemon thyme
1/4 cup (60gr) granulated sugar
4 tablespoons (55 grams) unsalted butter, at room temperature, cut into small pieces
In a bowl placed over a pan of simmering water, whisk together the eggs, sugar, lemon thyme, lmeon zest and lemon juice until blended. Cook, stirring constantly until the mixture reaches 160F. Remove from the heat and strain the mixture over a bowl. Cut the butter into small pieces and whisk into the mixture until the butter has melted. Cover with some plastic wrap directly in contact with the curd to prevent a skin from forming. You can refrigerate it for up to a week. Makes about 1 1/2 cups.
Note: I used liquid vegetarian rennet that I found at the health food store near me, but you can also find it here.
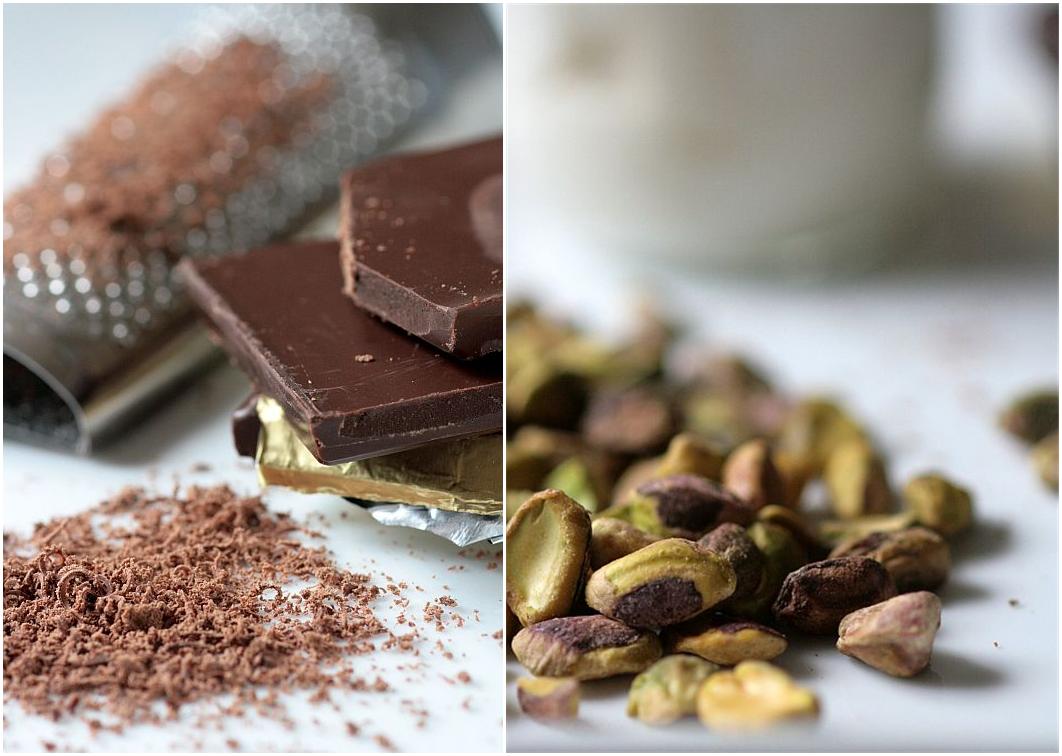
As promised, here is one of the desserts Chris and I tackled while she was visiting this past weekend, a Cassata Cake, as part of another Bakenista get together. I have to admit that I would have probably passed on this Bakenista shing-ding if Chris had not been in my kitchen. Not much time left for "fun baking-just because" these days and not much room left in the fridge for a big cake like this. We had not really planned to bake that early together again but it looks like the folks at King Arthur got word of our little Skype chats and got interested to check out how we were baking live while spread across the US. Halley, from the King Arthur Test Kitchens blended right in and seemed to enjoy the experience, and it seems that we were all trying to be on our best behaviour!!
From my end, the experience was even better since I had another Bakenista in the kitchen and Italian to boot…how fitting when making an Italian classic, isn’t it?! I hope that Chris posts her step by step pictures of the cake making while I post the finished product. We started around 9am, a littler earlier than our scheduled Skype chat, but we were aligning ourselves on "puppy time" and Bailey was falling back asleep then. It was a wonderful morning of tag teaming making the cake and working the keyboard to chat with the others. I started with the cake batter, I think… not that I am getting old or anything but between lack of sleep, puppies, and a rum soaking syrup at 10 am, I somehow found myself scratching my head at 4pm that I was still in my jammies! Chris prepared the ricotta, pistachio, and chocolate filling and layered the cake with it while I was trying to pull Bailey away from Tippy’s tail. When we looked at the clock, it was already noon…Wow…time does fly when you are having fun!!
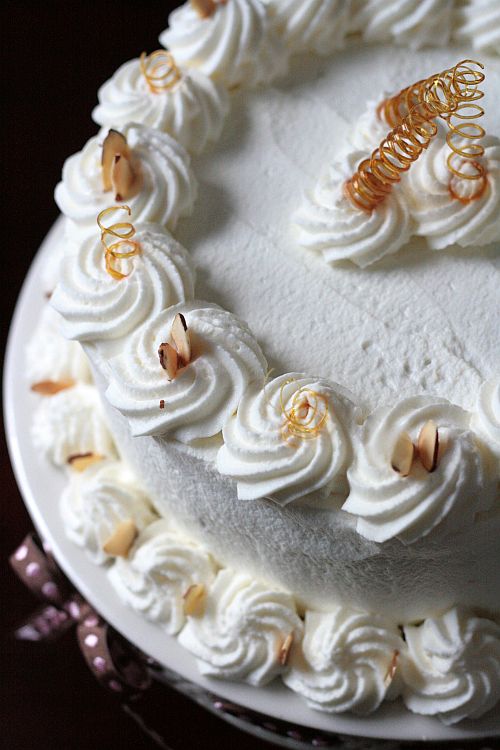
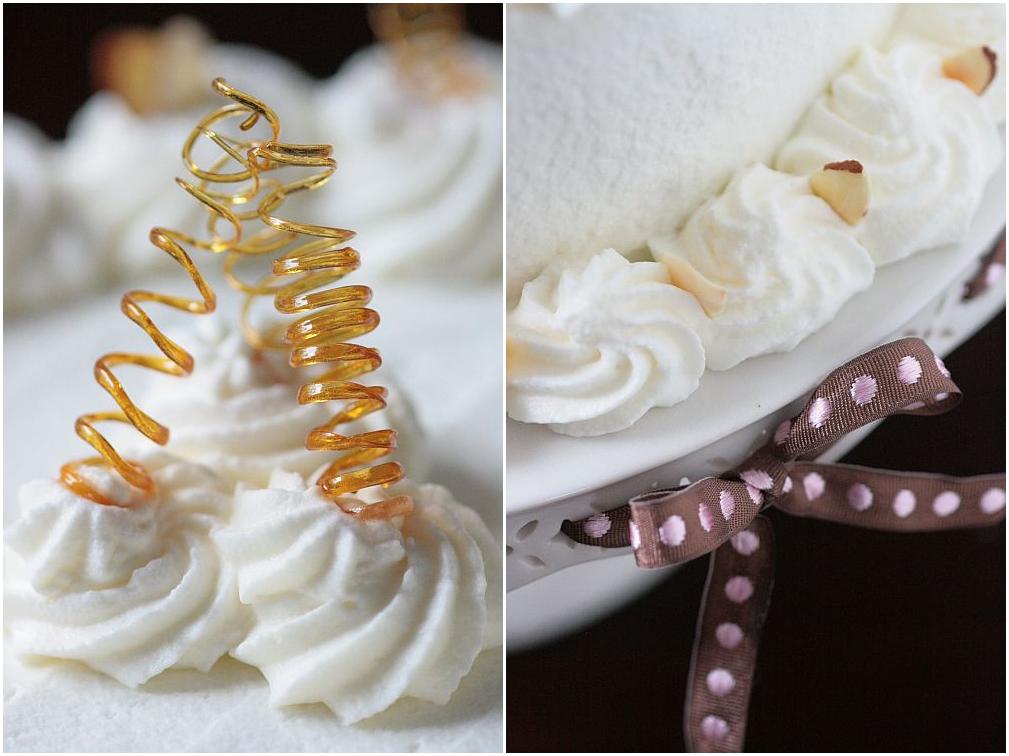
While Chris was here, she asked me to give her a couple of lessons on basic pastry methods, like making macarons (her firsts and a success!), cream puffs (not her first but a little recap), dry sugar caramel (her fear), etc…Showing her the different consistency of things as we went along was a lot of fun. In spite of the humidity I made some caramel corkscrews to decorate the cake and to show her the right consistency to play easily with caramel and they lasted about the time of the photo shoot it was so humid. Later in the afternoon, I covered the cake with a stabilized whipped cream frosting and decorated it wishing she were still around to share a slice with us, not to mention that she was a fantastic and very patient photo assistant all weekend and somehow taking pictures of the cake without her felt kind of empty. Stay tuned for other installment of our baking fest!
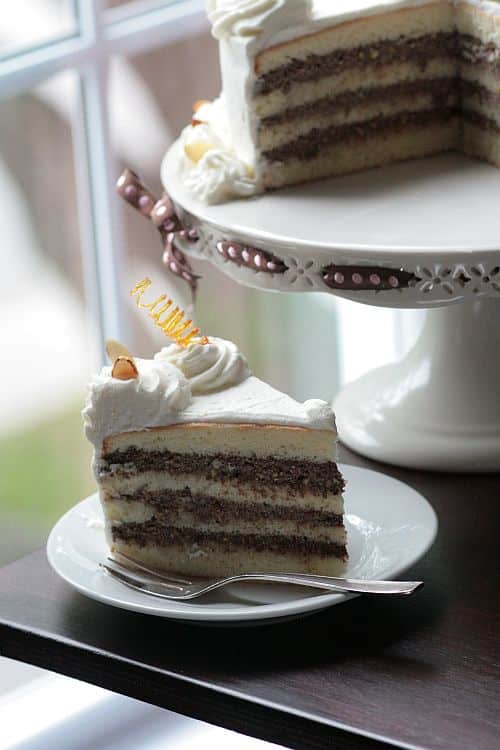
The recipe for this Cassata Alian Sicilian comes from Dolce Italiano by Gina De Palma and originally includes orange zest and almond extract which we skipped as the filling was flavorful as is, spread on rum soaked cake trimmings so we figured it might be overkill. The icing called for is a basic powdered sugar icing but somehow that seemed super sweet to us so we decided to go for a simple whipped cream frosting stabilized with some gelatin…crucial in high humidity settings if you do not serve the cake right away so you avoid the risk of ending with a pool of water on your cake plate. It seems like a really long recipe but it is very detailed…granted it is not a cake you start at 5pm for dinner at 8pm, but it is extremely complicated and comes together quickly.
Cassata Alian Sicilian:
makes one 9-inch cake, 10 servings
Sponge Cake Layers:
2 cups bleached cake flour, sifted
2 teaspoons baking powder
1 teaspoon salt, plus a pinch
8 large eggs, separated
1 1/2 cups granulated sugar
2 teaspoons pure vanilla extract
1/2 cup (1 stick/4 ounces) unsalted butter, melted and cooled
Rum Soaking Syrup:
2 cups granulated sugary
3/4 cup cold water
1/2 cup rum
Stabilized Whipped Cream Frosting:
2 cup heavy cream
1/4 cup powdered sugar
1 1/4 tsp powdered gelatin dissolved in 3 Tb. cold water
Preheat the oven to 350°F and position a rack in the center. Lightly grease two 9-by-2-inch round cake pans with butter or nonstick cooking spray, line them with parchment paper, then grease the parchment.
Sift together the cake flour, baking powder, and 1 teaspoon salt into a medium bowl and set aside.
In the bowl of an electric mixer fitted with the whisk attachment, beat the egg yolks and sugar on medium speed until very light and pale yellow in color and doubled in volume. Beat in the vanilla extract, followed by the melted butter. Transfer the egg mixture to a large, clean mixing bowl. Fold in the dry ingredient-quickly and lightly, stopping just before they are fully incorporated. Clean the whisk attachment and mixing bowl.
Place the egg whites and the pinch of salt in the cleaned bowl of the electric mixer. Using the whisk attachment on medium-high speed, beat the egg whites until firm peaks form. Fold the egg whites into the batter quickly and lightly, incorporate any streaks of dry ingredients that remain.
Evenly divide the batter between the prepared pans, rap the pans against the counter top to eliminate air bubbles. Bake for 35 to 40 minutes, or until they are golden brown, a cake tester inserted in the center comes out clean, and the cakes have begun to pull away from the sides of the pan. Allow the cakes to cool for 5 minutes in the pan, then carefully unmold and set them out to cool on a a wire rack.
While the cakes are cooling, prepare the rum syrup: In a medium saucepan, stir together the sugar, water, and rum. Place the saucepan over medium heat and bring the contents to a boil. Lower the heat and allow the syrup to simmer for 5 minutes. Remove from the heat and let it cool.
Filling: using a microplane or box grater, grate the chocolate into fine, feathery shreds. Using a sharp knife, finely chop the pistachios. Place the ricotta, confectioners' sugar, and cinnamon in the bowl of an electric mixer and, using the paddle attachment, beat until the ricotta is creamy and soft (it will remain slightly gritty due to its original consistency). Add the grated chocolate, chopped pistachios, and beat just until combined.
Assembling the cake: Have ready a 9-inch springform pan. Using a serrated knife, carefully split each cake layer in half horizontally to make four layers. Place one of the layers in the bottom of the pan and, using a pastry brush, moisten it generously and evenly with some of the rum syrup. Spread the cake layer evenly with one third of the ricotta mixture. Repeat twice with another cake layer, more of the rum syrup, and another third of the ricotta mixture. Place the final cake layer on top and generously brush with the rum syrup. Wrap the springform pan tightly in plastic wrap; this helps the layers fit snugly on top of each other. Chill the cake in the refrigerator for at least 4 hours or overnight.
Whipped Cream Frosting: In the bowl of a stand mixer fitted with the whisk attachment, whip the cream with the sugar until soft peaks. In the meantime, dissolve the gelatin in the microwave for 10 seconds. Mine broke so I set the cup where the gelatin was in a large saucepan filled with a couple of inches of water, brought the water to a simmer and waited for the gelatin to melt. Slowly pour the gelatin in one steady stream over the whipped cream and continue to whip until firm. If you add your gelatin a little cooled and before the whipped cream is still at soft peaks stage, it should not clump on you.
Decorate your cake with the whipped cream and return the cake to the refrigerator to chill until you are ready to serve it, at least 3 hours.
So, who else is left with a huge hunka chunka of Cassata? Well, that would be Lisa, John, Ivonne, Stephanie, Ben, Kelly,Marcela. Chris can only look at her work and my hips are not too happy about that! It can easily serves 12, needless to say that after we kept a couple of slices for a little afternoon break, I took the rest to the neighbors! It is a special occasion cake but having Chris around was special enough to make me turn the oven on in the morning on a very hot day!
Words about friendship, even ones formed over the internet never rang truer learning about the sudden passing of one Daring Bakers, Sher from What Did You Eat? I can’t say I "knew" her but I was a fervent reader and loved her recipes and wit. You will be missed Sher and always remembered.