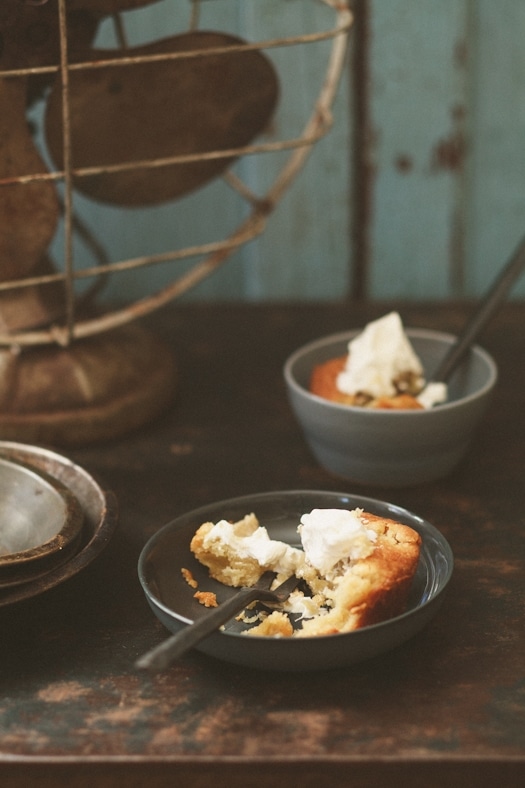
I don’t think I could have enjoyed making these Apple Cinnamon And Walnut Cakes more than this weekend. Rainy and grey weather, still getting over a bad cold and terrible news about someone I loved just made me head out to the kitchen and cook, bake, stir and chop. I also went for a long run and ran until my lungs were about to explode. I needed to feel life in me. A tangible happenstance of something as fundamental as taking a breath in and letting a breath out. I had to get into the kitchen, open a cookbook and start a methodological way of going about my day.
Gather ingredients. Follow directions. Measure and stir. Step one would sway me one way. Step two another. I did not want to think. I did not want to guess. I just wanted comfort. Comfort in making a cake similar to the one my grandmother would make when I was little. Comfort in bringing extra cakes to the neighbors on Sunday morning.
Life has funny ways indeed. And for a few hours, I surrendered. I was too tired from thinking, speculating, wondering, being sad, being mad and feeling like a piece of my life of the past thirteen years had been wrongfully taken from me. When someone screams, I get quiet. When someone gets mad, I smirk. When someone decides to check out, deliberately, I check in. I know no other way to deal with loss and grief. And I bake. Or cook.
If you read food blogs, such as this one, I am pretty much reassured that you do the same thing when blue. So I am hoping that you understand when my dealing with uncomfortable moments, makes me reach for the comfort of a soft cake, filled with aromas of apples and cinnamon, the tender crunch of walnuts and crumbs sticking to your fingers. Comforting scents and textures. Like a warm blanket on a cold and rainy day. These cakes will cure many a broken heart, will stop many a falling tear and will become the kindest balm for your soul.
Take my word for it. You can find comfort in taking familiar recipes, childhood recipes, family-hand-me-down recipes and make them yours. I just feel better for reconnecting to the only normalcy I know. Being in the kitchen and making food for the people I love. In memory or not.
This post was written with one single person in mind. Here is to you Tim… With all my love and thirteen years of an honest and seamless friendship between a man and a woman who were just trying to make sense of this life we are in. And for the many cakes I made you sample while I was pastry chef-ing at Mistral’s back in the days… Miss you Mischief. Your Misconduct.
Didn’t expect to take this long to announce the winners of the cookbook giveaway but we had snow over the weekend. Snow! In Charleston! (which was gone by 9am the day after). Kind of – sort of – just about unheard of. I did not even know of B’s existence the last time it snowed in Charleston. So yes…while everyone was glued to the tv weather report worrying about a ooplah of a inch accumulation, I was outside with the pups, dancing and playing in the streets, in the woods and by the marsh.
Anyways…Congratulations to Victoria N. winner of Amy’s Bread and Rosa from Rosa’s Yummy Yums, winner of Unforgettable Desserts. Email me at mytartelette{at}gmail{dot}com with your postal addresses please!
I wanted to hear that particular sound after the snow falls. A muffled breeze. The sound of silence soft as a cotton ball. The intense pleasure of snow falling on my face at midnight in immaculate quietness. Alone. The brightness of the moonlight bouncing off the snow. The dogs chasing snow and eating it as if it were cotton candy.
I know it sounds crazy but the evening was made complete by a loss of power. Right when the snow stopped for a moment. We never get this weather so our power lines probably got overwhelmed by a few flecks. Didn’t bother me. The spectacle was outside. There are always reruns to watch the Olympics. Good thing I did not have a batch of macarons ready to go in the oven when we lost power. I did shortly after the power came back though!
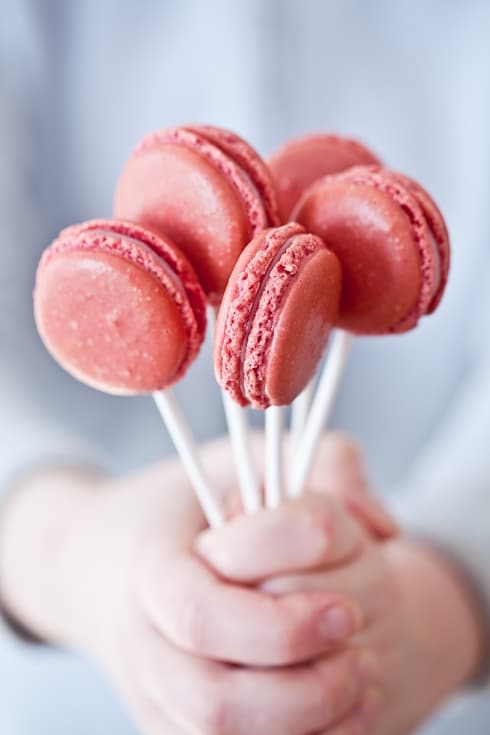
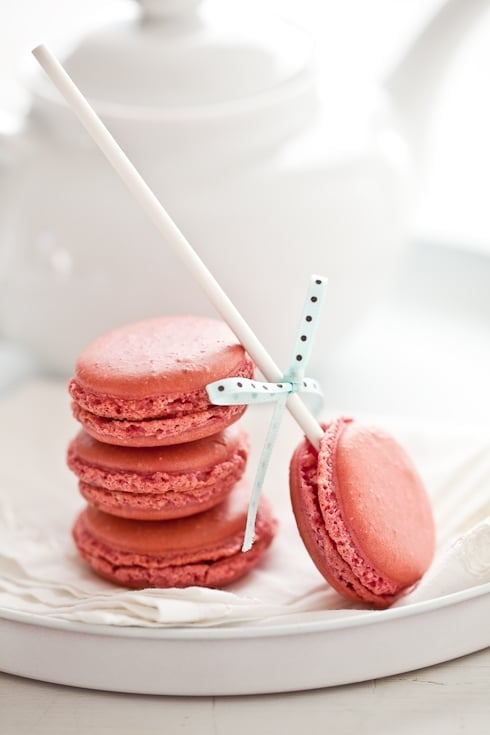
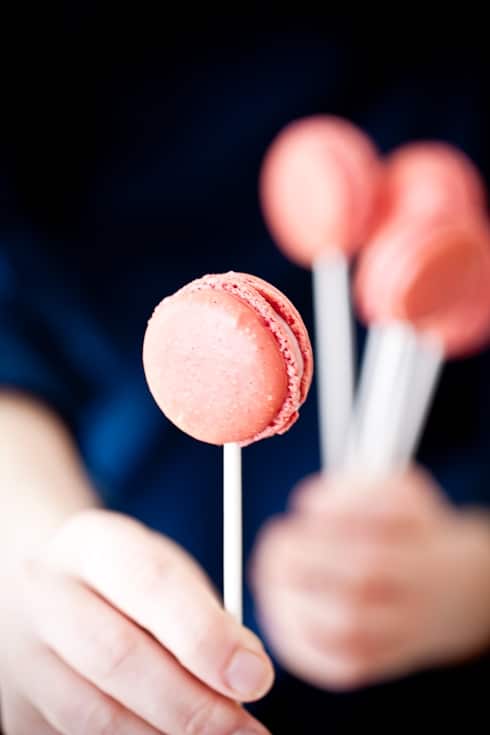
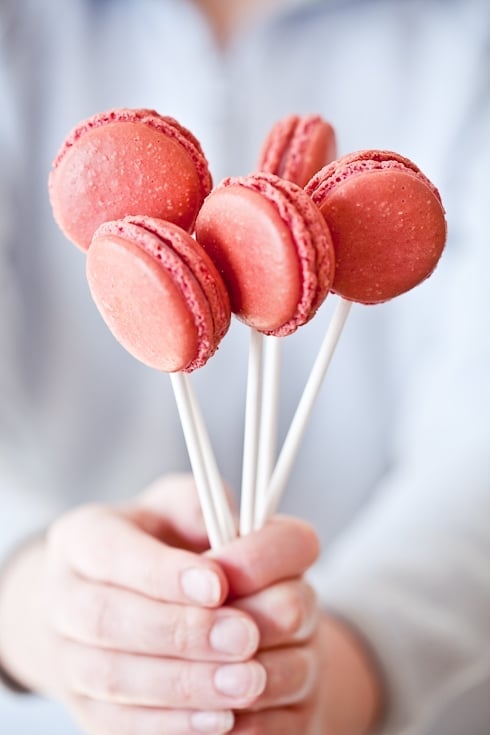
I did make this Raspberry Mascarpone Macarons bouquet for my Valentine. Because we don’t celebrate Valentine’s Day. Hmmm…I need to backtrack there because I saw your eyebrows go up half an inch just then. We both dislike Valentine’s Day. We’ve always had that knee-jerk reaction when the Hallmark labeled "sweetest day" of the year would roll in. Most years we were both at work that day, him in the front of the house serenading couples out on the town and me in the back of the house plating them the "de rigueur" chocolate lava cake or swan petit choux.
We don’t celebrate the sweetest day because each day we are together is well, pretty darn sweet as it is. It is! We feel bad for the people experiencing all the pressure of an evening having to go perfectly. Perfect is not real people! It does not last. Perfectly wrapped up love is pretty but insipid. Love is messy. Love is jumps and loops. Not bows and boxes. We both joked that we might get our "on the sweet side of life" citizenship cards revoked given our sarcastic comments associated with the day.
We also know that for some folks it is a bunch of hopes all wrapped up in many emotions getting a chance to come out on V-Day. We get that. We love that. I get chills watching young men getting roses at the stores. I love watching couples roaming the isles planning a great meal by candlelight. I get that. I still couldn’t tell you where the candles are in our house. Hurricane lamps I can. It was with this last thought that I turned to Bill and said "Oy! Time to do one fluffy puffy red or pink, smallish please, drippy sweet thing today. I fear it’s bad juju now if we don’t. I don’t even know if we have candles anymore!!"
He went and got me roses. For the argument we have not had yet and which he already knows he is going to lose. His words. I made him a bouquet of macarons. Pink macarons with a mascarpone raspberry filling. His favorites.
I’ve been toying with the idea of putting a macaron on a stick for a while. I even mentioned to Bakerella, the Queen of cake pops, when she took my macaron workshop in Atlanta that I wouldn’t be surprised if she came up with a macaron pop next. Then I thought, "eh, why can’t I? Hope she won’t mind!" I emailed Angie-Bakerella one night that I was making macarons pops for Valentine’s Day inspired by all her fun cake and cookie pops. She emailed back with a couple of pictures of her latest creation: adorable macaron pops! Made me so happy that we had been on the same wave length with these. I felt largely vindicated in my macaron geekiness. Ha!
I think that more than love on Valentine’s Day, I love when ideas come together completely by chance. Genuine coincidences. Not bad. Not bad at all.
Dear Angie-Bakerella, Bill said he’d share one of his macarons with you, because this Valentine’s Day, you were the sweetest thing. Love from the both us… Raspberry Mascarpone Macarons:
For the shells:
90 gr egg whites (use eggs whites that have been preferably left 3-5 days in the fridge)
25 gr granulated sugar
200 gr powdered sugar
110 gr almonds (slivered, blanched, sliced, whatever you like)
1 tablespoon cherry pink powdered food coloring
Prepare the macarons:
In a stand mixer fitted with the whisk attachment, whip the egg whites to a foam, (think bubble bath foam) gradually add the sugar until you obtain a glossy meringue (think shaving cream). Do not overbeat your meringue or it will be too dry. Place the powdered sugar and almonds and powdered color in a food processor and give them a good pulse until the nuts are finely ground. Add them to the meringue, give it a quick fold to break some of the air and then fold the mass carefully until you obtain a batter that falls back on itself after counting to 10. Give quick strokes at first to break the mass and slow down. The whole process should not take more than 50 strokes. Test a small amount on a plate: if the tops flattens on its own you are good to go. If there is a small beak, give the batter a couple of turns.
Fill a pastry bag fitted with a plain tip (Ateco #807 or #809) with the batter and pipe small rounds (1.5 inches in diameter) onto parchment paper or silicone mats lined baking sheets. Let the macarons sit out for 30 minutes to an hour to harden their shells a bit. In the meantime, preheat the oven to 280F. When ready, bake for 15 to 20 minutes, depending on their size. Let cool. Once baked and if you are not using them right away, store them in an airtight container out of the fridge for a couple of days or in the freezer.
For the filling:
4 oz mascarpone, room temperature
2-3 tablespoon good quality raspberry preserves
In a small bowl, whisk together the mascarpone and preserves together until well incorporated. Fill a small piping bag with a large plain tip (Ateco #809) with it and pipe in the center of each shell. Let the shell mature at least 24 hours in the fridge so all the flavors have the chance to meld together.
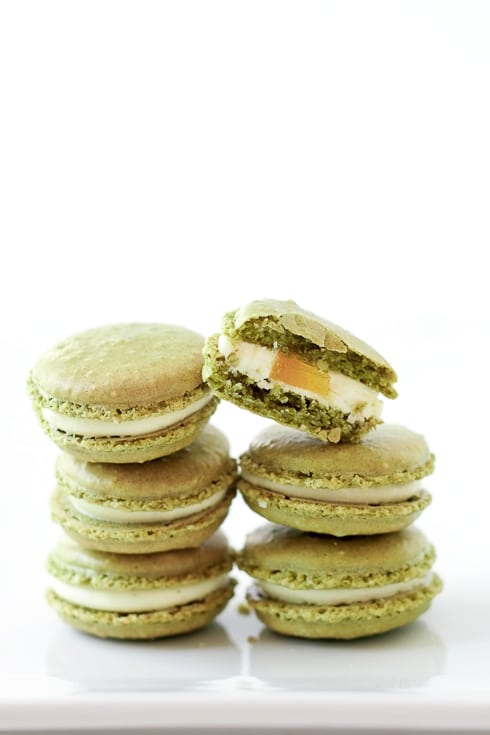
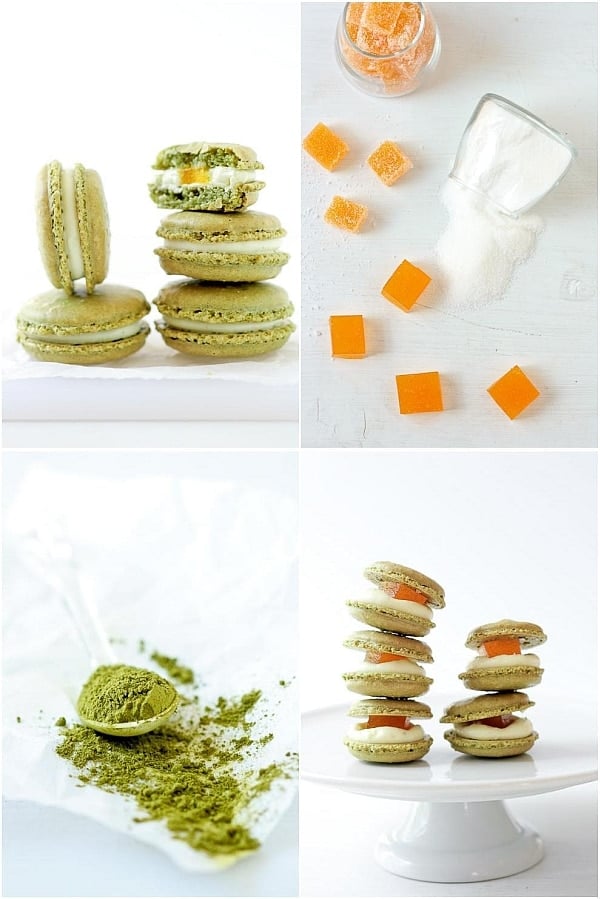
When Spring and Summer roll around, I think in shades of pinks and reds. When Fall and Winter point their nose, I am all about the blues and the purples. Greens are oranges are not my colors. Nope. And yet, the first thing I thought about with the first sign of cooler mornings and breezy nights were Matcha and Peach Pate de Fruits Macarons. Enjoying the last bit of summer produce while cozying up to the subtle taste of matcha tea.
Lately, the mere mention of tea evocates long talks on the porch and a light chill on a late night walk. You can feel the air changing. I can finally feel some coolness under my feet when I let the dogs out early in the morning. I can almost hear the grass crisp up as we come down, ready for us. These first few days of September have really been quite Fall-ish and are probably temporary due a hurricane being just around the corner. Nevertheless, every time this lovely Fall breeze enters the house, we just stop whatever we are doing and enjoy for a few seconds. Even if it is short lived it is worth those few seconds in the day.
When I went to teach Veronica a three dayPastry Bootcamp, she not only gifted me with her hospitality and friendship, but with also a few stashes of vanilla beans, some saffron and a brand new can of the matcha she preferred to use in her macarons. I can see why. From the can to the finish product I could taste and smell the wonderful grassy properties of matcha. If you have never had it before, you might go "wow! what is that?" but trust me it grows on you real fast. It’s unpretentious and absolutely delicious in pastry.
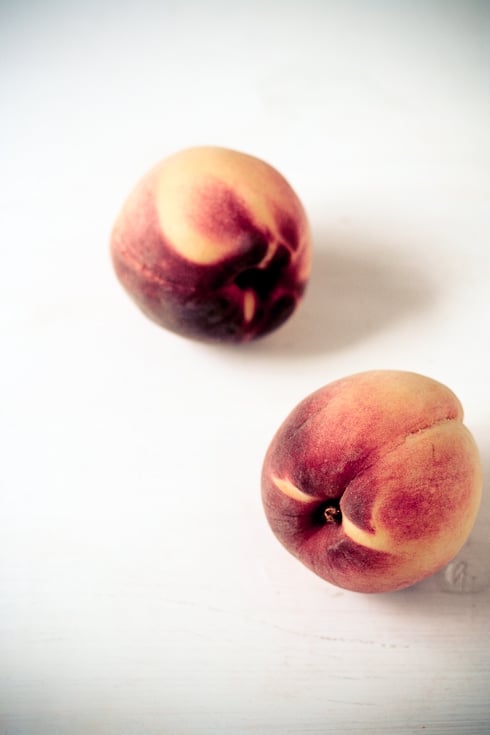
I know that our Southern peaches are near their end and I have been stocking, preserving and canning as many of them as I could. This season has been particularly prolific and tasty and as much as it pains me to say goodbye to stone fruits I am happily getting my taste buds ready for pears, pomegranates, apples and pumpkins. Each season is a new palette. Even if it makes me paint in greens and orange which I am so-so about! One thing I have made a couple of times recently is peach pate de fruits. It keeps well, makes great little gifts for my students and is just plain good when the fruits are ripe.
So…in my usual ways, peach in one hand and matcha macarons in the other, I decided to marry the two together in one little perfect bite, mending the bridge between Summer leaving and Fall approaching. Alright, so I was helped by a little mascarpone and vanilla cream in the middle. I had no idea that peach and matcha would be that delicious together. They are. I am making more this weekend!
On a side note, I know that Caitlin and Y are going to be disappointed that I did not do a talking picture post as we joked about while Twittering one night. I was starting to crack up looking at some of the shots and started playing around with captions. Here are some of the outakes for the macarons "beauty" shoot.
One more little thing though before the recipe. There are people you want to meet and there are people you want to meet, eat and laugh with and learn from. For me, Tish Boyle is one of those people. I remember the morning I opened my emails and found one with her name as the sender. I did not click for a few seconds. Really. I turned to Bill and said "if this is not a joke, she emailed me" pointing at one book I love and that she co-authored, Chocolate Passion. I carefully clicked and held my breath. I turned to Bill with the biggest smile ever and said "Tish Boyle wants me!". And we both laughed. Or I snorted my coffee. I can’t quite remember. She wanted an interview for the print magazineDesserts Professional, alongside David Lebovitz and Michael Laiskonis. Without hesitation, I emailed back "Yes!" before adding "I love your work". When she responded "I’m honored you even know who I am", I fell in love with her even more, if that was possible. Ugh, hello! I am supposed to say that! Thank you Tish, I am honored beyond belief to be in such good company in a wonderful magazine. You can check the article in their August issue.
Matcha And Peach Pate de Fruits Macarons:
Notes:
Use eggs that have been preferably aged 3-5 days in the fridge. Pierre Herme uses eggs that are aged until they are almost like water, about 5 days. If it’s good for Pierre, it’d good for me! The humidity, folding, aging of the eggs (the macs here were made with fresh whites) will affect the outcome. It’s all a balancing act of chemistry and action.
For the shells:
90 gr egg whites (30 gr granulated sugar
200 gr powdered sugar
110 gr almonds
1 tablespoon matcha powder
For the pate de fruits: Notes: I use Certo liquid pectin so I can’t vouch for how others might behave. I use a large stainless steel pot so the evaporation and cooking could happen faster.
For a superb pectin free recipe, follow this recipe posted by the awesome Anita from Married with Dinner.
13 oz (380gr) peach puree (weight after you remove skin, pits and processed)
1 tablespoon lemon juice
2 cups (400gr) sugar, divided
3-4 tablespoons liquid pectin
For the mascarpone – vanilla cream:
8 oz (210gr) mascarpone, at room temperature (or substitute cream cheese)
2-3 tablespoons sugar
1 teaspoon vanilla bean paste
or 1/2 vanilla bean, seeded
2 tablespoons heavy cream
Prepare the macarons:
In a stand mixer fitted with the whisk attachment, whip the egg whites to a foam, (think bubble bath foam) gradually add the sugar until you obtain a glossy meringue (think shaving cream). Do not overbeat your meringue or it will be too dry. Place the powdered sugar, almonds and matcha in a food processor and give them a good pulse until the nuts are finely ground. Add them to the meringue along with some food coloring if using, give it a quick fold to break some of the air and then fold the mass carefully until you obtain a batter that falls back on itself after counting to 10. Give quick strokes at first to break the mass and slow down. The whole process should not take more than 50 strokes. Test a small amount on a plate: if the tops flattens on its own you are good to go. If there is a small beak, give the batter a couple of turns.
Fill a pastry bag fitted with a plain tip (Ateco #807 or #809) with the batter and pipe small rounds (1.5 inches in diameter) onto parchment paper or silicone mats lined baking sheets. Let the macarons sit out for 30 minutes to an hour to harden their shells a bit. In the meantime, preheat the oven to 280F. When ready, bake for 15 to 20 minutes, depending on their size. Let cool. If you have trouble removing the shells, pour a couple of drops of water under the parchment paper while the sheet is still a bit warm and the macarons will lift up more easily do to the moisture. Don’t let them sit there in it too long or they will become soggy. Once baked and if you are not using them right away, store them in an airtight container out of the fridge for a couple of days or in the freezer.
Prepare the pate de fruits:
Line a 8×8-inch pan with parchment paper and set aside.
Plce the peach puree in a heavy saucepan and add the lemon juice. Stir in 1/2 cup (100gr) saugar and bring the mixture to a boil over medium heat and cook until its temperature register 113F, stirring constantly. Add the remaining 1.5 cups (300gr) sugar and the pectin to the pot and slowly bring the mixture to 200F, still over medium high heat while stirring constantly. Turn the heat down a bit and keep the mixture at 200F for 2 to 3 minutes. Turn the heat back up and slowly bring the mixture to 223F. Keep it there for an additional 2-3 minutes (turn the heat down if necessary to do so). Remove from the heat and immediately pour the mixture into your pan lined with parchment paper. Let set for a couple of hours. Cut shapes with a sharp knife and roll the pieces of pate de fruit in sugar. Refrigerate if not eating all of them at once.
Prepare the mascarpone-vanille cream:
In a large bowl, whisk together the mascarpone and sugar until smooth. Add the vanilla and the heavy cream and whisk until all the ingredients are incoporated. Place the mixture in a piping bag fitted with a plain tip and pipe a dollop of cream onto half of the macarons. Top with a square of pate de fruits and another macaron shell.
I realized as I was starting to write down the recipe for this post that it was actually my 550th post. Wow…That made me a little proud and left me slightly amazed at the same time! I think I even said "oh la vache!" (holy cow!). That’s a whole lot of stories, words, laughs, tears and just as much sugar, butter, flour and eggs! What could be more fitting to celebrate post #550 than a Daring Bakers Challenge? A very sweet and very rich one: a Dobos Torte.
I wrote last time that I hadn’t had an ounce of craving for chocolate lately and when I set out to make this challenge, things turned out just about the same. I looked at the recipe and could not chase the images of sweet sugared berries floating in my head. Or was it sugar made saber equipped raspberries fighting off little chocolate critters? Hmmmm…Still, not an ounce of chocolate was calling my name yet. Too hot, too humid and a fridge full of raspberries thanks to my mother – in – law who always buys for 8 when there are just the 2 of them.
A Dobos Torte is traditionally a rich layer sponge cake layered with chocolate buttercream and topped with caramel pieces. I respected all the components of the challenge while changing things around a bit for a few reasons: the season, the plentitude of raspberries and mascarpone I had (mother – in – law again) and the weather.
I baked the sponge layers in a sheet pan, cut out disks in the cake to form several 3-inch cakes in dessert rings. I layered the disks with a super light (but rich) mascarpone mousse and fresh raspberries. For the buttercream, I kept a similar method as the one given by the hostesses and made vanilla bean Swiss meringue buttercream where the egg whites are heated on the stove prior to being whipped. On a side note, the specks you notice on the cakes are neither caused by a problem with your vision or your computer screen. It’s not dirt either as my 5 year-old neighbor thought earlier. It’s the pure goodness of a vanilla bean.
I thought about that caramel topping long and hard and knew it was just not going to happen as it was written given our heat and humidity. I made pulled sugar ribbons because I could make just what I needed for the cake before they’d disintegrate in sugar puddles. Going back on previous posts, I realized there had been bubble caramel, caramel circles, caramel strands, caramel corkscrews, caramel window panes, caramel plates but never good old pulled sugar. Ah! No more! Here it is!
Before you say you will never ever do it because it’s caramel-and-oh-my-god-it’s-just-too-hard-because-it’s-caramel let me tell you why you could make it tomorrow and neither glue your entire kitchen nor burn all your pots and pans trying to get it to "the proper shade of amber". First, there is a high enough ratio of water to sugar for the liquid not to turn to caramel before you reach the desired temperature for pulled sugar. Then, your mission is NOT to let it turn color. You boil, add coloring or not, take it to a certain temperature, pour it off, let it cool a bit and start playing.
See? One more cool pastry thing to try one quiet evening. Do not fear the sugar!
We loved this version and I have already bookmarked the original one given by our hostesses to make this Fall and Winter. Thank you ladies for hosting and to Lisa and Ivonne for being such incredible Daring Bakers Founders! There are plenty more Dobos Torte to be seen from around the globe here.
For the sponge cake layers
6 large eggs, separated, at room temperature
1 1/3 cups (162g) confectioner’s (icing) sugar, divided
1 teaspoon (5ml) vanilla extract
1 cup plus 2 tablespoons (112g) sifted cake flour
pinch of salt
For the mascarpone mousse:
For the mousse:
3 egg yolks
1/2 tablespoon powdered gelatin
1/2 cup (125ml) honey
3 oz (90gr) mascarpone, at room temperature
1 cup (250ml) heavy cream
For the buttercream:
1 cup (200gr) sugar
4 large egg whites
3 sticks (340gr) unsalted butter, at room temperature
Prepare the cake layers:
Position the racks in the top and centre thirds of the oven and heat to 400F (200C). Line a half sheet pan with parchment paper and spray lightly with cooking spray. Set aside.
Beat the egg yolks, 2/3 cup (81g) of the confectioner’s (icing) sugar, and the vanilla in a medium bowl with a mixer on high speed until the mixture is thick, pale yellow and forms a thick ribbon when the beaters are lifted a few inches above the batter, about 3 minutes. (You can do this step with a balloon whisk if you don’t have a mixer). In another bowl, using clean beaters, beat the egg whites until soft peaks form. Gradually beat in the remaining 2/3 cup (81g) of confectioner’s (icing)sugar until the whites form stiff, shiny peaks. Using a large rubber spatula, stir about 1/4 of the beaten whites into the egg yolk mixture, then fold in the remainder, leaving a few wisps of white visible. Combine the flour and salt. Sift half the flour over the eggs, and fold in; repeat with the remaining flour. Pour the batter into the prepared half sheet pan and bake for 8 to 10 minutes or until slightly brown.
Prepare the mousse:
Whisk the egg yolks to break them up in the bowl of stand mixer (or with hand held beaters).
Sprinkle the gelatin over 2 Tb of cold water in a small cup and let it bloom.
In a heavy saucepan set over medium high heat, bring the honey to a boil and cook until it reaches 240F. Remove the pan from the stove and pour it carefully into a cup with a spout (easier to pour) .
Dissolve the gelatin in the microwave for 10 seconds, or in a bowl set over a pan of simmering water.
While still whipping the yolks, slowly pour in the hot honey, being careful to temper them and not cook them. Pour the gelatin over the egg/honey and whip together for a few seconds and add the mascarpone, one tablespoon at a time. Whip until cooled to room temperature and has tripled in volume
In another bowl, whip the cream to soft peaks or if you are using a stand mixer, pour the mousse into a large bowl and clean the mixer bowl thoroughly, or use another mixer bowl if you have one. Gently fold the whipped cream into the mousse trying to deflate the whole thing as little as possible. Use immediately.
Prepare the buttercream:
Place the sugar and egg whites in a large heatproof bowl over a saucepan of simmering water and whisk constantly, keeping the mixture over the heat, until it feels hot to the touch, about 3 minutes. The sugar should be dissolved, and the mixture will look like marshmallow cream (temperature should be about 235-238F). Pour the mixture into the bowl of a stand mixer fitted with the whisk attachment and beat the meringue on medium speed until it cools and forms a thick shiny meringue, about 5 minutes. Switch to the paddle attachment and add the butter, one tablespoon at a time, beating until smooth. Once all the butter is in, beat in the buttercream on medium-high speed until it is thick and very smooth, 6-8 minutes. Proceed per recipe or store for up to a week in the fridge or 3 months (well wrapped in the freezer).
Assemble the cakes: like eight cake rings with rhodoid or plastic protector sleeves cut to fit (yes, like the ones in the office)and place them on a baking sheet. Place a cake round at the bottom, place a layer of raspberries on the outside, fill with mousse to the top of the raspberries, top with one round of cake, more mousse and a final round of cake. Place in the refrigerator and let set 2 hours or overnight. When the mousse is set, cover with the buttercream and refrigerate.
For the pulled sugar ribbons:
1 1/4 cup (250gr) sugar
100 ml water
1 teaspoon lemon juice
5-8 drops red food coloring
In a heavy saucepan set over high heat, bring the sugar and water to a boil (do not let it turn into caramel). Once it is boiling, add the lemon juice and coloring. Bring the syrup to 298F on a candy thermometer. Immediately pour the caramel onto a silicone mat. You might want to wear some pastry gloves at this point because the caramel is extremely hot. Little tip: I have found myself with not one glove in the tool box so I used a new pair of dishwashing gloves instead.
Let it harden until it is pliable and carefully start folding the mat back and forth onto itself to work the sugar mass a bit. Take small pieces of the mass and start pulling, twirling or even make rose petals and other flowers with it. Beware that pulled sugar cools as fast as it gets hot so if it becomes harder and harder to work with you have different options available. If you have a heat lamp, place the pulled sugar underneath until pliable again. If you are like me (sans heat lamp) you can either place the pulled sugar on the silicone mat on a baking sheet directly on the stove on low heat until pliable or in a low heated oven. Be careful and watch it carefully: it can turn into "real" caramel very fast this way so do not walk away while you reheat.
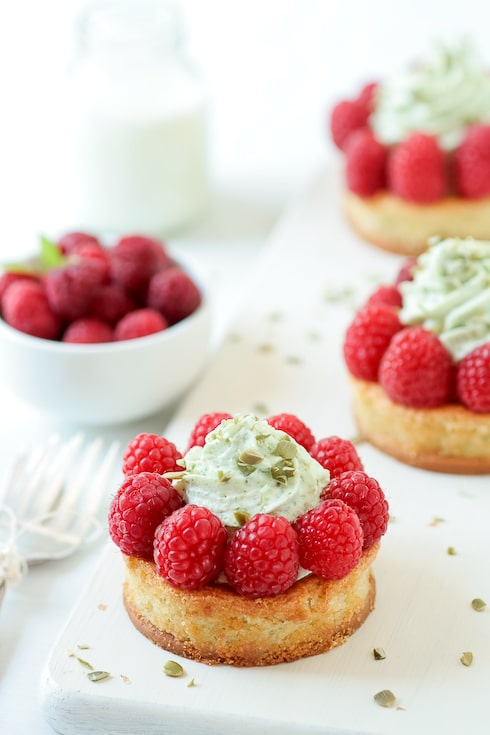
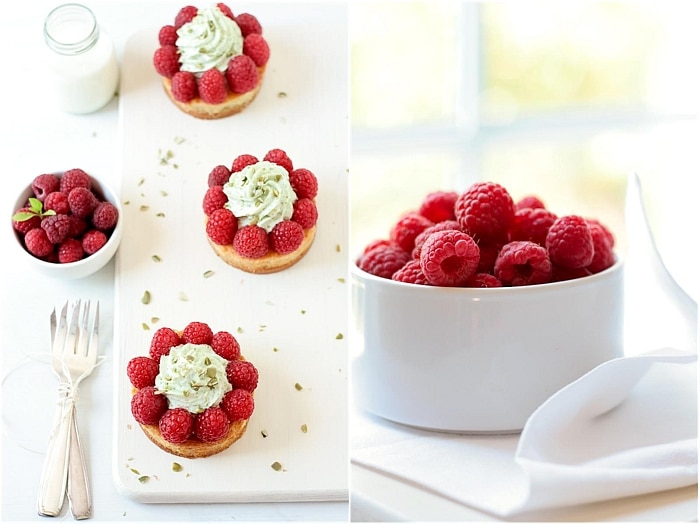
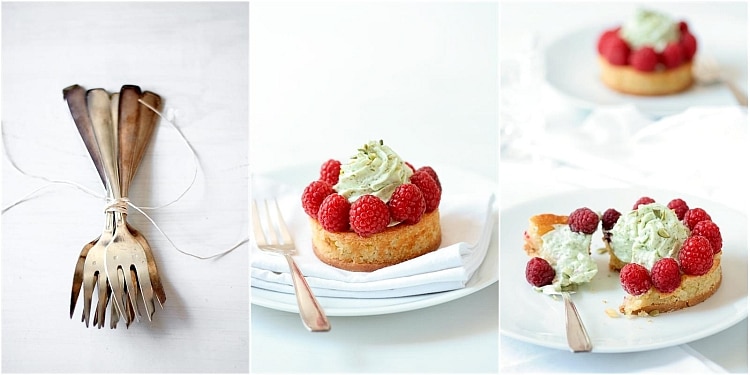
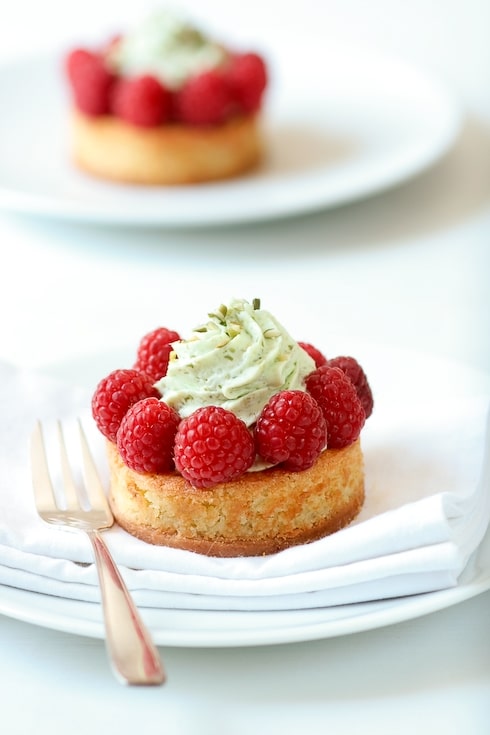
I realized a couple of years into our marriage that the occasions to take out our china and break into grandma’s pretty silveware were going to be limited if we did not expand the meaning of "occasions". Even a simple and casual dinner with friends is now considered one. A moment to celebrate friendship, time set aside to connect or reconnect, all made special by the conversations and the people around them. Even a simple dinner calls for a special dessert like these Pumpkin Seed Mascarpone Mousse And Raspberry Tartelettes and my grandmother’s vintage dessert spoons. Just because.
I like to set a pretty table and make a special meal when we have company and you can guess that there is a treat awaiting them for dessert. We are not stuck into fussy table settings and usually end up taking our plates to the back deck during Spring and Summer or cozy up in front of the fireplace during the winter. I also love the fact that I can take the dogs to the dock around 7pm and sit there watching the sunset while the porpoises give us a little show. Pretty idyllic. Something to take in and make time for.
We had friends over the other night and decided to get some crabs at the dock and have a simple crab boil for dinner. I knew we’d have to cover the deck table with layers of newspaper and just get ready for things to get messy. But oh so much fun! What I did not expect was for B. to call me from the dock and ask us to bring the party over there. I trust him and I knew there was a reason. We were not disappointed. The sea was at full tide, the sunset gorgeously pink, yellow and red and the porpoises were giving us the funniest game of hide and seek. Good company, good food, delicious surroundings. I don’t know how I got so lucky and I tried to take it all in since I know we won’t be here forever.
I wish my dad would have been there with us that night because it would have been the perfect setting to wish him a Happy Father’s Day (he also had a birthday just a few days ago!). I know he would loved it and he would have loved the whole meal, complete with these tarts. And I know my grandma would have loved to see her pretty silverware hanging out at the dock in a very informal setting. She was cool like that.
My intentions were to make pistachio and mascarpone mousse tarts but I was already using all of my pistachio stash for another project. I am stubborn though. I wanted something green to contrast with the red of the raspberries I intended to use. I looked around in the pantry and remembered a container of raw pumpkin seeds. Hmmm…would it work? Well, there is no better way to find out than to just do it, right?
Oh yes…it does! The tartelettes start with basic shortcrust rounds (or sable dough) set at the bottom of a tart ring and topped with a layer of almond cream. The pumpkin seeds are finely ground before being mixed in with mascarpone and whipped cream to make the mousse. To finish the tarts are studded with plump and tasty fresh raspberries. I admit there is a new store opening up nearby and with opening specials running all week, I got ingredients for close to nothing but if either mascarpone are hard to find or cost prohibitive where you live, you can substitute cream cheese and other berries like strawberries .
Pumpkin Seed Mascarpone Mousse and Raspberry Tartelettes:
For the tart shells:
1 stick (115 gr) butter, at room temperature
3/4 cup (93 gr) powdered sugar, unsifted
1 large egg
1 1 /2 cups (190gr) flour
2 tablespoons (20 gr) cornstarch (makes for a lighter crumb)
pinch of salt
For the almond cream:
1 stick (115 gr) butter, softened
1/2 cup (100 gr) granulated sugar
1 cup (100 gr) ground almonds
2 eggs
1/4 cup (60gr) heavy cream
Pumpkin Seed Mascarpone Mousse:
200 ml heavy cream
4 oz (120gr) mascarpone, at room temperature
2 tablespoons (25gr) sugar
1/3 cup (80gr) raw pumpkin seeds, ground
2 cups fresh raspberries
Prepare the tart shells:
In a mixer, whip together the butter and sugar together until light and fluffy. Add the egg and mix until incorporated. Add the flour, cornstarch and salt and mix briefly. Dump the whole mixture onto a lightly floured board and gather the dough into a smooth ball. Do not work the dough while in the mixer or it will toughen it up. Flatten the dough into a disk, wrap it in plastic wrap and refrigerate for an hour.
When the dough is nice and cold, roll it out on a lightly floured board or in between the sheets of plastic. You will need half the amount of dough to make the tartelettes. The other half can be kept in the fridge for up to 5 days or frozen, well wrapped for up to 3 months. Cut out eight rounds with a 3-inch pastry ring. Place them on a baking sheet lined with parchment paper and bake at 350F for 8-10 minutes. Let cool.
Prepare the almond cream:
Place the butter, sugar, almond powder, and the eggs in a large bowl and whisk until smooth (can also be done in a food processor). Add the cream but stir it in carefully instead of whisking it (you do not want to emulsify it or it will rise while baking). Refrigerate for 30 minutes. Place the 8 baked rounds of dough in eight 3-inch pastry rings, divide the cream evenly among the rings and bake 20 minutes at 350F. Let cool.
Prepare the mousse:
In the bowl of a stand mixer fitted with the whisk attachment, whip the cream to medium stiff peaks and reserve it in the refrigerator while you prepare the mousse.
In a medium bowl, whisk together the mascarpone and sugar with a spatula (really no need to put your mixer to use on that one). Add the ground pumpkin seeds and mix thoroughly until incorporated.
Carefully fold the reserved whipped cream into the mascarpone base by placing your spatula in the center of the bowl, scooping the bottom over the top. Give your bowl a 45 degree turn and repeat until the batter is smooth.
Assemble the tarts:
Place the mousse in a pastry bag fitted with a star tip and pipe a large dollop of mousse right in the center of the tartelettes, leaving a small border all around. Place raspberries all around the mousse. Refrigerate until ready to serve.
I need to end this post by telling you that I feel like the luckiest girl on my block lately and I’ll tell you more about it during the week when I am done rubbing my eyes in amazement. All I can say is that you will see a group of bloggers doing a bunch of fun and food related things in a pretty cool place. All in the name of research. Of course. Which reminds me I need to start packing…
It’s been a long time since I made strudel dough and it’s been even longer since I made it for our own eating pleasures. When I first moved to the US, one of my first pastry jobs was at a German bakery where we would make strudel dough by the buckets, starting fresh and early around 3am. I made so much strudels in that one year there that I overdosed a little and never made it at home after that. When I saw that the Daring Bakers challenge for May was strudel I had a split reaction. A "meh" followed by "oh wait I have always wanted to do this and this and this…"
The instructions were to make the strudel dough per the recipe given but allowed us to get creative as far as the fillings, shapes and sizes. I started with one idea and as (most) usual, I ended up with three. My first idea was not to make a traditional strudel and I blame Richard Leach for that. I have been itching to make his Ricotta Cheese Tarts in Strudel Rings since the first day I flipped the pages of his book "Sweet Seasons". I refrained from it up until now because of that studel making overdose mentionned above. Ha! No more! I had the perfect opportunity!
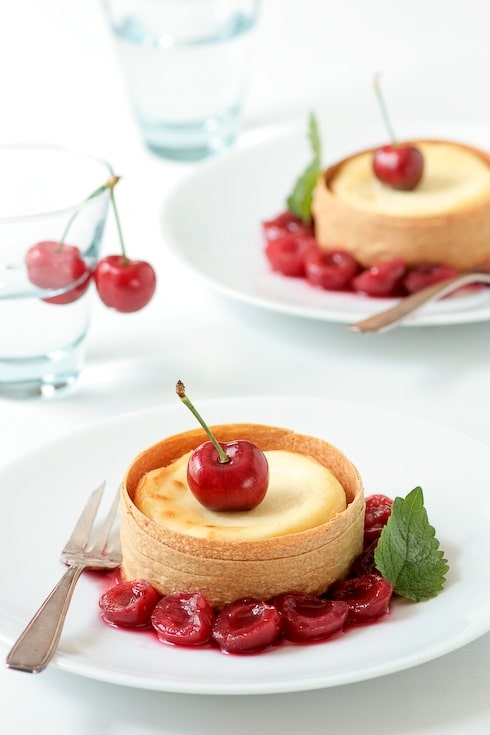
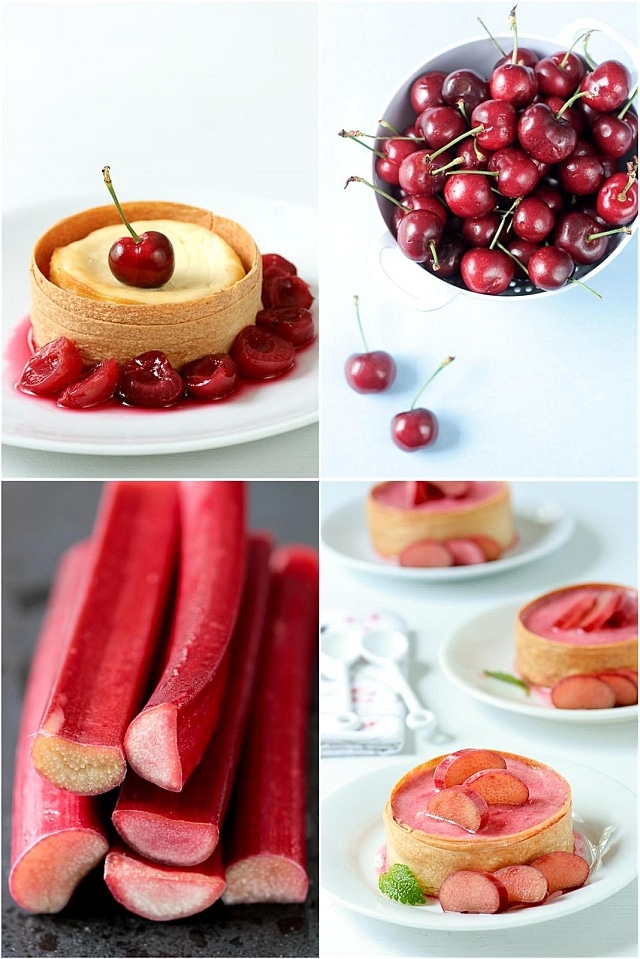
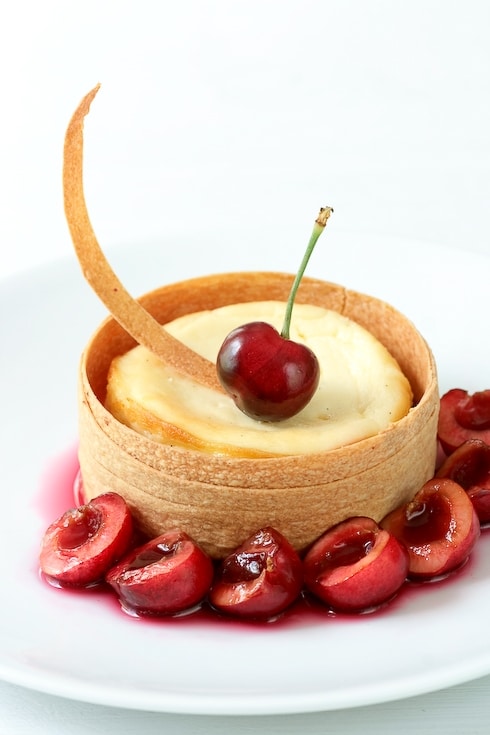
For the strudel rings, I rolled and stretched the dough until I could see through it and cut four 1 1/2-inch strips that I rolled around a 3-inch cake rings about 3-4 times. I baked them just until the rings were golden brown. I let them slide of the cake rings and let them cool while I prepared the mascarpone tart base. It is really like a light cheesecake baked right inside the rings. Once they were cooled, I placed them inside the strudel rounds and plated some with fresh cherries and others with lemon balm infused cherries. Both versions were equally good but my heart goes toward the lemon balm one.
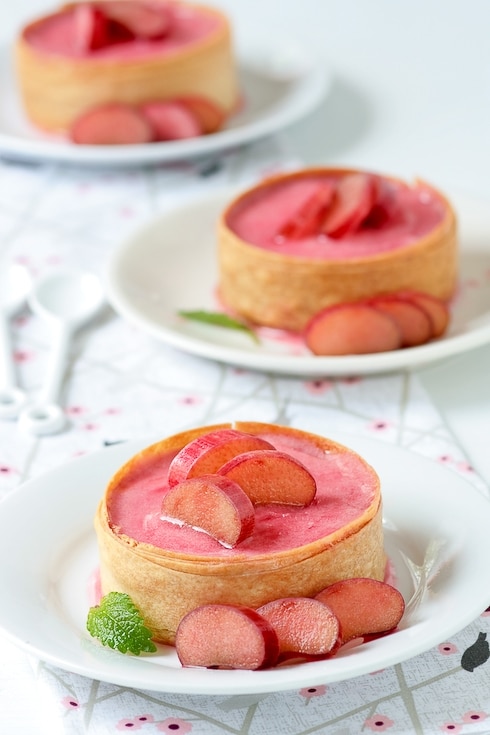
Of course the strudel dough recipe would give me a lot more than the quantity necessary for the strudel rings. I used the same technique to make slightly higher rings with the intention to use them as baskets for ice cream or sorbet. I even made handles for them but a mini trip over pupp Bailey and the handles flew across the room and broke to pieces. Sorbet cups would have to do. I made Garrett’srhubarb sorbet over the weekend and it was a wonder there was enough left to fill the cups. If you have the chance, run to make it! Absolutely delightful. My only change to his recipe is that I did not strain the rhubarb but pureed the heck out of it. Worked like a charm. Pink, smooth and creamy all at once.
I still had plenty of dough to make a traditional strudel like most of my Daring Bakers partners. I filled this one with roasted quince that I had in the freezer and fresh roasted white peaches. I sprinkled a basic hazelnut crumble on the dough before layering the fruits and rolled the dough in a log. In the cacophony of friends coming over for brunch, I completely forgot to take pictures of the log and had just a split moment to take pictures of the small strudel bites I cut for everybody to sample.
I found the dough a litte bland at first but paired with a punch of flavors it really took a life of its own and today I am glad to have leftovers of all three desserts to chose from after dinner!
See below for all the recipes and my notes.
The May Daring Bakers’ challenge was hosted by Linda of make life sweeter! and Courtney of Coco Cooks. They chose Apple Strudel from the recipe book Kaffeehaus: Exquisite Desserts from the Classic Cafés of Vienna, Budapest and Prague by Rick Rodgers.
Strudel dough
from “Kaffeehaus – Exquisite Desserts from the Classic Cafés of Vienna, Budapest and Prague” by Rick Rodgers
Notes: I used a printed tablecloth so I could see better how thin the dough was getting and how much I could keep on stretching. I found out that no pleats or wrinkles was much better or the dough will take on those at the same time you roll.
Use plenty (and more) flour to roll and instead of rubbing my hands on the cloth to make the flour stick down, I rolled my rolling pin over a few times. Do not refrain from kneading a full 8 to 10 minutes. It will develop all the gluten strands necessary to make this dough stretch like a breeze
1 1/3 cups (200 g) unbleached flour
1/8 teaspoon salt
7 tablespoons (105 ml) water, plus more if needed
2 tablespoons (30 ml) vegetable oil, plus additional for coating the dough
1/2 teaspoon cider vinegar
Combine the flour and salt in a stand-mixer fitted with the paddle attachment. Mix the water, oil and vinegar in a measuring cup. Add the water/oil mixture to the flour with the mixer on low speed. You will get a soft dough. Make sure it is not too dry, add a little more water if necessary.
Take the dough out of the mixer. Change to the dough hook. Put the dough ball back in the mixer. Let the dough knead on medium until you get a soft dough ball with a somewhat rough surface.
Take the dough out of the mixer and continue kneading by hand on an unfloured work surface. Knead for about 2 minutes. Pick up the dough and throw it down hard onto your working surface occasionally.
Shape the dough into a ball and transfer it to a plate. Oil the top of the dough ball lightly. Cover the ball tightly with plastic wrap. Allow to stand for 30-90 minutes (longer is better).
It would be best if you have a work area that you can walk around on all sides like a 36 inch (90 cm) round table or a work surface of 23 x 38 inches (60 x 100 cm). Cover your working area with table cloth, dust it with flour and rub it into the fabric. Put your dough ball in the middle and roll it out as much as you can.
Pick the dough up by holding it by an edge. This way the weight of the dough and gravity can help stretching it as it hangs. Using the back of your hands to gently stretch and pull the dough. You can use your forearms to support it.
The dough will become too large to hold. Put it on your work surface. Leave the thicker edge of the dough to hang over the edge of the table. Place your hands underneath the dough and stretch and pull the dough thinner using the backs of your hands. Stretch and pull the dough until it’s about 2 feet (60 cm) wide and 3 feet (90 cm) long, it will be tissue-thin by this time. Cut away the thick dough around the edges with scissors. The dough is now ready to be filled.
To make strudel rings and cups: Cut four 1.5-inch strips of dough, brush them with melted butter and roll them around cake rings. Bake at 350F until golden brown, about 15 minutes.
Cut four 2-inch strips for the sorbet cups. Proceed as with the rings.
For the hazelnut crumble, quince and white peach filling: Notes: this will make enough for 1/3 of the dough. Adapt if necessary.
2 white peaches, cur in half and pitted
1 large quince, peeled and cored
2 tablespoons (25gr) sugar
equal parts light brown sugar, flour, butter (cut in 1/4-inch cubes) and chopped hazelnuts (I did 50gr of each)
Place the peaches and the quince in a medium baking pan lightly sprayed with cooking spray and roast at 350F for 30 to 40 minutes until caramelized. Check at half time and add 1/4 cup of water to the pan is necessary to prevent them from scortching. Once baked, let cool completely to room temperature. Slice the fruits thin.
In a large bowl, stir together all the crumble ingredients and mix with your fingertips until the mixture forms pea size crumbs.
Fill the strudel with a layer of crumble and top with the roasted fruit. Roll from the short end, lightly brush with melted butter and bake at 350 for 30 minutes (more if you are doing the whole quantity of dough as a regular strudel).
Mascarpone Ricotta Cheese Tarts In Strudel Rings, adapted from Richard Leach.
Makes 4
Tart Rings: See above
For Lemon Balm Cherries:
2 cups (290gr) pitted and halved cherries
1/2 cup (125ml) water
juice of 1/2 lemon
1/2 cup (100gr) sugar
4 leaves lemon balm, roughly chopped
For the Mascarpone-Ricotta Tarts:
3/4 cup (180gr) mascarpone cheese, at room temperature
1/4 cup + 2 tablespoons (90gr) ricotta cheese
1/4 cup (50gr) sugar
1/2 vanilla bean, split in half and seeded
1 whole egg
1 egg white
1/4 cup (60ml) heavy cream
Prepare the cherries:
Place all the ingredients in a heavy saucepan and bring to a boil over high heat. Reduce heat to medium and simmer 5 minutes. Remove from the heat and let cool. Strain to discard the lemon balm. Use to decorate the tarts.
Prepare the tarts:
Wrap four 3-inch dessert rings with foil and place them on baking sheet. Lightly spray the inside with cooking spray.
Preheat the oven to 350F and position a rack in the middle.
In a mixer fitted with the paddle attachment, whip together the mascarpone, ricotta, sugar and vanilla bean seeds at medium speed, until smooth, about 2 minutes. Reduce the speed to low and add the egg and egg white and beat until smooth, scraping the sides and bottom of your bowl if necessary. Still on low speed, add the heavy cream and whip until incorporated.
Divide the mxiture evenly among the prepared cake rings and bake for 20 minutes or until just set. Let cool completely.
Once cooled, place a strudel ring around each tart and spoon some marinated cherries around the tarts.
Rhubarb Sorbet For Strudel Cups, adapted from Garrett’s.
3 1/2 cups of chopped fresh rhubarb (4-5 stalks)
2 1/2 cups of water
1 2/3 cups of sugar
2 teaspoons of lemon zest
2 tablespoons of corn syrup (I used glucose)
Placethe rhubarb, sugar, water, and lemon zest in a large and heavy saucepan. Bring to a boil over high heat. Reduce heat to low, and simmer 5 minutes, uncovered.
Let cool to room temperature. Working in batches, purée the mixture in a blender until smooth. Stir in the glucose. Cover and refrigerate until completely cold, preferably overnight.
Process the ice cream according to your machine’s manufacturer’s instructions. The sorbet will have a soft texture right out of the ice cream maker. Freeze a couple of hours before serving.
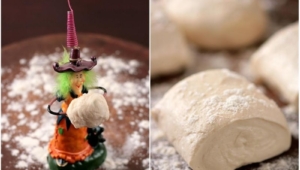
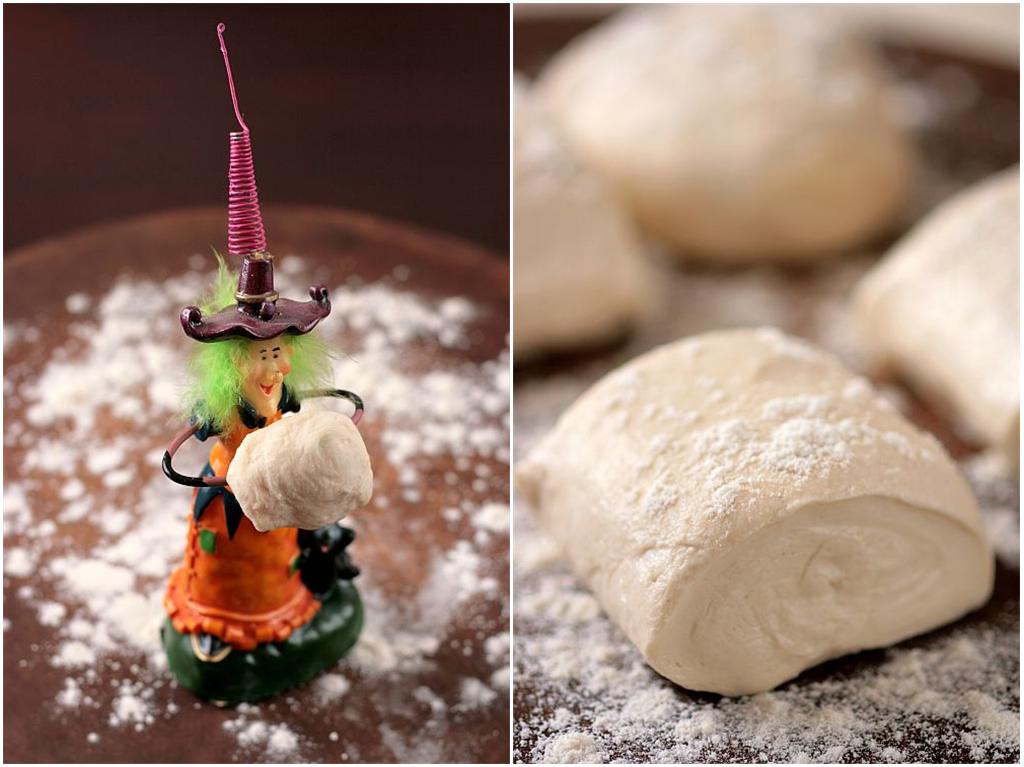
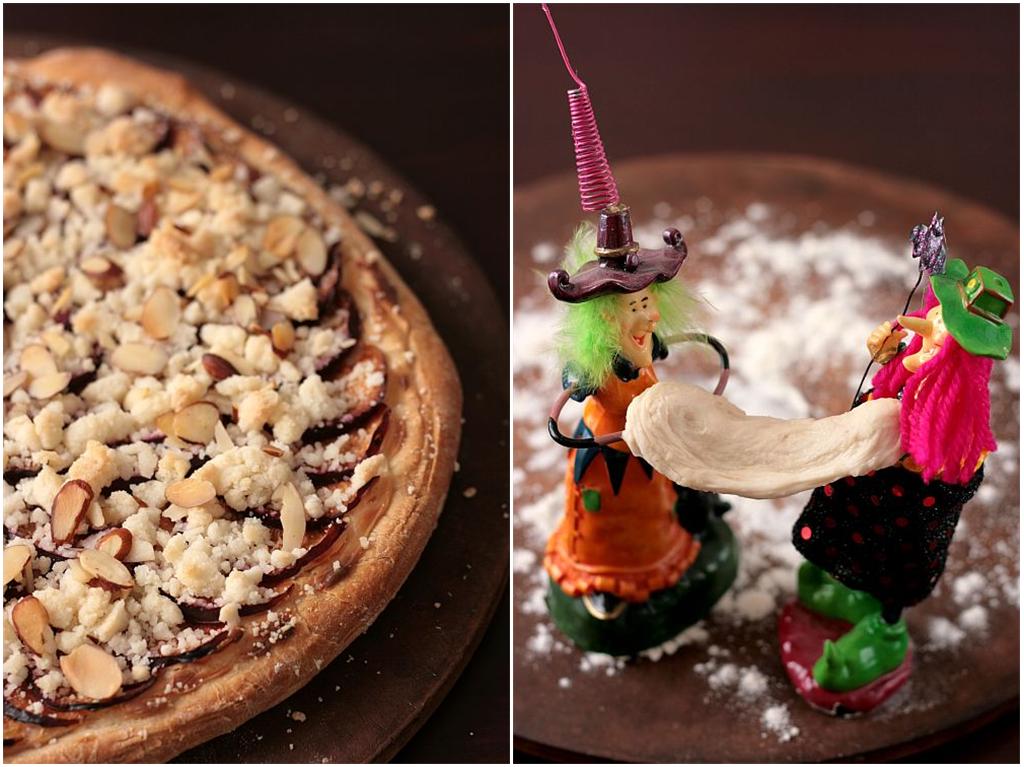
This Daring Bakers' challenge almost did not come to be. Almost. It’s been a busy month, work, play, life…the usual. Multiply that by two or three. It took a dinner invitation and a little Halloween inspiration to make it happen.
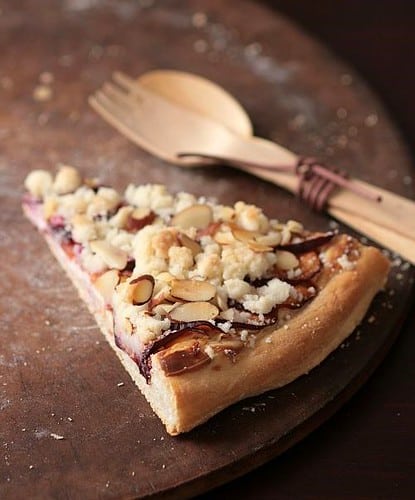
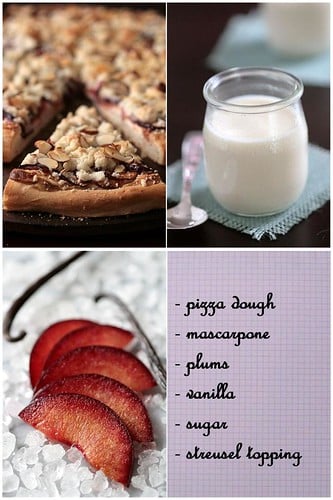
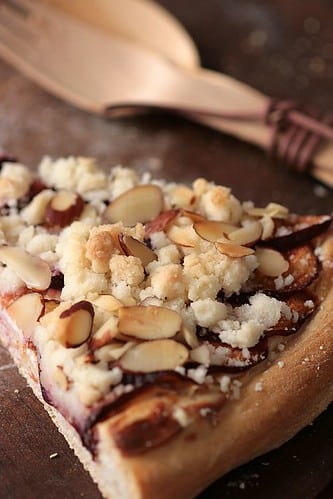
Our October hostess, Rosa from Rosa’s Yummy Yums chose pizza as our challenge and although excited about it right from the start (it’s got carbs…I am excited), I did not get to it until Monday morning. We had friends coming over yesterday for dinner and since it was going to be a late casual nibble around a game of Scrabble and some wine, I figured that pizza would be the perfect thing for that kind of get together. I made four small pizzas and kept three on the savory side and you guess it, one sweet for the blog. Turns out our guests arrived while I was still in traffic and helped themselves to the Plum Mascarpone and Streusel Pizza before Scrabble…my kind of peeps…dessert first!
One of Rosa’s requests, although not mandatory was to take a picture of us tossing the dough. My schedule is completely opposite my husband’s these days so I knew it would be a hard thing to do, not having extra hands to hold the camera while I tossed, even with a remote control it was proving difficult. I kept having this nightmare: 2 in the morning and you toss your dough, click the remote button and then watch your pretty dough fall on a glass of water or pan full of cookies, catch the said glass or pan and takes them for a dive down to the floor and with a big sound of broken glass, baking sheet tumbling and loud cursing you end up waking up a puppy, an old dog and your mate. So you spend the next hour, cleaning, playing, calming and promising more cookies to ease the pain of a bing and a bang…Yep…as I said, I had to find a back up.
Late Sunday night, I went to the attic to get some Halloween decorations and I was sitting there in the middle of unlabeled boxes (grhhh!), I picked up my favorite Halloween witches, Greta and Hilda. Ha!Ha! They would do the tossing or stretching and I would photograph their tribulations!Greta started on her own while Hilda was getting her pretty pink hair fixed up a bit and the task was proving to be a little to much for one person so Hilda jumped right in like a good Daring Bakers. Once they were done tossing, stretching and playing with the dough I spread some mascarpone flavored with some vanilla on one pizza, arranged plum slices over it and topped the whole thing with some almond streusel. The end result was close to a rustic brioche tart and absolutely wonderful warm out of the oven.
Thank you Rosa for such a fun challenge and to you Lisa and Ivonne for coordinating things so well each month! I bet your quest for pizza toppings and variations will forever be answered by taking a look at all the other Daring Bakers' creations. Happy tossing!
BASIC PIZZA DOUGH
Adapted from “The Bread Baker’s Apprentice” by Peter Reinhart.
Makes 4-6 pizza crusts
For the dough:
4 1/2 Cups (20 1/4 ounces/607.5 g) all purpose flour, chilled
1 3/4 Tsp Salt
1 Tsp Instant yeast
1/4 Cup (2 ounces/60g) olive oil or vegetable oil
1 3/4 Cups (14 ounces/420g or 420ml) ice cold water, ice cold (40° F/4.5° C)
1 Tb sugar
Semolina/durum flour or cornmeal for dusting
Toppings:
6 oz mascarpone, at room temperature
1 Tb sugar
1 vanilla bean
3 -4 plums, pitted and sliced streusel topping (add 1/3 cup sliced almonds)
In a bowl combine the mascarpone, sugar and seeds from the vanilla bean and stir until smooth. Spread over the dough right before baking, arrange the plum slices around and topped with the streusel. Bake at 375 for 15 minutes (unlike for savory pizza, the streusel needs to bake a little longer and not burn).
DAY ONE
Mix together the flour, salt and instant yeast in a big bowl or stand mixer. Add the oil, sugar and cold water and mix well (spoon or paddle attachment) to form a sticky ball of dough. On a clean surface, knead for about 5-7 minutes, until the dough is smooth. If it is too wet, add a little flour and if it is too dry add 1 or 2 teaspoons extra water.
If you are using an electric mixer, switch to the dough hook and mix on medium speed for the same amount of time. The dough should clear the sides of the bowl but stick to the bottom of the bowl. If the dough is too wet, sprinkle in a little more flour. If it clears the bottom of the bowl, dribble in a teaspoon or two of cold water. The finished dough should be springy, elastic, and sticky, not just tacky, and register 50°-55° F/10°-13° C.
Flour a work surface or counter. Line a jelly pan with baking paper/parchment. Lightly oil the paper. Cut the dough into 4-6 equal pieces. Sprinkle some flour over the dough. Make sure your hands are dry and then flour them. Gently round each piece into a ball.
Transfer the dough balls to the lined jelly pan and mist them generously with spray oil and cover with plastic wrap. Put the pan into the refrigerator and let the dough rest overnight or for up to thee days.
NOTE: You can store the dough balls in a freezer bag if you want to save some of the dough for any future baking. In that case, pour some oil (a few tablespooons only) in a medium bowl and dip each dough ball into the oil, so that it is completely covered in oil. Then put each ball into a separate bag. Store the bags in the freezer for no longer than 3 months. The day before you plan to make pizza, remember to transfer the dough balls from the freezer to the refrigerator.
DAY TWO
On the day you plan to eat pizza, exactly 2 hours before you make it, remove the desired number of dough balls from the refrigerator. Dust the counter with flour and spray lightly with oil. Press the dough into disks about 1/2 inch/1.3 cm thick and 5 inches/12.7 cm in diameter. Sprinkle with flour and mist with oil. Loosely cover the dough rounds with plastic wrap and then allow to rest for 2 hours.
At least 45 minutes before making the pizza, place a baking stone on the lower third of the oven. Preheat the oven as hot as possible (500° F/260° C). If you do not have a baking stone, then use the back of a jelly pan. Do not preheat the pan.
Generously sprinkle the back of a jelly pan with semolina/durum flour or cornmeal. Take 1 piece and lay the dough across your fists in a very delicate way and carefully stretch it by bouncing it in a circular motion on your hands, and by giving it a little stretch with each bounce. Once the dough has expanded outward, move to a full toss.
Make only one pizza at a time. During the tossing process, if the dough tends to stick to your hands, lay it down on the floured counter and reflour your hands, then continue the tossing and shaping. In case you would be having trouble tossing the dough or if the dough never wants to expand and always springs back, let it rest for approximately 5-20 minutes in order for the gluten to relax fully,then try again.You can also resort to using a rolling pin.
When the dough has the shape you want, place it on the back of the jelly pan, making sure there is enough semolina/durum flour or cornmeal to allow it to slide and not stick to the pan. Lightly top it with sweet or savory toppings of your choice.
Slide the garnished pizza onto the stone in the oven or bake directly on the jelly pan. Close the door and bake for about 5-8 minutes.
I always seem to have a story don’t I? Well, bloggers are like that…they like stories: to read, to tell, to share and to write about. Somehow there is always a story behind the desserts I make , sometimes it is a long drawn explanation and sometimes something that popped in my head while experiencing one of those stories. Today is no exception…these gratins almost did not happen. Glad they did in the end though because they were mighty good.
Let’s see…it all started last night when B’s mom called and asked if I wanted to go blueberry picking with her in the morning…at the crack of dawn to avoid the heat. Yes, yes, yes….provided there are a few coffee stops along the way please….Then she threw raspberries in the mix so I jumped fell out of bed! There are a few things that make my heart skip on a hot June morning (well, B. is one of them, of course) and among my favorites are berries, stone fruits and spending a few hours with my mother in law and her stories of my husband when he was wee high. I am about to digress again so I’d better get right on to the rest of the day…
After our little berry picking frenzy (I basically needed her to keep some of my stash in her extra freezer), I pulled in the driveway with a huge basket of raspberries just in time to see one of the twins holding a puppy and walking towards me. Now for those new here (Hello, hello!), we do not have children, we jokingly say that all we have to do is walk next door and borrow C’s twins for the day…or they borrow us, there are days one can’t tell…Anyways… Her husband had sent her to get new tires and she came back with the wrong tires and a "free" puppy (read no shots or tags and probably younger). Her husband was red as a poppy, the kids were beaming and in her usual Southern nonchalance she just walked up to me and said "help us give him a bath"
I spent a good part of the day taking work breaks to go play with the puppy which we finally named Sullivan. At some point we got distracted by the rest of the brood, a cat, another dog and a turtle (yep, they needed another dog like I need another bill) and did not pay much attention to Sully until we heard is whimpering. We turned around and burst out laughing. He had found a way to climb up the crate full of raspberries and was barely holding his balance not to fall off the tiny ledge and take a dive into it. I guess he got a little too impressed with his Cirque du Soleil capacities and fell head first into the raspberries! I ran over and picked him up, all red and happy licking his paws, face and tail. Once back on the ground he ran back to the crate and tried to climb it again! He surely enjoyed his first baptism by raspberries and was ready for a little more!
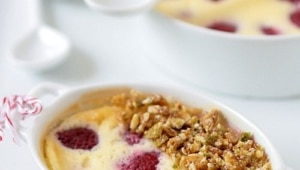
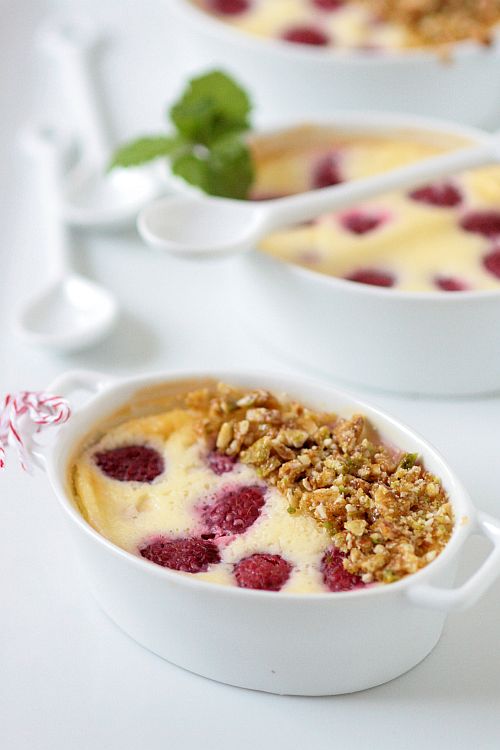
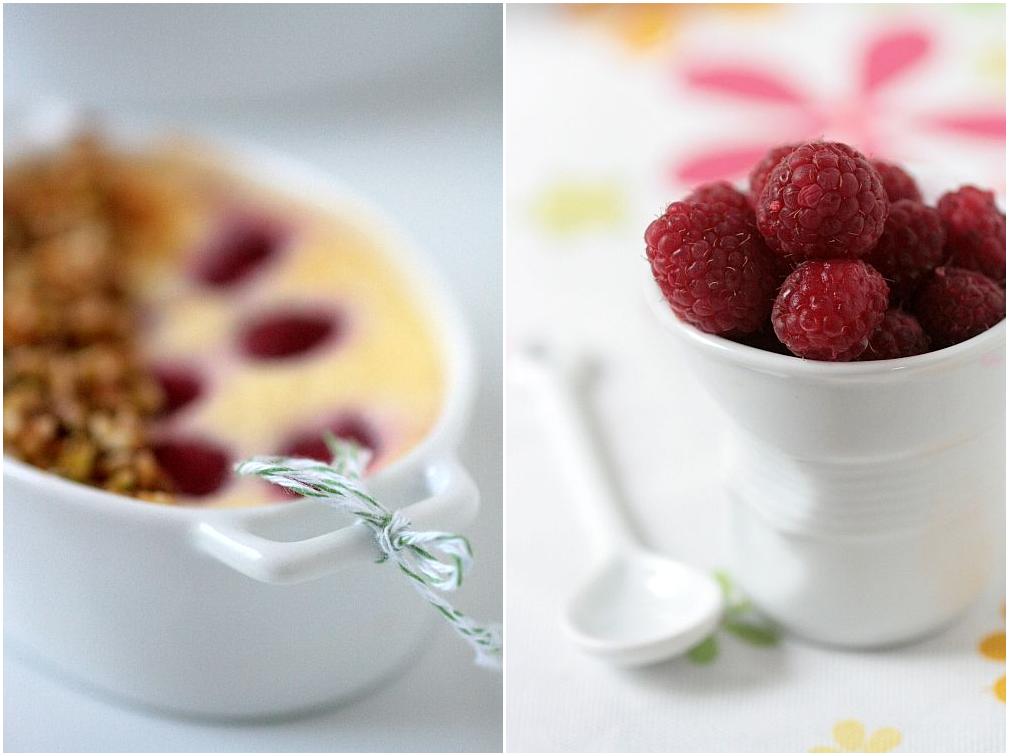
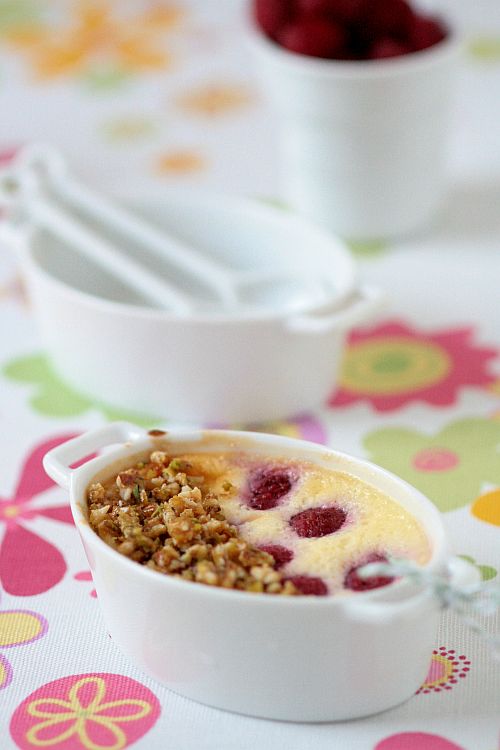
I did manage to save quite a bit of the berries after the puppy dive (thank God, they don’t weigh much at 8 weeks) and proceeded to make these little Mascarpone Raspberry Gratins. They made me think of Sully: light as feathers, wickedly cute and they really put a smile on my face! The fresh raspberries retain their fresh factor and the cream is rich and smooth without leaving that buttery coating on your tongue.
For the nut topping I have to thank one of my faithful readers, Bina, who sends me the most thoughtful gifts. Last winter, she had sent me an Indian specialty called Chikki, close to a toffee but this almonds, pistachios and cardamom. She emailed saying that her mom had made some more and brought it to the States and she would love to send me some more. Yes please!! So before the stash disappeared completely I did hide a few pieces and crushed them to top the gratins with. She also stitched me the cutest little kitchen towels but I am afraid to get the dirty! To top it all, her packaging is as precious as the gifts…. and since she only lives in the next state over I really hope e get to meet one day soon. Thank you and stop being shy, you are among friends!
Allright, allright, I am done….on to the recipe!
Mascarpone Raspberry Gratins:
Serves 4-6 depending on the size of your ramequins.
1/2 cup (4 oz) mascarpone, at room temperature
1/4 cup sugar
1 tsp vanilla bean paste or 1 tsp vanilla extract or 1/2 vanilla bean, seeded
1 egg + 1 egg yolk
3/4 cup heavy cream
1 cup fresh raspberries
In a large mixing bowl, whisk the mascarpone with the sugar until smooth. Add the vanilla, the egg and the egg yolk. Whisk until fully incorporated and add the heavy cream. Make sure everything is well combined and divide between your ramequins, not filling them all the way to the top, about 3/4 full. Divide the raspberries among the gratins and set the dishes in a deep roasting pan. Fill the pan with water, half way up the sides of the dishes and bake at 340 for about 20-25 minutes or until they seem to be barely set: still giggling a little when you move the pan but not completely wobbly. They will continue to bake and set as they cool. Let cool and serve either chilled or at room temperature.
Yes, another rhubarb post…it’s the season and I just can’t get enough….Sorry folks! When Marcela was planning her visit, one of her wishes was to get some rhubarb and Meyer lemons so we could bake something with them. She also wanted to keep the seeds of the lemon to grow her own tree back in Argentina. We searched everywhere for both to no avail and decided to stick with our original plan to make macarons instead. She did a fabulous job with the latter and I hope that macarons have no secret for her now and I got to tell you, buttercream and dulce de leche go really really well together!!
After dropping her off at the airport, B. and I headed for the farmers' market downtown and guess what I found by the bucket….rhubarb!!! Arghhhhh…..Wish I had it growing in the backyard but one has to do with what they have, right?! I need to add that since I mentioned I had found Loquat trees everywhere downtown, one of my clients told me she had her own tree and I was most welcome to head over her house and pick what I wanted. I did this afternoon and stopped at three bags full. Do you think I have enough fruit if you add the four pounds of strawberry that Marcela and I picked at a local farm yesterday afternoon?!!! There are going to be some fruity desserts coming up!!
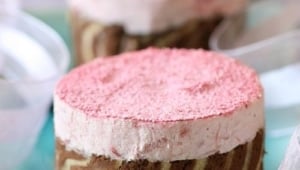
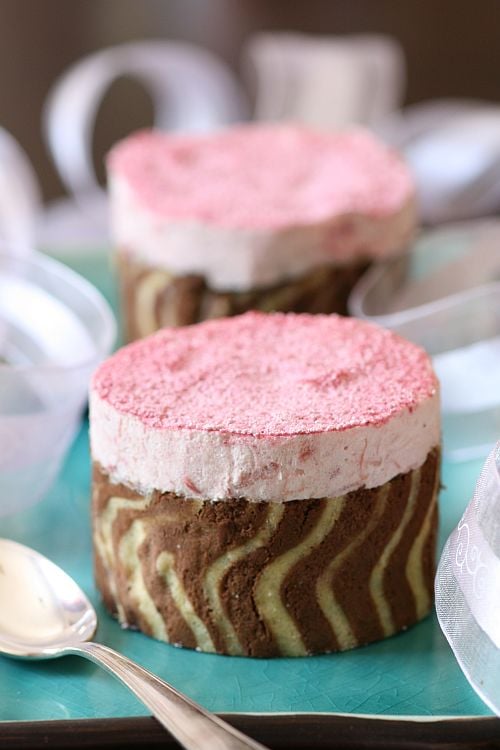
This is the dessert I wanted to make for her had I found rhubarb before her arrival….alas, or as B. would say "Yum, more for me", this mousse cake is going to be dessert for us tonight. So here is to you Pip, as a thank you for a wonderful time in your company and especially last night at the restaurant where I don’t recall ever laughing so hard in my life…and it involved another woman kissing my husband….
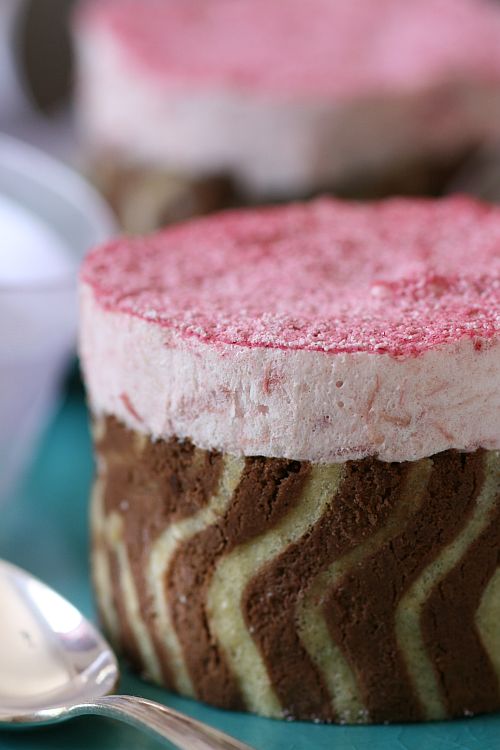
For the mousse I used the same recipe I used for the Raspberry and Mascarpone Mousse Cakes, back in March. I replaced the lime with lemon and added cooked rhubarb to the mousse base. I don’t really have a recipe to cook the rhubarb but I usually go for 1 cup of fruit to 1/3 cup sugar, cooked over low heat until the rhubarb softens and I still get chunks of fruit in there. The cake ring surrounding the mousse looks complicated and involved, but really it isn’t. It is made with an almond cake batter very similar to ones used for jelly rolls called "ribbon sheet cake" or Joconde and a tuile cookie batter (also known as tulip paste) piped onto the baking sheet before you pour in the cake batter so while baking it leaves an imprint on your cake. If it were rocket science I would not be doing it….trust me. It is not more time consuming than baking a cake and I find the whole process tremendously more fun given the end result.
I went for stripes but you can easily make squiggles, lace patterns, dots, smileys, etc….It is best to prepare both the mousse and the cake early in the day if you plan to serve this for dinner as the cake needs to cool and the mousse needs to set, and you can keep them in the freezer for a month or so if you decide to make them way in advance. For a velvety effect on top, I mix powdered sugar and cherry pink food coloring on top and dust the cakes with it right before serving. Do not do this in advance as your powdered sugar will melt and sink in the mousse due to its moisture content.
For the tulip paste:
4 ounces unsalted butter, softened
4 ounces powdered sugar, sifted
1/2 cup egg whites, at room temperature
4 ounces all purpose flour, sifted
1 1/2 Tb cocoa powder.
Cream the butter and powdered sugar together in a stand mixer fitted with the paddle attachment. Sift the flour and cocoa powder together and add to the butter mixture and mix until incorporated. Do not overmix. Use right away or store in the refrigerator, taking it out 30 minutes before you plan to use it.
Pour the batter into a piping bag fitted with a small plain tip. Line a baking sheet with parchment paper. Using a ruler set on top of the sheet as your guide, pipe lines with the tulip paste onto the parchment paper, or any shape you desire. You can also smooth a large amount of the paste on the paper and using a ruler set on the rim of the pan, use a decorator comb to drag on the batter to form lines. When I make somewhat straight lines, this is the method I use, and I use the pastry bag method for lace patterns and others. Set the baking sheet in the freezer until the tulip paste is firm. Keep frozen until you are ready to pour the cake batter on top.
For the ribbon sheet cake:
4 ounces finely ground almonds (I used slivered)
3 ounces powdered sugar
1 ounce all purpose flour
4 eggs
1 egg yolk
3 egg whites
1 ounce granulated sugar
1 ounce melted unsalted butter
In the bowl of a stand mixer fitted with the paddle attachment, beat the almonds, powdered sugar, flour and 2 eggs until combined. Scrape the sides and bottom of your bowl with a spatula and add the remaining 2 eggs and the yolk until well combined. Set aside.
Whip the egg whites in a separate bowl until they appear foamy, add the granulated sugar in a steady stream and whip until you get a glossy meringue. Fold the meringue mixture into the egg/flour mixture. Stir in the melted butter and fold until all the ingredients are well incorporated but without deflating your meringue base.
Remove the baking sheet with the tulip paste from the freezer and pour the cake batter on top. Bake at 450F for about 6-8 minutes or until the sponge becomes to color. Remove from the oven, let cool a few minutes and invert your cake onto a piece of parchment paper. Peel the baking paper. Let cool before using. You can keep it wrapped in the refrigerator for up to a week or in the freezer for a month. Bring it back to room temperature before you fit it in the pastry rings. Line 6-8 pastry rings (depending on their size, mine are 3 inches wide) with parchment paper, cut 1.5 inches wide strips of cake and cut them to fit around the inside of your rings. Divide the mousse inside the rings and let set.
For the mousse:
1 egg, separated
2 TB sugar
2 oz mascarpone cheese, at room temperature
75 ml. heavy cream
1 tsp. powdered gelatin (1/2 sheet) + 1 Tb water
zest and juice of one lemon
1 cup cooked rhubarb
Sprinkle the gelatin over the water, stir and let sit to bloom. In a large mixing bowl, whisk the mascarpone with the sugar, add 1 egg yolk and whisk until well incorporated. Heat the gelatin for about 10 seconds in the microwave and quickly whisk it in the mascarpone batter. Add the lemon juice and zest. Whip the egg white until stiff, fold into the mascarpone mixture. Add the cooked rhubarb. Whip the heavy cream to medium stiff peaks, and fold into the mascarpone. Divide it evenly and carefully among the pastry rings. Store in the refrigerator for 2-4 hours or overnight.
Granted it takes a tad longer than a baking brownies but it is just as fun and as good, and if you like playing with shapes, batters and let your imagination run wild, this is a good project to tackle in the kitchen. The end result is so tasty you won’t be disappointed!
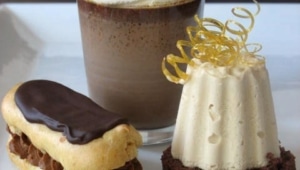
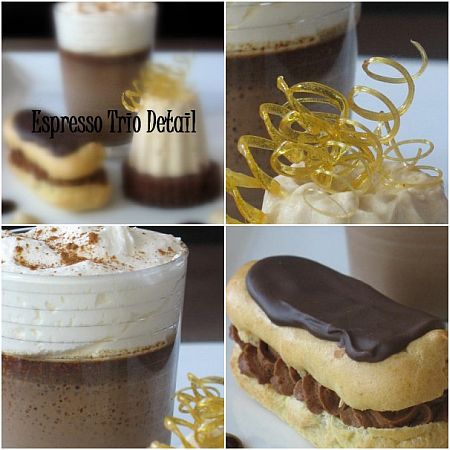
…more specifically Eclairs with Dark Chocolate-Espresso Mousse, Espresso-Dark Chocolate Pots de Creme and Frozen Mascarpone-Espresso Parfait on Deep Dark Chocolate Cake. Although this was work related, this is how I spend my Saturday. I am not getting fancy on you all of a sudden but it was either this post or more puddings, creams and mousses. Yes, I seem to veer away from cakes lately as there are not one that strikes me, although I did find a couple to try today.
Friday afternoon I got a call from K., one of the chefs I used to work with at the restaurant asking me if I’d make the desserts for a fancy dinner of wine representatives next weekend because he did not have time and the Executive Chef in his usual fashion was throwing fits about everything regarding this event. I agreed and he finished our conversation by saying "ok, well you bake tomorrow and I’ll be at your house on Sunday, I trust you"….Why oh why, tell me that…he was going to jinx me! I had the list of wines and descriptions and samples to be served next weekend and for the most part of the afternoon I tried to come up with desserts made with them or complimenting them. I wrote, scratched, sketched, scratched…never happy. Finally I completely changed my course: there would be appetizers and entrees cooked with the wines, sauces and reductions, emulsions and stocks, and then desserts with more wine? Crazy! These people might appreciate a break, a true one: a coffee break. After spending my Friday evening (oh my life is fun!) working ideas on paper, I finally had a plan for Saturday.
I baked all day, tweaked the flavors after many a sip of wine..dang my job is tough!! At 9pm, I sat down with a good omelette and a chunk of bread, tired but happy…Oh boy! Do I miss those days when my restaurant kitchen was my lab, when K. and I used to have our lunch breaks upstairs bitching about Big. Exec. Chef, dreaming about our "dream orders" me wanting quinces in July and him exotic Chinese mushrooms for pennies. And then, we were always called back to the dirty grind of reality by the voice of Big Exec. through the intercom "Helen, we are 86 lemon tarts and brulees, get to work! K., the veal shanks ain’t gonna braise themselves!" It’s good to know that some time after I left the restaurant, K. still relies on my opinion and just frankly told Big Exec.to f$#& off when he told him I was their dessert consult this time around! I was cracking up hearing their conversations…ah sweet revenge!!
Anyways, back to the desserts, largely inspired by my boyfriend Richard Leach (maybe I should tell him I "really" like him!), but tweaked to serve the guests in questions (read very tipsy after all that wine) and the logistics of the kitchen I would be baking and plating in: tight, busy, orchestrated like an assembly line that night so no time for me to come up with super fancy stuff. I am still working on a fruit based item, we just can’t make up our minds on what we like best, so that post will probably for next week. My initial "final" Saturday afternoon had mousse, an espresso shot and a parfait. I did not like the look of the mousse molded and plated, the espresso shot I had in mind was topped by a milk foam and that step only would require me to cross the whole kitchen with the hot line on one side and the dishwashers on the other side just to get to the frother on the other side of the waitstaff station..yeah right! The parfait was the only thing that stayed from my original thought, I just added the caramel corkscrew because I just can’t leave sugar alone! When K. came over Sunday, he was happy and relieved that I had taken that thorn out of his schedule. We drank and I fixed us spaghetti a la Lisa and we drank again…Not too shabby a weekend if I may say!
Espresso Trio:
Eclairs With Dark Chocolate Espresso Mousse: (serves 4)
Eclairs: 1 cup all-purpose flour
1 tablespoon sugar
1 cup water
1/2 cup butter
4 eggs
Heat oven to 375F. Heat water, sugar and butter in 3-quart saucepan to a rolling boil. Stir in flour. Stir vigorously over low heat until mixture forms a ball, about 1 minute. Remove from heat. Transfer to the bowl of a stand mixer and let cool a few minutes. Beat in eggs, one at time making sure the eggs are well incorporated each time. The dough should have the consistency of thick mayonnaise. Fill a pastry bag fitted with a plain round tip with the batter and pipe fingers of dough about 3-4 inches long on a parchment lined baking sheet. Bake until puffed and darker brown on top, 20 minutes, let cool completely before filling with the mousse. You’ll have more than just for 4 servings but you can freeze the shells for up to 3 months.
Dark Chocolate Espresso Mousse:
3/4 cups bittersweet chocolate, chopped
1/4 cup unsalted butter
1/4 cup espresso
2 egg yolk
1 Tb sugar
1 cup heavy cream
Combine the chocolate, butter and espresso in a small saucepan over low heat until the chocolate melts and stir until combined.
In a separate bowl, whisk the egg yolk and sugar until pale. Fold the chocolate into the egg mixture. Whip the cream to soft peaks and fold it into the chocolate base. Refrigerate one hour before using. Fill the eclairs with the mousse. Dip them into the chocolate glaze. Let set in the fridge
Chocolate Glaze:
1/2 cup dark chocolate
1 Tb butter
2 Tb cream
Melt the chocolate in the microwave, add the butter and cream and stir until combined
Chocolate Espresso Pots de Creme:
2 cups whole milk
1/4 cup sugar
1/4 cup espresso beans, crushed
3/4 cup bittersweet chocolate
5 egg yolks
1 cup heavy cream
cinnamon
Preheat the oven to 300F. Heat the milk with the sugar and beans until it comes to a boil. Remove from the heat and let it steep for 20 minutes. Strain the beans and reheat briefly, add the chocolate and stir until well combined.
Whisk the egg yolks, and slowly add the hot chocolate milk,whisking until well combined. Strain and divide among 4 heat resistant glasses or dishes. Set them in a roasting pan and fill with water (limit depends on the height of your pan and your glasses but the higher the better for even baking). Bake until the custard is barely set, about 30 minutes. Remove from the pan, let cool to room temperature and refrigerate until ready to use. When ready to be plated, whip the cream to soft peaks and divide evenly among the glasses or dishes, sprinkle with cinnamon.
Mascarpone-Espresso Parfait:
1/2cup mascarpone cheese,at room temperature
1/4 cup strong espresso
1/2 cup sugar
2 egg whites
1 cup heavy cream
In a small bowl, combine the mascarpone cheese the espresso and 2 Tb sugar and whisk until smooth. In the bowl of an electric mixer, whisk the egg whites adding the remaining sugar one tablespoon at a time until stiff peaks are formed. Fold into the mascarpone mixture.Whip the cream to soft peaks and fold into the egg-mascarpone base. Pipe or spoon into molds of your choice (I chose Flexipan Cannele molds). Freeze until ready to use.
Dark Chocolate Cake:
1/2 cup unsalted butter
1 cup sugar
1/2 cup dark cocoa powder (like Hershey’s special dark)
1 tsp baking powder
1 1/2 tsp baking soda
1/2 Tb salt (really, not a typo, but it does wonder with the parfait above)
1 1/2 cups flour
2 eggs
1 cup warm water
Preheat the oven to 325F.
Cream the butter, cocoa and sugar together until smooth. Add the baking powder,baking soda, salt and flour. Mix until smooth and add the eggs, then the water very slowly. Pour the batter into a 8×8 inch pan lined with buttered foil or parchment paper. Bake 30 minutes or until a knife inserted in the middle comes out clean. Refrigerate overnight. When ready to plate, cut out circles a little larger than the diameter of the parfait base and set the parfaits on top.
For the decorations, I made a simple chocolate sauce and espresso flavored creme anglaise as well as caramel corkscrew but feel free to skip or use other things. Same with the trio: make one, two or all and have fun! All the components work together, but also separately for lighter bites and they can be made over several days, and kept refrigerated or frozen (the parfaits).