
lemon

Ultimate Lemon Pound Cake and Lemon Thyme Strawberries

Lemon Pound Cake and Lemon Thyme Strawberries-Copyright©Tartelette 2008 First of all I would like to thank all of you for leaving such kind comments and sending emails after my last post. I surely did not mean to bring your spirits down and I forwarded each piece of advice and kind notes to M. Like me, she is deeply touched by your thoughts and prayers and was truly amazed by the generosity of bloggers and anonymous alike. I tell you, you guys rock!!

Life goes on and she is fully committed to enjoy the time she has and do the things she has been postponing for too long like coming to Pilates with me or dragging me out of bed to go strawberry picking this morning…I know she enjoyed bugging me after the ab torture I made her go through yesterday!! We got caught by the rain, but like many times in May around our parts, it pours ocean for 5 minutes and then the sun shines through as if nothing happened. We picked about 10 pounds of juicy red strawberries, so flavorful I feel the urge to put my nose in the basket every couple of hours. The house has taken on the delicious smell of strawberry jam, strawberry-rhubarb cake and macerated strawberries.

Everybody who knows me a little knows that I do not have a green thumb, and that is putting it mildly since I even killed silk plants one year (a blow torch was involved, …don’t ask). However, I have been tending to mint and oregano with good results in the past month, growing stronger and bigger everytime I cut them down a bit. I am also growing salad, parsley and baby’s breath (thank you Barbara for the seeds) and we are passed the sprout stage. Yipee! Last week at the farmer’s market I picked up a lavender plant as I terribly miss the scent of my childhood in Provence, and also a lemon-thyme plant….my new addiction. I don’t know why this time around I seem to get it. B. thinks my nurturing instincts are kicking in at 30-something since we can’t have kids, and that I need to make something else grow and thrive. A little far fetched although there is truth to it. First there was Tippy the dog, then Elliot the fish…both doing very well, and now seeds, sprouts and plants.

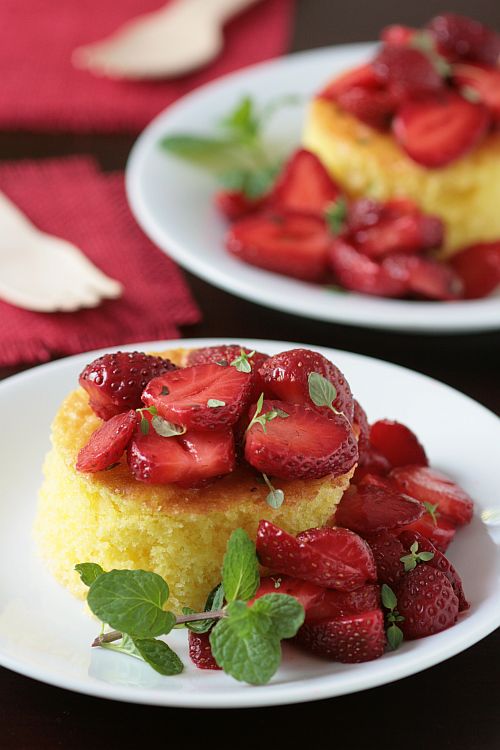
Back to the lemon-thyme, shall we?!! It looks like lemon and citrus are going to be frequent visitors to this site during May, and not only because of SHF. Lemon-thyme is a great complement to fresh fruit salad, simple cakes like pound cakes and yogurt ones. It is does not taste like thyme at all which is not unheard of in cakes but which would be a little harder to pass on when serving dessert, it is fragrant with lemon and lime tones at the same time. I made this dessert this afternoon to take to my neighbor C. for our usual get together on Friday afternoons for tea and dessert and talk about the plans for the weekend, although we realize there can’t be a plan with the husbands and the kids adding to the pot! We almost finished the bowl of lemon thyme strawberries, happily scooping with our spoons (forget plates), while noshing on the cake at the same time. Happy happy!! What a needed moment after the weird week we’ve had (I can’t say bad because I know some have it worse).

Lemon Pound Cake And Lemon Thyme Strawberries-Copyright©Tartelette 2008
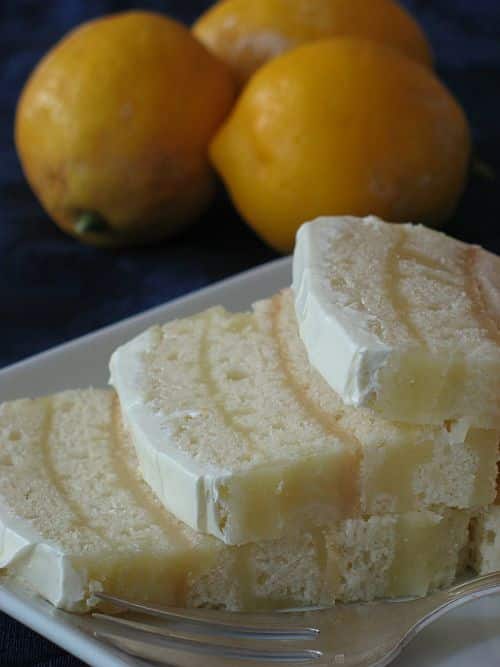
Ok, ok…I hear you…the recipe!!! Just a couple of words (yes, more!). The pound cake is my favorite ones this year, full of lemon, soaked in lemon and yet light on the palate. We eat it as a snack, I use cut slices for trifles or plated desserts, and some of you have emailed me lately that it is also one of your new favorites. I adapted it slightly from this book (from which I have been baking a lot from lately) and you can definitely halve the recipe if you don’t want to be stuck with a big cake around the house, keep it well wrapped in the fridge for a week, or freeze it for up to a month also well wrapped.

Ultimate Lemon Pound Cake With Lemon Thyme Strawberries:

Printable Recipe

For the Cake:
2 3/4 cups all purpose flour
1/2 tsp baking powder
1/4 tsp salt
3 sticks unsalted butter at room temperature
2 cups sugar
6 large eggs
1 cup milk
2 TB lemon zest
1/2 cup fresh lemon juice

Preheat oven to 300F. Butter and flour a 12 cup Bundt pan.
Sift the flour, baking powder and salt together.Cream the butter and 1 3/4 cups sugar until pale and fluffy. Add the eggs, one at a time, beating well after each addition. Reduce the speed and add the flour mixture, alternating with the milk, beginning and ending with the flour. Stir in the lemon zest.Pour the batter into the prepared pan and bake for 1 1/2 hours, or until a knife inserted in the middle comes out clean. Let cool in the pan for 15 minutes. Poke holes all over the cake with a wooden skewer.
Meanwhile, bring the lemon juice and remaining sugar to a boil over medium high heat in a small saucepan, stirring until the sugar is dissolved. Invert the cake onto a rack, positioned over a baking sheet and slowly pour the syrup over the cake, it will seep through the holes and into the cake. Let cool to room temp.

For the lemon thyme strawberries:
4 cups sliced strawberries
1/2 cup chopped lemon thyme
2 Tb lemon juice
2 Tb sugar (that is plenty to release the strawberry juices and the cake being sweet you don’t really need much more)

Mix all the ingredients together and let macerate at room temperature for 30 minutes. Refrigerate until ready to use. Bring back to room temp before serving.

Update on conversions:
1 stick of butter is about 112-115 gr.
For weight, volume, cups, etc…click here.

Fresh, clean, sweet but not overwhelming and no need for whipped cream!

Lemon Pound Cake And Lemon Thyme Strawberries-Copyright©Tartelette 2008
I may not be around this weekend but wanted to wish all moms out there a very very Happy Mothers' Day! My mom will have to wait for May 25th (French date for Mothers' Day) to have a her own special post, but I wanted to tell you all celebrating on Sunday that I admire your love, dedication and energy. Have I told you lately you rocked?!! Well, you do!

Lemon And Honey Tangerine Gratins

Everyday I wake up I count my blessings. Everynight I go to bed I think about the things I need to improve and realize that both my blessings and my shortcomings are numerous which makes me a standard-normal human being, and I am ok with that. What I am not ok with is being helpless when faced with death or diseases and wish I were a rocket scientist or super duper doctor working on some cure to help people. There are days I want to kick for not being a brainie and there are days I am fulfilled to focus on the things I know how to do, we all have to find our strong points and should stick to them. Being envious is a waste of time: maybe a rocket scientist can’t make as good a pie as my grandma’s?!!

Last Monday we had a couple friends of ours over for dinner, and as usual they came early in the evening so we could sit on the back porch and watch the sunset over the water (one of those blessings I am counting). We like to open a bottle of wine and get dinner ready together. He is an excellent cook and she has a personality to keep you entertained all evening. The evening started as usual until she announced she had pancreatic cancer, advanced stage. Silence fell upon us and B. went over her and just hugged her for a while, then him and finally said "Anything you guys need, anytime, day or night". I was not so quite vocal for the first couple of minutes. Flashbacks of my grandma and my brother dealing with chemo and radiation came rushing back and I kept starring at my feet. Clearly, you can’t say "it’s all going to work out", and "I’m sorry" seems so little.

She poured me another glass of wine and they started talking about their medical plans of attack. Invasive, long, painful…She talked about losing grip on the future, not knowing who she was anymore, that none of this fit in with being with their kids and grand kids. I finally broke my silence and said "Sometimes you don’t have to know the bigger picture or know for sure where you are heading. Sometimes it’s enough to know what’s next". She looked at me like I had become the Dalai Lama in the blink of an eye, then she said "So, what’s next?". The only words that came out were "Peeling tangerines for dessert". Silence again. "Oh crap, I have offended her" I thought. Everybody turned to me and bursted out laughing and she added "You have a funny and lovely way to put things in perspective"…Ah well, always count on me to put my foot in it!

I am kicking off this month Sugar High Friday with these light and refreshing Lemon tangerine Gratins. Honey tangerines are super juicy and quite flavorful and if you can’t find them where you are, feel free to substitute regular tangerines, clementines or even mandarins. We peeled the fruit and got most of the white membranes out and cut them in segments for the dish. The gratin part is sort of a cross between a custard and a creme brulee with its touch of flour and cream cheese. The original recipe called for mascarpone but the tub was being used for another purpose so cream cheese was the perfect substitute. For the top "gratin" part, I used half part brown sugar and half part white sugar and the blow torch to caramelize them but you could just as well put them under the broiler for a few minutes (keep your eyes on them though, they burn fast).

Lemon And Honey Tangerine Gratins:

Printable Recipe

Serves 4

1 1/4 cup milk
1/3 cup finely grated lemon zest
4 large egg yolks
1/2 cup sugar
1/4 cup all purpose flour
pinch of salt
3 Tb fresh lemon juice
1/2 cup heavy cream
1/2 cup cream cheese, at room temperature
4 honey tangerines (or 8 clementines or mandarins) peeled and cut into segments
14 cup brown sugar mixed with 1/4 cup white sugar for the top.

– Bring the milk and the zest to a simmer over medium heat. Remove from the heat and let stand to infuse for 10 minutes. Strain through a fine mesh sieve.
– Whisk the egg yolks with the sugar until pale yellow in a large mixing bowl. This can be done totally by hand. Add the flour and salt and whisk until just blended. Slowly add the warm milk to the egg mixture, whisking as you go along to prevent the eggs from curdling. Return the mixture on the stove and cook, stirring constantly over medium high heat until it becomes thick. Remove from the heat as soon as you see the first boiling bubbles on the surface. Pour the custard into a bowl, stir in the lemon juice and let cool to room temperature, whisking from time to time.
– Beat the cream with an electric mixer until soft peaks form, add the cream cheese and whisk until both are well combines. Add the whipped cream mixture to the cooled custard and fold gently to bring both masses together.
– Divide the tangerine segment among 4 dishes. Divide the custard mixture over each gratin dish. Sprinkle all evenly with the brown sugar/white sugar mixture and use a blow torch to caramelize the tops.
– If using the oven: preheat the oven to 425F and broil the custards 2 to 4 minutes depending on the strength of your oven.


Finally I would like to dedicate this post to another wonderful lady, Bri from the wonderful blog Figs With Bri who is right now fighting for a life trying to beat cancer. Though we have never met, Bri, from the moment I started reading, you made me laugh, you made me think, we visited and cheered each other and I just want to send your way a gazillion hugs and good vibes. I keep your family and husband in my daily thoughts, counting my blessings in the morning and trying to improve on my faults at night.

Lemon Rhubarb Mascarpone Mousse Cake

Rhubarb Mousse Cake-Copyright©Tartelette 2008Yes, another rhubarb post…it’s the season and I just can’t get enough….Sorry folks! When Marcela was planning her visit, one of her wishes was to get some rhubarb and Meyer lemons so we could bake something with them. She also wanted to keep the seeds of the lemon to grow her own tree back in Argentina. We searched everywhere for both to no avail and decided to stick with our original plan to make macarons instead. She did a fabulous job with the latter and I hope that macarons have no secret for her now and I got to tell you, buttercream and dulce de leche go really really well together!!

After dropping her off at the airport, B. and I headed for the farmers' market downtown and guess what I found by the bucket….rhubarb!!! Arghhhhh…..Wish I had it growing in the backyard but one has to do with what they have, right?! I need to add that since I mentioned I had found Loquat trees everywhere downtown, one of my clients told me she had her own tree and I was most welcome to head over her house and pick what I wanted. I did this afternoon and stopped at three bags full. Do you think I have enough fruit if you add the four pounds of strawberry that Marcela and I picked at a local farm yesterday afternoon?!!! There are going to be some fruity desserts coming up!!

This is the dessert I wanted to make for her had I found rhubarb before her arrival….alas, or as B. would say "Yum, more for me", this mousse cake is going to be dessert for us tonight. So here is to you Pip, as a thank you for a wonderful time in your company and especially last night at the restaurant where I don’t recall ever laughing so hard in my life…and it involved another woman kissing my husband….

For the mousse I used the same recipe I used for the Raspberry and Mascarpone Mousse Cakes, back in March. I replaced the lime with lemon and added cooked rhubarb to the mousse base. I don’t really have a recipe to cook the rhubarb but I usually go for 1 cup of fruit to 1/3 cup sugar, cooked over low heat until the rhubarb softens and I still get chunks of fruit in there. The cake ring surrounding the mousse looks complicated and involved, but really it isn’t. It is made with an almond cake batter very similar to ones used for jelly rolls called "ribbon sheet cake" or Joconde and a tuile cookie batter (also known as tulip paste) piped onto the baking sheet before you pour in the cake batter so while baking it leaves an imprint on your cake. If it were rocket science I would not be doing it….trust me. It is not more time consuming than baking a cake and I find the whole process tremendously more fun given the end result.

I went for stripes but you can easily make squiggles, lace patterns, dots, smileys, etc….It is best to prepare both the mousse and the cake early in the day if you plan to serve this for dinner as the cake needs to cool and the mousse needs to set, and you can keep them in the freezer for a month or so if you decide to make them way in advance. For a velvety effect on top, I mix powdered sugar and cherry pink food coloring on top and dust the cakes with it right before serving. Do not do this in advance as your powdered sugar will melt and sink in the mousse due to its moisture content.

Rhubarb Mousse Cake-Copyright©Tartelette 2008
Lemon Rhubarb Mascarpone Mousse Cake:

Printable Recipe

For the tulip paste:
4 ounces unsalted butter, softened
4 ounces powdered sugar, sifted
1/2 cup egg whites, at room temperature
4 ounces all purpose flour, sifted
1 1/2 Tb cocoa powder.

Cream the butter and powdered sugar together in a stand mixer fitted with the paddle attachment. Sift the flour and cocoa powder together and add to the butter mixture and mix until incorporated. Do not overmix. Use right away or store in the refrigerator, taking it out 30 minutes before you plan to use it.
Pour the batter into a piping bag fitted with a small plain tip. Line a baking sheet with parchment paper. Using a ruler set on top of the sheet as your guide, pipe lines with the tulip paste onto the parchment paper, or any shape you desire. You can also smooth a large amount of the paste on the paper and using a ruler set on the rim of the pan, use a decorator comb to drag on the batter to form lines. When I make somewhat straight lines, this is the method I use, and I use the pastry bag method for lace patterns and others. Set the baking sheet in the freezer until the tulip paste is firm. Keep frozen until you are ready to pour the cake batter on top.

For the ribbon sheet cake:
4 ounces finely ground almonds (I used slivered)
3 ounces powdered sugar
1 ounce all purpose flour
4 eggs
1 egg yolk
3 egg whites
1 ounce granulated sugar
1 ounce melted unsalted butter

In the bowl of a stand mixer fitted with the paddle attachment, beat the almonds, powdered sugar, flour and 2 eggs until combined. Scrape the sides and bottom of your bowl with a spatula and add the remaining 2 eggs and the yolk until well combined. Set aside.
Whip the egg whites in a separate bowl until they appear foamy, add the granulated sugar in a steady stream and whip until you get a glossy meringue. Fold the meringue mixture into the egg/flour mixture. Stir in the melted butter and fold until all the ingredients are well incorporated but without deflating your meringue base.

Remove the baking sheet with the tulip paste from the freezer and pour the cake batter on top. Bake at 450F for about 6-8 minutes or until the sponge becomes to color. Remove from the oven, let cool a few minutes and invert your cake onto a piece of parchment paper. Peel the baking paper. Let cool before using. You can keep it wrapped in the refrigerator for up to a week or in the freezer for a month. Bring it back to room temperature before you fit it in the pastry rings. Line 6-8 pastry rings (depending on their size, mine are 3 inches wide) with parchment paper, cut 1.5 inches wide strips of cake and cut them to fit around the inside of your rings. Divide the mousse inside the rings and let set.

For the mousse:
1 egg, separated
2 TB sugar
2 oz mascarpone cheese, at room temperature
75 ml. heavy cream
1 tsp. powdered gelatin (1/2 sheet) + 1 Tb water
zest and juice of one lemon
1 cup cooked rhubarb

Sprinkle the gelatin over the water, stir and let sit to bloom. In a large mixing bowl, whisk the mascarpone with the sugar, add 1 egg yolk and whisk until well incorporated. Heat the gelatin for about 10 seconds in the microwave and quickly whisk it in the mascarpone batter. Add the lemon juice and zest. Whip the egg white until stiff, fold into the mascarpone mixture. Add the cooked rhubarb. Whip the heavy cream to medium stiff peaks, and fold into the mascarpone. Divide it evenly and carefully among the pastry rings. Store in the refrigerator for 2-4 hours or overnight.

Granted it takes a tad longer than a baking brownies but it is just as fun and as good, and if you like playing with shapes, batters and let your imagination run wild, this is a good project to tackle in the kitchen. The end result is so tasty you won’t be disappointed!

Ice Cold Lemon Strawberry Fraisier

An abundance of gorgeous strawberries and extra Grand Marnier Mousseline led me to create this little thing. I called it a Fraisier because it looks like one but that’s where the resemblance stops….although by taste it was just as good. Like the choux, a Fraisier is one of my favorite desserts, one I would push my mother to buy for Easter it looked so Spring-like. It usually is compose of a genoise, pastry cream, strawberries and topped with a thin layer of marzipan. Rich in composition and ingredients but light in texture like most French desserts tend to be. It seems like we have a knack to pack a million calories in a bite that seems as light as air!!

Here I was with the strawberries, the mousseline cream and no base but a serious hunkering for Meyer lemon. Lemon genoise? Lemon meringue?….hmm…decision, decision, hesitation….That was until I remembered a recipe for "The Best Damm Meyer Lemon Pound Cake" on the Saveur Magazine website. With a claim like that I had to check it out for myself!! I made the cake, patiently waited for it to cool so I could cut slices and then rounds to fit into pastry rings to build the cake, and then a very common thing happened: we started cutting into it like mad and before I knew it half of it was gone!! I managed to sneak it away from Mr.Tartelette promising an even better dessert made with it (better not mess up, right!). I have to tell you that in itself, the cake is indeed pretty damm good, and the Meyer lemon really made a difference from usual lemon pound cake but my favorite still is The Ultimate.

The weather has been really quite hot and humid lately thus I decided to go for a very cold, icy cold really, version of my beloved dessert with the ingredients I had on hand. To build the dessert I used my trusted 3 inch diameter pvc pipe rings lined with parchment paper, and all I had to do to unmold them was to slide them out and let them sit, covered, on the countertop for 20-30 minutes. It is indeed best to take them out of the freezer ahead of time so the cake has time to soften up a bit and you don’t chase your dessert around trying to break into the ice. The mousseline was perfectly thawed but still icy cold and holding its own while the cake was at the right consistency for you not to break your spoon on it.


I am sending this to Meeta’s Monthly Mingle, Spring Fruit Sensations, hosted this month by Abby of Eat The Right Stuff. Once you have the Meyer lemon pound cake and the Grand Marnier Mousseline then it is just a matter of assembly.

Ice Cold Lemon Strawbery Fraisier: Serves 4

8 thin slices from the Meyer Lemon Pound Cake
1/2 recipe for Grand Marnier Mousseline
1-2 cups sliced strawberries

Using the 3 inch rings or cut pipe as a guide, cut 8 rounds from the lemon cake. Line your ring with parchment paper, place them on a parchment line baking sheet, put a slice of cake in each ring at the bottom. Line the walls if the rings with the sliced strawberries. Divide the mousseline in half and divide one half evenly among the rings and tap the sheet on the countertop to make sure it settles in the rings. Top with another slice of lemon cake, pressing gently on the cream, top with the remaining cream and freeze.
To serve, take the rings out of the freezer, slide the cakes with the parchment paper out, remove the paper gently and set the cakes to thaw for 20-3o minutes. Decorate with cut strawberries (I added some coconut when B. was not looking)

Fraisier-Copyright Tartelette 2008
I also wanted to thank the judges in the March edition of Does My Blog Look Good In This, hosted by Sabra of Cookbook Catchall for awarding this picture (just to clarify, not the one above, click on the link to fnd out) with First place. I am amazed, happy beyond belief given the gorgeous photographs that were entered in the contest. Go check out the other winners, pretty nice eh?!! Thank you, thank you….I take great pleasure shooting the desserts I feature here and I constantly learn from all the amazing talents out there 🙂

Last thing before I forget again: a lot of you email me everyday about baking and lately a lot about macarons. I am not holding back on purpose but a tutorial with tips and steps by steps will be available soon. This is one of the trickiest item to trouble shoot through a computer screen and although I have helped already a few of you out there with those and other desserts, I wanted you to know that I appreciate your patience. You guys make my day!

Sweet Melissa Lemon Blueberry Buttermilk Pie & Winners


Not only does Melissa Murphy’s latest book satisfies my cravings for bakery sweets but it also fulfills my love for all things citrusy. I wish I could show you how good her Lemon Squares are but I am afraid I only have the crumbs on our plates to show for it as they were devoured faster than I could take a picture. I had to hide the Lemon Blueberry Tartlets pictured to avoid the same "problem" (eating is never a problem in our neighborhood). I bookmarked the original recipe Lemon Blueberry Pie the first time I flipped through the book for plenty of delicious reasons: it had lemon, buttermilk, blueberries (the freezer is stock full of them) and I could make minis for a dinner party. They lasted for about 5 minutes and then our guests asked to come back next week for another try-out from the book (Chocolate Raspberry Truffle Torte anyone?)

Before I give you the recipe, I know you are awaiting to read if your name got pick to receive one of the 5 copies the publishers were giving away and this is great news for the winners. Thank you all for your participation, I know Melissa must be thrilled about it! I have got even more good news for the 250-ish of you who showed up for the event….keep on reading…..

I need the following people to send me their mailing address at mytartelette(@)gmail(dot)com so we can get the books on their way to ya’ll’s kitchen!
Congratulations to:
– Steph from Stephanie’s Kitchen
– The Coffee Snob from Eat and Be Happy
– Merav from A Tasteful Journey
– Kevin from Closet Cooking
– Ginny from Just Get Floury

The good news? Ariela from Baking and Books is also holding a giveaway for another 5 copies!! So…if your name did not get picked this time around, run to her blog and put your name in the hat once more! Who knows?!

Lemon Blueberry Buttermilk Pie
Reprinted with permission from The Sweet Melissa Baking Book by Melissa Murphy.

Blueberries really need to be offset by something tart to taste their best. This pie
is so delicious because the rich tang of buttermilk and fresh lemon juice shows off
plump ripe blueberries. This one is really fun and easy to make.

Makes one 10-inch pie (or 8 minis)

For The Pie:

1 prebaked 10-inch piecrust made from All-Butter Pie Dough (1/2 of the recipe below)
1 1/2 cups sugar
1 tablespoon plus 1 1/2 teaspoons cornstarch, sifted
8 tablespoons (1 stick) unsalted butter, melted
3 large eggs
1 teaspoon pure vanilla extract
1/2 cup buttermilk
2 teaspoons freshly grated lemon zest
2 tablespoons fresh lemon juice

For The Blueberry Topping:

1/4 cup apricot preserves
1 tablespoon water
1 1/2 dry pints fresh blueberries, picked through, stems discarded

All Butter Pie Dough:

2 1/4 cups all purpose flour
2 Tb sugar
1/4 tsp baking powder
1/2 tsp kosher salt
1 cup very cold unsalted butter, cut into 1/2-inch pieces
6-8 Tb ice water

In a large bowl, whisk together the flour, sugar baking powder and salt. Add the butter pieces, tossing with your figers to coat them with the flour. Using a pastry blender, cut the butter ito the flour util it is the size of large peas. Sprinkle 6 Tb of the water over the mixture and toss with a fork. The dough whould hold together when you squeeze it in your hand. If it is too dry, add the rest of the water.
Turn the dough onto a lightly floured work surface. Pat it together in one piece. Divide the dough into 2 equal parts, flatten each into a disk and wrap with plastic wrap. Refrigerate for at least 30 minutes before rolling. When ready to use, roll it out and fit a pie pan with the dough, prick with a fork. Cover with parchment paper and fill with beans or pastry weights. Bake at 350F for 20 minutes or so.

Position a rack in the center of your oven. Preheat the oven to 350°F. Line a cookie sheet with parchment paper or aluminum foil.
In a large bowl, whisk together the sugar, cornstarch, butter, eggs, vanilla, buttermilk, zest, and lemon juice until smooth. Pour the buttermilk mixture into the prebaked pie shell.
Place the pie plate on the prepared cookie sheet. Bake for 40 minutes, or until the crust is golden brown and the custard is set. Remove to a wire rack to cool to room temperature before topping with the blueberries.

To Make The Blueberry Topping

In a small heavy-bottomed saucepan over medium heat, whisk together the apricot preserves and the water until melted. Strain through a fine-meshed strainer into a medium bowl. Add the blueberries and, using a rubber spatula, stir gently to coat. Pile the blueberries on top of the pie.
Serve the pie chilled or at room temperature. It keeps tightly wrapped in the refrigerator for up to 2 days.

Lemon Meringue Pie

Or in my case Lemon Meringue Tartelettes…yep, can’t escape that nickname but to my defense Jen from The Canadian Baker and hostess for this month Daring Bakers' challenge had given us the option to make several tartelettes instead of one large pie. Be prepared to bathe in deliciously tart lemon curd and come out all sticky of meringue as 450 Daring Bakers got all sticky gooey once more just for you….and to overcome their fears, baking issues or just to have some fun!

Although this was not my first lemon meringue pie, it was fun to use someone else’s recipe for crust and curd and compare them with the ones I constantly use. No big challenge but I was so tired the day I made it that I really did not pay close attention and followed the recipe blindly. Hint to those DB who have to use violent threats to themselves to follow a recipe to a "t"…do it when you can barely stand on your feet from exhaustion, physical or mental. Mine was mental so I went ahead and dove in.

The crust turned out ok, not my favorite but very good. I like mine flaky with good ole Crisco. Since my mother in law gave me her recipe, I just think this is the best (and not too many worries for my arteries I use the non trans-fat one that came out a couple of years ago). This one did the trick, except that being on auto-drive that evening I added the whole measurement of cold water to the flour mixture instead of my usual a few tablespoons at a time until it comes together. Oopps…dough was wet…Wrapped it up, parked it in the fridge for an hour, with the absolutely faith (that means all digits crossed here) that the flour and butter would work their magic and tame their thirst with the extra moisture. Worked! People, never fondle your dough too much no matter how soft and shiny it is or you will pay the price of tough and too elastic a piece to work with! After that a familiar scene happened: roll the dough, cut rounds, fill tartelettes molds, cover with parchment paper, fill with dry beans, blind bake and let cool. Oven on, tired Tartelette…I almost forgot they were in when the neighbors gathering for drinks started to wonder what I was baking! I had forgotten we had planned a game of Scrabble.

On to the curd….now I had an audience…ahahahah!!!! Most likely they will be too invested in the game to notice if I mess up! It wa the first time I used a curd recipe that involved water and which method was slightly unsual (see the recipe below). I have been spoiled by the lemon curd in Alice Medrich’s book on low fat dessert and the fantabulous full fat lemon cream from Pierre Herme. But eh! I am always willing to try something new for my lovely Daring Bakers!! Everything went smoothly and the curd turned out smooth and tart, just like I love it. I remembered the good old advice from Harold McGee not to stir the cornstarch mixture too vigorously and not to cook it passed boiling or it will reverse its thickening properties…amazing given I was completely distracted by C. challenging B. about a word during our Scrabble game. Kids……!

The meringue part….delicious. Again, of where there is fluffy sugar topping there usually is a happy Tartelette. The recipe instructed us to use the oven for that part, but my oven was crowded with pizza when that part came up so I "had" to use the blowtorch (another excuse to play with fire) and for the kids to be convinced I had magical powers!! I first played with it on the tartelettes like I had done previously on lime meringue cupcakes and then I just used a plain tip and a large star tips and did the minis with them…and they kind of looked like cupcakes after all. I think I lost at Scrabble but I took the prize for eating the most of the mini lemon meringue pies in one sitting. What can I say…I love anything with lemons!

Will I make this particular lemon meringue pie again? Actually I did a couple of times for a friend and my mother in law and everybody enjoyed it. For us? Probably, not so much for the crust but the curd was really tart…which I love, so I will make sure to serve it to people who share the same fancy. The meringue was not overly, cloyingly sweet so it will be used again for other tarts.
Be sure to check my fellow Daring Bakers' posts popping out there everywhere and thanks Jen for a yummy recipe!

Lemon Meringue Pie: recipe courtesy of Wanda’s Pie in the Sky by Wanda Beaver, 2002

Makes one 10-inch (25 cm) pie. I made four 3.5-inch ones and twelve 2-inch minis.

For the Crust:

¾ cup (180 mL) cold butter; cut into ½-inch (1.2 cm) pieces
2 cups (475 mL) all-purpose flour
¼ cup (60 mL) granulated sugar
¼ tsp (1.2 mL) salt
⅓ cup (80 mL) ice water

For the Filling:

2 cups (475 mL) water
1 cup (240 mL) granulated sugar
½ cup (120 mL) cornstarch
5 egg yolks, beaten
¼ cup (60 mL) butter
¾ cup (180 mL) fresh lemon juice
1 tbsp (15 mL) lemon zest
1 tsp (5 mL) vanilla extract

For the Meringue:

5 egg whites, room temperature
½ tsp (2.5 mL) cream of tartar
¼ tsp (1.2 mL) salt
½ tsp (2.5 mL) vanilla extract
¾ cup (180 mL) granulated sugar

For the Crust:

Make sure all ingredients are as cold as possible. Using a food processor or pastry cutter and a large bowl, combine the butter, flour, sugar and salt. Process or cut in until the mixture resembles coarse meal and begins to clump together. Sprinkle with water, let rest 30 seconds and then either process very briefly or cut in with about 15 strokes of the pastry cutter, just until the dough begins to stick together and come away from the sides of the bowl. Turn onto a lightly floured work surface and press together to form a disk. Wrap in plastic and chill for at least 20 minutes.
Allow the dough to warm slightly to room temperature if it is too hard to roll. On a lightly floured board (or countertop) roll the disk to a thickness of ⅛ inch (.3 cm). Cut a circle about 2 inches (5 cm) larger than the pie plate and transfer the pastry into the plate by folding it in half or by rolling it onto the rolling pin. Turn the pastry under, leaving an edge that hangs over the plate about ½ inch (1.2 cm). Flute decoratively. Chill for 30 minutes.
Preheat oven to 350ºF (180ºC). Line the crust with foil and fill with metal pie weights or dried beans. Bake for 20 to 25 minutes. Carefully remove the foil and continue baking for 10 to 15 minutes, until golden. Cool completely before filling.

For the Filling:

Bring the water to a boil in a large, heavy saucepan. Remove from the heat and let rest 5 minutes. Whisk the sugar and cornstarch together. Add the mixture gradually to the hot water, whisking until completely incorporated.
Return to the heat and cook over medium heat, whisking constantly until the mixture comes to a boil. The mixture will be very thick. Add about 1 cup (240 mL) of the hot mixture to the beaten egg yolks, whisking until smooth. Whisking vigorously, add the warmed yolks to the pot and continue cooking, stirring constantly, until mixture comes to a boil. Remove from the heat and stir in butter until incorporated. Add the lemon juice, zest and vanilla, stirring until combined. Pour into the prepared crust. Cover with plastic wrap to prevent a skin from forming on the surface, and cool to room temperature.

For the Meringue:

Preheat the oven to 375ºF (190ºC). Using an electric mixer beat the egg whites with the cream of tartar, salt and vanilla extract until soft peaks form. Add the sugar gradually, beating until it forms stiff, glossy peaks. Pile onto the cooled pie, bringing the meringue all the way over to the edge of the crust to seal it completely. Bake for 15 to 20 minutes, or until golden. Cool on a rack. Serve within 6 hours to avoid a soggy crust.

And remember that you have until 4pm today to get the chance to get yourself a box of canneles!

Lemon Lime Meringue Cupcakes


I wish I could tell you I am sitting right here enjoying one of these lemon lime cupcakes as I type my post but truth is I am trying to write in a room where English and French are mingling with hand gestures and strange sounds, and my brain is not sure this post is going to make sense by the time you read it. I tried isolation, taking one cupcake to the office room, sitting down at the computer with a cup of tea but I keep being interrupted because it seems that nobody understand my house, kitchen and pantry set-ups, hmmmm….really?….and I thought I was Ol' Deat Martha!! Anyways…back to the cupcakes.

Laurie from Quirkie Cupcake posted a Cupcake Hero Event focused on lime and as a new September Daring Bakers I wanted to give her full support, except that I am late….I can’t lie…It’s funny how I can think so much (three weeks) that it almost seems real, like I already made it, and then I wake up the morning of the deadline to realize that it was all in my head, a nice pretty dream, full of lemon and lime and soft meringue…

We have a saying in French that goes like this: "Il n’a pas invente la poudre" translating as "he surely did not event gunpowder", which is pretty much what I did when I made these the other day. They had been on my "must try" list for a long time and this month I finally had the opportunity to play around with them and my blow torch. I used a recipe from one of my favorite blogs, Cupcake Bakeshop. Cheryl’s site is not only amazing to look at but I admire her adventurous spirit when it comes to pairing ingredients and flavors, creating recipes and styling them with the most relevant details. I fell in love with her meringue cupcakes ever since they jumped at me through the screen. I followed one of her recipes for the cupcakes adapting it to fit Laurie’s challenge, except I can’t remember which one as I scribbled it in my blue notepad one day I was in a hurry. I used lime oil as an added boost of flavor. The lime curd inside is my usual foolproof recipe that I make time and time again and probably make you guys sick ad tired of it….but if it ain’t broken why fix it? As for the meringue, well, if you have a blow torch it does make the job easier. I have not tried the broiler in my oven for these so far, but if you do, please let me know the outcome.


Lemon Lime Meringue Cupcakes:

Makes 12

Cupcakes:

1 stick unsalted butter, room temperature
1 cup sugar
3 large eggs
1½ cups all-purpose flour
1 teaspoon baking powder
½ teaspoon salt
2 teaspoons lime oil
½ cup buttermilk
1/4 cup fresh lime juice
zest of one lime

In the bowl of an electric mixer with the paddle attachment, cream butter and sugar. Add eggs, one at a time, beating well in between each addition. In a medium bowl, combine the flour, baking powder, and salt. Add flour mixture and milk alternatively to the butter/eggs mixture, beginning and ending with flour mixture. Add the lime juice and zest. Fill cupcake tins 2/3 full. Bake at 350 for 20 minutes until a cake tester comes out clean.

Lemon Curd:

grated zest of 2
1/2 cup strained lemon juice
1/2 cup sugar
2 eggs

Combine the zest, sugar, juice in a saucepan, and bring to a simmer. In a small bowl, beat the eggs until light.Beat some of the lemon mixture into the eggs to temper. Scrape the mixture back into the saucepan and cook stirring constantly until it thickens up, about 5 minutes. Remove the curd from the heat, let cool completely.

Lime Meringue Frosting:

1 cup egg whites
2 cups sugar
1 tsp. lime juice

Combine egg whites and sugar into the mixing bowl of your stand mixer and set over a water bath. Whisk by hand for a few minutes until the sugar is dissolved or preferably until the mixture reaches 110F . Transfer bowl to electric mixer, beat on medium speed for 10 minutes. Add lime juice Beat on high speed until stiff glossy peaks form, about 2 to 5 minutes more.

To fill the cupcakes: with a sharp knife cut a small hole in the cupcake, not cutting all the through. Fill the cavity with the lemon curd, and put the top back on. Spread the meringue and brown with a blow torch.

Meyer Lemon Cake Roll – Coming Full Circle

Meyer Lemon Cake Roll
I have to warn you guys that you may have to wait longer than a couple of days in between my post for the next month. My parents are visiting from France and staying until the middle of October. I already employed mom tonight to help me out in the kitchen while I could work on a couple of pastry projects and dad is in charge of hopping in the car in case we need something last minute from the grocery store. They have been here so many times before (14) that within a couple of days they had found their marks. Mom even exclaimed as soon as she got in the house "it’s good to be home", which made me beam with joy, of course. I hope you will understand if I don’t post too often, we have a few things planned (dad is a General after all), but a lot will be left to the weather and the temperatures (pretty hot and muggy right now).

Where am I going with this paragraph, those pictures and that title? Well, when I received Mary’s box of Meyer lemons, I was on the phone with mom and I had to spend the next 10 minutes explaining her about that group of wonderful people I knew and how we sometimes exchange much more than comments on our blogs, as well as trying to describe to her a Meyer lemon as I was cutting one open. She made me promise to save her some cake "or something"…Well between B., the neighbors and me, there was no cake left within a couple of days but there was plenty of lemons for another batch of curd. Since my parents were visiting, I decided to make my dad one of his favorites, a jelly roll cake, but with Pierre Herme’s signature lemon cream inside instead of jam or preserves. My paternal grandmother passed away when I was 4 so I never got the chance to share baking time in the kitchen with her (unlike my "mamie Paulette"), but I have always heard about her "strawberry jelly roll cake" and the way my dad closes his eyes when he reminisces about it is a pretty good indication it had to be something!
Mary’s lemons went a long away in satisfying both my family both native and French.

Now let’s really talk business: that Herme’s lemon cream…boy oh boy! Since I last made it, it must be on regular supply at the house, and we think as highly of it as we do Nutella. We put it on everything, mix it with everything. Some people, and I was too at first, are concerned, afraid, surprised at the amount of butter that goes into it, but let me tell you that it is absolutely worth and the magic of pastry is that you forget about how much there actually is once you put that spoon to your mouth….you’re hooked…you want more… This time around though I reduced the amount of butter as I was adding gelatin for a firmer hold inside the cake roll.
For the cake itself, I used another one of Herme’s recipe, from a book my mom brought me this trip and that I am already devouring (no pun intended). Nothing fancy about it, it is a plain sponge cake but I added grapefruit zest and a dash of almond extract, as I love the two together.

Meyer Lemon Cake Roll
Meyer Lemon Cake Roll:

Serves 12

For the Cake:

50 gr. butter
3 eggs, separated
100 gr. flour (I used White Lilly all purpose, which is naturally soft, but you could use all purpose or cake)
2 Tb grapefruit zest
1 tsp pure almond extract
100 gr. powdered sugar

Preheat the oven to 400 F.
In a microwave safe container, melt the butter. Set aside.
In a medium bowl, whisk the eggs, almond extract and the sugar until pale and thick. Add the grapefruit zest.
With an electric mixer, whisk the egg whites until stiff. Gently fold the whites and the flour, alternating, in the yolk/sugar mixture. Add the butter fold until incorporated.
Spread the batter onto a parchment paper lined baking sheet. Bake for 10 minutes. Remove from the oven, let cool for 5 minutes, invert onto another sheet of parchment paper. Let cool. Fill the cake with the lemon cream and roll. Dust with powdered sugar and serve.

For the Meyer Lemon Cream:

1 cup sugar
zest of 3 Meyer lemons
4 eggs
1 cup freshly squeezed lemon juice
1 Tb gelatin, softened in 3 Tbs water
1 stick butter, cut into 1 inch pieces, softened

Make a water bath by putting a saucepan of water over heat to simmer and placing a metal bowl over, without the bottom touching the water. Rub the sugar and lemon zest with your fingers and add to the metal bowl. Whisk in the eggs and lemon juice.
Cook the mixture over the water bath, whisking constantly until the cream reaches 180 degrees. It can take up to 10 minutes. Once the cream reaches 180 (your whisk will leave ribbon tracks in the cream),remove the cream off the heat and put it into a blender, with the gelatin. Pulse a couple of times, until the gelatin dissolves. Let the cream cool to 140. Add in the butter and process until perfectly smooth. Pour into a container, cover and refrigerate until ready to use.

Ricotta Cake With Meyer Lemon Curd

Ricotta Cake With Meyer Lemon Curd

I realize it could sound cliche or a little simple but this cake should really be called "Friendship Cake". It would not have been made, eaten and shared without the giving spirit of great friend:

Over the summer, Mary wrote several posts and shared recipes with Meyer lemons, each more tempting than the next. What started on my part as an innocent "I wish I could find Meyer lemons here" became a tortured "Mary, please send me some, I’ll pay for shipping!". Believe me, I searched everywhere in town for the coveted lemon and nothing…people would even give me the odd "why is it so important?". Well, if you have been reading this blog for a while you know by now how much I love anything and everything lemon, sour, tart, tangy and if bloggers on the west coast keep waxing poetic about the fragrant Meyer lemon, then I need to know what one tastes like.

Well, the postman rang the doorbell the other day handing B. a pretty heavy box and he exclaimed "It’s for you! From California"….Oh gosh, did I make a Recchiuti purchase in my sleep? Did I sleep walk to the computer and ordered Banana Cream Pie from Tartine?…No peeps…even better: Mary had sent me a box full of Meyer lemons! My eyes grew bigger, my tastebuds all awaken by the fragrance coming out from under the newpaper padding. I am aware that we all make food discoveries throughout our life but when you are of age to really enjoy what is under your nose, the experience is quite intoxicating. I have never had a lemon that tasted like a sour clementine with a faint smell of cardamom before. I am sure others will find that funny, but yes, I smell that spice everytime I bring one of those lemons to my nose…and it makes me happy!
I received Mary’s gift on friday and I have already put them to good use, not only with this cake, but in a batch of plum jam where I used the rinds to flavor the preserve, in sauces, ice creams and other cakes…just to give you a preview of things to come.

I was craving my beloved yogurt cake sunday afternoon but I wanted to try another recipe, something of the same substance but that would allow me to use the Meyer lemons as well as other ingredients. I was thinking ricotta instead of yogurt, and before following my usual recipe I decided to browse the web. Boy am I glad I did! I think I spent over an hour on both Sigrid’s blogs, looking at her magnificient photography and pretending to speak Italian fluently (!) and stumbled upon a recipe for a lemon ricotta cake from the sardinia region of Italy. Bingo! Fate!Kismet! or whatever else you find appropriate. I did not change much but reduce the sugar a bit. I also baked the cake in a rectangular pan and cut it in 5 long pieces, cut these in 3 separate layers and layered them with a light lemon curd filling(no butter in the cake or the curd). Perfect for an afternoon tea. I have to say that this is one of the desserts that never made it to the neighbors: I cut and froze slices so I could savour my precious loot for special times. You know, when you feel like bringing a friend closer to you although they are miles away, like tonight.

Mary, thank you. I truly hope that one day our paths do cross, in the kitchen and around a homemade meal. Yes folks, I have a wonderful friend, and I have never met her.

Ricotta Cake With Meyer Lemon Curd
Ricotta and Lemon Cake, adapted from here:

300 gr flour
200 gr sugar
300 gr. ricotta
3 eggs, separated
1 lemon , zest and juice
2 tsp. baking powder

Preheat oven to 350F.
In a large bowl, combine the ricotta and sugar. Add the egg yolks, the lemon juice and zest, then the flour and baking powder. In the bowl of an electric mixer, whip the egg whites until stiff and getly incorporate them to the egg/flour batter.
Butter and flour a 13×9 inch baking pan and pour in the batter. Bake for 40 minutes or when a toothpick inserted in the middle come out clean. Let cool completely.
Divide the cake in three lenghtwise and 5 crosswise. (you may have leftover slices…just eat them plain or with a touch of jam). In a large loaf cake pan line with plastic wrap, layer slices of cake and Meyer lemon curd. Refrigerate. Slice and eat when you are ready!

Meyer Lemon Curd Filling:

grated zest of 2 Meyer lemons
1cup strained lemon juice
1/2 cup sugar
2 eggs
1 packet gelatin, dissolved in 1/3 cup of water

Combine the zest, sugar, juice in a saucepan, and bring to a simmer.
In a small bowl, beat the eggs until light.Beat some of the lemon mixture into the eggs to temper. Scrape the mixture back into the saucepan and cook stirring constantly until it thickens up, about 5 minutes. Meanwhile, heat the gelatin in the microwave until dissolved, about 30 seconds. Remove the curd from the heat, stir in the gelatin and whisk until well incorporated. Let cool to room temp and use to fill the cake.
Strain and refrigerate, covered with plastic wrap until ready to use.

Update: I realize I forgot to tell you what I used on top of the cake. I took about /2 cup to 3/4 of mascarpone and mixed in some honey and iced the top with this. I have done similar cakes with sour cream or cream cheese instead, worked as well.

Bye Bye May: Lemon Macarons

Why would the end of May prompt me to make macarons? Well, they are delicate little cookies and for me May is a "delicate" month. On the first of May, I get a card from my parents with dried, fragile Lily of the Valley tucked inside. Then there is my birthday, for which I receive some precious orchid (background in the picture above) or other exotic flower….delicate.
Then there is a few more girlfriends' birthdays and of course mother’s day…the month ends up being very feminine, very pink and a major reason to make macarons!

I have been experimenting with a couple of recipes, one is promising but I want to tweak it a little bit more before posting, the results are almost as good as my cherished recipe originally found on Mercotte's blog.
I made a batch of these in an attempt to teach my friend C. and when she divided the loot in half I told her to keep them all and that I did not like macarons that much. Her jaws dropped, her eyes rolled in their socket and she almost checked my temperature. Yes, I am weird: I will gladly put me through the joyous torture of Italian meringue and macaron making but I don’t like eating them. I love the whole process, from deciding on the flavors, colors, folding, piping, filling but I am not a big fan. I find the process more rewarding than the results but friends and family think otherwise.

What could be more fitting the celebrate the end of May than a lemon flavored macaron filled with freshly whisked lemon curd? June will bring bolder flavors and colors but for now let’s stick to a tried and true recipe for the shells, as well as this lemon curd that I use now all the time.

Lemon Macarons:

For the shells:

120 gr. egg whites, divided
35 gr. sugar
150 gr. finely ground almonds
150 gr. powdered sugar
2 tsp. pure lemon extract

For the boiling syrup:
150 gr. sugar and 50 gr. water

Sift the ground almonds and powdered sugar.
In a stand mixer, whip 60 gr. egg whites to soft peaks, add 35 gr. sugar.In the meantime, in a saucepan on high heat bring the water and sugar for the syrup to 230 F. on a candy thermometer.
Slowly add the boiling syrup to the egg whites and continue to whip on medium – high speed until they are completely cooled and you have a shiny meringue (10-15 minutes).
Mix the remaining 60 gr. of egg whites, the lemon extract and the sifted almond/sugar and carefully fold into the meringue.
Fill a pastry bag fitted with a plain tip with the mixture and pipe macarons about 3 inches in diameter on parchment paper lined baking sheet. You can let them sit at room temperature for 20 minutes if desired. This is often done to assure those little feet at the bottom but I found that I can skip this step with this recipe and still end up with the same result.
Bake at 320 for 15 minutes. Let cool.

Lemon Curd:

grated zest of 1 lemon
1/2 cup strained lemon juice
1/4 cup sugar
1 eggs
Combine the zest, sugar, juice in a saucepan, and bring to a simmer.
In a small bowl, beat the eggs until light.
Beat some of the lemon mixture into the eggs to temper. Scrape the mixture back into the saucepan and cook stirring constantly until it thickens up, about 5 minutes.
Strain and refrigerate, covered with plastic wrap until ready to use.
Fill the macarons with about 1 Tb of the curd and refrigerate.

Bye bye May…Looking forward to June!

Note: Check out the WTSIM May edition on Jeanne’s blog…Yum!