
kumquats

Poached Kumquat & Almond Cakes

Kumquat & Almond Cakes


I love this time of year for so many reasons. They hit me with a bit of nostalgia in the afternoon but they all revolve around the same flavors and scents. I found myself humming our favorite Christmas story. He caught me starring at the skyline while my mom was describing the snow back home. He noticed I let the cardamom pods linger on the countertop a little while. That’s the holidays too. So I close my eyes and just imagine.

Kumquats


Chocolate. Thick as ganache and strong as coffee hot chocolate. Cardamom. My mom’s Swedish cardamom rolls, Roasted chestnuts. Piping hot snack we would get on the streets of Paris while visiting my grandparents. Oolong tea. The perfect cup to warm you up in the afternoon. Clementines and kumquats. One of my favorite Winter dessert.

Kumquat & Almond Cakes


A yogurt and a clementine or a handful of kumquats was by far the most common dessert at our house during Winter. My mom has this gigantic wooden fruit bowl for everyday dinners that I love. Not because of what it is but because of what it promises. Comes Winter and it is a cornucopia of lychees, citrus, pears, nuts and dates. Snapping the citrus skin to smell their natural oils to feel instantly energized was however my favorite part.

Poached Kumquats


With all the hustle and bustle of the holidays, it only took a glance over the kumquats at the store to instantly feel the promises of clean, fresh and vibrant desserts. It brought about the biggest skip in my step and the urge to come home and start baking. I know, I know…it’s all about the chocolate this time of year but I got to tell you, after rolling 3 pounds of truffles, I needed a break.

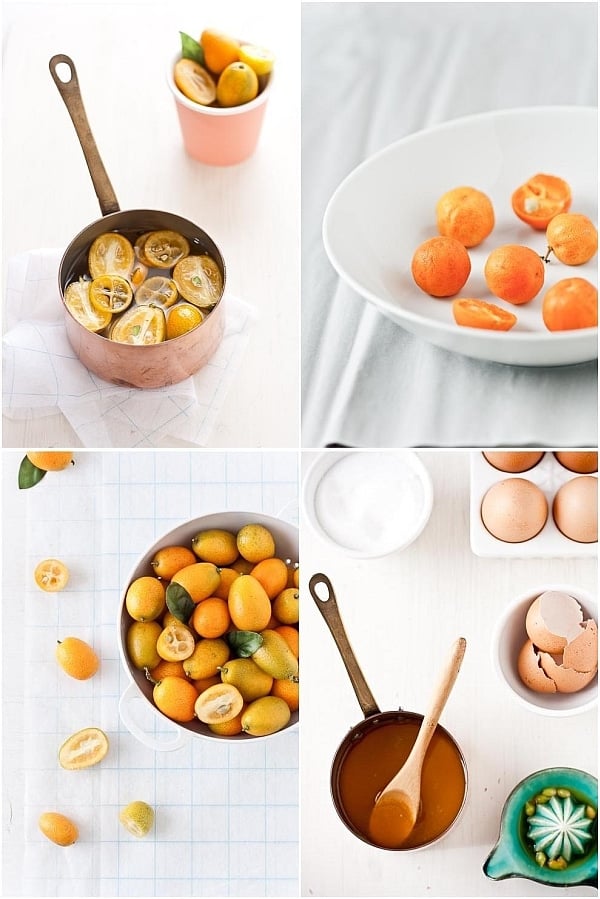
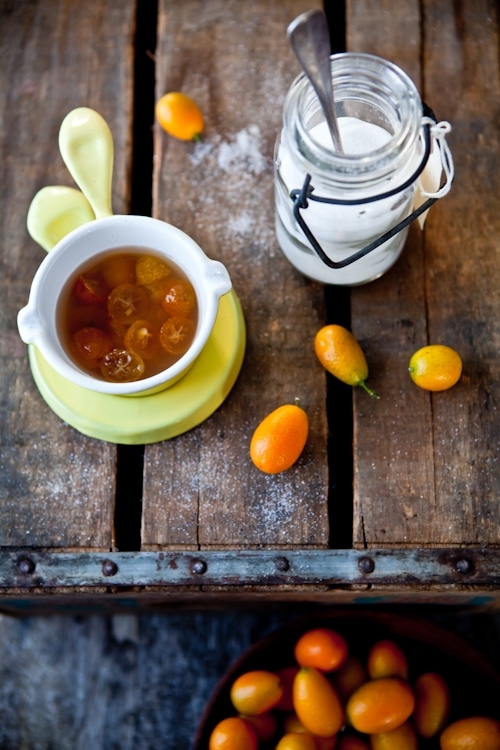
I started slicing and seeding a couple of pints of kumquats and was almost instantly transported back to my parents' home. I had no idea what I was going to make for sure. I only had the beginning of a plan you see. My mind had stopped at poached kumquats. Once I had done those, I started popping them in my mouth like they were candies and figured I’d better come with a plan fast or there would not be many left to share with B.

Kumquat & Almond Cakes


Fate would have it that I had decided to explore some of my favorite dessert book again and had bookmarked pretty much the entire citrus section in Hidemi Sugino’s The Dessert Book. I can easily bookmark all the recipes in the book actually. There are handful of pastry chefs I would follow blindly in the kitchen. Sugino is definitely one of them. His desserts are clean and yet complex, refined and yet simple. His recipe bring out the inquisitive quality of each of us and makes you wan to imagine dishes like he did.

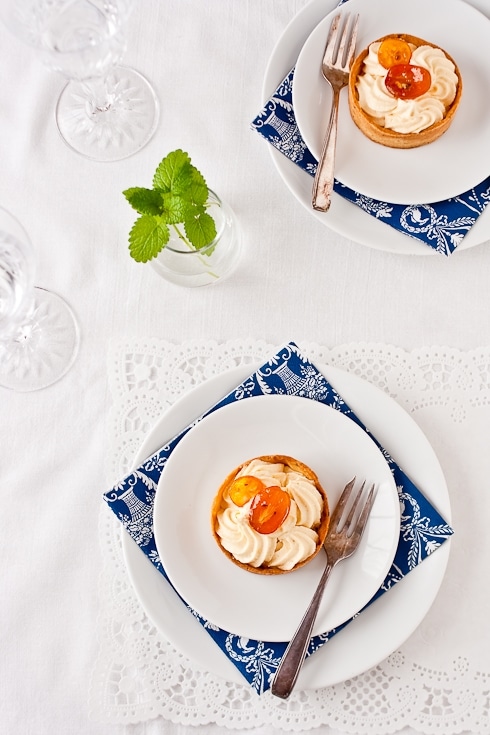
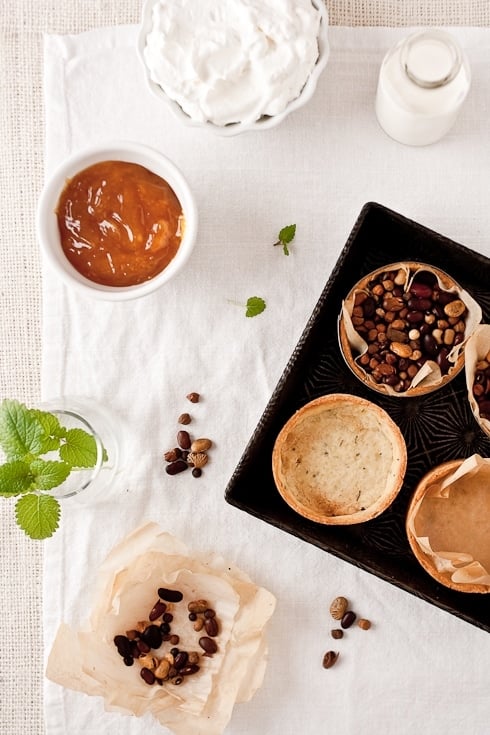
My mind quickly settled on a promising recipe for little tea cakes chock full of kumquat compote, poached kumquats and almonds. The compote is made by poaching sliced kumquats until tender and pureeing the whole thing, rind and pulp, together which adds the perfect hint of bitterness to cut down the sweetness of the cakes. Every bite makes made us slow down, close our eyes and just sigh.

Because we wholeheartedly approve. Hope you do to!

Kumquat & Almond Cakes


Kumquats and Almond Tea Cakes, adapted from Hidemi Sugino:

Makes 12

For the cakes:
1/2 cup (70gr) millet flour
1 teaspoon baking powder
pinch of salt
1 stick (113gr) unsalted butter at room temperature
1 1/4 cup (150gr) powdered sugar, unsifted
4 medium eggs
1 cup (100gr) ground almonds
1/2 cup reserved kumquat compote (recipe follows)

Sift together the flour, baking powder and salt. Reserve.
Butter the insides of cake tins (your preference) and place on a baking sheet. Reserve.
Heat the oven to 350F.
In the bowl of an electric mixer fitted with the paddle attachment, beat the butter and powdered sugar. Add the eggs, one at a time, beating well after each addition. Add the flour mixture and ground almonds and mix another 30 seconds. Fold in the kumquat compote with a spatula. Divide the batter in between your prepared tins, top with either fresh or poached kumquat slices and bake for 10-15 minutes until golden brown(the larger the tins the more baking time will be needed)

For the kumquat compote:
1 cup kumquats, halved and seeded
1 cup sugar
3/4 cup water

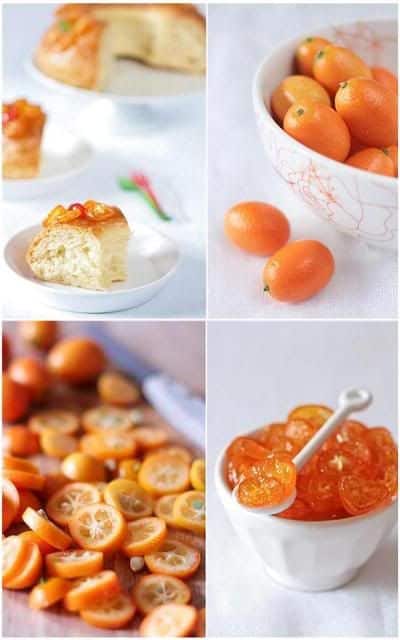
Place the kumquats, sugar and water in medium saucepan over medium high heat and slowly bring to a boil, stirring to dissolve the sugar. Turn the heat down and simmer for about 10 minutes, covered, until the kumquats are translucent. Remove from the heat and cool to room temperature.
Once cooled, drain the kumquats from the syrup, reserve a few slices and puree in a food processor adding 2 tablespoons to 1/4 cup of the reserved syrup as you go along. (it should look and feel like thick marmelade). Reserve.

Calamansi Mousse Tartelettes With Candied Kumquats

Calamansi Lime Mousse Tartelettes


The story could beging with "I’ve got these two friends, you see"…And then I could even attempt a rhyme like "they are wild and crazy". But that would be putting Todd and Diane in a box and these two, their hearts and their generosity will never bump the corners of a box. What am I talking about…their garden knows no boundaries. Over a month ago, they sent me a box of Calamansi limes from their own tree and it took me very little time to figure out what I wanted to do with them. Calamansi Mousse Tartelettes With Candied Kumquats.

Every time I virtually enter Todd and Diane’s garden, I get lost in all of its beauty and amazing givings. I literally get lost there and in the gorgeous pictures this amazing team pairs up with their delicious recipes. You get it, I am running low on adjectives to describe them and what they contribute to the blogging world. Actually wait, here’s another one, hot. These two are smoking hot. And hilarious. I’ve been fortunate to meet them both twice and twice I’ve wanted to bottle them up and take them home with me.

Ingredients for tartelettes

Clockwise: kumquats getting candied – fresh Calamansi limes – Calamsi curd in progress – fresh kumquats.

I had tasted Calamansi limes once years ago, before getting this shipment from Todd and Diane. Oh how I remember that first encounter. Could be one for the "what not to do" list. They look like rounded kumquats and I did what I usually do with kumquats. I popped a whole one in my mouth. Then I remember distinctly squinting my eyes, feeling my cheeks draw themselves inward. I love tart and I love sour but this on a scale from 1 to 10 was 25 in the sour-tart department. Oh my, did I squint!!

This time I had a plan. I zested about half of them and juiced them all and believe me, that took a little while and I was left with about 3/4 cup of juice. I immediately thought about making curd for tartelettes and mixed it with whipped cream to tone done the sour factor. The mousse was just right for everyone. For the shells, I used my favorite short crust dough but added some freshly chopped lemon balm to enhance the hints of citrus. Lemon verbena or lemon thyme would work quite well here also.

Making Tartelettes


Since all the little limes from the box had been used for juice, I candied some sliced kumquats to crown the tartelettes with. This almost did not happen as we had a full house munching on them the day I made them and barely saved enough for the tarts. These are like crack in our house. They take a bit of time with slicing and removing the seeds but they are well worth the time. I used them in breads instead of raisins, on tartines with herbed goat cheese, and my favorite way is to tuck pieces into a bowl of my freshly made rice pudding.

The combination of flavors worked out perfectly well from top to bottom. Literally. I know Calamansi limes are not available everywhere but you could easily replace them with limes or lemons, any citrus would work beautifully here.

Calamansi Lime Mousse Tartelettes


Calamansi Mousse Tartelettes With Candied Kumquats:

Makes four 3-inch tartelettes

For the sable crust:
1/2 stick (55 grams) unsalted butter, at room temperature
2 tablespoons (25 grams) sugar
1 egg yolk
3/4 cup (95 grams) all purpose flour
Pinch of salt
1 tablespoon freshly chopped lemon balm

For the Calamansi lime mousse:
3/4 cup (190 ml) calamansi juice (or lemon or lime juice)
1 cup (100gr) sugar
2 egg yolks
2 tablespoons unsalted butter, at room temperature
3/4 cup (190ml) heavy cream

Prepare the crust:In a stand mixer fitted with the paddle attachment, whip the butter and sugar until light and creamy. Add the egg yolk and mix for a short minute. Add the flour, salt and chopped lemon balm and beat until the dough just starts to come together. Gather the dough into a ball, flatten it a little to a small disk and wrap it well in plastic wrap. Refrigerate one hour before using.

Preheat oven to 350F.
Roll the dough between two sheets of parchment paper or on a well floured board until 1/4-inch thick. Cut out four 4 inch rounds of pastry dough and fit them inside four 3 inch tartlet molds, patting the dough in with your fingertips if needed. Place a small piece of parchment paper inside the tart shells, fill with beans or pie weights and blind bake for 12-15 minutes. Let cool to room temperature and remove the shells from the rings.

Prepare the curd:
In a heavy medium saucepan, stir together the Calamansi juice and sugar and bring to a simmer over medium heat until the sugar dissolves. In a small bowl, beat the egg yolks to break them up. Beat some of the Calamansi mixture into the egg yolks to temper. Scrape the mixture back into the saucepan and cook stirring constantly until it thickens up, about 5 minutes. Remove the curd from the heat, stir in the butter until it is completely incorporated. Let cool completely. If not using immediately, place a piece of plastic wrap over the top.
Whip the heavy cream to medium stiff peeks and gently fold it in the citrus curd in two additions or until no streaks of whipped cream remains.
Place the mousse into a piping bag fitted with a star tip and pipes rosettes of mousse inside the shells. You can also simply spoon the mousse inside the shells. Top with candied kumquat slices if desired and refrigerate.

Candied kumquats:
You can blanch the kumquats in boiling water for a minute before candying them but I forgot to one year at the restaurant and honestly did not see a difference in taste or time. If you think yours have been treated heavily with chemicals before packaging, I encourage to drop the kumquat slices in boiling water for a minute, drain them and proceed to the candy part.
1/2 cup (125ml) water
1 cup (100gr) sugar
1 pint fresh kumquats, washed, patted dry, and cut in 1/8 inch thin slices

In a heavy saucepan, combine the water and sugar and bring to a boil over high heat. Add the kumquats, being careful not to overcrowd your pan. Reduce the heat to a simmer and let the fruit become translucent, about 20-30 minutes. Remove the fruit with a slotted spoon and place it, separating the slices, on a piece of parchment paper or silpat. Use as desired.

Ahhh The Weekend!

Candying Kumquats


Ah the weekend! I love this time of year when we are all gearing up for the holidays and getting crafty. I’ve been quite busy with work which really feels like play so I am far from complaining but I have had little time to put together a proper post. It’s been over a week since I candied, shot and ate the kumquats in the picture above…see what I mean!! Working on it today since I am off. Promise.

There will be kumquats, Kalamansi limes that I received from my friends Todd and Diane and tarts. At the present time I am filling Candy Cane and Eggnog macarons for a block party. It’s fun. And torture. I want to eat some before we go!!

Menu For Hope 2009


In the meantime, I want to thank all of you who have showed great interest and support in this year’s Menu For Hope initiative. I just want to add that if you emailed me with a "I wish to participate with x gift" but did not provide all the information needed, I can not complete your participation and give you a prize code which you need to obtain to be part of the raffle. Thank you for understanding.

We need you! So keep brainstorming and putting together awesome prizes for the raffle or promote the initiave on your blog! You can read a lot more about P4P here.

Brioche des Rois – A Provencal Epiphany

"Brioche des Rois"


Last week with the quince and pear frangipane tartelettes, I mentioned that I was inspired by the traditional "galette des rois", a creamy almond frangipane encased in between two sheets of puff pastry, that we eat to celebrate Epiphany on January 6th. Tradition is to enclosed a little ceramic figurine inside, and once sliced, whoever gets the said trinket becomes queen or king for the day. Nowadays, that little ceramic is looking very designer-ish, far from the days we would use a dry fava bean as prize.

My dad is always the one cutting and the youngest child in the family is always the one under the table calling the name of the next person to get a slice. Now, why under the table? No reason but they really can’t cheat and see who is getting the ceramic and it’s just more fun! Why my dad? Because he always cheats and gives it either to the patriarch, my grandad, or the guest of honor… and it’s just more fun!

Truth be told, we rarely wait for the actual day of Epiphany to start eating the galette in France. Just like Halloween here starts in August, the galette des rois starts being sold right after Christmas day. In my family, we traditionally gather on New Year’s day to share a couple with a glass of Champagne to toast in the new year as everybody is still on vacation, available for one last family gathering and still at the ready for a little extra butter and sugar.

Photobucket


I distinctly remember one year that B. and I were still visiting after New Year’s…no less than 10 galettes shared within one week. Everybody was trying to have us over one last time before our return to the US and dessert was inevitably the galette. And as the guest of honor B. was always king…not that he seemed to mind! On our last night, my mom made some of my favorites and when dessert came, she exclaimed "Allez, on tire les rois une derniere fois!", "Let’s pick the king one last time". I gave her that look of "I love frangipane and puff pastry but if I see one more galette, I think I might be sick". She knew what was coming and before I could speak my mind and she brought out my childhood favorite instead, the Couronne des Rois. A round brioche type cake adorned with candied fruits and pearl sugar to mimic jewelry on a king’s crown (yes, similar to the New Orleans king’s cake).

Growing up in Provence this is the one we would get first for Epiphany while grandma was waiting for us up North with the frangipane galette. I love both equally. I really do…So this weekend we had the brioche Couronne des Rois for breakfast and the frangipane galette for tea in the afternoon. I did not forget to put my little ceramic inside and cut slices for the two of us and B. was crowned king again…surprise, surprise…I am my father’s daughter after all…ehehe…

After making the brioche dough, I divided it in half, formed my two rounds and topped one with the traditional pearl sugar, candied red and green cherries and candied citron and topped the other with homemade candied kumquats and pearl demerara sugar (found by chance at the Whole Foods). Citrus season is here and I can’t stop eating kumquats, it’s like popping natural vitamins for me. The skin is so thin and the seeds so tiny that you can, have to eat the whole fruit, so yes, for some it is an acquired taste. A contrast of textures and flavors, tart and bitter all at once. Here, I took the time to take most of the seeds out but they usually fall while taking their sugar bath so no worries if you happen to leave some. If you think I am excited over kumquats, wait until I see blood oranges!!
For even more traditional King’s cakes and celebrations, check out Zorra’s event here.

"Brioche des Rois"


Brioche des Rois Recipe:

2/3 cup (150ml) whole milk
2 1/4 cups (280g) all purpose flour
1 packet (7gr) dry active yeast
1 egg
1/4 cup (50gr) sugar
1/4 teaspoon salt
1 tablespoon orange blossom flower water
5 tablespoons (70g) butter, at room temperature
egg wash: 1 egg+2 tablespoons milk whisked together
1/3 cup apricot or apple jelly
candied fruits, pearl sugar or candied kumquats to decorate

In a saucepan or microwave safe bowl, warm up the milk over low heat or 20 seconds in the microwave until lukewarm (no higher than 110-112F) and stir in the yeast with a wooden spoon to dissolve. Let stand until foamy, about 10 minutes. Whisk in the egg, sugar and salt until just combined. Place the mixture in a stand mixer, with the motor running on low, stir in the flour and orange water. As the flour gets incorporated start adding the butter, one tablespoon at a time. Let the machine run for another 8 minutes to knead. You can do this by hand but the dough is extremely wet and a stand mixer makes it easier to handle.
Place the dough in a lightly oil bowl, cover with plastic wrap and let rise at room temperature, free of drafts for about 30 minutes. At this point, transfer the dough to the refrigerator for an hour. At this point you can leave the dough in the fridge for a day or overnight or proceed with the recipe.
Preheat oven to 350. On a lightly floured surface, knead the dough into a ball (or divide in half and keep one part refrigerated as you work on the first one), stick your thumb in the middle and push it open to form a crown or large donut. You can also form rolls and gather them together in a round. Place the brioche on a parchment lined baking sheet and let rise for 30-40 minutes. To keep the hole open I place an empty jelly jar in the middle that I fill with water so it doesn’t crack during baking. Brush with the egg wash and bake 20-25 minutes or until golden brown.
Let cool. In the meantime, heat up the apricot or apple jelly until bubbling hot and brush it on the brioche. Immediately stick the candied fruits and pearl sugar on the brioche.

Candied Kumquats:
1/2 cup (125ml) water
1 cup (100gr) sugar
2 tablespoons (40gr) light corn or glucose syrup
1 pint fresh kumquats, washed, patted dry, and cut in 1/8 inch thin slices

In a heavy saucepan, combine the water, sugar and corn or glucose syrup and bring to a boil over high heat. Let the mixture reach 234F. Add the kumquats, being careful not to overcrowd your pan and let the fruit become translucent, about 8-10 minutes. Remove the fruit with a slotted spoon and place it, separating the slices, on a piece of parchment paper or silpat. Use as desired.

Note: Tartelette travels to Oregon…well no not really…I just wanted to thank Danielle for including my work in The Oregonian’s "What we like to read, watch, click on" column today. The more I read about this region the more I want to move! Thank you!