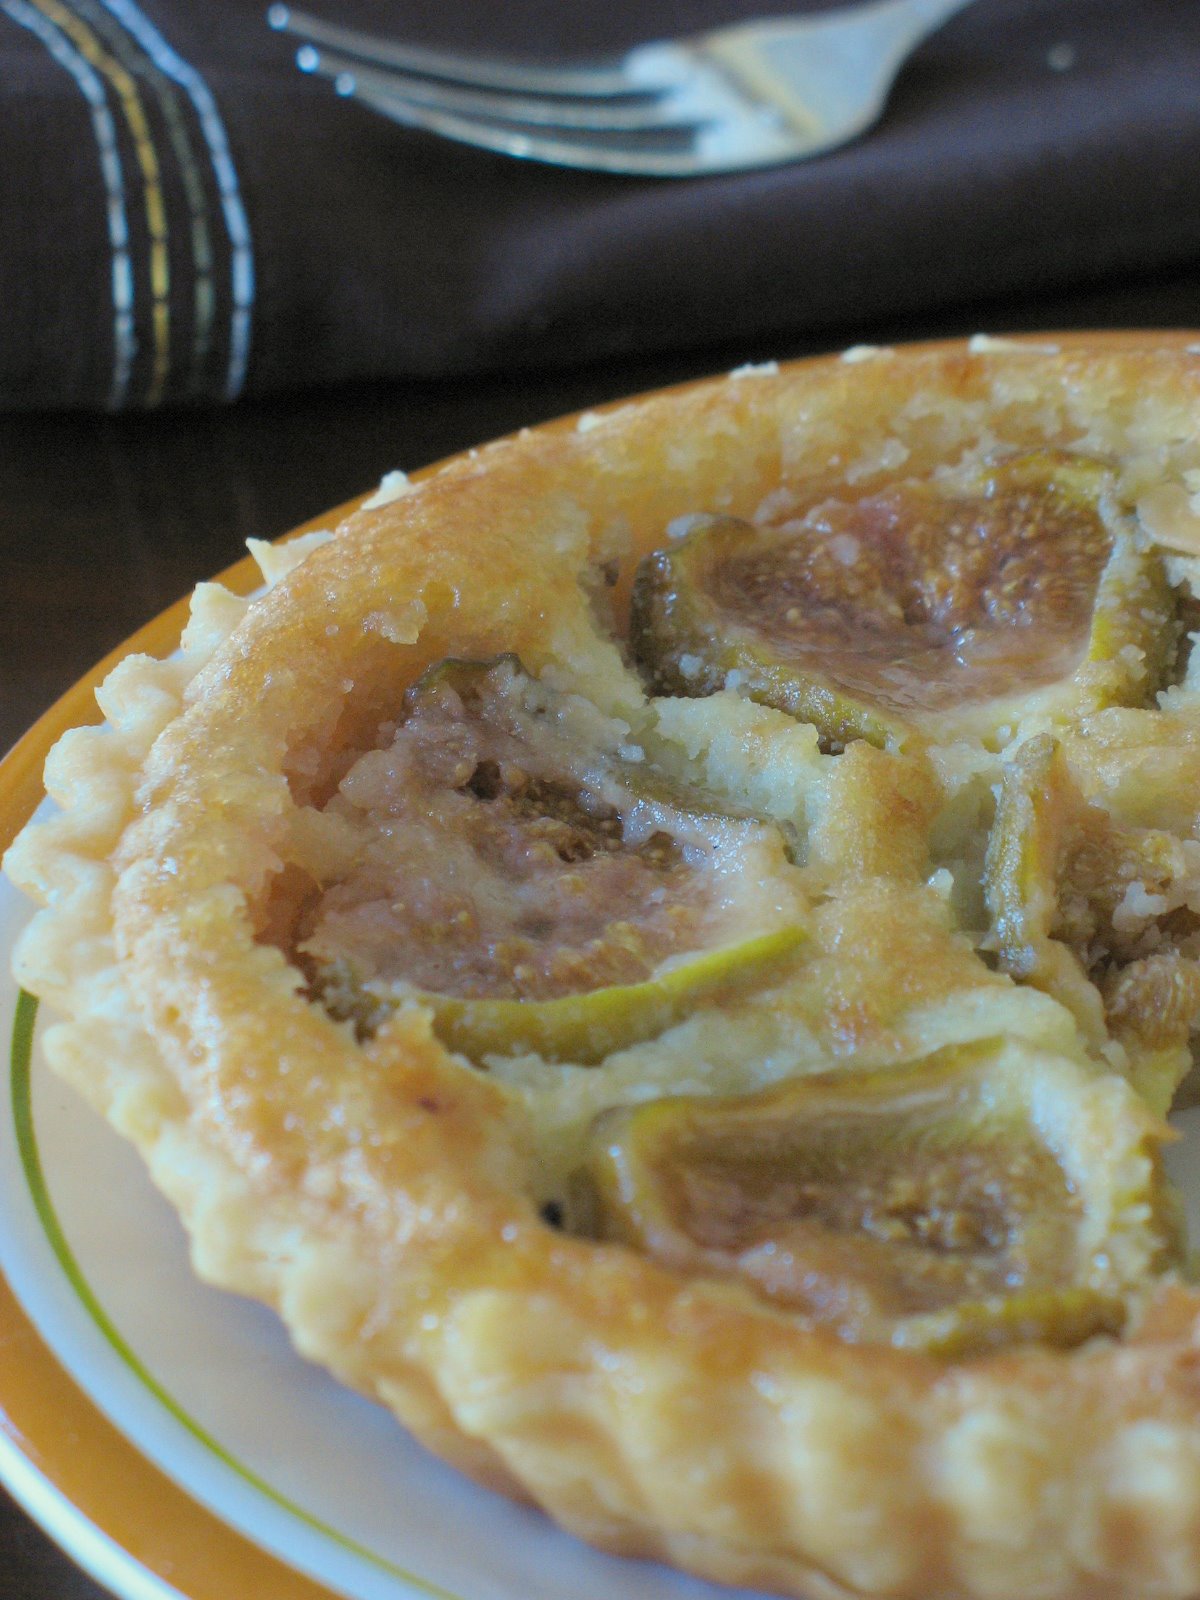
A few many things prompted me to make this lovely "tartelette" seen in the picutures as well as a few others in the past couple of days. Last week I was given a good 10 pound basket filled to the rim with lovely figs from one of my clients' extremely prolific fig tree. "Yippee!" I scream as I love fresh figs. We started eating them fresh, the grilled with melting goat cheese, cut up in salad or with pork tenderloin. Then came the fig chutneys, fig jams, fig cakes and finaly these "Fig Almond Frangipane Tartelettes". It turns out that Sophie likes them too and B. will eat anything covered with sugar!
I was also trying to find a suitable local crop to make a dessert for Sugar High Friday hosted this month by Johanna of the Passionate Cook . It turns out that the earliest colonists from England and Barbadoes landing in South Carolina found a bounty of foods in their new land, including peaches, figs, muscadines, pumpkins, squash, game, fish, nuts, and corn. Fig trees are almost as widespread as pecan trees here (my pecans seems about ready to implode) and the tiny fruits they produce packs a punch of flavor and juice. When I think about it, I don’t recall ever buying a single fig that was not from Charleston since I moved here. The common figs we get may not be the most sought after variety but they work just great for everyday life.
I make this kind of tartlets (and sometimes bigger pie) often throughout the year using different seasonal fruits. I love it with pears,apples, peaches, and plums, but quite frankly I think any fruit tastes wonderful when paired with a fragrant almond frangipane cream.
Fig Almond Tartelettes, adapted from Bon Appetit, October 1998
Makes 3 4- inch tartelettes (enough for 6 or 3 big appetites)
For crust
1 cup all purpose flour
1 tablespoon sugar
1/8 teaspoon salt
1/2 cup (1 stick) chilled unsalted butter, cut into 1/2-inch pieces
2 tablespoons ice water
1/4 teaspoon vanilla extract
For filling
1/3 cup whole almonds (about 2 ounces)
1/3 cup sugar1 large egg
3 tablespoons unsalted butter, room temperature
4 teaspoons rum or brandy
12 ounces ripe figs, cut into halves
1/4 cup apricot marmelade
Make crust:
Preheat oven to 375°F. Combine first 3 ingredients in processor. Using on/off turns, cut in butter until mixture resembles coarse meal. Mix 2 tablespoons ice water and vanilla in small bowl. Pour water mixture over dough. Process until moist clumps form. Gather dough into ball; flatten into disk. Roll out on floured surface to 12-inch round. Cut 3 rounds about 5 inches big, fit into pie plate and trim excess dough. (or use shapes and molds you like) Using fork, pierce dough all over. Bake crust until pale golden, about 30 minutes (crust may shrink slightly). Cool on rack. Maintain oven temperature.
Make filling:
Finely grind almonds with sugar in processor. Add egg, butter and 2 teaspoons rum. Process until batter forms. Pour filling into crust. Arrange fig halves atop filling. Bake until figs are tender and filling is golden and set, about 25 minutes.
Melt jelly with remaining 2 teaspoons rum in heavy small saucepan over medium-low heat. Brush jelly mixture over figs. Cool tartelettes. Serve at room temperature.
Pour mes lecteurs francais: j’ai demande a mes parents de me rapporter de la feve tonka, mais je ne sais ou leur dire de s’en procurer. Ils sont du cote de Versailles-Rambouillet-Paris. Quelques suggestions seraient les bienvenues. Merci.
Her eyes sparkled when she spotted Dorie's big baking book. "Have you made anything from it yet?" she asked picking it up from the shelf. After a few minutes flipping the pages she exclaimed :"Oh wait! I guess you have, some pages are already glued with sugar!"
Having my god-daughter Sophie over is a lot of fun. She marvels at everything The simplest thing that in my new American have become second nature to me are constant sources of surprises and questions….even baking. She has a keen interest in cooking and baking and is eager to tell me about the cakes she makes in the evening while the rest of the family gathers around and talk. I can tell we share the same blood just by the moments she shares in the kitchen with her mom and other relatives, and by her love of sweets!
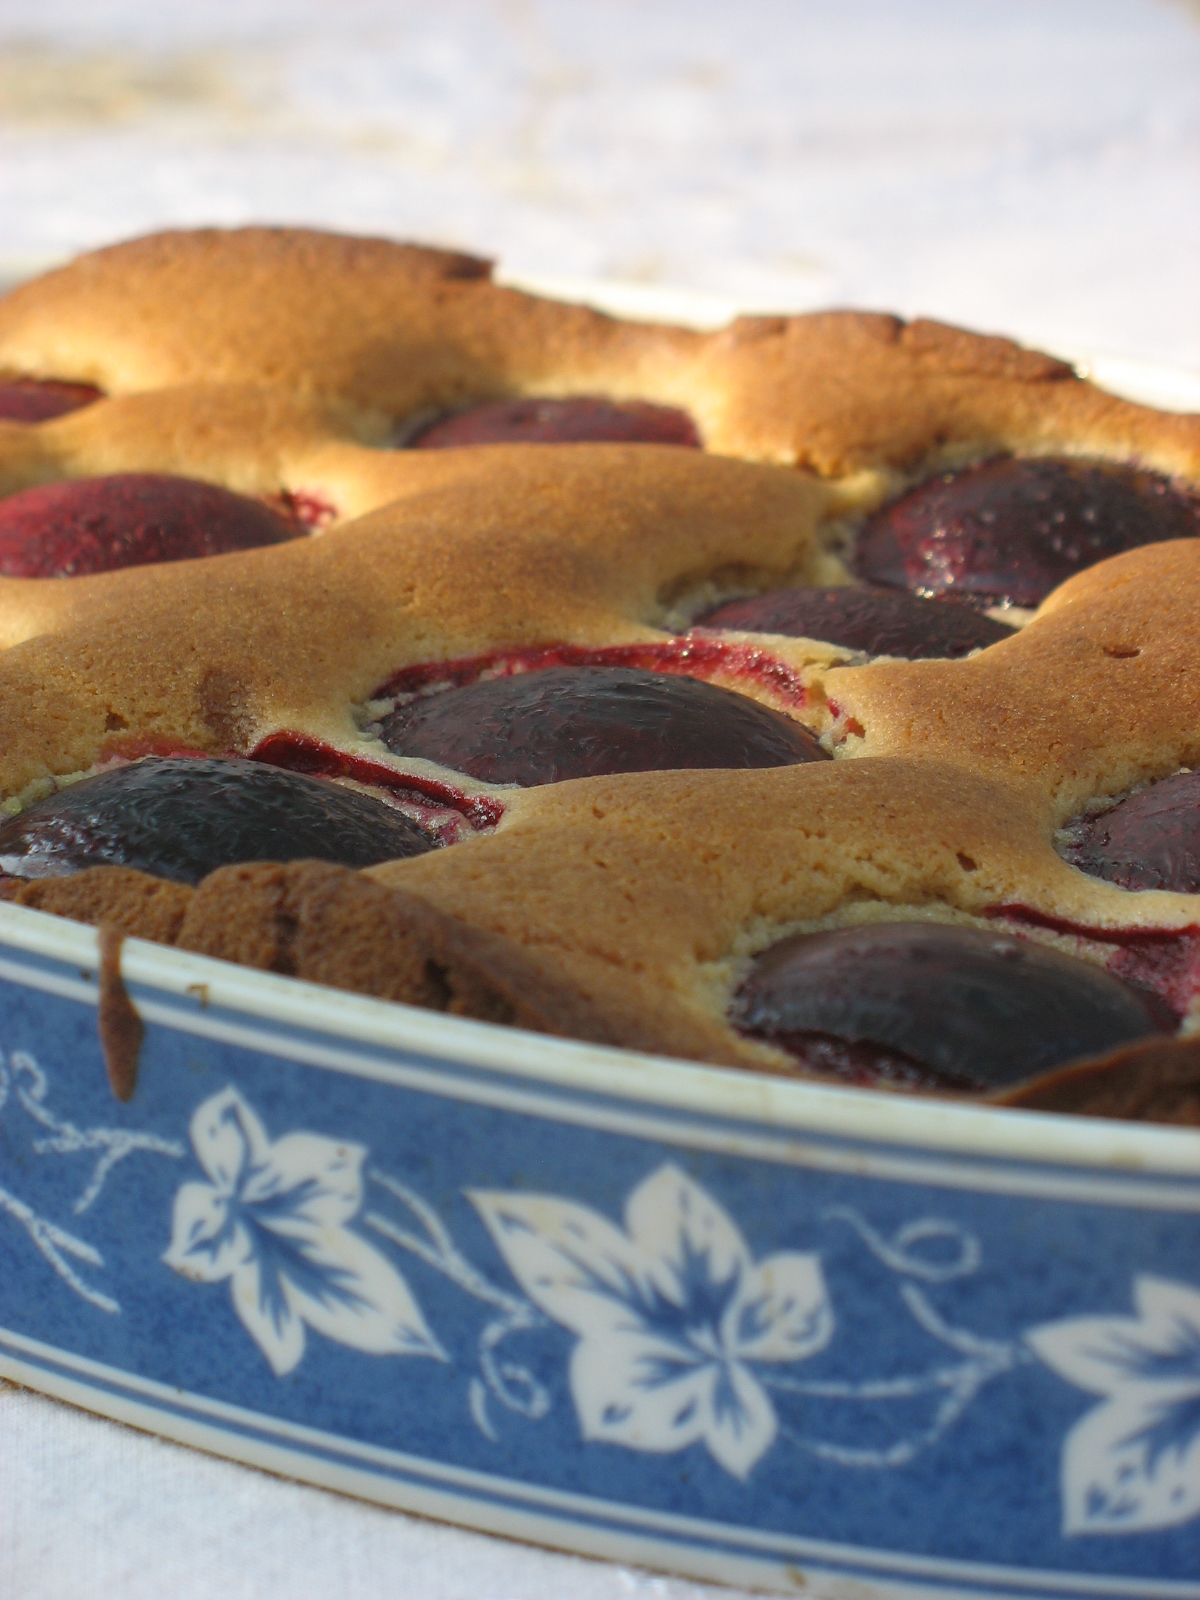
She was leafing through the book and her hand stopped on the picture of Dorie’s Dimply Plum Cake. "Oh that looks so good…I need aspirin, let’s go get some plums and make it!"….AND she’s got my logic….any excuse to make a trip to the store if I see something I want to bake! Off we went to the grocery store which was another adventure for her: in France cashiers are seated, there is no bagger and people have to bring their own bags (recycling and minimizing trash).
We looked at all the produce that was somewhat tropical and exotic for her, filled up on loads of cherries (we are truly related!), and a big bag of ripe and juicy plums.
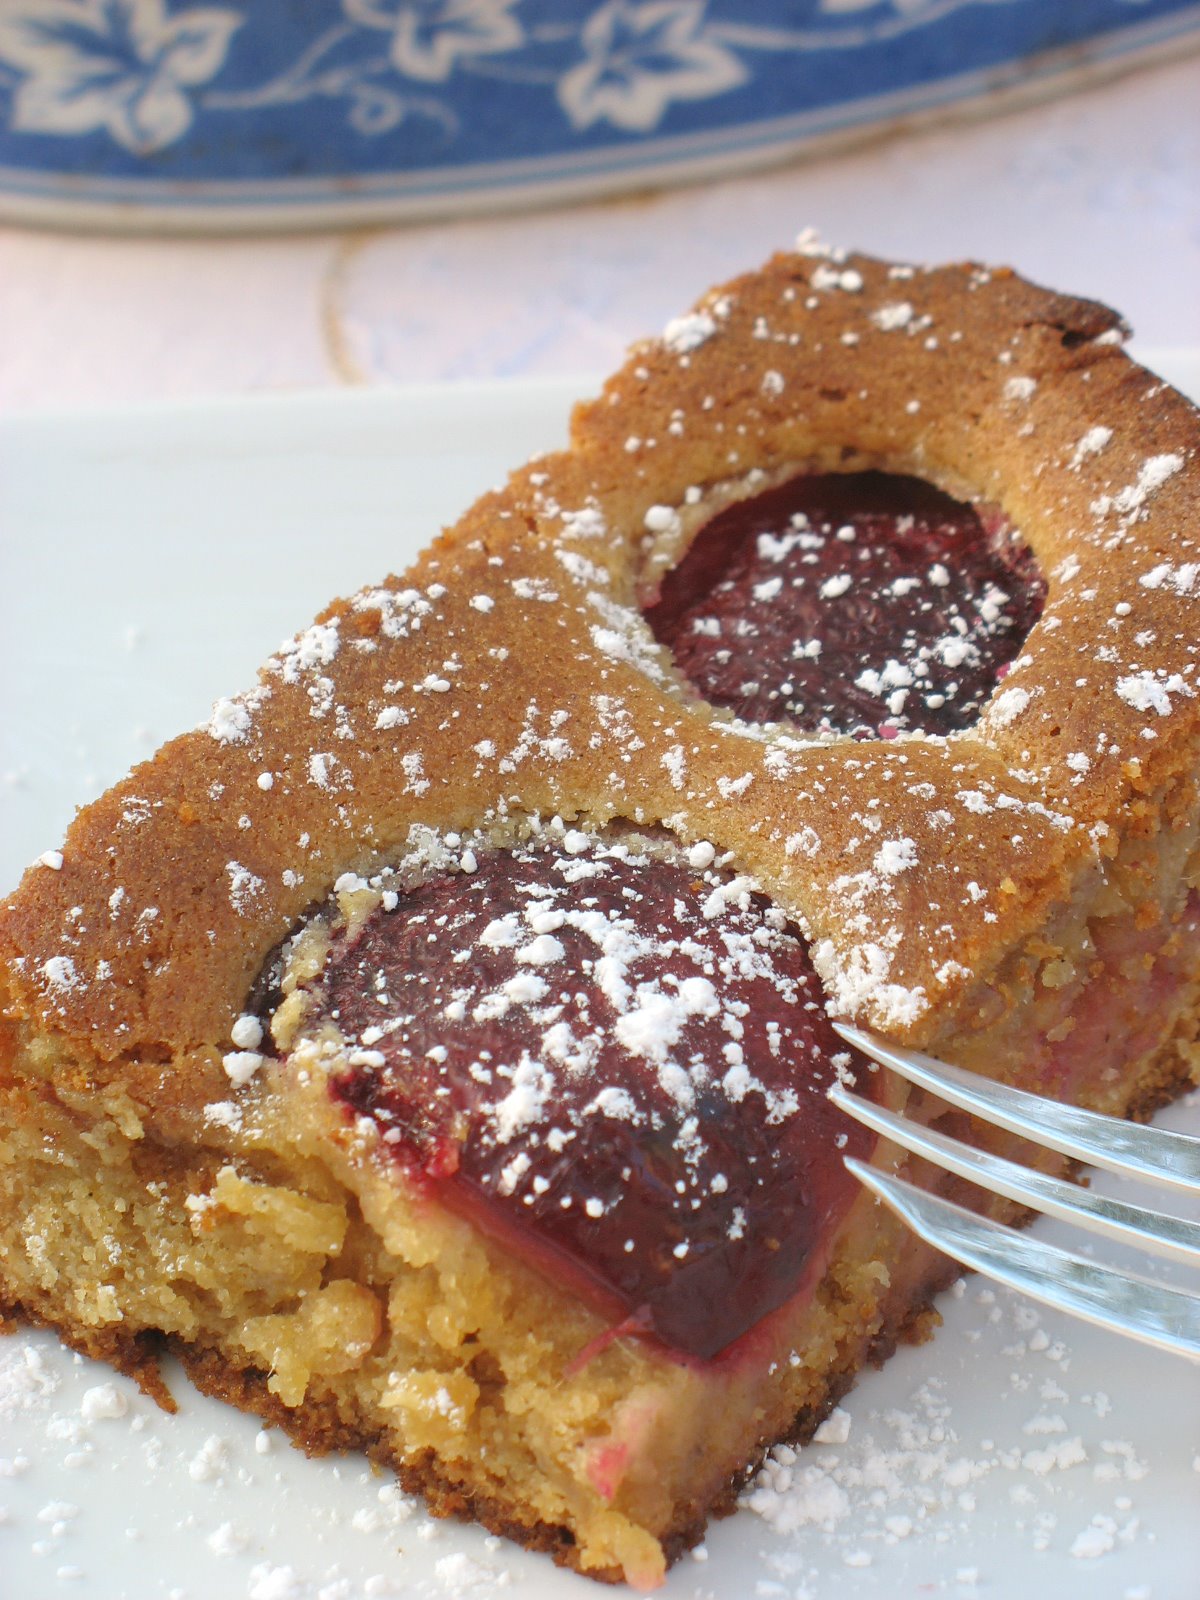
Once home we put some lasagna to warm up and in the meantime we made the cake. Easy, straighforward and within 30 minutes, the house smelled like a bakery again with vanilla and sugar tempting our tastebuds. We could not wait very long once it came out of oven and cut 2 big slices, put some creme fraiche on the side and enjoyed it while looking at the sunset…precious! If I could have hugged Dorie herself for such a sweet moment spent with Sophie, it would have been the icing on the cake!
Dimply Plum Cake, adapted from Dorie Greenspan:
Serves 8
1 1/2 cups all purpose four
2 tsps baking powder
1/4 tsp salt
1/4 tsp ground ginger
5 Tb unsalted butter
3/4 cup packed light brown sugar
2 large eggs
1/3 cup canola oil
grated zest of one lemon
1 1/2 tsp pure vanilla extract
8 purple or red plums, halved and pitted
Preheat the oven to 350F. Butter an 8×8 baking dish and set aside.
Combine the flour, baking powder, salt and ground ginger.
In a stand mixer cream the butter with the borwn sugar. Add the eggs, one at a time, beating well after each addition. Beat in the oil, lemon zest and vanilla. Reduce the speed and add the flour mixture.
Pour the batter in the prepared dish, smooth the top and arrang the plums on top. (Dorie did hers cut side up, I did the opposite). Bake for about 40 minutes or until a knife inserted in the middle comes out clean. Let cool for 15 minutes (if you can).
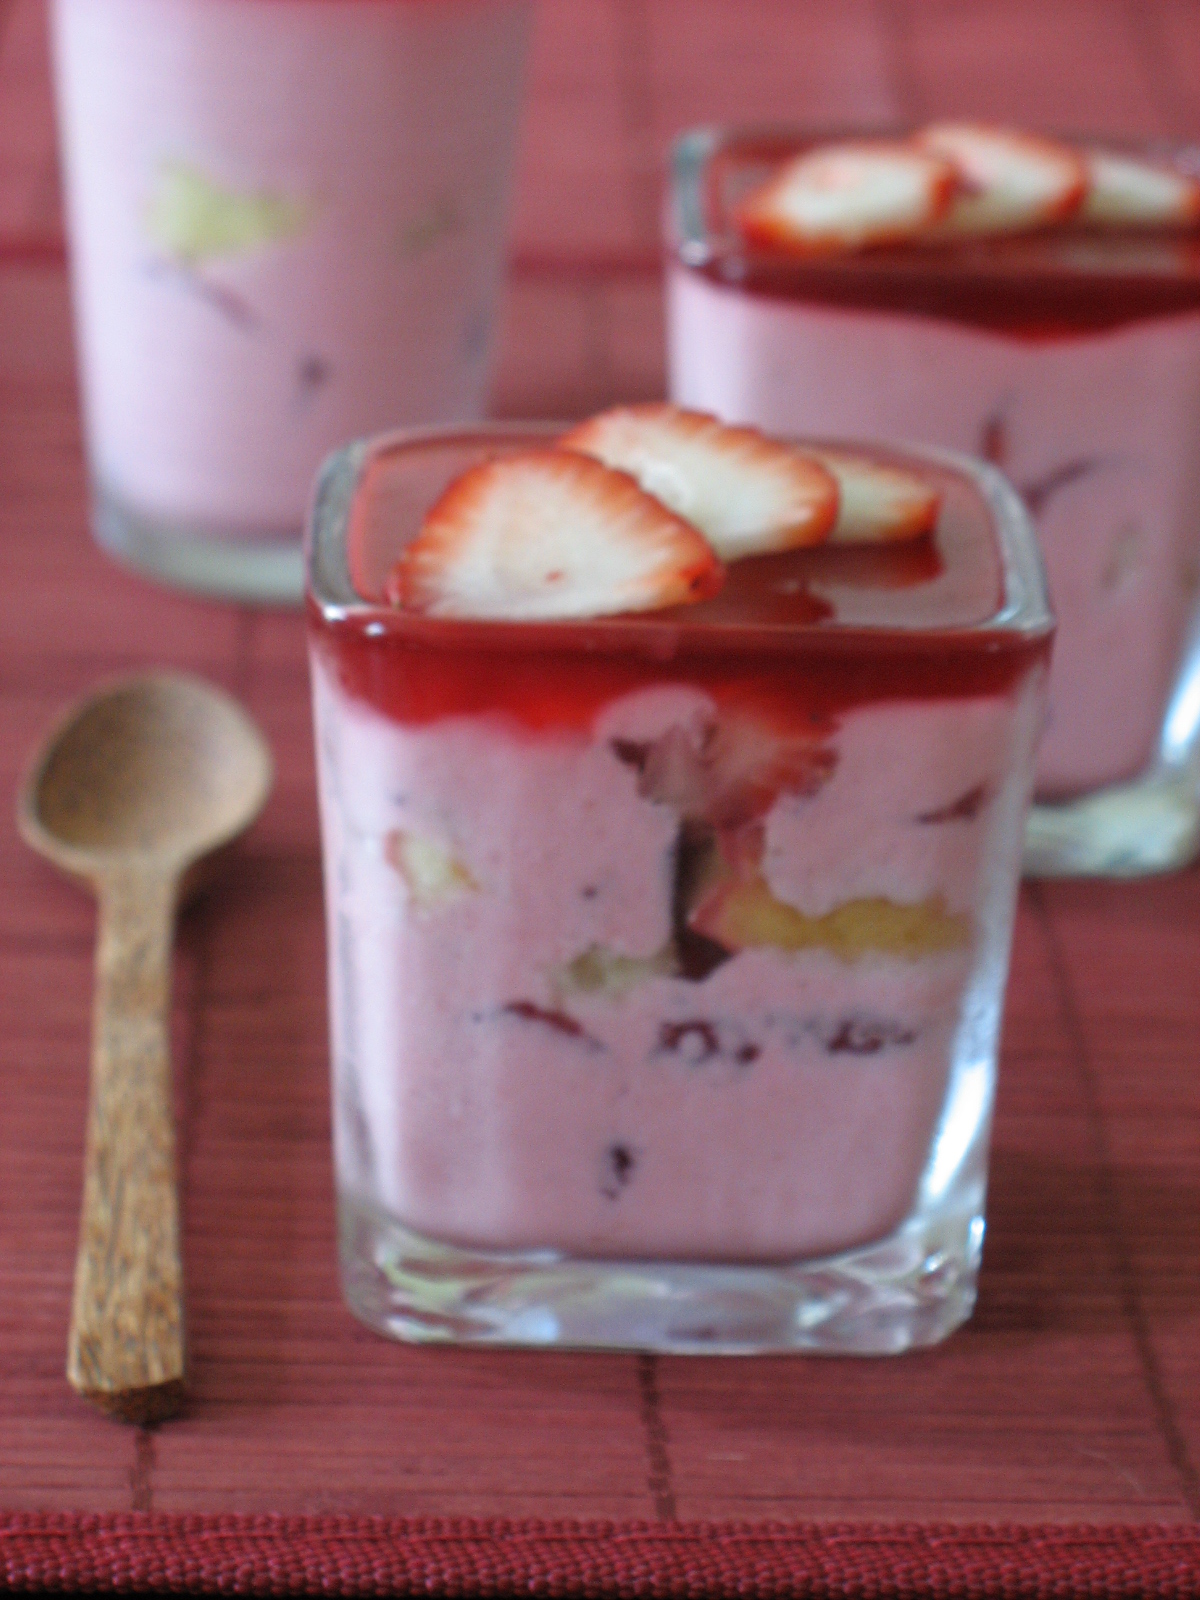
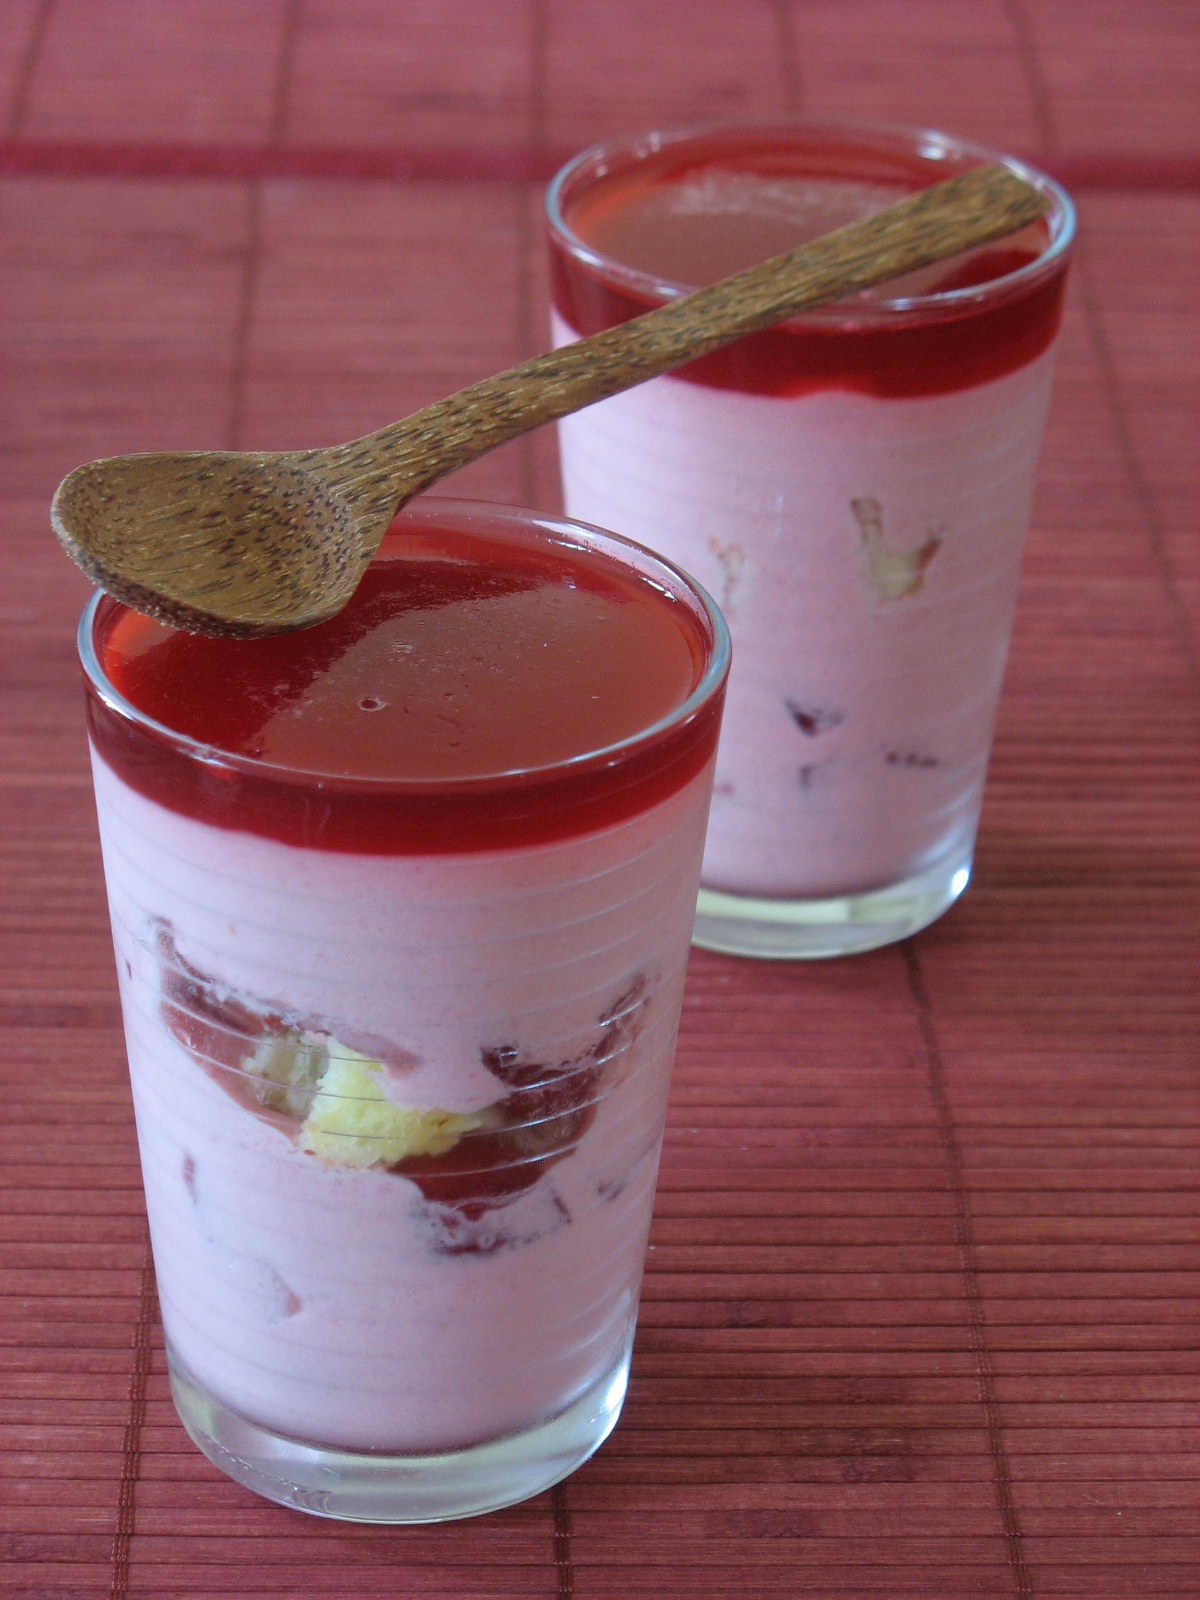
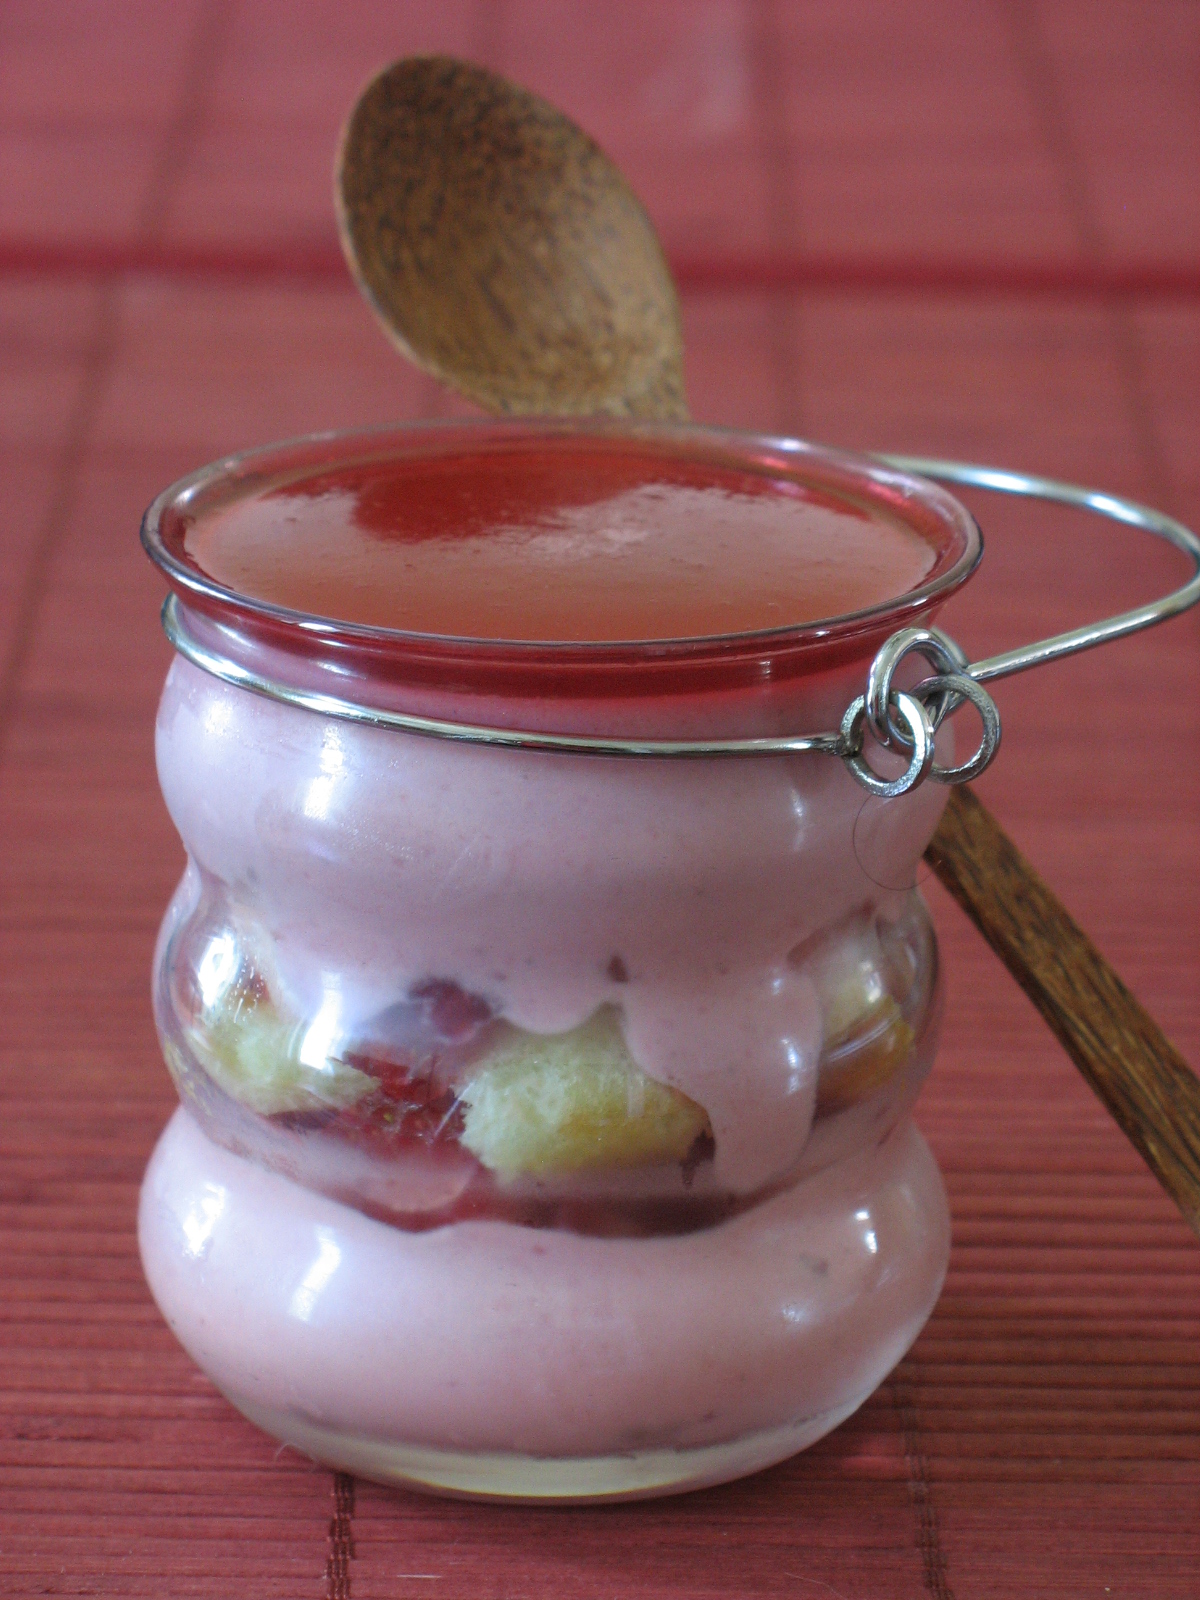
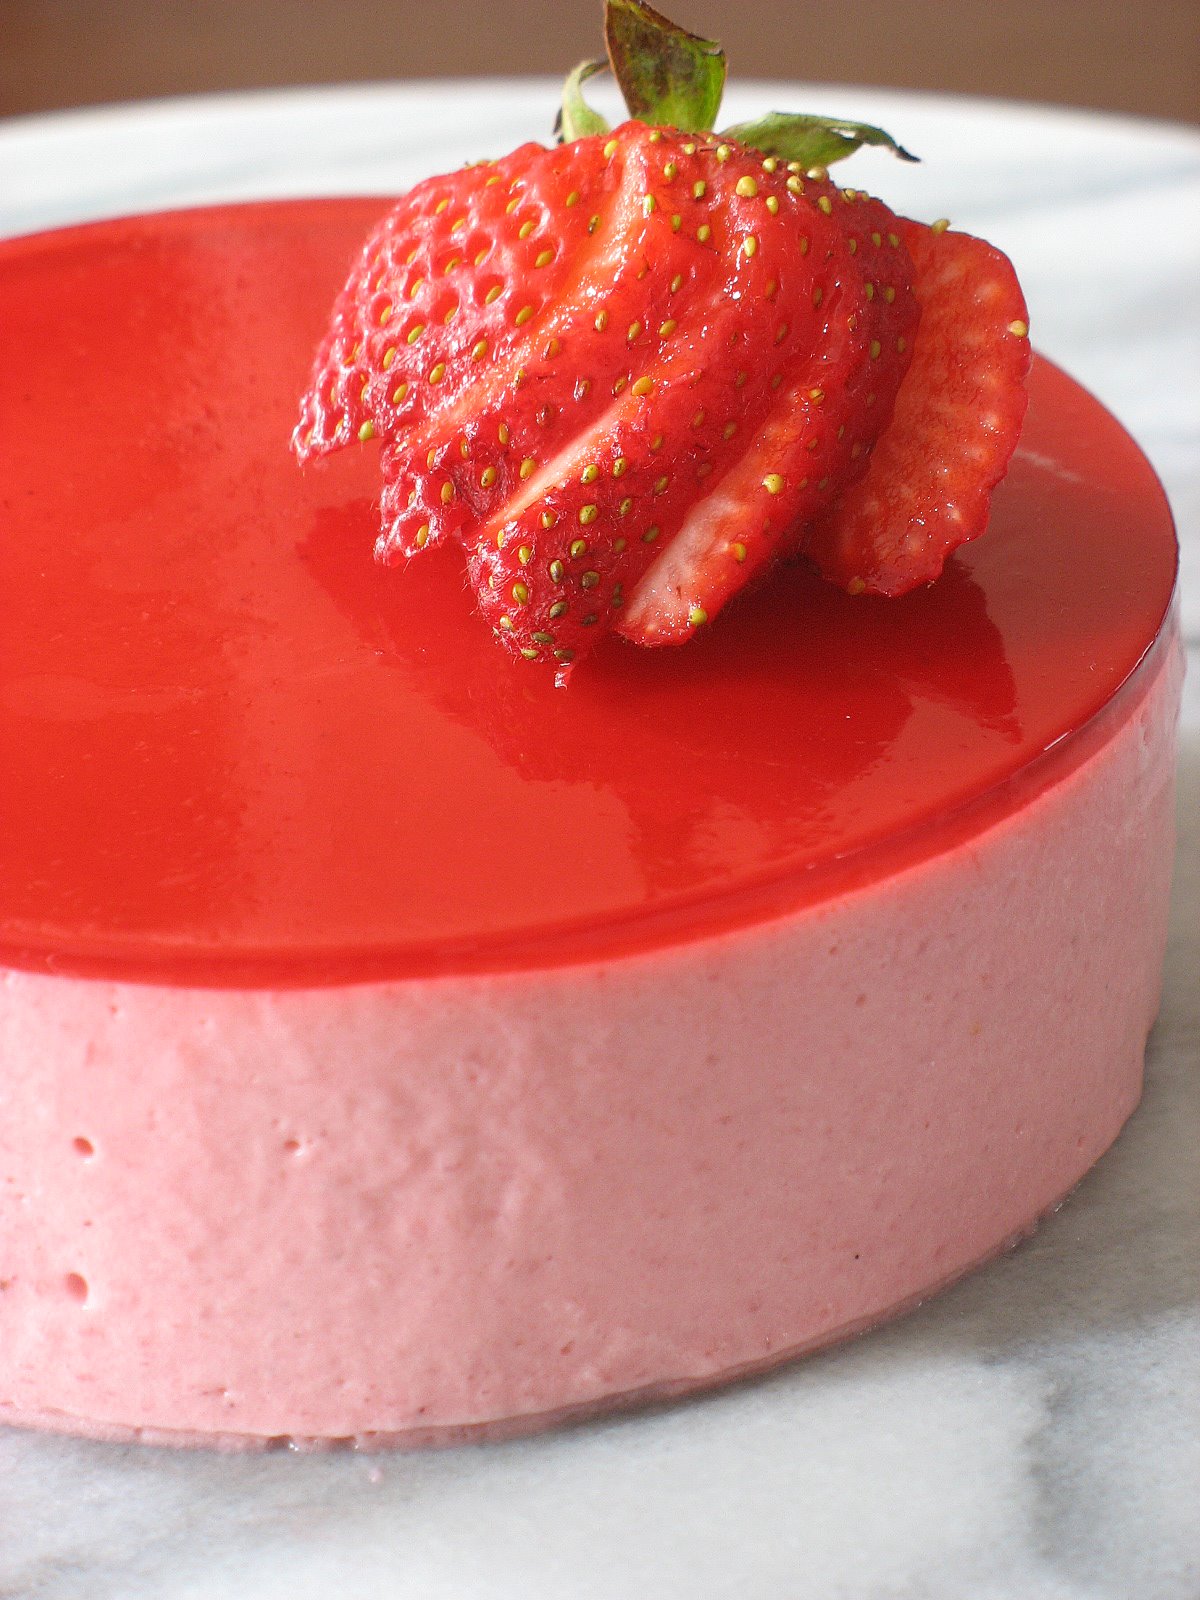
I know, I know, that is two mirror posts in a row…plus 65 others out there in the blogosphere thanks to my beloved Daring Bakers. If you have followed what I did for our July challege, I made 4 mini ones out of a recipe written out for a 10 inch cake. What did I do with the leftover cake, bavarian cream and strawberry mirror?…throw them away?…Heck no! Not in this kitchen!
I had more guests coming during the week so I layered the cake components in pretty glasses and parked them in the fridge until dinner. It seems that my fridge had a never ending love story with Strawberry Mirror cake for a while but that is ok, it looked pretty that way.
I thought about waiting another week or so before posting this but some events have prompted me to do it tonight. See, my 18 year-old god-daughter, Sophie called me last friday saying she was coming to visit for a while. Arrival day: wednesday….August 1st. Arghhhh!! Well, that meant a little cleaning here and there, a little food shopping and meal planning and prep cooking so I could enjoy my time with her. Oh, and a while means that she is staying a whole month!
She has never been to the States so I am tickled pink, I get to be 18 again!! I plan on making sure she has a wonderful time here so forgive me if my posting is sort of heratic in the coming month. I want to make sure you get your sugar fix though so I enrolled her to fill some macarons with me tomorrow night.
You can find the recipe for the Strawberry Mirror here, and if you decide to give it a go and have leftovers, just take out your favorite glasses and layer away.
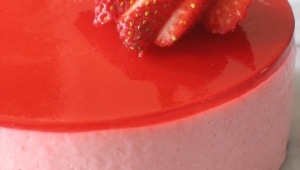
For those who have been following the monthly adventures of the Daring Bakers, you were maybe starting to wonder if we had drawn a blank on a recipe challenge for this month….Well, as you can see from the above picture, the answer is no….we are just sitting there…quietly reveling in the beauty of a refreshing and light Strawberry Mirror Cake.
Everything about the cake that Peabody had chosen this month had me excited for so many different reasons. The most obvious being that it seems like ages since I have made a mirror cake which is weird in my field since it is a very attractive cake, and has a perfect mix of light vanilla sponge cake and creamy bavarian cream, and travels and keeps well. Thus, having to make it for our challenge was a great way for me to reconnect with an old friend. As I was thinking about writing this very post I figured that you will have the chance to read about its making process, texture and taste and many other blogs (there are over 90 of us), and realized that for me this cake and its whole making experience was centered around friends. Building, sharing and entertaining friendships.
Soon after we were given the challenge, I started preparing for my trip to visit my new best girlfriend, Lisa. That was a big deal: the Queen of Dorkdom herself, co-founder with Ivonne of the Daring Bakers and accomplished Italian chef! Since we had decided to spend a good bit of time in the kitchen, I asked her if there were specific pastry items she wanted me to teach her, like macarons, caramel work and others. I also asked if she wanted to make the challenge cake that weekend. Her answer was "Oh my god, I am so glad you mentioned it. I was about to beg you to help me with it". Folks, although she feels quite nervous about pastry, Lisa rocked that challenge like a pro! I knew her back and feet were killing her we had done so much walking in the heat so I helped with little things like straining the fruit for the puree and juice, measuring little things and washing bowls and cups. Any nervousness about the cake were quickly dissipated, maybe by the fact that I could give her explanation on what the Bavarian should be like, how to decipher a pastry school recipe, giving her tricks like tapping the side of a pan with the back of a knife to get rid of air bubbles and so on. When other Daring Bakers started to ask how long it took to make certain parts of the recipe, I know we were giggling together, although miles away from each other, because we took the entire day and the next morning to make it. See, much like Tanna and Karen did in June with the bagel challenge, we truly shared a great moment of friendship making this one. The high point being when we sat down Sunday evening with her family and shared a great dinner ending with this gorgeous looking cake.
When I got back home, I tackled the cake challenge yet again but this time on a different feeling. I was by myself in the kitchen that Saturday afternoon, and after such a high friendly first time, I felt quite lonely making it. Instead of making one 10 inch cake like the recipe suggested I decided to make 4 individual ones (4 inches wide), kept one for us and brought the remaining three for our weekly cookout with the neighbors. At that point, the cake screamed friendship to me: sharing, laughing, eating…There was not one moment when I was making it that I did not think about Lisa and her family, the laughs and giggles we shared that weekend. Because I went with individual ones, I had quite a bit of cake and cram leftover so I layered them in glasses and we ate cake that week for breakfast, lunch and dinner, but we are up for that in this house, trust me on that! It is light and refreshing, not too sweet and filling enough in small quantities. I used Lemon Vodka instead of the kirsch and did not use any food coloring as B. is allergic and the strawberries were bright red enough.
Strawberry Mirror Cake
3 eggs
3 egg yolks
¾ cup sugar
1 tsp vanilla extract
3 egg whites
1/8 tsp cream of tartar
2 TBSP sugar
2/3 cup sifted cake flour
½ cup water
1/3 cups sugar
2 TBSP kirsch or strawberry liqueur
Strawberry Bavarian Cream
2 ½ TBSP unflavored gelatin
1 ½ cups strained strawberry puree(1 ½ baskets)
5 egg yolks
2/3 cup sugar
1 ½ cups milk
1 TBSP lemon juice
several drops of red food coloring
1 ¾ cups whipping cream
Strawberry Mirror
1 tsp lemon juice
1 TBSP kirsch
1 TBSP water
1 TBSP unflavored gelatin
Few drops of red food coloring
Strawberry Juice
1 ½ pints of strawberries(18 oz)
¾ cup sugar
¾ cup water
1.Preheat oven to 450F. Butter and flour the sides of an 11-by-17 inch jelly roll pan(rimmed baking sheet). Line bottom of pan with a sheet of parchment paper cut to fit bottom pan exactly.
2.Beat eggs, egg yolks and ¾ cup sugar together in a medium bowl until thick and light. Beat in the vanilla.
3.In a separate bowl, beat the egg whites until foamy, ad cream of tartar and beat until whites begin to form peaks. Add the 2 TBSP sugar and beat until the whites hold stiff, glossy peaks(do not over beat).
4.Sift flour over the egg yolk mixture and fold in . Stir in one fourth of the whites. Then carefully fold in the remaining whites.
5.Spread batter evenly in pan. Bake until light brown and springy to touch(7 to 10 minutes). Cool in pan 5 minutes. Run a knife along edge to loosen. Invert cake tin to cut out 8 ¼ inch circles of cake. Wrap the cake layers, separated with waxed paper, and set aside. Cake may be frozen at this point.
6.To make soaking syrup: Combine water and the 1/3 cup sugar in saucepan; bring to a boil to dissolve sugar. Cool to room temperature; flavor with liqueur. Set aside or refrigerate in glass jar until ready to use.
7.To assemble cake: Brush sides of 10-inch springform pan lightly with flavorless salad oil or almond oil. Cut out a cardboard circle that is exactly the same size as the bottom inside of the pan; cover cardboard with aluminum foil and fit into bottom of pan. Center one layer of the cake bottom of pan. Brush the cake with some of the soaking syrup to just moisten(not drench) the cake; set aside.
8.Prepare Strawberry Bavarian Cream. Immediately pour about half of the Bavarian Cream over the first layer of cake in the pan. Set the next layer of cake on top of the cream. Pour remaining Bavarian Cream over cake and smooth top of the cream with spatula. Refrigerate until the cream sets(1 to 2 hours).
9.Prepare the Strawberry Mirror.
10.To serve: Wrap a hot towel around the outside of springform pan for a few minutes. Run a small sharp knife tip around the edge of the Strawberry Mirror to separate it form the sides of pan. Mirror will tear when sides are unlatched if it is stuck at ANY point. Slowly unlatch the pan and slide it off the cake. Slice cake in wedges and serve in upright slices.
Prep Work Strawberry Bavarian Cream
1.Sprinkle the gelatin over the strawberry puree in a small bowl and set aside until spongy.
2.Combine egg yolks and sugar in a bowl' beat until light. Bring milk to a boil in sauce pan. Pour hot milk into yolk mixture ans stir with a wooden spoon(it doesn’t say so but I would temper the egg mixture first to be safe). Return this mixture to the saucepan and cook over medium heat, stirring constantly, until your finger leaves a clear trail in sauce when drawn across the back of the spoon.(Do not boil or mixture will curdle.) Immediately remove from heat and stir in softened gelatin mixture. Pour into a stainless steel bowl places over a bowl of ice water. Stir in lemon juice and a few drops of red food coloring. Cool over ice water, stirring occasionally, until mixture thickens to the consistency of softly whipped cream.
3.White gelatin mixture is cooling, whip the whipping cream until it holds soft peaks. When the gelatin mixture resembles softly whipped cream, fold the whipped cream into the gelatin mixture.
Strawberry Mirror
1.Prepare strawberry juice.
2.Place lemon juice, kirsch, and water in a small bowl. Sprinkle gelatin over this mixture; set aside until spongy and soft.
3.Measure 1 ½ cups Strawberry juice into a small saucepan and bring to a simmer; pour over gelatin mixture and stir to dissolve gelatin. Tint to desired color with red food coloring. Place bowl over bowl of ice water and stir occasionally until the mixture is syrupy and just beings to thicken(do not let jell); remove from ice water.
4.When mixture is syrupy, pour a 1/16-inch layer over the top of cake. Refrigerate until set.
Strawberry JuiceWash and hull strawberries; coarsely chop. Place strawberries in saucepan; crush to start juices flowing. Place over low heat; add sugar and water; simmer slowly 10 minutes. Pour juice and pulp through damp jelly bag or cheesecloth-lined colander and drain into a bowl for 15 minutes(Do not press down on fruit).
Adapted from Cakes and Pastries At The Academy by the California Culinary Academy 1993
Want to know what everybody else has been up to with this challenge? Head over to my side bar under "Daring Bakers" and click on "Find Us Here" where you will be directed to our official blogroll and start clicking to your heart’s content!
Thanks Peabody for giving me the chance to share great moments both away and at home while making the challenge! Looking forward to August!
I was trying to think of a more elusive or more creative title but I always have a difficult time doing so with desserts that incorporate several elements from others I have made or admired through pastry shops front windows (my favorite past-time), but sometimes you have to call a cat a cat. Note for the future: if you are good at it, you are hired the day I publish a book!
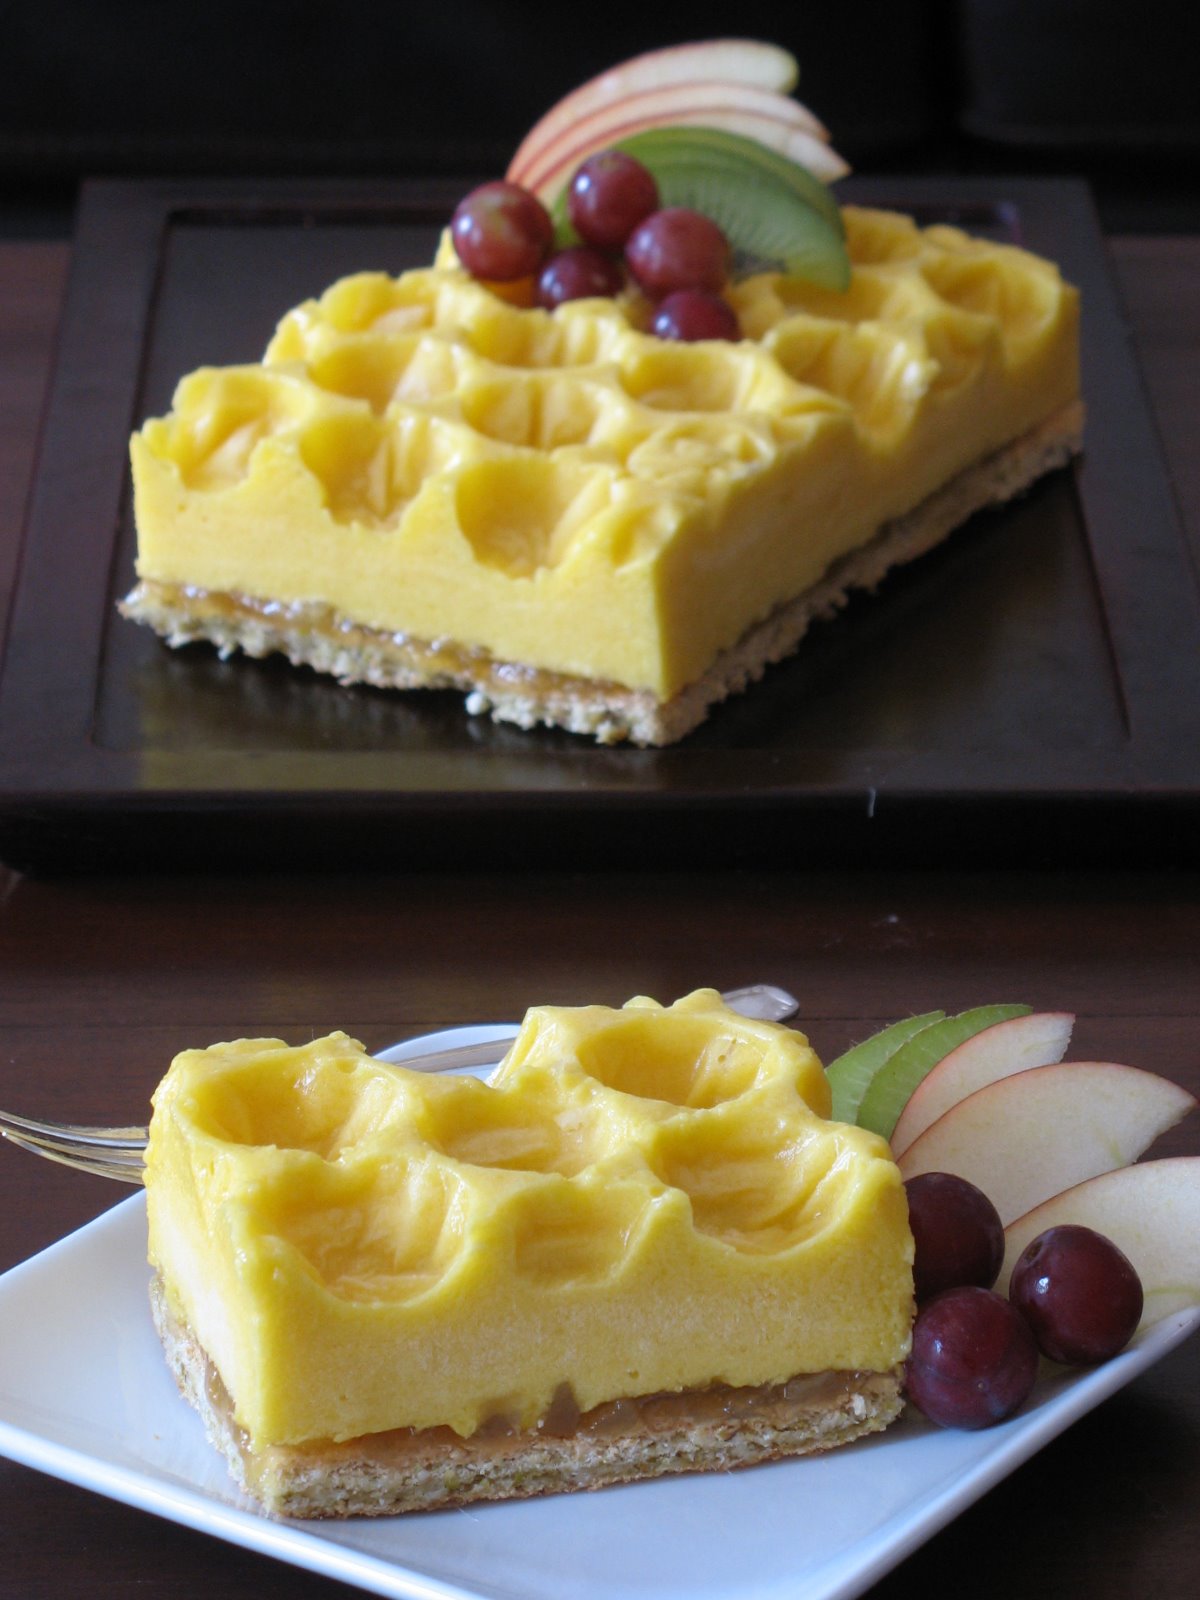
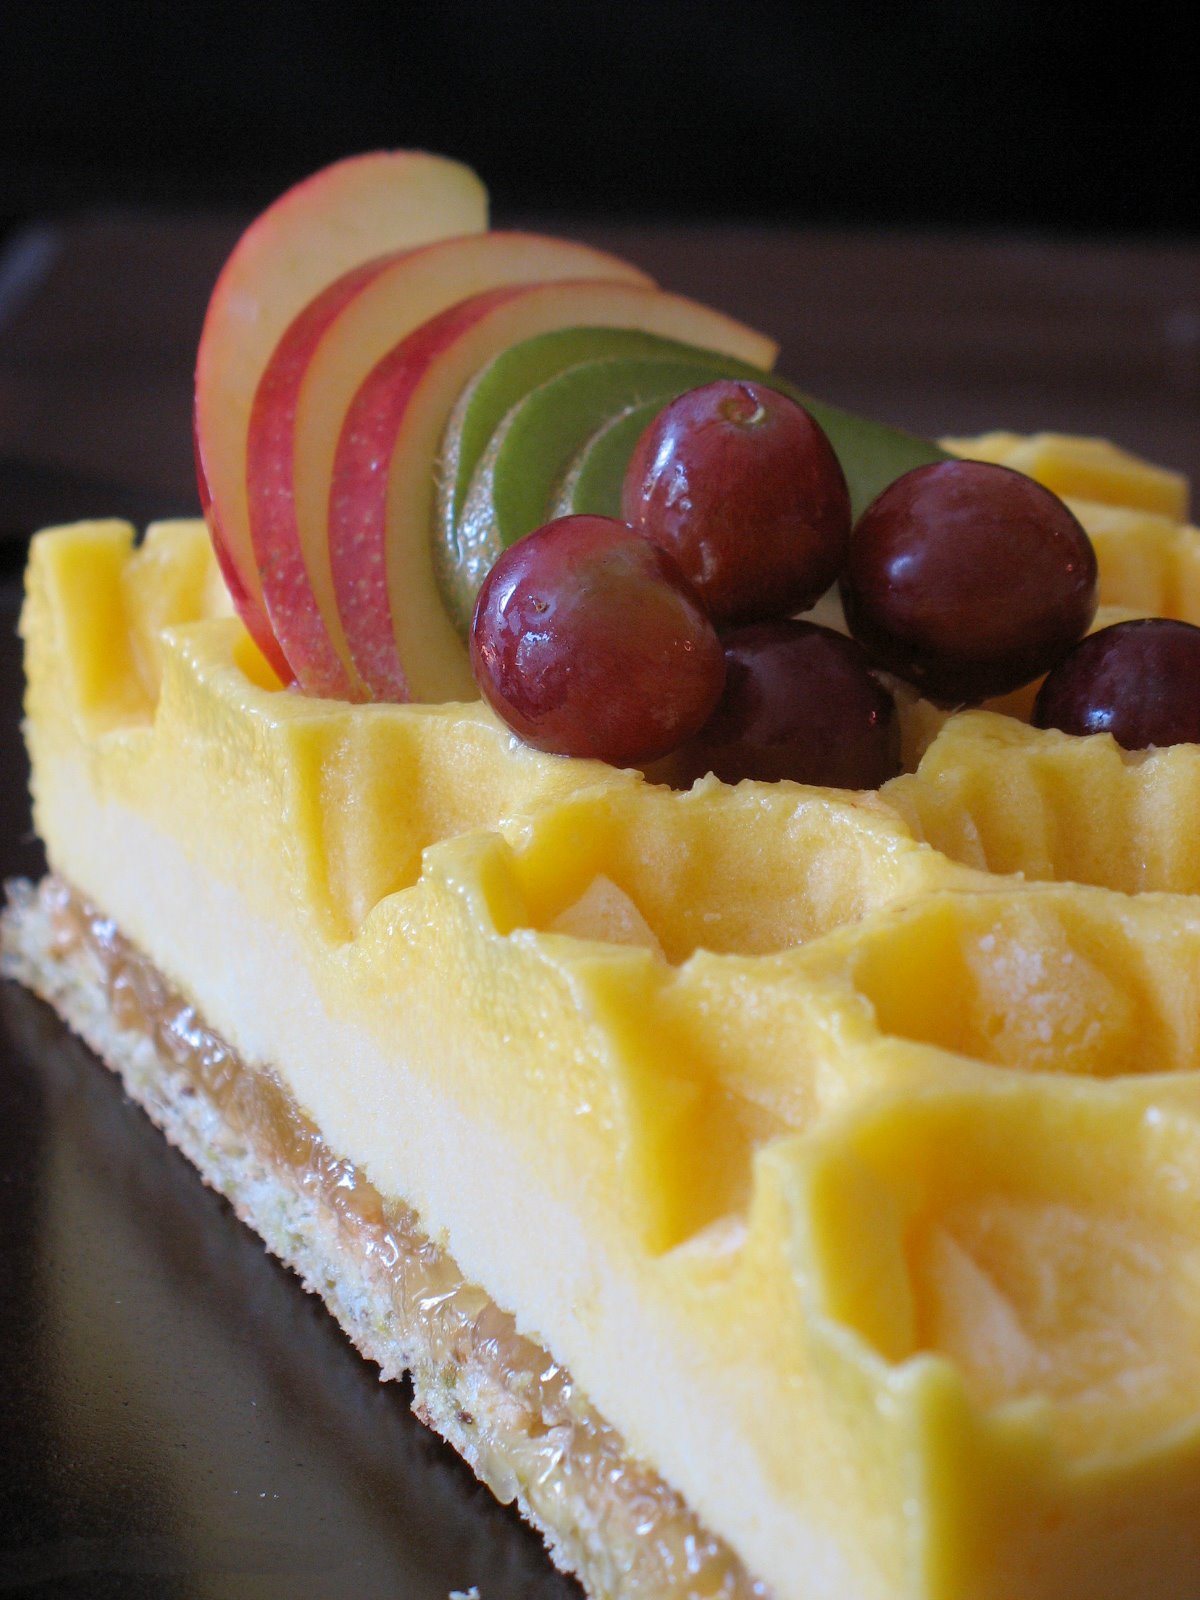
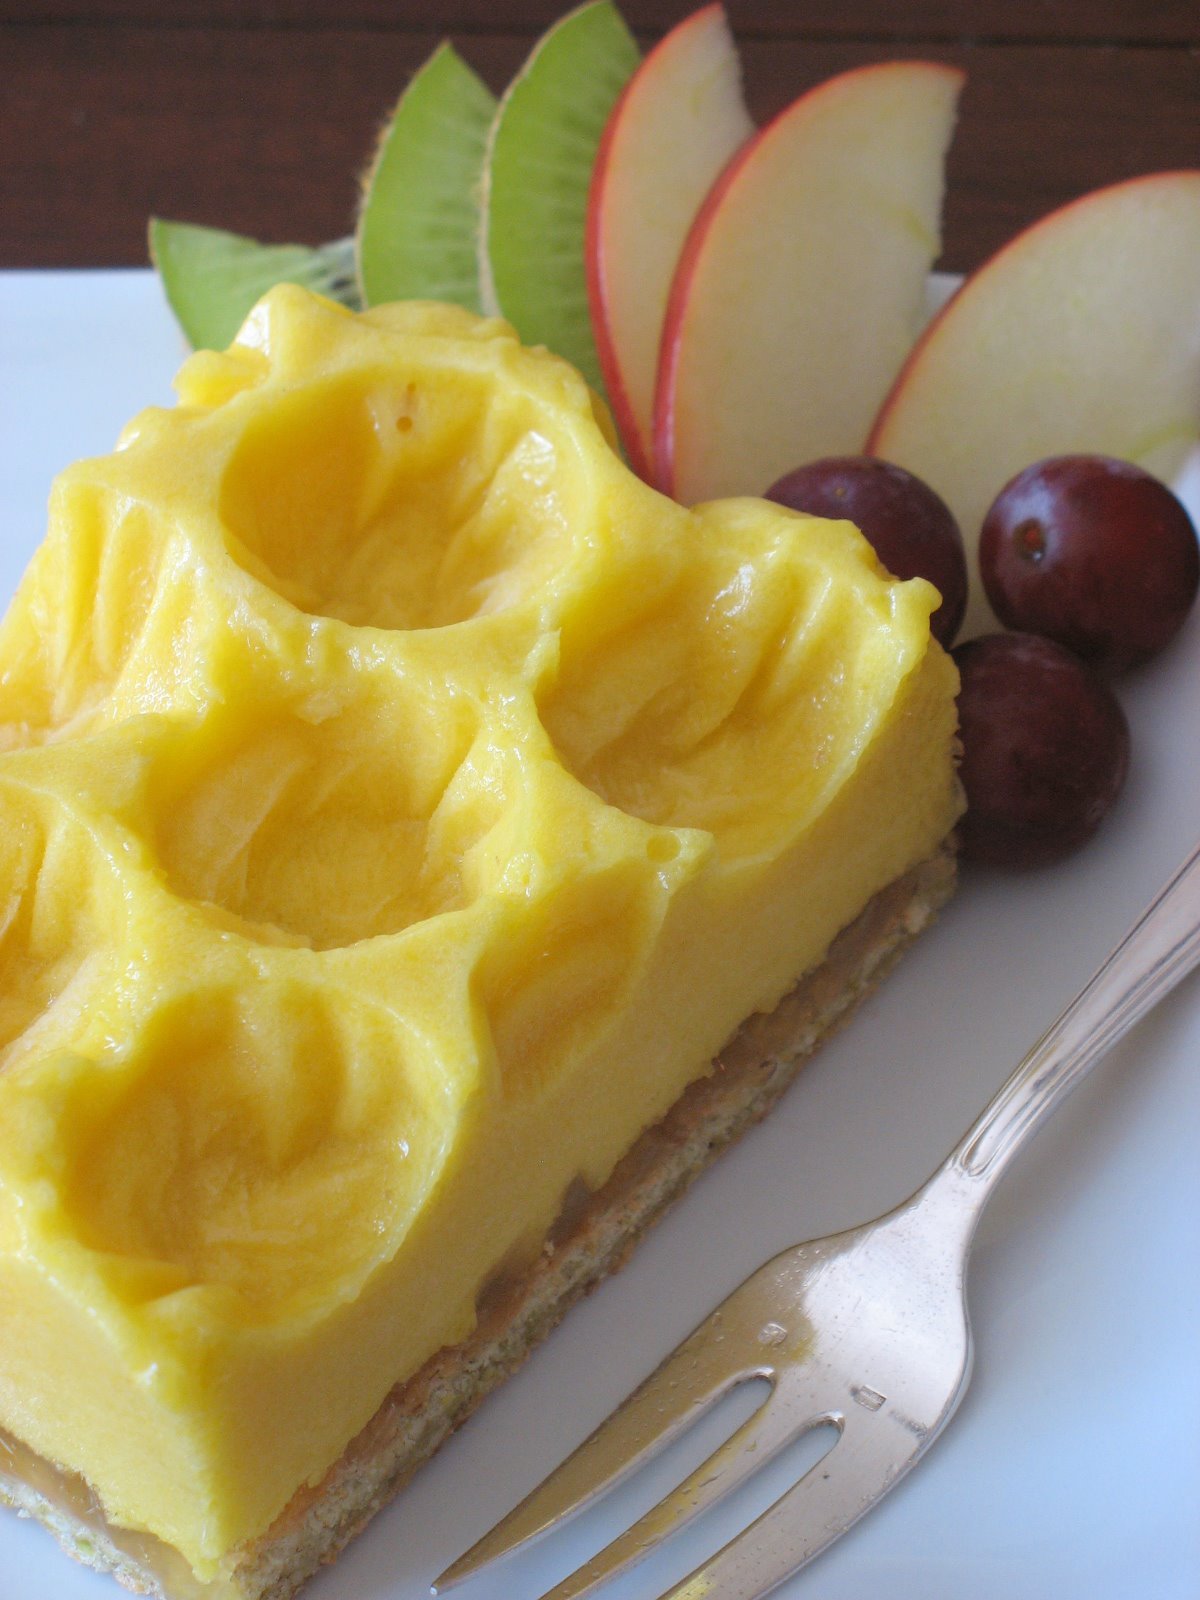
The dessert came about when Mary from Alpineberry announced that "Tropical" would be this month Sugar High Friday theme. Every single month, no fail, I am stuck with the same problem: my thoughts start racing and it takes me forever to make up my mind. I never thought I would say this concerning desserts, but in this case abundance is not great! Most of the produce I find here is what I would consider tropical, with plenty of papayas, limes, kiwis of different kinds, cactus pears and so forth but for me the little French alien, I still consider them exotic in some sort of way. For the event I chose to focus on mangoes, pistachios and pineapple. I knew I wanted a pistachio dacquoise at the base and a mango mousse on top, but that sounded kind of basic, so I added a layer of pinneapple preserve (store bought I confess) in between. I started to think about different design elements that would make it more interesting to the eye when I came to plate it for guests. At the restaurant I had those really nice flexible molds made specifically to give a form to a mousse or frozen custard. But I was at home, ready to get started on my dessert…and no desire to head downtown to borrow one (too hot outside!). I did not have those but I had a few sheets of large bubble wrap that would do the trick in a pinch. The honeycomb design echoes the honey in the mousse and creates little pockets very useful to prop up a few cut fresh fruit for plating and decorating.
Dacquoise (dah-kwaz) refers to both the cake it is named after composed of layers of nut meringue and buttercream, as well as one of the layers of meringue. It is used at the base of many cakes in French pastries and provides a nice change from a pastry or shortbread crust. A dacquoise is very close in texture to a macaron, with some recipes adding a touch of flour or cornstarch to the batter. I already like a dessert where the base is a big giant layer of macaron and who better fitted to provide me with a great recipe than the master of macaron himself? My sugar daddy, Pierre Herme. The mousse is one that I developped over the years from different sources making it safe to adapt with all sorts of fruits. This time I replace some of the sugar with wildflower honey and added some freshly grated ginger to perk it up a bit. The dessert looks a lot more intricate than it is. You can prepare the dacquoise a couple of days ahead, make the mousse and layer the rest of the dessert the day before you plan to serve it.
Honeycomb Mango Mousse & Pistachio Dacquoise:
Serves 8
For the dacquoise layer: (inspired from Herme’s Plaisirs Sucres)
70 gr. finely ground pistachios
75 gr. powdered sugar
25 gr. granulated sugar
3 egg whites
In a large bowl, mix togther the nuts and powdered sugar. Beat the egg whites to soft peaks. Slowly incorporate the granulated sugar with the machine running, until you get nice glossy peaks. Delicately fold in the nut mixture. Spread on a parchment line 8×8 baking dish and bake at 340F for about 35 minutes.
For the mousse layer:
2 ripe mangoes, peeled, cut up and pureed
1/2 cup water
1 envelope unflavoured gelatin
1/4 cup sugar
1/4 cup honey
1/2 tb fresh grated ginger
1 cup whipping cream, whipped
Sprinkle the gelatin over the water and let soften for about 10 minutes.
In a medium saucepan, combine the mango puree, sugar, ginger and honey. Heat until the sugar is dissolved. Remove from the heat and add the gelatin. Stir to dissolve and let cool to room temp, or until it starts to thicken a bit. Fold the whipped cream into the mango. Use it in the dessert assembly before it has time to thicken so it will be easier to pour.
Dessert Assembly:
Remove the dacquoise from the baking pan. Line the same pan with heavy duty plastic wrap. Cut a sheet of bubble wrap to fit and put it on top of the plastic, bubbles side up. Pour the mango mousse and freeze until set.
Spoon 1 cup pineapple preserves (or others of your choice) on top of the mango mousse. Press the sheet of dacquoise on top with a light pressure of your fingertips so all the elements adhere together. Freeze until ready to use.
To unmold, flip the pan over and remove the plastic and bubble wrap. Decorate and serve.
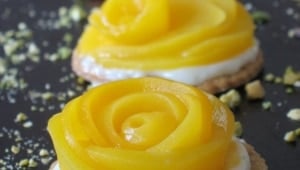
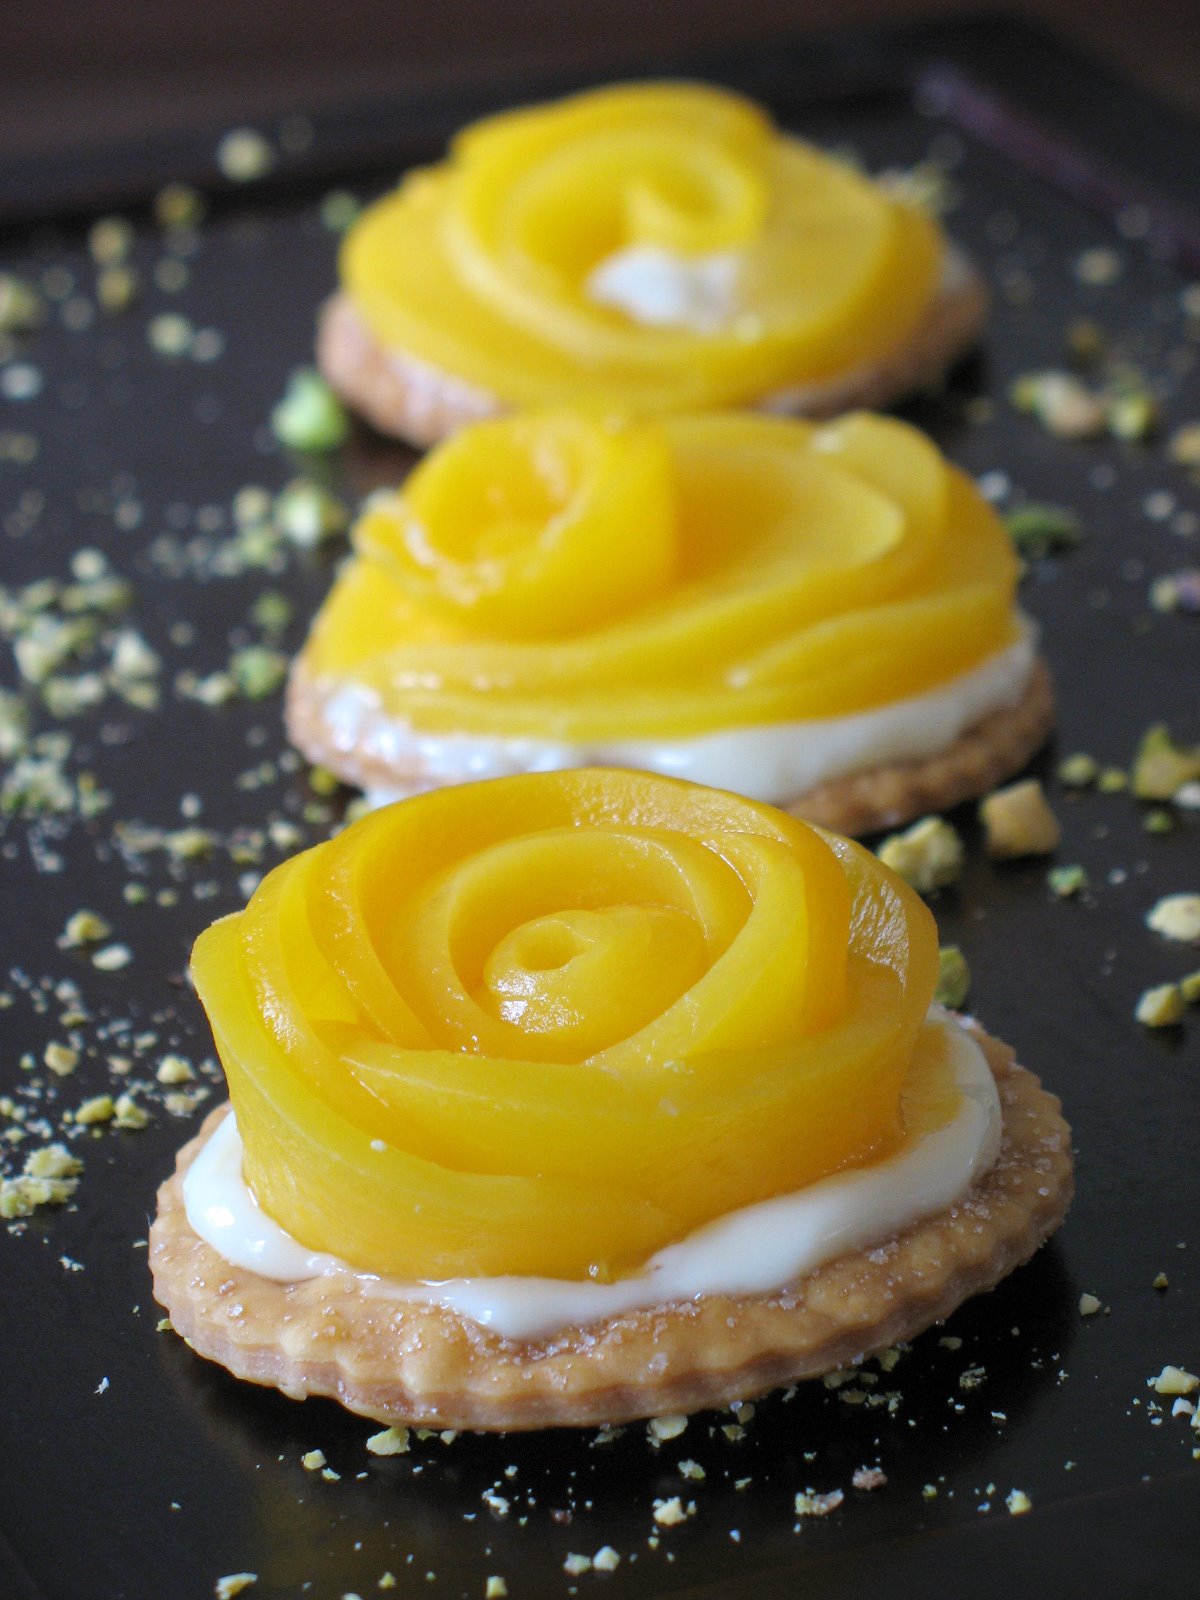
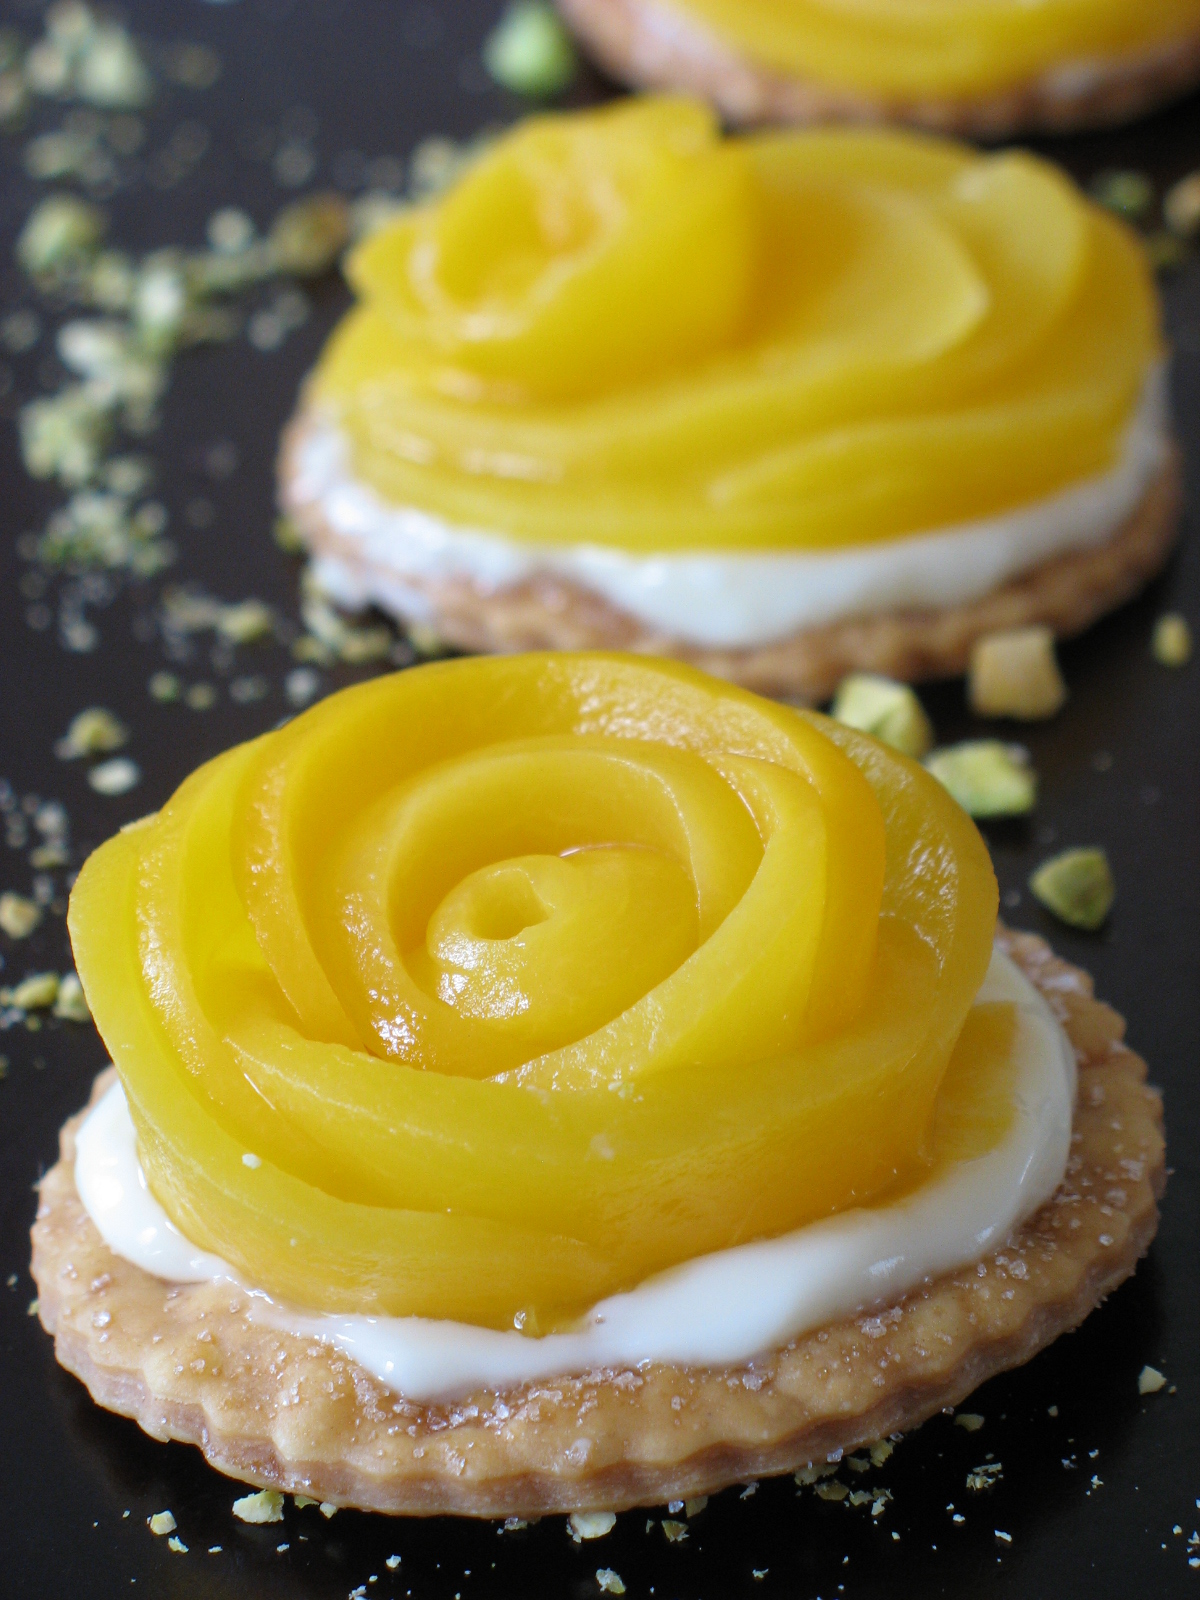
Late last night Old Chef called me and "wondered" if I could make 50 apricot tartlets "on the fly" (last minute/quickly) for a function thursday night. I put the verb wonder in between quotes because this man never just "wonders". When you pick up the phone, he is on the other end trying to make sense of his crazy ideas before you even can say "hello".
Nothing crazy or out of the ordinary with his request this time, and as usual he was leaving me with most of the execution choice, flavor, plating, etc… However….I had told him how I showed Lisa the rose fruit trick last weekend and he mentionned I could make them pretty like that for the function. Oy! Ok…I am extremely patient (Lis?) and the thought of 50 pretty apricot roses did not phase me much. What bothered me was finding decent apricot that I could poach and slice to make them. I had to supplement my batch with jarred ones, got home and got cranking.
In the middle of my stirring the pastry cream (my question at the time was "which alcohol should I flavor it with this time"…see! I wish I had more days like that), Old Chef calls. Change of plans. We are now at 100 tartlets and no more apricot but they want peaches. Oy again! Talk about trying to be cost effective….back to the store, back to see Charlie and his homemade jarred fruits and now the fun an resume. I was still pondering that alcohol issue, in case you were wondering…and in the end I opted for spiced rum because nothing else floated my boat and I was trying to be a little cost effective with what I had.
The tartlets are easy to put togehter and if you do not have the patience to play around witth making the roses, just place them on the pastry cream, in a spiral pattern.
I downscaled the recipe for home use as I doubt that no matter how pretty or good they turn out that you want to be stuck with 100!!
Peaches 'N Cream Tartlets:
Makes 8
Tart Dough: (pate brisee)
1 1/4 cups all-purpose flour
1 1/2 Tbs sugar
1/2 cup chilled (1 stick) unsalted butter, cut in pieces
2 Tbs ice water
1 egg yolk, lightly beaten
Place flour and sugar in the bowl of a food processor, and process for a few seconds. Add butter, and process until the mixture resembles coarse crumbs. Add the ice water then the egg yolk, processing just until the dough holds together. Do not process for more than 30 seconds. Turn the dough out onto a work surface. Place on a sheet of plastic wrap. Flatten, and form into a disc. Wrap, and refrigerate at least 1 hour before using.
Roll the dough out thin and with a 3 inch cookie cutter, cut as may rounds as needed. Lay them on a parchement lined baking sheet. Sprinkle with 1 TB. sugar and bake at 350F until golden brown and cooked through.
Pastry Cream:
1 1/4 cups (300 ml) milk
1/2 vanilla bean, split lengthwise and scraped (throw the seeds in the pot with the milk)
3 large egg yolks
1/4 cup (50 grams) granulate sugar
1/4 cup (40 gr)cornstarch
3/4 tablespoon (10 ml) spiced rum (or other liquor of choice), optional
In a medium bowl, whisk the sugar and egg yolks together, add the cornstarch mixing until you get a smooth paste. Set aside.
Meanwhile in a saucepan combine the milk and vanilla bean on medium heat until boiling. Remove from heat and add slowly to egg mixture, whisking constantly to prevent curdling, (pour through a strainer if this happens) Remove vanilla bean. Place the egg mixture back into a medium saucepan and cook over medium heat until boiling, whisking constantly. When it boils, whisk mixture constantly for another 30 – 60 seconds until it becomes very thick and it is hard to stir.
Remove from heat and immediately whisk in the liqueur (if using). Pour into a clean bowl and immediately cover the surface with plastic wrap to prevent a skin from forming. Let cool. If not using right away refrigerate until needed, up to 3 days. Beat before using to get rid of any lumps that may have formed
For the Peach Roses:
Use ripe fruits, canned fruits or poached fruits.
To make the roses, cut thin slices of fruit. For the bud, choose a small piece and roll it between your fingers. Let rest on flat surface and start adding slightly bigger fruit slices around it, overlapping a little. Before you know it, you will have a pretty fruit flower, and remember that practice makes perfect.
News flash…the heat is scorching here down south….My solution? Something frozen, quick and satisfying.
When I got off the plane yesterday, I felt I was wilting on the spot. I had easily forgotten that with heat comes high humidity here in Charleston. I kid you not, my pants were wrinkle free in no time flat and my energy level sucked out of my body. I had not realized how my long weekend away had left me somewhat tired and I ended sleeping most of the time on the airplane, and that meant I was wide awake at midnight. I started looking around the kitchen, wanting to bake something to calm me down (works as good as drinking hot milk sometimes). Five days without his mate and B. had left quite a few bananas to go past their prime. I thought about muffins, scones or cake for breakfast the next day but that meant turning the oven on and oh..did I mention how hot and humid it was? Yes, bad idea…That’s how I ended up making a frozen parfait, on the complete opposite end of the spectrum!
I am a summer gal for the produce but a winter/fall one in regards to the weather, so I can’t help but stock on fresh with berries, peaches, nectarines, plums, watermelon, you name it. However, I like to keep me some naners (bananas) around for substance. I am constantly filling that fruit basket so much so that my produce guy said he thought I moved or left to see greener pastures when he did not see me these past few days. What can I say? “Hi, my name is Tartelette and I am addicted to fresh produce…what’s up doc?!”
I feel sleep deprivation is calling my name, so without further ado, here is the recipe:
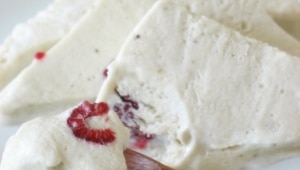
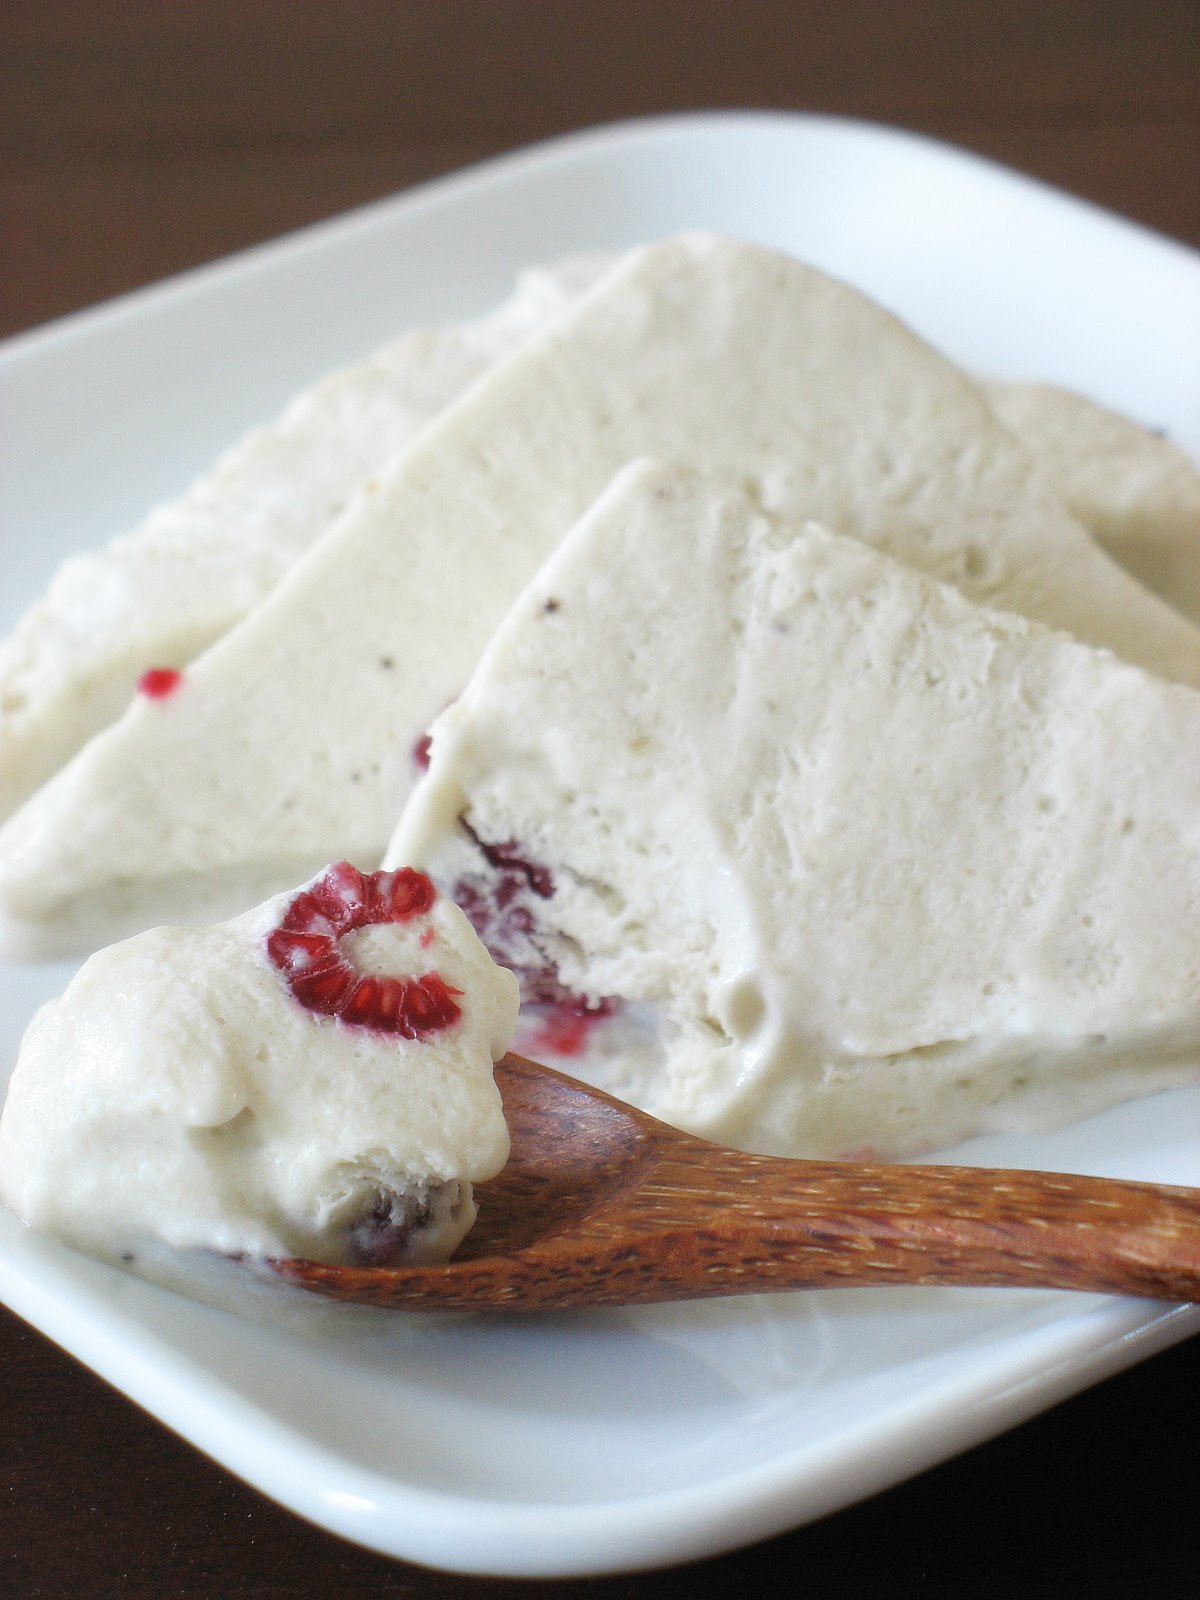
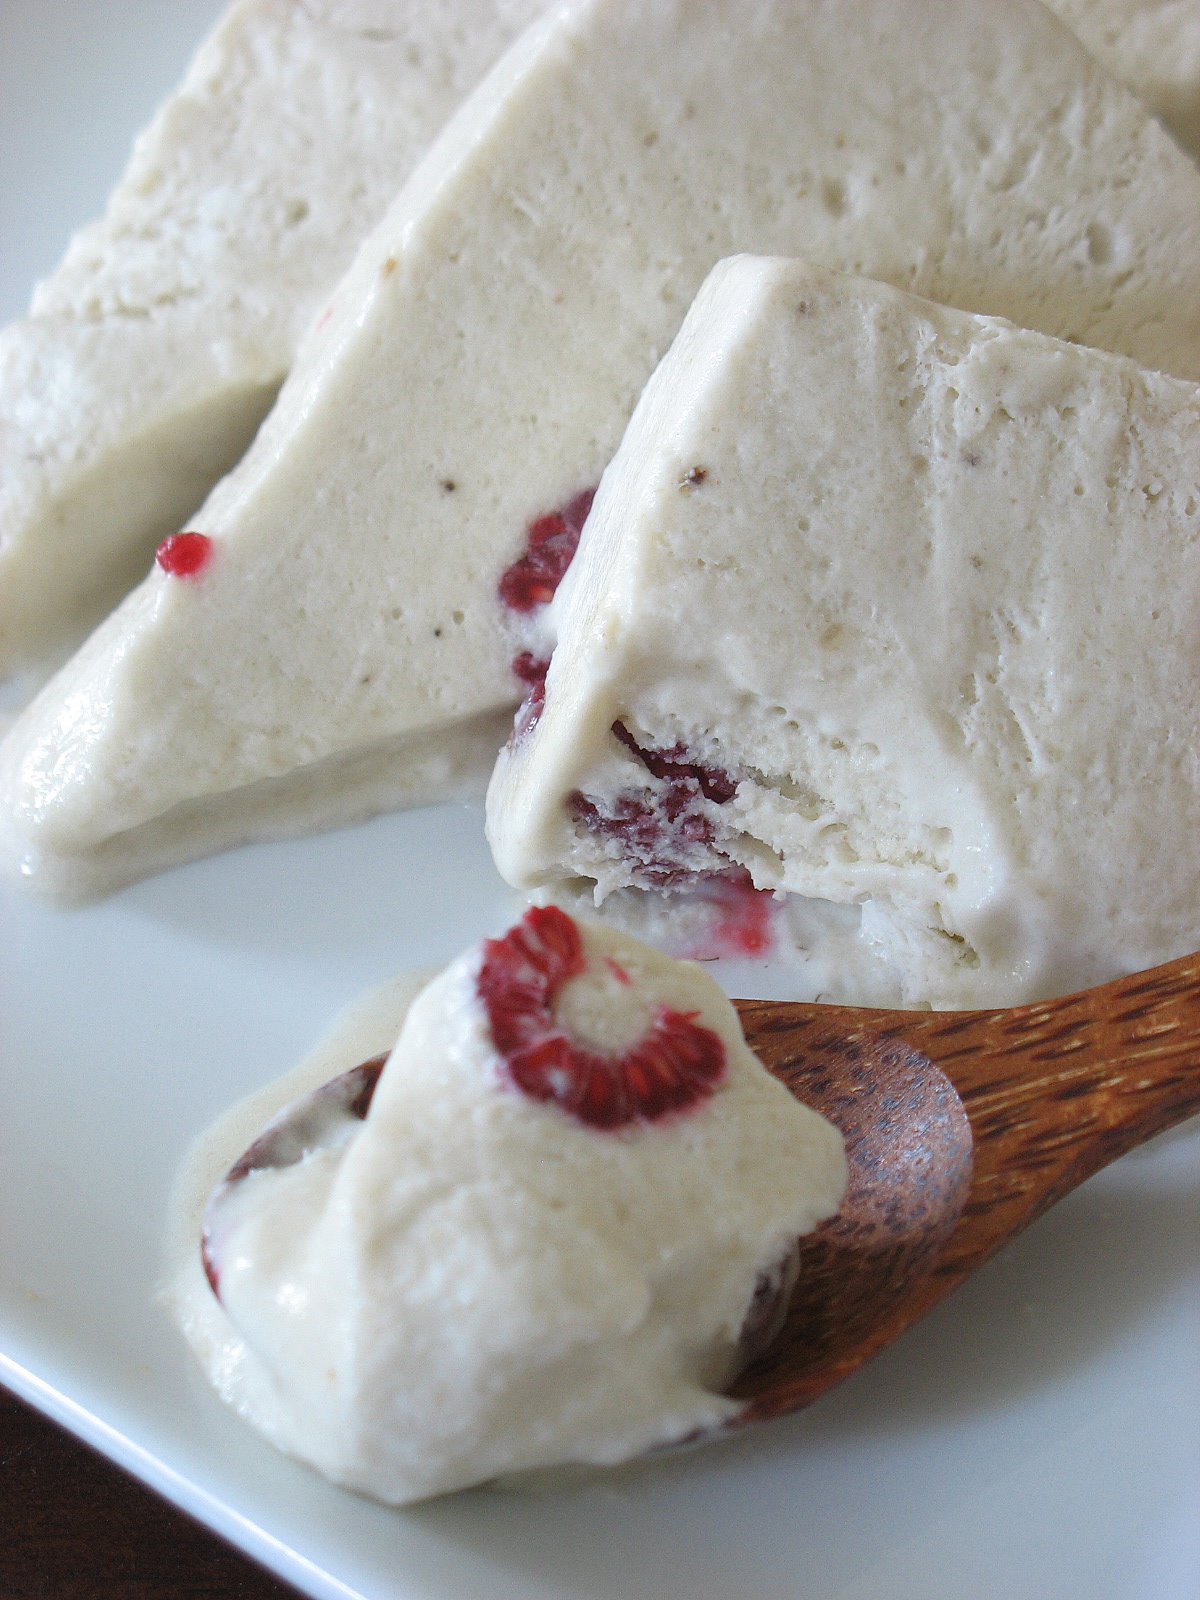
Banana Raspberry Frozen Parfaits:
Serves 8 -10
2 eggs, separated
1/2 cup sugar
1 cup pureed bananas
1/2 cup mascarpone, at room temperature
1 cup heavy cream
1 pint raspberries
In an electric mixer bowl, whisk the egg yolks and 1/4 cup of sugar until pale and fluffy. In a separate bowl, stir the banana puree and mascarpone until smooth. Fold the yolk mixture into the banana mixture. Whisk the egg whites until firm peaks. Add the remaining 1/4 cup of sugar, 1 Tb. at a time and continue to whip until glossy. Fold the whites into the banana mixture. Whip the cream to soft peaks and add to the banana mix. Line the inside of a narow loaf pan with plastic wrap and let it hangs over the sides. Pour half of the banana parfait in the mold. Scatter raspberries on top and add the remaining half of the banana mixture. Cover with plastic wrap and freeze until firm.
Cut out slices and plate.
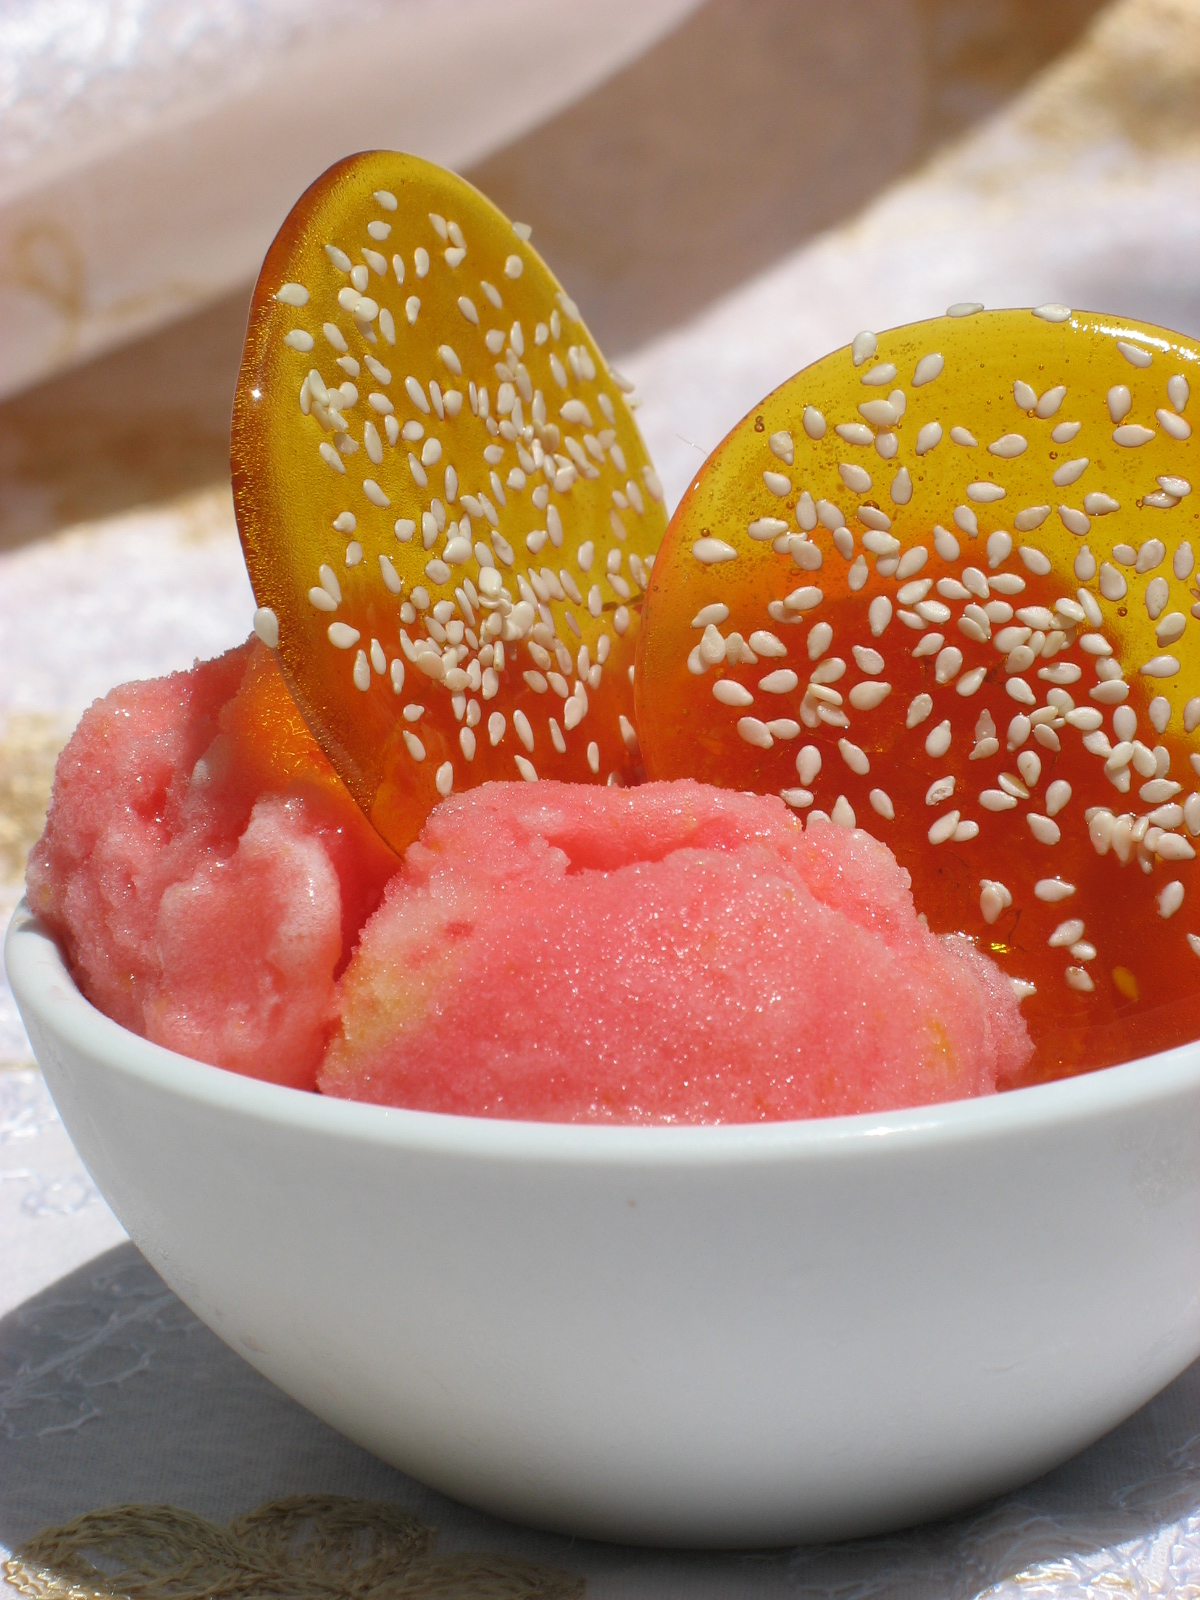
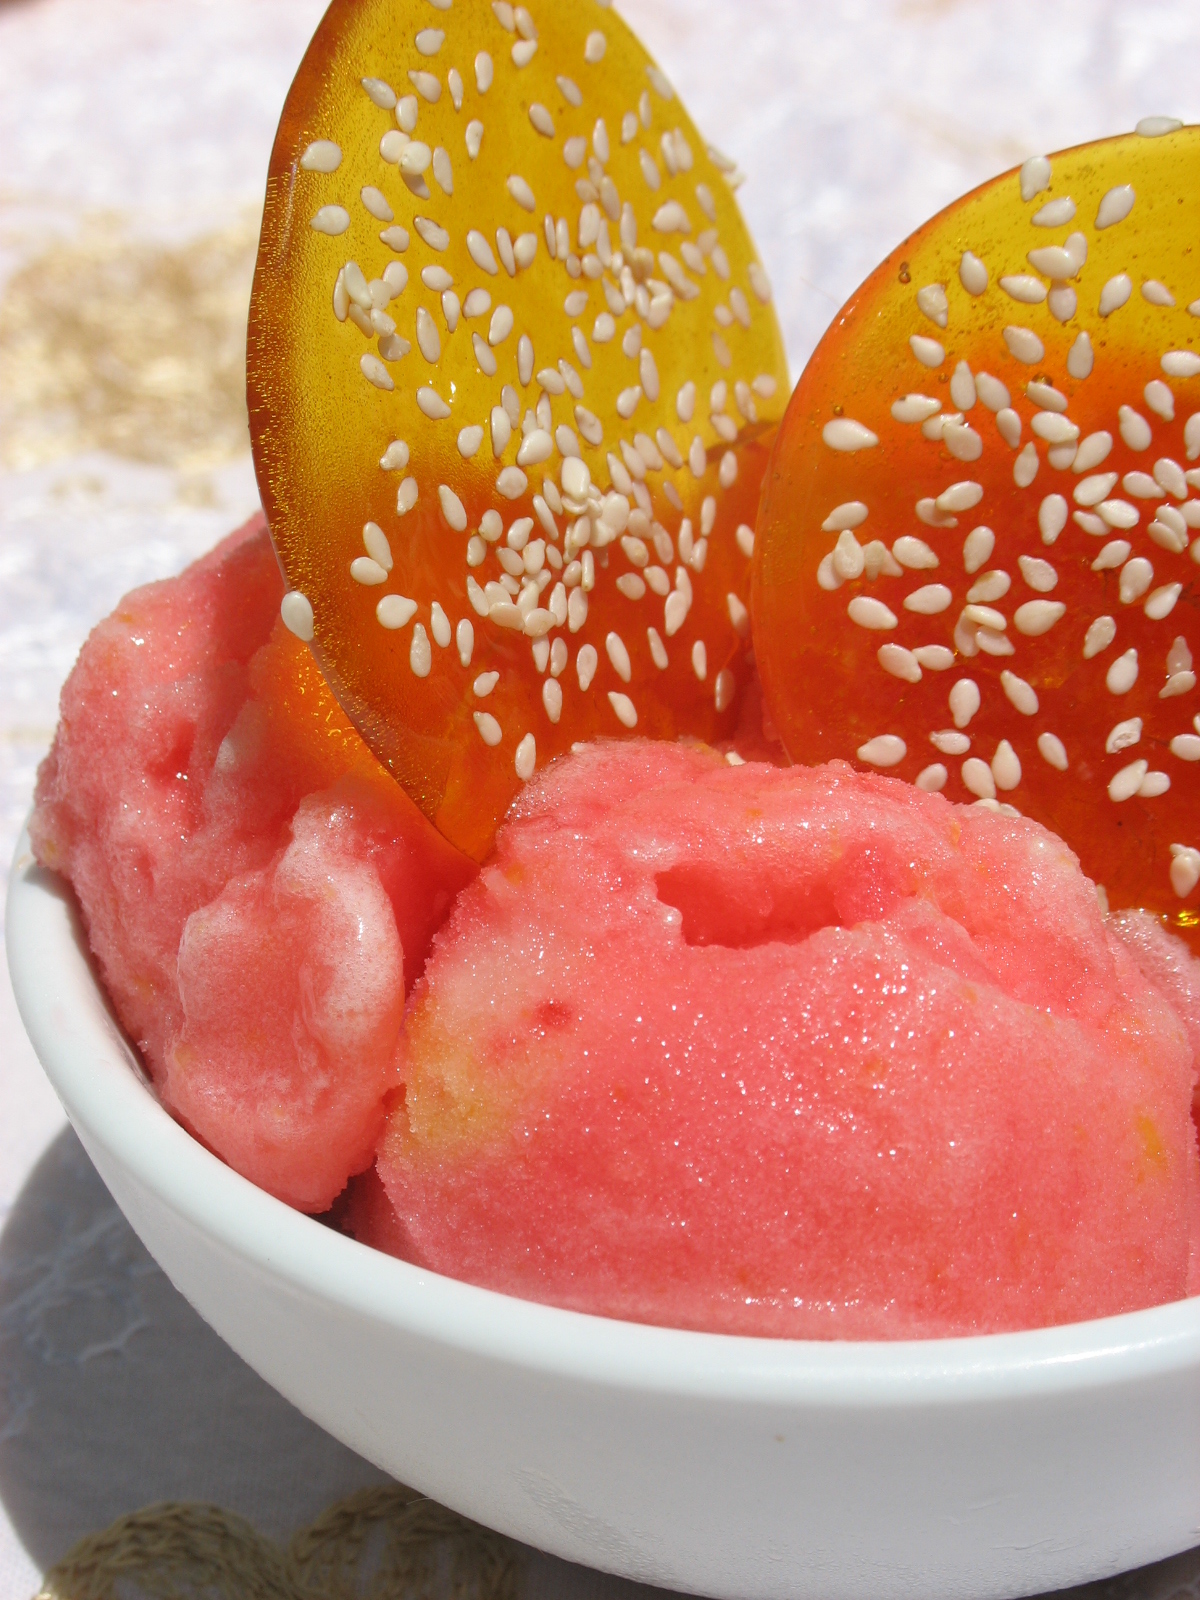
It is that time again for another round of Donna Hay inspired creations known as "Hay Hay It’s Donna Day" masterminded by Barbara of Winos and Foodies. The winner from last month, Laura, from the magnificient blog Eat Drink Live has chosen sorbet as the theme for July. How fitting! Not to mention that my ice cream maker seems to be churning nonstop these past couple of weeks!
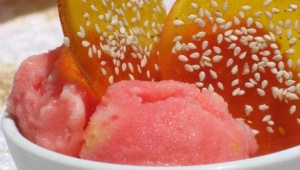
The "3-2-1" part of the title needs to be explained, otherwise the sorbet you see in these pictures does not make any sense at all. As usual, when Laura announced the theme I could not make up my mind. I was thinking of mango, lychee, peach, strawberry, rapsberry….the list goes on. Finally after a week of churning flavors in my head, I decided I would make two, plate them up and let friends decide which one they prefered. One evening I made a lemon sorbet and an apricot sorbet, turn the ice cream maker on and let it do its own little dance. I could not help but try them and I swooned….they were awesome. "Oh dear! How to decide?" I thought. I was glad friends were going to do it for me! The next day, I served one scoop of each in separate bowls and drizzled both with raspberry sauce. I watched guests take a spoon of the lemon, then the apricot, then back and forth for a few times until they all combined both in one bowl and started mashing them all three together. When I timidly asked their favorite, they all showed their bowl and said "that one!"…The one they had created by churning together lemon and apricot sorbets with raspberry sauce. So you see, 3 elements became 2, made up 1: Lemon-Apricot-Raspberry Sorbet. I am telling you, along with 6 other people that it totally rocks!
For the recipe, I used the one posted on her blog from Donna Hay. It is easy and straightforward and give the silkiest sorbet ever. I have not tried to remake the sorbet by mixing all the ingredients prior to their churning in the ice cream maker. Mine is not big enough to accomadate both quantities. It does not take much longer to do both flavors and freeze them together or separately. Each is delicious on its own, but combined…hmmhmmhmm…Divine! The decoration is simply some caramel sesame tuiles: big drops of caramel sprinkled with sesame seeds and left to dry.
Lemon Apricot Raspberry Sorbet:
For the lemon sorbet:
3/4 cup 150g caster (superfine) sugar
1 cup 240ml water
1 1/2 cups lemon juice
1 tsp lemon zest
To make the basic syrup, place the sugar and water in a saucepan over a low heat and stir without boiling until sugar is dissolved.
Increase the heat and bring to the boil for one minute. Set aside to cool.
Combine the lemon juice, zest and sugar syrup, place in an ice-cream maker and follow the manufacturer’s instructions or the instructions below for a thick and scoopable sorbet. If you don’t have an ice-cream maker, place the juice and syrup mixture in a metal bowl or cake tin, cover and freeze for an hour or until just beginning to set at the edge. Beat with an electric hand whisk and return to the freezer. Repeat three times at hourly intervals or until the sorbet is thick and smooth.
For the apricot sorbet:
3/4 cup 150g caster (superfine) sugar
1 cup 240ml water
2 1/2 cups apricot puree
To make the basic syrup, place the sugar and water in a saucepan over a low heat and stir without boiling until sugar is dissolved.
Increase the heat and bring to the boil for one minute. Set aside to cool.
Combine the fruit puree and sugar syrup, place in an ice-cream maker and follow the manufacturer’s instructions or the instructions below for a thick and scoopable sorbet. If you don’t have an ice-cream maker, place the fruit and syrup mixture in a metal bowl or cake tin, cover and freeze for an hour or until just beginning to set at the edge. Beat with an electric hand whisk and return to the freezer. Repeat three times at hourly intervals or until the sorbet is thick and smooth.
For the raspberry sauce:
1 pint fresh raspberries or 1 1/2 cups frozen
1/2 cup sugar
2 tsp. cornstarch
2 Tb. water
In a medium saucepan, combine the raspberries and sugar. Cook over medium low heat until the fruits release their juices. In a separate ramequins, dissolve the corstarch with the water. Slowly add to the raspberries and continue to cook until the mixture is thickened and does not appear cloudy anymore. Let cool and refrigerate.
To make the Lemon-Apricot-Raspberry Sorbet:
In a large bowl, combine equal scoops of lemon and apricot sorbets, drizzle with raspberry sauce and smash, mash, beat, churn until it comes together. Do not worry if some small chunks remain of each sorbet, they are like little pockets bursting with flavor.
Check out Laura’s blog around July 15th for the round up and voting instructions.
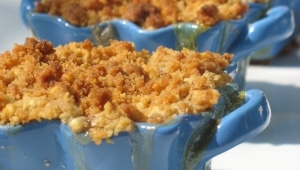
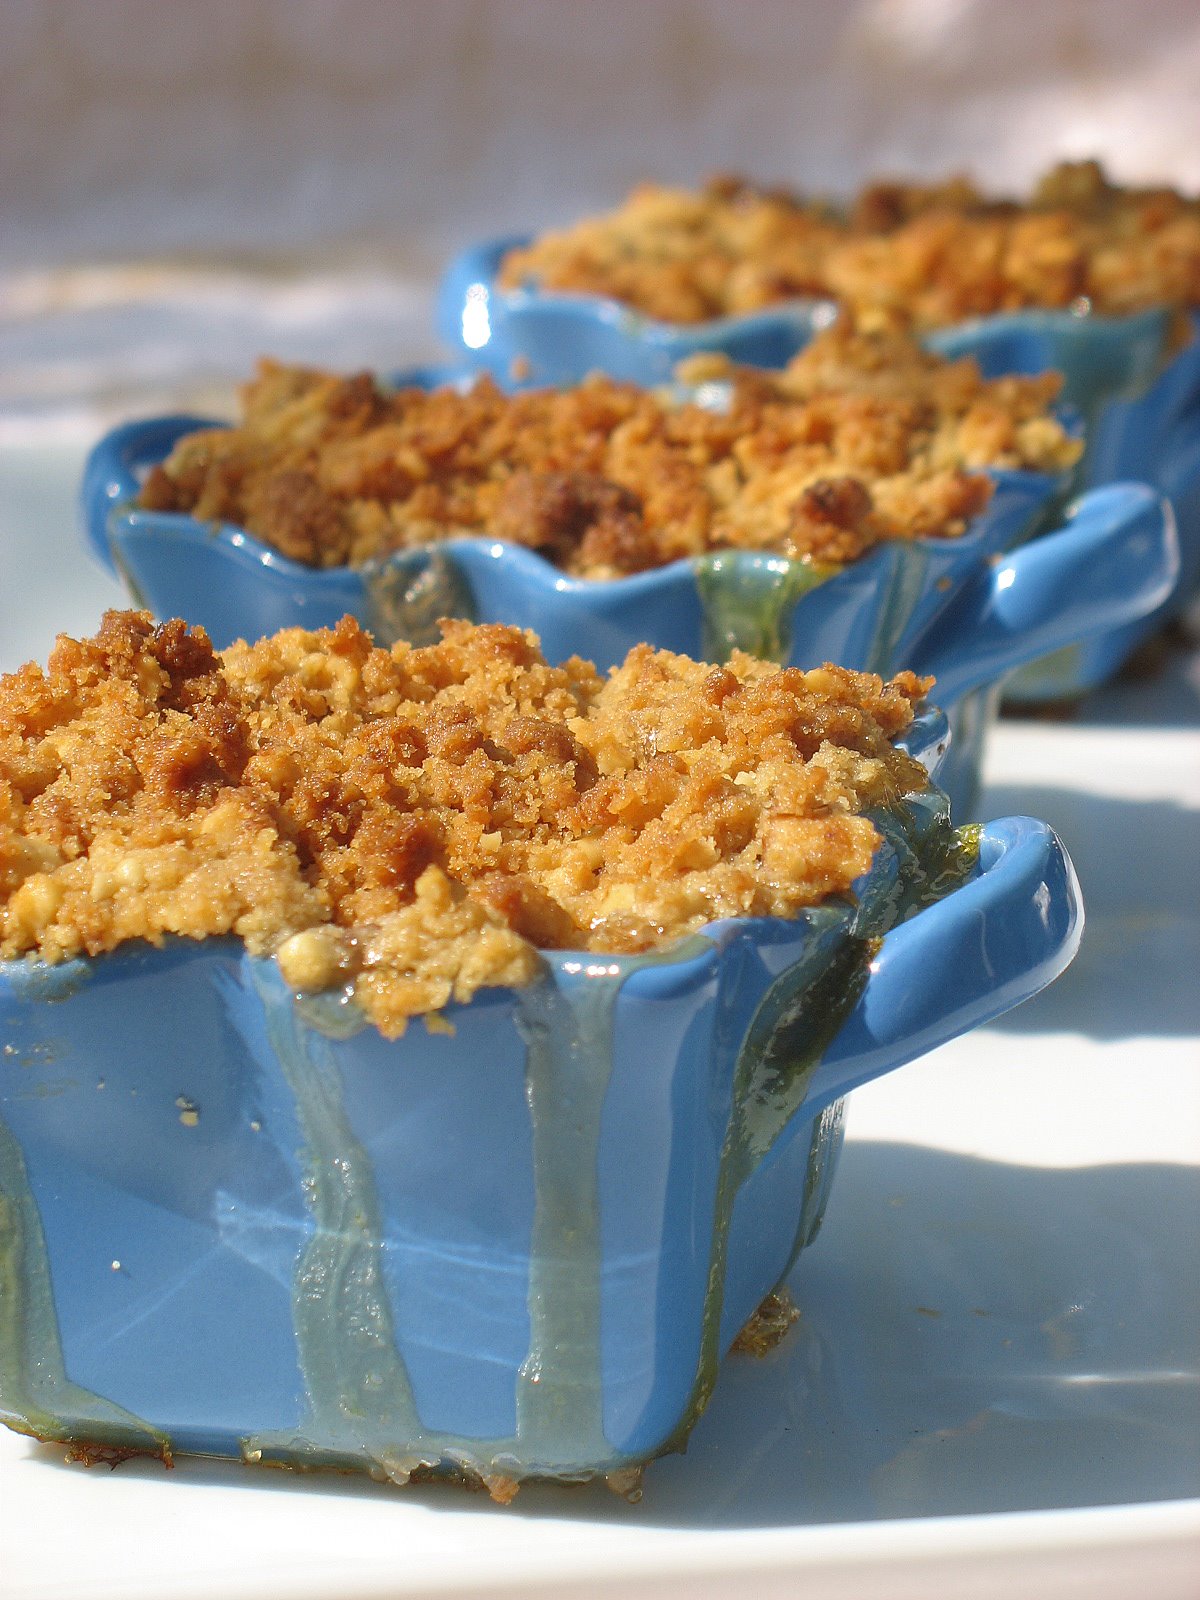
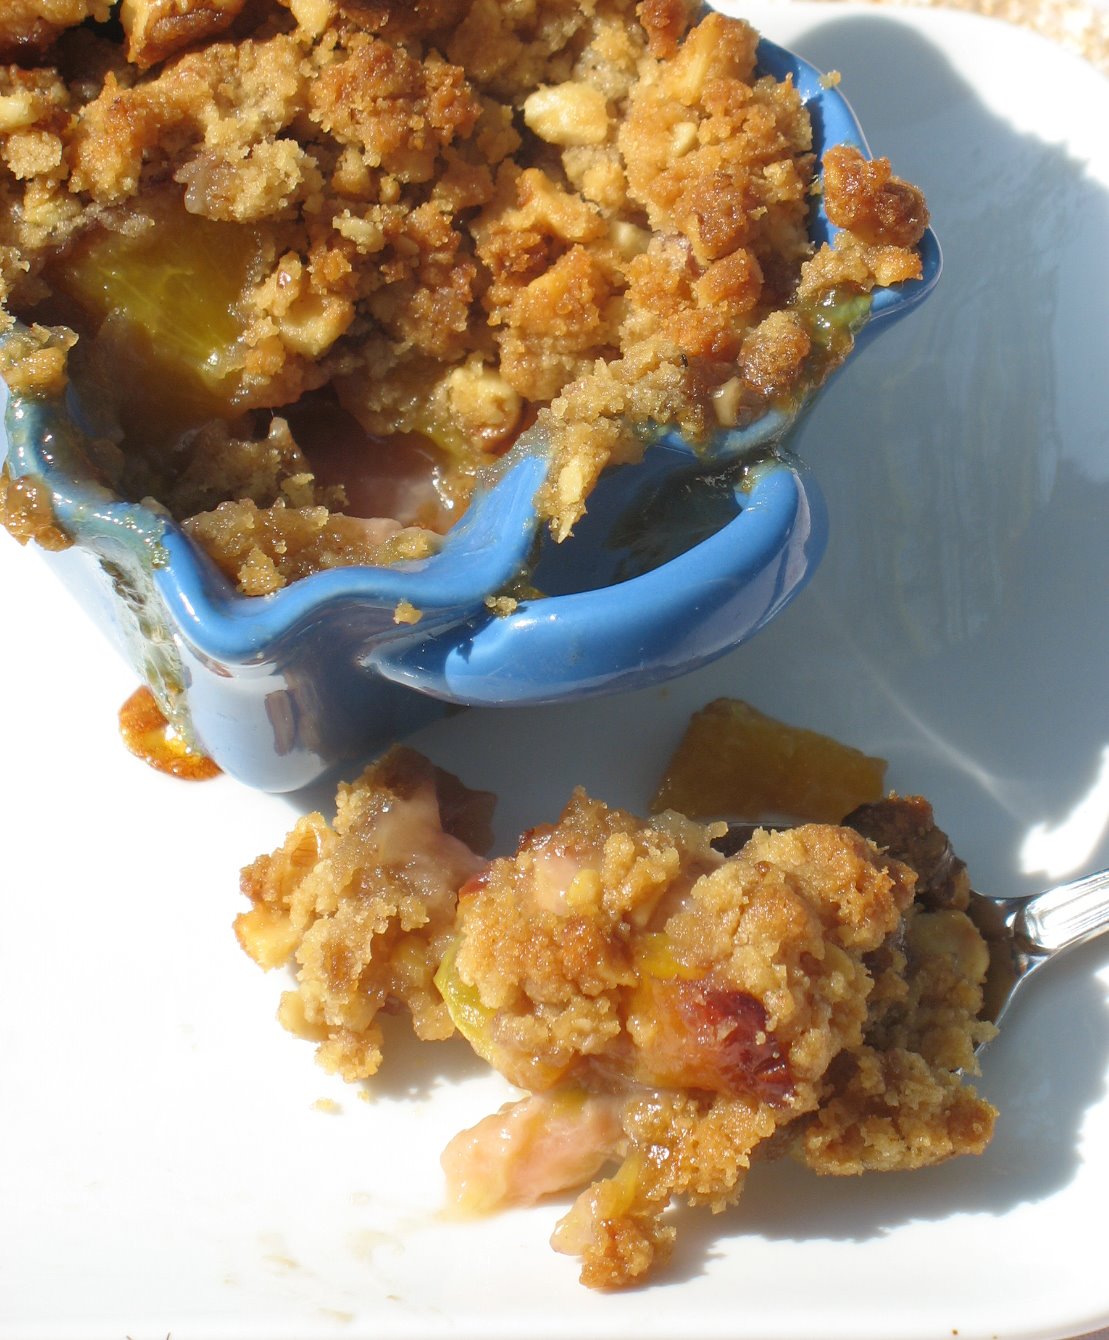
You know that Georgia Peach Ice Cream I was tempting you with the other day?….Well, it goes really well with a warm nectarine and banana crumble! Sounds like an awkward combination but I am telling you, it works! I have to add that we have eaten this with pretty much any kind of ice cream, from peach, banana, vanilla to chocolate and my favorite was salted butter caramel, but that will be for another post…if I can save enough for a picture!
I know a crumble is not a typical summer dessert but my friends in the Southern hemisphere might appreciate a little comfort food. The rest of us can have a perfect excuse to dish out more ice cream just to cool things off!
The beauty of a crumble or a crisp is that you can change and substitute the fruits at will, and play with the topping ingredients. I chose walnuts in the streusel topping, but I also think that coconut or almonds would work quite well.
Nectarine and Banana Crumble:
Serves 4
Filling:
4 nectarines, pitted and cut into small pieces
2 bananas, cut into small pieces
1/4 cup sugar
zest of one lemon
2 Tb lemon juice
2 Tb cornstarch
Streusel topping:
1 stick butter, cold
1/2 cup light brown sugar
1/3 cup flour
1/2 cup chopped walnuts
For the filling: in a large mixing bowl, combine the fruits and the rest of the ingredients. Toss well, but gently not to break the bananas too much.
Divide between 4 ramequins, place the ramequins on a baking sheet as the fruits are most likely to release their juice, causing a spill. Set them aside while your prepare the topping.
For the topping: In a bowl, combine the flour, sugar, walnuts, add the butter cut in small pieces and mix with your fingertips until you get coarse crumbs.
Divide evenly among the 4 dishes.
Bake at 350 until for 20-30 minutes.
Update: It looks like the good folks of Blogger have named me "Blog Of Note". I am sincerely touched and for all new readers, well, I hope you hang around a little and get your virtual fill of sweets and sugar! Thanks for visiting!
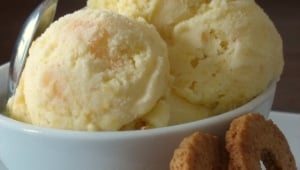
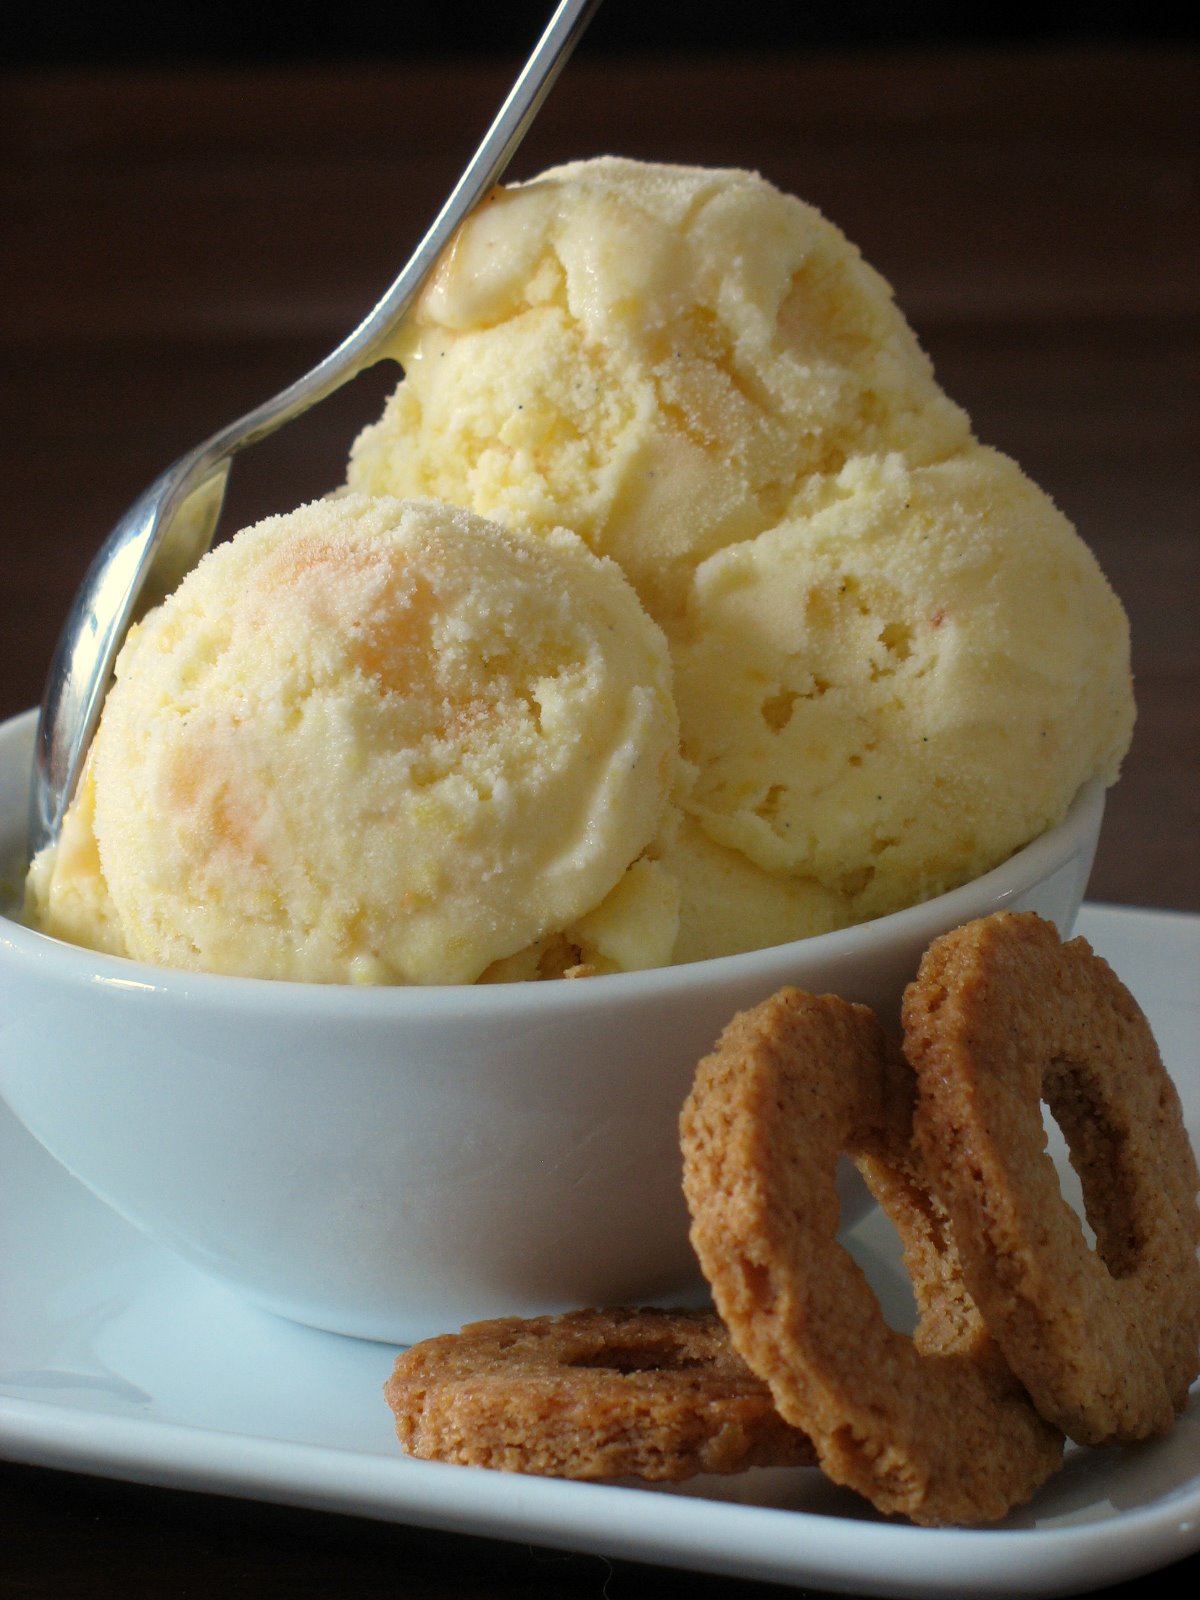
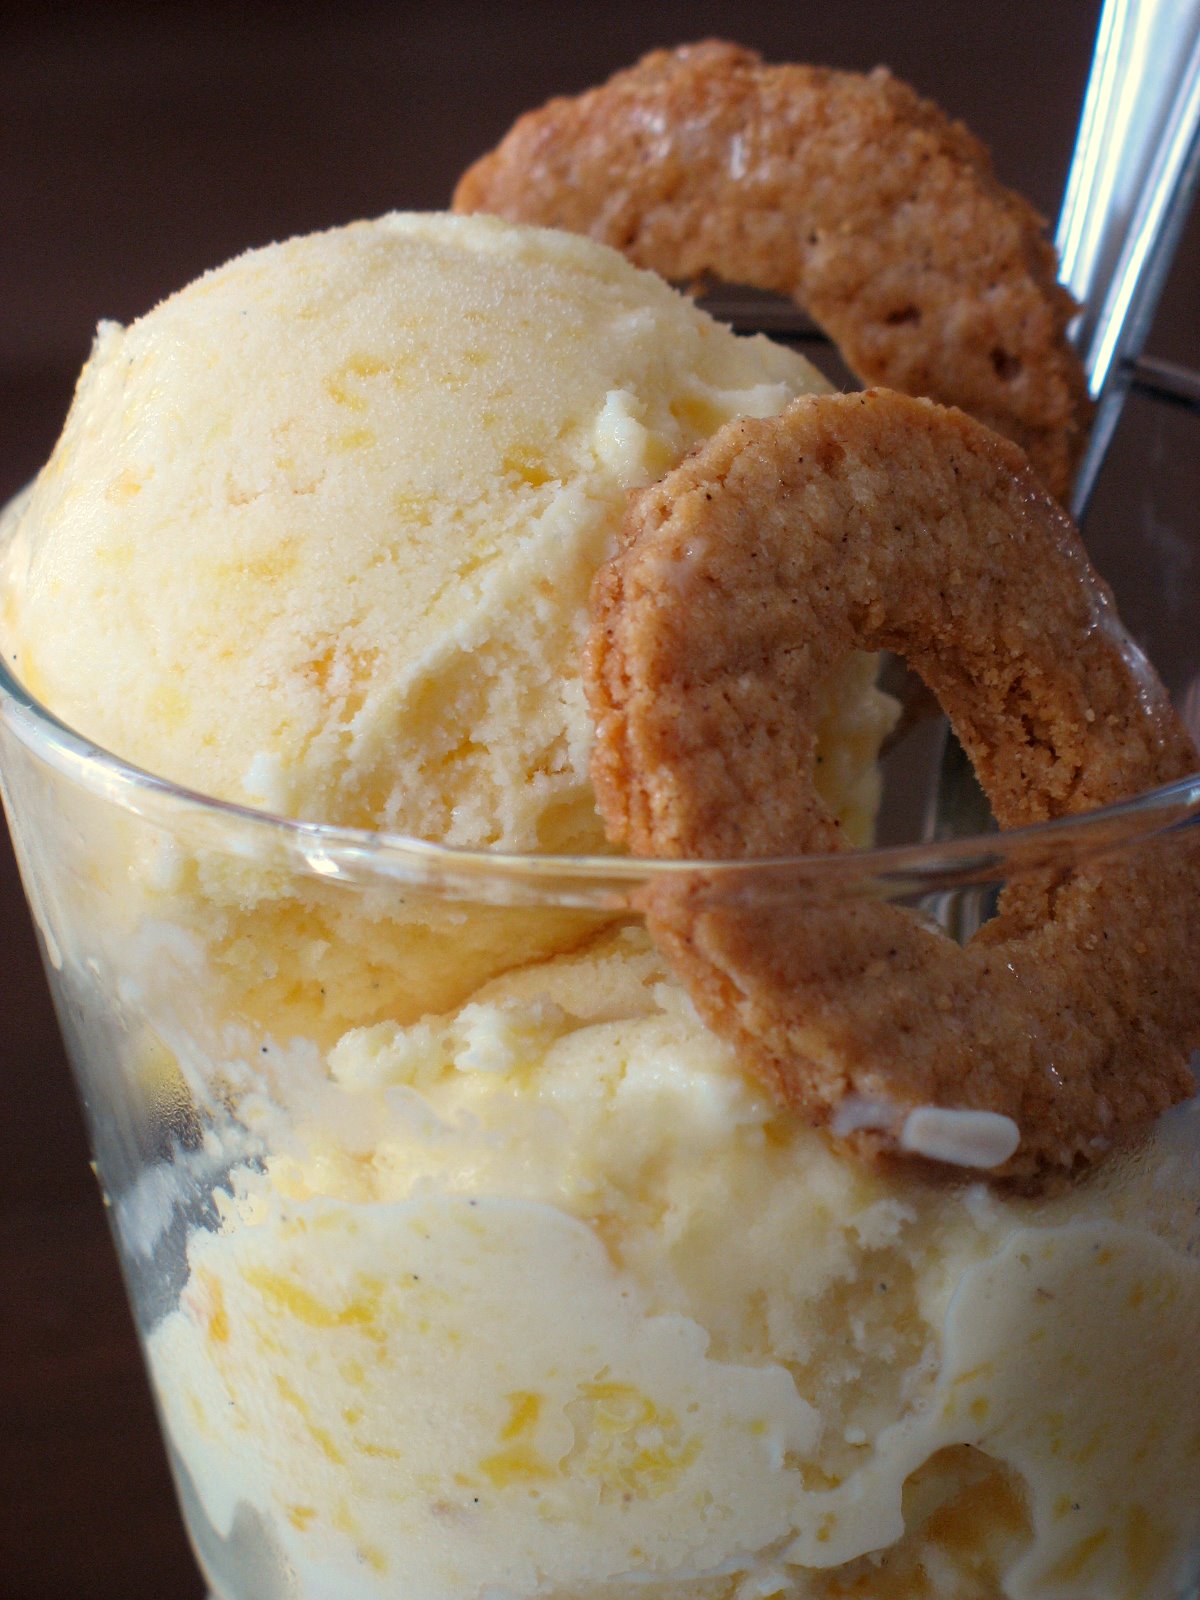
Well these georgia peaches Son they know their way around They can take your money, son before you get sight of town Well they talk a little funny, but they look so fine Nine out of ten of them gonna sell you a dime I think they’re cute, think they’re cute as they can be Talkin’ about a funny talkin’, honk-tonking georgia peach
Well, peaches, peaches Love them georgia peaches Well, peaches, peaches Love them georgia peaches
Excerpt from Lynyrd Skynyrd’s Georgia Peaches
Yes, I know that me and the boys from the band were not talking about the same kind of peaches, but I could not help myself and kept humming the tune while peeling the fruit to make this ice cream.
When I got to the farmer’s market this morning and found a bounty of gloriously fragrant and yellow Georgia peaches, I knew some would end up in a cake, some cut up on my salad and some would turn out into an ice cream. It has been so hot and humid the past few days, we keep filling up on frozen fruits and icy cold smoothies while the ice cream machine is dying from boredom. I just was not that inspired until this morning. Oh sure, I could whip up some of our favorites again, but we are craving light, fresh and if possible incredibly tasty and there is nothing fitting the description better than a Georgia peach.
There is not much to add, other than giving you the recipe, and urging you to make it with fresh fruit and not frozen or canned are we are here in the US in full peach season. The base is a light custard and a little lemon juice or crystallized ginger can really perk it up.
Peach Ice Cream, adapted from Cuisine at Home (thanks Lisa for my birthday present!)
Makes 5 cups
2 cups fresh peaches, skinned, pitted and diced
1/4 sugar
1 tsp. lemon juice
4 egg yolks
3/4 cup sugar
1 1/2 cups whole milk
1 cup heavy cream
1 vanilla bean, split in half or 1 tsp. pure vanilla extract
Macerate the peaches with the lemon juice in a saucepan with the lemon juice and sugar for about 10 minutes or until syrupy. Simmer over medium heat until the peaches are soft for about 5 minutes. Let cool completely.
Whisk the egg yolks with the sugar until thick and pale. In the meantime, heat the milk, cream and vanilla bean until steam rises. Gradually add the hot cream to the egg yolks, whisking constantly to prevent them from scrambling. Pour the mixture back into the saucepan and cook over medium heat until the cream coats the back of a spoon, 5 to 8 minutes.
Strain the cream and let cool completely. Stir in the peaches. At that point I used an hand-held mixer to puree some of the peaches and leave chunks into the base. Churn the mixture in an ice cream maer according to manufacturer’s instructions. Transfer to a container and freeze until firm.
It is so good that I am taking it to Meeta’sMonthly Mingle. She is on a well deserved vacation, so check back after the 7th of July for a cold and creamy ice cream round-up.