fruit

A Pavlova And A Guest

Pavlova5

It’s "Share Your Space Friday" here again!! I have never posted that much in a week and the fun part is that I only had to write an intro!!

I am loving having guest bloggers and not only because it gives me time to frolic in the sun (ugh…no not really…!) but mainly because it is like having a friend stop by and share with you a bit of their day, their personality, etc… And if personality had a name, it would be Kelly from Sass and Veracity. I knew from the first post that I’d be reading forever…I think it was her post on creme brulee and I found myself almost hugging the computer screen just staring at her stove. Meeting her last Fall was the icing on the cake….if only my mom and mother-in-law would let me be adopted by this sassy gal…sigh… She’s got verbage, she’s got class, she’s got ethics and an amazing sense of humor. Most of all, I don’t know better person to cheer anybody on in anything they venture doing.

I am thrilled to have Kelly pop by and share with you this amazingly refreshing pavlova. Read on for the recipe.
Now….doesn’t this look amazing for Spring! Happy Easter everyone!


I’m one of those cooks who is notorious for preparing recipes I’ve never tried before when there’s a special occasion looming. It doesn’t matter whether it’s for family, close friends, or a party for 40, I can guarantee that everything I make will be new to me. I’m sure that to some, I’m either grossly egotistic, or to others, a complete fool. I’d say adventuresome — or a glutton for punishment. The thrill of discovery during the planning process far exceeds any worry I could have about screwing something up. I love sifting through my magazines, cookbooks, and favorite web sites looking for the perfect recipe — especially if it’s something totally new.

So when Helen contacted me about doing this guest post, after initially grinning like a sap, I felt as if I’d been given permission to create the biggest planning mess I’ve made in a while. Cookbooks and magazines everywhere. A bookmarking frenzy on my Mac. Silly questions about "which recipe would be best" posed to my 16-year-old son who patiently indulged me with a more than one-syllable response. It was as if I’d been invited to a lovely party and then realized I didn’t have anything to wear. Even if I actually had a particular recipe in mind, and said recipe came out perfectly, I’d have to take photos.

Ah, the photos. I’ve all but swooned over Helen’s ethereal photos at one point or another. Light and airy, softly beckoning me to linger over what she has prepared, each photo taunts me with a "just you go ahead and try to make this, girlie!" And I think, in time — all in good time after kicking my procrastination skills into high gear. I met Helen last last Fall at the wedding of a mutual friend, and it took no time at all to learn just why her work is as flawless as it appears. She’s patiently persistent, works hard, is extremely focused, works hard, and has a seemingly bottomless reservoir of energy. Did I mention how hard she works? Meeting her was an absolute pleasure. Clearly, I had to make something that would have a chance of gracing the page, right?

Pavlova

Ironically, I came very close to baking a Paris Brest, something I’ve made before, but at the last minute, changed my mind. I’m sure it has nothing to do with the fact that the last time I made pate a choux, I was less than thrilled with the outcome. Instead, I’ll blame it on the photograph I saw in this month’s issue of Gourmet of the "Pavlova with Lemon Curd and Berries." Its imperfect, simple appearance reminded me of a galette and prodded me to reconsider the long standing issue I’ve had with meringue. Not the meringue on pies — meringue that’s baked. For some reason, I’ve always steered clear of it, not quite relishing the sensation it causes in my teeth when I bite into it. Or maybe it’s the near weightlessness of it. Surely something so light can’t have much substance. Excuses, excuses.

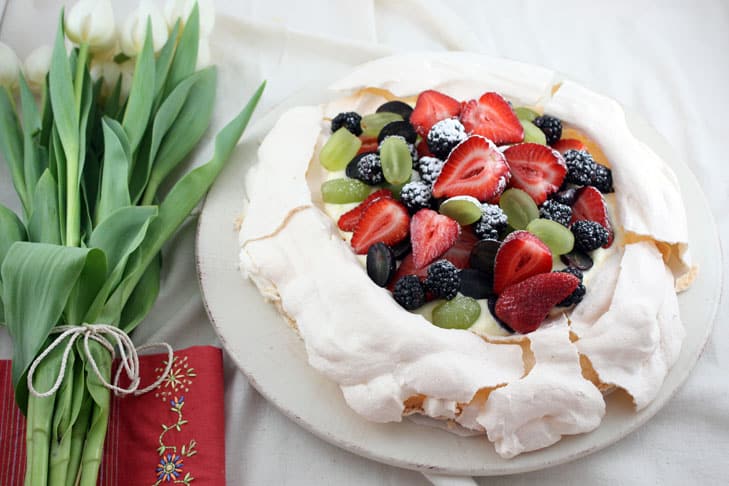
But I was mesmerized by the Pavlova, a dessert named after the famous Russian ballerina who, after touring Australia and New Zealand in the 1930’s, is said to have had this dessert named after her. Although it’s the "light and airy" aspect of her dancing that the dessert was created to mimic, I’m reminded more of a flouncy tutu, fluffed high with tuille. Just beautiful.

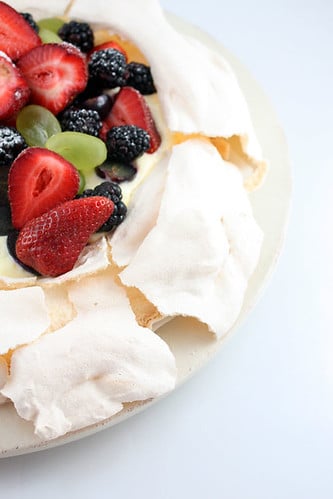
I’ve been savoring this dessert since yesterday, marveling over extreme contrasts in texture and flavor. The meringue crust, so delicate that touching it causes it to shatter, melts on my tongue. In the center, the meringue is a creamy, marshmallow treat, its sweetness tempered by the tartness of the lemon cream. The combination of the berries and grapes add a perfect crunch that brings it all together. Whimsical, unpredictable, and oh so delicious.

Here’s to you, Helen. You’re an inspiration to me in many ways and I’m quite honored to have done this for you.


Pavlova7

Pavlova with Lemon Cream, Berries, and Grapes

For the meringue…
1 cup superfine granulated sugar
1 tablespoon cornstarch
3 large eggs at room temperature 30 minutes
3 tablespoons cold water
1 teaspoon distilled white vinegar

For the filling…
2/3 cup granulated sugar
1 tablespoon cornstarch
1/8 teaspoon salt
1/3 cup fresh lemon juice
1/2 stick unsalted butter
3 large egg yolks, lightly beaten
2 teaspoons grated lemon zest
1 cup heavy cream
2 cups mixed berries
2 cups grapes

Preheat oven to 300ºF and position a rack in the center.
To prepare the lemon cream, stir sugar, cornstarch, and salt in a saucepan. Add the lemon juice and butter, bringing the mixture to a simmer over medium high heat. Continue to whisk at a simmer, about 1 minute. Whisk about 1/4 of the mixture into the beaten egg yolks, then transfer the egg yolk mixture back into the saucepan. Over low heat, continue to cook, but make sure not to boil, whisking constantly until the lemon curd is thick, about 2 minutes. Scrape into a shallow bowl, stir in the lemon zest, and place a piece of parchment over the surface. Refrigerate for about 1-1/2 hours.

To prepare the meringue, line a baking sheet with parchment and trace a circle about 7″ in diameter in the center. Turn the parchment over.
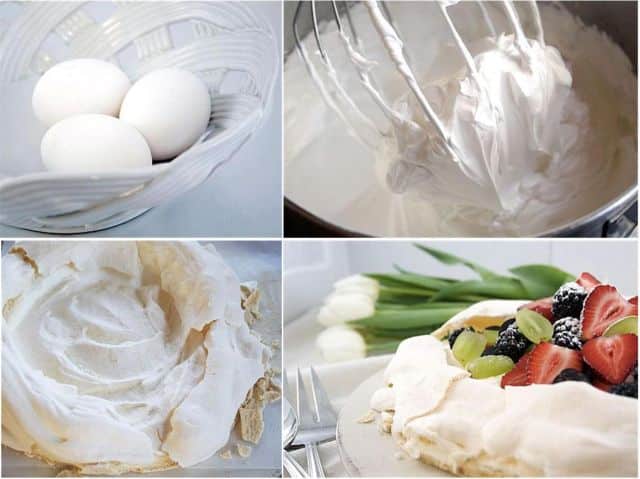
Whisk superfine sugar and cornstarch together in a small bowl. In the bowl of an electric mixer, beat whites with a pinch of salt at medium speed until soft peaks form. Add the water and beat until whites hold soft peaks once again.
On medium-high, beat in sugar mixture 1 Tbsp at a time. After all sugar has been added, beat 1 minute longer. Add vinegar, then beat at high speed until glossy and stiff peaks form, about 5 minutes (longer if using hand-held mixer). The meringue will be extremely thick.
Spread meringue carefully to cover the circle on the parchment, creating a cavity in the center (for the filling). Bake until meringue is pale golden and has a crust, about 45 minutes. Avoid opening the oven door! Turn oven off and prop door open slightly with a wooden spoon. Cool meringue in oven 1 hour. The exterior will be dry and possibly cracked, the inside more like the consistency of marshmallow.

To assemble the pavlova, beat the heavy cream just as it holds stiff peaks, then 1/4 cup at a time, whisk cream into the lemon curd. Check consistency each time before adding more cream. It should be able to mound. Spoon lemon cream into cooled meringue and mound fruit in the center. Serve with extra whipped cream if desired.
 

A Taste Of Yellow 2008 – Tropical Fruit Verrine and Peach Macarons

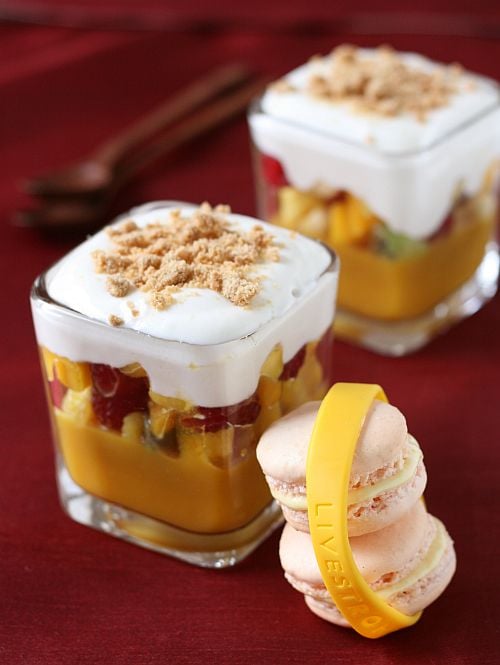
Verrines and Peach Macarons. Copyright©Tartelette-2008 There are many events I like to participate in but there is one I would not miss for the world: LiveStrong Day With A Taste Of Yellow launched and hosted by Barbara from Winos and Foodies . Last year 149 bloggers from all over the world answered her call to celebrate life, remember our loved one who passed away from cancer and this year I have no fear that more will rally on May 13th to support the LiveStrong Foundation. I have previously talked about my brother passing away at an early age from cancer and then my grandmother a few years later. There is not a day that goes by without their memory influencing my thoughts, my choices and my attitude. I laugh more, I try not to sweat the small stuff (does not mean I succeed all the time) and I live and love stronger, for me and others. I tried to write this post all weekend long but everytime my eyes got cloudy and my heart heavy, no exception this very minute. I miss Thierry, I miss Mamie Paulette. I wish I could write a more eloquent post to their memory but I can’t even write the word cancer without hurting. The anger and disbelief has given way to sadness but last year I did manage to write some about it which you can read here.

Instead I want to focus on the woman behind the event, Barbara. Although I have never met her in person, I like to believe that we would be good friends if we were neighbors. I first "met" Barbara when I sent her a package during one round of Blogging By Mail….all the way to New Zealand! We kept in touch through emails, we discovered more about each other as the months went by and she is in my thoughts just about everyday. She has her own battle with cancer to fight and yet she never cease to amaze me by dropping me a line or sending me a little package when I come here and open up about some of my "mishaps". Thank you for being here, for being fierce, for being strong, for being such a support when I needed a little boost.

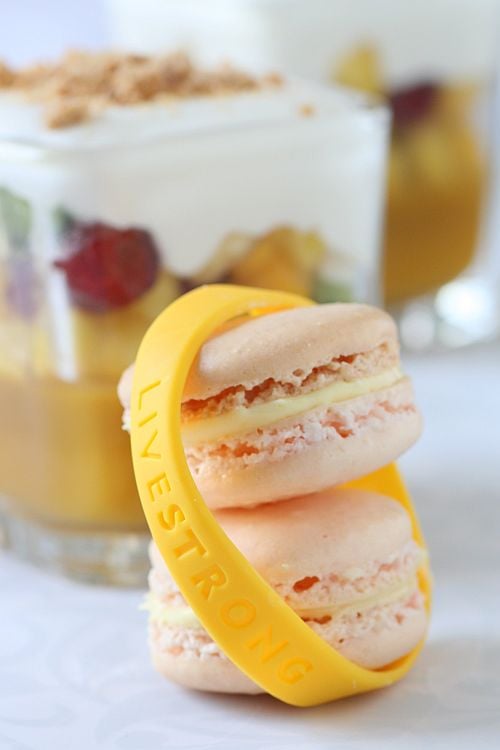
When she launched Taste of Yellow this year, she added a little photo contest opportunity with the request that our picture had to feature the yellow cancer wristband. Name your color, I got it, but in this case when I went to get mine wrapped around Teddy The Mini Bear I discovered that this ferocious beast had a field trip with the bear and the bracelet. I got online and figured I would order a bag of 10 and give them out to friends and family and right after I hit "buy", an email from Barbara came in reading that she had some and would I like her to send me one (from Australia this time, because she moved) Yep, Ma’m! I gave the whole bag I purchased away and kept hers for the photo shot and away from the beast of the house! Thank you my dear, macarons look great wrapped in yellow! The "funny" thing this year is that LiveStrong day falls on my birthday, a date my brother never missed although he was completely in his own world when it came to dates and celebrations. Life has a way to remind you of the big things doesn’t it?

Allright, what about Barbara’s event and the food…. It has to be yellow for one and since it has been in the 80sF around here lately I decided not to turn the oven on too long and make something refreshing. A tropical "verrine" of mango, fruit salad, and whipped Greek yogurt with peach ganache macarons…yellow, yellow…Of course I had to stick a macaron in there..eheheh!! That went down so easy last night as we were sitting on the porch, reminiscing about the first time B. met my bother in Montmartre in front of a big bowl of spaghetti and the first time he met my grandmother at her house in front of one of her famous tarts and a cup of tea. Great memories…the best (someone pass me a Kleenex).

I need to add after reading several comments that you do not need a yellow wristband to enter the event, it is just to take part in the photo contest. However, purchasing one or several through the Lance Armstrong Foundation will help fight this nasty disease.

Verrines and Peach Macarons. Copyright©Tartelette-2008
Tropical Fruit Verrines With Peach Macarons:

Printable Version

For the verrines (serves 4)

2 mangoes

2 Tb lime juice

1 pint fresh raspberries

1 cup diced fresh pineapple

2 kiwis, skinned and diced

1 bananas, skinned and diced

1 cup Greek yogurt

1 cup heavy cream, whipped to soft peaks

For the bottom layer, peel the mango and cut in rough chunks, run them through the food processor with the lime juice until you obtain a fine puree. Divide it evenly among four glasses or dishes.

Peel and dice the remaining mango and mix it with the other fruits to get a nice fruit salad, add a couple of Tbs of lemon juice to prevent the fruits from turning brown if you want. Divide on top of the mango puree evenly among the glasses.

Mix the Greek yogurt and the whipped cream and top each glass with it. Sprinkle with crushed sugar cookies if your desire. Refrigerate until ready to serve.

For the Macarons shells:

3 egg whites (I like to use 1-2 day old egg whites)

50 gr. granulated sugar

200 gr. powdered sugar

110 gr. ground almonds

1 drop yellow food coloring

1 drop red food coloring

For the whites: the day before (24hrs), separate your eggs and store the whites at room temperature on a covered container. If you want to use 48hrs (or more) egg whites, you can store them in the fridge.

In a stand mixer fitted with the whisk attachment, whip the egg whites to a foam, gradually add the sugar until you obtain a glossy meringue. Do not overbeat your meringue or it will be too dry and your macarons won’t work. Combine the ground almonds and powdered sugar in a food processor and give them a quick pulse. It will break the powdered sugar lumps and combine your almonds with it evenly. Add them to the meringue, give it a quick fold and remove some of the batter that will remain uncolored. Add the food colorings to the rest and fold the mass carefully until you obtain a batter that flows like magma or a thick ribbon. Give quick strokes at first to break the mass and slow down. The whole process should not take more than 50 strokes. Test a small amount on a plate: if the tops flattens on its own you are good to go. If there is a small beak, give the batter a couple of turns. Fill a pastry bag fitted with a plain tip (Ateco #807 or #809) with the batter and pipe small rounds (1.5 inches in diameter) onto parchment paper baking sheets. Preheat the oven to 300F. Let the macarons sit out for an hour to harden their shells a bit and bake for 8-10 minutes, depending on their size. Let cool.

If you have trouble removing the shells, pour a couple of drops of water under the parchment paper while the sheet is still a bit warm and the macarons will lift up more easily do to the moisture. Don’t let them sit there in it too long or they will become soggy. Pipe or spoon some ganache on one shell and sandwich with another one.

If you use fresh whites, zap them up in the microwave on medium high for 20 seconds to mimic the aging process.

For the Peach Ganache:

150 gr good quality white chocolate

1 peach

75 ml heavy cream

Bring a small pot filled with water to a boil on the stove and cook the peach in it for a couple of minutes. Remove from the water, let cool, peel and chop into rough chunks. Run them through the food processor until you get a fine peach puree. Set aside.In a bowl set over a pot of simmering water, melt the white chocolate until completely smooth. Remove from the heat and add the heavy cream and peach puree. Gently incorporate all the ingredients together until your ganache is smooth. Refrigerate until of piping consistency and fill the macarons shells with it.

Honey Panna Cotta and Raspberry Terrine

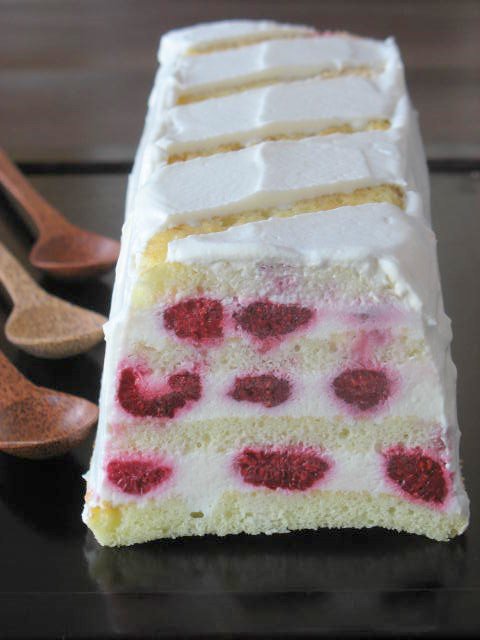
Right around mid December, I had that feeling something somewhere was not right but I could not really put my finger on it. Something was missing every time I’d turn on the computer but I could say what. The filling lasted a few days more when suddenly it hit me, "WTSIM…" was missing! Peeps, that’s bad when your body has become so trained to certain cycles that it knows when something is out of place. And that’s even worse when it is in your "other" life, your blogging life that is. Unless they ask us to make stew or barbecue I am always there to go play with Johanna, Jeanne and Andrew. January’s theme is "Terrine" and as I was reading Johanna’s directions I almost sighed in disappointment when she said that sweet terrines were welcome. Oh good! Now what?!!

I thought about steamed puddings in terrine molds and about nice layered fruit gelatin layers. The former seemed a little heavier than I wanted to bring to our weekly gathering with the neighbors and the latter was going to be received as this weird jello-type dish no matter how sophisticated the layering and fruits would be. I was in the mood for layers of cream and fruits and decided to pair them with a light genoise and assemble the terrine that way. I got lucky at the farmers' market that Saturday and came home with some very ripe and fresh raspberries and homemade yogurt, thick and wholesome.

The yogurt is the base for a light and creamy panna cotta flavored with honey. I was inspired by a recipe from The Sweet Life by Kate Zucherman. I was intrigued by this recipe as the other element is a egg white custard. Like most of us out there I am used to egg yolks based custard so this was an interesting play on a basic. I have to say that on its own, it is very eggy tasting…not something I would want to eat by the spoonful like creme anglaise. However, once mixed in with the yogurt and honey, the strong egg flavor disappear completely and one is left with a very silky panna cotta. Something I can eat by the spoonful!!

The genoise is the same used in the December Daring Bakers' challenge as the cake is moist and fluffy and works perfectly cut up in log strips to layer the cream and the fruit. My little play on the cake is that I brushed each layer with some Saint Germain Elderflower liqueur that my sweet friend Anita sent me a few weeks ago. It took the whole terrine from "excellent" to "awesome". I have to hide the bottle from myself because it is truly addictive! You can skip the alcohol part or substitute with Kirsch or white rum. Feel free to use something else than raspberries like strawberries, peaches, etc…

Honey Panna Cotta and Raspberry Terrine:

For the Genoise (recipe from the Yule Log Daring Baker Challenge):

Note you will only need about half the sheet pan. I wrap the leftover really well and freeze it for other uses (layered cake and mousse or instant cake Napoleons, etc…)

3 large eggs

3 large egg yolks

pinch of salt

¾ cup of sugar

½ cup cake flour

¼ cup cornstarch
one (1) 10 x 15 inch jelly-roll pan that has been buttered and lined with parchment paper and then buttered again.

Set a rack in the middle of the oven and preheat to 400 degrees F.
Half-fill a medium saucepan with water and bring it to a boil over high heat. Lower the heat so the water is simmering.
Whisk the eggs, egg yolks, salt and sugar together in the bowl of a heavy-duty mixer. Place over the pan of simmering water and whisk gently until the mixture is just lukewarm, about 100 degrees if you have a thermometer (or test with your finger – it should be warm to the touch).
Attach the bowl to the mixer and, with the whisk attachment, whip on medium-high speed until the egg mixture is cooled (touch the outside of the bowl to tell) and tripled in volume. The egg foam will be thick and will form a slowly dissolving ribbon falling back onto the bowl of whipped eggs when the whisk is lifted.
While the eggs are whipping, stir together the flour and cornstarch.
Sift one-third of the flour mixture over the beaten eggs. Use a rubber spatula to fold in the flour mixture, making sure to scrape all the way to the bottom of the bowl on every pass through the batter to prevent the flour mixture from accumulating there and making lumps. Repeat with another third of the flour mixture and finally with the remainder.
Scrape the batter into the prepared pan and smooth the top.
Bake the genoise for about 10 to 12 minutes. Make sure the cake does not over bake and become too dry or it will not roll properly.
Once the cake is done (a tester will come out clean and if you press the cake lightly it will spring back), remove it from the oven and let it cool on a rack. Remove the cake from the baking sheet and invert it on a larger piece of parchment paper. Peel of the parchment paper that was lining the baking sheet. For the Panna Cotta (start the day before) (adapted from Kate Zuckerman)
16 oz plain whole milk yogurt
1/2 cup sour cream
2 Tb honey
1/2 Tb unflavored gelatin
1/3 cup whole milk
1/3 cup heavy cream
1/4 cup sugar
3 egg whites

8 to 24 hours ahead of time: line a fine mesh strainer with cheesecloth or coffee filter and place it over a bowl so that it is suspended. Scrape the yogurt in the lined strainer and let it drain, refrigerated.
After 8-24 hours (I strain mine overnight), combine the yogurt, sour cream and honey. Whisk well and set aside at room temperature.
In a small bowl, sprinkle the gelatin over 1 1/2 Tb water and set aside to bloom for 10 minutes.
Make the egg white custard: In a small saucepan, heat up the milk, cream and 2 Tb of the sugar, until the sugar is dissolved and the mixture is almost boiling.
In a small bowl, whisk together the egg whites and the 1/4 cup of sugar. Slowly whisk in some of the hot milk to temper the eggs. Add the remaining milk, whisk well, and pour the whole thing back into the pot. Stir constantly over medium heat until the mixture thickens like for a regular egg custard (should coat the back of a spoon).
Remove from the heat and stir in the gelatin. Stir well until the gelatin is completely dissolved. Strain the custard through a sieve if necessary. Let cool to room temperature. You can speed up this process by putting your bowl over an ice bath. Once the custard is cooled, stir in the yogurt mixture. Set aside a room temperature until ready to use. Remaining ingredients:

2 cups fresh or frozen raspberries.

1/2 cup heavy cream, whipped to soft peaks with 1-2 Tb sugar.

To assemble:

Line a terrine mold with plastic wrap, making sure that it extends over the edges of the pan as it will give you a better grip when you unmold it. Cut one strip of genoise the same width as the bottom of your terrine. Mine gets wider as you reach the rim of the mold so my pieces are going to get a little wider each time.

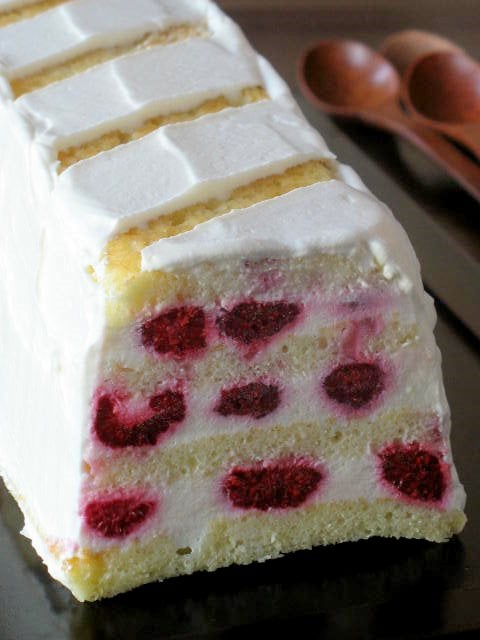
Spoon about 1/4 cup of the honey panna cotta on top of the cake layer, carefully place raspberries the whole length of the mold, right on top of the panna cotta. Cover with another 1/4 cup of the cream. Cut another piece of the cake and repeat with the panna cotta and raspberries. Repeat the process until you reach the top. Make sure that your last layer ends with a piece of cake as it will be your base when you unmold the pan. Cover with plastic wrap and refrigerate for at least 2 hours or for up to 2 days before serving. To serve:

Remove the terrine from the refrigerator as well as the plastic wrap on top. Invert the pan onto a serving plate and peel of the plastic wrap that was lining the inside of the mold. Cover the cake with the whipped cream and keep refrigerated until ready to serve.

To make strips: cut out strips of paper the width you desire and lay them on top of the terrine while you spread the whipped cream. Go slow and steady or you will move them at the same time. Peel the strips off and voila!

Apple And Thyme: Pear Tart With Grandma And Mom

It’s interesting how life comes at you full force, sometimes from people you don’t even know.
A few weeks ago one member of the Daring Bakers, Inge, posted an event she was hosting to honor the women, be it moms or grandmothers (or any person special to us) who influenced us in the kitchen. The event, Apple and Thyme, was somewhat prompted by the fact that a blogging friend of hers, Jeni from the Passionate Palate, had just lost her mother to a long battle with cancer.

Losing is the right term when it comes to loved ones, especially mothers. You lose a bit of your essence, a small part of your flesh is ripped and your heart is taken away from away from you. The hurt and the pain diminish with time but never really go away. I am sorry that Jeni had to experience such a tragedy. I often think about the pain my own mother must feel day in day out after losing her own mother and it just breaks my heart. I can’t think about a day without my mom, even though we do not talk on the phone everyday or even when sometimes we don’t really like each other (hey, we all have our moods!). Jeni, I offer you my deepest condolences and thank you for reminding me to hug my mom, even if only in my dreams.

If you have been reading this blog for a while, you know how deeply my grandmother has influenced my baking. She had that magical touch…you would come to visit and within half an hour the table was set with a wonderful spread of foods. It seemed almost effortless to her to come up with the most delicious foods. I used to believe my grandmother was this goddess of the kitchen, even when she was too frail from battling cancer. It’s not that I thought less of my mother’s cooking and baking, don’t get me wrong, but I felt like my mother was showing me the ropes, the behind the scenes, while grandma was giving me the picture perfect, no mise-en-place necessary final product.

My mother is more of a cook than a baker but when she tackles the dough, man! She is good! Just as good as her own mother and I hope I am up to par with their talent. Most French house cooks and bakers do not make elaborate 5 courses meal or produce 3 layer mousse cakes every day of the week. We make yogurt cakes, chocolate mousses, clafoutis, flans, and tarts….lots of tarts!! I think the first item I ever baked was a tart, maybe a quiche, something with a crust, something with a filling, something with cream….and I got hooked, hence the blog name "Tartelette"…. There is always a tart of some sort in the fridge…no lie. Well, except tonight because I finished the last slice of this one. I love the contrast between crust and filling, the endless possibilities of ingredients combination. If a tart had a cousin, it would be a salad: both can be as rustic or elaborate as you wish, both can make a meal (savory tart) or a side, both make use of seasonal produce or what is overripe in the fruit basket and both adapt to a myriad of cultures and cuisines.

I remember my mother and grandmother teaching me the A,B,Cs of tart doughs, "pate sablee, pate brisee, pate feuilletee" (shortbread, basic, puff pastry), and I grew up making my doughs from scratch every time. Even when the times brought packages of ready made tart dough at the grocery store, they were still making them from scratch most of the time. It always seemed funny to me to buy them only to have them remain in the fridge drawer. "Juste au cas ou" …just in case. But again, "just in case" never usually happens in France…because nobody drops in "just like that"…we are a nation of planners you see, so there is always plenty of time to make dough…but that aspect of French culture is for another post. I have one of those pre-made dough in my fridge actually…and you know what? I think I ought to throw it away…it’s been there for a while and probably will never get used…why? In my mind, there is nothing like homemade: it is neither labor nor time consuming and if you are really lazy, you can turn a dough in your food processor in less than 5 minutes. A little resting time, a little rolling and "hop" you’re there…

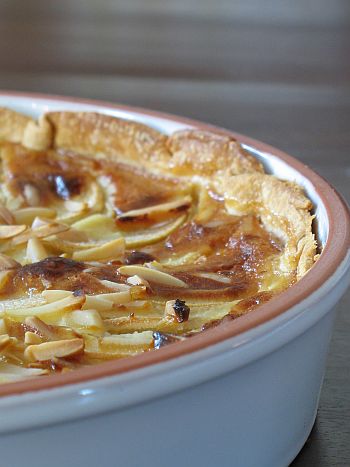
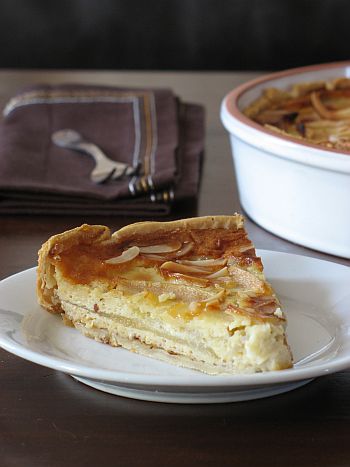
For this particular tart to pay tribute to both my mother and grandmother I have chosen one of our favorite combination: pears and almonds. I miss you grandma and mom, and hope I make you proud everytime I step in and out of the kitchen.


Pear And Almond Tart

Makes one 10 inch tart.

Crust:
1 1/4 cups all-purpose flour
1 1/2 Tbs sugar
1/2 cup chilled (1 stick) unsalted butter, cut in pieces
2 Tbs ice water
1 egg yolk, lightly beaten

Place flour and sugar in the bowl of a food processor, and process for a few seconds. Add butter, and process until the mixture resembles coarse crumbs. Add the ice water then the egg yolk, processing just until the dough holds together. Do not process for more than 30 seconds. Turn the dough out onto a work surface. Place on a sheet of plastic wrap. Flatten, and form into a disc. Wrap, and refrigerate at least 1 hour before using.
Preheat oven to 350F and blind bake the tart shells: roll the dough out on a lightly floured surface, lay into tart shell, cover with parchment paper or foil, pour dry beans or pie weights on top and bake fro 15 minutes. Let cool before proceeding.

Filling:
2 large pears, peeled and cored, thinly sliced (I chose Comice for this tart)
3 eggs
1/2 cup sugar
1/2 cup ground almonds
1 cup milk
1/2 cup heavy cream
1/4 cup slivered almonds

In a large mixing bowl, whisk together the eggs and the sugar until pale. Whisk in the ground almonds, milk and cream. Pour into the cooled pie shell, leaving about a 1 inch border so that the batter does not overflow when you arrange the ears on top. Arrange the pear slices over the top and sprinkle with the slivered almonds. Bake at 350 until golden brown, do not worry if it still wiggles a bit in the middle, the custard will keep on setting once removed from the oven. Serve warm or at room temperature…oh heck! Eat it anyway you want, it is darn good even cold!!