I hope everyone had a wonderful Christmas surrounded by friends and family or just chilling. We loved being able to share the day with a few different groups of people, plopping from one dinner to another and a glass of Champagne to a glass of wine, surrounded by the warmth of a good fire and a few good hugs.
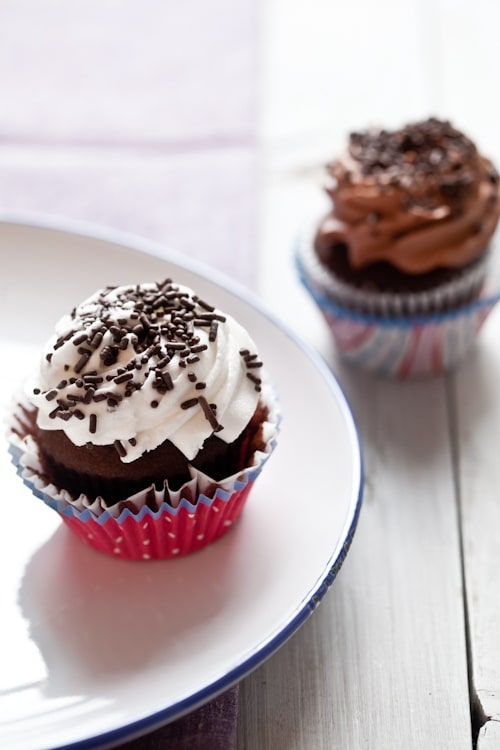
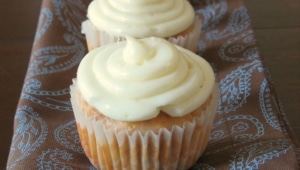
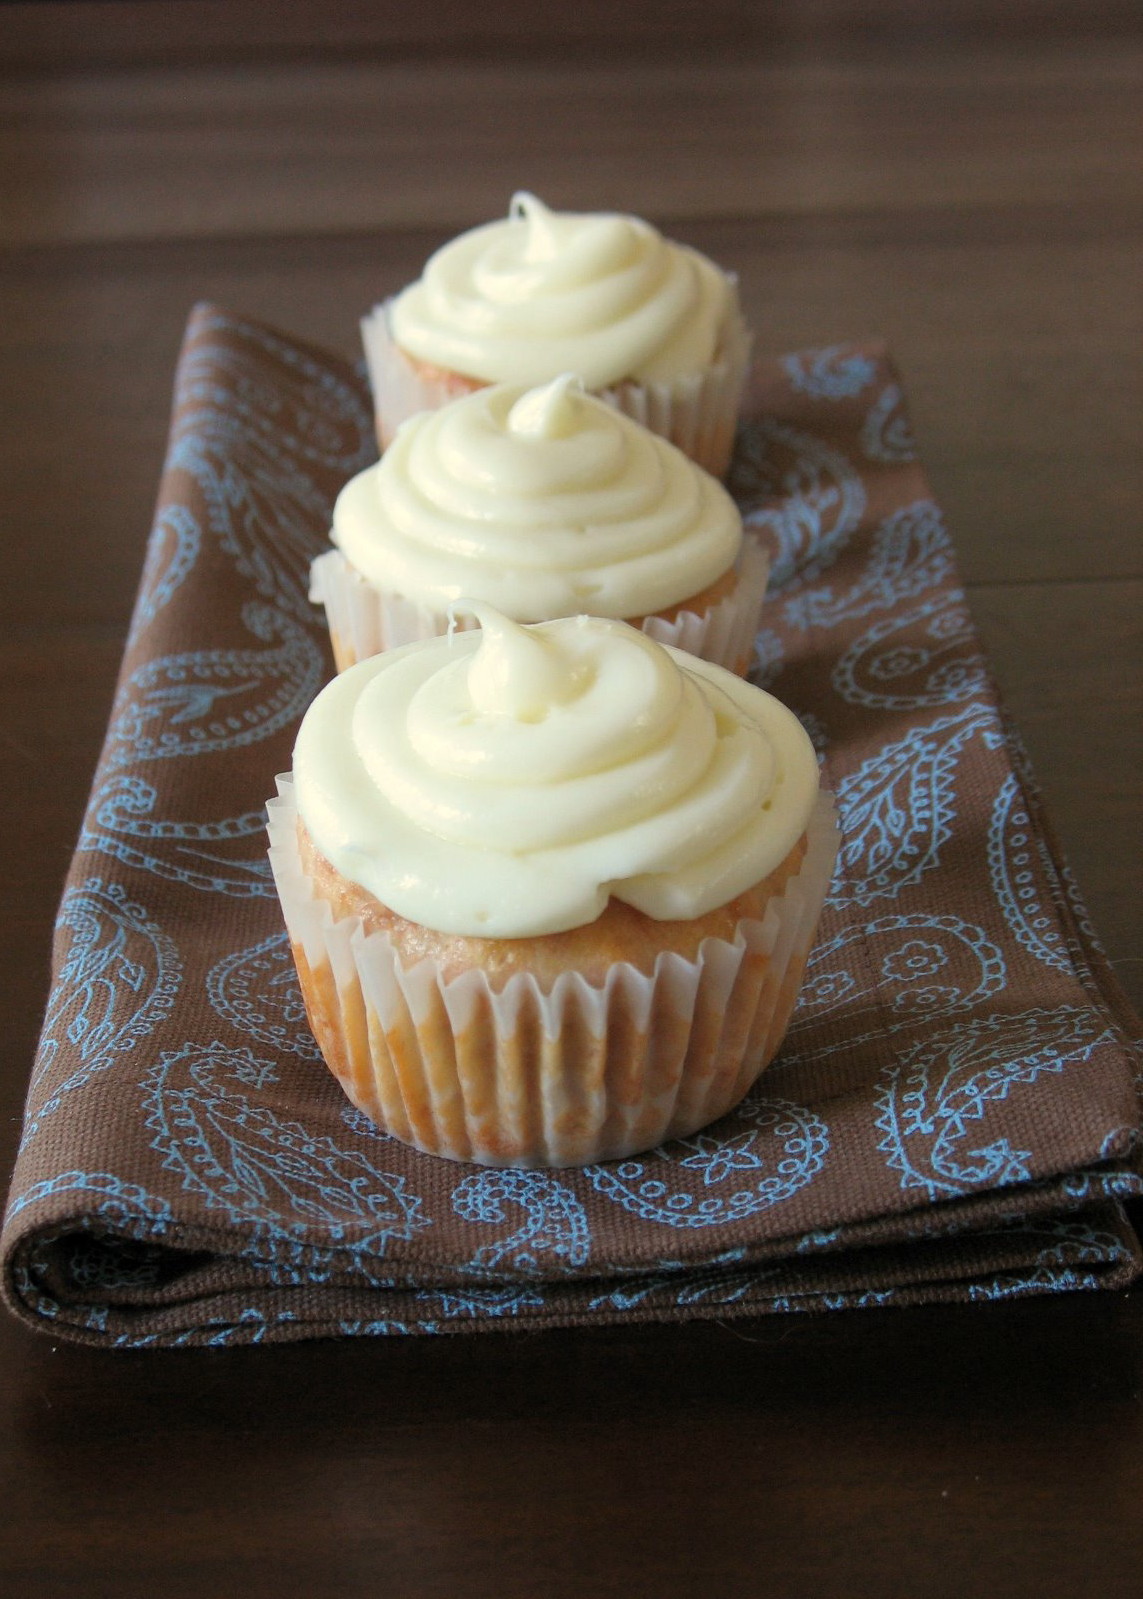
Today is Nutella Day. And that, folks, makes me very very happy. That means I can dig my spoon with reckless abandon in the jar of Nutella. Oh wait…I think I have had Nutella day for 2 weeks straight now. Oops..
It’s been years since I have participated to a Nutella Day, an event created by my good friend Sara from Ms. Adventures in Italy and Michelle from Bleeding Espresso but given the amount of Nutella I have consumed to keep the writing and shooting going lately, I felt I needed to honor the delicious chocolate hazelnut spread.
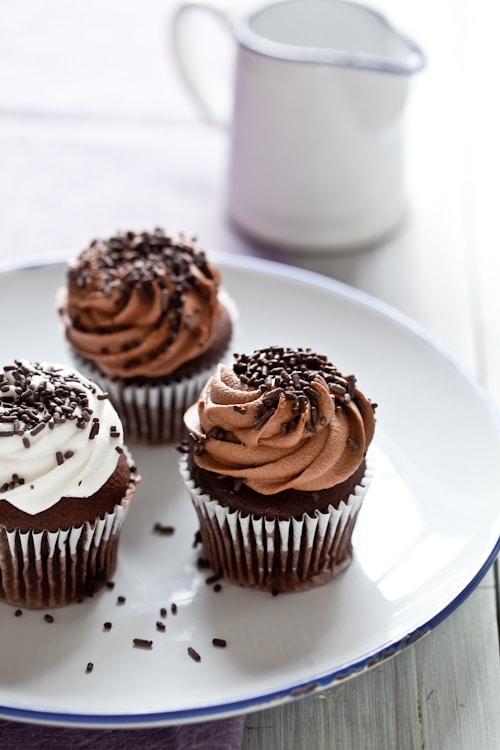
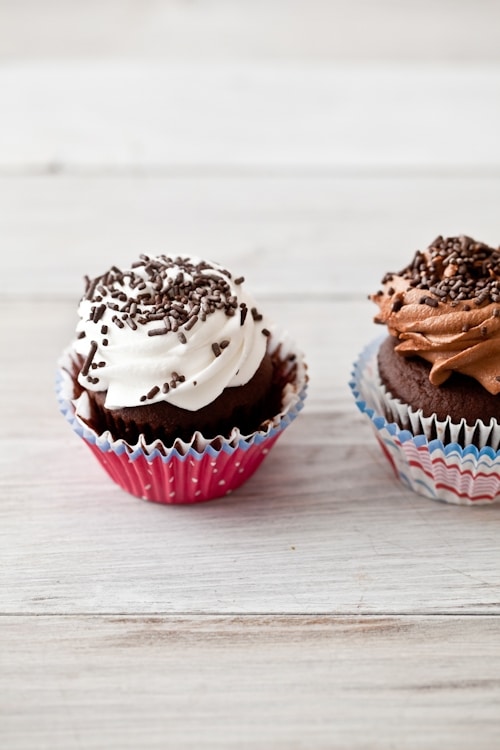
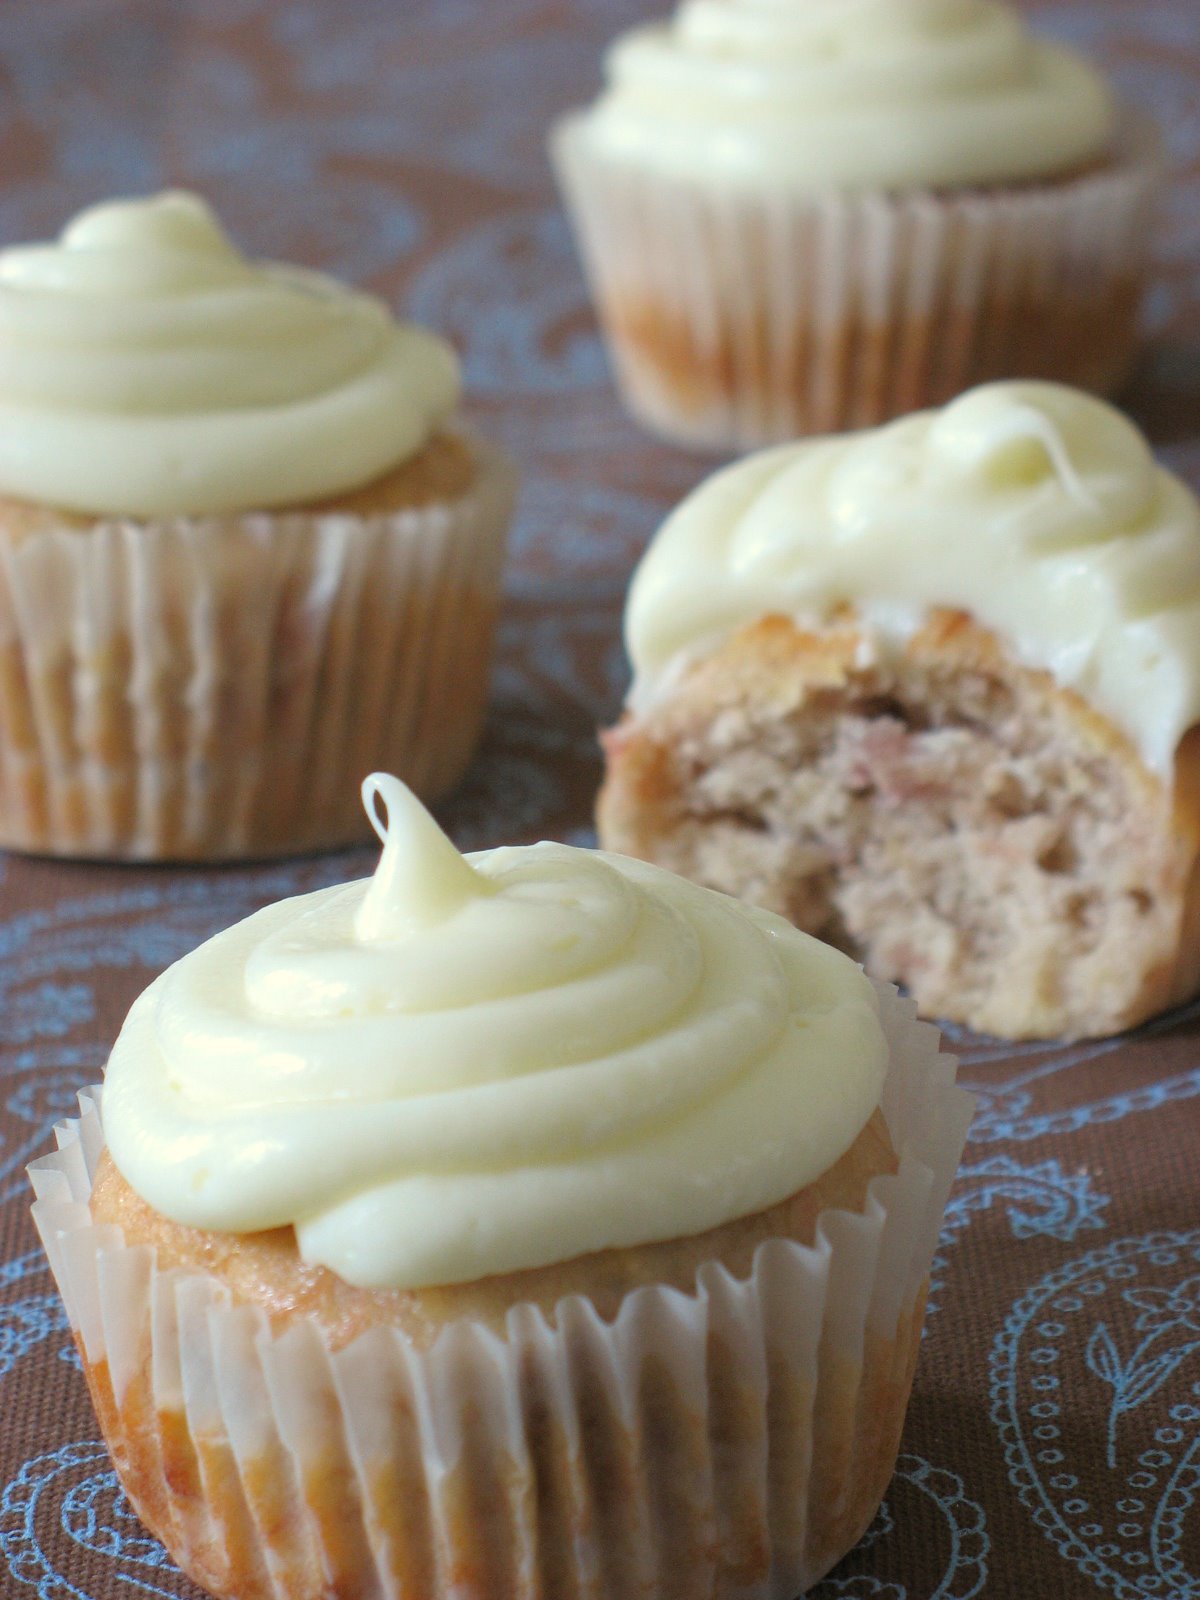
These cupcakes hit the spot. I wanted nothing more than to share a couple of these right away with B. but he was already gone for work. I waited patiently. Then I waited anxiously. My resistance was fading. And when he got home that afternoon, a couple were already gone. I had a cupcake with frosting. Then a cupcake without frosting. Then just frosting. One week from manuscript deadline, I think I am allowed a little lot of Nutella. And coffee.
Ok, so I got a bit carried away with the frosting. But that’s ok. It reminded B. of the bakery cupcakes he’s always lusting after. Good! Gluten free Nutella Cupcakes and Nutella cream cheese frosting or plain cream cheese frosting. Who can blame me? For once the ratio of cake to frosting satisfied me completely!
Have a great Nutella Day and a wonderful weekend! Nutella Cupcakes (adapted from this recipe) and Nutella Cream Cheese Frosting:
Note: I double lined the cupcakes just to be on the safe side but you don’t have to.
The colored liners are from Bake It Pretty by the way.
Use 200gr all purpose flour to replace the sweet rice and millet flours and the corn starch if desired.
Makes 12
For the cupcakes:
For the cupcakes:
125g unsalted butter, at room temperature
1/3 cup (110gr)honey or light brown sugar
1 tablespoon ground coffee
2 tablespoons milk
1/4 cup Nutella
2 large eggs
1/2 cup plus 2 tablespoons (100 gr) superfine sweet rice flour
1/4 cup (50 gr) millet flour
1/4 cup (50 gr) cornstarch (or use tapioca flour)
1 teaspoon baking soda
pinch of salt
Prepare the cupcakes:
Preheat the oven to 350F. Place 12 muffin liners inside a muffin pan and lightly brush with melted butter (or cooking spray).
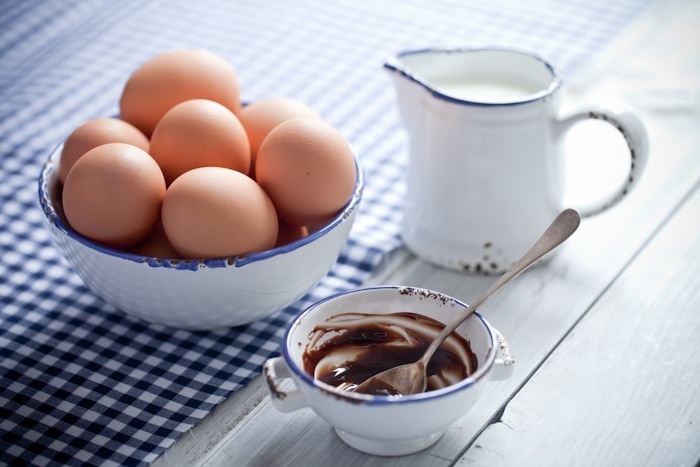
In an electric mixer, whip the butter and honey until fluffy at medium speed, 2-3 minutes. Reduce the speed to low and add the coffee, milk and Nutella. Still on low, add the eggs, one at time and scraping the bowl after each addition. In a separate bowl, mix together the flours, cornstarch, baking soda and salt and slowly fold this in with the butter – Nutella mixture until the mixture is smooth. Divide evenly among the muffin liners and bake 20-25 minutes. Let cool completely before frosting or enjoy warm without.
Nutella Cream Cheese Frosting:
8 oz cream cheese at room temperature
2 tablespoons unsalted butter at room temperature
1/4 cup powdered sugar
2 oz Nutella
In the bowl of an electric mixer, whisk together the cream cheese and butter until smooth. Sift the powdered sugar over the bowl and whisk for a few seconds. Add the Nutella and mix until completely incorporated. That is plenty for 12 cupcakes by the way. Halve the recipe if you plan to do some Nutella and some plain.
For plain cream cheese frosting:
remove the Nutella and add 2 tablespoons butter to make it 1/4 cup total and 1/4 cup powdered sugar to make it 1/2 cup total. Same process.
There aren’t many things you’ll see me do because they are cool and there are very few people I (almost always) agree with or trust (almost always) blindly. My dear B. will tell you I spend my life with an imaginary raised eyebrow and my right ear pointed up. I am not skeptical, I am curious. Sometimes cautious. Sometimes not at all.
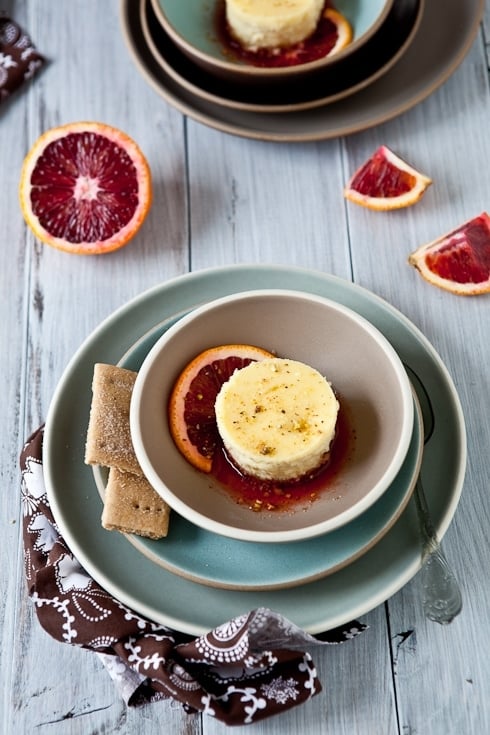
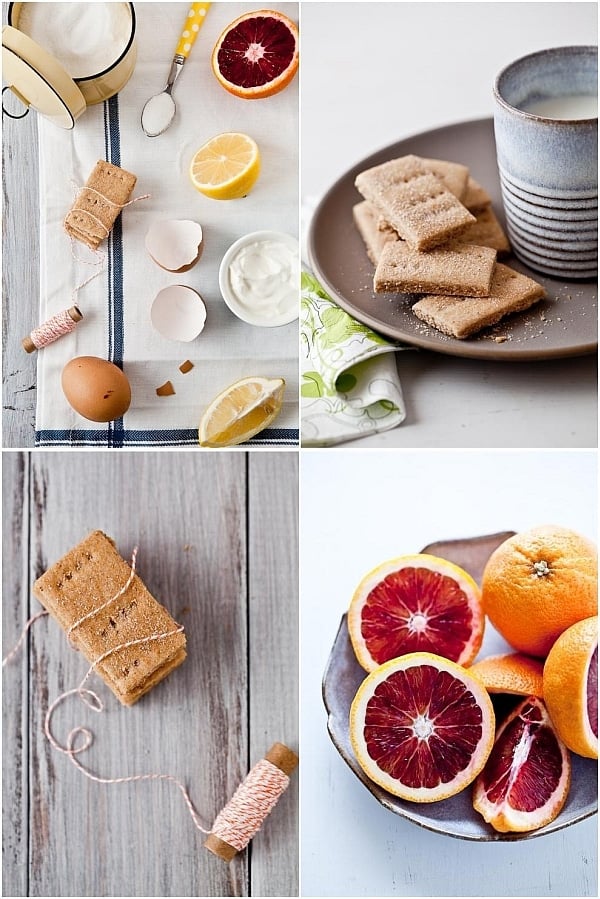
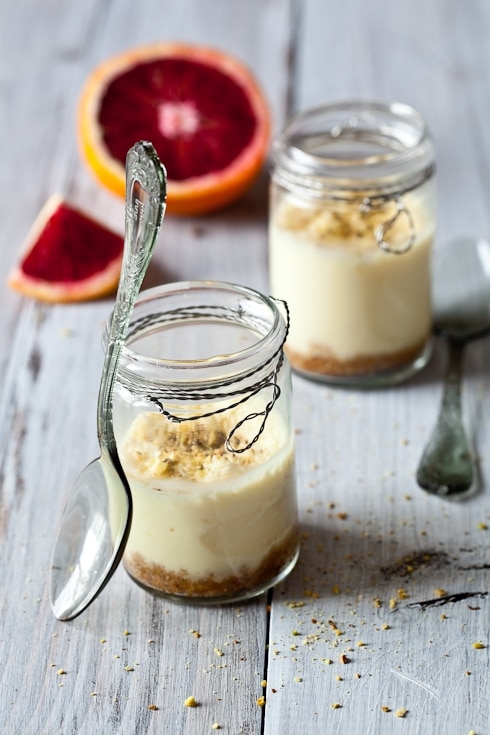
When Shauna mentioned that she was working on gluten free graham crackers, I had my ears tuned in to her updates. When she posted them, I blindly and happily followed her trail and made a batch. Then two. Then B. said they’d be even better under a cheesecake. So I made a batch of mini Lemon Goat Cheese Cheesecakes with Blood Orange Syrup. Then two.
I often talk about tea time as being an important ritual of my day (as much as my schedule lets me) and when I moved to the US, I became quite fond of having a few graham crackers with my tea. I was a student, they were cheap and a box lasted a while between roomie and myself.
Then I stopped having a cookie with tea altogether. Partly because it’s not that much fun a ritual when done alone so I’d save those moments for when my parents would visit and partly when I discovered it was not helping my health issues. I stopped. Until last week.
I made a batch of Shauna’s gluten free graham crackers as soon as I came home from Atlanta. I sat down with my cup of tea and my just baked cookies and sighed. Content and thankful. Bill started saying that they were pretty close to the real thing but not quite until I stopped him, with my eyebrow raised, and asked "if the real thing is what makes us truly happy then these are it for me" and added "it’s ok if you don’t like them as much…more for me!"
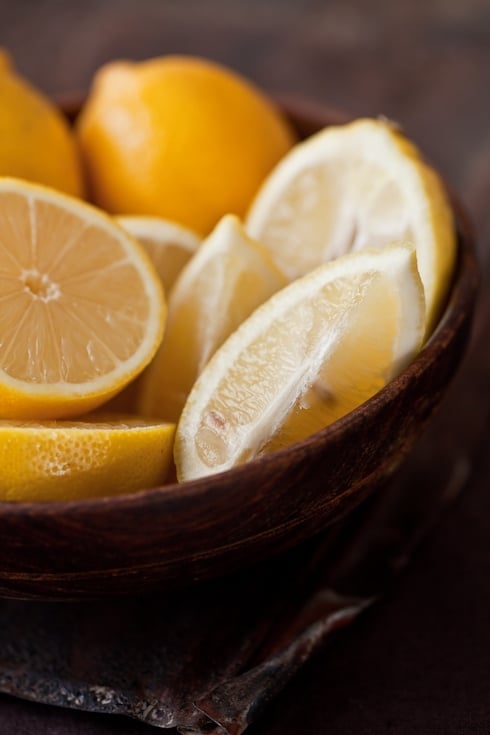
Men don’t generally take a hint and yet mine likes to give me some, especially when it comes to desserts. He starts by fidgeting around the cookie jar. Opens the fridge, closes it. Plays with the cookie jar some more. Until I break down and ask if he has a suggestion. He may not bake or cook, but he’s got good ideas about eating. I had all forms of citrus laid out on the countertop for an article I was working on and he suggested we use some of the lemons and make a cheesecake if possible.
Since it was spur of the moment, I had about half the quantity of cream cheese I needed but being a big fan of goat cheese in desserts, I used some to make up the difference. The tang of the fresh goat cheese worked perfectly with the tang of the lemons. I felt it needed some color though and made a quick blood orange syrup to go with it.
This first forray into a completely gluten free cheesecake was such a success that I made another batch a couple of days later. Yes. That good.
Lemon Goat Cheese Cheesecakes with Blood Orange Syrup:
Makes 8 mini cheesecakes
For the graham crakers: follow the recipe on Shauna’s site blindly…you won’t be disappointed, and grind enough graham crakers to make 1 cup crumbs.
For the cheesecake:
1 cup (250ml) graham cracker crumbs
4 tablespoons (60gr) unsalted butter, melted and cooled slightly
1 cup (200gr) sugar, divided
8 oz (240r) fresh mild goat cheese, at room temperature
8 oz (240gr) cream cheese, at room temperature
juice and zest of a whole lemon
3 large eggs
Preheat the oven to 325F and position a rack in the middle. Line 8 standard sized muffin tins with liners and slighly spray with cooking spray. Place the muffin pan in a large roasting pan. Set aside.
In a medium bowl, stir together the graham cracker crumbs, the melted butter and 1/4 cup (50gr) sugar. Divide the mixture evenly among the prepared muffin liners and pat with the back of a spoon. Bake for 5 minutes. Let cool. Lower the heat to 300F.
In the bowl of a stand mixer fitted with the paddle attachment, beat the remaining sugar with the cheeses and the lemon zest on medium speed until the mixture is completely smooth. Add the eggs, one at a time and beating well after each addition. Add the lemon juice and beat another 30 seconds. Divide the mixture evenly among the muffin liners. Add hot water to the roasting pan but do not worry about coming up halfway the side of the muffin pan too much. The oven temperature is already so low that the water is just to be on the safe side. Add at least one inch inside the roasting pan.
Bake the mini cheesecakes for 20 minutes or until slightly giggling (or jiggle – whatever suits your mood) in the middle still. Keep an eye on them as they bake rather fast this way. Let cool completely before unmolding and serving with the blood orange syrup.
Notes: I made 8 small ones (baked in muffin tins) but you could make two 4-inch ones and bake them for about 10 minutes longer at the same heat.
For the blood orange syrup:
1 cup (250ml) fresh blood orange juice
1/2 cup (100gr) sugar
In a heavy bottomed medium saucepan, stir together the blood orange juice and the sugar over medium high heat until the sugar dissolves and the mixture comes to a boil. Reduce the heat and simmer down until the liquid is about reduced by half. Let cool and serve with the cheesecakes.
————————————————————————————-
Le P’tit Coin Francais:
Pour les fonds de cheesecakes: suivez la recette de Shauna ici ou utilisez des miettes de Petits Lu ou sables bretons.
Pour les cheesecakes:
250ml de miettes de petits gateaux
60 gr de beurre mou, fondu
200 gr de sucre, utilise en 2 fois
240 gr de fromage de chevre (frais et doux)
240 gr de cream cheese ou autre fromage frais
jus et zeste d’un citron
3 oeufs
Prechauffez le four a 160C. Habillez des moules a muffins avec des caissettes en papier de la meme taille et badigeonnez l’interieur d’huile avec un pinceau (ou utilisez un spray a huile comme ici). Placer les moules dans une grande et profonde leche frite par example.
Dans un bol de taille moyenne, melangez les miettes de biscuits, le beurre fondu et la moitie du sucre. Melangez bien avec une spatule et distribuez de facon egale a l’interieur des moules prepares. Tassez avec le dos de la spatule. Faites cuires pendant 5 minutes. Mettere de cote. Baissez la temperature du four a 150C.
Dans le bol d’un mixeur, battez au fouet les deux fromages, le reste de sucre et le zeste de citron jusqu’a ce que la pate soit lisse. Ajoutez les oeufs, un a un et en battant bien apres chaque ajout. Ajoutez le jus de citron et battez 30 secondes de plus jusqu’a obtenir une pate lisse.
Repartissez la pate entre les moules et ajoutez environ 2 centimetres d’eau chaude dans la leche frite. Faites cuire environ 20 minutes. Retirez les cheesecakes du four avant qu’ils soit completement cuits. Laissez refroidir completement avant de demouler. Servir avec le sirop a l’orange sanguine
Sirop a l’orange sanguine:
250 ml jus d’orange sanguine (frais de preference)
100 gr sucre
Placez le jus d’orange et le sucre dans une casserole a fond epais et portez a ebullition. Reduire la temperature sous la casserole et faire reduire le sirop de moitie. Servir avec les cheesecakes.
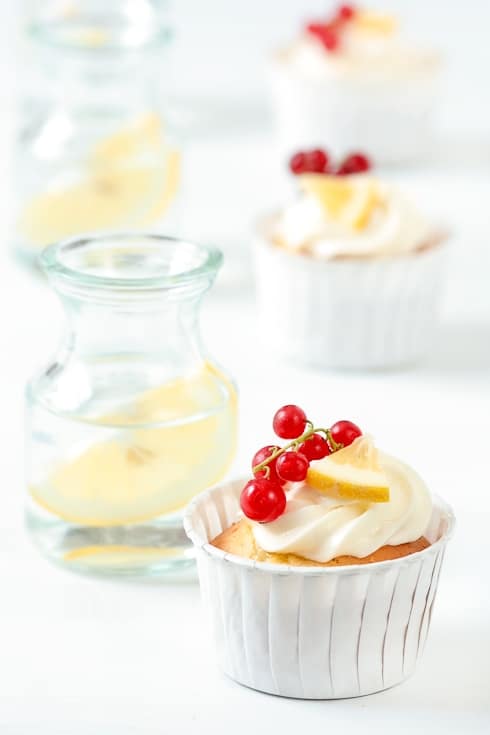
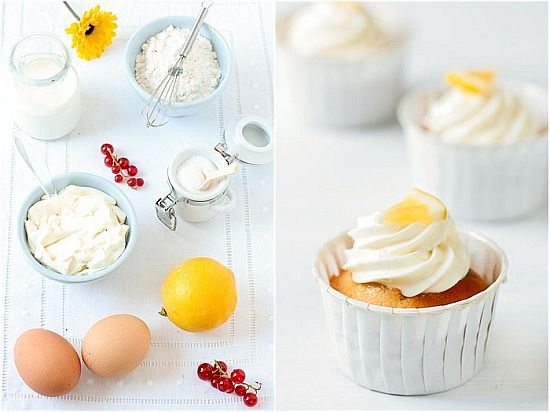
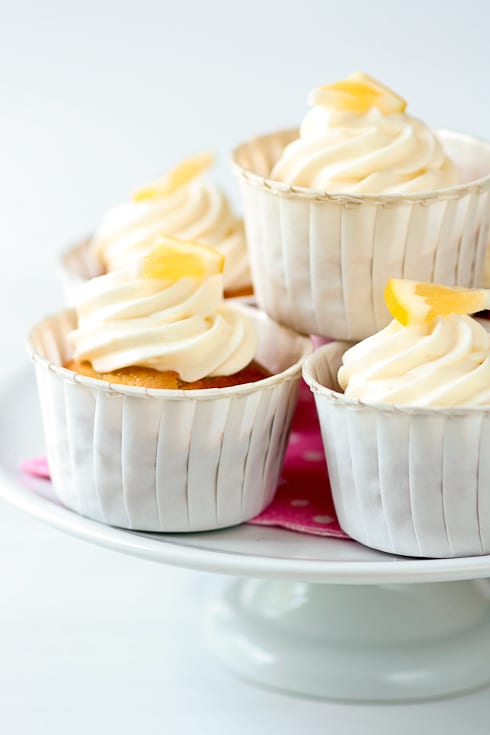
I was sketching desserts and jotting down recipe notes the other night when I asked B. if he had any more suggestions for the box of Meyer lemons we had in the fridge. A whole box! Thanks to my dear Mary of Alpine Berry I am now host to a whole crisper full of gorgeous homegrown Meyer lemons from her tree. I had just finished churning lemon ice cream and lemon sorbet but his eyes lit up and he exclaimed "Lemon Limoncello Cupcakes, please!" To which I reply "Sacre bleu! You want me to turn zee oven on?!". But he’d been really fantastic with these lemons that I had to cave and make him cupcakes.
The lemons arrived while I was visiting Veronica (I will put a page up soon on how to get your own Pastry Bootcamp) and I had completely forgotten to warn him. When I finally remembered, some of them were already showing a sad face. You’d never believe what my man did: he washed each and everyone of them, dried them, segmented the ones that were going bad, saved the good parts, placed the others in the crisper by order of ripeness, the sad ones toward the front, the happy ones in the back. Now you have to understand that this was coming from a guy who does not bake or cook, rarely steps foot in the kitchen unless he is on dishes duty. Bless his heart! You rock Bill!!
So, you can imagine that when he asked for cupcakes, I could not say no even though they are not part of my usual baking repertoire. It’s a French quirk nothing more. The addition of my homemade Limoncello is purely because we have been enjoying remembering family stories while sipping on the liquor. The more we sip, the more details we seem to remember about a particular afternoon spent with my uncle Jacques one winter. If you have ever had homemade moonshine, this will sound all too familiar, if not, well, give it a try. You’ll have something funny to tell your kids.
Whenever we go home to France to visit my family, we have to do "the rounds". Lots of uncles, aunts and cousins inviting us to lunch or dinner around a lot of food, good wine, tons of stories and an obligatory after dinner "digestif" (an alcoholic sip to help with your disgestion). A nice sip of cognac or Grand Marnier alongside a steaming espresso. Over the years, Bill has become very fond of this tradition and was looking forward to the much talked about "Jacques' moonshine". After lunch, my uncle prepped coffee and pulled out from the liquor cabinet a bottle of Perrier, popped it open and set it in front us. Bill looked surprised until a waft of it came to tickle his nose. This was no Perrier alright!
We drank our espresso and my uncle leaned towards Bill to fill his cup with moonshine. B. got concerned that there was still a small stain from the espresso at the bottom and asked if it would not be best to wash it out first. We *all* looked at him and giggled. Jacques, in his usual prankster’s way, told Bill to look very closely while he poured. At the first drop, all remaining coffee stains disappeared. "See, just like bleach!". Bill got this extremely worried look on his face and I knew exactly what he was thinking "Oh dear God, these Frenchies are trying to kill me!" We all raised our cups, toasted the newcomer to the family and drank our moonshine straight. Silence followed. Then Bill coughed and exclaimed "works your intestines like bleach would too!" to which we replied "well yes, that’s our interpretation of digestif!".
When we first had a taste of the Limoncello I made, we both squinted and remembered the day my uncle tried to bleach Bill’s stomach with homemade moonshine. I had made it very very strong. But what can you expect when the recipe came straight from an Italian boat captain shoving a bottle of his own 180 proof alcohol in my basket?! Ha! Good thing I had planned to dilute it with lemon juice and more sugar! Still…way way strong to be sipped easily so I have used it as a soaking syrup for cakes a great deal and made us a little tipsy on more than one occasion!
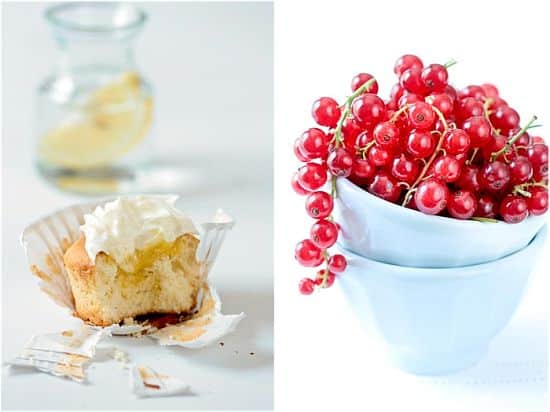
These cupcakes are clearly on the adult side with Limoncello in the batter and cream cheese frosting. I do make an unconventional lemon curd as I don’t use a whole lot of eggs and no butter. This one was on the (very) tart side with a lot less sugar than most recipes call for. I love a good Swiss or Italian meringue buttercream on my cakes but since they were per Bill’s request, I went with his favorite, cream cheese frosting with Meyer lemon zest and liquor. I topped each one with redcurrants because we love to eat them fresh. Tart on tart! Now that’s my kind of Happy Hour!
2 oz (60gr)unsalted butter, at room temperature
2 oz(60gr) cream cheese, at room temperature
1 cup (200gr)sugar
3 large eggs
2 tablespoons (30gr) limoncello (see here or here for possible recipes)
1½ cups (190gr) all-purpose flour
1 teaspoon baking powder
½ teaspoon salt
½ cup(125ml) buttermilk
1/4 cup Meyer lemon juice
zest of one Meyer lemon
For the Meyer lemon curd:
zest of 2 lemons
1/2 cup (125ml) lemon juice
1/4 cup (50gr) sugar
1 egg + 1 egg yolk
For the cream cheese frosting:
2 oz (60gr)unsalted butter, at room temperature
4 ounces (120gr) cream cheese, at room temperature
1 tablespoon (15gr) limoncello
1 cup (115gr) powdered sugar, sifted
Prepare the cupcakes:
Preheat oven to 350F and position a rack in the center.
In the bowl of an electric mixer fitted with the paddle attachment, beat the butter, cream cheese and sugar at medium speed until light and creamy, about 2-3 minutes. Add the eggs, one at a time, beating well after each addition. Add the limoncello and beat an extra minute. In a medium bowl, combine the flour, baking powder, and salt. Add flour mixture and buttermilk alternatively to the butter/eggs mixture, beginning and ending with flour mixture. Add the lemonjuice and zest. Fill cupcake tins 2/3 full. Bake for 20 minutes or until a toothpick inserted near the middle comes out clean. Let cool completely.
Prepare the Meyer lemon curd:
In a heavy medium saucepan, stir together the lemon zest, juice and sugar and bring to a simmer over medium heat. In a small bowl, beat the egg and egg yolk to break them up. Beat some of the lemon mixture into the eggs to temper. Scrape the mixture back into the saucepan and cook stirring constantly until it thickens up, about 5 minutes. Remove the curd from the heat, let cool completely.
Prepare the cream cheese frsoting:
In the bowl of an electric mixer fitted with the paddle attachment, beat the butter and cream cheese on medium speed until light and creamy, about 2-3 minutes. Add the limoncello and beat an extra minute. Reduce the speed to low and gradually add the sifted powdered sugar and beat until fully incorporated and smooth.
To assemble:
Cut a whole into each cupcake with a melon baller or the back end of a large pastry tip. Fill each cavity with the lemon curd. Fill a pastry bag fitted with a star tip with the cream cheese frosting and pipe onto each cupcake. Decorate with berries if desired.
Notes: I recently found out that the newest Wilton nut cups I previously used for baking cupcakes had been changed and now came with a warning that the new coating was not fit for baking. I baked one batch with the cupcake liners lined with parchment paper inside and one set without. I also put an empty liner in the oven to see what the coating would do. Nothing happened to the coating in all three experiments but use your own judgement/preference as far as liners go.
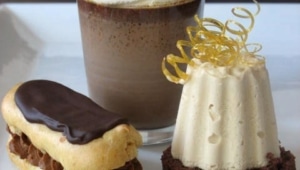
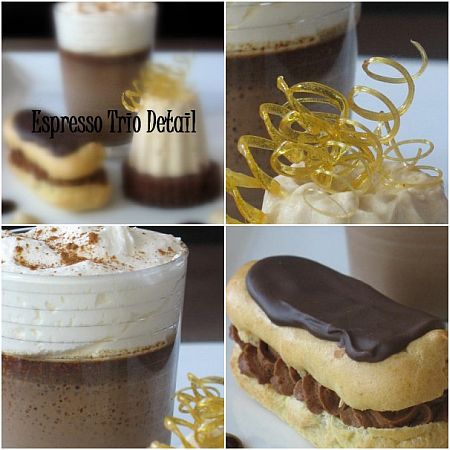
…more specifically Eclairs with Dark Chocolate-Espresso Mousse, Espresso-Dark Chocolate Pots de Creme and Frozen Mascarpone-Espresso Parfait on Deep Dark Chocolate Cake. Although this was work related, this is how I spend my Saturday. I am not getting fancy on you all of a sudden but it was either this post or more puddings, creams and mousses. Yes, I seem to veer away from cakes lately as there are not one that strikes me, although I did find a couple to try today.
Friday afternoon I got a call from K., one of the chefs I used to work with at the restaurant asking me if I’d make the desserts for a fancy dinner of wine representatives next weekend because he did not have time and the Executive Chef in his usual fashion was throwing fits about everything regarding this event. I agreed and he finished our conversation by saying "ok, well you bake tomorrow and I’ll be at your house on Sunday, I trust you"….Why oh why, tell me that…he was going to jinx me! I had the list of wines and descriptions and samples to be served next weekend and for the most part of the afternoon I tried to come up with desserts made with them or complimenting them. I wrote, scratched, sketched, scratched…never happy. Finally I completely changed my course: there would be appetizers and entrees cooked with the wines, sauces and reductions, emulsions and stocks, and then desserts with more wine? Crazy! These people might appreciate a break, a true one: a coffee break. After spending my Friday evening (oh my life is fun!) working ideas on paper, I finally had a plan for Saturday.
I baked all day, tweaked the flavors after many a sip of wine..dang my job is tough!! At 9pm, I sat down with a good omelette and a chunk of bread, tired but happy…Oh boy! Do I miss those days when my restaurant kitchen was my lab, when K. and I used to have our lunch breaks upstairs bitching about Big. Exec. Chef, dreaming about our "dream orders" me wanting quinces in July and him exotic Chinese mushrooms for pennies. And then, we were always called back to the dirty grind of reality by the voice of Big Exec. through the intercom "Helen, we are 86 lemon tarts and brulees, get to work! K., the veal shanks ain’t gonna braise themselves!" It’s good to know that some time after I left the restaurant, K. still relies on my opinion and just frankly told Big Exec.to f$#& off when he told him I was their dessert consult this time around! I was cracking up hearing their conversations…ah sweet revenge!!
Anyways, back to the desserts, largely inspired by my boyfriend Richard Leach (maybe I should tell him I "really" like him!), but tweaked to serve the guests in questions (read very tipsy after all that wine) and the logistics of the kitchen I would be baking and plating in: tight, busy, orchestrated like an assembly line that night so no time for me to come up with super fancy stuff. I am still working on a fruit based item, we just can’t make up our minds on what we like best, so that post will probably for next week. My initial "final" Saturday afternoon had mousse, an espresso shot and a parfait. I did not like the look of the mousse molded and plated, the espresso shot I had in mind was topped by a milk foam and that step only would require me to cross the whole kitchen with the hot line on one side and the dishwashers on the other side just to get to the frother on the other side of the waitstaff station..yeah right! The parfait was the only thing that stayed from my original thought, I just added the caramel corkscrew because I just can’t leave sugar alone! When K. came over Sunday, he was happy and relieved that I had taken that thorn out of his schedule. We drank and I fixed us spaghetti a la Lisa and we drank again…Not too shabby a weekend if I may say!
Espresso Trio:
Eclairs With Dark Chocolate Espresso Mousse: (serves 4)
Eclairs: 1 cup all-purpose flour
1 tablespoon sugar
1 cup water
1/2 cup butter
4 eggs
Heat oven to 375F. Heat water, sugar and butter in 3-quart saucepan to a rolling boil. Stir in flour. Stir vigorously over low heat until mixture forms a ball, about 1 minute. Remove from heat. Transfer to the bowl of a stand mixer and let cool a few minutes. Beat in eggs, one at time making sure the eggs are well incorporated each time. The dough should have the consistency of thick mayonnaise. Fill a pastry bag fitted with a plain round tip with the batter and pipe fingers of dough about 3-4 inches long on a parchment lined baking sheet. Bake until puffed and darker brown on top, 20 minutes, let cool completely before filling with the mousse. You’ll have more than just for 4 servings but you can freeze the shells for up to 3 months.
Dark Chocolate Espresso Mousse:
3/4 cups bittersweet chocolate, chopped
1/4 cup unsalted butter
1/4 cup espresso
2 egg yolk
1 Tb sugar
1 cup heavy cream
Combine the chocolate, butter and espresso in a small saucepan over low heat until the chocolate melts and stir until combined.
In a separate bowl, whisk the egg yolk and sugar until pale. Fold the chocolate into the egg mixture. Whip the cream to soft peaks and fold it into the chocolate base. Refrigerate one hour before using. Fill the eclairs with the mousse. Dip them into the chocolate glaze. Let set in the fridge
Chocolate Glaze:
1/2 cup dark chocolate
1 Tb butter
2 Tb cream
Melt the chocolate in the microwave, add the butter and cream and stir until combined
Chocolate Espresso Pots de Creme:
2 cups whole milk
1/4 cup sugar
1/4 cup espresso beans, crushed
3/4 cup bittersweet chocolate
5 egg yolks
1 cup heavy cream
cinnamon
Preheat the oven to 300F. Heat the milk with the sugar and beans until it comes to a boil. Remove from the heat and let it steep for 20 minutes. Strain the beans and reheat briefly, add the chocolate and stir until well combined.
Whisk the egg yolks, and slowly add the hot chocolate milk,whisking until well combined. Strain and divide among 4 heat resistant glasses or dishes. Set them in a roasting pan and fill with water (limit depends on the height of your pan and your glasses but the higher the better for even baking). Bake until the custard is barely set, about 30 minutes. Remove from the pan, let cool to room temperature and refrigerate until ready to use. When ready to be plated, whip the cream to soft peaks and divide evenly among the glasses or dishes, sprinkle with cinnamon.
Mascarpone-Espresso Parfait:
1/2cup mascarpone cheese,at room temperature
1/4 cup strong espresso
1/2 cup sugar
2 egg whites
1 cup heavy cream
In a small bowl, combine the mascarpone cheese the espresso and 2 Tb sugar and whisk until smooth. In the bowl of an electric mixer, whisk the egg whites adding the remaining sugar one tablespoon at a time until stiff peaks are formed. Fold into the mascarpone mixture.Whip the cream to soft peaks and fold into the egg-mascarpone base. Pipe or spoon into molds of your choice (I chose Flexipan Cannele molds). Freeze until ready to use.
Dark Chocolate Cake:
1/2 cup unsalted butter
1 cup sugar
1/2 cup dark cocoa powder (like Hershey’s special dark)
1 tsp baking powder
1 1/2 tsp baking soda
1/2 Tb salt (really, not a typo, but it does wonder with the parfait above)
1 1/2 cups flour
2 eggs
1 cup warm water
Preheat the oven to 325F.
Cream the butter, cocoa and sugar together until smooth. Add the baking powder,baking soda, salt and flour. Mix until smooth and add the eggs, then the water very slowly. Pour the batter into a 8×8 inch pan lined with buttered foil or parchment paper. Bake 30 minutes or until a knife inserted in the middle comes out clean. Refrigerate overnight. When ready to plate, cut out circles a little larger than the diameter of the parfait base and set the parfaits on top.
For the decorations, I made a simple chocolate sauce and espresso flavored creme anglaise as well as caramel corkscrew but feel free to skip or use other things. Same with the trio: make one, two or all and have fun! All the components work together, but also separately for lighter bites and they can be made over several days, and kept refrigerated or frozen (the parfaits).
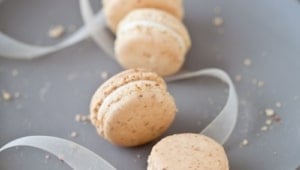
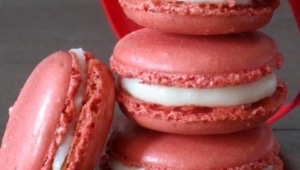
"Hein! Des macarons aux cacahuetes..?! Ca va pas la tete Tartelette?! C’est pas des vrais comme Pierre!"
"What? Peanut macarons? Did you lose your head Tartelette?! There are no the real thing like Pierre’s!"
Yes well, who said that macarons had to be 100% almond based? Not the pastry shops selling pistachio ones! Necessity is the mother of invention and that proved to be especially true last weekend when these little peanut macarons with a cream cheese buttercream and crystallized ginger center came out of my kitchen.
I had just finished an order for deep red and deep green holiday inspired macarons with traditional fillings and almond shells when I found an extra bowl of buttercream in the fridge, and plenty of ripe egg whites. Since I was on the macaron making train, I decided to make one more batch for us and the neighbors. When I went to weigh the almonds, I had half of what I needed…darn…out of pistachios too and the walnuts were going in cookies…but eh! Peanuts were sitting quiet and pretty on the pantry shelf so why not?! What do I have to lose? Flat macarons, sticky macarons, cracked macarons? Not a problem! They could always find their destiny in ice cream!
Really, what would be the big deal by replacing half the almonds with half peanuts? Peanuts are more oily than almonds but there would only be half the amount in the batter, not enough to make a big difference. I should be ok…and might as well pray too. A conversation with Veronica reinforced my belief things could get pretty tasty. I don’t want to be stuck with eating macaron shells. Remember I am the one who loves making them but not that much eating them. Now is my time to fess up: I have already had six. That little surprise of ginger inside combined with the peanut taste and not too sweet filling is just sinful.
Another issue that afternoon was that I was running out of powdered red color so I knew these would not be as red as Christmas inspired ones. Oh well, there will just be as tasty, especially with the cream cheese buttercream filling, which is nothing more than a basic cream cheese frosting but a little less sweet. The crystallized ginger piece in the middle is completely borrowed from Karen’s fabulousmacarons creations which you can go admire on her blog Mad Baker. Go check them out, I’ll wait….
You’re back? Then let me give you the recipe for these:
Gingered Peanut Macarons:
For the shells: (Makes 35 halves)
225 gr powdered sugar
60 gr almonds
65 gr unsalted roasted peanuts
3 egg whites (about 100gr)
red food coloring (powdered is better)
25 gr granulated sugar
small pieces of crystallized ginger
In a food processor, run the nuts and powdered sugar until the nuts are finely ground. Run through a sieve if needed.
Whip the egg whites until foamy, slowly add the granulated sugar, until they are glossy. Add the red food coloring.
Slowly fold the nut/sugar mixture into the whites with a wide spatula. The mixture should remain shiny and flow easily.
Fill a pastry bag with the batter and pipe small rounds onto parchment lined baking sheets.
Let the macarons rest for 20 minutes.
Preheat the oven to 315 and when they are ready, bake them for 12-15 minutes.
Let cool, remove from the paper and fill with the buttercream, add a piece of ginger and top with another macaron shell.
Cream Cheese Buttercream:
8 oz cream cheese, at room temperature
1/2 stick butter (55 gr), at room temperature
1/2 cup powdered sugar
With a stand mixer and the paddle attachment, beat the cream cheese and butter until fluffy. Add the powdered sugar, give it one more whirl to incorporate everything. Fill a pastry bag with the mixture and fill the macaron shells.
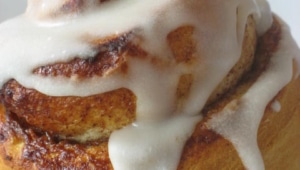
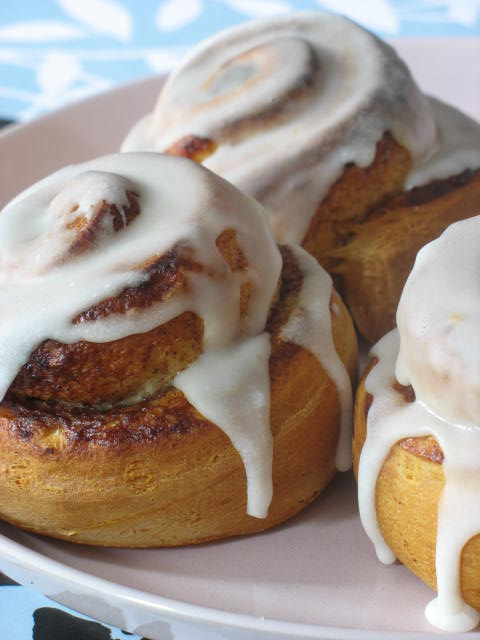
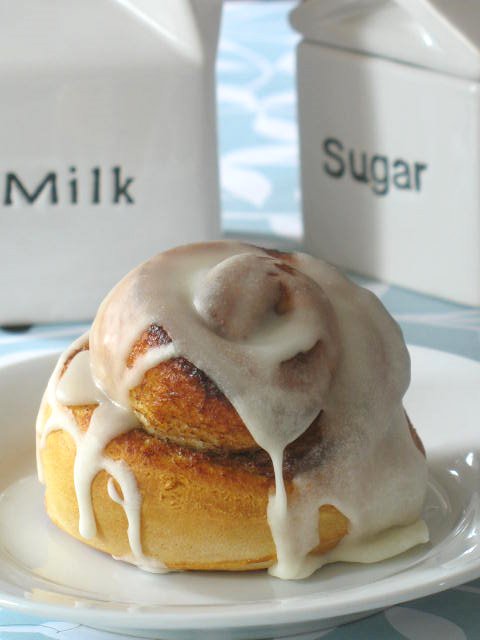
I will be the first one to say that one can never have too many cinnamon rolls! When a sweet somebody suggested after the September Daring Bakers' challenge that we make a go at a recipe for Cinnabons, guess who answered the call of more butter, yeast, dough and cream cheese…and more butter? Yes, your truly as well as Marce, Kelly, Mary, Sara, Laura Rebecca and Chris.
There were a lot of events and gathering around the house that particular weekend and I had to start my dough at the ungodly hour of 5am just to make sure I’d have a chance to get it done that day. Add to the equation a sick dog and a sick Tartelette, and you have me passing out on the couch around 9am while everybody else is gearing up and meeting on Yahoo Instant Messenger to share the fun. When I finally woke up Marce kept trying to invite me to a conference chat and I kept clicking to no avail….I was stuck on my southern side of the world….hate being left out. I IMed my tech guru, while at the same time conversing with Kelly and trying to get her set up.
Now if you know me at all, you probably figure that I can juggle 3-4 desserts going on , at once in the kitchen while entertaining the neighbor’s twins. And if you know me just an ounce, you probably realise that at that point my coughing and sneezing self had 3 Yahoo windows open, emails just in case and everybody typing faster than me. I had the biggest laugh of my life when Lisa asked me to take Kelly through a Yahoo IM set up…me?!!! ahahah!!! Thank god for cutting and pasting her instructions!!
Not to lose her beautiful sweet cool, Kelly had the smart move to quit trying and set up her UStream show, which was a blast by the way. I have a laptop on the kitchen table , you know for when I see a recipe and I have to try it right then and there…. I had Kelly keeping me company while I was baking and decorating cookie trays for a party.
Now that you get a feeling for the ambiance of the day, let’s talk about the real issue here: how did the Cinnabons do compared to Peter Reinhart’s? Both doughs were a pleasure to work with and although Reinhart’s was much softer than this one, they both had a good rise and were easy to roll out. We liked the flavor of Reinhart’s buns over the Cinnabons, something to do with the lemon extract in the dough I am sure. We preferred the texture of the Cinnabons though. The dough remained very tender, a little gooey in the center which I like, a lot. And that filling…hmmm butter/cinnamon/butter/cinnamon…oh yeah and sugar with that butter!
The icing on the Cinnabons really put it over the top, but that had to be expected since I don’t think anything can beat cream cheese frosting. Do you? Then stop reading because you are about to read about a sweet fattening snafu. Since my head was not totally there (cold) I think I got cross eyed for a split second while reading the instructions and instead of 1/2 a stick of butter, I used a whole one! Paula and Lisa would be so proud of me!!!
Since I realized my error before frosting the second pan, I quickly rectified my shot and made the "proper" one. Guess which rolls got devoured first? We are so butter easy !!
Which recipe will I make again? I am pretty sure it will be the Cinnabons but with a little lemon extract in the dough.
Cinnabon™ Knock-off Cinnamon Rolls
Rolls:
1 pkg. active dry yeast (1/4 oz. size or 2 1/4 tsp.)
1 c. warm milk (105º to 110º F.)
1/2 c. granulated sugar
1/3 c. margarine, melted (used butter)
1 tsp. salt
2 eggs
4 c. all-purpose flour
Filling:
1 c. packed brown sugar
2 1/2 TBS. cinnamon
1/3 c. margarine, softened (used butter)
For the rolls, dissolve the yeast in the warm milk in a large bowl
Mix together the sugar, butter, salt & eggs. Add flour and mix well
Knead the dough into a large ball, using your hands lightly dusted with flour. Put in a bowl, cover, and let rise in a warm place about an hour or until the dough has doubled in size.
Roll the dough out on a lightly floured surface. Roll the dough flat until it is approximately 21 inches long and 16 inches wide. It should be about ¼ inch thick.
Preheat oven to 400º F.
For the filling, combine the brown sugar and cinnamon in a bowl. Spread the softened butter evenly over the surface of the dough, and then sprinkle the cinnamon-sugar evenly over the surface.
Working carefully from the top (a 21 inch side), roll the dough down to the bottom edge.
Cut the rolled dough into 1 ¾ inch slices and place 6 at a time, evenly spaced, in a lightly greased baking pan. Let the rolls rise again until doubled in size (about 30 min.). Bake for 10 minutes, or until golden on top.
While the rolls bake, make the icing by mixing the butter and cream cheese in a large bowl with an electric mixer on high speed. Add the powdered sugar and mix on low speed until the sugar is incorporated, then add the milk and flavorings. Mix on high speed again until the icing is smooth and fluffy.
When the rolls come out of the oven, let them cool for about 10 minutes, then coat generously with the icing.
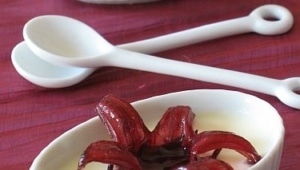
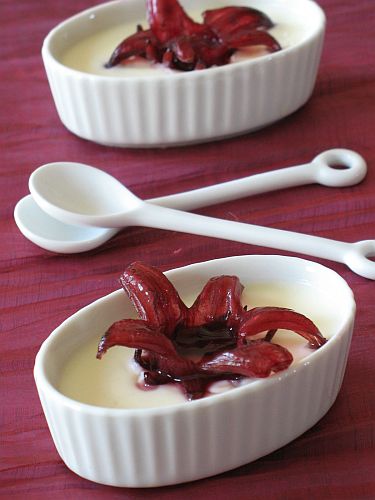
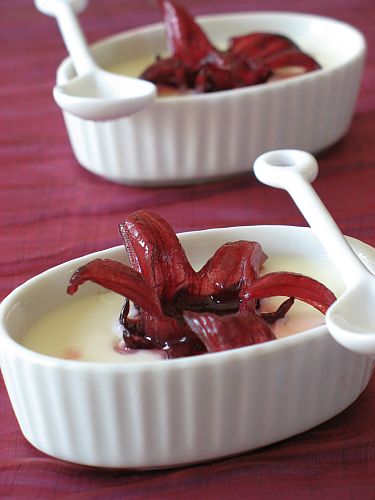
Nothing much going on in the kitchen right now as my work life as taken a somewhat unexpected turn. Well, ok, I knew changes were coming, I was not sure of the timing so it’s been a pretty stressful week to say the least. I did fulfill the orders I had for cakes and other desserts but that’s about it. What I did find time to do was those little ramequins of white chocolate pots de creme (cream pots, literally) adorned with dried hibiscus flowers.
When I visited Lisa a couple of weeks ago, I asked her (ok, begged) to take me back to Sur La Table and Trader Joe’s to get the few things I had noticed from my previous trip there. Among the items I was coveting were those little ramequins (about 3 inches long and 1.5 inch wide) and dried sweetened hibiscus flowers. Why? Because both were pretty ad would photograph well, and I was curious to the taste of the dried fruit. B, brought back a large supply of the dried buds to make tea from a previous trip to Egypt and I fell in love with the deep red/pink color as well as its slight tart taste. Turns out the flowers taste just like dried cranberries….yum!
For more elaborated posts (and because no one tells a story like Lisa) about Mary's and my trip, go to Lisa’s blog where you will get the full report of our adventures.
One evening last weekend, while we had company over ( and boy, did we have fun), I was craving the comfort of white chocolate. Yes, I admit it, and chocolate purists can throw a stone at me, I like white chocolate. Can’t stand to eat it on its own, but I love incorporating it into desserts. The guys had plenty to munch on, brownies, cake….but I needed white chocolate…I needed soft and creamy and I needed a perk of flavor and tartness. So while the boys were grilling, I started the creams and by the time we were getting cozy on the patio with coffee, the creams were ready! While a little on the rich side, the ramequins are small enough to provide the perfect 4 bites serving. Wait until serving time to set the dried hibiscus flowers on top or they will start to bleed after a couple of days in the fridge. The verdict? Well, we fought over the last one…that should tell you something!
White Chocolate Pots de Creme, adapted from Death by Chocolate, by Marcel Desaulniers:
1 cup heavy cream
3/4 cup whole milk
12 ounces white chocolate, finely chopped
6 egg yolks
Combine the cream and milk in a heavy bottom, 2 quart saucepan. Place over medium heat and bring to a boil. Bring the water in a double boiler to a simmer. Place the chocolate in the top half and stir with a rubber spatula until melted. Whisk the egg yolks into the melted chocolate. Slowly pour the boiling cream mixture into the chocolate, whisking constantly. Bring to a temperature of 160 degrees, about 3 1/2 to 4 minutes. Remove from the heat and transfer to a stainless steel bowl. Cool in an ice bath, stirring constantly with a wire whisk to a temperature of 90 degrees F., about 4 to 5 minutes. Evenly divide the mixture into 8 small pot de creme forms or glass custard cups. Cover each with plastic wrap and refrigerate for 2 to 3 hours to set before serving.
Some of you are probably wondering if I am growing banana trees in my backyard…Every time I turn around there is a banana or two ready to be used. I even found a big bag of them in the freezer…We are being invaded and I have to come up with the recipes faster than I can run. I hope that this is my last banana installment for a while, not that I am getting tired of the taste but it’s time to move on and play with other things in the kitchen.
I looked at pages after pages of banana centered recipes, and although they were all fine and dandy, there seemed to be something missing. After reading so many recipes for muffins and cupcakes, I already had formulated a basic recipe that would allow me to play with the ingredients and the spices.
I quickly scribbled this one on a piece of paper, using some of my sad bananas and extra roasted rhubarb. Then, I added two of my favorite spices, ginger and cardamom and to round things out I included some orange zest. The frosting used is a cream cheese one I have used severaltimes on this blog before and could eat with a spoon on m morning toast.
Rhubarb Banana Cupcakes with Cream Cheese Frosting:
3 cups flour
1 cup sugar
1 tsp baking powder
1 tsp. ground ginger
1 tsp. ground cardamom
3 eggs
3/4 cup oil ( I used apricot)
1 tsp. vanilla
grated zest of one orange
2 bananas, mashed
1 cup roasted rhubarb
Combine the dry ingredients in a large bowl (flour through cardamom). In a separate bowl, stirr the eggs and the oil. Add the bananas, rhubarb and orange zest. Add to the dry ingredients and stir just until combined. Divide into muffin lined tins and bake 35-30 minutes or until a toothpick inserted in the middle comes out clean.
In bowl of electric mixer, beat the cream cheese and butter, on low speed, until very smooth with no lumps. Gradually add the sifted powdered sugar and beat, on low speed, until fully incorporated and smooth. Pour into a piping bag and decorate the cupcakes.
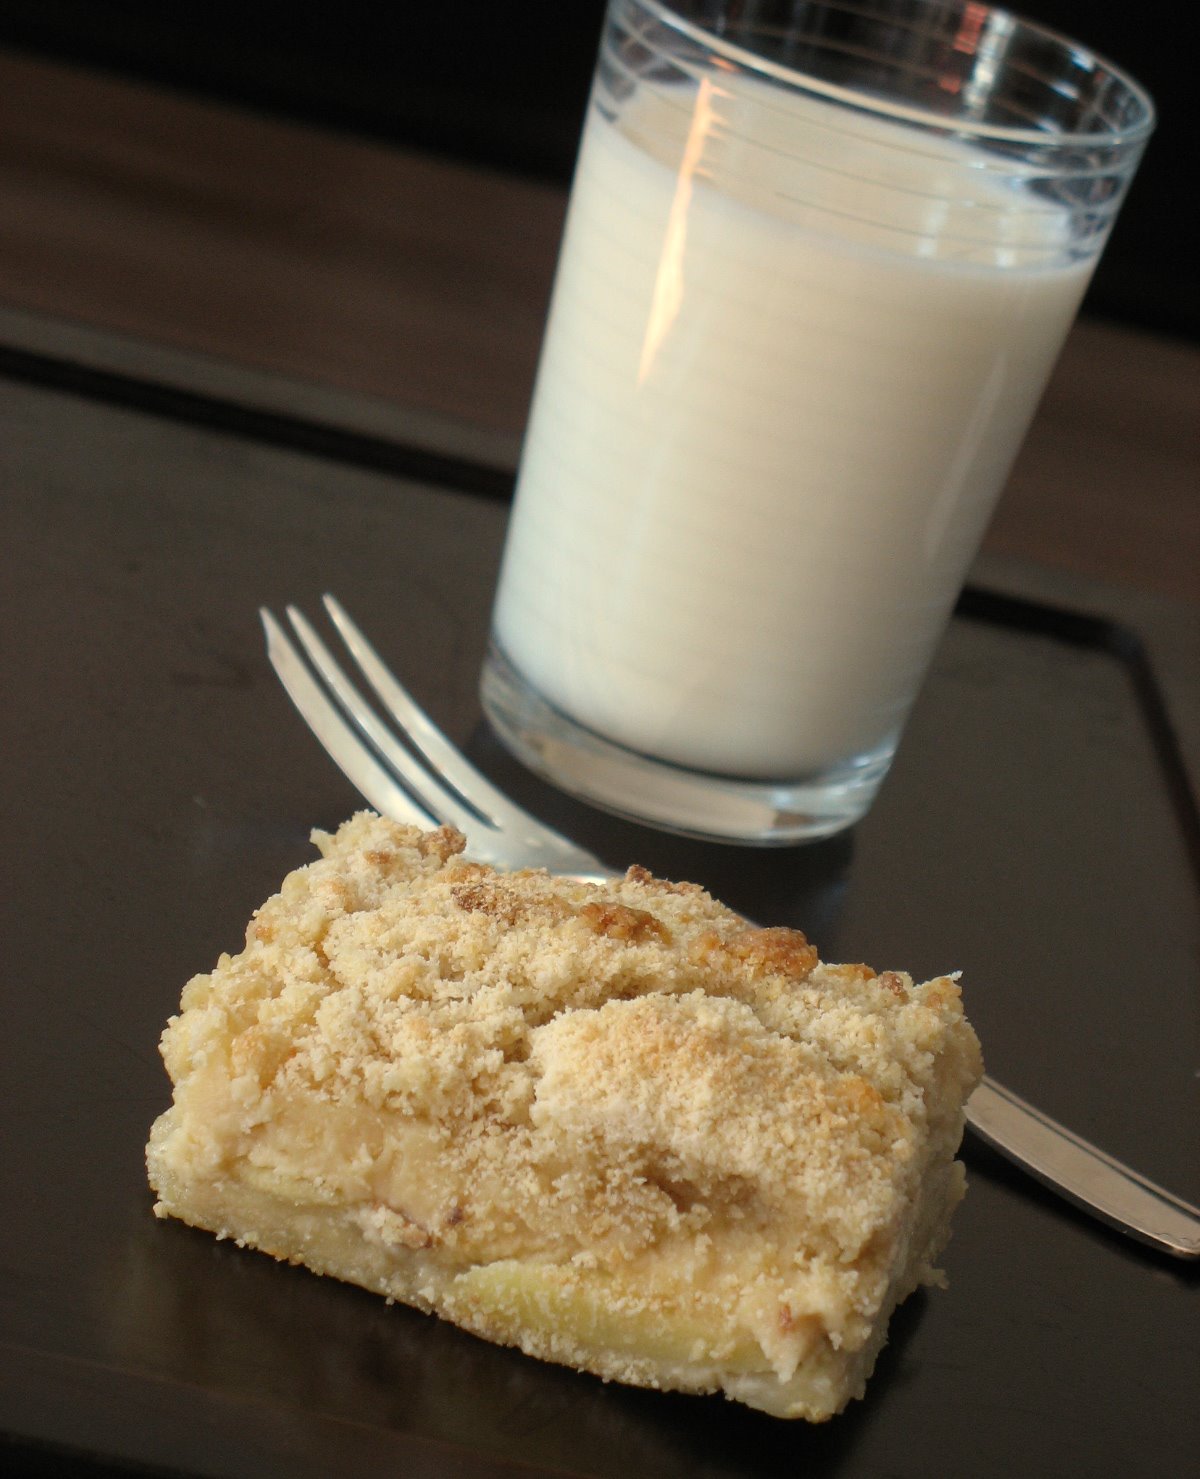
When I saw Mary's beautiful picture and mouth watering post, I know it would not take me long to give it a try. Since my first apple bar inspired by Dorie Greenspan, I was on the look out for another one.
I have yet to establish a system in my labyrinth of "to-try" recipes but I have taken a spring resolution of some sort to bake one to two recipes that I have bookmarked from another blog each week, and if you knew how many I put in my "favorites" each day, you would see that it is not a small endeavour!
I adapted her recipe a little bit given what I had in my pantry, but mostly because I got sidetracked by my dog chasing a bird that had flown into the house, hence the title of this post. The bars were delicious. I had a difficult time not nibbling at the little pieces sticking out in the corners, the uneven edges or the crumbly topping. I had a harder time saving some for B., needless to say the neighbors never saw a sample of these, not even a crumb!
Little Birdie Almond Apple Bars, adapted from Mary’s recipe:
Crust:
1 1/4 cup all purpose flour
3 ounces cream cheese, softened
2 ounces (4 tbsp) unsalted butter, softened
1/4 tsp pure almond extract
1/4 cup granulated sugar
1/4 cup light brown sugar
1/3 cup ground almonds
Topping:
1/4 cup tbsp all purpose flour
1/4 cup brown sugar
2 Tb. butter, cold
Filling:
5 ounces cream cheese, softened
1/2 cup granulated sugar
1 large egg
1 tbsp freshly squeezed lemon juice
3 medium apples, peeled, cored & cut into thin (I chose Braeburn)
Preheat oven to 350°F. Line a 9×9 inch square baking pan with parchment. Spray with cooking spray.
Make the Crust:
Combine the flour and ground almonds and set aside.
In the bowl of a stand mixer, fitted with the paddle attachment, beat the cream cheese and butter on medium speed until smooth. Add the almond extract and beat on medium until smooth, about 1 minute. Add both sugars and beat on medium speed until blended. On low speed, mix in the flour/almond just until the dough comes together. It should be crumbly.
Reserve about 2/3 cup of the crust mixture.
Press the remaining dough evenly into the bottom of the prepared pan.
Bake until light golden, about 16-18 minutes. Remove crust from the oven.
Make the Topping: Add the flour, brown sugar to the reserved dough. Cut in the butter and mix with your fingertips. It should remain crumbly. Set aside.
Make the Filling:
In a large mixing bowl, beat the cream cheese and sugar until smooth. Beat in the egg and the lemon juice.
To assemble:
Arrange the apple slices over the baked crust. Pour the cream cheese filling over the apples and gently spread the filling to cover. Crumble the topping over the filling. Bake until lgolden brown, about 45-50 minutes. Let cool to temperature.
I found the bars easier to cut after a chill time in the fridge. The flavors were even more pronounced the next day (given the one square I had saved for the picture)
——————-
No, no, this is not the new HHDD event but stay tuned…the theme will be posted before the end of the week.