There are times you just want chocolate. Easter Sunday for example. I know it’s already bee a couple of weeks since then but I still think about chocolate. And cake.
There are times you just want chocolate. Easter Sunday for example. I know it’s already bee a couple of weeks since then but I still think about chocolate. And cake.
My life in Birmingham is nothing but a series of first. Fall. Winter. Friday nights. Weekends. Dinner with friends. Neighborhood. All a first. Living a long distance relationship with my husband. Definitely a first. Having one puppy at home as my companion. How we have come to rely on each other, the old pup and me. Another first. Which is quite nice knowing that at 16 years-old, he is giving me some precious last moments together.
Everything about settling here as been new and wonderful. I am exploring a lot on my own every chance I get. I have also started a little fun side notebook in which I jot down the places I want to discover as a first with Bill and not just on my own. They can be restaurants, parks, places…I just know him, and I know us, and I know how much more fun and meaningful it would be to do those as a couple.
Spring would definitely be one of the seasons I would want us to experience together here. But, we all know one cannot stop Mother Nature. It will be Summer before he moves here for good. I just have to find the right words, the most descriptive ones to tell him how gorgeous Birmingham is in the Spring. And it is. I know one can say "but it’s the South! You know the South!" Yes. But it is a completely different South. One with seasons, tornadoes instead of hurricanes. One with a different past. One with a different food culture.
A series of first everywhere and all the time…
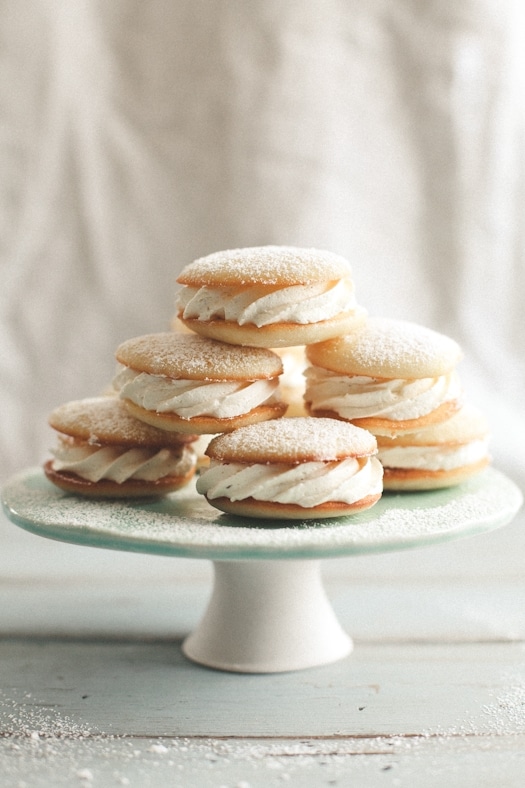
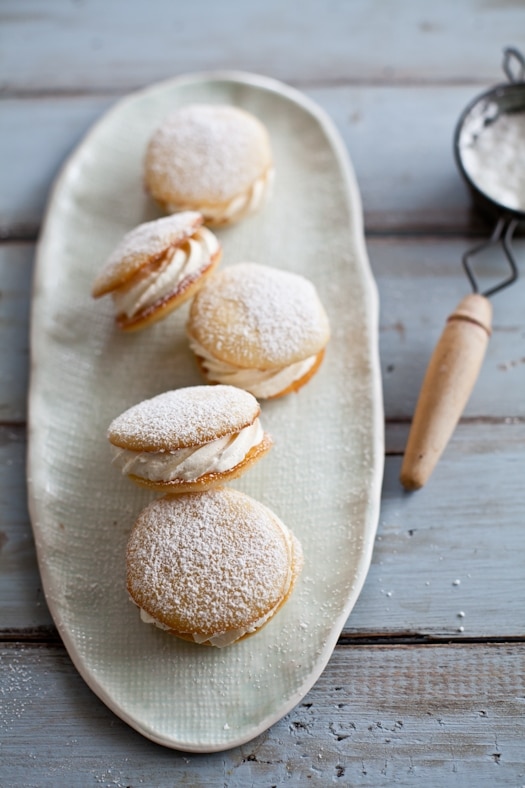
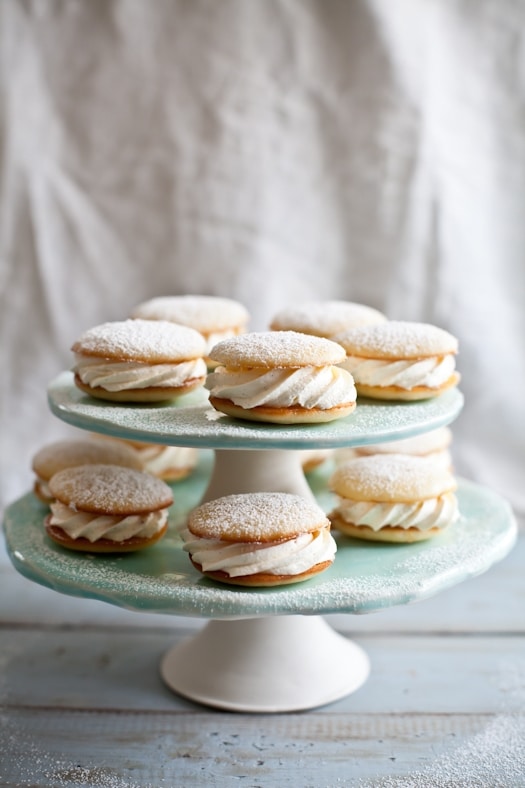
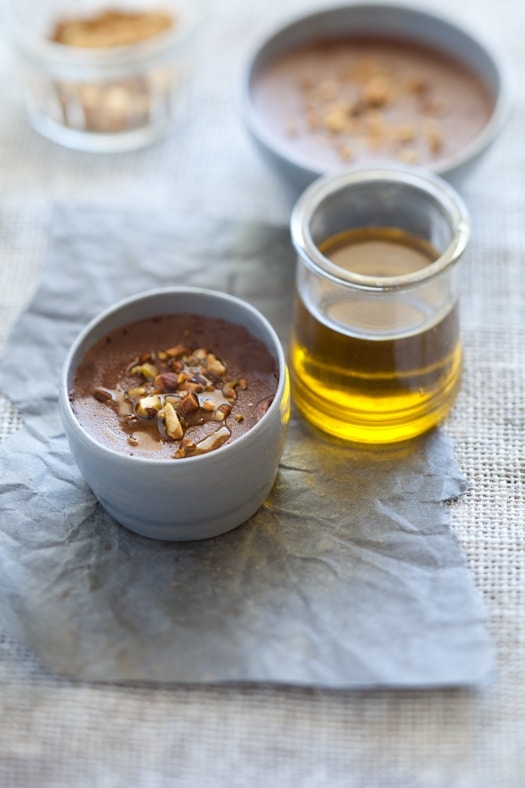
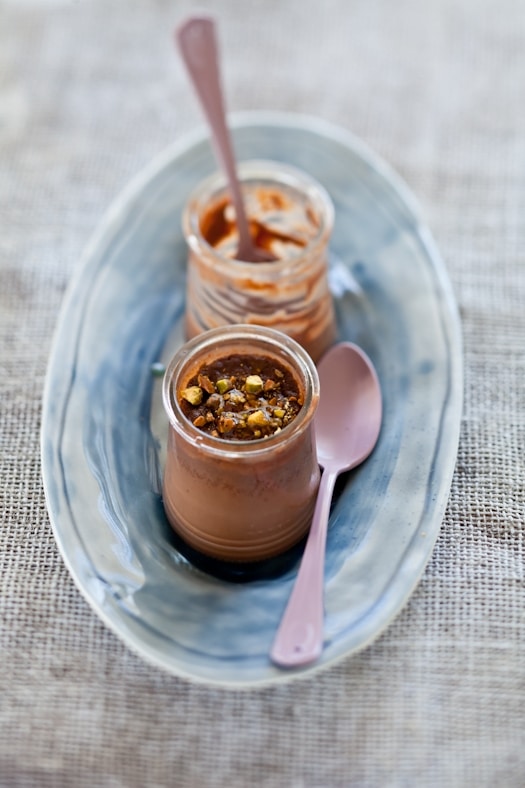
The first time I turn my favorite sponge cake recipe into Lemon Cakelets With Vanilla Bean Cream. The first time I add deep rich and robust olive oil (from the family batch) to Bittersweet Chocolate Pots de Creme.
And guess what…there will definitely be seconds…
It’s always excited to see someone realize their dreams. Pick up their courage, their doubts, their talent and creativity and just go for it. I got excited when Beatrice announced she was writing a cookbook and I got even more excited when I finally held in my hands. "La Tartine Gourmande, Recipes For An Inspired Life" was no doubt a labor of love for Beatrice. It shows. From the colorful imagery to the detailed recipes, one can tell she did put a lot of care and perfectionism into her first cookbook.
I have Bea met once before on a press trip and it was a delight to see that the book matches the person in real life. Deeply French, but also very much in love with the flavors and aesthetics of other countries she visited. The book achieves what I look for most times in cookbooks: it reads like a novel with prose and anecdotes and at the same time it serves the purpose at hand, giving you plenty of recipes and creative ideas for casual to sophisticated plates.
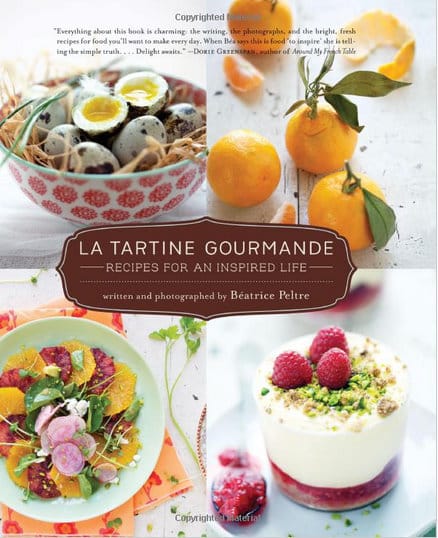
The book is divided in two major parts; one where Bea goes through core recipes used in various chapters, as well as covering the flours, sugars and utensils she favors. The other parts covers all the recipes, from breakfasts to picnic, to casual lunches with friends, to sophisticated or simple dinners. One thing I really appreciated in Bea’s writing is the fluidity of the recipe writing as well as the simple yet to the point style of the headnotes.
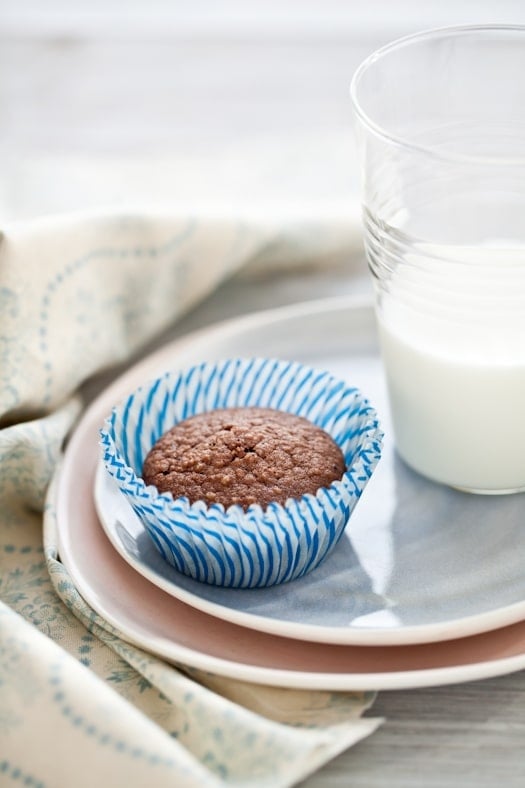
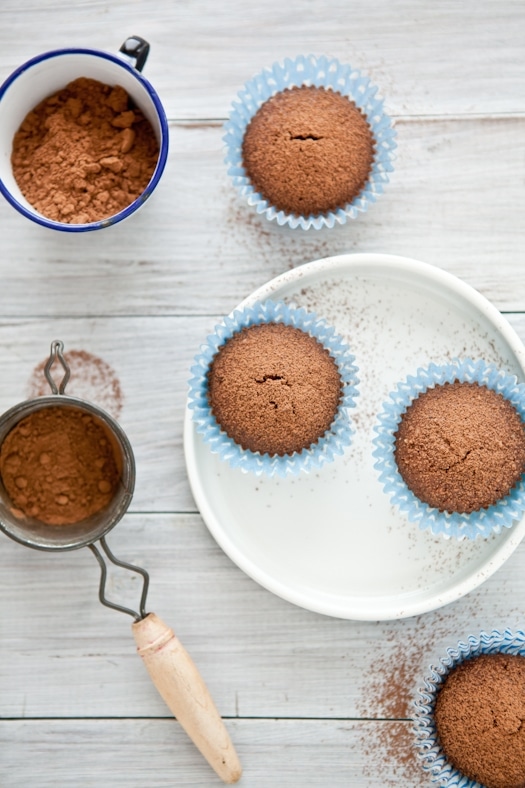
If you are familiar with Bea’s blog, the book is indeed, its perfect extension. Recipes that are simple to make, full or flavors and leaving you inspired to go create more of your own. I made 3 batches of these Chocolate Financiers in the span of a week. They disappeared as fast as I was pulling them out of the oven. (Recipe for the financiers after the jump)
Bea was kind enough to answer a little fun interview I prepared so you could get to know her better. For more descriptions and excerpts from her book, you can check her amazon author page, here.
1/ Which person in your life influenced your cooking the most?
My mother. No doubt. I learned by her side. But in many ways too, it’s my upbringing in France. And the fact that I come from a family where there’s always been a clear passion for food, home cooking, and making someone happy with a meal. My brother and sister-in-law whom I am very close to love to cook and eat–like my mother, they keep an amazing vegetable garden to feed our crave for homegrown foods. Whenever I am in France, we spend a lot of time cooking together. Talking about food. So I know that it’s really us all, as a family, that rooted this love for food inside me. And the way I cook.
2/ Which culinary traditions or family habits have you kept from France?
The fact that I cannot skip lunch. Ever 😉 I am so French in that way. Lunch is cooked and needs to be a sit down meal during which I leave work and other things I am doing behind–to enjoy my meal. And it does not matter if I will have that meal alone. Everyone deserves that treat. As a family, Lulu, P. and I always eat together. Sharing our meals is a very important time of our day. Lulu is only 3 but she understands and loves it.
When I look at the dishes I make, no doubt, my cooking is French in essence. But I don’t perhaps cook what most people think of as French cuisine. I like to reinvent classics, which connects me to my roots and the foods that I loved to eat as a child. And then I personalize them to my taste and the influences my cooking gained from traveling and living in different countries. So in the end, it’s French but with a twist and exotic touches. I am curious about food, so I also like to constantly try new ingredients and build recipes around them.
At home, we always cared how food was presented on a plate. And we also always made sure that our meals were balanced in nutrition as well as in texture–hence I will always eat something cooked with something raw (ie there will always be salad that accompanies my meals). I think these definitely explain why I love to play with food the way I do. I like to make a dish pop onto a plate, looking light and colorful. And not overly complicated. I believe that we eat with our eyes first. I believe that what makes a great meal is quality ingredients, attention–and the rest follows naturally. That’s the way I was brought up to think about food.
3/ If stranded on a deserted island, which of the following would you miss the most?
– vegetable
– fruit
– spice and/or herb
vegetable: carrots from my mother’s garden
fruit: I’d say I’d miss the taste of a wild strawberry. So concentrated. So delicious and unique.
spice: cumin
herbs: parsley, coriander, chervil
4/ What is your favorite meal to cook for a romantic dinner "a deux"?
Not sure. It changes all the time since my creative flow keeps coming. I know there’d be chocolate somewhere during the meal (hello Molten chocolate cakes!). And we’d have a stunning looking refreshing appetizer, most likely a dressed-up salad or a verrine, with tons of zest (grapefruit, orange or lime), avocado and crab meat. As a main, I could easily imagine a creamy red kuri squash risotto finished with truffle oil and served with clams cooked in white wine, garlic and .fresh herbs.
5/ Favorite word? Least favorite word? Favorite color? Two things you can’t stop eating lately?
Favorite word: Maman….it’s filled with so many meanings and special things for me.
Least favorite words: Dépêche toi! (hurry up!) I hate when I have to rush….
Favorite color: That’s a hard one as I love most of them. Right now, I’d say red as I can see myself buying a lot of fabrics, bowls and home textiles with different hues of red on them. I also also love spring green and turquoise blue.
Two things I can’t stop eating right now: fine slices of apples enjoyed with pecans and honeycomb; coconut milk tapioca pudding with stewed fruit.
Bea and her publisher were also very kind to share two copies with two readers. To enter the giveaways for a copy of "La Tartine Gourmande, Recipes For An Inspired Life" – all you have to do is leave a comment (no anonymous, one entry per person) on this post between Monday March 5th and Thursday March 8th, midnight EST. You must claim your prize within 48 hours or two other winners will be picked. I know this sounds harsh but many enter, I announce winners and prizes stay unclaimed for months and/or are never claimed which is not fair to the other participants who really do care about a gift.
Disclosure: I was sent a copy of the book by the publisher. All images (except the book cover) and opinions are my own.
Chocolate Financiers, slightly modified from La Tartine Gourmande:
Ingredients:
8 tablespoons unsalted butter, at room temperature
1 cup almond meal
2 tablespoons millet flour
2 tablespoons cocoa powder
A pinch of sea salt
1/3 cup powdered sugar
4 large egg whites (beaten slightly)
1 teaspoon pure vanilla extract
Directions:
Preheat the oven to 350F, position a rack in the middle and line the inside of 10 muffin tins with wrappers.
In a small saucepan, melt the butter over medium heat and cook until it starts to turn brown and smells smells like hazelnuts, between 8 to 10 minutes. Let cool slightly.
In the bowl of a stand mixer, combine the almond meal, millet flour, cocoa powder, salt, and sugar. Mix until blended. On low speed, beat in the egg whites.
Add the butter and vanilla and mix for another 30 seconds.
Divide the batter evenly between the muffin tins and bake the financiers for 20 minutes, or until a toothpick inserted near the middle comes out clean. Let cool and dust with more cocoa powder if desired.

I have thought a few times about this week. Right here. Right now. The week when my first book, "Plate To Pixel. Digital Food Photography & Styling" is out into the world. From November to March, it was the hard work of a team that did not stop until it was right. This week the book is yours. Ours.
Wow… it still is just barely sinking in. Once the book in my hands, it took a full 24 hours for my shoulders to relax and a smile to timidly cross my lips. Then as I was standing there in the rain with Bailey, that smile grew to a stupidly wide expression of gratitude and excitement.
I bolted back inside to Taylor who was getting his video equipment together and said "let’s do this! Let’s show people how awesome food photography can be with a little help from a friend!"
And so we shot this video promo of "Plate To Pixel. Digital Food Photography & Styling". Words fall short to tell Taylor what an amazing job he did on it. Thank you dear friend!
I loved working on this book so much! I wrote it with you in mind. And you is a lot of people with different likes and dislikes, different ways to go about life. But we all have the same goal. Take pictures of food and have a wonderful experience doing it.
Whether you need just a little push, a lot of help or just reinforcement that you are on the right track. I compiled information, hands-on visuals of bouncing, diffusing, white balances, exposures, depth of field, … Composition and styling techniques, equipment setup so you can see the full how-tos of a picture, step by step styling demos…and the list goes on!
I will be doing fun giveaways in the coming weeks to express my thanks for your support and kind words these past few months and your enthusiasm these past few days.
But today is especially awesome to celebrate the release of the book. There won’t be one lucky person but three!
– I am giving away 2 signed copies of Plate To Pixel and a little surprise inside…
– my super talented friend Asya from gleena.com who is the artist behind the numbered ceramic plates I love to use here, is giving away four white ceramic dessert plates numbered 1 through 4 (like the ones in the picture below)
All you have to do is leave a comment here between today, April 26th 2011 and Friday April 29th 2011, midnight Eastern time.
Guidelines: one entry per person, no anonymous comment, leave 24hrs for your name to appear in giveaway as I manually moderate entries.
Note: Plate to Pixel is currently available online on Amazon (US, UK, Germany, etc…), Wiley, Book Depository, Barnes & Noble, Borders. It will be in stores in about 10 days or so!
Now…how about some Double Trouble Chocolate Cake to really celebrate?!!

Double Trouble Chocolate Cake:
Serves 10-12
For the cake:
1 stick (113gr) butter
1 cup (200gr) sugar
1/2 cup (45gr) natural cocoa powder
2 eggs
1/2 cup superfine rice flour
1/2 cup millet flour
1/2 cup gluten free oat flour
1 teaspoon (5gr) baking powder
1 teaspoon (5gr) instant coffee powder
1/2 teaspoon (2.5gr) baking soda
1 cup (250ml) warm water
Note: for a non gluten free version, you can use 1 1/2 cups all purpose flour instead of the rice, millet and oat flours.
For the ganache:
12 oz bittersweet chocolate (chips or chopped)
pinch of salt
1 1/2 cups heavy cream
Prepare the cake:
Preheat oven to 325F. Butter one deep 9-inch round baking pans, sprinkle some rice flour into the pans, shake it around and tap the excess off. Line the bottoms with one 9-inch circle of parchment paper. Set aside.
In a mixer fitted with the paddle attachment, mix together the butter and sugar until light and creamy. On low speed, add the cocoa and mix until incorporated. Add the eggs, one at a time, beating well after each addition. Scrape the bowl with a spatula to make sure they are properly mixed in. Add the flours, baking powder, coffee powder and baking soda and mix on medium-low speed while slowly adding the warm water and mix until smooth. Pour the batter in the prepared pan and bake for 30 to 40 minutes or until a toothpick inserted in the middle comes out clean. Let cool to room temperature and unmold the cake. Divide in three horizontally.
Prepare the chocolate ganache:
Place the chocolate and salt in a non reactive bowl and set aside. In a heavy bottom saucepan set over high heat, bring the cream to almost boiling (really hot basically!). When hot, pour it over the chocolate and salt. Let stand for 5 minutes before slowly whisking the mixture to bring it together to a smooth and silky ganache. If it’s not completely smooth, return to very low heat for a few seconds to melt the chocolate some more. Brands vary so this step may be necessary if the chocolate is not completely melted.
To assemble the cake:
Let stand the ganache about 15-20 minutes so it is thick enough to apply between the layers of chocolate cake. Leave about 1 to 1.5 cups for the top and sides and set and slightly warm it up a bit so it spreads more easily.
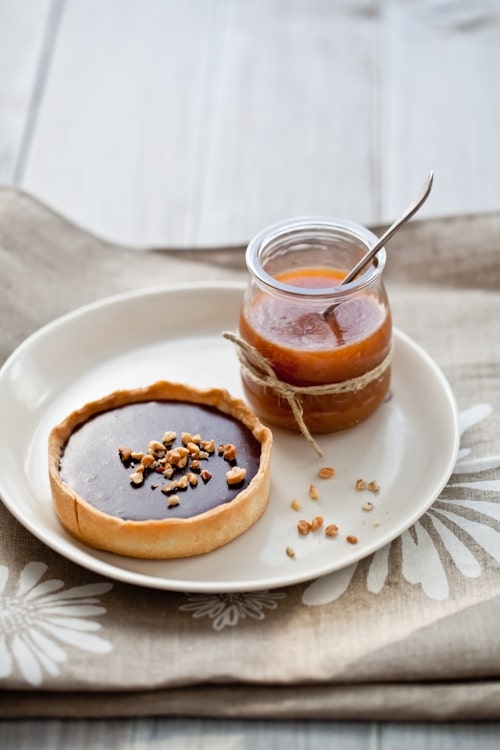
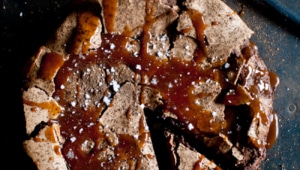
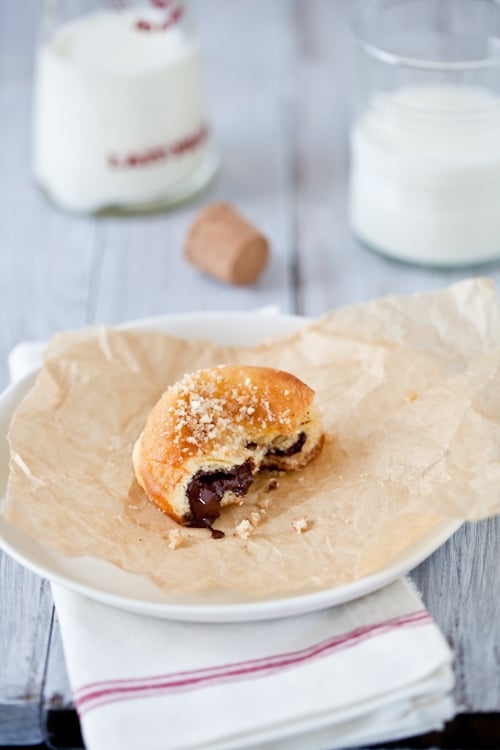
I smiled when I made these tarts. The enticing smell wrapping up the entire house. I smiled when I photographed them. The anticipation of tasting one slowly building up. I smiled when we finally shared one. My toes curling up with happiness. All we needed that day was a bit of dark chocolate and milk jam nestled in macadamia goodness. That day was Valentine’s day folks.
Talk about posting behind schedule! The past three weeks have been a complete blur of editing and reviewing the manuscript for Foodography. Now is ultimate crunch time before going to print in a couple of weeks. I confess I got butterflies in my stomach when the first chapters came out from the designer all laid out and ready for us to comb through, dot our i’s and cross our t’s one more time.
Since this past November that I started writing, B. has been nothing but even more amazing than he already is. We’re not into anything V-Day related but this time I wanted to do something extra special for him. He’s been my rock throughout this whole project. He held me, both literally and figuratively, whether the words were coming in floods or whether I pondered over the same sentence for 30 minutes. So I wanted to make something special.
I remembered a decadent macadamia tart in an issue Elle a Table that I had brought back after my last trip home. I smiled realizing I had no problem finding a magazine but it’s been weeks since I have been able to match a couple pairs of socks. Obvious discombobulated sense or priorities on my part, ehehe!
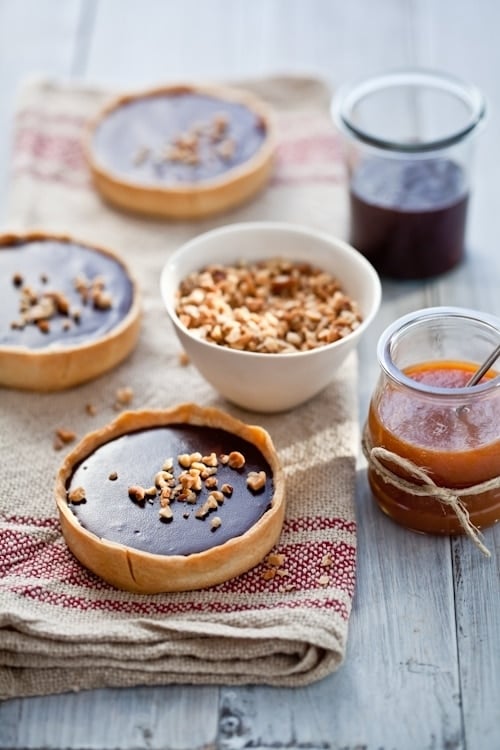
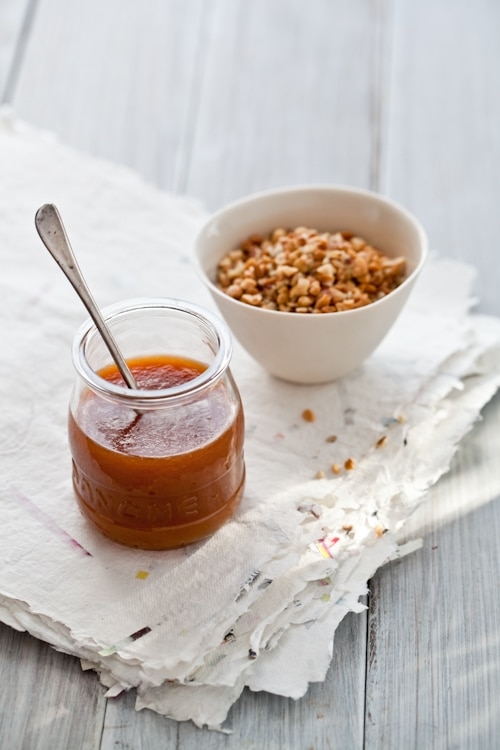
The base of the tarts is a lovely crust with ground macadamia nuts in it that gets filled with a sweet layer of milk jam and topped with a smooth layer of bittersweet chocolate ganache. Milk jam is very similar in taste to a slow simmered cream and caramel sauce and is super easy to make. It’s simply whole milk, sugar and a pinch of baking soda simmered on the stove until they are reduces to a thick caramel sauce.
The process is as enjoyable and addicting as the end result. It fills the air around you with one of the nicest aromas. It is a specialty of the Normandy region of France, but one so good that it’s been adopted throughout the country. Thank goodness! Being from Provence, I like to add a sprinkle of lavender buds or a little lemon zest once in a while to spice things up a bit. Just like romance…
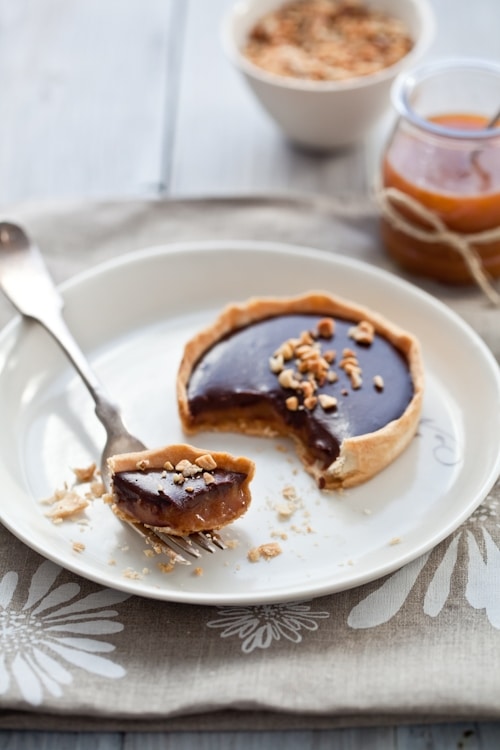
After sharing one with him, I put the rest in the freezer and in the whirlwind of a shoot I completely forgot about them until one late night last week. We split one, not entirely thawed and he explained it tasted like a really cold ice cream sundae topping. I could definitely see how some pieces of that tart thrown in some vanilla ice cream would be absolutely delicious. And absolutely decadent. Something to share with your honey…
Macadamia, Milk Jam and Chocolate Tarts:
Makes six 4-inch tartelettes or one 9-inch tart
For the crust:
5 tablespoons (70gr) unsalted butter, at room temperature
3 egg yolks
pinch salt
1/2 cup (80gr) superfine rice flour
1/2 cup (60gr) millet flour
1/2 cup (45gr) ground macadamia nuts
2 tablespoons to 1/4 cup cold water or milk
For the milk jam:
2 cups whole milk
1/2 cup sugar
1/4 teaspoon baking soda
For the chocolate ganache:
5 oz bittersweet chocolate (chips or chopped)
pinch of salt
1/2 cup heavy cream
Prepare the crust:
In a mixer, whip the butter on medium speed until light and airy. Add the egg yolks, one at a time and beating well after each addition. Mix until incorporated. Add the salt, and all the rice and millet flours, the ground nuts and mix briefly. Add some water or milk, one tablespoon at a time if the dough feels too dry. Dump the whole mixture onto a lightly floured (use more rice flour) board and gather the dough into a smooth ball. Flatten the dough into a disk, wrap it in plastic wrap and refrigerate for an hour.
Preheat oven to 350F and position a rack in the center.
When the dough is nice and cold, roll it out on a lightly floured board or in between two sheets of plastic to fit your prefered pie pan or six 4-inch tart rings. If the dough tears while you roll or/and transfer into the pan, just patch it with your fingertips. Line the dough with a piece of parchment paper, fill with pie weights or dy beans and par bake for 15 minutes until golden brown and completely baked. Remove the weights and parchment paper. At this point you can refrigerate the baked crust for up to 5 days before using. Let cool while you prepare the filling.
Prepare the milk jam:
Place the milk, sugar and baking soda in a heavy bottom saucepan and bring to a boil over high heat. When the mixture is boiling, turn the heat down to medium-low and simmer until thick as jam, about 45 minutes to 1 hour. The time will differ depending on the diameter of your pot, (the wider, the less time it will take) and the heat you use (electric stove set on medium low can present some differences).
Prepare the chocolate ganache:
Place the chocolate and salt in a non reactive bowl and set aside. In a heavy bottom saucepan set over high heat, bring the cream to almost boiling (really hot basically!). When hot, pour it over the chocolate and salt. Let stand for 5 minutes before slowly whisking the mixture to bring it together to a smooth and silky ganache. If it’s not completely smooth, return to very low heat for a few seconds to melt the chocolate some more. Brands vary so this step may be necessary if the chocolate is not completely melted.
To assemble:
Pour 2 tablespoons of milk jam at the bottom of each tartlet. Refrigerate for about 30 minutes. Spoon some chocolate ganache over the milk jam until you reach close to the top. Refrigerate a couple of hours before serving to let the ganache and milk jam set.
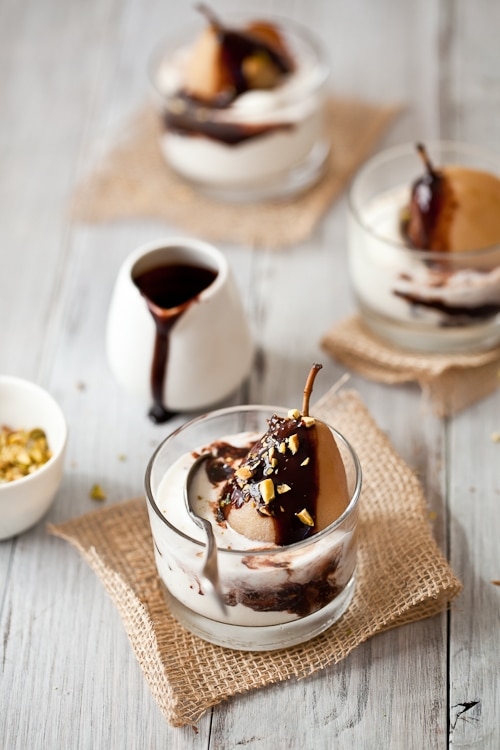
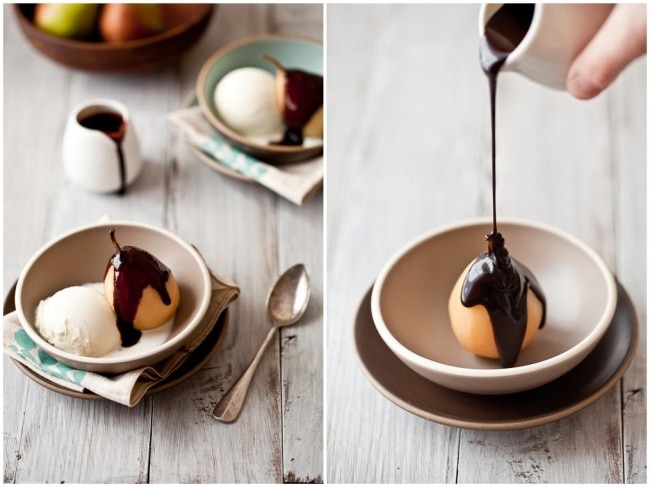
If you read this from France or are an expat anywhere in the world, you’re probably looking at this picture and thinking "Oh! Helene made Poire Belle Helene!" and move on to the rest of the post. If you had never had such a dessert and read a title like this, you’d think I’d blown a fuse by naming a dessert after myself. And as if that weren’t enough, adding the adjective "belle" to describe it all. Hmmmm….No.
I did not come up with name, heck I did not even liked the dessert this much until in my late twenties! Auguste Escoffier created the Poire Belle Helene in 1870, naming it after one of Offenbach’s operette, La Belle Helene. Yes. 1870. Makes me wish Escoffier had had a blog in 1870. Or a twitter account. I bet his updates would be of the most delectable kind. Seriously.
This is probably one of the core desserts of French cuisine. At least of bistros and restaurants when I was growing up. Funny thing is that I never did make much of it though because it bears only half my name. Indeed, I was born and baptized Marie-Helene like some are named Marie-Louise or Jean-Luc. However computers here in the States don’t seem to recognize hyphens and cut my first name in half. If I was going to be halved somehow, at least I’d get to pick which one, darn it. So I’m Helene. Except when I am in trouble, ehehe!
So, there is part of the little story. Or at least part of the reason why I never really appreciated Poires Belle Helene until well into my twenties. Why this late? I have an aversion for fruits and chocolate combined. There, I said it! I love nuts and chocolate. I love lemon and chocolate. I used to hate all fruits with chocolate. My most least favorite pairing was orange and chocolate. My less least favorite (!) was pear and chocolate.

There is something about the soft fragrance of pears that plays well with chocolate and either brings it forth and mellows it just so. Poached pears and hot chocolate sauce especially. They like each other, it’s obvious. They’re not sure on who should lead though and artfully play that up. And much like two people attracted to each other, poached pears and hot chocolate sauce are kind of the ultimate in sexy when it comes to dessert.
It’s the only fruit – chocolate pairing that enthused me this much. Add a good scoop of vanilla bean ice cream and the combination hot chocolate, cold vanilla, soft fruit just has me weak in the knees. There are indeed moments of bliss to be experienced with the simplicity of certain flavors, textures and temperatures. Poire Belle Helene is just that. Hot and cold, creamy, crunchy, soft. We did a few "hmmmm" and "aaaahhhs" with the first spoonfuls. I even caught one of my friends sashaying her hips around the living room the night we shared these for dinner.
Poire Belle Helene won’t bring on World Peace but I guarantee it’ll make everyone at your dinner table a tad bit happier inside…It won’t cure whatever ails you but it won’t give you a brain freeze. It will just super activate all your senses…
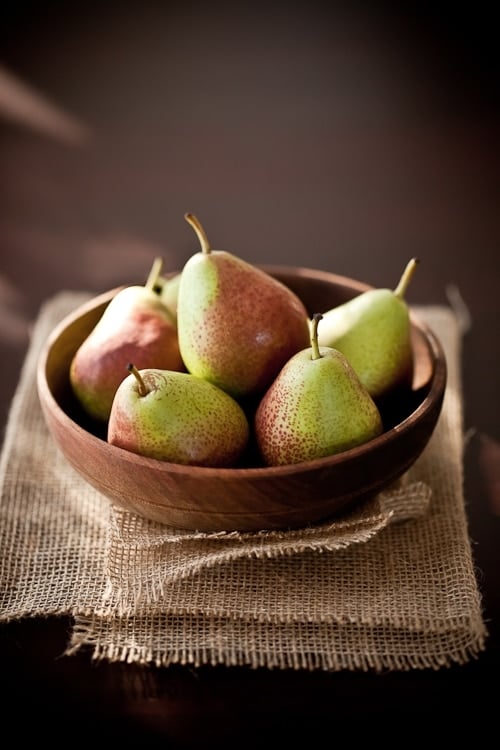
Tiny Forelle pears make it remarkably easy to plate and portion out but you can use any of your favorite pear variety. As I have three major deadlines all coming to a clash for November 1st, this dessert has been the easiest thing to fix myself for a little midnight reward. That’s my sly way of saying "I know I suck big time at posting right now and wait, you ain’t seen nothing yet. It might get worse!…"
Please send chocolate…
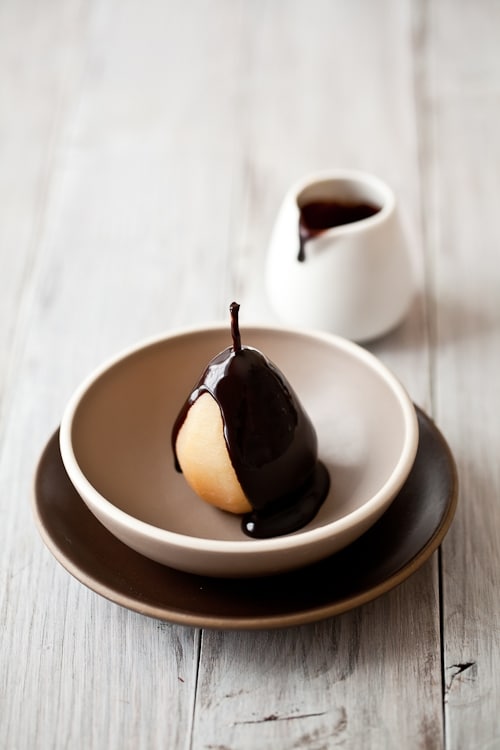
Poires Belle Helene – Spiced Poached Pears with Chocolate Sauce and Vanilla Ice Cream
Serves 6
For the poached pears:
6 Forelle pears (or other small-ish pears)
2 tablespoon mulling cider spice mix
juice of one lemon
For the chocolate sauce:
4 oz semisweet best quality chocolate
1 cup heavy cream
1 teaspoon honey
For the ice cream:
2 cups (500ml) heavy cream
1 cup (250ml) whole milk
1 cup (200gr) granulated sugar
1 vanilla bean
Prepare the pears:
Place the pears, spice mix, lemon juice and enough water to cover them in a tall saucepan and bring to a boil over medium high heat. Lower the heat and let them simmer for 15-20 minutes or until the pears are just soft (poke with a toothpick to check).
Remove from the water using a slotted spoon and allow to cool on paper towel or baking rack.
Prepare the sauce:
Place the chocolate in a non reactive bowl and set aside.
In a heavy saucepan set over medium high heat, bring the cream and honey to a strong simmer. Remove from the heat and pour over the chocolate. Let sit for 5 minutes then slowly stir until the mixture comes together.
Prepare the ice cream:
In a large saucepan, stir together the cream, milk, and sugar. Cut the vanilla bean in half and scrape the inside with the tip of a knife. Add that pulp (the seeds) to the pot. Bring the mixture to a simmer over medium low heat, stirring occasionally to dissolve the sugar. Remove from the heat and let steep as it cools to room temperature. Refrigerate, preferably overnight. Strain if desired.
Process the mixture into your ice cream maker according to the manufacturer’s intructions.
To plate: ice cream + poached pear + warm chocolate sauce.
Yes…
By the lack of postings one could wonder if I ever came down from the high that BlogHer Food and San Francisco. I did. I actually gave myself one day to catch up and crashed hard on Wednesday evening. Responsibilities hit me up again the following day. I love that work is insane and insanely good. I don’t like that it keeps me away from here this much. I definitely rely on a 4 o’clock break complete with cookies and milk. Or as it was the case this week, doughnuts and hot chocolate!
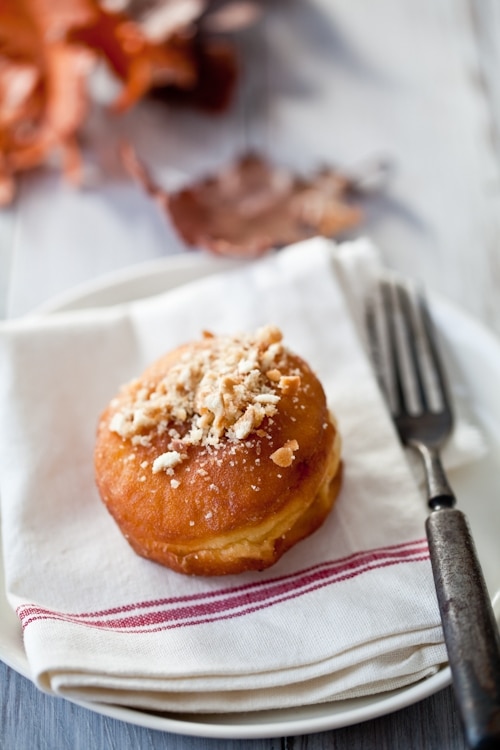
I am not one to be afraid of deep frying but I certainly am one to shy away from making doughnuts that often. I know I will end up eating too many. Right out of the hot oil. Almost. Perfectly brown. Crisp and soft. Lightly sprinkled with powdered sugar. Simple is always best but there is a place and time to venture out in baking. Especially when it comes to doughnuts. S’Mores Doughnut specifically.
Thanks to Lara Ferroni and her book "Doughnuts: Simple and Delicious Recipes to Make at Home", I only have to sit there and pick the next one. I know for having been part of her testing panel that all the recipes have been seriously and thoroughly discussed, dissected and perfected. I could not have possibly tested them all and started making a list of the ones to bake once her book would be out. S’mores doughnuts of course, but also Apple Cider, Creme Brulees, Sopapillas, Loukoumades, Carrot Cake…there is literally a doughnut and a glaze for every friend you have.
You get it. I liked the book. A lot. The doughs, the glazes, the fillings. The regulars like Basic Raised Yeast doughnuts, the basic cake, the chocolate version. And a impeccable gluten free version. Maple glaze, bourbon, caramel, chocolate. There four pages of these for your belly’s delights. See? Not kidding when I tell you there something for everyone.
If you are into visuals, Lara’s book is truly the proverbial feast for your eyes. And how could it be otherwise with Lara’s talent as a photographer and stylist. Knowing what goes into a shoot when working/acting as a single agent, from the shopping, cooking, styling, photographing, all the way to post processing, you can tell that Lara poured her heart and perfectionism into this book.
It shows. It’s fun, it’s straight foward, it’s generous in details and instructions and it’s quirky at times. Much like Lara…
So far this week, I made the Gluten Free Raised Doughnuts with a citrus glaze and the S’Mores Doughnuts. Wish I had not ran out of gluten free flours when I decided to make these but from the look on B’s face as he chowed through a couple, I know I must make them again this week! Stay tuned for another doughnut post…Both versions of the basic yeasted doughnut were equally easy to work with and very close in texture which is no small order in gluten free baking. That makes me very very happy for the rest of the recipes in the book.
Bravo Lara! Hard work pays off, period. Wishing your book plenty of sweet and delicious success! I am honored everyday by your friendship and generosity.
S’Mores Doughnuts (reprinted with Lara’s permission)
Makes 8 to 12
4 tablespoons unsalted butter, melted, divided
10 graham crackers, finely crushed
2 teaspoons superfine sugar
1 batch Basic Raised dough (recipe follows)
1 tablespoon milk or water
twelve 1-ounce squares milk or dark chocolate
48 mini marshmallows
Stir together 3 tablespoons of the melted butter, graham crackers and sugar. Cover and set aside.
Prepare the dough as directed through the proofing stage. Roll the dough to just a bit more than 1/4 -inch thick. Cut into 3-inch diameter rounds. Roll out half of the rounds to about a 3 1/4-inch diameter. To assemble, lightly brush each wider round with the milk or water and place a square of chocolate and 4 mini marshmallows in the center of each. Top with the smaller rounds and lightly pinch to seal. Then recut with the same cutter to seal the edges.
Fry the doughnuts as directed and let cool for only 3 minutes. Brush each doughnut with a little melted butter, then dip into the graham cracker mixture. Serve immediately.
Basic Raised Dough:
3 tablespoons (22grams) active dry yeast, divided
1 cup of whole milk, heated to 110ºF, divided
2 to 2 1/2 cups bread flour, divided
2 tablespoons (30 grams) superfine sugar
½ teaspoon salt
1 teaspoon pure vanilla extract
3 egg yolks
½ stick (4 tablespoons / 2 oz) unsalted butter or vegetable shortening
vegetable oil for frying
In a medium bowl, dissolve 2 tablespoons of the yeast into ¾ cup of the milk. Add ¾ cup of flour and stir to create a smooth paste. Cover and let rest in a warm spot for 30 minutes.
Combine the remaining milk and yeast in the bowl of a stand mixer fitted with the paddle attachment. Add the rested flour mixture along with the sugar, salt, vanilla, and egg yolks. Mix until smooth. Turn off the mixer and add ½ cup of the remaining flour. Mix on low for about 30 seconds. Add the butter and mix until it becomes incorporated, about 30 seconds. Switch to a dough hook and add more flour, about ¼ cup at a time with the mixer turned off, kneading the dough at medium speed between additions, until the dough pulls completely away from the sides of the bowl and is smooth and not too sticky. It will be very soft and moist, but not so sticky that you can’t roll it out. You may have flour left over. Cover the bowl with plastic wrap and refrigerate for at least 1 hour (and up to 12 hours).
Line a baking sheet with a lightly floured non-terry dish towel. Roll out the dough on a slightly floured surface to ½ inch thick. With a doughnut or cookie cutter (can use a glass, too) cut out 3-inch-diameter rounds with 1-inch-diameter holes (for filled doughnuts, don’t cut out the holes).
Place the doughnuts on the baking sheet at least 1 inch apart and cover with plastic wrap. Let sit in a warm spot to proof until they almost double in size, 5 to 20 minutes, testing at five-minute intervals. To test whether the dough is ready, touch lightly with a fingertip. If it springs back immediately, it needs more time. If it springs back slowly, it is ready. If it does not spring back at all, it has overproofed; no worries- you can punch it down and re-roll it once.
While the doughnuts are proofing, heat a heavy-bottomed pot with at least 2 inches of oil until a thermometer registers 360F. With a metal spatula, carefully place the doughnuts in the oil. Fry for 1 to 2 minutes per side or until golden brown. Remove with a slotted spoon, drain on a wire rack over a paper towel, and let cool before glazing.
Disclosure: the book was sent by Lara’s publisher as a thank you for being one of her recipe testers.
Yes, I am giving away a box full of chocolate donated by Scharffen Berger in San Francisco. Head toward the end of the post for details on how to participate.
Back in June (wow that feels like an eternity…) I was part of a food blogging panel at Evo 10 with two wonderful ladies, Jane and Helen Jane. Yep, I am not making this up. We clearly sounded like a tribe "Hi! I’m Helen!" "And I am Jane!" "And I’m Helen Jane". They were handling the blogging part of our workshop and I was doing the photography part. Lots of fun and new friendships came out of this. Honest, comfortable and packed with belly laughing punctuated conversations.
There is a myriad of ways to blog and find your peace and balance. I don’t think on it much. I am thrilled to make you discover bits about my home country, new recipes and techniques. It’s a place for me to practice my crafts and hopefully to give you something enjoyable to look at and tempt you as well. I put a lot of hard work and dedication into this space and it has given me so much in return. Most of all, the possibility to connect with wonderful people all over the world and be able to live all sorts of experiences.
However, when Jane sent me an email asking me if I wanted to help her organize a little party during BlogHer Food this weekend, my first reaction was "ugh…I don’t really have time to plan right now" but Jane came back with the words "what if it is a swanky chocolate filled little shingdig?". My reply? "go on, I’m listening…"
I have no idea how it all happened but before I knew it, I was part of a team of talented and generous ladies getting together venue, foods, libations and gifts for a party. I got worried that we would have to sell our souls to the Devil to make it happen but Jane & Kristen calmly said "We won’t do any of that. Just sit pretty and eat your chocolate. Scharffen Berger is giving us tons for the party".
I am a milk chocolate kind of gal if you must know. I don’t eat that much chocolate but when I do, it’s the creamy kind that gets me all tingly. Add nuts and caramel bits and I will do just about anything…
And that I did. And still do tonight as I am finishing packing for BlogHer Food. I can’t wait to be there and see familiar faces and meet new ones. People I’ve been reading for years becoming even more real. I love that my schedule this weekend is a nice balance of work, play and unexpected.
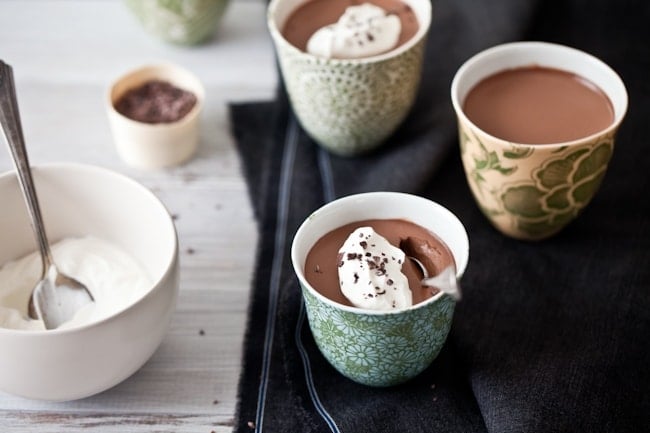
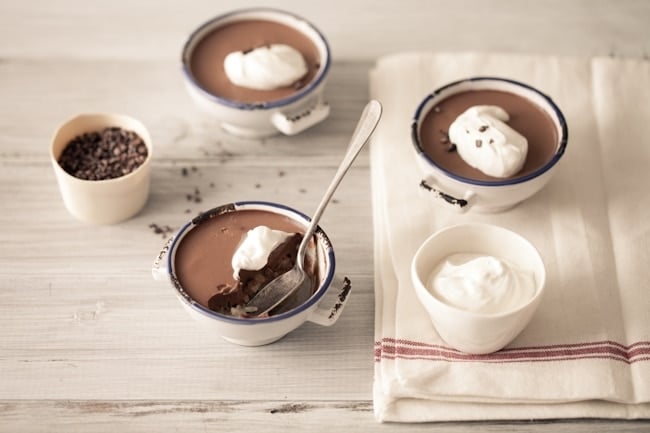
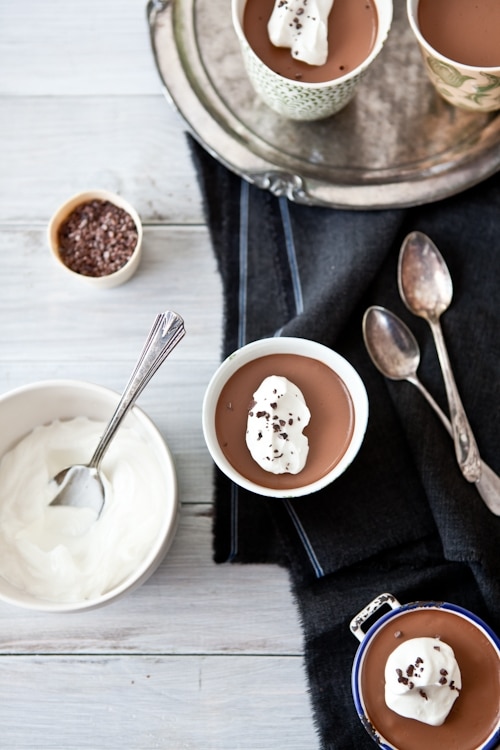
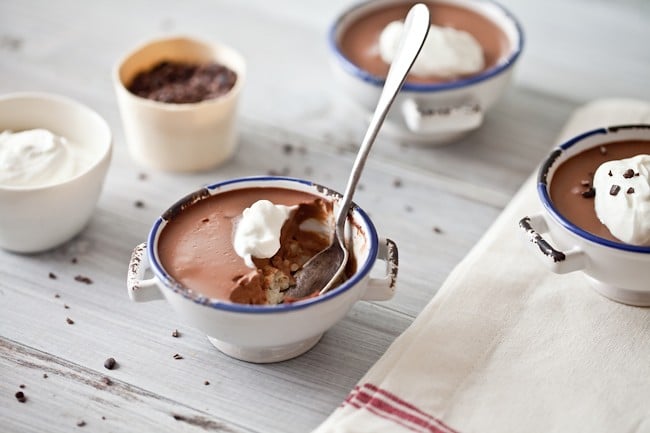
There was a tad bit of planning to be done on the home front before heading out though. Mainly stocking the fridge with good foods and making sure that the important things were right in front of his eyes if B. opened up said fridge. There are now eight Vanilla Rice Pudding & Chocolate Panna Cotta facing him. Don’t worry, he’s got more nutritious foods to dig into.
I have no idea what got into me to combine panna cotta and rice pudding except my deepest love for both. I figured with the weather finally changing a bit we could try to get into Fall mood a little too and start simmering, stirring, chocolating again after the heat of the summer. It does feel nice to finally have that little crisp in the air as the sun rises over the water.
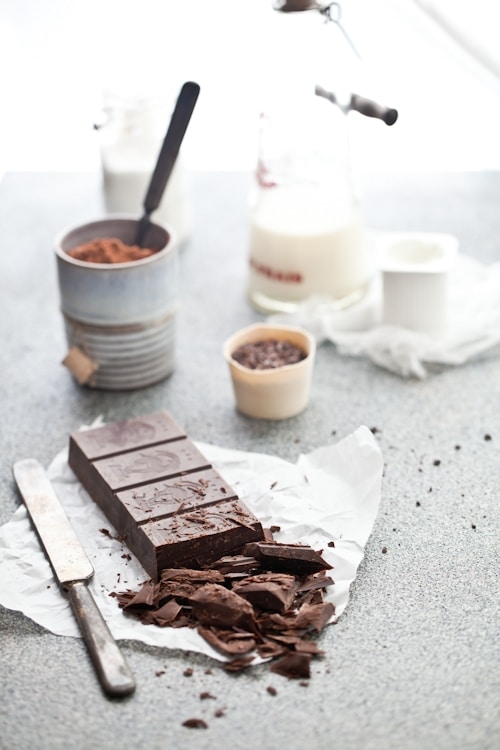
So I am not going to tell you that this post was made possible by the folks at Scharffen Berger who sent me chocolate because I would have made this recipe without them sending chocolate anyway. But…I would have used high quality chocolate like theirs nonetheless specifically because chocolate is in the front seat in this one.
What I am going to tell you is that they make some mighty fine chocolates and by using the 70% bittersweet chocolate bars, the panna cotta packed a good chocolate punch while remaining smooth as silk. To make sure you get the chance to feel the way we feel after sharing one of these, I asked if they’d let me have more chocolate to give away to one of you. I asked for "some chocolate" and they are sending a box full.
That’s also why I love them. They know how good their craft is and are all about getting us addicted to it…eheheh. Did they ask or demand I post about them? Nope. I volunteered. That was a no brainer for me. Eat chocolate and giveaway some more on your blog. Make someone else happy.
I am happy to be giving away a mixed box of Unsweetened Natural Cocoa Powder, 99% Cacao Unsweetened Chocolate Baking Bar, 62% Cacao Semisweet Chocolate Baking Chunks and a few of their eating bars in various percentages courtesy of Scharffen Berger. To enter, you have until Monday October 11th, midnight Easter standard time to leave a comment on this post. (No anonymous comment). The winner will be picked at random by the closest person to me in the room (not kidding) – I’ll be in San Francisco until Tuesday but I will make sure to get in touch with the winner.
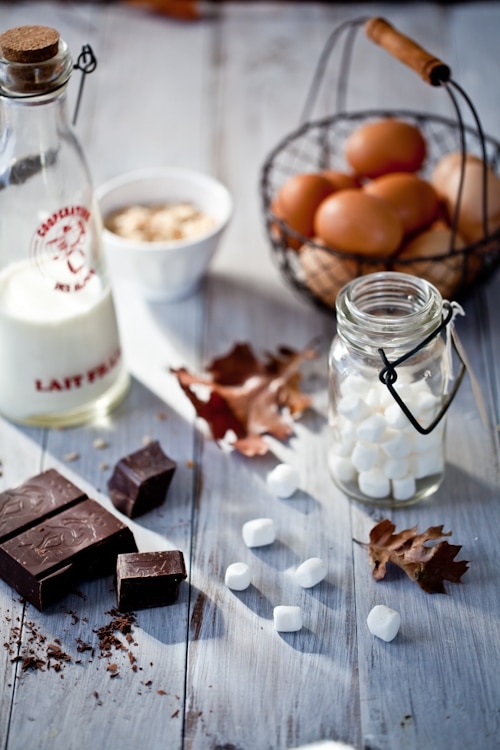
Vanilla Rice Pudding & Chocolate Panna Cotta:
Serve 6 to 8
For the rice pudding:
1 cup rice (really the kind you like best)
1 1/2 cups (315ml) whole milk (I used raw)
1/2 vanilla bean, split open
1/2 cup (60ml) heavy cream
1/4 cup (50gr) sugar
Pinch of salt
For the chocolate panna cotta:
1 tablespoon powdered gelatin (2 sheets gelatin)
1/4 cup water
1 cup whole milk
1 cup heavy cream
1/3 cup honey
8 oz bittersweet chocolate
1 cup Greek yogurt
Cocoa nibs, dusting of cocoa powder and fresh whipped cream (optional garnish)
Prepare the rice pudding:
In a stainer, rinse the rice under cold water for a minute to remove some of its natural starch.
In a medium saucepan set over medium heat, bring the rice, milk, cream, sugar to a simmer. Scrape the seeds from inside the vanilla bean and add to the pan with the salt. Cook until tender, stirring occasionally for about 20 to 30 minutes. Remove from the heat. Let cool for a few minutes and divide the pudding evenly among ramekins. Cover with a layer of plastic wrap until you are ready to pour the panna cotta on top of the rice pudding.
Prepare the panna cotta:
Place the water in small bowl and sprinkle the gelatin over it. Reserve.
In a large heavy bottomed saucepan placed over medium heat, bring the milk, heavy cream, and honey to a simmer. When the cream is hot, remove from the heat and whisk in the chocolate until melted. Add the reserved gelatin and stir until it is completely dissolved. Add the yogurt and whisk vigorously until well blended.
Divide the mixture over the rice pudding ramekins. Let stand at room temperature for 20 minutes and then refrigerate for at least 4 hours before serving to let the cream set properly.
Garnish with cocoa nibs and whipped cream if desired.
Full disclosure:
The chocolate, cocoa powder and cocoa nibs used in this recipe were given by Scharffen Berger at no cost.
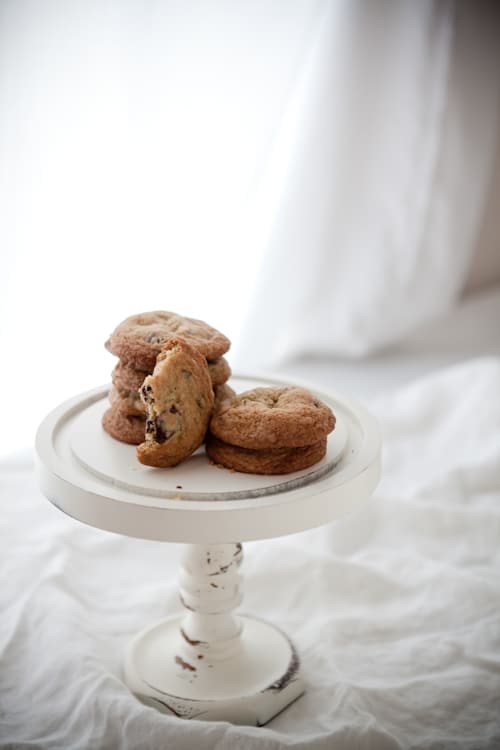
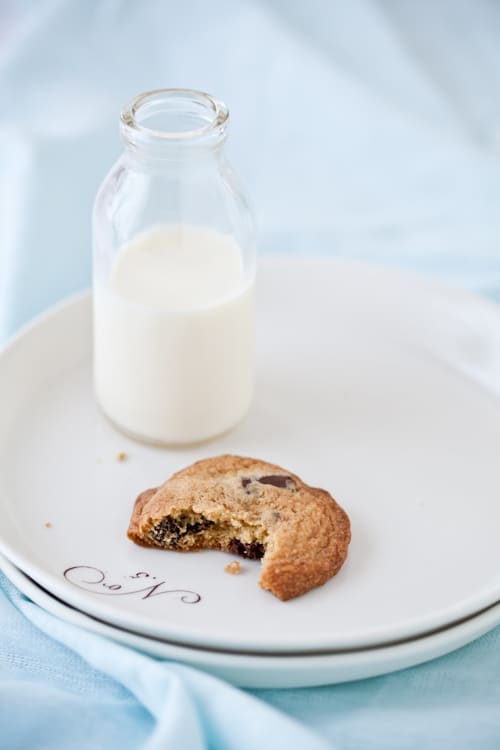
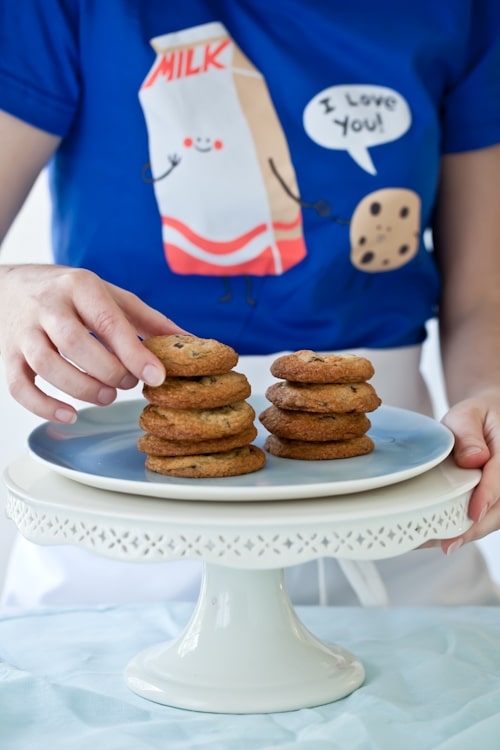
Cookies. Milk. Afternoon showers. Looking at the shoreline through the window. That was just the medicine needed the other day. Even if just for the enticing aroma of warm chocolate wafting through the house. I did not know the power of chocolate chip cookies until I moved to the US though. We don’t really do those back home. We have eclairs, macarons, financiers. These I knew as my pick up-feel better-never let me down treats. Until I met B.
Turns out I married a chocolate chip cookie monster. It does not matter which kind comes out of the oven, a tray usually disappears in its entirety as soon as the cookies are cool enough to handle. And before I am done with the batch I can pretty much start over. His favorites are hands down chocolate chip cookies and I think I have baked 100 different recipes so far. Always in search of the next best one.
I must say, after years of marriage and oodles of batches behind me that I get it. the French have their baguette and chocolate bar as a snack, here it’s cookies and milk….and I love that too. Unlike B. I am good after a couple of cookies but I had to find a gluten free recipe now and one that he would not even blink twice about trying. And liking.
I really had not particularly trying to find one until the good folks at Threadless contacted me about a promo they were doing. I have a personal rule not to do product review here, mostly because I hate to commit to a deadline for one when work is already full of deadlines as it is. But it’s Threadless tees…I love them. I bought my first one four years ago and probably bought over a dozen for friends and family since then. They are awesome. Different, fun and they promote artists and individual talent.
Before I agreed I checked the selection they wanted to promote, trying to tie it in somehow with this blog and give you something back at the same time in the form of a new recipe. You can guess I fell in love with the Cookie Loves Milk design. And I had the perfect reason to search for that gluten free chocolate chip recipe my repertoire was missing.
I picked the most reliable gluten free source I know, my friend Shauna from Gluten Free Girl and The Chef. I know the extent with which her recipes are developed and the love she puts in making them for us around. If you doubt it, watch this video trailer for their upcoming cookbook. See what I mean? I picked her cookie recipe in the Blog Aid cookbook we both participated in to raise funds for the Haiti this past winter. Tons of your favorite bloggers contributed pictures and recipes! And dorky as I am, I baked in my brand new Cookie Loves Milk tee….
You know what I love about that tee-shirt? It brings a smile on everyone’s face. Even the cranky bank teller giggled. Five seconds of giggles in your day and you have already done a great deal for your inner self. Smiling. The good for the soul kind of workout. Something I am definitely happy to promote and stand behind. Not to mention that this tee is so comfortable to wear I almost went to bed with it..eheheh! The flip-flops that came along? Just what I needed for the beach…
But that’s not all… Threadless has nicely offered to giveaway a "Cookie Loves Milk" tee shirt to one lucky reader of this blog (they unfortunately ran out of flip-flops) and I am am adding a copy of the Blog Aid – Recipes For Haiti cookbook where the following recipe comes from. To enter:
– leave a comment on this post (why not tell me your favorite cookie?) between today Wednesday August 11th and Sunday August 15th, midnight eastern US time.
– one entry per person, duplicates will not be published
– no anonymous entry. Sign Zorro or Bambi if you must…
36-hour Chocolate Chip Cookies – originally adapted from David Leite from Leite’s Culinaria, now adapted from Shauna’s version.
Note: Read more about why 36 hours in the fridge makes them better here.
1 cup sorghum flour
1 cup corn starch (you can sub tapioca starch)
1 cup potato starch
1 cup millet flour
1 tablespoon xanthan gum
1 1/2 teaspoons baking soda
2 teaspoons baking powder
1 1/2 teaspoons kosher salt
2 1/2 sticks unsalted butter, at room temperature
1 1/4 cups brown sugar
1 cup plus granulated sugar
2 large eggs, at room temperature
2 teaspoons vanilla extract
2 cups chocolate chips or chocolate chunks
Sea salt
In a large bowl, whisk together each of the flours and "starches" along with the xanthan gum, baking soda and baking powder.
In the bowl of an electric mixer fitted with the paddle attachment, beat together the butter and the sugars on medium speed for a couple of minutes. then mix for 1 minute more. Don’t overmix. the eggs, 1 at a time, beating well in between each addition and scraping the sides and bottom of your mixer bowl if necessary. Add the vanilla extract and beat an extra 30 seconds.
Add the flour mixture into the batter, 1/2 cup at a time, mixing just until the dry ingredients are coming together. Add the chocolate and mix briefly to incorporate.
Cover the dough with plastic wrap and refrigerate for 36 hours.
When ready to bake, preheat the oven to 350°F, position a rack in the middle of the oven and line baking sheets with parchment paper or a non-stick baking mat.
Scoop your preferred size of dough balls onto your baking sheet, 2 inches apart from each other. Sprinkle the tops with the sea salt.
Bake the cookies about 12-15 minutes, depending on the size of your cookies or until golden brown. Let cool the cookies 10 minutes on the baking sheets before transferring to cooling racks.
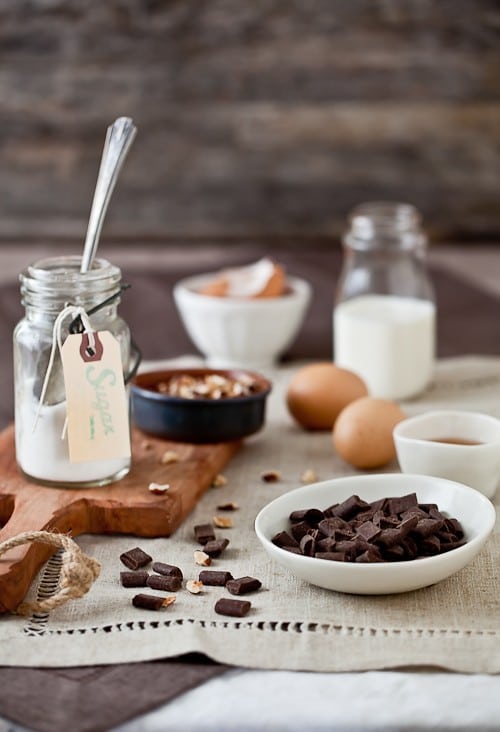
Thank you guys so much for playing the game the other day and giving me great suggestions for B’s birthday cake. He was a bit shocked I did not have any of my own – the truth is I had too many and after staring at them for a few days, none seemed that fun anymore! And, I really like when we can all share, communicate, participate.
As you can guess, B’s cake had plenty of chocolate, eggs, sugar and nuts…Which one did I/we pick? EP’s Chocolate and Hazelnut Meringue Cake from Martha Stewart ended up stealing the show. Congratulations on winning the "Artisan Breads At Home". You are going to love this book!
How did I pick? Actually I ended involving B. a little in the process as I noticed after 50 or so comments that I was slightly putting in the "maybe" or "no sure" columns flavors, desserts, ideas that he could picked if given the chance. It was his birthday after all. And I have known in the 13 years we have been together that I should never expect anything if only be surprised.
We sat down and I asked him for key words that would help me narrow down the winning suggestion. Here were his specs: chocolate, nuts, crunchy – creamy, gluten free so I would not have to worry about adapting (go ahead, insert "awwww" right here!). I read everyone of your comments and put a star next to the ones that fit his criteria then I went back and had him look them over, one by one and pick his top three.
You guessed it, I didn’t want to spoil the element of surprise completely. Yes. It turned out into a day 100% tuned into him and I am happy for it. This year has been nothing but tranquil for us and he deserves every bit of "you you you you you" that I could give him. And I am glad you indulged me in this rather fun and chocolatey quest.
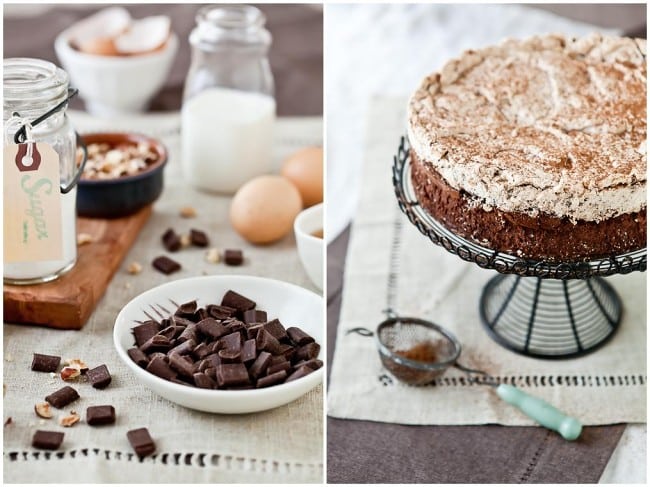
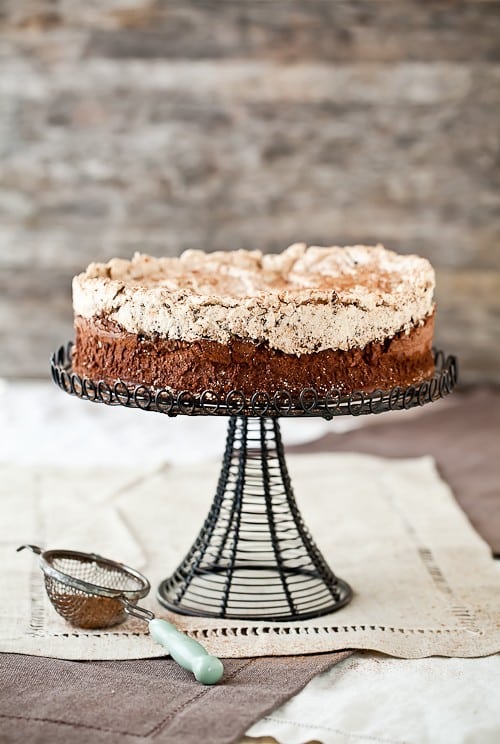
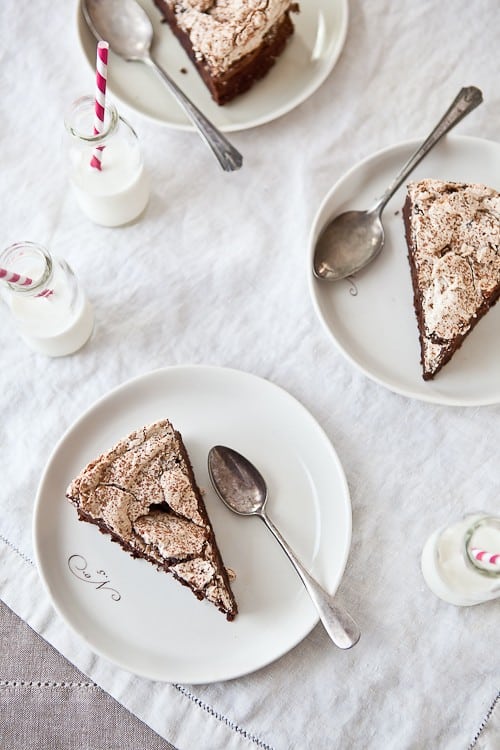
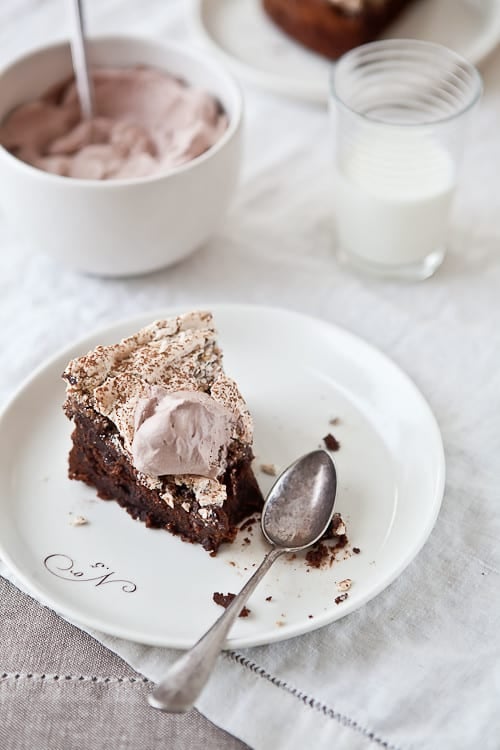
That cake is sublime! flourless, creamy, complex and yet not so rich that you have to stop after one bite – more like control yourself not to want it for dessert at every meal! Granted we invited plenty of friends to share with us so the slices were small but I have to say, sneaking in the kitchen passed midnight and sharing a slice with a cold glass of milk after everyone had gone home was pretty much the "ahhhhhh" moment of the day.
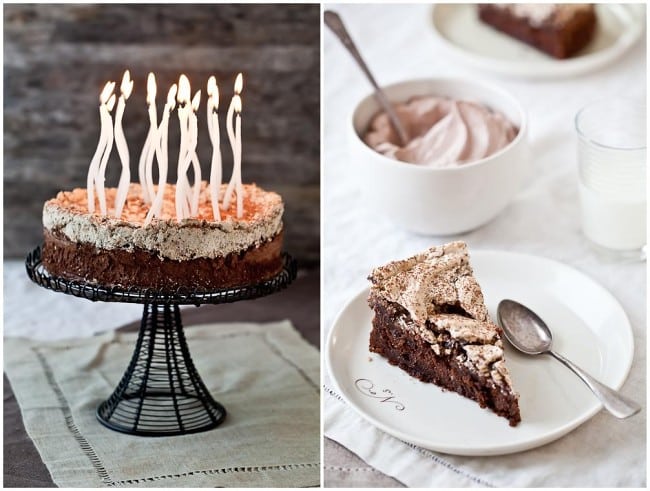
The combination of the deep flavors of the cake (I added espresso to the batter instead of vanilla extract) with the meringue was exactly what he asked for. Because we have been heat indexes hovering around the 115F-120F and high humidity, I cooked the meringue topping longer than what the recipe called for to make sure it would not end up in complete puddle of goo when the time to serve it came about. It worked perfectly and yielded the right amount of crunch and softness after standing for a few hours. Like macarons, this cake only tastes better after 24 hours.
Speaking about cake and chocolate, how about doing a little French Word A Week on chocolate cake while we are at it? So, here it is: click on Gateau Au Chocolat to hear its pronunciation.
Thanks everyone for playing along! Have a great weekend everyone!
Chocolate and Hazelnut Meringue Cake, adapted from Martha Stewart.
Makes one 9-inch cake
Notes:
– Now is not the time to use the cheap-o chocolate. Get the best quality bittersweet chocolate you can find as it is the star of the recipe. (Guittard, Callebaut, Valrhona, El Rey, Scharffen Berger, etc…)
– To toast the hazelnuts, preheat oven to 350F and spread the nuts in a single layer on a baking sheet. Bake 10 to 15 minutes until golden brown.
– To skin the nuts without driving yourself crazy, place them in a mesh bag (like a recycled orange or lemon bag) and rub the nuts between your hand over the sink. The skins will fall and only the "naked" nuts will remain in your bag.
– The cake at room temperature is excellent but served really cold, it becomes even fudgier and the meringue gives slightly under your tooth like a soft pavlova. Brilliant!
For the cake:
10 tablespoons unsalted butter, plus more for pan
3/4 cup firmly packed light-brown sugar
6 large whole eggs, separated
12 ounces bittersweet chocolate, melted and cooled
1 1/2 tablespoons espresso (or vanilla)
1 1/2 tablespoons rum (optional)(not with us!)
1/4 teaspoon salt
For the meringue:
4 ounces bittersweet chocolate, roughly chopped (1 cup)
1 cup hazelnuts (about 4 ounces), toasted and skinned (see notes)and roughly chopped
1 tablespoon cornstarch
4 large egg whites
3/4 cup sugar
Prepare the cake:
Preheat oven to 350 degrees. Butter a 9-by-3-inch springform pan. Line bottom with parchment paper. Butter parchment and set aside.
In the bowl of an electric mixer fitted with the paddle attachment, whip the butter and brown sugar until pale and smooth at medium speed, about 3 minutes. Add egg yolks, one at a time, beating well after each addition and scraping the bottom and sides of your bowl if necessary. Add the melted chocolate, espresso (or vanilla), rum, if using, and salt. Beat until combined. Transfer to a clean bowl and wash your mixing bowl thoroughly.
In a clean mixer bowl fitted the whisk attachment, beat the 6 egg whites on high speed until soft peaks form, about 2 minutes. Fold one-third of the egg whites into chocolate mixture. Fold in remaining egg whites and pour batter into prepared pan, and bake 25 minutes.
Prepare the meringue:
Combine the chopped chocolate, nuts and cornstarch in a small bowl, and set aside. Place remaining 4 egg whites in a clean mixer bowl fitted with the whisk attachment, beat on high speed until frothy. With the mixer running, slowly add the sugar and continue beating until stiff peaks form, about 8 minutes. Fold in hazelnut mixture.
Assemble and Finish:
Remove cake from oven. Using a large offset spatula, spread meringue mixture on top of cake using as little strokes as possible not to deflate the meringue, and return to oven. Bake until meringue is lightly browned and crisp, 25 to 30 minutes. Transfer pan to a wire rack; let stand 10 minutes. Run a knife around the edge of the cake to loosen, and release sides of pan. Let cool, about 30 minutes, before slicing and serving.
————————————————————————————
Some inquiring minds asked so here is a short prop list.
– Plates: the ever fabulous Asya from Gleena.
– glasses and little bottles (they are bud vases actually): Wal-Mart.
– paper straws from Bake It Pretty.
– silverware, glass jar and linens: vintage from a little shop in town.
– candles: gift from my friend Jen from Use Real Butter (I think she got them at Peppercorn in downtown Boulder).
– wire cake stand and green handled strainer from etsy.