It’s been a yucky week….all grey with some rain drops here and there. Rain with warm tempereatures. Thunderstorms and shorts, I’ll never get used to this!! I decided to see it as soft and comforting. I baked and I baked without prospect of a good picture taking day. The fridge is overflowing, the freezer is about to get there. In the midst of running out of room in former, I had to start reorganizing the latter. I pulled out one bag each of raspberries and juicy plums to replace them with other desserts that will hopefully be "taken care of". I already told the neighbors to come over for desserts because there is no way B. and I can eat a dozen fast enough. Well we could….but our doctor would not be very happy!
The weather had been threatening us with rain long enough for me to let my guard down and leave the house without an umbrella. Don’t ask…Of course I got soaked while leaving the grocery store after a quick run for milk and eggs one early morning!! Actually I was still dripping when I got home that I figured "what’s a little longer?" and took the dogs for their long walk. They were wired and going crazy and I needed a quiet house later on to work, not the usual circus of Bailey hanging from Tippy’s tail. Once back inside, we were all hungry and in need of a little comforting. I let them chase each other around, that their idea of comfort. Well more like Bailey running like a kid who just put his paw in a plug and Tippy watching, shaking his head as if to say "you crazy dog". I, on the other hand, was craving the comforting smell of a freshly baked crumble and a cup of tea.
Easy, fast, comforting…I don’t know about you but at that moment a crumble felt as good as a dry towel.
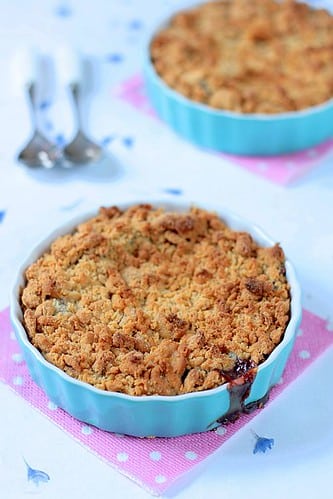
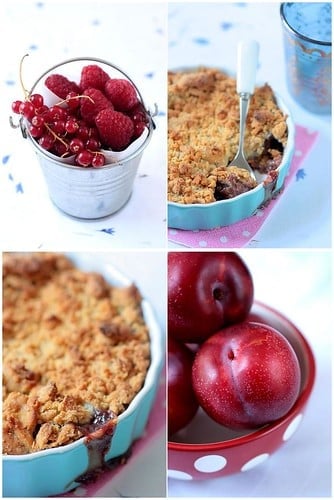
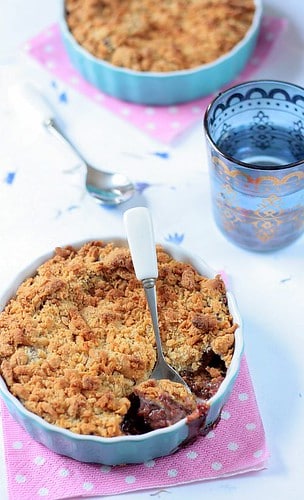
I tossed together the raspberries and plums and topped them with a streusel topping spiced up with a little cardamom. Thirty minutes and a dry off later, I was rewarded with the wonderful smell of freshly baked "comfort". I exclaimed "you missed all the fun!" when B. got home and saw us all huddled together on the living room floor enjoying the rest of the morning. He saw an extra crumble dish on the counter top and quickly replied "no, I don’t think I did" before proceeding to dig in his share with a happy smile. Dessert before lunch….my idea of making the best out of a rainy morning!
Plum-Raspberries Cardamom Crumbles:
Serves 4
For the fruits:
4 plums, pitted and chopped into small cubes (about one cup diced)
1 cup fresh or frozen raspberries
1/4 cup sugar
zest of one lemon
2 Tb lemon juice
2 Tb cornstarch
Streusel topping:
6 tablespoons butter, cold
1/2 cup light brown sugar
1/3 cup flour
1 teaspoon cardamom
1/2 cup chopped walnuts (optional)
Preheat your oven to 30F.
In a large mixing bowl, combine the fruits and the rest of the ingredients. Toss well, but gently not to break the raspberries too much. Divide between 4 ramequins and place them on a baking sheet as the fruits are most likely to release their juice, causing a spill. Set them aside while your prepare the topping.
In a bowl, combine the sugar, flour, cardamom and walnuts if using. Add the butter cut in small pieces and mix with your fingertips until you get a mixture that ressembles coarse crumbs. Divide th topping evenly among the 4 dishes. Bake for 20-30 minutes or until the topping is golden brown.
You can make this gluten free by substituting the all purpose flour with gluten freee flour or rice flour. Why am I mentionning this? October is Celiac Awareness Month! If you want to venture into gluten free baking, check this article.
Don’t forget to enter the drawing to win one of 5 copies of Confetti Cakes for Kids! The contest ends Tuesday October 14th at midnight US Eastern time.
Thank you all for the very nice birthday wishes for my mother, she truly appreciated the thought. Funny story about birthdays in my family and birthdays phone calls especially: my grandmother had the habit to see whom of her children would call her first to wish her a happy birthday. When I called my mom on Tuesday, I immediately said "I know I am not the first but I am the furthest…that’s got to count!".
Anyways, back to today’s dessert… I can’t plan..Let me rephrase this: I can’t plan to have a distraction free day because we all know that concept never truly works. I had planned yesterday to be a writing day punctuated by a few walks with the dogs, a couple of play breaks with them and the neighbors' kids, no grocery shopping, no baking commitment, no visits, no errands…just me and my thoughts. Ha! I should have checked the weather channel because as soon as I woke up the rain had decided to fall hard and steady, which meant no walks with the dogs, no play time nextdoor. Thus I had two crazy monkeys on my hands who all of a sudden had decided to team up to tear the house apart when I was not looking. I am still laughing when I think about the tricks those two played on me!
It all started when I was sipping my coffee looking at the creek and the rain…and the high tide…tidal creek during high rain equals a big puddle in your yard and a creek boat (think small fishing tin there people….we’re not the yacht type) that threatens to float away. B. went outside to tighten the rope, the dogs followed and found the yard, sorry puddle…and all hell broke lose. They played fetch with each other for thirty minutes and all we could do was watch. Watch them turn from beige to black really…Two bathes and numerous towels later and everybody settled down…a little. By then I had lost my writing mojo and decided to bake instead. At least it was easier to stop their shenanigans with a whisk in my hand than a thought up in the air.
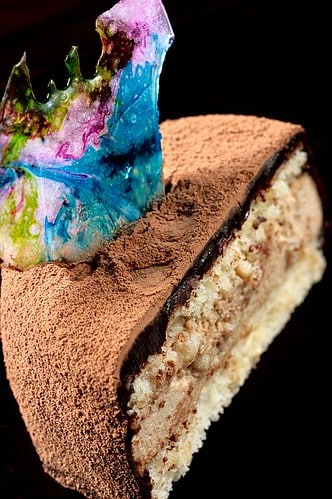
Baking did take place but not in the case of this cake. How can I make a cake without turning the oven on? Recycling….When we did the last Daring Bakers challenge I did the whole batter but baked a 6 inch cake for the challenge and a 8 inch cake that I froze, not really sure of what I would use it for. I got a call from a friend Tuesday morning and told her to come by meet the puppy later that day over coffee and cake. I thawed the cashew gateau and started working on a filling when she called to cancel: her best laid plans got also derailed that day. We reset for the day after (gosh I have never written anything with that much timeline involved!), which turned out great given the way my rainy day was shaping up.
For the cake I used pastry rings to cut out 4 rounds into the cake and split those minis in half. I used one half at the bottom of each ring, topped them with a simple coffee and cardamom mousse, (you might have extra mousse in which case I recommend you divide it into glasses and eat as is. It is easier to make the full amount and have extra than the opposite. It is really good on its own), one more layer of cake and let them set in the fridge overnight. Wednesday morning I topped each mini cake with a dark chocolate ganache. The inspiration for the caramel stained "glass" panel comes from my grandmother (same one!) who used to say "I don’t care if it rains as long as there is some sun and some colors somewhere". I feel the exact same way but since there was no sun in sight I decided there would be colors then! I go a lucky break of 20 minutes to take some pictures and walk the crazy monkeys. Not too bad a day after all.
Cashew Gateau With Coffee Cardamom Mousse:
Serves 4
For the gateau: 3/4 cups cashew, toasted/skinned
1/3 cup cake flour, unsifted
1 Tbsp. cornstarch
3 large egg yolks
1/2 cup sugar, divided (2Tb & 6 Tb)
1/2 tsp. vanilla extract
½ tsp. grated lemon rind
2 lg. egg whites
2 Tb melted butter, cooled
Position rack in the lower 3rd of the oven and preheat to 350 degrees. Grease and flour a 8” X 4” inch round springform pan. Using a food processor, process nuts, cake flour, and cornstarch for about 30 seconds. Then, pulse the mixture about 10 times to get a fine, powdery mixture. While you want to make sure there aren’t any large pieces, don’t over-process. Set aside.
Put the yolks in the bowl of an electric mixer, with the paddle attachment, and beat until thick and light in color, about 3-4 minutes on med-high speed. Slowly, add 8 Tb of sugar. It is best to do so by adding a tablespoon at a time, taking about 3 minutes for this step. When finished, the mixture should be ribbony. Blend in the vanilla and grated lemon rind. Remove and set aside.
Place egg whites in a large, clean bowl of the electric mixer with the whisk attachment and beat on medium speed, until soft peaks. Increase to med-high speed and slowly add the remaining 2 Tb of sugar, over 15-20 seconds or so. Continue to beat for another ½ minute. Fold the yolk mixture to the whites. Pour the warm butter in a liquid measure cup (or a spouted container). Put the nut meal in a mesh strainer (or use your hand – working quickly) and sprinkle it in about 2 tablespoons at a time – folding it carefully. Be sure to exclude any large chunks/pieces of nuts. Again, work quickly and carefully as to not deflate the mixture. When all but about 2 Tbsp. of nut meal remain, quickly and steadily pour the warm butter over the batter. Then, with the remaining nut meal, fold the batter to incorporate. With a rubber spatula, transfer the batter into the prepared pan, smoothing the surface with the spatula or back of a spoon. Tap the pan on the counter to remove air bubbles and bake in the preheated oven for 30-35 minutes. You’ll know the cake is done when it is springy to the touch and it separates itself from the side of the pan. Remove from oven and allow to stand for 5 minutes. Invert onto a cake rack sprayed with nonstick coating, removing the pan. Cool the cake completely.
For the coffee cardamom mousse: 1/2 teaspoon ground cardamom
1/2 cup espresso or strong coffee
1/4 cup sugar
1 tsp powdered unflavored gelatin, softened in 1 tablespoon cold water
1 cup heavy cream, cold
In a mediu saucepan, bring the coffee, sugar and cardamom to a simmer. Remove from the heat and stir in the gelatin until it is completely dissolved. Let cool to room temperature. In the bowl of a stand mixer with the whisk attachment or with hand held beaters with balloon whisks, whipe the cream just until it holds stiff peaks, do not overbeat or it will become grainy and separate. Add a small amount first to the coffee mixture to loosen up the batter, slowly fold the rest of the whipped cream. Do not let it set completely before using it for the cake filling (have your cake baked, cooled, and cut before using)
For the chocolate ganache:
1/2 cup heavy cream
3/4 cup chopped chocolate or chocolate chips (about 6 oz or 180 gr)
In a medium saucepan, bring the cream to a simmer, remove from the heat and add the chocolate. Let it sit for 5 minutes so that the chocolate starts to melt then slowly stir the cream and chocolate until they come together to make the ganache. Let cool slightly before using it over the cakes.
To assemble: Cut 4 rounds out of the 8 inch cake and cut each round in half. Using 4 3 inch round pastry rings, place a cake round at the bottom of each ring, top with about 1/4 cup of coffee mousse, top with another cake round and let sit overnight. In the morning, make the ganache. Line a sheet pan with a sheet of parchment paper, position a cooling rack or a grid over it, position your cake over the grid and slowly pour the ganache over all the cakes to cover the completely. Rap the sheet over the counter top (be gentle, no jumping cakes allowed!), to let the ganache fall evenly. Let them set in the fridge for a couple of hours. You can dust them with a good coat of cocoa powder if desired like I did here.
For the stained glass caramel windows:
250gr sugar (1 cup)
37.5 ml water (35 gr) (2 1/2 Tb)
various food colorings
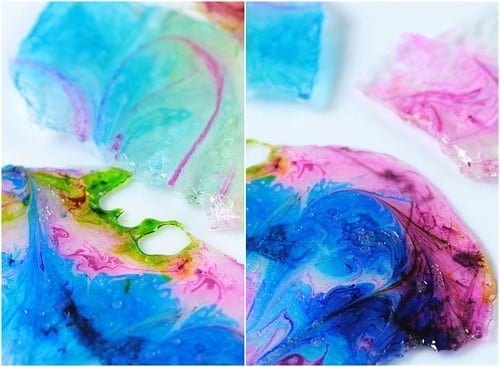
Line a baking sheet with parchement paper. Drop a few drops of food coloring onto the paper. Do not touch them, sirl them or move them.
In a heavy saucepan, combine the sugar and water, do not stir and bring to a boil over high heat. Continue to boil until the caramel reaches the soft crack stage or 140C – 285F on a candy thermometer (do not let it turn color). Immediately pour over the parchment paper with the food coloring. Take the baking sheet with your hands and move it left to right, right to left to move and swirl the colors. Let set until completely cooled. Break pieces of your desired size to decorate the cakes with.
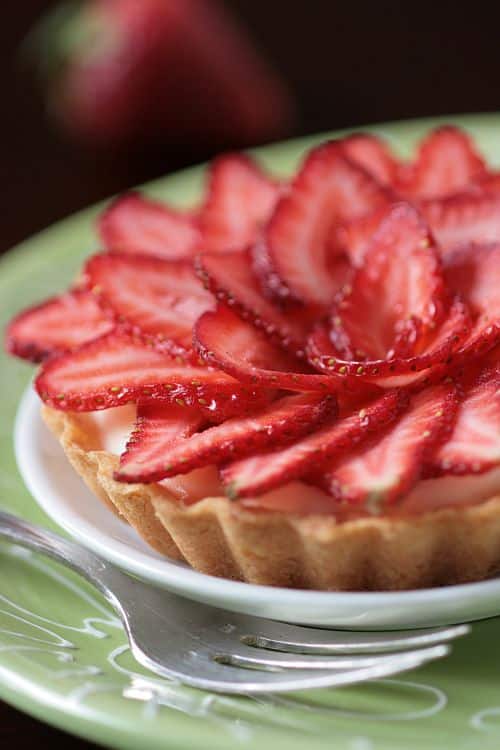
I realised the other day that I have been turning the oven on late in the evening lately. The heat is not conducive to "wanting" to bake, nor is the rain that makes me crave soft and cold flavors. Airy mousses and creamy puddings, clouds of meringue and pools of creme anglaise…ice creams, let’s not forget ice creams, one of my weaknesses. So when Old Chef asked me if I could come up with a couple of items for a private dinner for a client on Thursday, I cringed…Well, just a little, because I like him, I like the clients and let’s face it, you don’t need to twist my arm when it comes to baking! One of the requests they had was to have berries….lots of berries….beside a cold berry soup that I will tell you more about next week, I thought I would combine my ongoing love affair for mousses with fresh strawberries in individual tartlets.
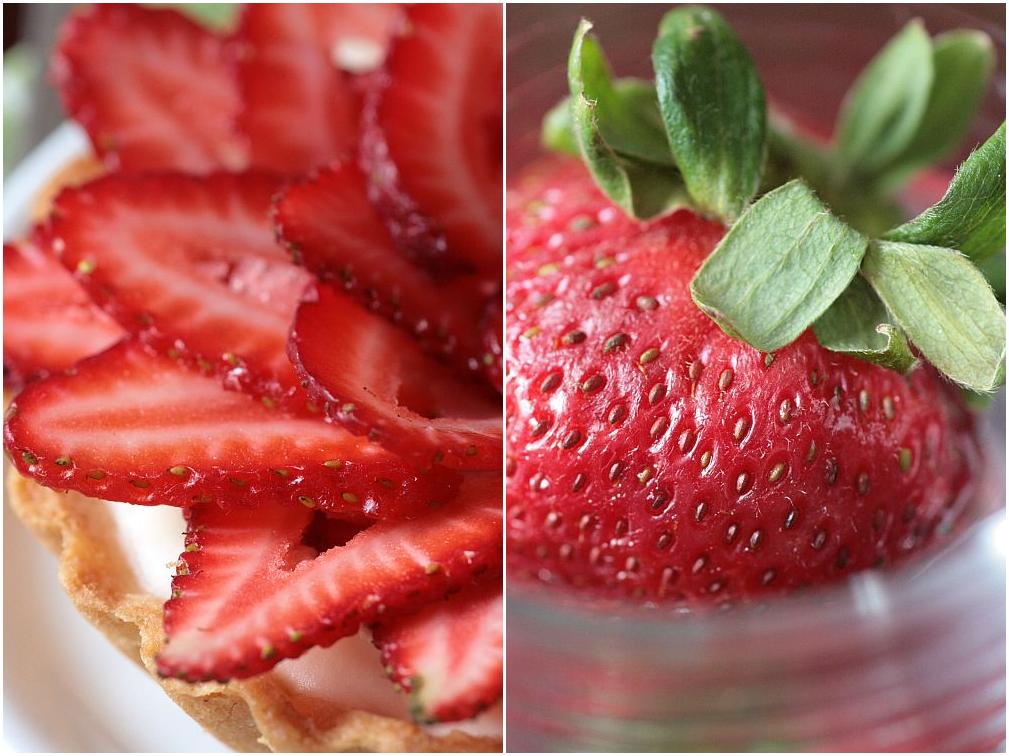
Back in May, I told you about our friend M. who had just been diagnosed with cancer. She underwent surgery a couple of weeks ago and is now back home, tired but already restless. She is not out of the danger zone yet, but there is progress. She called me yesterday all upset because she was tired of roaming around the house, tired of resting and tired of being told to sit down when she wanted to go for a walk. "Want to slice strawberries for me then?" I asked her. "Pick me up in 20 minutes!" was her response. I knew that an afternoon of baking and chatting would cheer her spirits up, not to mention that I am starting to get worried about this trend I developed to talk to the custard while I stir it!!
I set her up a stool by the counter and while she hulled and sliced the berries, I prepared the tart dough. When I turn the oven on, she gave me that look of "oh no! It’s already hot and humid…please!". I promised her it would not take more than 20 minutes to bake them and then we can cool down again. I did not mention that I would have to turn it on for another couple of hours after her departure because she would have given me that "crazy girl!" look and checked my pulse! It’s not only that it is hot outside, it also ungodly humid so opening up the windows is out of the question. She wondered if I had burnt a fuse when I said, 20 minutes…but that’s it really. Once the shells are baked, they are filled with a delicious mousse and topped with sliced strawberries.
We made enough for eight tartelettes as test products since I’ll have to make twice that amount on Thursday so they would be fresh, while chatting about her grand kids, the operation, the road ahead, the journey already accomplished. We each kept a couple and I went next door to my favorite neighbors to drop the remaining 4 (see Dad, I can count!), and then I got a big surprise from C’s eight year-old twins. Remember they got a puppy a couple of weeks ago, Sully? Well, their attention span has already moved on to faster and bigger things so they decided that since I love the puppy and he seems to like me back, I should be his new "mom". So, tonight we brought the newly renamed Bailey home where a brand new crate and a new friend awaited him. I’d say four tartelettes for a puppy is a pretty good deal!
The idea of the mousse came when I was flipping through "The Sweet Life" by Kate Zuckerman, remembering how rich, creamy and delicate her caramel mousse was last time I made it. Her Maple and Star Anise is along the same process and although I love maple syrup, I am not a big star anise fan…so in went one of my favorites, cardamom. I also halved the recipe and used hand held beaters as such a small quantity of mousse is easy to ruin in a deep stand mixer bowl. I was so tempted to make the full batch though….it is so good that I could literally sit by myself and the bowl and be content, my thighs not that much however. You’re warned! The small amount of mousse in each tart is perfect to offer a smooth and spiced contrast to the strawberries without being too sweet or overly rich.
Maple Cardamom Mousse and Strawberry Tartelettes:
Makes 6-8 depending on your tart shells, or on 10 inch round tart
For the tart shells:
1 stick butter, cut in small pieces
1 1/2 cups flour
1/2 cup powdered sugar
1 egg yolk
In a food processor, combine the flour and butter and pulse until you get a mixture that has the texture of cornmeal. Add the egg yolk and pulse until the mixture comes together in a ball. Wrap in plastic and refrigerate while you prepare the filling. Roll between sheets of plastic wrap and cut out circles larger than your tart shells, fit the dough into the molds and cut out the excess. Prick with a fork, cover with a sheet of parchment paper and fill with pie weights or dried beans. Bake at 350 for about 15-20 minutes, or until baked through.
For the mousse: 3 egg yolks
1/2 tablespoon powdered gelatin
1/2 cup grade B maple syrup
4 crushed cardamom pods
1 cup heavy cream
Whisk the egg yolks to break them up in a deep large bowl with hand held beaters (my KA has a deeper bowl than the standard model so I don’t know if that would work in a smaller capacity bowl).
Sprinkle the gelatin over 2 Tb of cold water in a small cup and let it bloom.
In a heavy saucepan, combine the maple syrup and cardamom. Bring the syrup to a boil over medium-high heat and let it reach 240 degrees F. Remove the pan from the stove and strain the cardamom seeds carefully into a cup with a spout (easier to pour) .
Dissolve the gelatin in the microwave for 10 seconds, or in a bowl set over a pan of simmering water.
While still whipping the yolks, slowly pour in the hot maple syrup, being careful to temper them and not cook them. Pour the gelatin over the egg/syrup, whip together until cooled to room temperature and has tripled in volume
In another bowl, whip the cream to soft peaks or if you are using a stand mixer, pour the mousse into a large bowl and clean the mixer bowl thoroughly, or use another mixer bowl if you have one. Gently fold the whipped cream into the mousse trying to deflate the whole thing as little as possible.
Divide about 1/4 to 1/3 of a cup (depending on how deep your tart shells are) of the mousse among the tart shells and let set in the fridge.
To finish the tarts, slice about 2 pints of strawberries and arrange on top of the mousse filled tarts. Serve chilled but not cold.
I know my mom is going to say "Ah! Finalement" (Ah! Finally) when she reads this post. You see it is not uncommon during our phone conversations for me to say "Oh, by the way, I saw this really cool ingredient, gadget, linen, etc…on a French site and I am having it come to your house so you can bring it next time you come visit or pop it in the mail with the next care package. Hope it’s not too much trouble!" There is usually a pause, sometimes a sigh, followed by "where the heck did you find this? What don’t you sleep at night for a change?"
The explanation is easy: B’s muscles unwind when he falls asleep by severely twitching which provokes him to jerks and send his knee(s) in my ribs or his arm across my face. One black eye and a many bruises later we both agreed that it was safer for me if I let him fall asleep first and then sneak in the bed half an hour later. Most of the time, I turn the computer on and start browsing….and find things I "need" for baking. You’ve been there, "surfing" the Internet…How long is your baking wishlist now that you’re blogging?!! That’s how I found a bunch of cool syrups one night that I "wanted" for baking. Flavors like cotton candy, pain d’epices, candy apple, lavender, and this strawberry syrup I used with the Tapioca Puddings. A few clicks and a phone call to the parents and they were on their way.
Now that Sprig is in full swing, I can’t get enough rhubarb. Every trip to the store and a couple of pounds end up in my cart, it’s like I am on auto pilot. My preferred method of cooking is to cut it large cubes and cook it down over the stove and stop the heat when I can still get some chunks. I can’t describe the feeling of biting into it when it is cooked that way. The mellow bite of flesh that gives out on your tongue, while your taste buds are tickled by the sourness of the fruit quickly followed by a hint of sugar. I like sour tastes so I have a tendency to go light on the sugar when I cook the rhubarb down. I also took opportunity of the oven being on one night I was cooking the cheesecake for the Daring Barker challenge to cut large cubes of it and roast it with a sprinkle of sugar at 325F. The end result was allright, a little bit too "stewed" down for my taste…but who cares? It’s rhubarb!!
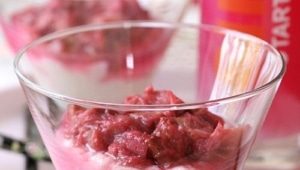
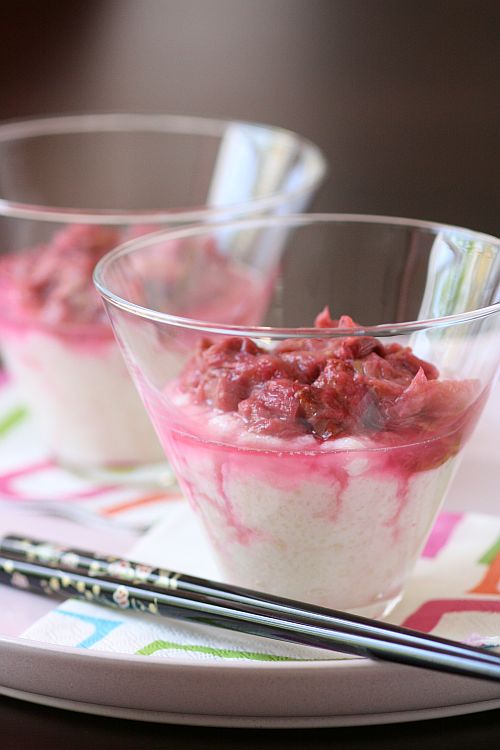
I like rice puddings a great deal but there was this little container of small bead tapioca left to be used and in an effort to organize the pantry (and I hate to throw away) I used it instead for the puddings adding a touch of cardamom to the milk while it was cooking. Some tapioca or rice pudding recipes call for an egg custard but that always seem a little too rich for me so I skipped that one. Once cooled down, I spooned into glasses, topped it with the rhubarb and added a splash of the strawberry pie syrup my parents sent me. I understand you may not have the same syrup I sued available but you can substitute you favorite syrup with these like grenadine, reduce pomegranate juice, blueberry, etc…Seemed like the perfect pairing, strawberries and rhubarb. We’ve been feasting on these for the last couple of days feeling pretty happy and virtuous after an insane amount of cheesecake chocolate pops!!
Cardamom Tapioca Puddings With Roasted Rhubarb and Strawberry Syrup:
For the puddings:
1/3 cup tapioca
2 1/2 cups milk (I used 2%)
1/4 cup sugar
6 cardamom pods, crushed with the back of a knife
1/4 cup fruit syrup
In a heavy saucepan combine the milk, and cardamom pods. Bring to a simmer, remove from the heat, let steep for 20 minutes. Strain the pods. Return the milk to the saucepan and add the tapioca, and 1/4 cup sugar. Cook over medium heat until the mixture thickens up, about 10 minutes, stirring every so often. Remove from the heat and let cool to room temperature, cover with plastic wrap to prevent a skin from forming.
Roasted Rhubarb:
2 cups diced rhubarb, large chunks (1 inch)
1/2 cup sugar
Put the chunks of rhubarb in a large roasting pan and sprinkle with the sugar. Bake at 325F until the fruit barely starts to give when you press your fingers in one piece, 30-45 minutes. Remove from the oven and let cool.
Divide the pudding among 4 glasses or dishes and top with the rhubarb. Drizzle one tablespoon of syrup over each glass. Serve at room temperature.
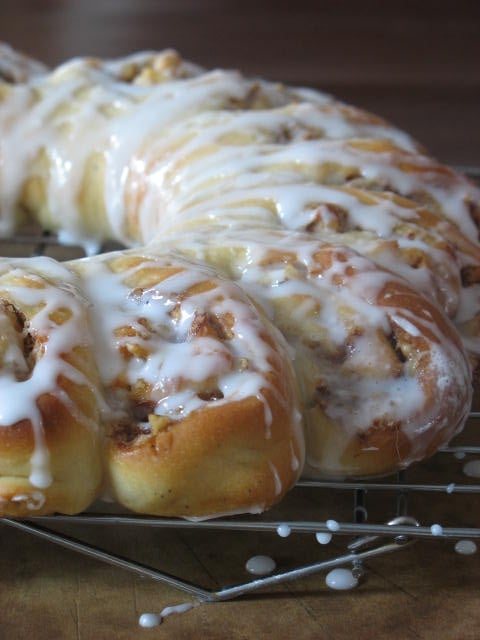
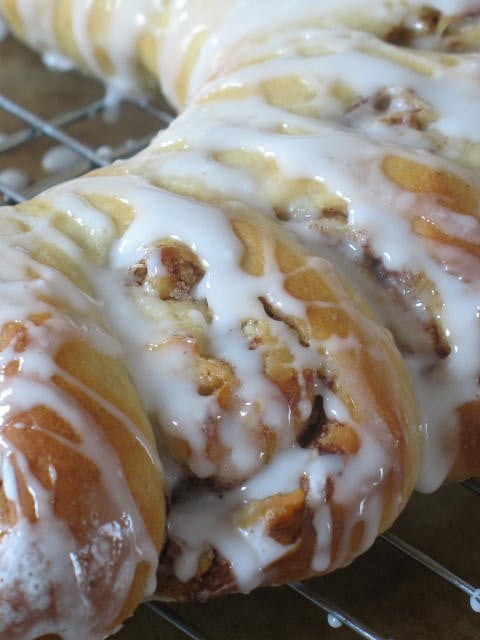
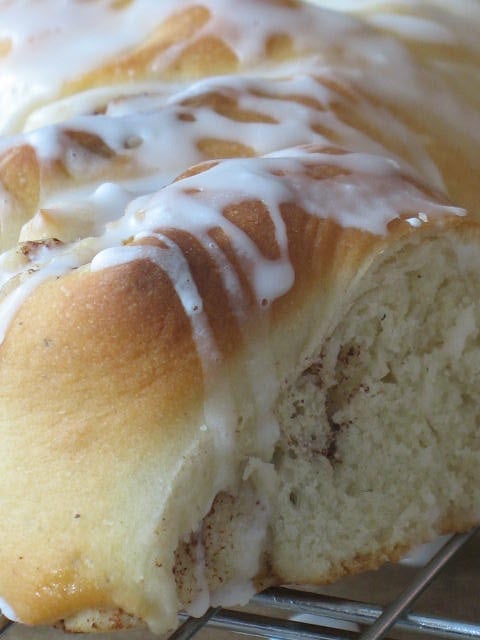
Hard to believe that in spite of the amount of bread I bake every week, from simple baguettes to brioche or my now well known love affair with cinnamon rolls, I have not participated in one single Bread Baking Day event, created by Zorra. Something had to change! When Eva announced this month’s theme, I knew I could not pass on it: shaped bread. I love messing with decoratively shaped breads such as Sunflower rolls, Dulce de Leche Rolls, Apricot Couronne and others. There is one that I love to make on an almost weekly basis: the Tea Ring. Over the past years, I have tried so many different recipes that I have come up with a basic dough that is light and soft yet sturdy enough to accommodate many different spices, nuts and fillings.
This one has my beloved cardamom in the dough, as well as cinnamon and walnuts inside. The crumb is perfectly tight to hold it own dunked in coffee and yet soft enough to melt in your mouth. I make it using either instant dry yeast or rapid rise yeast and never had a problem either or. With the instant dry yeast, you will need to proof it first in the warm milk. If you are relatively new at bread making this can be easily messed up if your liquids are too hot. Using rapid rise yeast decrease this risk because you just mix it in with the rest of the ingredients, skipping that proofing step.
Which one do I use? Both, and I admit that I have come to love the rapid rise kindbecause I don’t have to mess up with the liquid temperatures, if that gets me yelled at by the bread police, well then be it! My take on it is that if it sold and it works to produce lovely breakfast rings like this one, I am in! Since I use the instant yeast and proofing method for this one, I will write the recipe down as such, but know that is ok to be lazy busy and throw the yeast in with the rest of the ingredient if you use rapid rise.
Swedish Tea Ring:
Ring Dough:
1 package instant yeast (2 1/4 tsp)
1/2 cup milk
1/4 cup butter, softened
2 Tb sugar
1 egg, beaten
1/4 tsp salt
1 tsp. cardamom
zest of one lemon
2 1/2 – 3 cups all purpose flour
Filling:
1/4 cup butter, softened
1/4 cup brown sugar
1/2 TB cinnamon
1/2 cup walnuts, chopped
Heat the milk until tepid (105F-110F). In the bowl of a stand mixer, dissolve yeast in the warm milk until foamy, about 1o minutes. Add 2 1/2 cups flour, butter, salt, sugar, egg, lemon zest and mix using the dough hook until the dough comes together. Add the remaining 1/2 cup of flour if the dough is still too soft. Turn it out onto a lightly floured surface and knead until smooth and satiny, about 5 minutes.
Lightly oil a large bowl, place the dough in the bowl and turn to coat with oil. Cover with plastic wrap and let rise in a warm place until doubled in volume, about 1 hour.
Punch down the dough and turn out onto a lightly floured surface. Roll the dough out to a 12×18 inch rectangle. Spread the softened butter all over the rectangle. In a small bowl, mix together the cinnamon, sugar and walnuts. Spread this mixture evenly across the dough. Roll the dough into a long roll and press the seam closed. With the seam turned downward, seal the two ends together to make a ring.
Place the ring on a parchment paper lined baking pan. Using a sharp knife or kitchen shears, make cuts every inch or so along the ring, cutting only three quarters of the way through. Twist each piece slightly so that the rolls fan out from the center of the ring. Cover the roll with plastic wrap and let rise in a warm place for 45 minutes. Bake at 375F , 20 to 30 minutes. Remove the ring from the oven, place on a rack to cool.
When cooled, combine the powdered sugar, vanilla and milk and drizzle the glaze all over the ring.
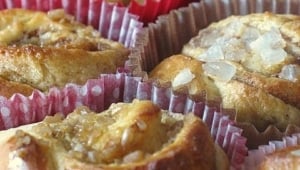
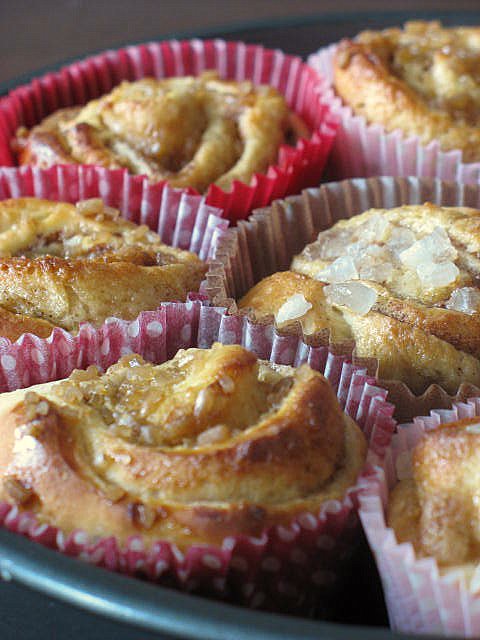
You might be thinking that Tartelette has gone off the deep end, obsessed with cinnamon rolls. Well, obsessed might be a bit big, "me likey some cinnamon rolls" although not grammatically correct would be more appropriate to label my affection for fluffy dough rolls filled with spices. First there were these, then these yummy knockoffs and now these inspired from Anne from Anne’s Food.
During our September Daring Baker challenge, she mentioned Swedish cinnamon buns and I instantly remembered the ones my mom used to make during the winter. She had been given the recipe by a Swedish friend of hers, except that Glenna called them "Bole" or something like that. I did not know any other version while growing and fell in love with them the minute my mom pulled them out of the oven. The scent of cardamom wafting through the house was powerful and magical. Cardamom and cinnamon together in the dough is one of the differences with the American type cinnamon rolls, the other one being that each roll is baked in its individual casing (shorter in Europe, I used muffin paper cups) for a shorter period of time.
Within a few hours I was sitting at the kitchen table with a roll and a cup of tea, my eyes closed…and I was back in time 15 years ago listening to my mother and grandmother talking about our Christmas dinner, the food, the table setting, the linens, the decorations, etc…I felt empty and content at the same time. As children, our games and hobby were held in the kitchen or not very far from it (except on holidays where we were outdoors all the time), and little did they know all the wonderful memories I now have of these days of leisurely baking and chatting.
Now grandma is gone and I religiously make her truffles and cake for Christmas, and mom cannot always come and visit as much as she would want (every weekend :)), but there is one thing that I will never forget to make from now on : Swedish Cardamom Buns.
Swedish Cardamom Buns, adapted from Anne whose is based on a recipe from Bara Bullar of Åsa Swanberg
Makes 24
Dough:
2 packs active dry yeast (yes 2, you can’t taste the yeast once baked no worries)
1 eggs
2 cups finger-warm milk
1 pound all purpose flour
1 cup light brown sugar
1 1/4 stick butter, softened
1 tsp salt
2 tsp ground cardamom
Filling:
3/4 stick butter, softened
1/2 cup light brown sugar
1/2 Tb ground cinnamon
1/2 Tb ground cardamom
Decoration:
1 egg, beaten with 1/2 tsp water, and a tiny pinch of salt
pearl sugar
In a bowl, dissolve the yeast with some of the tepid milk. Add the rest of the milk, half of the flour and the egg. Leave to proof, covered, for one hour.
Add the rest of the flour, the sugar, salt, cardamom and butter. Work into a smooth and silky dough. Here’s when you might need a bit more flour. Transfer the dough to a clean bowl, cover and leave to proof for 30 minutes. Divide the dough into two. Roll out each part to a large rectangle. Spread with butter, and sprinkle with sugar and cinnamon. Roll each rectangle into a tight roll, starting at the long edge, and cut each roll into about 10-12 pieces. Place each piece in a paper cup on a baking sheet (covered with parchment paper so you won’t end up with a mess), cover and leave to proof for 30 minutes.Beat the egg with a pinch of salt and 1/2 tsp of water, and brush this carefully on the buns. Finish by a light sprinkling of pearl sugar. Bake at 450°F for 6-8 minutes, until they’re as golden as you like them.