
cardamom

Tartelettes a la rhubarbe: Rhubarb Tartelettes

Rhubarb Tartelettes


With our schedules packed to the gills I often wonder if I can make a post "short and sweet". Sweet? Yes I can! Short? Yeah….not likely. I may start thinking I don’t have much of a story to go along with a post and three paragraphs in, I realize I will never have nothing to say. Why? Because I love to listen and pay attention.

When I was a little girl, maybe three or four years old, I was on the train with my mom actively listening to a conversation between the 2 ladies seated on the same banquette. I think I made them uncomfortable listening to them with such purpose that at the next stop, they moved to the banquette right behind us. Not even five minutes went on that I turned around, tapped on one of the ladies’s shoulders and exclaimed " Parle plus fort, j’entends pas!". "Speak louder I can’t hear!"

Baking With Rhubarb


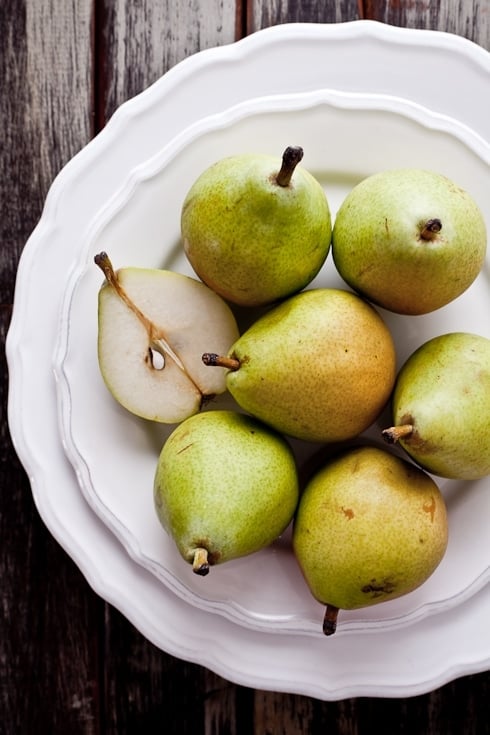
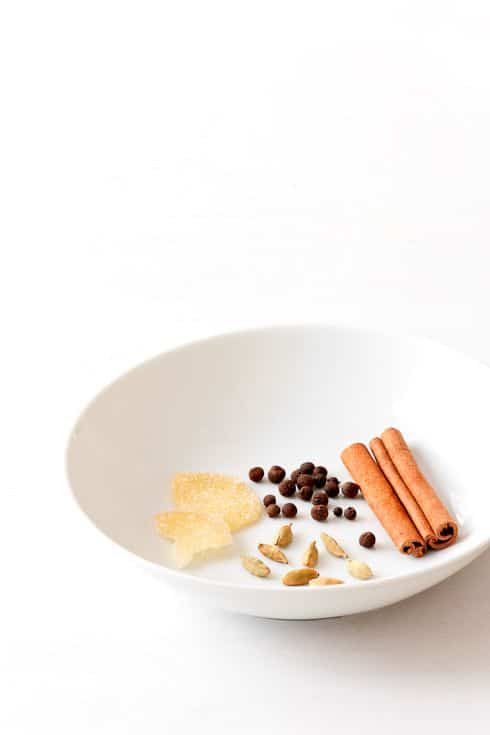
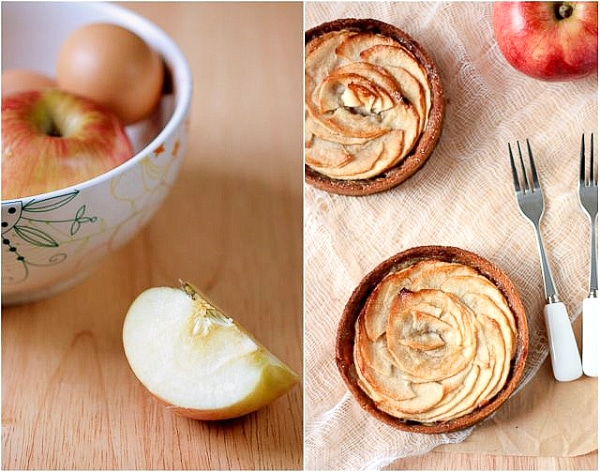
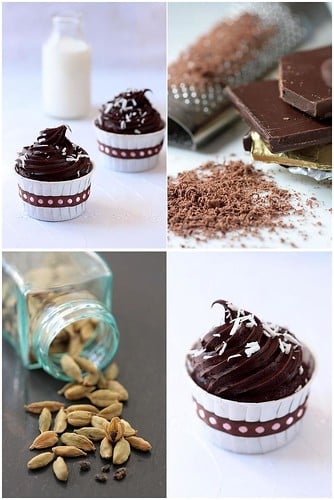
I remember to this day what they were talking about. Embroidered handkerchiefs. See? I register everything. Down to the scent of the rhubarb tart my grandmother used to make for us in the summer. Since this year’s first ventures and posts with rhubarb, I have had a craving for Grandma’s rhubarb and custard tart and a couple of attempts left me seriously bruised in my hopes of finding that elusive scent. That one enticing flavor I could not pinpoint until last week when I was organizing the spice cabinet and exclaimed out loud "Je sais! C’etait de la cardamome!" (I got it! It was cardamom!)

Rhubarb Tartelettes


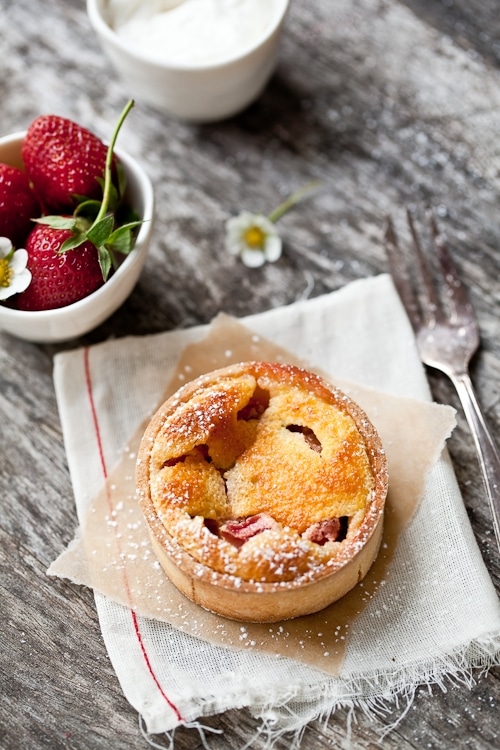
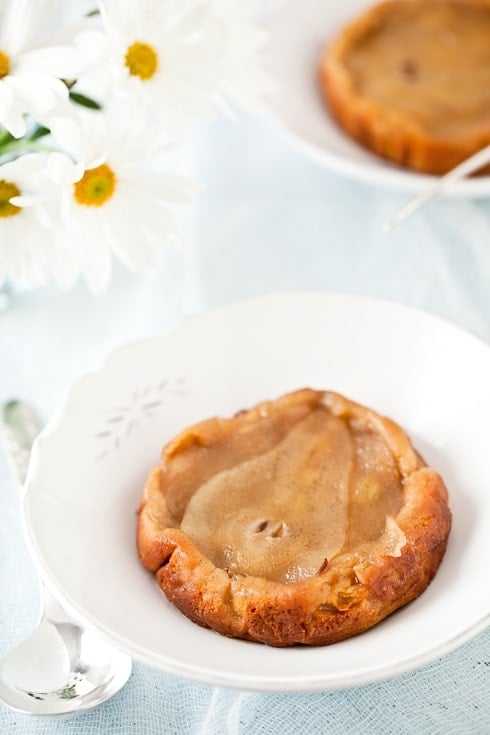
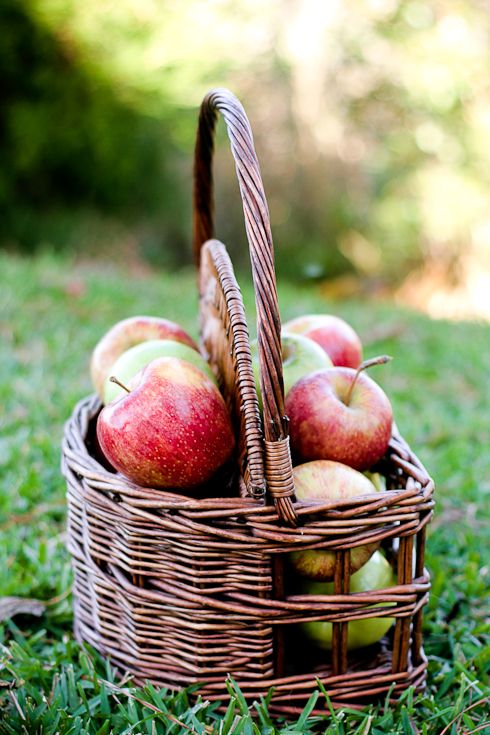
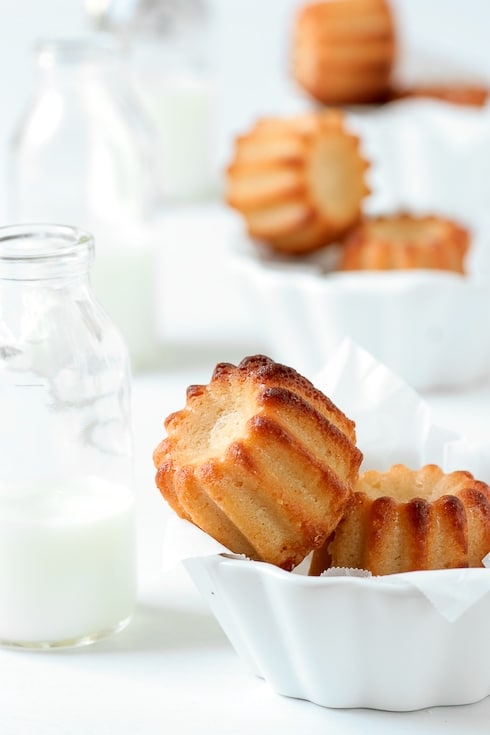
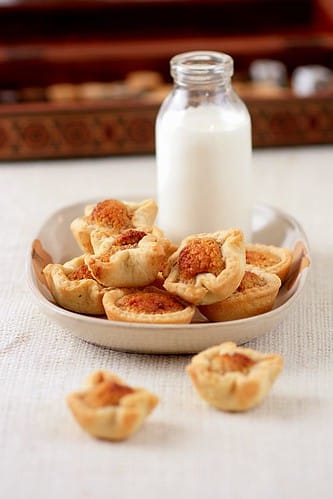
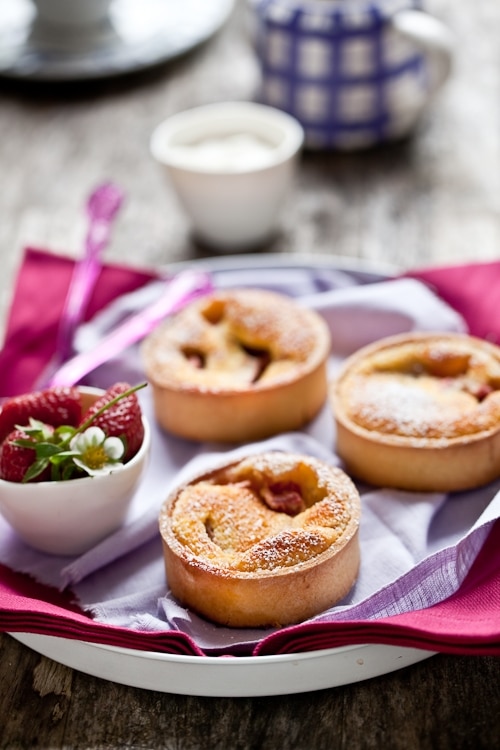
I have made her tart twice in tartelettes format (and plenty of other sweet treats) since I spotted local rhubarb at the farmers market (more fragrant and tart than store bought) and each time that precious scent of cardamom permeated the air and everything around the house transporting back to the days she was still around. The woman knew her tarts, that’s a fact. Apples were a fruit of choice but her custard rhubarb pie was something to come home to. Always. A slice of her tart and you will remember it forever.

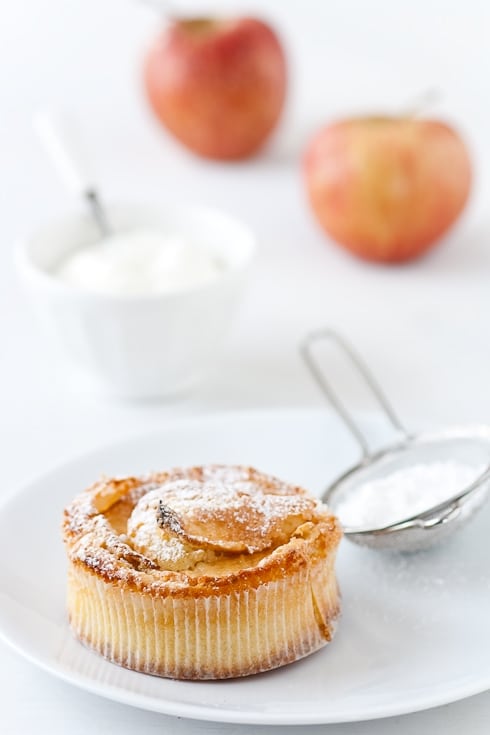
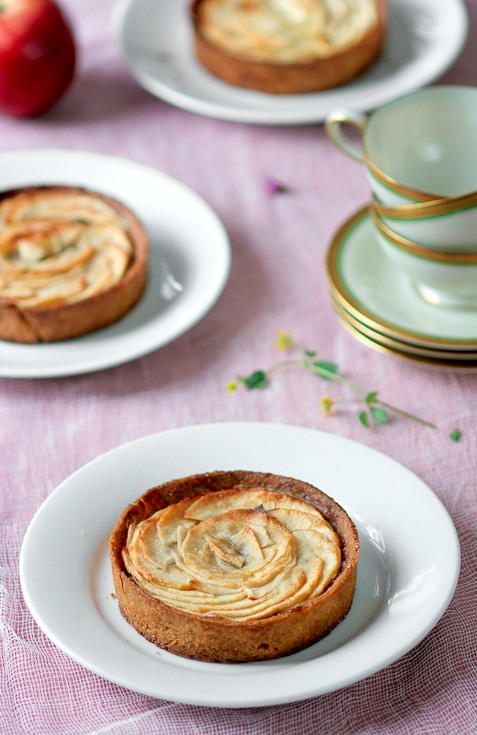
Where am I going with all this "remembering this" and "nostalgia that"? Well, this coming Thursday is my birthday and I can’t remember for the life of me what I did last year to celebrate. I know what I made to celebrate (blogs are precious tools for that!) but can’t figure out if we stayed in and went out. How much Champagne did I have to completely forget?! Ha! I also get nostalgic around this time which was the perfect opportunity to make her famous pie. I made 8 small ones. Bill had one. That leaves one for every day of the week that I am celebrating being a year older.

Rhubarb Tartelettes


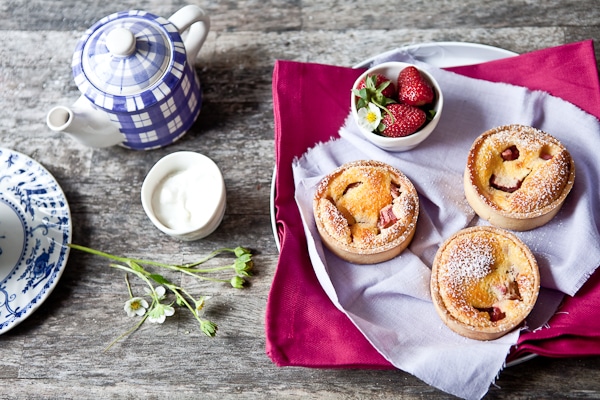
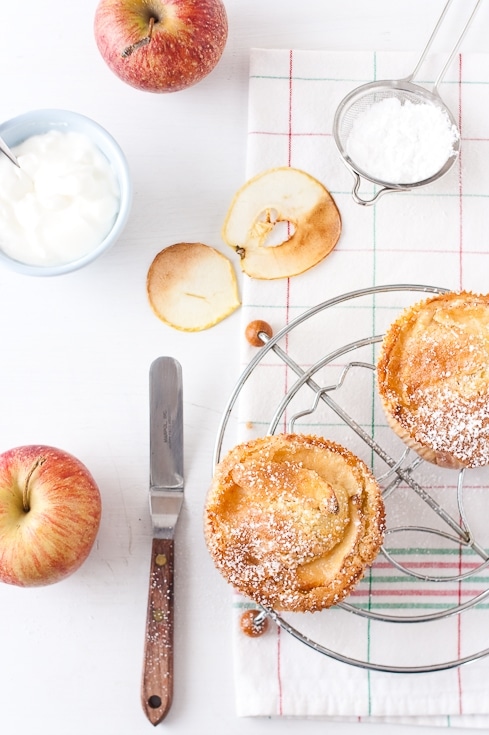
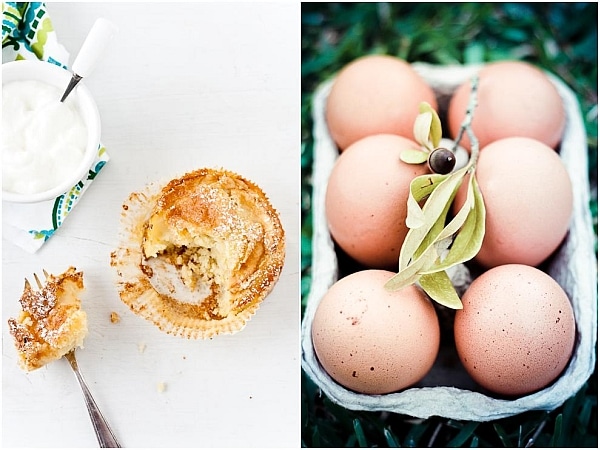
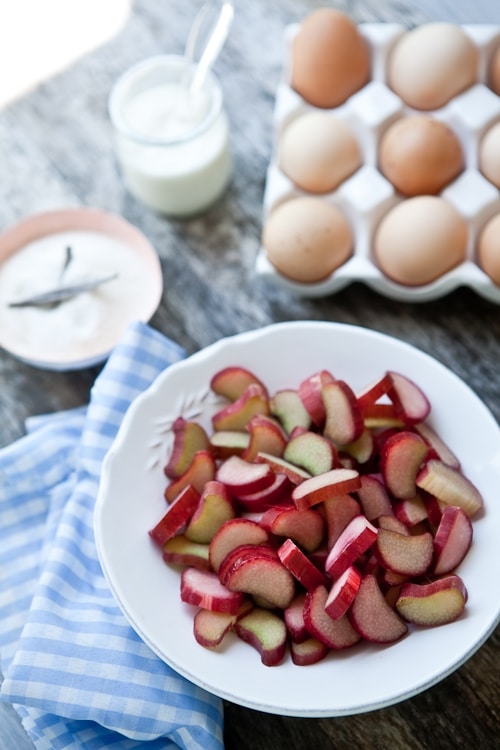
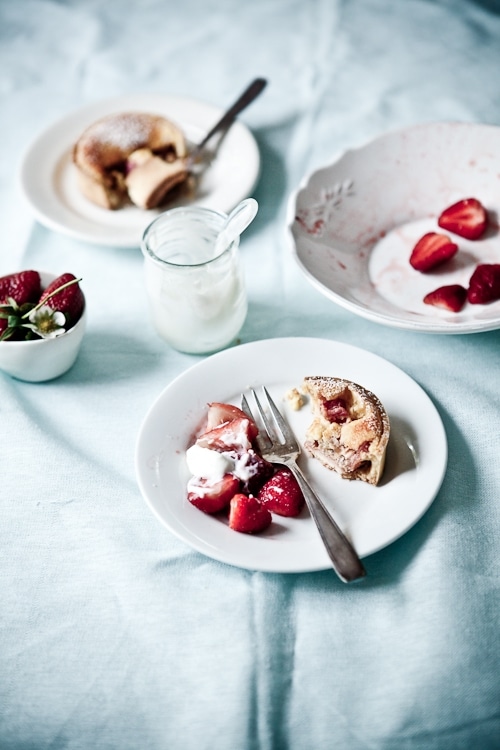
This year, we are starting the celebrations tonight with dinner. Tomorrow with drinks with friends and more celebration on the due day, Thursday. I figured it would be a sure way to remember next year what I did if I packed the week with plenty of opportunities to create memories find trouble. Eheheh! Right now I am knee deep in strawberry jam with the 20 pounds or so that Fanny and I picked up at Ambrose farm yesterday. The house smells divine. I did put a couple of bowls aside to mix with creme fraiche and serve along side the tartelettes. The resulting scene this morning (yes, tarts for breakfast!) was as delicious as it tasted.

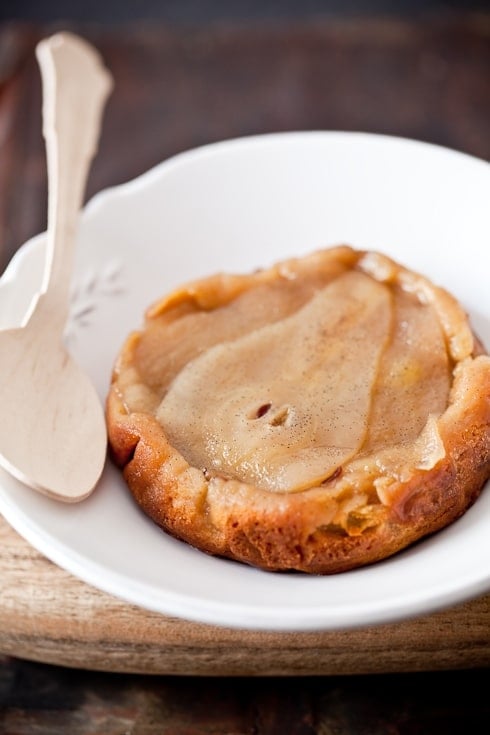
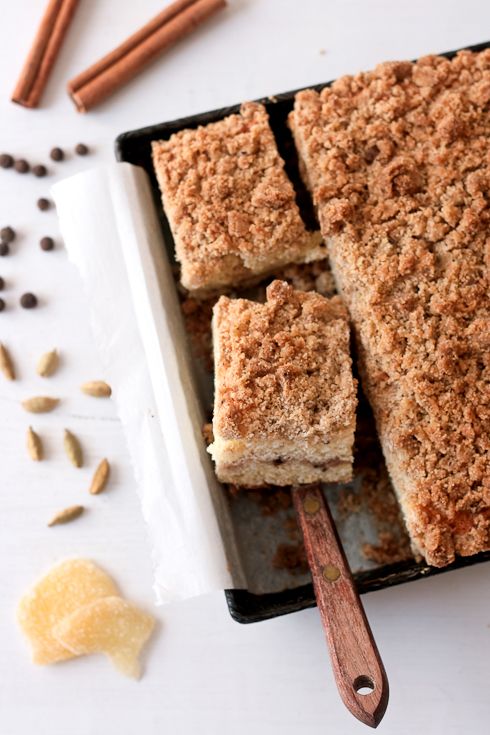
I will do my best to save one for Thursday, the actual birthday. They are so good as they are with cardamom in the dough and custard and softly poached pieces of rhubarb. Not sure I can make them last.
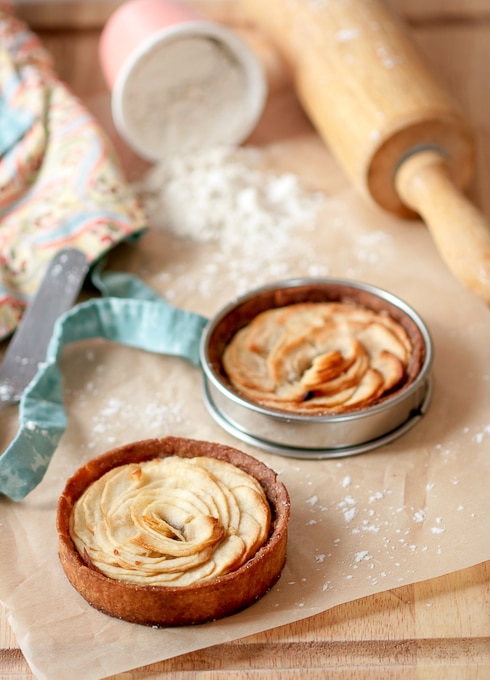
Rhubarb Tartelettes - The Aftermath


Rhubarb Tartelettes

Makes eight 3-inch tarts or one 9-inch tart.

For the crust:
5 tablespoons (70gr) unsalted butter, at room temperature
3 egg yolks
pinch salt
1/4 teaspoon ground cardamom
1/2 cup (80gr) brown rice flour
1/2 cup (60gr) millet flour
1/4 cup (30gr) sorghum flour
1/4 cup (40gr) corn starch
(or 1.5 cups of all purpose flour if not using gf flours & cornstarch)
1/2 teaspoon xantham gum
2 tablespoons to 1/4 cup cold water (optional if the dough seems too dry)

For the filling:
3 eggs
1 cup (200gr) sugar
1 cup (250ml) creme fraiche (or sour cream)
1/2 teaspoon cardamom
Poached rhubarb

Prepare the crust:
In a mixer, whip the butter on medium speed until light and airy. Add the egg yolks, one at a time and beating well after each addition. Mix until incorporated. Add the cardamom, salt, and all the different flours, and the xantham gum and mix briefly. Add some water, one tablespoon at a time if the dough feels too dry. Dump the whole mixture onto a lightly floured (use more rice flour) board and gather the dough into a smooth ball. Flatten the dough into a disk, wrap it in plastic wrap and refrigerate for an hour.
Preheat oven to 350F and position a rack in the center.
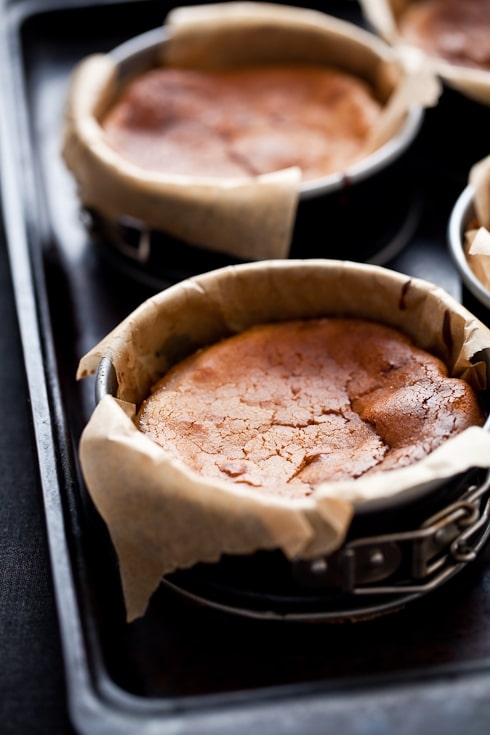
When the dough is nice and cold, roll it out on a lightly floured board or in between two sheets of plastic to fit your prefered pie pan or eight 3-inch tart rings. If the dough tears while you roll or/and transfer into the pan, just patch it with your fingertips. Line the dough with a piece of parchment paper, fill with pie weights or dy beans and par bake for 10-15 minutes until almost completely baked. Remove the weights and parchment paper. At this point you can refrigerate the baked crust for up to 5 days before using.

Prepare the filling:
Preheat the oven to 350F and position a rack in the center.
In a large bowl, whisk the eggs and sugar until the mixture is pale and airy. Add the creme fraiche and cardamom and whisk until well blended.
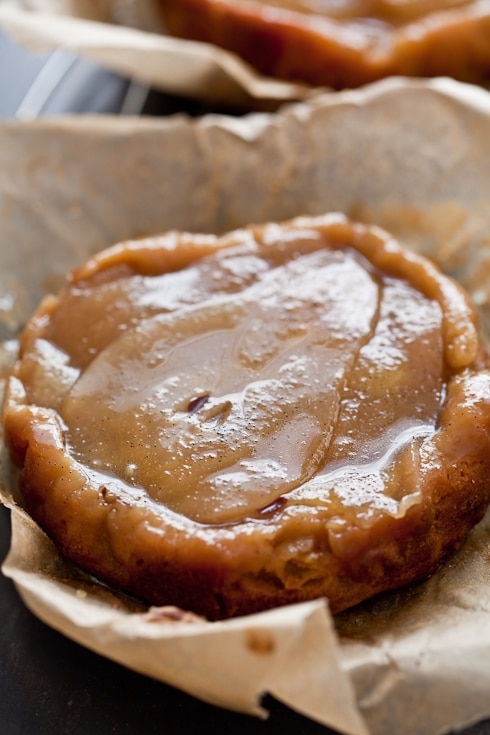
Divide the poached rhubarb pieces (you may not need the whole quantity but you can freeze it for up to 3 months if needed) at the bottom of each pre baked shell and divide the filling accordingly. Bake 20-25 minutes until golden.
If you have leftover filling, place in a baking cup and bake alongside the tarts. Bonus baked egg custard!

——————————————————————————–
Le P’Tit Coin Francais:

Tarte a rhubarbe:

Pour une tarte ou 8 minis

Pour la pate:
70gr beurre mou, non sale
3 jaunes d’oeuf
pincee de sel
pincee de cardamome
80gr farine de riz brun
60gr farine de millet
30gr farine de sorghum
40gr de maizena
(ou de 210gr de farine blanche)
1/2 cc de gomme de xantham

Pour la garniture:
3 oeufs
200 gr sucre
230 gr creme fraiche
1/2 cc cardamome

Preparer la pate:
Dans le bol d’un mixer, battez le beurre pendant 1 minute. Ajoutez les jaunes d’oeufs un a un, tout en melangeant bien apres chaque jaune. Ajoutez le sel, cardamome et les farines sans gluten, le sel et la gomme de xantham. Melangez brievement et verzes le contenu sur un plan de travail. Ramassez en boule et metter au refrigerateur pendant une heure.
Prechauffez le four a 180C et positionnez une plaque au milieu.
Etalez la pate sur un plan de travail legerement farine (farine sans gluten de preference), ou entre deux feuilles de papier sulfurise. Foncez en un plat a tarte (mini ou pas), mettre une feuille de papier sulfurise dans le fond, et des pois/riz. Faire pre-cuire 10-15 minutes. Sortez la tarte du four et laissez refroidir.

Preparer la garniture:
Dans un grand bol, fouetter les oeufs et le sucre jusqu’a ce que le melange blanchisse. Ajouter la creme fraiche et la cardamome et battre jusqu’a obtention d’un melange homogene.
Placer des morceaux de rhubarbe au fond des tartes, ajoutez assez d’appareil a garniture pour les recouvrir et faites cuire 20-25 minutes a 180C.

Upside Down Pear Cardamom Cake (GlutenFree)

Gluten Free Pear Cardamom Cakes


Growing up, my brother and I did not have any kind of special relationship. We did not dislike each other but we did not like each other either. I guess you could say we had one typical brother-sister relationship. I had crushes on his friends just about every week and he found my friends a bit too Strawberry Shortcake for his taste. We had wrestling fights, screaming fights, pillow fights and he often hid in my closet to scare me before bedtime. Typical.

I often wondered if we would ever find some common ground. Some place of understanding. We did find it when our brother passed away. Right there, in front of me, stood a broken man. He was not this "my brother-this pain in the rear" boy anymore. He was in pieces. I was too. And we picked them up together. We held each other up and found each other then. There is no reason why things happen. They just do. And we knew what we had to do then. And we still do it. Our way.

Baking With Pears


We still don’t call each other that often. Or send cards. Or email. He knows I got his back and he’s got mine. He’s always smart with business and techie advice for me. He loves food and is an amazing cook. He gave me two beautiful and smart nieces.

While chatting on the phone the other day, we were catching up on each other’s work, progress, accomplishments and to hear him say that he was proud of me was the biggest validation of my life. Like Christmas had come in March. There was also a pause. Very unusual if you know the speed of my brother’s conversations. That’s when he dropped a line that I didn’t expect…

Gluten Free Pear Cardamom Cakes


"Hey, I really like when you write me a post on your blog for my birthday. I also really like when all your virtual friends come wish me a happy birthday." Silence on my part. A bit surprised that he would admit this. I laughed. Out loud. Then I apologized and promised that, yes, I would post something on his birthday. I virtually made him some (gluten free) Upside Down Pear and Cardamom Cakes that we quickly devoured last night.

As a kid, his birthday dinner would always include frog legs with tons of parley and garlic and a chocolate cake with walnuts and oranges that I was not particularly fond of. I did think about making it for him again as a wink to the past but my mom had brought over the new French Saveur and Elle a Table and I kept coming back to the article on upside down cakes in Elle a Table. So many variations from one simple base that it would have been difficult not to find one that suited everyone.

Gluten Free Pear Cardamom Cakes


I adapted the base recipe to make it gluten free and added some cardamom to the ripe pears I used in the cake. There is something about pears and cardamom that is almost magical once baked together. Instead of doing the cakes and the caramel with sugar, I used wildflower honey. I am really enjoying baking with sucanat, honey and maple syrup versus regular granulated sugar these days. So much more fragrant. So many more health benefits too.

The cake was moist from the millet and sweet rice flour, oozying with honey and vanilla bean caramel, and the smell permeating the kitchen was unbelievable. We quickly brewed some fresh coffee and sat down with some cake.

Gluten Free Pear Cardamom Cakes


So here’s to you Arnaud! Happy Birthday! Joyeux Anniversaire!

Upside Down Pear Cardamom Cakes, adapted from Elle A Table

Makes four 4-inch cake or one 8-inch cake. Serves 6-8

For the honey caramel:
1/2 cup honey
1/4 cup water
1/2 vanilla bean, seeded

For the cake batter:
3 pears, peeled and thinly sliced
3 large eggs
1/2 cup (125ml) honey
1 1/2 (160gr) stick unsalted butter, melted and cooled
3 1/2 oz (100gr) superfine sweet rice flour
2 oz (50gr) millet flour
1/2 teaspoon ground cardamom

Preheat oven to 350F. Line the inside of four 4-inch springform pans or one 8-inch pan with parchement paper. Place the pans on a baking sheet and set aside.

For the caramel:
In a large heavy bottomed saucepan, place the honey, water and vanilla bean seed and bring to a boil over high heat. Reduce the heat to medium and let the syrup simmer down until thickened, should take 5-8 minutes. Remove from the heat. Divide the caramel among the prepared cake pans.

For the cake:
Divide the pear slices among the bottom of each cake pan and set aside.
In the bowl of an electric mixer, beat the eggs and honey on medium speed for about 2 minutes. Slowly add in the melted butter. Add the flours and cardamom and mix until fully incorporated, about 1 minute. Divide the batter in between the pans and bake for 30-40 minutes or until golden brown.

Remove from the oven and let cool to room temperature. Unmold carefully over a plate. Watch out for the oozing honey caramel.

Mom’s "Tupp" Apple Cardamom Cake

Apple Cardamom  Cake


Let’s talk winning tickets, shall we? First, my dear human random number generator, B., picked Brandy from Nutmeg Nanny to receive Nicole’s The Baking Bites Cookbook. Congrats! Send me a quick email and I’ll pass the info along. Now on to this cake…

I know I am going to jinx it. I just know it. Maybe if I whisper it very softly: It finally feels like Fall around here. Mostly in the wee hours of the morning when I can finally feel a chill in the air and a dry breeze through the marsh. Actually, not having a free day on the schedule until April means that the season has indeed changed. Drastic times call for drastic measures and I often turn the comfort of my mom’s apple cake during the Fall and holiday season. The one cake that earned her the affectionate name of Maman Tupp and the one we know as "Gateau Aux Pommes Tupp".

Apple Cake


I am pretty sure that most French people reading are familiar with the "Gateau aux Pommes 5-4-3-2-1" that the brand Tupperware® introduced during home demonstrations of their products. A very simple, very unassuming and particularly delicious appple cake, soft and moist all the way through. It was especially known for its creamy butter and sugar topping forming a tempting thin crust while baking. For years, I thought that was my favorite part of the cake. Now I know. Two slices with some creme fraiche is my favorite part!

When you are 5 or 6, saying that you would like the "Gateau 5-4-3-2-1" for "gouter" (4pm snack) is not only long but it does sound silly. However, it made it very easy to start baking with mom at an early age since the recipe went something like "5 spoons of flour, 4 spoons of sugar, 3 spoons of milk"…and so on. One bowl, one spoon, dry before wet, one apple, whip it all and bake.

Apple Cardamom Cakes


We made it so often in my family that it became much easier for everyone to call it the "Gateau Aux Pommes Tupp" (Tupp Apple Cake) and over the years to make it even shorter with a simple "Gateau Tupp". See, it works so much better to beg mom for it this way. This simple gateau became the one we would gather around during tea time on a cold and rainy day, the one that made any bad school day be forgotten in a few whisks of sugar. It solved a few arguments and mended broken hearts too.

Yes, my mom was a Tupperware® lady back in the 80s. She never played the sales game, but she loved to host parties for friends getting in the biz. That was her thing, the hosting. And the baking, the cooking, and passing around trays of items made with the brand’s products. Let’s face it mom, you also loved getting new stuff for the kitchen. To this day she is still very well stocked in containers, molds and measuring instruments of all sorts from the big T company.

Apples


It was very fortunate that my parents in law dropped off a basket full of apples from a recent visit to an orchard in North Carolina and I made a big dent in it baking a few of these cakes. In the end, the cakes are nothing like the original recipe. I made ours a tad less sweet and gluten free which is perfect here to keep the cakes moist, thus not following the original "5-4-3-2-1" formula. Then, there was the matter of the spoon measure called for in the original version. I don’t own such an instrument but I figured that since the company was American, a large spoon such as the one mom used had to be close to 1/4 cup. Yes, in this cake, precision to the gram has very little importance and that’s just what I need when swamped.

Now, if you’ll excuse me, it’s time for my daily slice…Or mini cake.

Apple Cake


Mom’s Tupp Apple Cake:

Notes: if you do not intend to make a gluten free cake, replace all the gluten free flours (rice, tapioca, sorghum) with 1 1/4 cups all purpose flour.
The cake bakes in two separate times: first for 10 minutes, the remove it from the oven to add the cream topping and bake for an additional 20 minutes.
I added cardamom just because it reminds me even more of my mom but you can skip that part or add cinnamon instead.

For the cake:
1/2 cup (80gr) sweet brown rice flour
1/4 cup (30gr) tapioca flour
1/2 cup (65gr) sorghum flour
1/2 cup (100gr) sugar
1 teaspoon ground cardamom
pinch of salt
1 teaspoon (5gr) baking powder
3/4 cup (190ml) whole milk
1/3 cup (80ml) oil
1 egg
2 apples, peeled, cored and thinly sliced (I like Granny Smith but any kind will do here)

For the topping:
5 1/2 tablespoons(80gr) unsalted butter, at room temperature
1/2 cup (100gr) sugar
1 egg
1 teaspoon vanilla extract

Prepare the cake:
Preheat the oven to 350F. Spray or butter the inside of a 9-inch round baking pan or several 3 to 4-inch baking pans if you want smaller cakes. Place them on a baking sheet and set aside.
In large mixing bowl, whisk together the flour, sugar, cardamom, salt and baking powder. Reserve. In another large bowl, whisk together the milk, oil and egg until just blended.
Slowly pour the liquids over the dry ingredients, whisking well to make sure that everything is well incorporated, about 40 to 50 strokes.
Pour the batter into the prepared pan(s) and arrange the apple slices on top in a circular pattern.

Prepare the topping:
In a medium bowl, whisk together the butter and sugar until fluffy. Add the egg and the vanilla extract and whisk until smooth. Reserve

Bake the cake(s) in the oven for 10 minutes. Remove the cake(s) from the oven and spread the creamy butter topping over the top(s). Bake an additional 20 minutes or until a skewer inserted near the center comes out clean.

Chai Coffee Cake And A Giveaway

Chai Coffee Cake


It won’t be a surprise to say that there is always cake at the ready in the house. Whether it be for B. as a late night snack after a music job, friends dropping by on a late saturday afternoon, or simply as a quick snack as we pass by the kitchen. It’s usually a variation of my grandma’s yogurt cake. Always good. Always comforting. One cake I never make enough is coffee cake. You know, the kind with the lovely strudel top that is both crunchy and soft as you bite into it. But then Nicole’s Chai Spiced Coffee Cake entered my life. Twice in one week. Three times a day, once.

I did not make it twice just for us and just because. You see, a couple of weeks ago, I received an email from a high school senior here in town, Haley, whose senior project was to recreate the Julie-Julia project but with David Lebovitz' Room For Dessert book. Haley asked if I would have a bit of time to give her some tips about running her blog chronicling the project, photography, writing, etc… I said yes. I remember when I started blogging that I was often looking up to my seniors for pointers (I still do at times) so I thought it was a great opportunity to give back to the blogging community. I am no expert but I have been at this blogging thing for a while now, eheheh.

And I love when life on the screen brings about wonderful little happenings like this!

Chai Spices


Anyway, I thought we’d have some cake and tea and get right into the nitty nifty gritty of blogging and pictures. Well, schedules got out of hands and I never got to make that Chai Coffee Cake for Haley. We did meet this week and spent a great afternoon. I hope I answered her questions, at least until next time we meet. I gave her tips on how to operate her point and shoot camera to the best of its capacity, tips on light, focus, etc…and let her play with my props. Hopefully, there will be cake next time we do this!

I love this cake on so many levels but first and foremost because it is one of the recipes that Nicole included in her newly released first cookbook, "The Baking Bites Cookbook". Nicole’s Blog, Baking Bites is one of the handful of blogs I started reading prior to starting my own. We were "blog friends from afar" until we finally met at BlogHer Food in San Francisco. Nicole is as delightful and true as she is on her blog. I am so proud that she achieved one of her lifelong dreams by writing this book.

Chai Coffee Cake


I bluntly asked her if I could feature one of her recipes and introduce some of you to her blog if you did not read it already and to her "baby", The Baking Bites Cookbook. She agreed. I bluntly added "hey! Would you be ok to give a copy to one reader?" and she said yes. So here you go: there is one free copy of this delicious book up for grabs. All you have to do is leave a comment on this post. The giveaway runs until Monday November 2nd, midnight US Eastern time and a reader will be chosen at random to receive a copy.

Given how good the Chai Coffee Cake was, I can’t wait to bake more from Nicole’s book!

Chai Coffee Cake

Chai-Spiced Crumb Coffee Cake, from The Baking Bites Cookbook with permission of Nicole Weston:

Cinnamon is the standard spice for topping a crumb coffee cake. This coffee cake keeps the crumb topping and spices it up a little more by using some of the same flavors that are found in chai, including cinnamon, ginger, cardamom and allspice. These spices really help to make the coffee cake memorable – and they also make you want to come back for a second slice.

Note: the only change I made to the recipe was to fill my baking pan with half the batter, sprinkle some of the topping and add the remaining batter and topping.

Topping:
1/3 cup sugar
1/3 cup brown sugar
1 teaspoon ground cinnamon
1/2 teaspoon ground ginger
1/2 teaspoon ground cardamom
1/2 teaspoon ground allspice
1/4 teaspoon salt
1 1/2 cups all purpose flour
1/2 cup butter, melted and cooled slightly

Cake:
1 3/4 cups all purpose flour
3/4 teaspoon baking powder
1/2 teaspoon baking soda
1/4 teaspoon salt
2/3 cup butter, room temperature
1 cup sugar
2 large eggs
1 1/2 tsp vanilla extract
2/3 cup sour cream, full or low fat

Preheat oven to 350F. Line a 9-inch square baking pan with parchment paper or lightly greased aluminum foil.

Make the Topping:
In a medium bowl, combine all topping ingredients except butter. Whisk to blend.
Gradually stir in the melted butter, using a large fork or spatula to mix. When all the butter has been incorporated and the mixture looks like wet sand, squeeze small clumps together to make large crumbs ranging in size from that of a pea to that of a grape. Set aside.

Make the Cake:
In another medium bowl, whisk together flour, baking powder, baking soda and salt.
In a large bowl, cream butter and sugar together until light. Beat in eggs, one at a time, followed by vanilla extract. With the mixer set on a low speed (or by hand), alternately add in flour and sour cream in two or three additions. When no streaks of flour remain, pour into prepared pan. Top evenly with crumb mixture.
Bake at 350F for about 45 minutes, or until a toothpick inserted into the center comes out clean.
Cool on a wire rack before slicing.
Serves 9-12

Indian Cardamom Mava Cakes

Indian Mava Cakes


Many days of the week, I wish I could just call up my friend Bina to come and have tea or coffee with me. I know my afternoons have never been sweeter as since she shared her Mava Cakes recipe with us. I am very fond of a little tea break and I am very fond of Bina. We "met" when she emailed about her macarons issues. We just went through every problem, one by one, laughing along the way. Like with most friendships, it is difficult to explain how the pieces of the puzzle just fell into place. We started sharing a bit more each day, her about India and me about France.

We finally met in person and confirmed our friendship went deeper than a computer screen. We cook the same way, from memory, from family, for others, always worried people are going to enjoy themselves and have enough. Our cultures are miles away from each other and yet we relate by cooking like our ancestors did. Our way to keep alive the generations before us and pass it on to the ones after us.

Bina is funny, talented, attentive and generous. There is no better guide than her when going grocery shopping at an Indian grocery store which is precisely what I did on my last visit. A lot of dishes and treats were mentionned on that last trip but nothing prepared me to the little box she sent me last month.

Mava Cakes


"I am sending you some mava cakes I just made. It’s a recipe I have been working on for a while". As soon as the package arrived, I ripped the wrapping to shreds and stared at the container, wondering if I should wait on B. to sample one. I did not, and a moment of sheer bliss quickly followed. I started counting the mini cakes wondering how many I could eat before B. would find it strange she sent so little…

Hints of butter, milk and cardamom hit me all at once sending my senses in a very happy dance. I quickly shut the box closed and sent her an email "please, please, please, tell me how to make those! What’s the story behind them? What’s mava?"


Turns out mava is a reduction of milk and/or cream that gives a thick spread complementing the butter and other ingredients in the cakes. Her recipe calls for evaporated milk and heavy cream and I am sure there are others out there but this is the one that makes Bina feel closest to home and that sounds perfect to me! On a side note, she tops hers with cashew halves but I ran out on my last batch and plopped a pitted cherried right in the middle instead.

Mava Cakes


Thank you dear Bina for adding your words and memories to this post. I am just the one telling people "you must make this!".

Mava cakes bring back all the wonderful memories I have of growing up in Mumbai– my family, friends, college, monsoons, red double-decker buses, Marine Drive, amazing food, wonderful bakeries…

The bakeries were not the trendy places more common now, but simple Irani/Parsi ones which had the best mava cakes! Our family favorite was the City Bakery which was a ‘must-stop’ for us, often around 5 am, on our way back from the airport after helping a friend or relative catch an international flight (which always left at some crazy hour like 3 am!). The city always looked so quiet and peaceful at that hour and as we approached the bakery, we would be greeted with the amazing aroma of freshly baked bread. Next to the breads, piled high on a tray were the mava cakes. Not particularly impressive to look at, plain looking almost, occasionally dressed with a sprinkle of cashews or almonds. One bite of these delicious cakes was all it took to get hooked! We would return with our stash of baked goodies and sit in our balcony overlooking the Arabian Sea, sipping hot tea and munching on these cakes, watching the sky get brighter. Home for me is now over here but whenever I make these cakes, I feel like I am back on that balcony and that always makes me smile.

Mava Cakes


One year ago: Loquat Creme Brulee Tartelettes.
Two years ago: Lemon Mascarpone Charlottes.

Mava Cakes:
Makes about 12-18 depending on the molds
Notes: I used canele molds but feel free to use anything that you have, like muffin tins or cupcake liners.
Make sure to use a large pot so the milk and cream cook down properly.

For the mava:
2 cans (14oz each) evaporated milk (not low fat)
1 cup (250ml) heavy cream

For the cakes:
1 1/4 cups (155gr) all purpose flour
1/2 teaspoon (2gr) baking powder
1/4 teaspoon cardamom
pinch of salt
1/2 cup (100gr) mava, at room temperature
6 tablespoons (85gr) unsalted butter, at room temperature
1 cup (100gr) sugar
2 eggs
6 tablespoons whole milk
cashew halves (optional)

Prepare the mava:
Place the evaporated milk and heavy cream in a large stainless steel pot or wide saucepan (12-inch) with tall sides. Bring the mixture to a boil over high heat. Reduce the heat to medium high and let it cook, stirring more than occasionally for about 10 minutes. Turn the heat to medium and let the mixture cook for another 10-15 minutes, stirring occasionally, until the mixture starts to thicken. Turn the heat to medium low and cook another 10 minutes. At this point, the mixture starts looking like a grainy butterscotch pudding. No worries, everything is going according to plan. Turn the heat down to low and continue cooking another 10-15 minutes. Do more than stirring occasionally there too: there is very little moisture left and the higher risks of scortching happen at that point.
The whole process should take about 50 minutes, pay close attention to the mixture during the first and last 10 minutes of cooking. The final consistency is that of a very thick pudding.
Let cool to room temperature. Refrigerate if not using right away. The mava can also be frozen for up to 3 months. With this mava recipe, you have 3/4 cup to 1 cup of mava, enough for 3 batches of cakes.

Prepare the cakes:

Preheat the oven to 350 and position a rack in the middle. Lightly spray with cooking spray (or brush with melted butter) small cupcake, muffin tins or other mini cake moulds. Set aside.
In a large bowl, stir together the flour, baking powder, cardamom and salt. Reserve. In a stand mixer fitted with the paddle attachment (or with hand held beaters), beat together the mava, butter and sugar at medium speed until light and fluffy. Turn the speed to low and add the eggs, one at a time and beating well after each addition. Still with the motor running on low, add the reserved flour mixture and the milk. Turn the speed back up to medium and beat until the mixture is smooth. Divide evenly among the prepared cake tins, top each with a cashew half if using and bake for 20-25minutes.

Cardamom and Saffron Ice Cream

Saffron&Cardamom Ice Cream


I am usually pretty excited when Mondays roll around. New week, new things happening, new people to meet and things to discover. It’s never quite the same and I look forward to the things learned and observed. Except this Monday. It has been such a splendid weekend, I hardly want it to end. We did have an Easter egg hunt for the kids next door and an improvised picnic in the yard with the neighbors. It just filled me with joy, hope and laughter. An instant battery charger for the soul.

I am usually in charge of desserts when we get together but this time I only had ice cream ready. Actually, I could have cut tiny pieces of what was left of a chocolate coconut and mango cake I had made but that would have been like giving an elephant a thimble to drink from. (more on the cake this week). Instead, I brought down the container of Cardamom and Saffron Ice Cream I was saving for such warm and pleasant days.


Can The Weekend Last All Week?


If I had shown you the inside of the cabinets during Jen’s Kitchen Tour series, it would have confused everybody. I have what B. called "kitchen bougeotte". (To have "la bougeotte" = to be fidgety). With my parents and almost all their sibblings born an raised abroad, there was no standard for cuisine types in the family. Wherever they were they would learn some local dishes and ultimately pass them on to us. Along with all the pots and pans specific to each culture. I realized the tour would quickly require a two-page extension if I included them and I could not subject you and Jen to that. It was long enough already!!

Being here in the States is close to cuisine paradise with some many different nations in one spot, so you can bet my "kitchen bougeotte" is greatly satisfied! I am under heavy French, Asian and Indian flavors. In the pantry, each culture tends to have a specific bin. There is however a couple of spices with their own prime real estate in the pantry. Cardamom and saffron.

I love, love, love cardamom. In baked goods, mousses, cakes, you name it I am there. I use green cardamom for baking while I keep black cardamom for savory dishes. I don’t usually think of saffron when baking but I am pleasantly surprised each time I do. While I don’t pretend to be fluent in Indian cooking, I do enjoy the knowledge and recipes from other bloggers out there. I also have the loveliest of friend who prepared this ice cream the last time I saw her and from the first spoonful, I knew I would have to make it at home….quickly! This ice cream made me week in the knees, literally.

Saffron&Cardamom Ice Cream - All Dressed Up...

No saffron was harmed during the photo shoot…it all went back in its jar. Now everybody can relax."

The flavors of this ice cream are reminiscent of kulfi although the method used here is a bit different than in traditional kulfi recipes. Oh trust me, next on my list is to get me a set of kulfi molds and to try Deeba’s recipe…hmmm… Nothing could be simpler than this refreshing ice cream: cardamom infused cream, pinch of saffron and a handful of pistachios (check your sources given the recent news). Churn and dig…

Cardamom and Saffron Ice Cream Recipe:

2 cups (500ml) heavy cream
1 cup (250ml) whole milk
1 cup (200gr) granulated sugar
4-5 green cardamom pods
pinch of saffron
1/3 cup (40gr) raw pistachios

In a large saucepan, stir together the cream, milk and sugar. On a flat surface, or with a mortar and pestle, gently crush the cardamom pods and add both seeds and pods to the cream mixture. Bring the mixture to a simmer over medium low heat, stirring occasionally to dissolve the sugar. Remove from the heat and let steep as it cools to room temperature. Refrigerate, preferably overnight.
Once infused, strain the mixture and remove the crushed cardamom pods. Add a few threads of saffron and stir.
Coarsely chop the pistachios and add them to the mix.
Process the mixture into your ice cream maker according to the manufacturer’s intructions.
No ice cream maker? No problem! Pour the cream into a freeze proof container and freeze for a couple of hours. Take it out and whip it with an electric mixer or immersion blender, freeze it again, whip it again….do that four or five times. The mixture won’t be quite the same but pretty darn close.

Grandma’s Apple Tartelettes

Grandma's Apple Tarts - Afternoon Baking


I know I have kept building this up since my mother’s ratatouille and wrote a couple of other things in between. Part of me is thrilled to share my grandma’s apple tart with you and part of me wants to keep it inside just a little longer. It’s unlike me not to share so these past few days I kept wondering why it was so dang hard to write this very simple, very humble yet delicious recipe. A simple pate sucree topped with a vanilla bean apple compote and thin slices of apples. A sprinkling of sugar.

You can guess that it is just not about the tart. It’s the mamie behind it and telling "her" in a few paragraphs in a blog can’t possibly explain why this recipe means so much to us and why we absolutely love to make it. I am willing to try though, because I know that my grandmother is very much like yours. Comforting, simple and sometimes complex.

appledip3b


What can I say that could possibly do justice to my grandmother’s heart and personality? She was married to my grandfather for 71 years (love their wedding picture). This year they would have celebrated 75 years of marriage and I get all choked up when I think know what my grandfather truly wants nowadays. I know he wishes to see her again soon. It never saddens me when I hear him say that. I smile instead. I want to make him her apple tart so that he can smell the wonderful aromas of vanilla beans and apple "compoting" together. So that he can hear the swishing of her apron as I roll the dough for the crust. So that he can pass beside me as I am slicing the apples and say "listen to your grandmother. She knows when they are too thick".

Following her thought that a recipe is a canvas for the baker to give a recipe his or hers personality, she never wrote the ingredients or recipe down. To anyone who asked her about it she would simply jot down "pate sucree – compote de pommes – tranches de pommes". Basically, if you use what you know you like, you can’t go wrong even if it changes every time you make it. I did just that. I added some almonds to the dough for a little earthy flavor. I combined vanilla and cardamom for the cooked apple and I sprinkled the sliced apple with some sugar rubbed with lemon zest. To me that was Mamie. A little bite, a little spice, a good bit of delicious and a touch of pizzaz.

Grandma's Apple Tarts


Apple Tartelettes Recipe:

Makes four 4- inch tartlets

Pate Sucree:
2 tablespoons (20gr) slivered almonds
1/2 (60gr) cup powdered sugar, unsifted, divided
1/2 stick (56.5gr) unsalted butter, at room temperature
pinch of salt
3/4 cup (90gr) all-purpose flour
1 egg yolk

Preheat oven to 350F.
Place almonds and 1 tablespoon powdered sugar in a food processor. Pulse until the nuts are finely ground. In bowl of electric mixer fitted with paddle attachment, cream butter, ground nuts and salt on medium speed until well-combined. Slowly add remaining powdered sugar and flour and mix well. Add the egg yolk and mix until incorporated. Shape dough into a ball and flatten into a disc. Wrap with plastic wrap and refrigerate for two hours or overnight.
Place the dough in between two sheets of plastic wrap or parchment paper and roll it out to about 1/8-inch thick. Cut out four 6- inch rounds and fit them inside four 4- inch tartlet molds, patting the dough in with your fingertips if it breaks on you as you transfer the rounds. Gather the scraps and set aside.
Prick the dough with a fork and refrigerate 30 minutes.
Preheat the oven to 350F and bake the shells for 12 to 15 minutes. Let cool on wire racks.

Apple Compote:
1/2 vanilla bean
1 teaspoon (2gr) ground cardamom
2 tablespoons sugar
4 medium apples (your preference. I went with Fuji)
1/4 cup to 1/3 cup (60 to 80ml) water

On a flat surface, cut the vanilla bean in half lenghtwise without cutting all the way through and scrape the seeds from the pods with a pairing knife. Place them in a large saucepan along with the cardamom and sugar. Set aside.
Peel, core and roughly chop the apples. Add them to the vanilla and sugar mixture along with the water. Bring the mixture to a simmer over medium heat. Turn the heat down, cover and let the apples stew for 30 to 45 minutes. Check every 20 minutes to and add water to the mixture if the liquid evaporates faster than the apples can cook. I tend to cook mine just unti soft so that they keep a bit of texture under the tooth. Remove from the heat and let cool to room temperature. Divide the mixture evenly among the tart shells.

Apple Topping:
2 tablespoons (15gr) granulated sugar
zest of half a lemon
2-3 medium apples

In a small bowl, rub together the sugar and lemon zest so that the citrus natural oils can flavor the sugar.
Peel, core and thinly slice the apples (the thinner the prettier. Decoratively arrange the slices over the compote and sprinkle evenly with the sugar.
Bake at 350F for 20 to 25 minutes or until the top appples are golden brown.

White Chocolate, Vanilla Bean Cardamom Mousse and Raspberry Layers

Raspberry and Cardamom Mousse White Chocolate Layers


Hugging my mom, joking with my dad. This is pretty much all I have done in the past 24 hours. It had been a year since I last put my arms around maman and two(!) since I was able to share some fun tidbits with papa. It had never been that long but such has been life on both sides of the ocean, with timing, responsibilities, projects and happenings that we have been this long apart since I moved here. After a long delayed connecting flight and one suitcase missing, I was finally able to kiss them profusedly and start planning some fun things to do in between work and more work while they are here.

Once home, we sat down to a simple meal of quiche and salad and talked for almost three hours at the dinner table. Things don’t change. Time slows down a bit when they are here and I am perfectly fine with that. Today felt like a Sunday and I have no doubt that tomorrow will feel like a Saturday…

Raspberry and Cardamom Mousse White Chocolate Layers


When they visit, I still cook as I would for B. and myself and try to give my mom a real vacation. They do so much for the rest of the family when they are in France that I enjoy pampering them. My dad can read, walk to the dock and clear his mind of all his responsibilities back home. My mom just sits at the kitchen table and we talk and gossip while I bake or cook. She is my favorite prep cook (she does a mean chopping job) and loves to pick on all the little things that have changed around the house.

For their first dinner with us Sunday night, after hours of airplane and airports, I knew they would appreciate a little something sweet to end the meal. I figured they would be more tired than hungry so I prepared something light. Something that would bring sweet dreams, something almost as soft as crisp bed sheets and as comfortable as fluffy pillows. I layered squares of tempered white chocolate with dollops of vanilla bean and cardamom mousse and fresh raspberries. Crisp, soft, refreshing and light. A good night indeed…

…and the missing suitcase finally got on another flight and is finally here too…

Raspberry and Cardamom Mousse White Chocolate Layers


White Chocolate, Vanilla Bean Cardamom Mousse and Raspberry Layers Recipe:

For the white chocolate squares:
1 pound (500gr) good quality chocolate, chopped
( I can’t recommend one good brand over another, just make sure to use good quality. The one I used here was given to me by a sales rep and I found it a little too white and a little too sweet compared to Valrhona or Callebaut for example)

Place the chocolate in a bowl over a saucepan of simmering water. Make sure that the bottom of your bowl fits snuggly over the pan and that it is never in direst contact with the water. Stir the chocolate constantly as it melts. Continue stirring the chocolate until is completely melted and registers 110F on a candy thermometer. Remove the bowl from the water bath let it cool to 82F. Set the chocolate over the warm water again and stir it until is reaches 88F. Spread the chocolate on a very clean and even surface in a very thin layer ( I use the back of a sheet pan that I only use for chocolate and caramel applications). Let it cool and harden completely before cutting 3 inch squares in the chocolate layer. Gently lift the squares and set them aside.

For the vanilla cardamon mousse and raspberries layers:
3 egg yolks
pinch of salt
1 1/2 teaspoons powdered gelatin
1/4 cup (25ml) cold water, divided
1/2 cup (100gr)sugar
3 cardamom pods, cracked open
1/2 vanilla bean, split open and seeded
1 cup (250ml) heavy cream

2 cups raspberries

In the bowl of a stand mixer, whisk the egg yolks and the salt. In a small bowl, sprinkle the gelatin over 2 tablespoons of water, and let it sit while you make the syrup base of the mousse.
Combine the sugar, cardamom pods and the remaining 2 tablespoons of water in a heavy saucepan. Cover and bring to a rapid boil over medium high heat (prevents crystallization of the sugar on the side of the pan). Once boiling, uncover and cook until the mixture reaches 238F.
Strain the pods and seeds in a container with a spout, it will be easier to add to the yolks. Pour the syrup slowly and into a steady stream into the egg yolks with the machine running on medium high. Melt the gelatin in the microwave for 10 seconds or until dissolved. Add it to the yolk mixture along with the seeds from the vanill bean and continue to whisk on medium high until it triples in volume and cools to room temperature.
In a separate bowl, whip the heavy cream to soft peaks. Add it to the mousse base and fold the two gently together. Pour the mousse in a pastry bag fitted with a plain tip (I use Ateco #807).

Assembly:
Place one chocolate square on a plate and alternate pipings of mousse and raspberries, top with a second chocolate squares and repeat. Top with a last square of chocolate and a raspberry and chocolate shavings if desired.

Around The World In 100 Cookies: Field Guide To Cookie Book Tour

Viennese Crescents


Here is another post in the series "When blogging become much more than just blogging". I am loving the extra dimentional relationships formed and cultivated through blogging and when Anita asked a few of us to take her first released book "Field Guide To Cookies" on a virtual tour, I literary smiled from ear to ear. Anita is a sweetheart, a terrific baker, a great friend, a fellow Daring Baker (we hosted the Saint Honore challenge together), and an extremely talented writer. Indeed, no one can describe flavors and textures as well as she does. Trust me. Head over to her blog, Dessert First and then tell me if you did not get lost in the fold of a sweet pie or the silkiness of an ice cream.

It just happened that Anita asked us to take her book on a tour at the same time that I was completing the Princess Torte assignment for Desserts Magazine and the editor mentionned that the next issue would be on cookies. Ha! "Well…I am just getting this nifty pocket book filled with 100 recipes of cookies from all over the world. I am sure I can come up with something!" And I sure did! Viennese Crescents, Indian Cookies, Algerian Almond Tarts, Dark Chocolate Crinkles (I won’t post the recipe as you can see on another host’s blog, Sara from Ms. Adventures In Italy), Pecan Sandies and Turtle Bars were made and devoured by the neighbors and us in a mere couple of weeks. They went so fast that I did not have the chance to take a picture of the Turtle Bars…they were going faster than I was cutting them!

“The Field Guide To” is a fun and informative series on how to master almost anything in the kitchen from meat to cocktails and now cookies. The whole format behind the series is to have a booklet full of information on how to achieve the perfect cookie, every time, whether you are a novice baker or a seasoned one. The book is divided into four chapters: drop cookies, bar cookies, molded cookies and rolled cookies. The notes on the perfect cookies and baking tools are perfect for beginners in the kitchen, giving them detailed explanation of what usually goes wrong in cookie making. The pocket size format makes it easy to have it around the kitchen and out on the counter top almost all the time. I like the fact that I can carry Anita’s recipes with me on weekend escapades, family gatherings or friends and have a delicious recipe to prepare for them!
Knowing her care for details and wonderful writing skills, this book went beyond all expectations I had. Each recipe is so much more than just a recipe. It starts with a general description that reads more like a history lesson then just a description of taste and texture. All the recipes have a nifty little coding system making it easy to know where you are in the recipe: prepping, mixing, baking, storing, etc… I was so happy to be able to test Anita’s recipes and have a copy of her book that I asked her if she’d be ok answering a few questions that popped in my head while I was baking. Here are a couple to get your appetite going. For the rest of the interview, check the next issue of Desserts Magazine coming out next week.

Dark Chocolate Crinckles


Dark Chocolate Crinkles – Before and After

Tartelette: As the introduction states it, this book is about more than just cookies, but also tea cakes and small bites. How did you decide which ones would make it into the book?
Anita: Even though 100 cookies sounds like a lot, it was tricky to decide which ones would make it and which ones would be cut. My editor and I wanted to cover as many styles of cookies as possible, and include ones that maybe many people had not heard of. On the other hand, since the book was primarily targeted for a North American audience, we needed to include many of the classics familar to most people and not scare them away with too many strange and unknown cookies. I hope I found a balance between many traditional favorites like chocolate chip and oatmeal raisin, but also the more exotic and international, like macarons and pizzelles.

Tartelette: Which aspects of the writing experience did you like best? Baking, testing, researching?
Anita: I really enjoyed researching the cookies. Since this cookbook is a little different than most other cookbooks with the longer entries, I needed to do a lot more research than just looking up recipes: I needed to find out where the cookie had originated, who first made them, how it evolved through time. I definitely boned up on my world history doing research on this book! Of course, I also enjoyed testing the recipes – my one biggest wish is that I had more time to test the recipes, because you always think of something else to tweak that might turn the recipe from good to fantastic! I had a great team of recipe testers to help me out, although sometimes I wished I had their job and could just bake all day, forget about the research and writing parts!
To be continued…

Viennese Crescents


Viennese Almond Crescents, (reprinted with permission of the author)(first picture also)
Makes about 2 dozen cookies

1/2 cup ground almonds
1/2 cup confectioners’ sugar
1/2 cup softened unsalted butter
1 1/2 teaspoon vanilla extract
1 teaspoon almond extract
1 cup all-purpose flour
1/8 teaspoon salt
1/2 cup vanilla sugar (I used powdered sugar), for coating

Sift together the ground almonds and confectioners’ sugar in a bowl.
In a stand mixer, beat butter on medium speed for several minutes until smooth.
Add in the almond mixture and mix until combined. Add in the vanilla and almond extracts and mix until combined. Add in the flour and salt and mix on low just until combined and the dough starts clumping together.
Turn dough out onto a piece of plastic wrap, wrap tightly, and chill for about 20 minutes.
When you are ready to bake the cookies, preheat the oven to 350°F. Line a few cookie sheets with parchment paper or silicone baking mats.
Form dough into 1-inch balls. Roll into a log and curve the ends to make a crescent shape. Place on cookie sheets about 1 1/2 inches apart.
Bake for 8 to 10 minutes, rotating sheets halfway through; the edges of the cookies should turn light brown but the tops should not get too dark. Cool sheets on wire racks for about 4 to 5 minutes. While they are still warm, roll cookies in the vanilla sugar to coat. Let them finish cooling on wire racks. They are best enjoyed the day they are made, but you can store them in an airtight container between sheets of wax paper for 2 weeks.

Algerian Tarts


Algerian Almond Tarts, (reprinted with permission of the author).
Yield: About 2 1/2 dozen cookies

Pastry:
2 cups all-purpose flour
1/4 teaspoon salt
1/2 cup unsalted butter, melted
2 eggs
2 tablespoon rosewater or orange flower water
1 teaspoon lemon juice

Filling:
3 cups sliced almonds
1 1/2 cups sugar
2 eggs
1 1/2 teaspoons lemon zest
2 teaspoons rosewater or orange flower water
1/2 teaspoon vanilla extract

Topping:
1/2 cup honey
Pine nuts (optional)

Preheat oven to 350°F. Lightly grease a few cookie sheets or line with silicone baking mats.
In a stand mixer, combine the flour and salt. With the mixer running on low speed, gradually add butter, egg, vanilla, rosewater, and lemon juice. Mix for a few minutes until dough is smooth. Cover dough with a damp cloth and set aside while you make the filling.
Using a food processor, grind almonds and sugar to a fine meal. Add eggs, lemon zest, rosewater, and vanilla and process until all ingredients are evenly incorporated.
Roll out dough to about 1/16” on a lightly floured surface. Using a 2 to 3 inch cookie cutter to cut out circles from the dough.
Drop tablespoonfuls of filling into the center of each circle. Wet fingers with water and pinch the dough together into four corners, forming a cup around the filling. Or, if you have a mini muffin tin or other small molds, you can fit the dough circles into the molds and fill about 3/4 full with the filling.
Place tarts on sheets. Bake for 20 minutes, rotating cookie sheets halfway through until filling begins to brown and the cookies are a light golden color.
Remove sheets from oven and place on wire racks. Drizzle honey over each of the tarts. Let tarts cool on sheets before serving. Store in an airtight container for up to 1 week.

Indian Cookies


Indian Almond Cookies, (reprinted with permission of the author).
Makes about 3 dozen cookies

2 cups blanched almonds
2 tablespoons milk (I did have to use 2 extra tablespoons because my dough was really dry)
1 3/4 cups sugar
1/2 teaspoon cardamom powder
Silver foil

In a food processor or blender, grind blanched almonds to a fine powder. Add milk and mix until a smooth paste is acquired.
In a heavy saucepan, combine the paste, sugar, and cardamom at medium-low heat, constantly stirring to avoid burning; stir 8 minutes or until a lump of dough is formed.
Spread the dough onto a lightly greased jelly roll pan or baking dish, flour or grease a rolling pin, and and gently roll the dough to approximately 1/4 inch thick. Apply silver foil and press slightly with the foil’s paper packaging or a paper towel so that the silver adheres to the dough.
As the dough cools, its texture resembles that of marzipan. Once it has completely cooled, cut it into 1–2 inch diamond shapes. They will keep up to 1 week if sealed in an airtight container.

Pecan Sandies

Pecan Sandies, (reprinted with permission of the author) Perfect for Christmas!
Makes 2-3 dozen

1 1/2 cups pecans, toasted
1/3 cup confectioners’ sugar
1/3 cup light brown sugar
1 1/2 cups all-purpose flour
1/4 teaspoon salt
3/4 cup plus 2 tablespoons cold unsalted butter
1 egg
1/2 teaspoon vanilla extract
About 30 pecan halves for decorating

Kitchen Note: the day I made these we had 100% humdity so my dough never got firm enough to even roll into a log and I ended up doing drop cookies instead. Turned out perfect.

Grind pecans and sugars together in a food processor until the nuts are finely ground. Add in the flour and salt and process until combined. Cut the butter into small pieces and scatter over the mixture in the food processor. Process until the mixture resembles coarse crumbs.
Add egg and vanilla and process until the dough comes together.
Turn dough out onto a piece of parchment paper or silicone baking mat. Roll out to about 1/4 in thick. Sprinkle the dough with a little flour if it gets too sticky.
Cover the dough with plastic wrap and chill in the refrigerator for about 1 hour or until firm.
When you are ready to bake the cookies, preheat the oven to 325°F. Line several cookie sheets with parchment paper or silicone baking mats. Using a cookie cutter, cut out cookies from the chilled dough, about 2 inches in diameter. Place a pecan half in the center of each cookie.
Bake for 18 to 20 minutes or until the edges of the cookies turn golden brown, rotating cookie sheets halfway through. Cool cookie sheets on wire racks for a couple of minutes before transferring cookies directly onto wire racks with a spatula to finish cooling.Store in an airtight container for up to 1 week.

Do not miss the entire tour which you can follow as the book travels around the world:
Nov. 11th – Jen of use real butter
Nov. 12th – Ari of Baking and Books
Nov. 13th – Sara of Ms. Adventures in Italy
Nov. 14th – Ivonne of Cream Puffs in Venice
Nov. 17th – Tartelette
Nov. 18th – Veronica of Veronica’s Test Kitchen
Nov. 19th – Aran of Cannelle et Vanille
Nov. 20th – Bea of La Tartine Gourmande
Nov. 21st – Peabody of Culinary Concoctions by Peabody

Bittersweet Chocolate and Cardamom Cupcakes

Bittersweet Chocolate - Cardamom Cupcakes


Over the past couple of months I have been consumed by guilt. Even though I had tons of ideas and a couple of sleepless nights I did miss a couple of Sugar High Fridays. Guilty! It matters. It’s sugar. Allright, so "consumed" is a little strong. Upset that I could not work my schedule right to find an hour to make cupcakes is more realistic. When something I could have done starts bugging me, the smaller it is, the more it bugs me. I can easily forget there is an elephant in the room, but if a tiny little fly starts dancing in my head….It will keep dancing and buzzing until I do something about it. The elephant will still be in the room though.

I missed Fanny’s S.O.S for cupcakes but I surely was not going to miss Anita’s call for SHF spiced up sweets. So when C. and I started to plan her upcoming birtday party, the little fly in my head started to dance, loudly. Tap dancing even. Maybe I could combine both.
C: hmm, not sure what I want for dessert for my birthday…
Me: Cupcakes! You want cupcakes!
C: really?
Me: chocolate cupcakes with a hint of cardamom…
C: that’s very grown up for a cupcake
Me: Well, that’s settled then! Chocolate Cardamom Cupcakes! Glad we had this discussion!

Allright, so that was the summed up version. I did give her some space to think and talk more than that, give me some credit here! I did however guided her towards the bittersweet chocolate cupcakes and the addition of cardamom in them which is a spice that she likes as much as I do. The frosting is a simple whipped ganache. Easy, rich and chocolatey to the bone. The combination seems classic and worked well as there were one left for her last night! Too bad I can only send a picture to Anita for this month SHF!!

Bittersweet Chocolate - Cardamom Cupcakes


Bittersweet Chocolate and Cardamom Cupcakes:

Makes 24 cupcakes.
Kitchen Notes: the whipped ganache needs to go on the cupcakes as soon as it is ready so have the cupcakes baked and completely cooled. Make sure the ganache is chilled well before whipping or it might separate.

Note: I noticed a bloop (sorry was typing late night-early morning) and in the ganache I gave the single measure of chocolate for a double measure of cream. My sincere apologies…and yes, I promise to stop typing this late 🙂

2 cups all-purpose flour
1 teaspoon baking soda
1 1/2 teaspoons ground cardamom
1/8 teaspoon salt
2 sticks (8 oz) unsalted butter, at room temperature
1 cup granulated sugar
4 large eggs, at room temperature
6 ounces bittersweet chocolate, melted and cooled
1 cup buttermilk

Preheat the oven to 350 degrees. Sift together the flour, baking soda, cardamom and salt and set aside.
In a stand mixer fitted with the paddle attachment, mix the butter and sugar on medium speed until airy and creamy. Add the eggs, one at a time, beating well after each addition (scrape down the sides if necessary). Still on medium speed, add the chocolate and mixing until well incorporated. Add the flour,baking soda and salt alternating with the buttermilk . Make sure that all the ingredients are well incorporated but do not overbeat. With each addition, beat until the ingredients are incorporated, but do not overbeat. Spoon the batter into cupcake liners, filling them about 2/3 of the way full. Bake for 20–25 minutes, or until a toothpick inserted in the center of the cupcake comes out clean.

Whipped Ganache Frosting:
12 ounces (360 gr) good quality bittersweet chocolate
2 cups (500ml) heavy cream

Place the chocolate in a medium size bowl and set aside. In a large saucepan set over medium heat, bring the cream to a simmer. Pour the hot cream over the chocolate and let sit for a couple of minutes. Stir the cream and chocolate together gently until the mass becomes smooth and shiny. Let cool and refrigerate until very cold. When ready to use, whip the ganache until it is holds its shape and spreads easily. Use as soon as it is made or it will be too stiff to pipe. If this happens, just reheat it on top of a double boiler to melt it again, and repeat the cooling and whipping process. If your chocolate is less than 72% bittersweet, add 2 more ounces before adding the hot cream.
We had a tad more than needed but with enough spoons digging into it, it was not a problem.

Bittersweet Chocolate - Cardamom Cupcakes