
cake

Chocolate & Hazelnut Meringue Cake

Birthday Cake Preparations


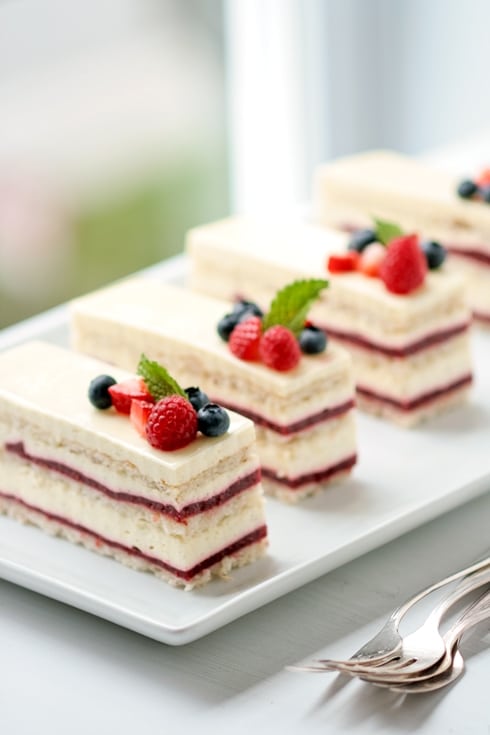
Thank you guys so much for playing the game the other day and giving me great suggestions for B’s birthday cake. He was a bit shocked I did not have any of my own – the truth is I had too many and after staring at them for a few days, none seemed that fun anymore! And, I really like when we can all share, communicate, participate.

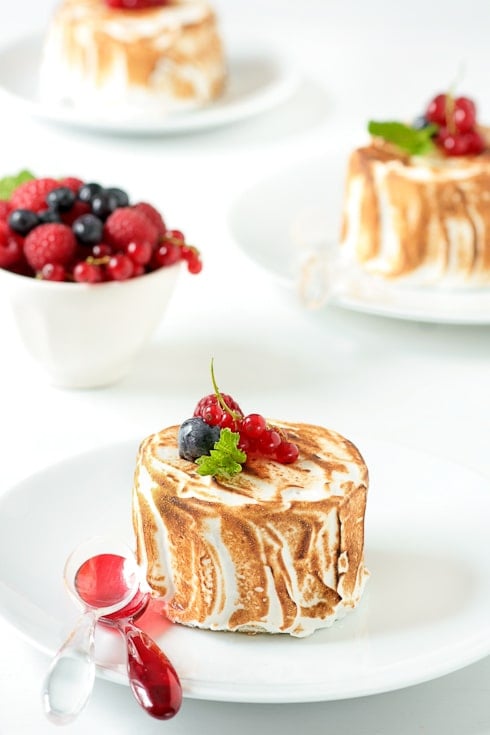
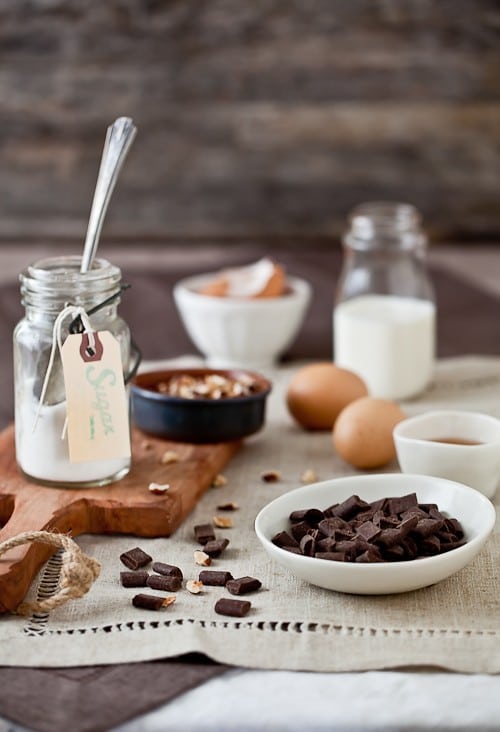
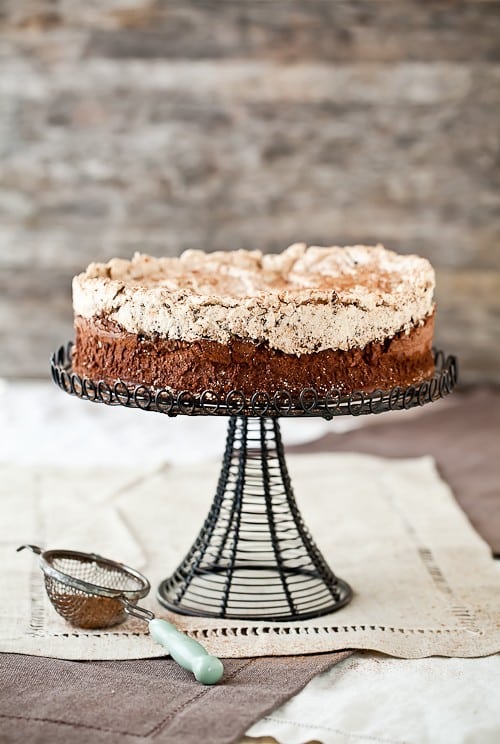
As you can guess, B’s cake had plenty of chocolate, eggs, sugar and nuts…Which one did I/we pick? EP’s Chocolate and Hazelnut Meringue Cake from Martha Stewart ended up stealing the show. Congratulations on winning the "Artisan Breads At Home". You are going to love this book!

Chocolate & Hazelnut Meringue Cake


How did I pick? Actually I ended involving B. a little in the process as I noticed after 50 or so comments that I was slightly putting in the "maybe" or "no sure" columns flavors, desserts, ideas that he could picked if given the chance. It was his birthday after all. And I have known in the 13 years we have been together that I should never expect anything if only be surprised.

We sat down and I asked him for key words that would help me narrow down the winning suggestion. Here were his specs: chocolate, nuts, crunchy – creamy, gluten free so I would not have to worry about adapting (go ahead, insert "awwww" right here!). I read everyone of your comments and put a star next to the ones that fit his criteria then I went back and had him look them over, one by one and pick his top three.

Chocolate & Hazelnut Meringue Cake


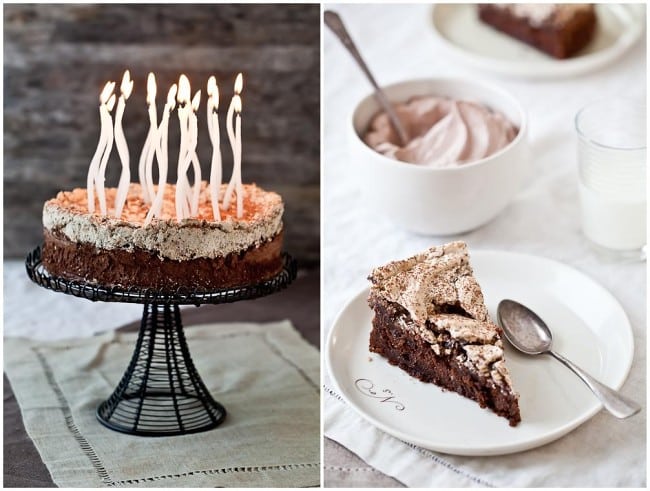
You guessed it, I didn’t want to spoil the element of surprise completely. Yes. It turned out into a day 100% tuned into him and I am happy for it. This year has been nothing but tranquil for us and he deserves every bit of "you you you you you" that I could give him. And I am glad you indulged me in this rather fun and chocolatey quest.

Chocolate & Hazelnut Meringue Cake


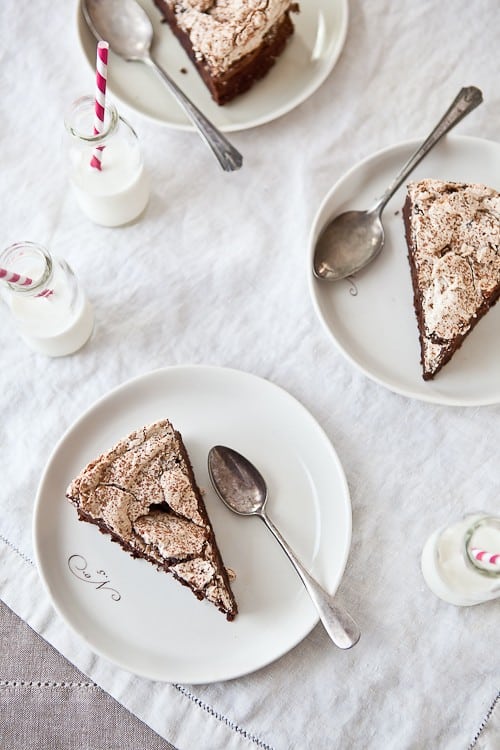
That cake is sublime! flourless, creamy, complex and yet not so rich that you have to stop after one bite – more like control yourself not to want it for dessert at every meal! Granted we invited plenty of friends to share with us so the slices were small but I have to say, sneaking in the kitchen passed midnight and sharing a slice with a cold glass of milk after everyone had gone home was pretty much the "ahhhhhh" moment of the day.

Chocolate & Hazelnut Meringue Cake


The combination of the deep flavors of the cake (I added espresso to the batter instead of vanilla extract) with the meringue was exactly what he asked for. Because we have been heat indexes hovering around the 115F-120F and high humidity, I cooked the meringue topping longer than what the recipe called for to make sure it would not end up in complete puddle of goo when the time to serve it came about. It worked perfectly and yielded the right amount of crunch and softness after standing for a few hours. Like macarons, this cake only tastes better after 24 hours.

Speaking about cake and chocolate, how about doing a little French Word A Week on chocolate cake while we are at it? So, here it is: click on Gateau Au Chocolat to hear its pronunciation.

Thanks everyone for playing along! Have a great weekend everyone!

Chocolate & Hazelnut Meringue Cake


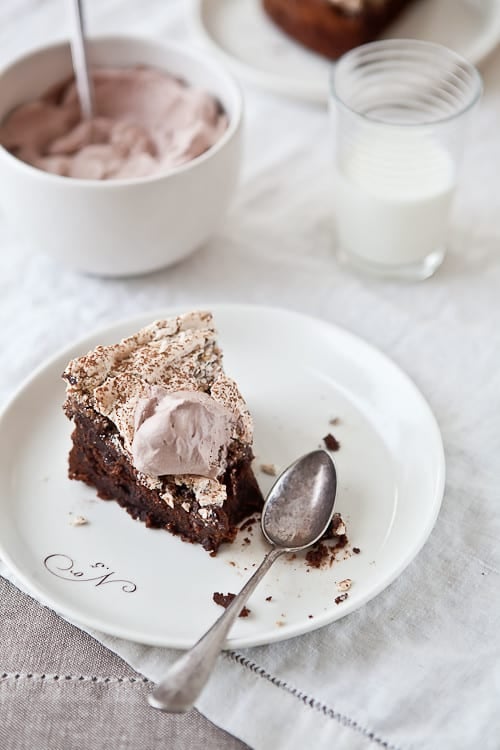
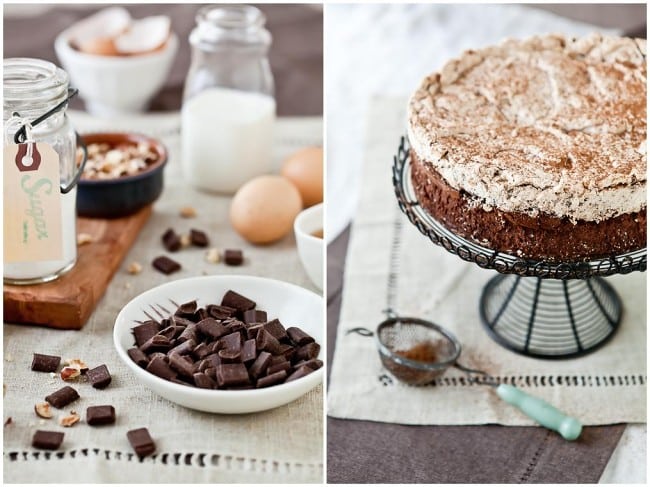
Chocolate and Hazelnut Meringue Cake, adapted from Martha Stewart.

Makes one 9-inch cake

Notes:
– Now is not the time to use the cheap-o chocolate. Get the best quality bittersweet chocolate you can find as it is the star of the recipe. (Guittard, Callebaut, Valrhona, El Rey, Scharffen Berger, etc…)
– To toast the hazelnuts, preheat oven to 350F and spread the nuts in a single layer on a baking sheet. Bake 10 to 15 minutes until golden brown.
– To skin the nuts without driving yourself crazy, place them in a mesh bag (like a recycled orange or lemon bag) and rub the nuts between your hand over the sink. The skins will fall and only the "naked" nuts will remain in your bag.
– The cake at room temperature is excellent but served really cold, it becomes even fudgier and the meringue gives slightly under your tooth like a soft pavlova. Brilliant!

For the cake:
10 tablespoons unsalted butter, plus more for pan
3/4 cup firmly packed light-brown sugar
6 large whole eggs, separated
12 ounces bittersweet chocolate, melted and cooled
1 1/2 tablespoons espresso (or vanilla)
1 1/2 tablespoons rum (optional)(not with us!)
1/4 teaspoon salt

For the meringue:
4 ounces bittersweet chocolate, roughly chopped (1 cup)
1 cup hazelnuts (about 4 ounces), toasted and skinned (see notes)and roughly chopped
1 tablespoon cornstarch
4 large egg whites
3/4 cup sugar

Prepare the cake:
Preheat oven to 350 degrees. Butter a 9-by-3-inch springform pan. Line bottom with parchment paper. Butter parchment and set aside.
In the bowl of an electric mixer fitted with the paddle attachment, whip the butter and brown sugar until pale and smooth at medium speed, about 3 minutes. Add egg yolks, one at a time, beating well after each addition and scraping the bottom and sides of your bowl if necessary. Add the melted chocolate, espresso (or vanilla), rum, if using, and salt. Beat until combined. Transfer to a clean bowl and wash your mixing bowl thoroughly.
In a clean mixer bowl fitted the whisk attachment, beat the 6 egg whites on high speed until soft peaks form, about 2 minutes. Fold one-third of the egg whites into chocolate mixture. Fold in remaining egg whites and pour batter into prepared pan, and bake 25 minutes.

Prepare the meringue:
Combine the chopped chocolate, nuts and cornstarch in a small bowl, and set aside. Place remaining 4 egg whites in a clean mixer bowl fitted with the whisk attachment, beat on high speed until frothy. With the mixer running, slowly add the sugar and continue beating until stiff peaks form, about 8 minutes. Fold in hazelnut mixture.

Assemble and Finish:
Remove cake from oven. Using a large offset spatula, spread meringue mixture on top of cake using as little strokes as possible not to deflate the meringue, and return to oven. Bake until meringue is lightly browned and crisp, 25 to 30 minutes. Transfer pan to a wire rack; let stand 10 minutes. Run a knife around the edge of the cake to loosen, and release sides of pan. Let cool, about 30 minutes, before slicing and serving.

————————————————————————————
Some inquiring minds asked so here is a short prop list.
– Plates: the ever fabulous Asya from Gleena.
– glasses and little bottles (they are bud vases actually): Wal-Mart.
– paper straws from Bake It Pretty.
– silverware, glass jar and linens: vintage from a little shop in town.
– candles: gift from my friend Jen from Use Real Butter (I think she got them at Peppercorn in downtown Boulder).
– wire cake stand and green handled strainer from etsy.

Upside Down Pear Cardamom Cake (GlutenFree)

Gluten Free Pear Cardamom Cakes


Growing up, my brother and I did not have any kind of special relationship. We did not dislike each other but we did not like each other either. I guess you could say we had one typical brother-sister relationship. I had crushes on his friends just about every week and he found my friends a bit too Strawberry Shortcake for his taste. We had wrestling fights, screaming fights, pillow fights and he often hid in my closet to scare me before bedtime. Typical.

I often wondered if we would ever find some common ground. Some place of understanding. We did find it when our brother passed away. Right there, in front of me, stood a broken man. He was not this "my brother-this pain in the rear" boy anymore. He was in pieces. I was too. And we picked them up together. We held each other up and found each other then. There is no reason why things happen. They just do. And we knew what we had to do then. And we still do it. Our way.

Baking With Pears


We still don’t call each other that often. Or send cards. Or email. He knows I got his back and he’s got mine. He’s always smart with business and techie advice for me. He loves food and is an amazing cook. He gave me two beautiful and smart nieces.

While chatting on the phone the other day, we were catching up on each other’s work, progress, accomplishments and to hear him say that he was proud of me was the biggest validation of my life. Like Christmas had come in March. There was also a pause. Very unusual if you know the speed of my brother’s conversations. That’s when he dropped a line that I didn’t expect…

Gluten Free Pear Cardamom Cakes


"Hey, I really like when you write me a post on your blog for my birthday. I also really like when all your virtual friends come wish me a happy birthday." Silence on my part. A bit surprised that he would admit this. I laughed. Out loud. Then I apologized and promised that, yes, I would post something on his birthday. I virtually made him some (gluten free) Upside Down Pear and Cardamom Cakes that we quickly devoured last night.

As a kid, his birthday dinner would always include frog legs with tons of parley and garlic and a chocolate cake with walnuts and oranges that I was not particularly fond of. I did think about making it for him again as a wink to the past but my mom had brought over the new French Saveur and Elle a Table and I kept coming back to the article on upside down cakes in Elle a Table. So many variations from one simple base that it would have been difficult not to find one that suited everyone.

Gluten Free Pear Cardamom Cakes


I adapted the base recipe to make it gluten free and added some cardamom to the ripe pears I used in the cake. There is something about pears and cardamom that is almost magical once baked together. Instead of doing the cakes and the caramel with sugar, I used wildflower honey. I am really enjoying baking with sucanat, honey and maple syrup versus regular granulated sugar these days. So much more fragrant. So many more health benefits too.

The cake was moist from the millet and sweet rice flour, oozying with honey and vanilla bean caramel, and the smell permeating the kitchen was unbelievable. We quickly brewed some fresh coffee and sat down with some cake.

Gluten Free Pear Cardamom Cakes


So here’s to you Arnaud! Happy Birthday! Joyeux Anniversaire!

Upside Down Pear Cardamom Cakes, adapted from Elle A Table

Makes four 4-inch cake or one 8-inch cake. Serves 6-8

For the honey caramel:
1/2 cup honey
1/4 cup water
1/2 vanilla bean, seeded

For the cake batter:
3 pears, peeled and thinly sliced
3 large eggs
1/2 cup (125ml) honey
1 1/2 (160gr) stick unsalted butter, melted and cooled
3 1/2 oz (100gr) superfine sweet rice flour
2 oz (50gr) millet flour
1/2 teaspoon ground cardamom

Preheat oven to 350F. Line the inside of four 4-inch springform pans or one 8-inch pan with parchement paper. Place the pans on a baking sheet and set aside.

For the caramel:
In a large heavy bottomed saucepan, place the honey, water and vanilla bean seed and bring to a boil over high heat. Reduce the heat to medium and let the syrup simmer down until thickened, should take 5-8 minutes. Remove from the heat. Divide the caramel among the prepared cake pans.

For the cake:
Divide the pear slices among the bottom of each cake pan and set aside.
In the bowl of an electric mixer, beat the eggs and honey on medium speed for about 2 minutes. Slowly add in the melted butter. Add the flours and cardamom and mix until fully incorporated, about 1 minute. Divide the batter in between the pans and bake for 30-40 minutes or until golden brown.

Remove from the oven and let cool to room temperature. Unmold carefully over a plate. Watch out for the oozing honey caramel.

Pinch Cake Lemon Mousse Strawberry Trifle And A Giveaway!

Lemon Mousse Strawberry Trifle


I’m in Atlanta for the next few days and very excited to be meeting a whole bunch of bloggers and foodies I only know via the screen. I’ve left early to prepare a workshop and also to take time to visit with friends there and put my brain cells to rest a bit. I was off to a good start by catching up with my blogging pal Chris around a delicious bowl of Thai noodles as soon as I landed. Sweet long weekend indeed.

It’s funny but without being a homebody, I am extremely happy in the "here and now" and very comfortable where my derriere was on the couch last night. Meaning, I wish it all could happen closer to me so B. could attend too. Although not surprised, I am very grateful for his mending the fort while I am away for work and he’s stuck here with two crazy dogs and a pile of papers to grade. I’ve left a fridge full of home cooked meals and a tray of these Pinch Cake Lemon Mousse Strawberry Trifles.

Everytime I set out to leave things for him in the kitchen, you can bet that I never forget to leave dessert. This time, I went straight to the source and asked what he most wanted to have. "Something retro like a trifle or strawberry shortcakes."For the occasion, I wanted to try something different and figured it was high time I picked something from Rose Levy Beranbaum’s Heavenly Cakes. I used her recipe for Pinch Cake and layered it with lemon curd mousse and fresh strawberries. They’re in season in Florida which is just a skip and a hop from us (and tasty).

Strawberries And Lemons


I was attracted to this particular cake recipe for two reasons, how easy it was to convert as it contained very little flour and also because I loved the story behind the name, Pinch Cake. Paraphrasing Mrs. Beranbaum: in Spain, the cake is originally known as pinch bread and the name is partially derived from the way of eating it: by pinching out pieces between your fingers. Mrs. Beranbaum calls this version Salt because it was created in 1985 by Miquel B. Costabella, pastry chef of Salt Bakery, named after the village of Salt, close to Girona, Spain. History, baking. Happy.

But wait! While I am away rolling in sugar in Atlanta, here is a chance for you to bake it at home too: I am giving away one copy of Heavenly Cakes.

All you have to do is leave a comment (one per person) here between today and Sunday January 17th (midnight Eastern time) when the winner will be chosen at random. The giveaway is open world wide. Why not tell me what your favorite retro dessert is while you’re at it? Would love to know!

Lemon Mousse Strawberry Trifle


Some updates before I leave: the macarons workshops in L.A are both sold out, but I’ve been asked to teach a third class on Food Photography in L.A, Saturday March 6th 2-5pm. Email rachael{AT}lafujimama{DOT}com if you are interested.

I did say I was working on one more surprise: I figured Seattle was so close to L.A not to go visit a couple of dear friends. Well, thanks to the organization skills of Viv from Seattle Bon Vivant, I am now teaching 3 workshops there. Two will be on photography and one on macarons. [Update: all classes SOLD OUT]. Can’t wait to meet Seattle, its wonderful community and thrilled to be staying on Shauna’s couch. After that trip I’ll have two days to get the house ready for 3 weeks with my parents. Phewee…!

Gimme cake…!

Pinch Cake Lemon Mousse Strawberry Trifle

Makes 6 to 8

Catalan Salt Pinch Cake, adapted from Rose’s Heavenly Cakes:

1 cup + 2 tablespoons (112gr) unblanched sliced almonds
3/4 cup plus 2.5 tablespoons (180gr) sugar, divided
6 large eggs
2 large egg whites
1 teaspoon finely grated lemon zest
1/2 cup plus 1 tablespoons white rice flour

Preheat the oven to 325F/160C.
Line a quarter sheet pan with a sheet of parchment paper and slightly spray with cooking spray. Reserve.

Toast the almonds on a separate baking sheet until pale golden, about 7 minutes.
Cool completely and pulse the almonds with 2.5 tablespoons sugar until finely ground. Stop before the nuts start to form a paste.
Place the eggs into a 2-cup measure with a spout and whisk them just to break them up.
In a stand mixer fitter with the whisk attachment, beat the egg whites on medium low speed until foamy. Increase the speed and whisk until soft peaks. Gradually beat in the remaining cup of sugar. Continue beating until the meringue is thick and glossy. With the beater off, stir in the almond mixture until evenly incorporated.

Reattach the whisk and with the mixer on medium speed, add the beaten eggs to the meringue, 2 tablespoons at a time, beating for 2 minutes after each addition. It should take a total of 20-25 minutes but be sure to beat for a minimum of 20 minutes. Add the lemon zest.
Sprinkle the flour over the batter and fold until completely incorporated. Pour the batter onto the prepared baking sheet and bake for 15-20 minutes until a knife inserted near the center comes out clean.

For the lemon mousse:
grated zest of 1 lemon
1/2 cup (125 ml) lemon juice
1/4 cup (50gr) sugar
2 eggs
1 cup (250 ml)heavy cream

4 cups fresh strawberries

Combine the zest, sugar, juice in a saucepan, and bring to a simmer. In a small bowl, beat the eggs until light. Beat some of the lemon mixture into the eggs to temper. Scrape the mixture back into the saucepan and cook stirring constantly until it thickens up, about 5 minutes. Strain and let it cool to room temperature, covered with plastic wrap until ready to use.
In a stand mixer, whip the cream to medium stiff peaks. Incorporate the cooled lemon curd in three additions. Place in a piping bag.

To assemble:
Cut out rounds in the baked caked that will fit inside the glasses that you wish to use. I got enough rounds for 2 layers for six 3-inch wide glasses.
Place one round of cake at the bottom of the glass, position strawberry halves inside facing out on top, pipe some lemon curd in the middle and repeat the layers. Top with some extra whipped cream if desired.

Le P’tit Coin Francais:

Pour le gateau:
112gr amandes emondees
180gr sucre
6 oeufs
2 blancs d’oeuf
1 cuilliere a cafe de zest de citron
80gr farine de riz

Prechauffez le four a 160C.
Mettez une feuille de papier sulfurise sur une petite plaque a biscuit a rebords. Beurrez legerement et mettez de cote.
Faites toaster les amandes sur une autre plaques jusqu’a ce qu’elles deviennent dorees, 7 minutes environ.
Laissez les refroidir completement et reduisez les en poudre dans un mixer avec 2 cuillieres a souple de sucre. Arretez la machine avant que les amandes ne forment une pate.
Mettez les oeufs dans un grand verre mesure et les battre legerement a la fourchette, juste pour les casser.
Montez les blancs en neige en ajoutant le reste de sucre au fur et a mesure afin d’obtenir une meringue ferme. Ajoutez les amandes et melangez.
Ajoutez les oeufs entiers battus, 2 cuilleres a la fois et tout en battant l’appareil pendant 2 minutes apres chaque addition. Le procede devrais prendre environ 20 a 25 minutes (au moins 20). Ajoutez le zest de citron.
Ajoutez la farine en pluie et soulevez a l’aide d’une maryse jusqu’a ce que la pate soit homogene.
Versez la pate sur la plaque preparee et faites cuires 15 a 20 minutes.

Pour la mousse au citron:
le zest d’un citron
125ml de jus de citron
50gr sucre
2 oeufs
250ml de creme entiere liquide

Amenez le zest, sucre et jus de citron a fremissement a feu moyen. Dans un bol de tailled moyenne, fouettez les oeufs pendant 2 minutes. Ajoutez en filet le jus de citron chaud tout en continuant de fouetter. Remettre la mixture dans la casserole et cuire a feu moyen jusqu’a epaississement. Passez a la passoire et laissez refroidir.
Pendant ce temps, montez la creme en chantilly et quand la preparation au citron est refroidie, y melanger la chantilly.

Assemblez:
Dans 6 a 8 verres, faites des couches successives de gateaux, mousse au citron et fraises.

Mom’s "Tupp" Apple Cardamom Cake

Apple Cardamom  Cake


Let’s talk winning tickets, shall we? First, my dear human random number generator, B., picked Brandy from Nutmeg Nanny to receive Nicole’s The Baking Bites Cookbook. Congrats! Send me a quick email and I’ll pass the info along. Now on to this cake…

I know I am going to jinx it. I just know it. Maybe if I whisper it very softly: It finally feels like Fall around here. Mostly in the wee hours of the morning when I can finally feel a chill in the air and a dry breeze through the marsh. Actually, not having a free day on the schedule until April means that the season has indeed changed. Drastic times call for drastic measures and I often turn the comfort of my mom’s apple cake during the Fall and holiday season. The one cake that earned her the affectionate name of Maman Tupp and the one we know as "Gateau Aux Pommes Tupp".

Apple Cake


I am pretty sure that most French people reading are familiar with the "Gateau aux Pommes 5-4-3-2-1" that the brand Tupperware® introduced during home demonstrations of their products. A very simple, very unassuming and particularly delicious appple cake, soft and moist all the way through. It was especially known for its creamy butter and sugar topping forming a tempting thin crust while baking. For years, I thought that was my favorite part of the cake. Now I know. Two slices with some creme fraiche is my favorite part!

When you are 5 or 6, saying that you would like the "Gateau 5-4-3-2-1" for "gouter" (4pm snack) is not only long but it does sound silly. However, it made it very easy to start baking with mom at an early age since the recipe went something like "5 spoons of flour, 4 spoons of sugar, 3 spoons of milk"…and so on. One bowl, one spoon, dry before wet, one apple, whip it all and bake.

Apple Cardamom Cakes


We made it so often in my family that it became much easier for everyone to call it the "Gateau Aux Pommes Tupp" (Tupp Apple Cake) and over the years to make it even shorter with a simple "Gateau Tupp". See, it works so much better to beg mom for it this way. This simple gateau became the one we would gather around during tea time on a cold and rainy day, the one that made any bad school day be forgotten in a few whisks of sugar. It solved a few arguments and mended broken hearts too.

Yes, my mom was a Tupperware® lady back in the 80s. She never played the sales game, but she loved to host parties for friends getting in the biz. That was her thing, the hosting. And the baking, the cooking, and passing around trays of items made with the brand’s products. Let’s face it mom, you also loved getting new stuff for the kitchen. To this day she is still very well stocked in containers, molds and measuring instruments of all sorts from the big T company.

Apples


It was very fortunate that my parents in law dropped off a basket full of apples from a recent visit to an orchard in North Carolina and I made a big dent in it baking a few of these cakes. In the end, the cakes are nothing like the original recipe. I made ours a tad less sweet and gluten free which is perfect here to keep the cakes moist, thus not following the original "5-4-3-2-1" formula. Then, there was the matter of the spoon measure called for in the original version. I don’t own such an instrument but I figured that since the company was American, a large spoon such as the one mom used had to be close to 1/4 cup. Yes, in this cake, precision to the gram has very little importance and that’s just what I need when swamped.

Now, if you’ll excuse me, it’s time for my daily slice…Or mini cake.

Apple Cake


Mom’s Tupp Apple Cake:

Notes: if you do not intend to make a gluten free cake, replace all the gluten free flours (rice, tapioca, sorghum) with 1 1/4 cups all purpose flour.
The cake bakes in two separate times: first for 10 minutes, the remove it from the oven to add the cream topping and bake for an additional 20 minutes.
I added cardamom just because it reminds me even more of my mom but you can skip that part or add cinnamon instead.

For the cake:
1/2 cup (80gr) sweet brown rice flour
1/4 cup (30gr) tapioca flour
1/2 cup (65gr) sorghum flour
1/2 cup (100gr) sugar
1 teaspoon ground cardamom
pinch of salt
1 teaspoon (5gr) baking powder
3/4 cup (190ml) whole milk
1/3 cup (80ml) oil
1 egg
2 apples, peeled, cored and thinly sliced (I like Granny Smith but any kind will do here)

For the topping:
5 1/2 tablespoons(80gr) unsalted butter, at room temperature
1/2 cup (100gr) sugar
1 egg
1 teaspoon vanilla extract

Prepare the cake:
Preheat the oven to 350F. Spray or butter the inside of a 9-inch round baking pan or several 3 to 4-inch baking pans if you want smaller cakes. Place them on a baking sheet and set aside.
In large mixing bowl, whisk together the flour, sugar, cardamom, salt and baking powder. Reserve. In another large bowl, whisk together the milk, oil and egg until just blended.
Slowly pour the liquids over the dry ingredients, whisking well to make sure that everything is well incorporated, about 40 to 50 strokes.
Pour the batter into the prepared pan(s) and arrange the apple slices on top in a circular pattern.

Prepare the topping:
In a medium bowl, whisk together the butter and sugar until fluffy. Add the egg and the vanilla extract and whisk until smooth. Reserve

Bake the cake(s) in the oven for 10 minutes. Remove the cake(s) from the oven and spread the creamy butter topping over the top(s). Bake an additional 20 minutes or until a skewer inserted near the center comes out clean.

Raspberry And Vanilla Dobos Torte With The Daring Bakers

Summer Dobos Torte


I realized as I was starting to write down the recipe for this post that it was actually my 550th post. Wow…That made me a little proud and left me slightly amazed at the same time! I think I even said "oh la vache!" (holy cow!). That’s a whole lot of stories, words, laughs, tears and just as much sugar, butter, flour and eggs! What could be more fitting to celebrate post #550 than a Daring Bakers Challenge? A very sweet and very rich one: a Dobos Torte.

I wrote last time that I hadn’t had an ounce of craving for chocolate lately and when I set out to make this challenge, things turned out just about the same. I looked at the recipe and could not chase the images of sweet sugared berries floating in my head. Or was it sugar made saber equipped raspberries fighting off little chocolate critters? Hmmmm…Still, not an ounce of chocolate was calling my name yet. Too hot, too humid and a fridge full of raspberries thanks to my mother – in – law who always buys for 8 when there are just the 2 of them.

Spatulating...


A Dobos Torte is traditionally a rich layer sponge cake layered with chocolate buttercream and topped with caramel pieces. I respected all the components of the challenge while changing things around a bit for a few reasons: the season, the plentitude of raspberries and mascarpone I had (mother – in – law again) and the weather.

I baked the sponge layers in a sheet pan, cut out disks in the cake to form several 3-inch cakes in dessert rings. I layered the disks with a super light (but rich) mascarpone mousse and fresh raspberries. For the buttercream, I kept a similar method as the one given by the hostesses and made vanilla bean Swiss meringue buttercream where the egg whites are heated on the stove prior to being whipped. On a side note, the specks you notice on the cakes are neither caused by a problem with your vision or your computer screen. It’s not dirt either as my 5 year-old neighbor thought earlier. It’s the pure goodness of a vanilla bean.

Summer Dobos Torte


I thought about that caramel topping long and hard and knew it was just not going to happen as it was written given our heat and humidity. I made pulled sugar ribbons because I could make just what I needed for the cake before they’d disintegrate in sugar puddles. Going back on previous posts, I realized there had been bubble caramel, caramel circles, caramel strands, caramel corkscrews, caramel window panes, caramel plates but never good old pulled sugar. Ah! No more! Here it is!

Before you say you will never ever do it because it’s caramel-and-oh-my-god-it’s-just-too-hard-because-it’s-caramel let me tell you why you could make it tomorrow and neither glue your entire kitchen nor burn all your pots and pans trying to get it to "the proper shade of amber". First, there is a high enough ratio of water to sugar for the liquid not to turn to caramel before you reach the desired temperature for pulled sugar. Then, your mission is NOT to let it turn color. You boil, add coloring or not, take it to a certain temperature, pour it off, let it cool a bit and start playing.

Summer Dobos Torte


See? One more cool pastry thing to try one quiet evening. Do not fear the sugar!

We loved this version and I have already bookmarked the original one given by our hostesses to make this Fall and Winter. Thank you ladies for hosting and to Lisa and Ivonne for being such incredible Daring Bakers Founders! There are plenty more Dobos Torte to be seen from around the globe here.

The August 2009 Daring Bakers' challenge was hosted by Angela of A Spoonful
of Sugar
and Lorraine of Not Quite Nigella. They chose the spectacular Dobos
Torte based on a recipe from Rick Rodgers' cookbook Kaffeehaus: Exquisite
Desserts from the Classic Caffés of Vienna, Budapest, and Prague.

Summer Dobos Torte

One year ago: Chocolate Eclairs with the Daring Bakers
Raspberry And Vanilla Dobos Torte:

Makes eight 3 – inch cakes

For the sponge cake layers
6 large eggs, separated, at room temperature
1 1/3 cups (162g) confectioner’s (icing) sugar, divided
1 teaspoon (5ml) vanilla extract
1 cup plus 2 tablespoons (112g) sifted cake flour
pinch of salt

For the mascarpone mousse:
For the mousse:
3 egg yolks
1/2 tablespoon powdered gelatin
1/2 cup (125ml) honey
3 oz (90gr) mascarpone, at room temperature
1 cup (250ml) heavy cream

For the buttercream:
1 cup (200gr) sugar
4 large egg whites
3 sticks (340gr) unsalted butter, at room temperature

Prepare the cake layers:
Position the racks in the top and centre thirds of the oven and heat to 400F (200C). Line a half sheet pan with parchment paper and spray lightly with cooking spray. Set aside.
Beat the egg yolks, 2/3 cup (81g) of the confectioner’s (icing) sugar, and the vanilla in a medium bowl with a mixer on high speed until the mixture is thick, pale yellow and forms a thick ribbon when the beaters are lifted a few inches above the batter, about 3 minutes. (You can do this step with a balloon whisk if you don’t have a mixer). In another bowl, using clean beaters, beat the egg whites until soft peaks form. Gradually beat in the remaining 2/3 cup (81g) of confectioner’s (icing)sugar until the whites form stiff, shiny peaks. Using a large rubber spatula, stir about 1/4 of the beaten whites into the egg yolk mixture, then fold in the remainder, leaving a few wisps of white visible. Combine the flour and salt. Sift half the flour over the eggs, and fold in; repeat with the remaining flour. Pour the batter into the prepared half sheet pan and bake for 8 to 10 minutes or until slightly brown.

Prepare the mousse:
Whisk the egg yolks to break them up in the bowl of stand mixer (or with hand held beaters).
Sprinkle the gelatin over 2 Tb of cold water in a small cup and let it bloom.
In a heavy saucepan set over medium high heat, bring the honey to a boil and cook until it reaches 240F. Remove the pan from the stove and pour it carefully into a cup with a spout (easier to pour) .
Dissolve the gelatin in the microwave for 10 seconds, or in a bowl set over a pan of simmering water.
While still whipping the yolks, slowly pour in the hot honey, being careful to temper them and not cook them. Pour the gelatin over the egg/honey and whip together for a few seconds and add the mascarpone, one tablespoon at a time. Whip until cooled to room temperature and has tripled in volume
In another bowl, whip the cream to soft peaks or if you are using a stand mixer, pour the mousse into a large bowl and clean the mixer bowl thoroughly, or use another mixer bowl if you have one. Gently fold the whipped cream into the mousse trying to deflate the whole thing as little as possible. Use immediately.

Prepare the buttercream:
Place the sugar and egg whites in a large heatproof bowl over a saucepan of simmering water and whisk constantly, keeping the mixture over the heat, until it feels hot to the touch, about 3 minutes. The sugar should be dissolved, and the mixture will look like marshmallow cream (temperature should be about 235-238F). Pour the mixture into the bowl of a stand mixer fitted with the whisk attachment and beat the meringue on medium speed until it cools and forms a thick shiny meringue, about 5 minutes. Switch to the paddle attachment and add the butter, one tablespoon at a time, beating until smooth. Once all the butter is in, beat in the buttercream on medium-high speed until it is thick and very smooth, 6-8 minutes. Proceed per recipe or store for up to a week in the fridge or 3 months (well wrapped in the freezer).

Assemble the cakes: like eight cake rings with rhodoid or plastic protector sleeves cut to fit (yes, like the ones in the office)and place them on a baking sheet. Place a cake round at the bottom, place a layer of raspberries on the outside, fill with mousse to the top of the raspberries, top with one round of cake, more mousse and a final round of cake. Place in the refrigerator and let set 2 hours or overnight. When the mousse is set, cover with the buttercream and refrigerate.

For the pulled sugar ribbons:
1 1/4 cup (250gr) sugar
100 ml water
1 teaspoon lemon juice
5-8 drops red food coloring

In a heavy saucepan set over high heat, bring the sugar and water to a boil (do not let it turn into caramel). Once it is boiling, add the lemon juice and coloring. Bring the syrup to 298F on a candy thermometer. Immediately pour the caramel onto a silicone mat. You might want to wear some pastry gloves at this point because the caramel is extremely hot. Little tip: I have found myself with not one glove in the tool box so I used a new pair of dishwashing gloves instead.
Let it harden until it is pliable and carefully start folding the mat back and forth onto itself to work the sugar mass a bit. Take small pieces of the mass and start pulling, twirling or even make rose petals and other flowers with it. Beware that pulled sugar cools as fast as it gets hot so if it becomes harder and harder to work with you have different options available. If you have a heat lamp, place the pulled sugar underneath until pliable again. If you are like me (sans heat lamp) you can either place the pulled sugar on the silicone mat on a baking sheet directly on the stove on low heat until pliable or in a low heated oven. Be careful and watch it carefully: it can turn into "real" caramel very fast this way so do not walk away while you reheat.

For My Birthday Girls: A Raspberry Rose Vanilla Cream Cake

Raspberry Rose Vanilla Birthday Cake


Two people I love are having a birthday this week and as much as I wanted to make something special for each of them, work decided to get in the way big time. Not complaining, just saying, and that’s why I am so late updating this week. Thus, I find myself asking them to share this Raspberry Rose Vanilla Cream Cake. I know they won’t mind because they already share so much. One is my wonderful mother and the other one is my (now) three year-old beautiful niece. Joyeux Anniversaire les filles!

It bugs me to say that I don’t see enough of my niece but a trip to France has not been quite feasible in the past couple of years. I do get to hear a lot about her and her personality through my mom’s reports and pictures my brother sends me. Her sister is just like me and she seems to be more like her dad. Oy! If they keep the ressemblance going, teenage years are going to suck for him big time because we were anything but pleasant to each other!!

Raspberry Rose Vanilla Birthday Cake


While I did make a batch of saffron macarons for my mother, (which we devoured for her, eheheh!) I wanted to find something they could both enjoy, albeit virtually. Not sure little C. is ready for saffron yet, although given how talented a cook my brother is, I would not be surprised!

My mother makes me think of apricots and lavender and she is as soft and delicious as a raspberry mousse tarts (Yes, my mom is delicious). My baby niece on the other hand makes me think of cream and vanilla. Soft as a rose too. A Raspberry Rose and Vanilla Bavarian Cream Cake!

The cake is composed of almond dacquoise slightly enhanced with a bit of rose water and layered with layers of jelled raspberry puree and vanilla bean scented bavarian cream. I added a simple lemon glaze on top to bring forth all the flavors. While it may look complicated and time consuming it is not, I assure you. I made the dacquoise and the raspberry layers one evening and the bavarian cream and assembly the next day. The only difficult part would be to resist the bavarian cream before it actually makes it into the cake!

Raspberry Rose Vanilla Birthday Cake


A year ago: Cashew Gateau With Coffee Cardamom Mousse

Raspberry Rose Vanilla Bavarian Cream Cake:

Serves 8 to 10


For the almond rose dacquoise:

1 1 /2 cups (160gr) almonds
1 cup (100gr) powdered sugar, unsifted
1/4 cup (30gr) all-purpose flour
6 egg whites
1/2 cup (100gr) granulated sugar
2 teaspoons rose water

For the raspberry layers:
2 tablespoons powdered gelatin
1/4 cup cold water
4 cups frozen raspberries
1/2 cup sugar

For the vanilla bavarian cream:
8 egg yolks
1/2 cup (100 gr) sugar
2 cups (500 ml) whole milk
1 vanilla bean
2 tablespoons powdered gelatin, sprinkled over 1/4 cup water
2 cups (500ml) heavy cream

Lemon glaze: (prepare once the cake is set)
1/4 cup (60ml) lemon juice
2 tablespoons (15gr) water
2 tablespoons (25gr) sugar
1 teaspoon powdered gelatin sprinkled over 2 teaspoons water

Prepare the dacquoise:

Preheat the oven to 350F and position a rack in the oven.
In a food processor, pulse the almonds and the powdered sugar together until finely ground. Sift the flour over the mix and reserve. In a stand mixer fitted with the whisk attachment, beat the eggs whites on medium speed until foamy. Gradually add the sugar while whipping the egg whites on high speed until stiff. Add the almond-flour mixture to the egg whites and fold gently with a spatula. Halfway through the process, add the rose water and continue to fold until smooth. Try to keep as much air as possible.
Line two quarter sheet pans with parchment paper, coast slightly with cooking spray and divide the batter among both pans and bake for 12 to 15 minutes, or until golden. Let cool. Inver the pans onto a cutting board and slowly peel off the parchment paper.

Prepare the raspberry layers:
Line two quarter sheet pans with parchment paper.
Sprinkle the gelatin over the cold water and reserve.
In a large saucepan set over medium low heat, bring the raspberrries and sugar to a simmer and cook until the berries are completely thawed and reduced to a puree (smash them down with a spoon if necessary) and the sugar is dissolved. Remove from the heat and add the gelatin, stirring until it completely dissoved in the raspberries. Pour over the prepared sheet pans. Let cool to room temperature and then freeze until firm.

Prepare the Bavarian cream:
In a large bowl, whisk the egg yolks with the sugar until very pale. In the meantime, in a large saucepan set over medium heat, bring the milk and the vanilla bean (split open and scraped over the milk) to a boil. Slowly pour the milk over the yolks, whisking constantly. Pour the mixture back into the saucepan over medium low heat and cook until the cream coats the back of a spoon (as if making creme anglaise). Remove the vanilla bean. Add the softened gelatin and stir until melted completely into the cream. Let cool to room temperature.
Whip the heavy cream to soft peaks and fold it into the cooled cream base. Use immediately.

Prepare the lemon glaze:
In a small saucepan set over medium high heat, bring the lemon juice, water and sugar to a simmer and cook until the sugar is dissolved and the liquid is hot. Remove from the heat and add the softened gelatin. Stir until it is completely dissolved. Let cool to room temperature.

To assemble:
Line a 8×8 or 9×9-inch sqaure baking pan with enough plastic wrap to have about 2 inches overhanging on all sides (easier to pick up to unmold once the cake is set). By all means, use a square frame if you have one instead and build your cake directly in the frame set on a sheet pan.
Cut one of the dacquoise to fit inside the cake pan and place it at the bottom. Remove the raspberry jelly from the freezer and cut a piece to fit inside the cake pan also. Place it on top of the dacquoise layer. Pour a little less than half of the bavarian cream on top of the raspberry layer (you want to keep a little bavarian for the very top layer). Repeat with a layer of dacquoise, a layer of raspberry jelly, a little less than the other half of the bavarian cream. Use the remaining cake cut outs to form a final layer of dacquoise. Smooth the remaining bavarian cream in one thin layer on top. Refrigerate the cake until completely set, about 2 to 4 hours or overnight. Once it is firm, spread the lemon glaze on top. Place the cake back in the fridge and let it set for about 30 minutes. Keep refrigerated until ready to serve. To plate, remove the cake from the pan by lifting all four corners of the plastic wrap and trim the edges.

Meyer Lemon Sorbet Baked Alaska

Lemon Sorbet Baked Alaska


It’s completely cliche but it’s always good to do as much as you can when you can so that when the unexpected strikes, you can let it ride and take a breather in a way. I started this post about Meyer Lemon Baked Alaska at the same time I was publishing the last one thinking I was just going to write down the recipe while it was fresh in my head and finish it later, probably on Monday or Tuesday. I should have listened to my brain screaming "Murphy’s Law" loud and clear while I turned on the radio instead.

Of course the unexpected happened. A spider found my right eye very appetizing one night and decided to have a go at it. I am allergic to spider bites. I know, it’s not a life threatening disease and the Earth did not shake when it happened, but eh! that’s my latest adventure!

When I mean "allergic" I am not exaggerating. Ask my friend Jen about the last time I got bit. We were emailing back and forth and I got back from walking the dog only to discover 30 minutes later that my ankle was 3 times its original size. I was home alone and she kept checking on me although it was getting late. She is the best emergency nursing blogger out there! You can imagine that when my eye saga started on Sunday, she was not really shocked to find out it was another spider bite: "aaaah, a spider bite. those little jerks. they LIKE you :)"…Nice.

Lemon Sorbet Baked Alaska


The eye doctor said that it was probably because my blood was pure sugar by now. If he was trying to score a box of macarons, he was seriously out of luck! So short of working/baking/typing/working, I was just enjoying digging my spoon in Meyer lemon sorbet in baked meringue goodness. At least my fingers weren’t busy thinking about rubbing my eye and I occupied them with another much more fun activity like eating. Nah! (no worries, it’s all getting better now)

I don’t usually make Baked Alaskas for us but a former patron asked if I could come up with a dessert for a small gathering of international students she was hosting. When someone hires me for an event, whether big or small, I do a little bit of research before suggesting a few options. Beside the total number of guests, I like to know about dietary restrictions, likes and dislikes and especially countries of origins and different cultures if any.

Why? I find that it brings a smile on people’s face a lot more times to eat something that makes them jump in a "Oh my! It’s been ages since I have had this". They also love to share with their neighbor or the whole table some family stories or cultural differences. This, to me is a job well done. No one just ate desserts but there were memories associated with it as well as the sharing of information and personalities. Listening to the person next to you is such a personal enrichment at the same time. I am a geeky research freak, what can I say?!

Lemon Sorbet Baked Alaska


So why, with a group of international students did I chose to make Baked Alaskas? Well, thanks to Wikipedia which pointed it out in better terms than I could: no one knows for sure its country of origin. China? Scandinavia? Norway? France? Perfect to serve to a multi national bunch of hungry students!


I went with lemon sorbet instead of ice cream because I knew the rest of the meal was rather on the heavy side (huge spread of small bites from all over the world). To keep homemade sorbet from getting icy and retain a velvety texture after a couple of days in the freezer, I add some simple syrup or honey to the base before churning it. Does its magic trick every time! The baking part of the meringue once each cake is covered with it can be done in the oven but it was pretty hot at my friend’s house that I used a blow torch instead of turning the heat a notch higher.

One year ago: Cassata Sicilian

Meyer Lemon Sorbet Baked Alaska:

Notes: prepare the cake and sorbet in advance as you will need to use the Italian meringue fairly quickly or it will tend to look "gritty" if applied later. You can apply the Italian meringue and freeze your cakes until ready to use your blow torch or oven (no longer than a day or two otherwise the Italian meringue has a tendency to start "liquifying").

Makes 8

For the lemon poppy seed cake base:

1 1/2 cups (185gr) all purpose flour
1 cup (200gr) sugar
1 tablespoon (14gr) baking powder
1/4 (1.5gr) teaspoon salt
1/2 cup egg whites (about 3-4)
3/4 (175ml) cup milk
1/4 cup (62.5ml) lemon juice
grated zest of one lemon
1 tablespoon (9gr) poppy seeds
2 oz (60gr) unsalted butter, melted and slightly cooled
2 oz (60gr) extra virgin olive oil (the fruitier the better)

For the Meyer lemon sorbet:
2 cups (500ml) freshly squeezed Meyer lemon juice (or regular)
1 cup (100gr) sugar
4 cups (1 liter)water
2 tablespoons mild honey

Prepare the cake base:
Preheat oven to 300F and position a rack on the center. In a bowl, combine all the dry ingredients for the cake. Set aside. In a separate bowl combine the egg whites and the milk. Make a well in the center of the flour mix and slowly add in the egg white mixture while stirring with a whisk. Add in the poppy seeds, the melted butter and oil. Mix with a whisk until smooth. Line a quarter sheet pan or a 9×13 inch pan with parchment paper, lightly spray with cooking spray and pour in the batter. Bake for 20 minutes or until a toothpick inserted in the center comes back clean. Let cool completely.

Prepare the Meyer lemon sorbet:
In a saucepan, combine the sugar and water and bring to a boil, stirring to dissolve the sugar. Add the honey and let cool to room temperature.
Pass the lemon juice through a sieve to remove the pulp and add it to the sugar syrup, stirring well to blend.
Pour into the container of an ice cream maker, and freeze according to the manufacturer’s instructions. Transfer to a container and freeze until firm before serving.

For the Italian Meringue frosting:
1 cup (200gr) sugar
2 tablespoons water
100gr egg whites (4 to 5)

Place the sugar and water in a heavy medium saucepan over high heat and let the sugar dissolve and boil to 238F. In the meantime, in the bowl of an electric mixer fitted with the whisk attachment, whip the egg whites to stiff peaks on medium speed. Once the sugar syrup is at the right temperature, slowly pour it over the beaten egg whites on medium-low speed. Increase the speed to high and let the meringue get glossy and completely cooled before using.

To assemble:

Cut out eight 3-inch rounds to fit your cake rings. Cut each cake round in half horizontally. Line 8 cake rings with parchment paper or rhodoid (pastry film, but cut sheet protectors work well too), and place one half cake base at the bottom. Place the cakes on baking tray. Fill each cake ring with about 1/2 cup of lemon sorbet and top with another round of cake. Freeze for at least 30 minutes before applying the meringue. When ready, unmold and frost with the meringue.
If you do the "baked" part in the oven: set your oven on broil at the highest setting and watch carefully.
If using a blow torch: well that’s easier but make sure to have a clear area to work with to prevent burning other things on your countertop (and this is experience speaking!).

Peach Chamomille Mousse Cakes

Peach Chamomille Mousse Cakes


There are times in your life when you need to pull out all the stops, set up a special table, make an extraordinary tasty meal and just twirl some caramel strands around pretty mousse cakes. When crap hits the fan outside of my comprehension I just try to deal with it the best way I can: doing the things I know, doing them with dedication and focus. Yes, like twirling caramel strands around Peach and Chamomille Mousse Cakes.

Granted, my normalcy may not be yours but we all deal differently with stress and incredible circumstances. You might set out to clean your closet or reorganize your files. B. takes the house on a vaccum marathon. I usually go to the dock, take a huge breath in and go home to try to find some way to reconnect and it always ends up with the kitchen counter covered in sugar and flour. I also forge ahead in the photography and writing projects I have (portfolio is up!) happy not to have a minute to think too much about the telephone ringing. (I did previously established that I had a weird sense of logic, didn’t I?!)

Peach Chamomille Mousse Cake


I have been quite open here in the past, sharing painful sentiments and emotions, bringing you to share with me the positive in rather difficult moments. But there are circumstances that only a handful of people (if that many) have been made aware of and I wish to keep for ourselves for now. Sorry to tell you that things are not always as they seem without elaborating but not having to formulate yet again things into words here is such a relief.

All day long we make plans, rationalize, explain, and I find peace knowing that I can come here and just hint at stuff and then tell you in the lightest manner possible to go bake a cake because things are prettier all wrapped up in sugar. Thank you for allowing me to do that. Being here with you and sharing what I am passionate about whether it be pastry, baking, photography, ingredients is one of the best part of the day. Thank you.

Peach Chamomille Mousse Cake


One thing I am passionate about when Spring comes around is going down to the farmer’s market and get all my produce fresh and at ridiculously low prices. Egss, raw milk, vegetables and fruits galore. Happy, happy! I got so excited the other day when I got the first local peaches of the season. Velvet skin, rich colors and intoxicating scent. Happier, happier!

With peaches this fresh and juicy in my basket, I could only think about making ice creams and mousse. I wanted to create something soft and subtle, something that makes you want to close your eyes and focus on what it is you are eating and not only just eating it. I made a simple lemon and olive oil cake for the base, opting for a grassy flavored oil to play up with the peaches. The two different mousses start with the same base, a pate a bombe for which I flavored the sugar syrup with a good handful of dried chamomille buds (organic, usually by the bulk teas), and added pureed peaches to half of the mousse base. You can simply refrigerate the cakes until set and enjoy them chilled or freeze them and let them soften a bit for 10-15 minutes. We had them both ways and enjoyed them equally.

Peach Chamomille Mousse Cakes


One year ago: Snickers Macarons

Peach Chamomille Mousse Cakes:

Makes four 3-inch cakes
Notes: I build these cakes in 3-inch wide entremet or mousse cake rings but you could build one single cake in a 8-inch round or 8×8-inch cake pan. Only the look will be different. Instead of using rhodoid to line the rings, (nothing against it, just did not have any on hand), I used a much less expensive medium: plastic proctector sheets (yes the ones used around the office to protect documents) and cut them to fit the inside of the rings.
I did brush the cake base with Limoncello but you can skip this step if you wish.

For the lemon olive oil cakes:
1 1/2 cups (185gr) all purpose flour
1 cup (200gr) sugar
1 tablespoon (14gr) baking powder
1/4 (1.5gr) teaspoon salt
1/2 cup egg whites (about 3-4)
3/4 (175ml) cup milk
1/4 cup (62.5ml) lemon juice
grated zest of one lemon
6 tablespoons (80gr) olive oil

For the chamomille and peach mousses:

1.5 tablespoons powdered gelatin
7 Tablespoons (130gr water), divided
2 cups (500 ml) heavy cream
6 egg yolks
1/2 cup (100 gr) sugar
2 tablespoons dried organic chamomille buds
3/4 to 1 cup peach puree (I process 2-3 cut peaches until finely pureed)

For the caramel decorations, please read here and here. I just twirled the caramel around a large tin can instead of a wooden spoon.

Prepare the cakes:
Preheat oven to 300F and position a rack in the center.
In a bowl, stir together all the dry ingredients for the cake. Set aside.
In a separate medium bowl, whisk the egg whites and the milk. Make a well in the center of the flour mix and slowly add in the egg white mixture while stirring with a whisk. Add lemon juice, zest and the olive oil. Mix with a whisk until smooth. Line a quarter sheet pan with parchment paper, lightly spray with cooking spray and pour in the batter. Bake for 20 minutes or until a toothpick inserted in the center comes back clean. Let cool and cut out four 3-inch rounds to fit your cake rings (extra cakes freeze well for up to 3 months). Line 4 cake rings with rhodoid or plastic sheets cut to fit and place your cake bases at the bottom. Place the rings on a baking tray and set aside.

Prepare the mousses:
In a small bowl, sprinkle the gelatin over 2 tablespoons of water and let stand while you prepare the pate a bombe.
In the bowl of a stand mixer fitted with the whisk attachment (or hand held beaters), beat the cream until it holds soft peaks. Chill it while you prepare the mousse base. Wash your bowl and whisk attachment.
In a heavy saucepan, stir together 5 tablespoons of water, sugar and chamomille buds. Bring to a boil over medium heat. Since you are not making caramel, it is ok to stir occasionally until the sugar is dissolved. Let it boil and bring the mixture to 238°F on thermometer (soft-ball stage). Strain the syrup to remove the chamomille over a container with a spout (makes it easier to pour over the egg yolks)
In the clean bowl of your mixer, still using the whisk attachment, beat the yolks slightly to break them up. Increase the speed to medium high and slowly pour the hot syrup over the yolks. Go fast enough to prevent the eggs from scrambling but not so fast that you end up with most of the syrup on the wall of the bowl or the whisk. Dissolve the gelatin in the microwave for 10-12 seconds and quickly add it to the pate a bombe. Continue to whip until the mass is completely cold and airy.
Fold about one third of the pate a bombe base into the chilled whipped cream to loosen it up and make it easier to incorporate homogeneously. Fold in the remaining pate a bombe.

Assemble: Divide the mixture in half and carefully fold the peach puree into one part. Spoon or pipe the chamomille mousse over the cake base and do the same with the peach mousse. Refrigerate or freeze until set.

Berry Mousse and Lemon Poppy Seed Cake Verrines

Berry Mousse - Lemon Poppy Seed Cake Verrines

"Whatcha making?" Bill asked when he stepped into the kitchen area on Sunday. "My birthday cake" I replied, scraping the last bit of batter onto a sheetpan. He then pointed at the two bowls filled with strawberries and blackberries, the couple of lemon and the bottle of Limoncello. "Yes, yes, yes…all those for my cake". His eyes lit up in anticipation and he left the room uttering "hmmhmmhmm".

A few hours later, he tried to sneak a peak into the refrigerator to see the final product and opened and closed the refrigerator door a couple of times. "Where is it? Are you done yet? I can’t see it!". I pulled out a tray of glasses and handed him a spoon. "It’s not a cake! Wait…I am sorry. It’s your birthday, I should have known better…"

Lemon poppy seed cake brushed with straight Limoncello and layered with strawberry and blackberry mousse. There is cake, there is cream and there is enough space to stick a candle in it. I am ready to celebrate!

Berry mousse - Lemon Poppy Seed Cake Verrines


Yes, it’s my birthday and since I like to make myself something I really want, it is most often one of three things (and sometimes all at once): it usually contains lemons, it must be small and preferably in a verrine (glass). The sound of spoons digging that last bit of dessert in the bottom of a ramekin or glass is music to my ears. It doesn’t mean the end. It means everybody reached the bottom and "cling-cling" wishes for more. Happy sound.

With the abundance of local strawberries and the hot days we have been having, I started craving something light and refreshing. Everyday I’ve also been getting wild blackberries from the woods across the street and my mere one cup harvest grew to a whopping 1 pound on Sunday morning. I don’t think the new neighbors have realized yet the treasure laying at their feet just a few yards away. I am already scheming blackberry pies, cobblers, sorbet and secretly wish they don’t figure out what I am doing in the morning, reaching down into the bushes. I want it all….I promise to share the results of my baking though. Promise. Yes, really!!

As I was eating my (early) birthday treat, I started thinking about Bea, Anita and Jeannette, also celebrating another year this month and Kate to-day! There is also one tiny person who now can be added to the list of May babies and that is Kristin's newest addition, Leah Katherine, born on Monday night. This dessert is for you all!

Berry Mousse - Lemon Poppy Seed Cake Verrines


One year ago: Lemon Meringue Cake with Lemon Ice Cream.Two years ago: Birthday Girls and a chocolate cake.

Berry Mousse and Lemon Poppy Seed Cake Verrines:

Makes enough for ten to twelve 6 to 8 oz ramekins or glasses

For the cake:
1 1/2 cups (185gr) all purpose flour
1 cup (200gr) sugar
1 tablespoon (14gr) baking powder
1/4 (1.5gr) teaspoon salt
1/2 cup egg whites (about 3-4)
3/4 (175ml) cup milk
1/4 cup (62.5ml) lemon juice
grated zest of one lemon
1 tablespoon (9gr) poppy seeds
1 stick (113gr) unsalted butter, melted and cooled

For the strawberry mousse:
2 teaspoons powdered gelatin
1 tablespoon water
8 oz (210gr) strawberries, pureed
1/4 cup (50gr) sugar
1/2 teaspoon lemon zest
1 tablespoon lemon juice
3/4 cup (6oz – 190ml) heavy cream

For the blackberry mousse:
2 teaspoons powdered gelatin
1 tablespoon water
8 oz (210gr) blackberries, pureed
1/4 cup (50gr) sugar
1/2 teaspoon lemon zest
1 tablespoon lemon juice
3/4 cup (6oz – 190ml) heavy cream

Limoncello

Prepare the cake: preheat oven to 300F. In a large bowl, stir together all the dry ingredients for the cake. Set aside. In a separate medium bowl stir together the egg whites and the milk. Make a well in the center of the flour mixture and slowly add in the egg white mixture while stirring with a whisk. Stir in the lemon juice, zest, the poppy seeds and the melted butter. Mix with a whisk until smooth. Line a quarter sheet pan with parchment paper, lightly spray with cooking spray and pour in the batter. Bake for 20 minutes or until a toothpick inserted in the center comes out clean. Let cool completely and cut out as many disks as you need to fit inside your ramekins or glasses.

Prepare the strawberry mousse: sprinkle the gelatin over the water in a small bowl and set aside to bloom (soften).
In a medium saucepan set over medium heat, stir together the strawberries and sugar just until hot. Add the gelatin and stir until it is completely melted. Let cool to room temperature. In the meantime, whip the heavy cream to soft peaks. Once the strawberries are at the right temperature, carefully fold the whipped cream into the fruit base.

Prepare the blackberry mousse the same way.

Assemble the verrines: brush Limoncello on each of the cake pieces or rounds that are going to be used in the glasses. Place a cake round at the bottom of the glass, top with blackberry mousse, one cake round, strawberry mousse, one cake round, blackberry mousse. Finish with more wipped cream if desired (I added lemon zest to mine).

Chocolate Mango And Coconut Cream Cake

Chocolate Coconut & Mango Entremet


When others were painting eggs for Easter last week, I was busy painting a cake. Well, applying brush strokes to a birthday cake would be a more accurate description. Carol and Fifi paint, very well I might add. I just fiddle with a pastry brush because I am short on time to come up with other things to decorate this delicious Chocolate Mango And Coconut Entremet Cake.

I know, I know, being short on time and making a multi layer cake does not seem right in the same sentence. Well, welcome to my logic! It’s true I am not the most logical person for "real life" things although I am improving with each year that passes. The only domain for which I am extremely logical is in the kitchen and with food. Do not ask why. And just in case you needed proof, let me tell you a little story…


I was about 10 or 11 and learning maths and how to solve logical problems starting such as "if train A leaves the station at 11.35 and train B…" and this was about as far as my brain would register. Two trains, two times, one station…oy! My favorite though was the "mantel problem" (yes, yes, I did say mental mantel). It always went something like "if your mantel measures x across by y across, how much fabric do you need to go around it, leaving k amount for the corners as well as the top and bottom" (or something like that). I would just stare at my dad and feel really sorry for it that I could not wrap my head around the solution. Did not make sense. Long minutes of complete silence during which I could hear my dad shoes start to tap the floor under the dining room table. Oh that awful feeling of letting him down…

Most time it would end in excruciating diagrams and long line of equations that burried me further into maths and logic oblivion. Until one fine day when my dad finally understood that if I were going to learn that kind of language, he would have to translate it into my own. Instead of lining that darn mantel piece with fabric, he proclaimed we would line it up with chocolate bars! Yeah!! I can relate to that! Within a few minutes, my eyes lit up and I could start to hear some big motion happening inside my head…I was on a roll…

Chocolate Coconut and Mango Entremet


We did have birthday over Easter weekend in the family and a request for a summery-tropical-beach cake. When I mentionned coconut as part of the cake layers, a few raised their hand in protest. Ah yes, I had forgotten we had "coconut shreds haters" in the family. No problem. No shreds anywhere, just plenty of coconut milk in the Bavarian cream would do. I had just the right amount of Alfonso mango puree leftover from the panna cottas I made recently so it got turned into a lovely and silky mousse and let’s not forget the usual suspects like flour, butter, eggs, cocoa.

When someone asks for a multi layer entremet cake for a birthday, my logic is to say yes even if work is busy because I know I can make the task easy by spreading the job over a couple of days without fretting. You can make the cake layers ahead of time and keep them well covered in the fridge or refrigerator. The mousses will set up rather fast so make them the day you are ready to put it all together. Since I can’t paint, I gave up on the idea of doing a beach scene on top and used some matcha dissolved in water to brush some strokes on top of the cake.

I was a bit worried of combining so many different layers into one cake but it actually worked perfectly! The coconut milk in the Bavarian cream gave it a very soft flavor and not at all artificial (no one likes to eat flavored SPF 50) while the mango finished up that lovely tropical theme. Since the cocoa genoise was a little too simple on its own, I added some rum flavored simple syrup to flavor it a bit. It was an adult affair anyway. See…I am logical after all!

Chocolate Coconut and Mango Entremet


Chocolate – Mango and Coconut Cream Cake Recipe:

Serves 10-12

For the vanilla genoise:
3 large eggs
3 large egg yolks
1 teaspoon (4gr) vanilla extract
pinch of salt
¾ cup (150gr) of sugar
½ cup (70gr) cake flour
¼ cup (30gr) cornstarch

Preheat the oven to 400F and set a rack in the middle.Lightly spray a 12×17 baking sheet with cooking spray or lightly brush with melted butter. Set aside
Whisk the eggs, egg yolks, vanilla, salt and sugar together in a large bowl over a pan of simmering water. Whisk gently until the mixture is just lukewarm, about 100F on a candy thermometer(or test with your finger – it should be warm to the touch).
Transfer the mixture to the bowl of a stand mixer fitter with the whisk attachment (or hand held beaters) and whip on medium-high speed until the egg mixture is cooled and tripled in volume. The mixture will be thick and will form a slowly dissolving ribbon falling back onto the bowl when the whisk is lifted.
Over a medium bowl or a piece of parchment paper, sift together the flour and cornstarch.
Add one-third of the flour mixture to the beaten egg mixture. Use a rubber spatula to fold in the flour mixture, making sure to scrape all the way to the bottom of the bowl to prevent the flour mixture from making lumps. Repeat with another third of the flour mixture and finally with the remainder.
Pour the batter into the prepared pan and smooth the top with an offset spatula.
Bake the genoise for about 10 to 12 minutes. Make sure the cake does not over bake and become too dry or it will not roll properly. Let cool on a rack. Remove the cake from the baking sheet and invert it on a larger piece of parchment paper. Peel of the parchment paper that was lining the baking sheet. Set the cake aside.

For the cocoa genoise:
Same process but replace the amount of cornstarch with the same amount in cocoa powder and proceed with the recipe the same way.

For the coconut Bavarian cream:
1 tablespoon (7gr) powdered gelatin
3 tablespoons water
4 egg yolks
1/4 cup (50 gr) sugar
1 cup (250 ml) coconut milk
1 cup (250ml) heavy cream, cold

In a small bol, sprinkle the gelatin over the water and let stand to soften while you prepare the cream.
In a large bowl, whisk the egg yolks with the sugar until very pale. In the meantime, in a medium large saucepan set over medium heat, bring the coconut milk to a simmer. Slowly pour the milk over the yolks, whisking constantly to prevent them from curdling. Pour the mixture back into the saucepan over medium low heat and cook until the cream coats the back of a spoon (as if making creme anglaise). Add the softened gelatin and stir until melted completely into the cream. Let cool to room temperature.
In a stand mixer fitted with the whisk attachment, whip the cream to soft peaks on medium speed and fold it into the cooled cream base. Use within one hour.

For the mango mousse:
1.5 teaspoons (3.5gr) powdered gelatin
1 tablespoon (15gr) water
4 oz (120gr) mango puree (to make your own, see here)
2 tablespoons (25gr) sugar
1/2 cup (125ml) heavy cream, cold

In a small bowl, sprinkle the gelatin over the water and let it soften while you prepare the fruit.
In a medium saucepan, bring the mango puree and sugar to a simmer. Remove from the heat and add the softened gelatin. Stir until the gelatin is completely melted.
Transfer the fruit puree to a large bowl and let it cool to room temperature.
In a stand mixer fitted with the whisk attachment, whip the cream on medium speed until soft peaks form. Fold about 1/3 of the whipped cream into the fruit puree to lighten it up (do not worry about losing air at this point). Carefully fold in the rest of the whipped cream. Use within one hour.

Rum simple syrup:
1/2 cup (125ml)water
1/4 cup (50gr) sugar
2 tablespoons (30gr) rum

In a small saucepan set over medium high heat, bring all the ingredients to a simmer until the sugar dissolves, stirring occasionally. Let cool to room temperature.

Lemon glaze:
1.5 teaspoons (3.5gr) powdered gelatin
1 tablespoon (15gr)water
1/4 cup (62.5ml) water
1/4 cup (62.5ml) lemon juice
2 tablespoons (25gr) sugar

In a small bowl, sprinkle the gelatin over the water and let it soften.
In small saucepan set over medium high heat, bring the water, lemon juice and sugar to a simmer, stirring off and on to make sure the sugar dissolves properly. Add the gelatin and stir until completely dissolved. Let cool to room temperature (if the mixture gels, warm up over low heat until barely melted again).

To assemble:
Line an 8×8 baking pan with parchment paper of foil, leaving a border on the sides to make it easy to remove when set. You can also use a cake frame of the same dimensions.
Cut two 8×8 cake layers in each of the genoises. Place one layer of the chocolate genoise at the bottom of your pan and brush with some rum syrup. Pour half the coconut Bavarian on top and smooth with an offset spatula. Top with a layer of vanilla genoise, brush some rum syrup on top. Pour half the mango mousse and smooth with an offset spatula. Repeat the process with the second half of cakes and creams. Refrigerate until set. Pour the lemon glaze over the cake and let set in the fridge.
Cut through the cake with a knife dipped in hot water to prevent breaking the glaze instead of slicing through it.