
buttermilk

Braised Artichokes With Olives & Feta, a Lavender Buttermilk Tart & A Cookbook Giveaway!

Baked Artichoke Hearts With Olives & Feta


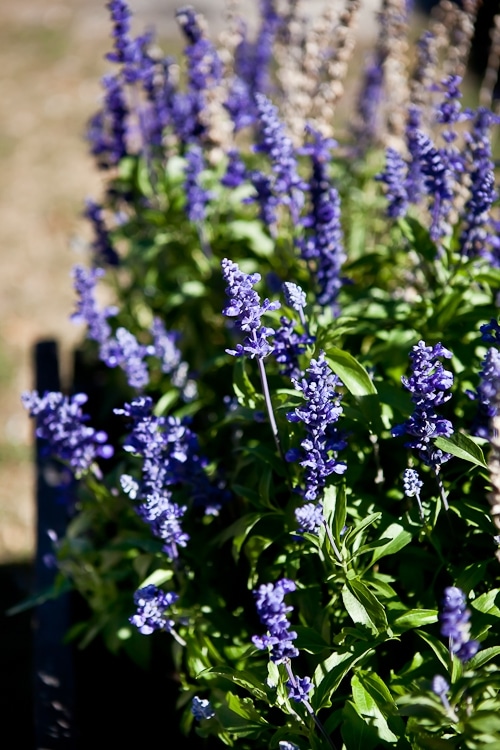
I’ve had the chance to travel to the West coast and back twice in the last couple of weeks and twice I had high hopes of experiencing some lower, nice Fall-ish temperatures. I was ready. Sweaters picked. Scarves tied up to my purse. Instead, it was tank top and summer dressed that ended up in my suitcase. It felt exactly like what October is here in the South. A soft stroke of the sun, a lull of breeze in the trees. A delicious moment.

Since we never really get a transition between seasons, it’s always a bit difficult to feel in an autumnal mood with food and recipes. I do, however, like to get in the kitchen and try to conjure up some wicked good Fall recipes whenever possible. It most often involves roasting, slow simmers, braising. Warmth and aromas filling the house with the comfort of nostalgia and the promise of another season ahead. Yes, it does make me mellow.

Artichokes


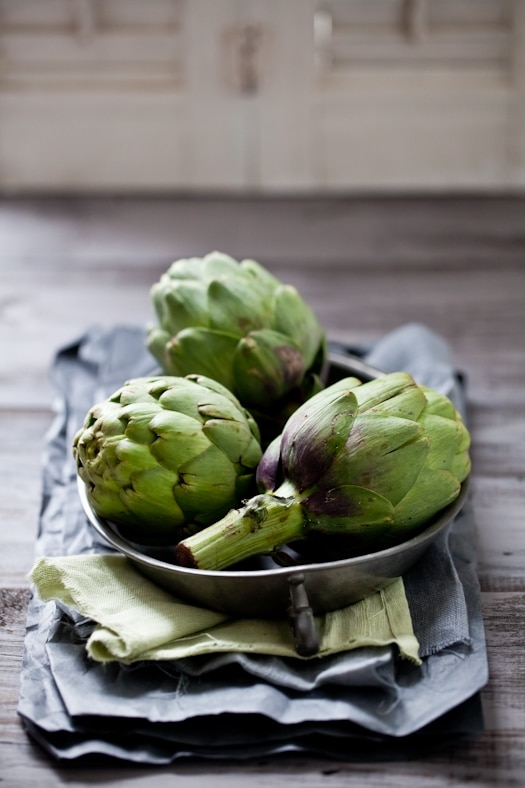
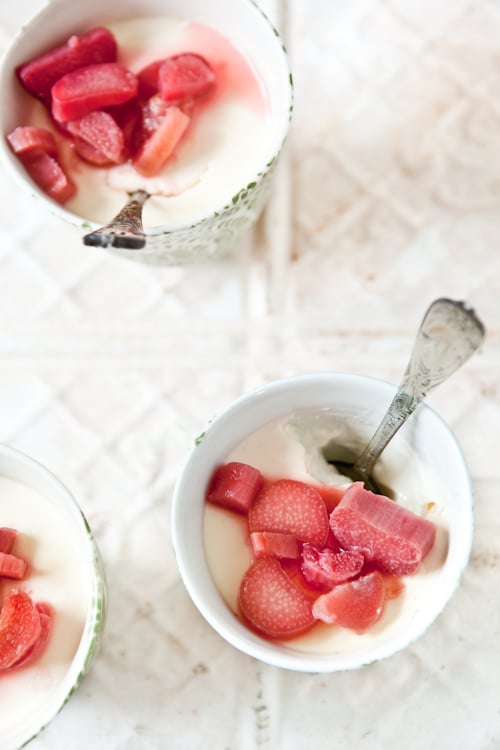
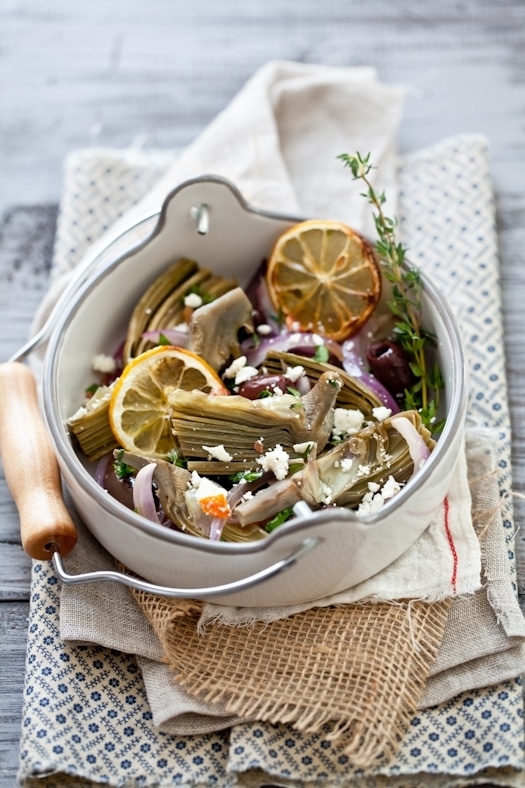
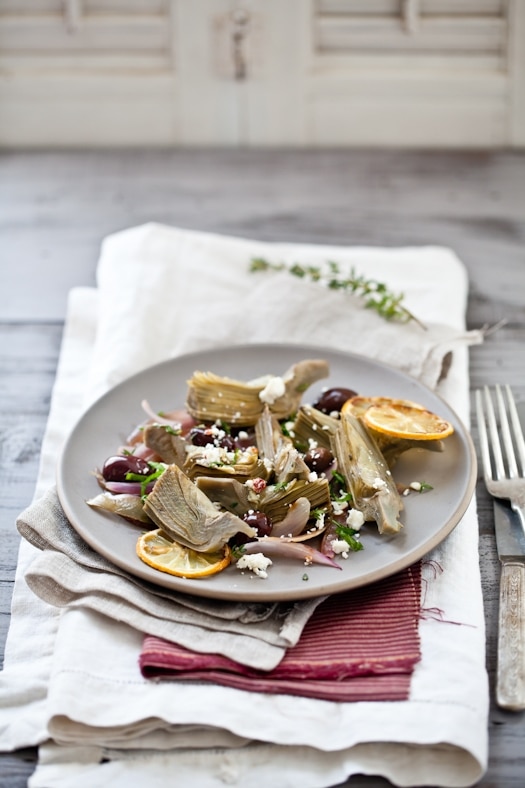
One of the dishes I made recently that really invoked Fall as I knew it back home was artichokes, braised with plenty of onions, lemon, olives, thyme and feta. I did not vary much, if at all, from the original recipe I found in a magazine my mom sent me. I usually ad lib the recipes I read but this one was too intriguing to pass up.

When it comes to artichokes, we usually fix them two ways: steamed ad served with vinaigrette to dip or barigoule (barigoule is the name of a certain kind of mushroom in Provence by the way). We had this with sauteed scallops one night which turned out to be a perfect match. Hearty and light. Not quite Summer anymore and not yet Fall either.

Baked Artichoke Hearts With Olives & Feta


I made the artichoke dish the evening before a trip to Portland last week and fully expected to have some leftover for B. to warm up while I was gone but we almost polished the entire thing with our dinner companions that evening.

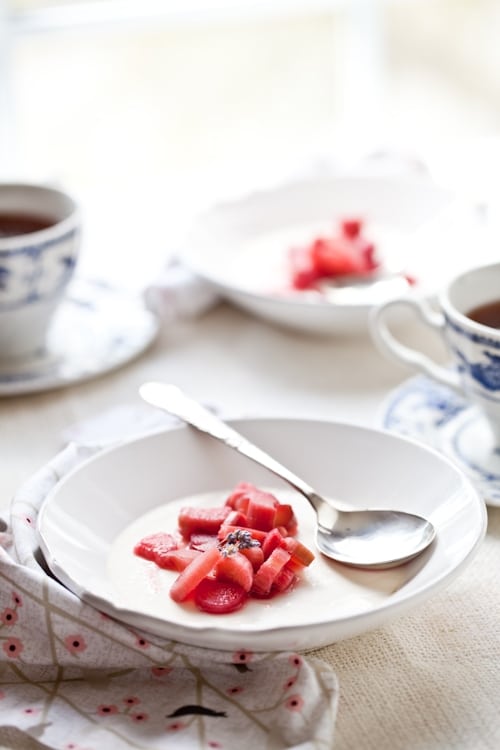
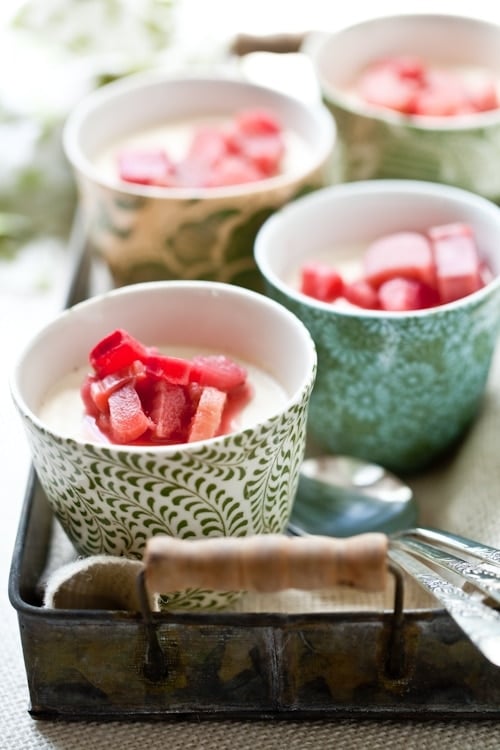
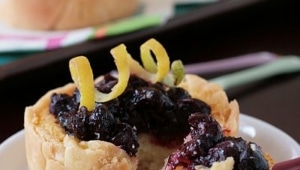
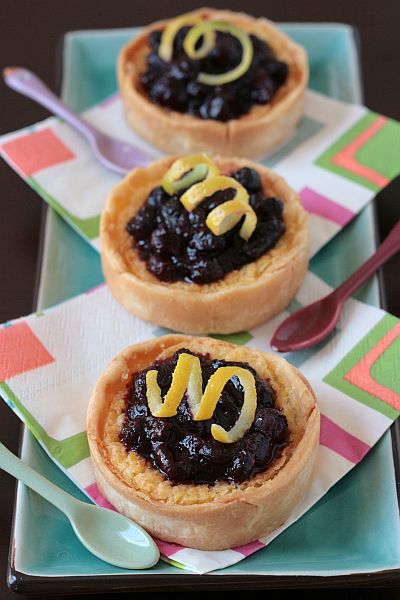
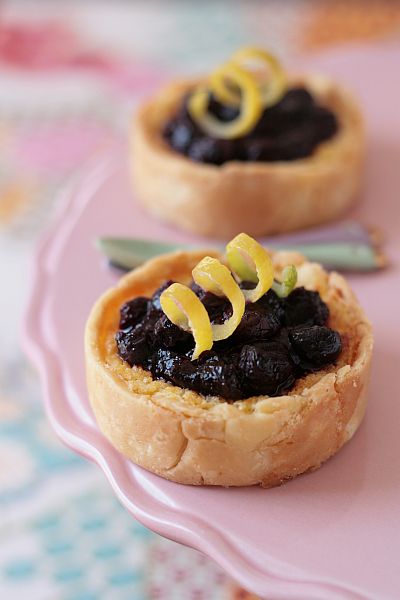
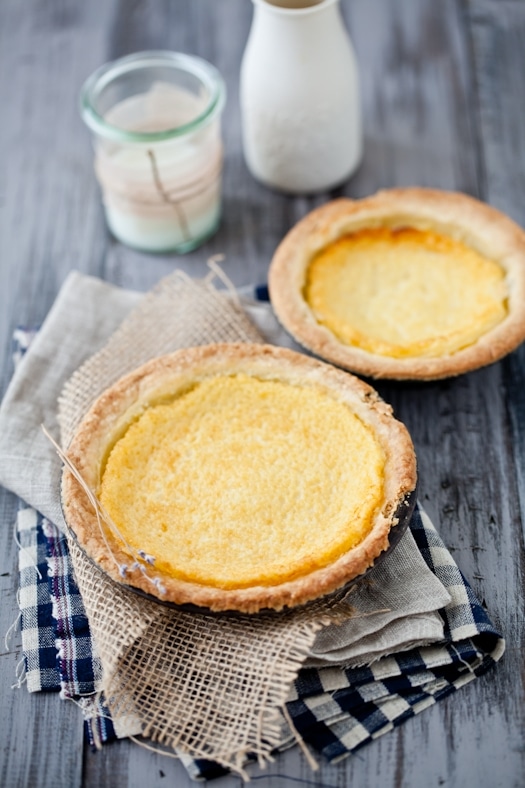
Tonight, I prepared a Lavender and Buttermilk Tart for tomorrow’s dinner, right on the eve of my departure for New Hampshire. I am teaching two food photography and styling workshops at the bi-annual creative retreat Squam Art Workshops. I like for Bill to have a little something sweet while I am gone. In moderation right now because I’m pretty much here and gone for another couple of months for various work projects.

Lavender & Buttermilk Pie


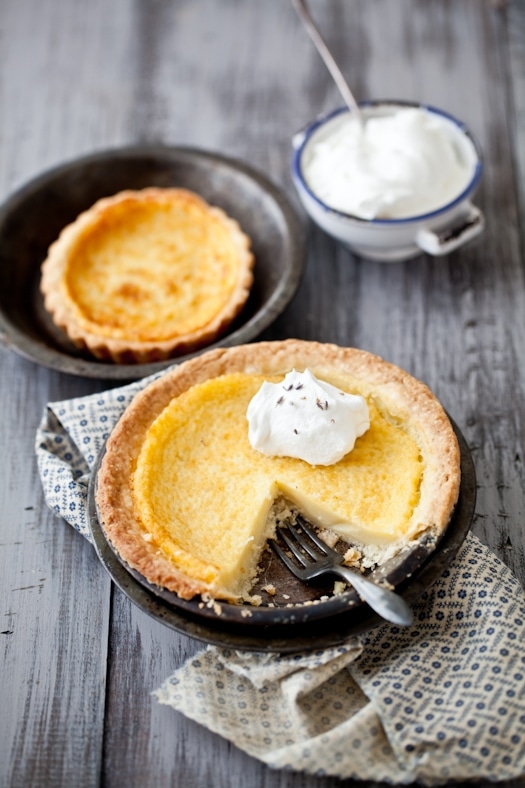
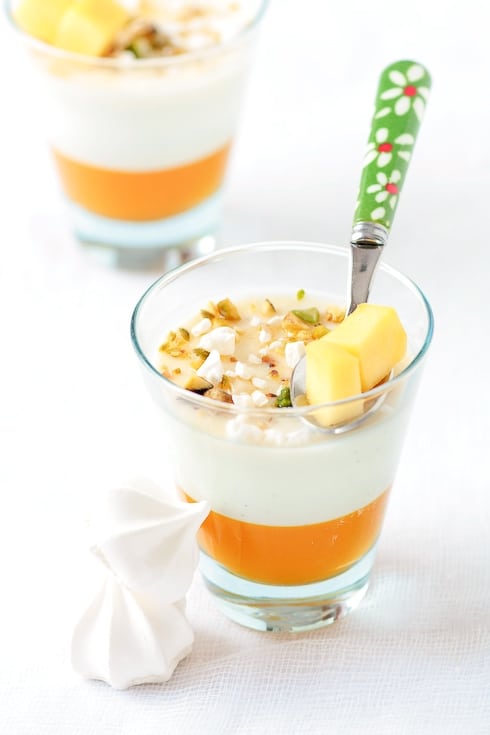
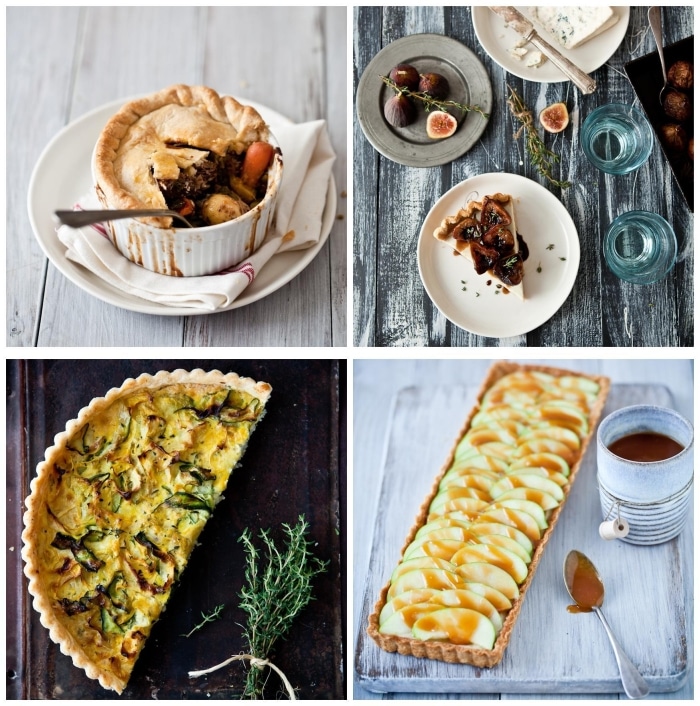
The tart is from Holly Herrick's newly released "Tart Love: Sassy, Savory and Sweet" and for which I was honored to be commissioned to do the photography. I must tell you why I dig this book so much. Beside the fact that I am thrilled of the work that the designer and publisher did with the photos and lay out, I am completely enamored with all the recipes in this book. Holly is not only a prolific recipe writer but a darn good one to boot. Her flavor combination were at times intriguing but always spot on and a sure success. Trust her to know what flavors and tastes work together and in what quantity.

The woman is an amazing chef. Her pastry crust is flaky, rich, easy to make and easy to roll and re-roll without ending with rubber. The recipes are creative, fun and quirky at times: Feisty Shrimp & Grits Pockets, Salad Nicoise Tart, Raspberry Creme Brulee Tartlets, Butterscotch & Caramel Apple Tarts. I love her titles as much as I love that Holly’s personality and love of seasonal produce comes through each recipe.

Lavande


I could talk about the tarts in this book for hours. I loved making all of them as much as I loved photographing them. Whether you are a novice or an advanced cook, you will find more than ten tarts you can start baking right from the start. Seriously. If you are nervous about making a tart crust, Holly takes you through each step with care and ease. If you wish you had more interesting or just some new/other tart fillings in your repertoire, this is also the book for you.

Trust me. I just received my "official" copy the other day and I have rediscovered, with great excitement, recipes I had cooked just a year ago. I am thrilled to give away two copies of Holly’s book, Tart Love. Fresh from the press, tested, tasted and approved by yours truly. And my husband and about everyone in the neighborhood when I was done taking the tarts mug shots, ahah!

Tart Love

Photos from Tart Love: Sassy, Savory and Sweet. © Helene Dujardin 2011

All you have to do to enter the giveaway is to:
– leave a comment at the end of this post. One entry per person, duplicates will be rejected and anonymous will not be accepted (unless you are my mother, but she knows better…!)
– Please allow 48 hours for your comment to be moderated and to show up on the blog as I will be traveling this week.
– The giveaway will close Sunday September 18th 2011, at midnight Eastern time

Keep your eyes peeled for other reviews and giveaway of the book as some bloggers have graciously offered to take it on a virtual launch tour! Could not be more excited for Holly to give her hard work the recognition it deserves.

Lavender & Buttermilk Pie


Braised Artichokes With Onion, Olives & Thyme, barely adapted from Saveurs (France)

Serves 6

Ingredients:
2 lemons
6 baby artichokes
1 1/2 tablespoons olive oil, divided
1 red onion, sliced
1/2 cup white wine or stock (vegetable or chicken)
1/2 cup Kalamata olives, pitted
1/2 cup feta cheese, crumbled
6 sprigs of thyme, chopped
1 teaspoon vinegar

Directions:
Turn the oven to broiler setting. Slice one of the lemons horizontally and spread the slices on a baking sheet line with parchment paper. Place under the broiler until the lemons turn a bit dark on the edges. Remove from the oven and let cool.
Fill a large bowl with water and the juice of the remaining lemon. Cut the top of the artichokes and remove the outer leaves almost down to the core (only the softer leaves should remain). Save the leaves to steam later and snack on if desired.
Cut the artichokes in half and clean the inside of that fuzzy part (in France, we call this the "hay"). Cut each half once more and place each quarter immediately in the lemon water to prevent oxidation.
Heat up one tablespoon of olive oil in a large sauteeing pan and cook the onion for about 5 minutes, until tender.
Add the artichokes to the pan, the white wine (or stock) and the same amount of water (1/2 cup). Season with salt and pepper according to your preference. Cover with a lid and cook for 30 minutes. Remove the lid and cook another 10 minutes. Let cool completely.
Place the artichokes and onions on serving plate, randomly add olives, feta cheese, lemon slices and chopped thyme. Drizzle with 1/2 tablespoon of olive oil and the vinegar. Check the salt and pepper if necessary.

——————————————————————————-

Lavender & Buttermilk Tart, adapted with permission from Holly Herrick’s Tart Love: Sassy, Savory and Sweet.

(Serves 6 to 8)

Tart Crust:
2 1/4 cups White Lily all-purpose flour (or other brand if White Lilly is not available)
1/4 cup granulated sugar
pinch of sea salt or kosher salt
2 sticks (1 cup) unsalted butter, cold and cut into 1/4-inch cubes
3 tablespoons ice-cold water, or just enough to hold the pastry together

At least 30 minutes before rolling and baking (or up to one day in advance), prepare the pastry. In the bowl of a food processor fitted with a plastic blade, pulse together the flour, sugar and salt. Add the butter and pulse rapidly, 40 – 50 times, or until the butter is blended into the flour and is coarse and the butter is the size of small peas. Gradually, add the water in a small trickle, with the processor running. Continue adding just as the pastry starts coming together in the shape of a loose, crumbly ball. Turn out onto a lightly floured surface. Form into a disc, about 1″ high, and wrap tightly with plastic wrap. Refrigerate at least 30 minutes or overnight.

1 egg wash – yolk, pinch salt, splash water, blended together

For the lavender infused buttermilk:
1 1/2 cups buttermilk
1/2 cup whole cream
1 tablespoon dried lavender flowers or lavender leaves (available at most gourmet specialty stores and some groceries)

For the custard dry ingredients:
1/4 cup flour
3/4 cup sugar
1/4 teaspoon kosher or sea salt

For the custard wet ingredients:
3 large eggs
6 tablespoons sweet butter, melted
1 teaspoon best-quality vanilla extract

Prepare tart crust. Chill 30 minutes (or overnight), and roll out into your preferred tart pan, creating a little border above the rim of the pan itself. Chill 20 – 30 minutes.
Preheat the oven to 375F. Place the prepared shell on a baking pan and partially blind bake the pastry by placing a piece of parchment paper on the bottom crust, filling it with dried beans or pie weight and baking for about 10 -15 minutes. Let cool and remove weights and paper. Brush down the pastry with the egg wash, and return to the oven to finish baking until golden brown, another 10 minutes. Remove the pre-baked shell from the oven and reduce the oven temperature to 350F. Allow the shell to cool slightly at room temperature.

Meanwhile, infuse the buttermilk with the lavender. Combine the buttermilk, cream and lavender flowers in a saucepan, whisking to combine. Turn the heat on high and bring up to a low boil, reduce the heat to medium low and simmer gently for 10 minutes. Remove from the heat and set aside to steep five minutes. Using a fine sieve, strain the infused buttermilk into a medium bowl and refrigerate to cool.

Meanwhile, in a large bowl, whisk together the dry ingredients (flour, sugar and salt), whisking to combine. In a medium bowl, combine the wet ingredients. Whisk the eggs for one minute until light and lemon-colored and fluffy. Whisk in the butter and vanilla. When the buttermilk has cooled to body-temperature or cooler, it’s time to add it to the wet mixture, slowly streaming into the egg mixture and whisking to combine. To finish the custard, stream the milk/egg mixture into the dry ingredients mixture, whisking constantly. Pour the custard into the prepared tart shell. Bake 35 minutes or until the custard has browned to a light tan and the custard still quivers to the touch. Remove from oven and cool for at least one hour before slicing.

Lavender Panna Cotta With Poached Rhubarb

Lavender Panna Cotta With Poached Rhubarb


There are very few things that say Spring to me like a few stalks of rhubarb do. I am not alone sharing that sentiment just from seeing all the rhubarb recipes posted by fellow bloggers out there. That makes me happy. I do have a little love affair with "la rhubarbe" each year.

This complex, fibrous and tart plant is probably one I remember the most vividly about my childhood. I literally grew up on that stuff every Spring and Summer. I can’t recall a sunny day without my mother compote de rhubarbe or a vacation without my grandmother tarte a la rhubarbe.

Lavender Panna Cotta With Poached Rhubarb


I got an early start on my rhubarb baking (crumbles) when I got giddy finding hothouse cultivated rhubarb. But last week’s venture to the farmers market with my parents was a success with a bunch pretty stalks of wild rhubarb making their way into our basket.

I really wanted to use it before their return to France and thought that a go at rhubarb sorbet would be a good one to whirl but we did not have nearly enough. I was going to acquiesce to my mother stewed rhubarb but I knew B. would never put a dent in it. The mushy texture of stewed rhubarb is something the man cannot stand. I like it on plain yogurt or fromage blanc.

Lavender Panna Cotta With Poached Rhubarb


As much as I wanted to make my grandmother’s rhubarb tart it would have to wait until I am completely happy with the results. There was one elusive whiff of a scent whenever she’d pull hers out of the oven and I have yet to nail it down but I am getting close. Ha!

In the meantime, I made one of the desserts I knew would make everyone happy, Lavender Panna Cotta with Poached Rhubarb.

There is something about lavender that I can’t never grow tired of. I grew up in Provence, surrounded by lavender and mimosa. One look at a lavender bud and I feel like I am six again. Once the scent hits my nose I can almost hear the cicadas in the background and my mom yelling from the patio to get down from the apricot tree. Yes, it was a rather idyllic upbringing. One I wish to share with B. when we move back home eventually one day in our old age.

Lavender Panna Cotta With Poached Rhubarb


Beside sorbet, this is one of our favorite ways to eat rhubarb, gently poached in lemon juice and a touch of honey until barely fork tender to preserve most of the texture that would be lost otherwise. The contrast with the silky panna cotta both in texture and flavor elicited lots of oohs and ahhs from the table the other day. Lots of fidgeting and eying the kitchen for second too!

I had made more panna cotta and had gotten some more rhubarb ready to be chopped and poached for when Tami came to visit but we never got around to it. Too much fun was being had on the town. The house was so quiet after a month of visitors that both B. and I were glad to have a couple of these to dig into to chase the blues away.

Lavender Panna Cotta With Poached Rhubarb


By the way….if you are in Charleston this week, do not miss Cabaret at the Sottile Theater. Great cast, great performances! And I am not just saying that because B. plays in the orchestra (although I am kind of very proud he is!)

Green cups: Anthropologie
Low bowls: Anthropologie
Blue tea cups: vintage gift from
Tami
Tray: vintage find
napkins: remnant pack from
Cicada studio


Lavender Panna Cotta with Poached Rhubarb

Serves 4-6

For the panna cotta:
1 tablespoon powdered gelatin (2 sheets gelatin)
1/4 cup water
2 cups heavy cream
1/4 cup honey
1 tablespoon edible lavender buds
2 cups full fat buttermilk

For the poached rhubarb:
Juice of one lemon
1/2 cup water or sweet white wine or blush wine
2 tablespoons honey
5 stalks rhubarb, chopped into small pieces (1/2 inch)

Prepare the panna cotta:
Place the water in small bowl and sprinkle the gelatin over it. Reserve.
In a large heavy bottomed saucepan placed over medium heat, bring the heavy cream, honey and lavender buds to a simmer. When the cream is hot, remove from the heat and whisk in the reserved gelatin until it is completely dissolved. Add the buttermilk and whisk until well blended.
Divide the mixture among 4-6 cups or ramekins. Let stand at room temperature for 20 minutes and then refrigerate for at least 4 hours before serving to let the cream set properly. Top with the poached rhubarb just before serving.

Prepare the rhubarb:
Place the lemon juice, water (or wine) and honey in a heavy bottom saucepan over high heat. Bring to a boil and add the pieces of rhubarb. Poach for 2-3 minutes then gently remove the rhubarb from the poaching liquid and set aside (they will continue to soften as they cool). You can reduce the poaching liquid to a syrup over medium heat and use to drizzle over the panna cotta, it’s fantastic.

————————————————————————————-

Le P’tit Coin Francais:

Pour les panna cotta:
2 feuilles de gelatin
1 verre d’eau
500ml de creme liquide
60ml de miel
1 cs de lavende
500ml de lait ribot (babeurre)

Pour la rhubarbe:
5 tiges de rhubarbe, coupees en des
jus d’un citron
250ml d’eau ou de vin blanc sucre ou de rose
2 cs de miel

Preparer les panna cotta:
Mettre la gelatine a ramollir dans l’eau.
Dans une casserole a fond epais, chauffer la creme avec le miel et la lavende jusqu’a fremissement. Hors du feu, ajouter la gelatine refroidie et bien melanger pour qu’elle fonde. Ajouter le lait ribot et bien melanger de nouveau.
Verser dans des coupes ou des ramequins et laisser refroidir a temperature ambiante pendant 20 minutes. Placer ensuite au refrigerateur de preference 2 a 4 heures.

Pour la rhubarbe pochee:
Porter a ebulition le jus de citon, miel et eau (ou vin) a chauffer dans une grande casserole. Ajouter la rhubarbe et faire pocher 2-3 minutes. Prelevez les morceaux du liquide et mettre de cote. Reduire le liquide de pochage de moitie et verser sur les panna cotta avec la rhubarbe.

Mango & Vanilla Bean Buttermilk Panna Cottas

Mango and Vanilla Bean Buttermilk Panna Cotta


Interesting how even past 30 years old I still want mommy when I spike a fever and walk around with a box of tissues. Wondering why I never catch a 24 hour bug or never lose my appetite when sick. Sad to see my parents leave after such good times. Amusing to see the dogs go back and forth between both bedrooms looking for them. Funny how little mishaps can turn into creamy deliciousness like these Mango And Vanilla Bean Buttermilk Panna Cottas.

The morning of my parents' departure, my father and I were up before anyone else as usual. We were reminiscing about the last few weeks spent together. We like to talk food while preparing meals. Surprise, surprise! When we were kids, my father taught us how to crack and juice a coconut, introduced us to the wonders of papaya simply sprinkled with lime juice, cooked the most fabulous Osso Bucco or rice pilaf. I guess he will be my other guest blogger when they come back!

This past Sunday morning, the conversation fell on the wonderful meal my dear friend Bina prepared the last time we visited her and her family. After taking me to the Indian market so I could stock up on my usual and new favorites, she also sent me home with a whopping big can of Alfonso mango puree. We were happily surprised to find out that it was the same kind we would scout at the exotic market when I was a kid. We kept dipping our spoons in the can while getting breakfast ready. I poured some of the puree in 4 glasses for everybody to have a taste and proceeded to make breakfast.

Mango&Vanilla Bean Buttermilk Panna Cotta


We decided to send them off with a hearty good old American breakfast and I decided to use the last bit of buttermilk I had to make pancakes. I went ahead and whisked buttermilk, vanilla bean seeds, sugar. I am not sure what exactly went array after that or when it did. Pressing needs of sleepy puppies, checking and re-checking and nothing had been left out of the suitcases, phone calls to and from relatives and friends,… I stood over the stove, poured some batter in the pan and turned around. Two minutes later, I heard "Aren’t pancakes similar to crepes?" …Hmmm…Yes they could be instead of the gunky burnt mess that was in the frying pan. I had forgotten the eggs and flour.

"Oh dear…I am losing my mind!"…I looked at my parents and pulled out the croissants and toasts. Not much time left to fix anything, finally get in the shower and leave for the airport. I could feel my dad travelling nerves getting sharper by the minute but I hated to waste a vanilla bean anything. Panna Cottas quickly came to mind. I bloomed some gelatin in water, froze everybody’s glass of pureed mango and heated up some cream and the vanilla infused buttermilk. Why freeze the fruit? I wanted clean layers for the fruit and panna cotta and once frozen you can easily pour your cream base without it falling straight to the bottom of the puree because of its heavier weight. It also quickens the setting process of the panna cottas but alas it was high time we left for the airport.

So here we are now, parents sound and safe in France and us with two extra Panna Cottas. I served them with little Swiss meringue cookies (same as in Floating Island but piped and baked on a sheetpan) and chopped pistachios. They are so good I wish I could share with you!

Note: I am aware of the pistachio recall here in the States and I am keeping up with the grower involved. Mine were from another farm but please check your stashes and sources.

Mango and Vanilla Bean Buttermilk Panna Cotta


Mango And Vanilla Bean Buttermilk Panna Cottas:

Serves 4

Kitchen Note: for the recipe I used one cup (250ml) of canned mango puree which I know is not available everywhere. According to the National Mango Board, you would need 2 medium sized mango to obtain one cup of puree. You can substitute with any soft fruit reduced to a puree like apricot, peach, pear, etc…

1 cup (250ml) mango puree
1 tablespoon (15gr) water
1 3/4 teaspoons (4gr) powdered gelatin
1 vanilla bean
1 cup (250ml) heavy cream
1/4 cup (50gr) sugar
1 cup (250ml) whole buttermilk

Divide the mango puree evenly among 4 glasses or ramekins.
Place the water in a small ramekin and sprinkle the gelatin over it. Let it bloom while you prepare the cream.
On a flat surface, cut the vanilla bean in half lengthwise without cutting all the way through. With a pairing knife, scrape the seeds from the pods. Set aside.
In a medium saucepan, heat the heavy cream with the sugar and vanilla bean seeds until the cream is just about to boil, stirring occasionally to make sure the sugar dissolves completely. Remove from the heat and stir in the gelatin until it is completely melted. Let cool for about 10 minutes and add the buttermilk. Let cool to room temperature. You can speed up the process by placing your saucepan over a bowl filled with ice but keep and eye on it as it will thicken faster. Once the cream is cooled, slowly pour it over the frozen fruit and let set in the fridge, at least two hours, preferably overnight.
Serve with chopped pistachios and meringue cookies if desired.

Sweet Melissa Lemon Blueberry Buttermilk Pie & Winners


Not only does Melissa Murphy’s latest book satisfies my cravings for bakery sweets but it also fulfills my love for all things citrusy. I wish I could show you how good her Lemon Squares are but I am afraid I only have the crumbs on our plates to show for it as they were devoured faster than I could take a picture. I had to hide the Lemon Blueberry Tartlets pictured to avoid the same "problem" (eating is never a problem in our neighborhood). I bookmarked the original recipe Lemon Blueberry Pie the first time I flipped through the book for plenty of delicious reasons: it had lemon, buttermilk, blueberries (the freezer is stock full of them) and I could make minis for a dinner party. They lasted for about 5 minutes and then our guests asked to come back next week for another try-out from the book (Chocolate Raspberry Truffle Torte anyone?)

Before I give you the recipe, I know you are awaiting to read if your name got pick to receive one of the 5 copies the publishers were giving away and this is great news for the winners. Thank you all for your participation, I know Melissa must be thrilled about it! I have got even more good news for the 250-ish of you who showed up for the event….keep on reading…..

I need the following people to send me their mailing address at mytartelette(@)gmail(dot)com so we can get the books on their way to ya’ll’s kitchen!
Congratulations to:
– Steph from Stephanie’s Kitchen
– The Coffee Snob from Eat and Be Happy
– Merav from A Tasteful Journey
– Kevin from Closet Cooking
– Ginny from Just Get Floury

The good news? Ariela from Baking and Books is also holding a giveaway for another 5 copies!! So…if your name did not get picked this time around, run to her blog and put your name in the hat once more! Who knows?!

Lemon Blueberry Buttermilk Pie
Reprinted with permission from The Sweet Melissa Baking Book by Melissa Murphy.

Blueberries really need to be offset by something tart to taste their best. This pie
is so delicious because the rich tang of buttermilk and fresh lemon juice shows off
plump ripe blueberries. This one is really fun and easy to make.

Makes one 10-inch pie (or 8 minis)

For The Pie:

1 prebaked 10-inch piecrust made from All-Butter Pie Dough (1/2 of the recipe below)
1 1/2 cups sugar
1 tablespoon plus 1 1/2 teaspoons cornstarch, sifted
8 tablespoons (1 stick) unsalted butter, melted
3 large eggs
1 teaspoon pure vanilla extract
1/2 cup buttermilk
2 teaspoons freshly grated lemon zest
2 tablespoons fresh lemon juice

For The Blueberry Topping:

1/4 cup apricot preserves
1 tablespoon water
1 1/2 dry pints fresh blueberries, picked through, stems discarded

All Butter Pie Dough:

2 1/4 cups all purpose flour
2 Tb sugar
1/4 tsp baking powder
1/2 tsp kosher salt
1 cup very cold unsalted butter, cut into 1/2-inch pieces
6-8 Tb ice water

In a large bowl, whisk together the flour, sugar baking powder and salt. Add the butter pieces, tossing with your figers to coat them with the flour. Using a pastry blender, cut the butter ito the flour util it is the size of large peas. Sprinkle 6 Tb of the water over the mixture and toss with a fork. The dough whould hold together when you squeeze it in your hand. If it is too dry, add the rest of the water.
Turn the dough onto a lightly floured work surface. Pat it together in one piece. Divide the dough into 2 equal parts, flatten each into a disk and wrap with plastic wrap. Refrigerate for at least 30 minutes before rolling. When ready to use, roll it out and fit a pie pan with the dough, prick with a fork. Cover with parchment paper and fill with beans or pastry weights. Bake at 350F for 20 minutes or so.

Position a rack in the center of your oven. Preheat the oven to 350°F. Line a cookie sheet with parchment paper or aluminum foil.
In a large bowl, whisk together the sugar, cornstarch, butter, eggs, vanilla, buttermilk, zest, and lemon juice until smooth. Pour the buttermilk mixture into the prebaked pie shell.
Place the pie plate on the prepared cookie sheet. Bake for 40 minutes, or until the crust is golden brown and the custard is set. Remove to a wire rack to cool to room temperature before topping with the blueberries.

To Make The Blueberry Topping

In a small heavy-bottomed saucepan over medium heat, whisk together the apricot preserves and the water until melted. Strain through a fine-meshed strainer into a medium bowl. Add the blueberries and, using a rubber spatula, stir gently to coat. Pile the blueberries on top of the pie.
Serve the pie chilled or at room temperature. It keeps tightly wrapped in the refrigerator for up to 2 days.