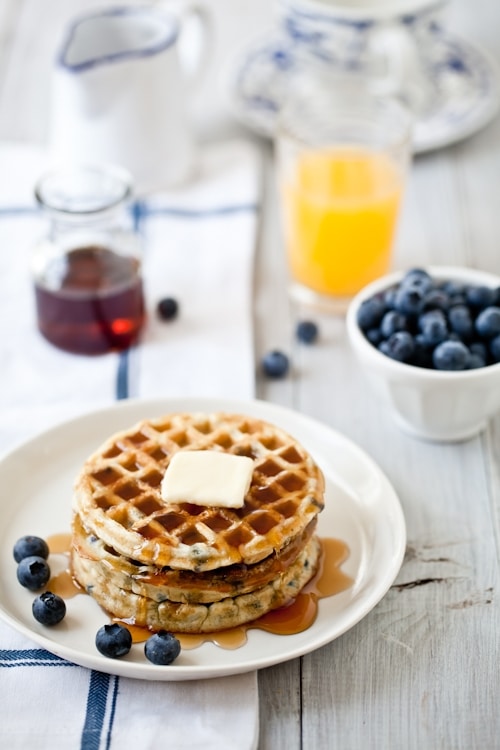
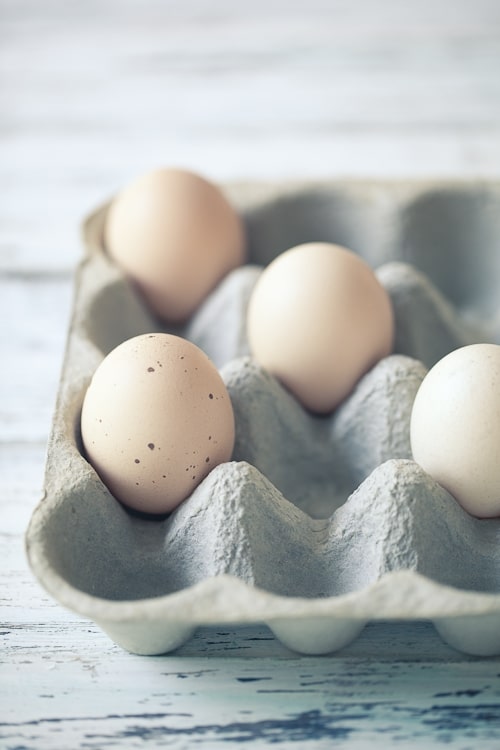
Sunday mornings are good for waffles and eggs. Any mornings really. But yesterday was so absolutely gorgeous that we had all the windows open, shorts and t-shirts on. I knew I had a mile long work to do but I just needed to put all this aside and do something familiar.
Cracking an egg. Popping a few blueberries in my mouth. Making waffles. Hearing the whisk against the mixing bowl. Smelling the scent of freshly squeezed oranges. Doing things that require time and attention, away from the work list. It’s not procrastinating but recharging my internal batteries.
We sat down on the back deck with our waffles and our hot coffee and talked. I listened actually. Writing feels like talking at times. And right then, I was out of words. We made a pact to have more Sunday mornings as cozy as this one. We usually don’t need a reminder to take a break but just thinking about our schedule from now throughout the Summer made me appreciate some chilling time even more.
Yep. Looks like I am back on the road teaching workshops here and there. And talk about awesome workshops…All are located in gorgeous venues allowing one’s creative juices to really get going!
In a couple of weeks I’ll be heading down to Savannah, Georgia to be part of the firstGo Savor Culinary Retreats. Since it’s so close to home, it’s the perfect opportunity to relax, share, be with good friends and meet new faces. We are also looking forward to the time away.
We decided to team up and do a workshop on artificial light during the Go Savor retreat, targeted to the bloggers who can only shoot at night or when the quantity of light outside is not enough. B. used to operate his own portrait and wedding studio for over 10 years (in a life way before us) so it came as natural as buttering my toast to ask him to team up. He’ll be doing an hands on demo on speedlights and I’ll be doing one on a studio light kit.
Since natural light is definitely more my grove, there will be another workshop that weekend. One of my favorite peeps, Tami from Running With Tweezers is also coming to Go Savor and we will be doing natural light, composition and styling the next day. We aim to please and we aim to share as much as people want to take in or leave out. We’ve attended events together, we’ve worked together but we’ve never done workshop together and I am very much looking forward to it.
Check out the Go Savor site for updates on registration and great giveways.
In April I’ll be doing a food photography workshop as part of Food Blog Forum Orlando, April 9th. I don’t have my full schedule set out for April yet, but when Jaden emailed and asked if I wanted to be part of this awesome one day event dedicated to sharing information in a fun and relaxed atmosphere. Just good peeps passing on what they know and are passionate about.
Jaden is good people…When Jaden asks, you say yes. I am really glad that Julie from The Little Kitchen persuaded her to make it happen and I am really thrilled to be able to participate and give back.
For more info on the line up and registration, follow the (hot) link here. See you there I hope!
Moving on to May and going a bit further out West….all the way to Sante Fe, New Mexico to teach an awesome workshop May 6th – May 9th. Luxury of time, creativity of location, great workshop topics! Oh yeah…
When Angela Ritchie emailed last year asking me if I wanted to be one of the workshop instructors, I think I read the email 5 times before answering "yes please!". I was already familiar with Angela’s workshops and how interactive, creative and completely hands on they were. Think of them as a complete retreats. I had promised myself I would do one in 2011, I had no idea I would be teaching one! I picked Sante Fe as the location because of all its earthy and colorful gorgeousness. I can’t wait!
If you want to get more info about this amazing opportunity to spend a complete weekend learning food photography, head over to the site here. I can’t wait to be there and share, practice, show and discover new things from hanging out with different people for a few days.
Hope to see you there!
An now on to the recipe and some darn good Blueberry Waffles…! Gluten Free Blueberry Waffles
Makes 6-8
1 3/4 cups warm water
1/2 cup finely ground flaxseed
1/2 cup potato flour
2 cups superfine rice flour
2 teaspoons baking powder
1 teaspoon baking soda
pinch salt
1 3/4 cups coconut milk
2 tablespoons honey
1 cup fresh blueberries
syrup
Mix the ground flax seed with the warm water in a large bowl, and let the mixture sit for 5 minutes.
Whisk together the potato flour, rice flour, baking powder, baking soda, and salt in a medium bowl. Reserve.
Blend the coconut milk with the honey and then add to the flax seeds mixture.
Dump the dry ingredients into the wet ingredients and mix until the batter looses the bulk of its bumps. Add the blueberries and fold them in gently with a spatula
Grease both sides of the waffle iron with a little vegetable oil or butter and pour some of the batter (1/3 cup) into the center of the iron. Close the top and cook until brown or according to the manufacturer’s directions. Serve with syrup if desired.
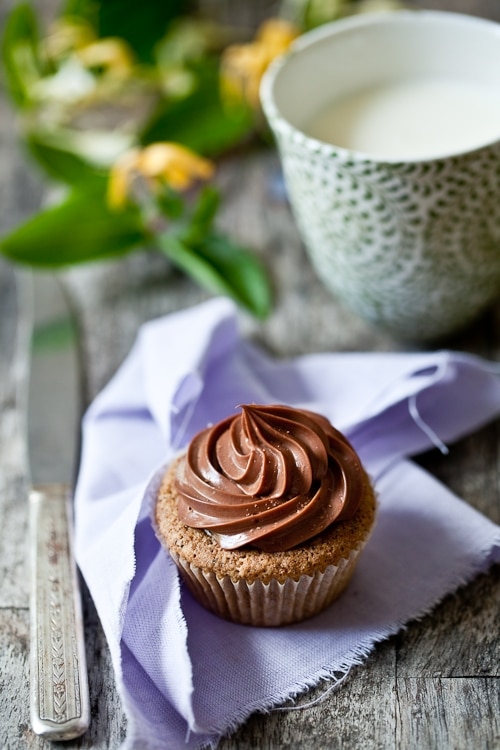
I have tried. Really I have. I just can’t seem to get you. Or you aren’t that captivating enough to me. Not after that many years trying. I am willing to sacrifice more time getting to get you though. Really, I am. Even the little time I have left these days in the morning is not without a thought or two for you. Unfortunately it’s been the extent of our relationship lately. "The thought of you". Well, until I made these Tamarind Coffee Cupcakes. Now it’s all about "the very thought of them".
You and I are comfortable with each other. We’re not bored and we’re not indifferent but we just can’t seem to get wild and crazy about each other either. Let’s recap a little here. We tried early on to build a solid foundation with a cup of coffee and a piece of toast. Until I got burned out on the toast with butter and jam, dunked in my coffee because I wanted that just about 10 more times before heading out the door.
So we decided to make it bit more structured and add an egg and piece of bacon to that toast. Oh. Beautiful mornings ensued. Definitely. Until I got lazy in our relationship and refused to do this much clean up before work. You would not compromise and a full break-up followed. Months without a nibble. Until a roomate made a piping hot bowl of oatmeal topped with a splash of honey and a handful of roasted hazelnuts.
I wanted to marry you then. We did have a long engagement. It became clear though that I do have a "coeur d’artichaut", even for you. It just was not enough. So we made pancakes with oatmeal and honey and nuts. Then waffles. And crepes. More pancakes. Eventually I started forgetting the toasted nuts. The honey too. Then one day I woke up and hit the snooze button and gave you the silent treatment. Sorry.
I went back to the eggs. Soft boiled. Poached. Sunny side up. You name it. I had it. It was almost indecent. Then I had a smoothie period. A green juice period. A funky smoked fish and German bread period. A bowl of fruit, sprinkle of flax seed period. Virtuous is not me. That also went out the window. I cheat with mid-morning snack. A tomato with sea salt. A handful of nuts, etc… You see?
It’s not you. It’s me. I’m not just fickle. I am a gourmande. Of life. Of food. Of emotions. If I didn’t have to watch for certain health issues, I’d have croissant, pains au chocolat, chaussons aux pommes and other French delicacies every day for breakfast. And I would not get bored. All that butter. But if I did, I’d rapidly wear them on my derriere. So the Frenchies and I have a Sunday rendez-vous instead.
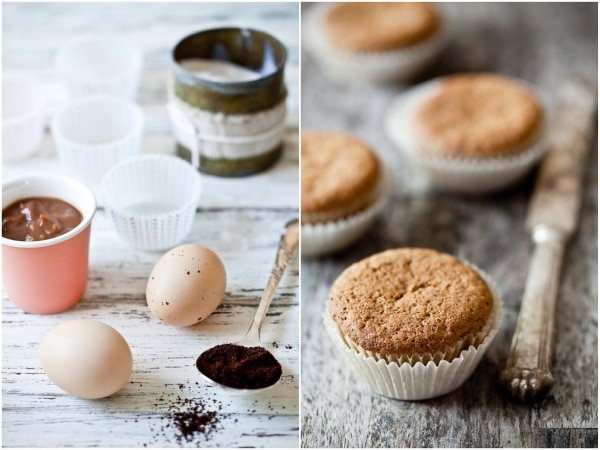
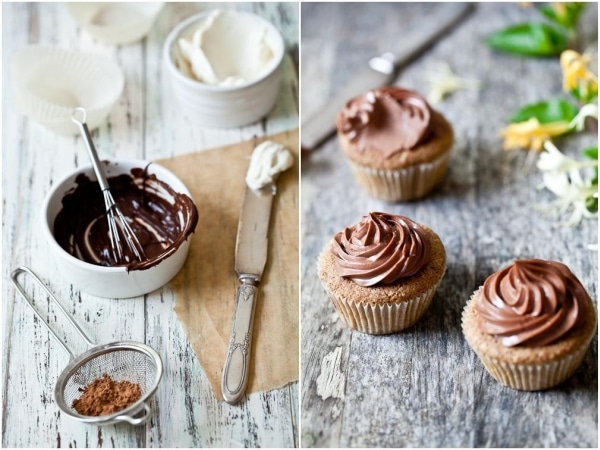
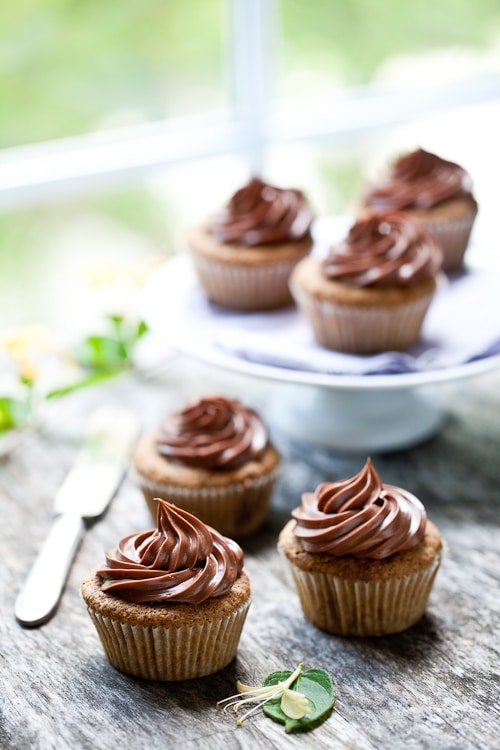
I was about ready to give up on the whole thing and remain a breakfast spinster until Dan Lepard posted these Tamarind Coffee Cupcakes. The coffee makes them incredibly versatile while the tamarind provides the perfect hint to wake up your tastebuds. In the morning I have one without frosting on my way up to the studio and in the afternoon a dollop of cream cheese-chocolate frosting is just a reminder that a sweet pause and a cup of tea is just what the doctor ordered during a long day on the job.
I used a mix of superfine sweet rice flour (info previously here and here), cornstarch as we don’t like tapioca flour but you can substitute either or according to your preference and millet flour. I did half butter and half coconut oil and used raw honey which intensifies the coffee in the cupcakes and brings out the chocolate when frosted.
Even B. agrees that this kind of love affair is also to his benefit. Indeed, I can’t possibly eat all 12 cupcakes in one sitting so I must share with him. We might finally find our groove you and I, dear Breakfast.
Yours truly,
Helene. Tamarind Coffee Cupcakes With Chocolate Cream Cheese Frosting, adapted from Dan Lepard.
Makes 12
For the cupcakes:
55g unsalted butter, at room temperature
55gr extra virgin coconut oil
1/3 cup (110gr)honey or light brown sugar
1 tablespoon ground coffee
1/4 cup tamarind paste
2 large eggs
1/2 cup plus 2 tablespoons (100 gr) superfine sweet rice flour
1/4 cup (50 gr) millet flour
1/4 cup (50 gr) cornstarch (or use tapioca flour)
1 teaspoon baking soda
pinch of salt
For the frosting:
1 block (8 oz) cream cheese, at room temperature
3/4 cup (170gr) semisweet chocolate, melted and slightly cooled
Prepare the cupcakes:
Preheat the oven to 350F. Place 12 muffin liners inside a muffin pan and lightly brush with melted butter (or cooking spray).
In an electric mixer, whip the butter, coconut oil and honey until fluffy at medium speed, 2-3 minutes. Reduce the speed to low and add the tamarind and coffee. Still on low, add the eggs, one at time and scraping the bowl after each addition. In a separate bowl, mix together the flours, cornstarch, baking soda and salt and slowly fold this in with the butter – tamarind mixture until the mixture is smooth. Divide evenly among the muffin liners and bake 20-25 minutes. Let cool completely before frosting or enjoy warm without.
Prepare the frosting:
In a large bowl, whisk together the cream cheese and semisweet chocolate until smooth. Fill a pastry bag with the mixture and pipe on top of each cupcake.
———————————————————————————–
Petits gateaux au tamarin et glacage au cream cheese chocolat:
Pour 12 petits gateaux
55 gr beurre, non sale, a temperature ambiante
55 gr d’huile de noix de coco, a temperature ambiante
110 gr de miel
1 cs de cafe moulu
70 gr de pulpe de tamarin
2 oeufs
100gr de farine de riz
50 gr de maizena
50 gr de farine de millet
1 cc de bicarbonate de soude
une pincee de sel
Pour le glacage:
210 gr de fromage frais, type Philadelphia, a temperature ambiante
170 gr chocolat (pas trop corse), fondu et legerement refroidi
Prechauffer le four a 175C. Aligner 12 caissettes a muffins dans une plaque a muffin et beurrer legerement l’interieur (pinceau et beurre fondu).
Dans un grand bol, mixer le beurre, l’huile de noix de coco et le miel jusqu’a ce que le melange soit leger, 2 a 3 minutes. Ajouter le cafe et le tamarin et ensuite les oeufs a un a jusqu’a obtention d’une pate homogene. Ajouter les farines, la maizena, le bicarbonate de soude et le sel et battre jusqu’a ce que le melange soit lisse.
Repartir dans les caisettes et faire cuire 20 a 25 minutes.
Pour le glacage:
Battre dans un grand bol le cream cheese et chocolate fondu jusqu’a obtenir un melange homogene. Le mettre dans un poche a douille et en glacer les petits gateaux une fois que ces derniers sont refroidis.
———————————————————————————–
This post is syndicated on BlogHer. Click here.
Let’s interrupt our usual programming of decadent and creamy treats to talk about breakfast, shall we? You know, that "most important meal" of the day, the one that also defines our lifestyle, mood, habits. Even the last edition of Saveur, almost entirely devoted to breakfast made it to my mailbox right when I had breakfast oatmeal squares in the oven…sign.
Over the past years, I have been catching myself saying I love breakfast but what I should really say is "I’d love to have breakfast". I hardly have time or appetite in the morning for more than a cup of coffee and a few spoonfuls of yogurt. Everyday I tell clients about the benefits of a balanced breakfast and yet this is a classic case of "do as I say and not as I do". Bad me.
It has not always been the case. As a typical French child, my mom would fix hot chocolate, toast and jam, maybe a yogurt, before heading to school. Sometimes toast was a croissant or a slice of brioche (toasted with some honey, please!). More or less of the above combination made its way onto my plate as I grew up. Before I stopped running as much as I used to due to knee issues (my fault: run 5 miles each morning then go work at the restaurant for 10-12 hours, 6 days a week…6 years later, you can imagine the x-rays!!), I would fix myself a good breakfast. Then I started going to bed later and later each day and waking up earlier and earlier and my appetite, time or desire for breakfast went down the drain.
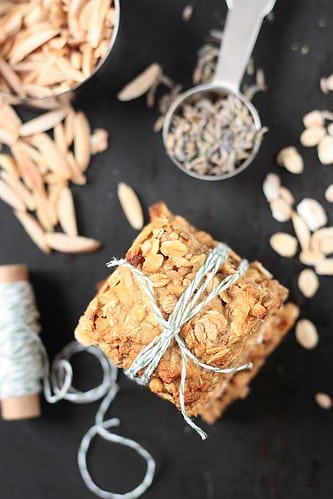
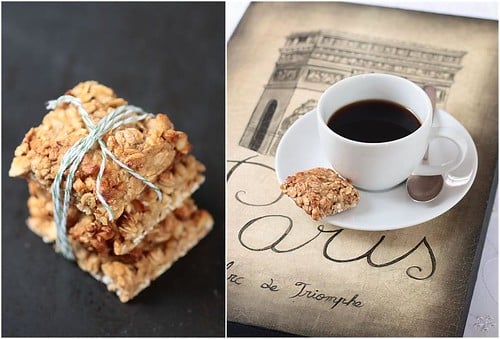
I started to look into other cultures for inspiration and different fares and still nothing. I wanted to be a breakfast eater!! I finally realized that I can’t eat a lot in the morning so breakfast would have to comprise a lot of essential vitamins and nutrients in a two to three bite something. Breakfast squares became an obvious and manageable choice for me. I can prepare them in 10 minutes the night before and grab a couple on my way out the door in the morning.
The dough is so forgiving and basic that you can change, substitute and replace at will. Today they were oatmeal, tomorrow they will be quinoa flakes. Almonds sometimes turn into pistachios, honey turns into agave syrup. I sometimes add a pinch of cinnamon or a spoonful of flax seeds. Today it was a pinch of edible lavender buds. If I know the morning is going to drag into a late lunch, I’ll have some with dried fruits for extra energy. You get the idea….the possibilities are quite endless and though it may not be the perfect breakfast, it is still better than what I would usually have: one big cup of coffee. Baby steps….
I have a curious mind and like you, I love to read about food so please tell me: "What do you eat for breakfast?"
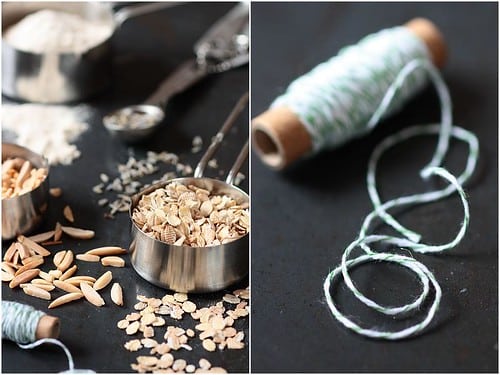
Breakfast Oatmeal Squares:
Makes 9, 3-inch squares
1/2 cup whole wheat flour
3/4 cup oats
1/3 cup chopped almonds
1 tsp edible lavender buds
1 egg
1/4 cup yogurt
1/4 cup honey
1 tsp pure vanilla extract
Preheat oven to 350F and line a baking sheet with parchment paper.
In a large bowl combine the flour, oats, almonds and lavender and set aside. In a smaller bowl whisk together the egg, yogurt, honey and vanilla extract. Add the egg mixture to the flour mixture and stir together with a large spoon or your hands until the dough comes together.
Pat the dough into a squares directly on the parchment paper, cut through with a sharp knife into 9 pieces and bake for 10-12 minutes. Do not overbake or you will end up with rocks under your teeth. Let cool and break the squares apart. Feel free to use a scoop and make drop cookies instead.
Note: Attention fellow bloggers! Martha Stewart is having a blog contest. For more info, please visit her blog "The Martha Blog".
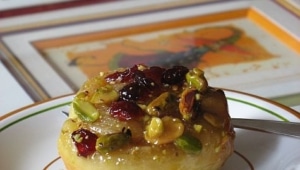
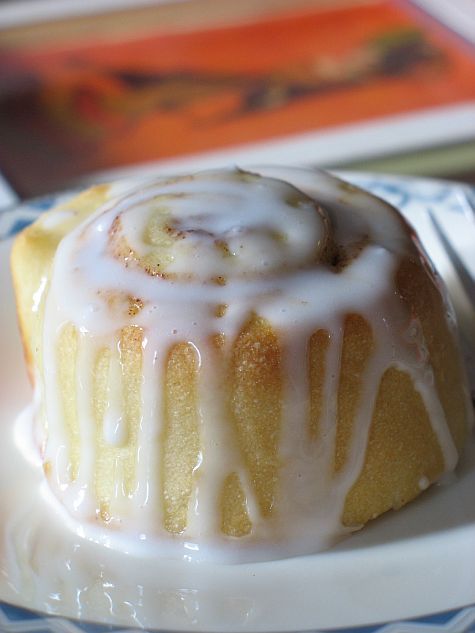
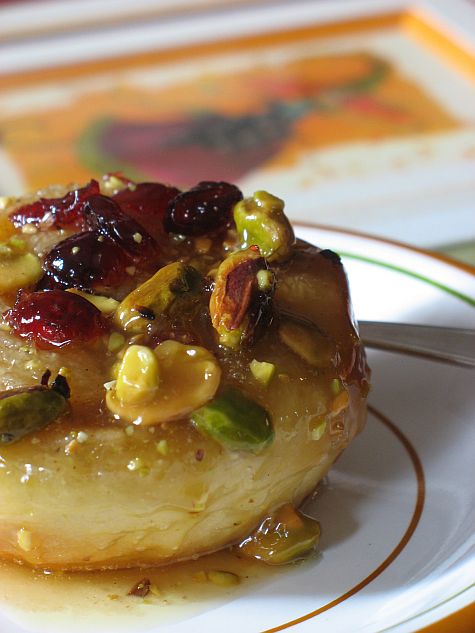
Are you ready for Fall yet? Well, you might with these Cinnamon and Sticky Buns, courtesy of the Daring Bakers, September edition. If I were you I would trust the numerous other Daring Bakers out there (over 100 by now), tempting you with pictures of gooey goodness and telling you how wonderful and soft these are. If anything, trust me: I have made them 4 times since the recipe was announced by Marce from Pip In The City, our hostess this month. Each month takes on a different aspect as far as the challenges and recipes are concerned. Sometimes, it is the challenge of coordinating schedules, sometimes it is trying to be creative with presentation or design, this time it was just difficult to keep them around long enough to share, let alone take pictures!
Everything about this recipe from Peter Reinhart’s The Bread Baker´s Apprentice made me want to make it again and again. Lisa got us started on a comical note as poor lady was suffering tremendously from her back and made the buns within the first week of September while high on painkillers. I expect her post to draw tears from my eyes, but her experience seriously made me crave sticky buns and cinnamon rolls. I made my first batch a couple of days later, in the evening, with the intention to photograph them in the morning and bring some to the neighbors before. When I got up, my husband was long gone…so was my tray of walnut sticky buns when they should have been awaiting their photo shoot! I thought that by no, he would now the rules of baking/blogging: don’t take any, don’t give any, don’t hide any until it has been photographed…nope! I got a sweet note form one of his students a few days later “Thank you Mrs. Tartelette, the sticky buns were delicious and it was great to start the day like this…” Well, I wish I had been there too!!
Now, you understand my challenge this month…but it deter me to make them again and again. I froze the cinnamon buns and proceeded to make the buns, this time with cranberries and pistachios. Probably my favorite combo of nuts/berries and it worked really well taste wise and packed a punch of visual appeal when I served them to my parents for brunch a couple of weeks ago. I changed the filling to cardamom instead of cinnamon a few times and it was jsut out of this world. We all loved the buttery goodness, (well, that’s a given with one pound of butter in the caramel part), the moistness of the dough and all the cinnamon flavor we tasted with every bite. I found that there was more than enough cinnamon sugar (used inside the rolls and buns) as well as powdered sugar glaze for the rolls. Turned out B. adds glaze as he eats away so if our mate is anything like mine, who knows?!!
Cinnamon and Sticky Buns (from Peter Reinhart’s The Bread Baker’s Apprentice)
Days to Make: One (1)Active/Resting/Baking Time: 15 minutes to mix, 3 1/2 hours fermentation/shaping/proofing, 20 – 40 minutes to bakeRecipe Quantity: Eight(1) – twelve (12) large rolls or twelve (12) – sixteen (16) small rollsMaking the Dough
6 1/2 tablespoons (3.25 ounces) granulated sugar
1 teaspoon salt
5 1/2 tablespoons (2.75 ounces) shortening or unsalted butter or margarine
1 large egg, slightly beaten
1 teaspoon lemon extract OR 1 teaspoon grated zest of 1 lemon
3 1/2 cups (16 ounces) unbleached bread or all-purpose flour
2 teaspoons instant yeast*
1 1/8 to 1 1/4 cups whole milk or buttermilk, at room temperature OR 3 tablespoons powdered milk (DMS) and 1 cup water
1/2 cup cinnamon sugar (6 1/2 tablespoons granulated sugar plus 1 1/2 teaspoons ground cinnamon, or any other spices you want to use, cardamom, ginger, allspice, etc.)
White fondant glaze for cinnamon buns or caramel glaze for sticky buns (at the end of the recipe.)
Walnuts, pecans, or other nuts (for sticky buns.)
Raisins or other dried fruit, such as dried cranberries or dried cherries (for sticky buns, optional.)
*Instant yeast contains about 25% more living cells per spoonful than active dry yeast, regardless of the brand. Instant yeast is also called rapid-rise or fast-rising.
Making the Dough: Cream together the sugar, salt, and shortening or butter on medium-high speed in an electric mixer with a paddle attachment (or use a large metal spoon and mixing bowl and do it by hand).
Note: if you are using powdered milk, cream the milk with the sugar, and add the water with the flour and yeast.
Whip in the egg and lemon extract/zest until smooth. Then add the flour, yeast, and milk. Mix on low speed (or stir by hand) until the dough forms a ball. Switch to the dough hook and increase the speed to medium, mixing for approximately 10 minutes (or knead by hand for 12 to 15 minutes), or until the dough is silky and supple, tacky but not sticky. You may have to add a little flour or water while mixing to achieve this texture. Lightly oil a large bowl and transfer the dough to the bowl, rolling it around to coat it with oil. Cover the bowl with plastic wrap.
Fermentation: Ferment at room temperature for approximately 2 hours, or until the dough doubles in size.
Form the Buns: Mist the counter with spray oil and transfer the dough to the counter. Roll out the dough with a rolling pin, lightly dusting the top with flour to keep it from sticking to the pin. Roll it into a rectangle about 2/3 inch thick and 14 inches wide by 12 inches long for larger buns, or 18 inches wide by 9 inches long for smaller buns. Don´t roll out the dough too thin, or the finished buns will be tough and chewy rather than soft and plump. Sprinkle the cinnamon sugar over the surface of the dough and roll the dough up into a cigar-shaped log, creating a cinnamon-sugar spiral as you roll. With the seam side down, cut the dough into 8 to 12 pieces each about 1 3/4 inches thick for larger buns, or 12 to 16 pieces each 1 1/4 inch thick for smaller buns.)
Prepare the Buns for Proofing:
For cinnamon buns: line 1 or more sheet pans with baking parchment. Place the buns approximately 1/2 inch apart so that they aren´t touching but are close to one another.
For sticky buns: coat the bottom of 1 or more baking dishes or baking pans with sides at least 1 1/2 inches high with a 1/4 inch layer of the caramel glaze. Sprinkle on the nuts and raisins (if you are using raisins or dried fruit.) You do not need a lot of nuts and raisins, only a sprinkling. Lay the pieces of dough on top of the caramel glaze, spacing them about 1/2 inch apart. Mist the dough with spray oil and cover loosely with plastic wrap or a food-grade plastic bag.
Proof the Buns: Proof at room temperature for 75 to 90 minutes, or until the pieces have grown into one another and have nearly doubled in size. You may also retard the shaped buns in the refrigerator for up to 2 days, pulling the pans out of the refrigerator 3 to 4 hours before baking to allow the dough to proof.
Bake the Buns:
Preheat the oven to 350°F (175°C) with the oven rack in the middle shelf for cinnamon buns but on the lowest shelf for sticky buns.
Bake the cinnamon buns for 20 to 30 minutes or the sticky buns 30 to 40 minutes, or until golden brown. If you are baking sticky buns, remember that they are really upside down (regular cinnamon buns are baked right side up), so the heat has to penetrate through the pan and into the glaze to caramelize it. The tops will become the bottoms, so they may appear dark and done, but the real key is whether the underside is fully baked. It takes practice to know just when to pull the buns out of the oven.
Cool the buns:
For cinnamon buns, cool the buns in the pan for about 10 minutes and then streak white fondant glaze across the tops, while the buns are warm but not too hot. Remove the buns from the pans and place them on a cooling rack. Wait for at least 20 minutes before serving.
For the sticky buns, cool the buns in the pan for 5 to 10 minutes and then remove them by flipping them over into another pan. Carefully scoop any run-off glaze back over the buns with a spatula. Wait at least 20 minutes before serving.
Toppings for the Buns: White fondant glaze for cinnamon buns:
Cinnamon buns are usually topped with a thick white glaze called fondant. There are many ways to make fondant glaze, but here is a delicious and simple version, enlivened by the addition of citrus flavor, either lemon or orange. You can also substitute vanilla extract or rum extract, or simply make the glaze without any flavorings.
Sift 4 cups of powdered sugar into a bowl. Add 1 teaspoon of lemon or orange extract and 6 tablespoons to 1/2 cup of warm milk, briskly whisking until all the sugar is dissolved. Add the milk slowly and only as much as is needed to make a thick, smooth paste.
When the buns have cooled but are still warm, streak the glaze over them by dipping the tines of a fork or a whisk into the glaze and waving the fork or whisk over the tops. Or, form the streaks by dipping your fingers in the glaze and letting it drip off as you wave them over the tops of the buns. (Remember to wear latex gloves.)
Caramel glaze for sticky buns
Caramel glaze is essentially some combination of sugar and fat, cooked until it caramelizes. The trick is catching it just when the sugar melts and lightly caramelizes to a golden amber. Then it will cool to a soft, creamy caramel. If you wait too long and the glaze turns dark brown, it will cool to a hard, crack-your-teeth consistency. Most sticky bun glazes contain other ingredients to influence flavor and texture, such as corn syrup to keep the sugar from crystallizing and flavor extracts or oils, such as vanilla or lemon. This version makes the best sticky bun glaze of any I´ve tried. It was developed by my wife, Susan, for Brother Juniper´s Cafe in Forestville, California.
NOTE: you can substitute the corn syrup for any neutral flavor syrup, like cane syrup or gold syrup.
1. In the bowl of an electric mixer, combine 1/2 cup granulated sugar, 1/2 cup firmly packed brown sugar, 1/2 teaspoon salt, and 1/2 pound unsalted butter, at room temperature.
2. Cream together for 2 minutes on high speed with the paddle attachment. Add 1/2 cup corn syrup and 1 teaspoon lemon, orange or vanilla extract. Continue to cream for about 5 minutes, or until light and fluffy.
3. Use as much of this as you need to cover the bottom of the pan with a 1/4-inch layer. Refrigerate and save any excess for future use; it will keep for months in a sealed container.
I might make another batch before this coming week is over! Thanks Marce for picking up such a recipe. Thanks Lisa and Ivonne, founders of the Daring Bakers, for managing this wonderful group with such gusto and taste. Check the blogroll to read more sticky goodness!
I was lucky enough to photograph the buns and rolls on pictures framed by my mom. See, her talent is that she is a framing artist. My dad paints watercolors and that’s how she got started, she took classes to be able to display his work. After many years, the class became more of a group of friends, challenging themselves with new techniques. Last year I ordered a set of prints from a French artist, Anne-Soline, 3 fairies and 3 dancers, and she brought them over this trip, double bubble-wrapped. They made it one piece, which enabled me to play around with the layout of the pictures.
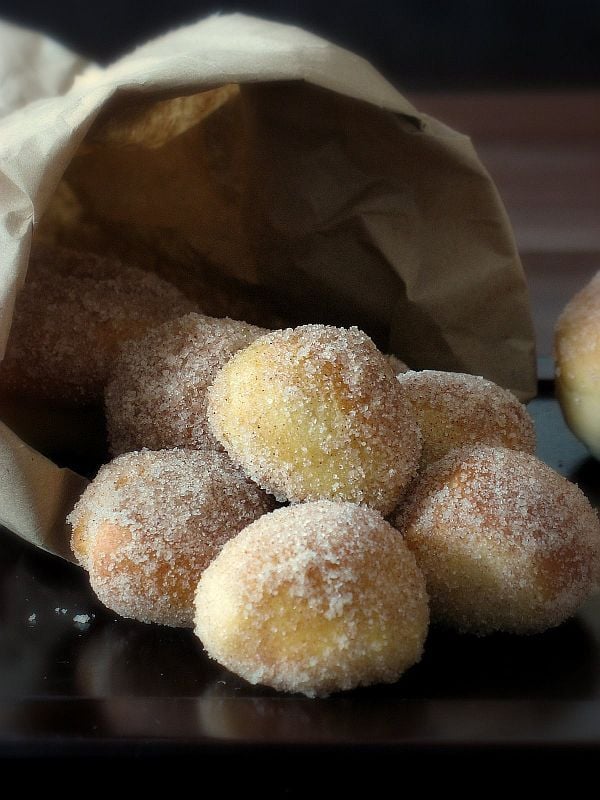
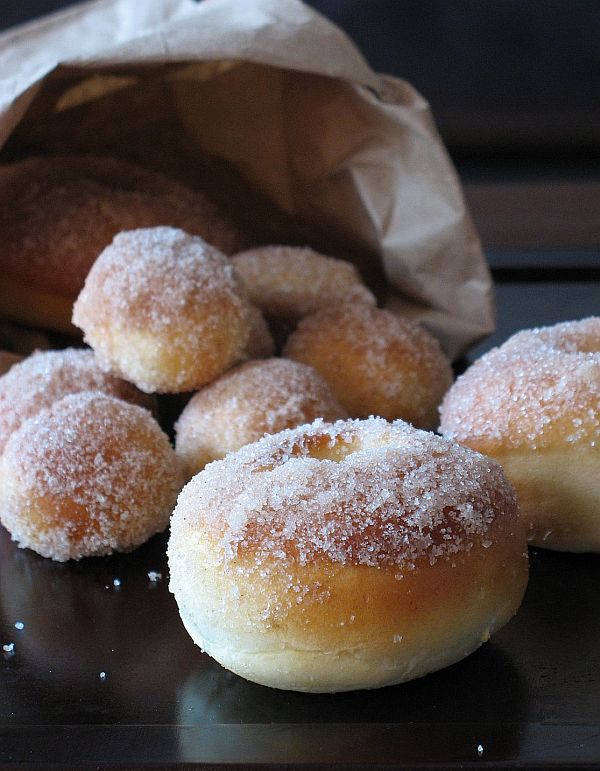
I know, it seems very strange to put "baked" and "doughnuts" in the same sentence and then expect you to believe me when I say they were good…but they were! But why would I turn a completely good fried piece of Americana into a baked good? Well, for once I was curious to try another recipe after my first success last year. I also have the same reason as last year for trying baked doughnuts yet again. My parents are coming to visit for a while and they love waking up to the scent of nutmeg, cardamom, and cinnamon….and my dad can’t resist the attraction of a good doughnut. However, they both have health issues that I have to take ito consideration when baking and cooking (heart and diabetes). Thus, the reason why I wanted to make a healthier version, and made this other version as a test run.
Looking online you will find dozens of recipes for baked doughnuts but how would you know if they are any good? Well, first you can always send me an email and I will force myslef to help you out and make a few batches, just to be on the safe side. On a more serious note, among all the interesting recipes I found online, I recognized two bloggers I had already followed in marbled chocolate cake goodness so I felt confident they would not stir me in a bad direction. One thing neither of us will tell you is that they "are exactly like doughnuts". The obvious reason being that they are not frying involved and like my predecessors I went for the cinnamon sugar topping instead of a powdered sugar glaze….sounded lighter. The resulting treats were not as soft and buttery to the mouth as the ones you get at Krispy Kreme for example but they make a good substitute when the craving hits. They are a tad chewier and more like soft pillows of dough but they were quickly devoured by our guests sunday morning, which is always a good sign.
1 1/3 cups warm milk, 95 to 105 degrees (divided)
1 packet active dry yeast (2 1/4 teaspoons)
2 tablespoons butter
2/3 cup sugar
2 eggs
5 cups all-purpose flour
A pinch or two of nutmeg, freshly grated
1 teaspoon salt
1/2 cup unsalted butter, melted
1 1/2 cups sugar
1 tablespoon cinnamon
Place 1/3 cup of the warm milk in the bowl of an electric mixer. Stir in the yeast and sugar and set aside for five minutes or so to let it proof. Stir the butter into the remaining cup of warm milk and add it to the yeast mixture. With a fork, stir in the eggs, flour, nutmeg, and salt – just until the flour is incorporated. With the dough hook attachment of your mixer beat the dough for a few minutes at medium speed. Adjust the dough texture by adding flour a few tablepsoons at a time or more milk. You want the dough to pull away from the sides of the mixing bowl and eventually become supple and smooth. Turn it out onto a floured counter-top, knead a few times (the dough should be barely sticky), and shape into a ball.
Transfer the dough to a buttered (or oiled) bowl, cover, put in a warm place, and let rise for an hour or until the dough has roughly doubled in size.
Punch down the dough and roll it out 1/2-inch thick on your floured countertop. With a 2-3 inch cookie cutter, stamp out circles in the dough . Transfer the circles to a parchment-lined baking sheet and stamp out the smaller inner circles using a smaller cutter. If you cut the inner holes out any earlier, they become distorted when you attempt to move them. Cover with a clean cloth and let rise for another 45 minutes.
Bake in a 375 degree oven until the bottoms are just golden, 8 to 10 minutes – start checking around 8. While the doughnuts are baking, place the butter in a medium bowl. Place the sugar and cinnamon in a separate bowl.
Remove the doughnuts from the oven and let cool for just a minute or two. Dip each one in the melted butter and a quick toss in the sugar bowl. Eat immediately if not sooner.
Makes 1 1/2 – 2 dozen medium doughnuts.
Notes:
– as Heidi suggests, it is best to do them the day you plan on eating them and not too early.
– remove them from the oven before you think they are done, they will continue to bake a little.
– make sure the holes in the middle are cut out pretty big as the donuts contine to rise as they bake and tend to swallow them back.
– you can make your dough, roll and cut out the donuts the night before and let them do their second rising in the fridge, covered. Set them out on the countertop an hour before baking so the yeast can wake up again….and you by the same time.
P.S: Last month I woke up to an early Christmas present: a nice lady named Tammy Wood emailed me with a beautiful collage of my pictures as a banner/header for my blog. She took pity on my attempts at spiffying the blog and "just made it one night"….Turns out she had come here via a common acquaintance, Aimee from Under The High Chair. I was beaming, fidgeting, amazed at her generosity. She is a professional who took the time to help me out, just because….! I quickly put it up and after much internal debate on my part I asked her if it were possible to change the pics to some of my favorites, which she promptly did upon her return from vacation. So peeps, look up, the images are different….I like both but this one is my favorite. Thank you Tammy…It is with people like you that humanity still goes round.
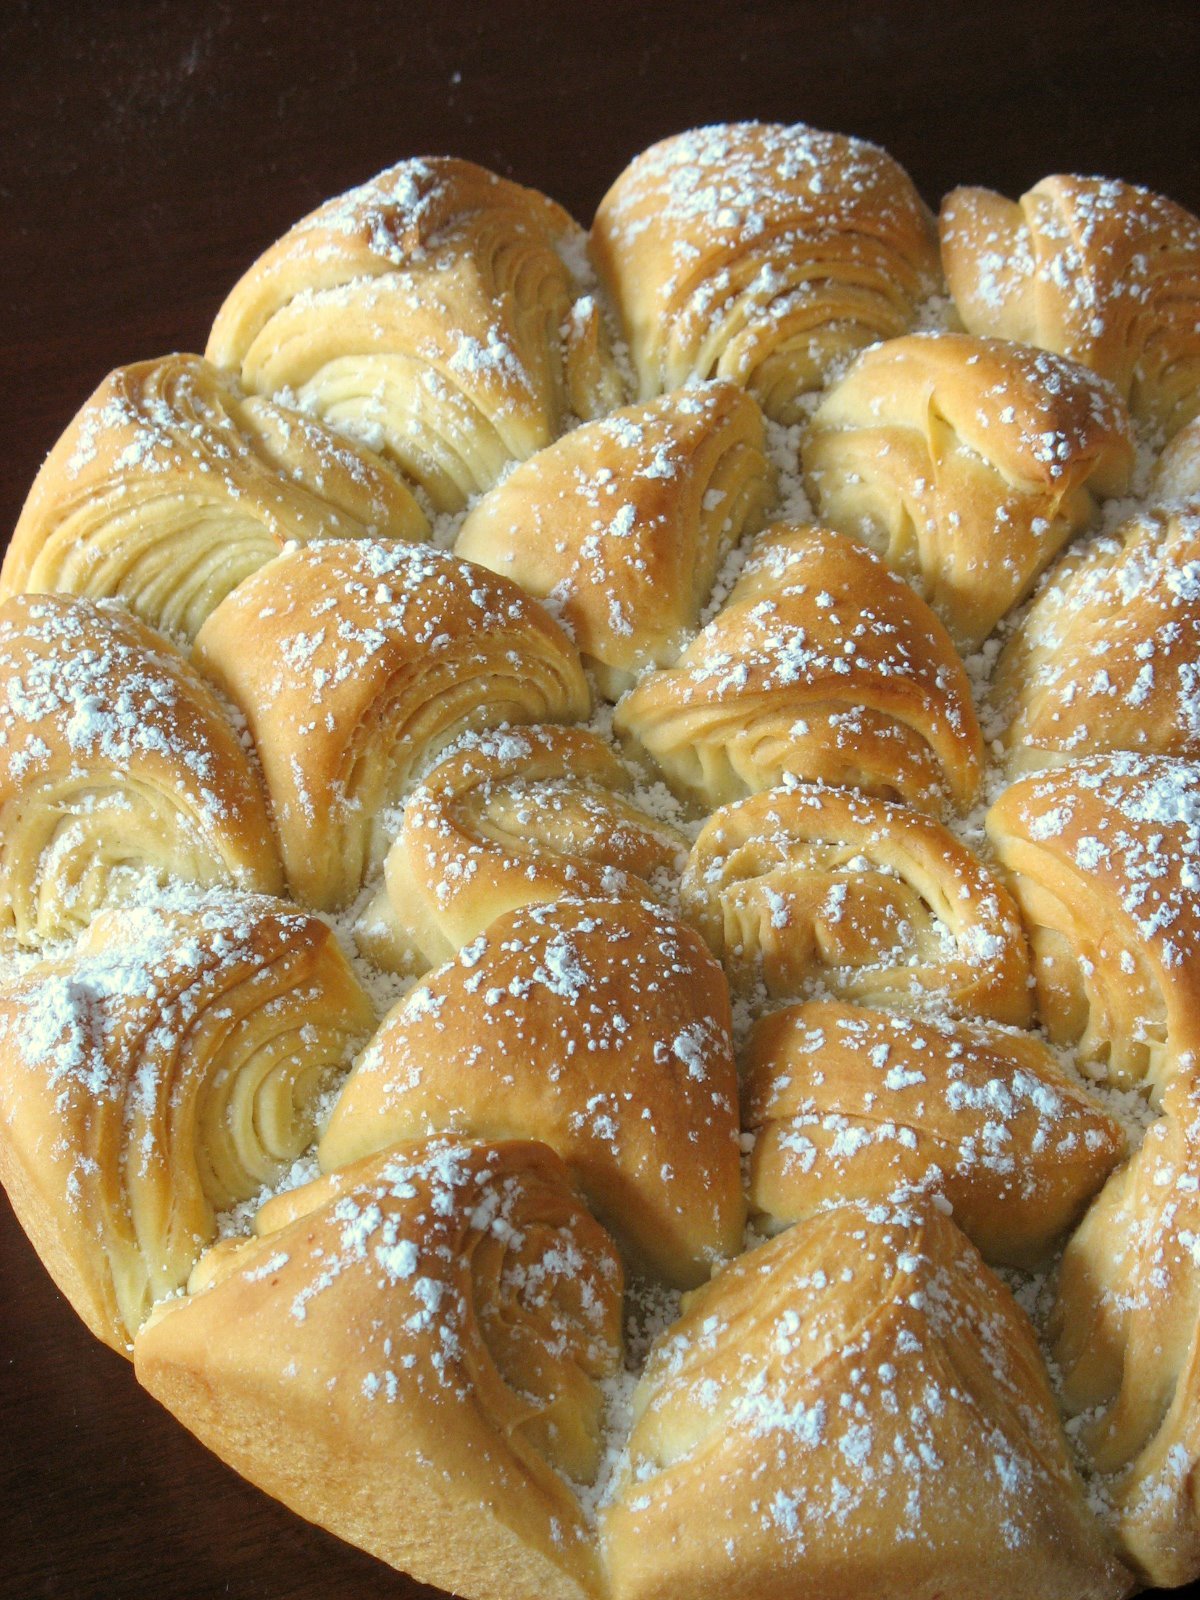
Do you ever get stuck on one picture and its recipe while reading your favorite blogs and you go back to it many many times? The minute I saw this bread, I hit the "add to favorite' button, and stared at it several times a day while reading emails or researching items on the computer. The recipe comes originally from Zapbook and has already traveled the French blogosphere quite a bit during this past month. I have been fond of Petite Lolie’s blog from the day I stumbled upon it. There is something aboout her site…it is beautiful, that’s what it is. Full of life, warmth, knowledge, know hows ans how tos…It’s fresh and abundant in lip smacking recipes.
Although the exact source of the bread is unknown, the recipe delivers a sunflower looking like brioche. I followed Petite Lolie recommendation and added a bit more sugar. I don’t think I kneaded the dough quite enough as the the texture of the dough was not as soft as my previous brioche. Always room for improvement. The actual shaping of each roll may seem time consuming but it took me about 15-20 minutes and the end result (look wise) is well worth it.
200 gr. milk
1/4 cup sugar
1 tsp. salt
2 eggs
500 gr. flour
2 tsp. dry yeast
50 gr. melted butter
extra melted butter for shaping the rolls
Put the yeast in a non reactive bowl. Heat the milk to lukewarm, and pour it over the yeast. Stir with a fork or spoon to make sure it dissolves properly. Add 2 Tb. sugar and slat and let the yeast proof for 10 minutes.
In a stand mixer fitted with the dough hook attachment, combine the flour, eggs, remaining sugar, melted butter. Turn the mixer on slow and slowly pour in the yeast mixture. Let the dough come together and continue the kneading either by hand or with the mixture for a good 5-8 minutes.
Put the dough into an oiled bowl and let rise for 1 hour or until doubled in size.
Shaping of the bread:
Once the dough has risen, divide it into 16 equal portions. Roll each portion out into a circle or oval. Take one piece, brush with melted butter, stack another piece on it, brush with melted butter again and repeat with 2 other portions. You are actually making 4 stacks of 4 portions each. Roll each stack tightly. Cut each into 4 triangular pieces. Position the rolls in a 10 inch round pan, with pointy ends facing toward the center.
Let rise for another 45 minutes. Preheat the oven to 375. Once the dough has risen, brush with an egg wash (egg beaten with some milk) and bake for 30 minutes.
End result…one could argue that brioche is brioche and this is yet another recipe. But come on, look at those plump folds! Every nation has its version of the basic brioche dough and I like exploring other cultures through bread baking. I am looking forward to making this one again, probably for the only reason that it looks gorgeous, tastes great, behaves well, and made my morning brighter! Yep, I am not complicated…making bread fuels my fire! I am wondering if such a bread exists in Bulgaria so I am on the lookout for a source, let me know if you have one.
One thing for sure: I am definetely putting this in my Easter Basket to be delivered to The Passionate Cook as part of this month’s Waiter There’s Something In My…(and because my dear mother in law is organizing brunch next sunday, as a pre-Easter menu testing).
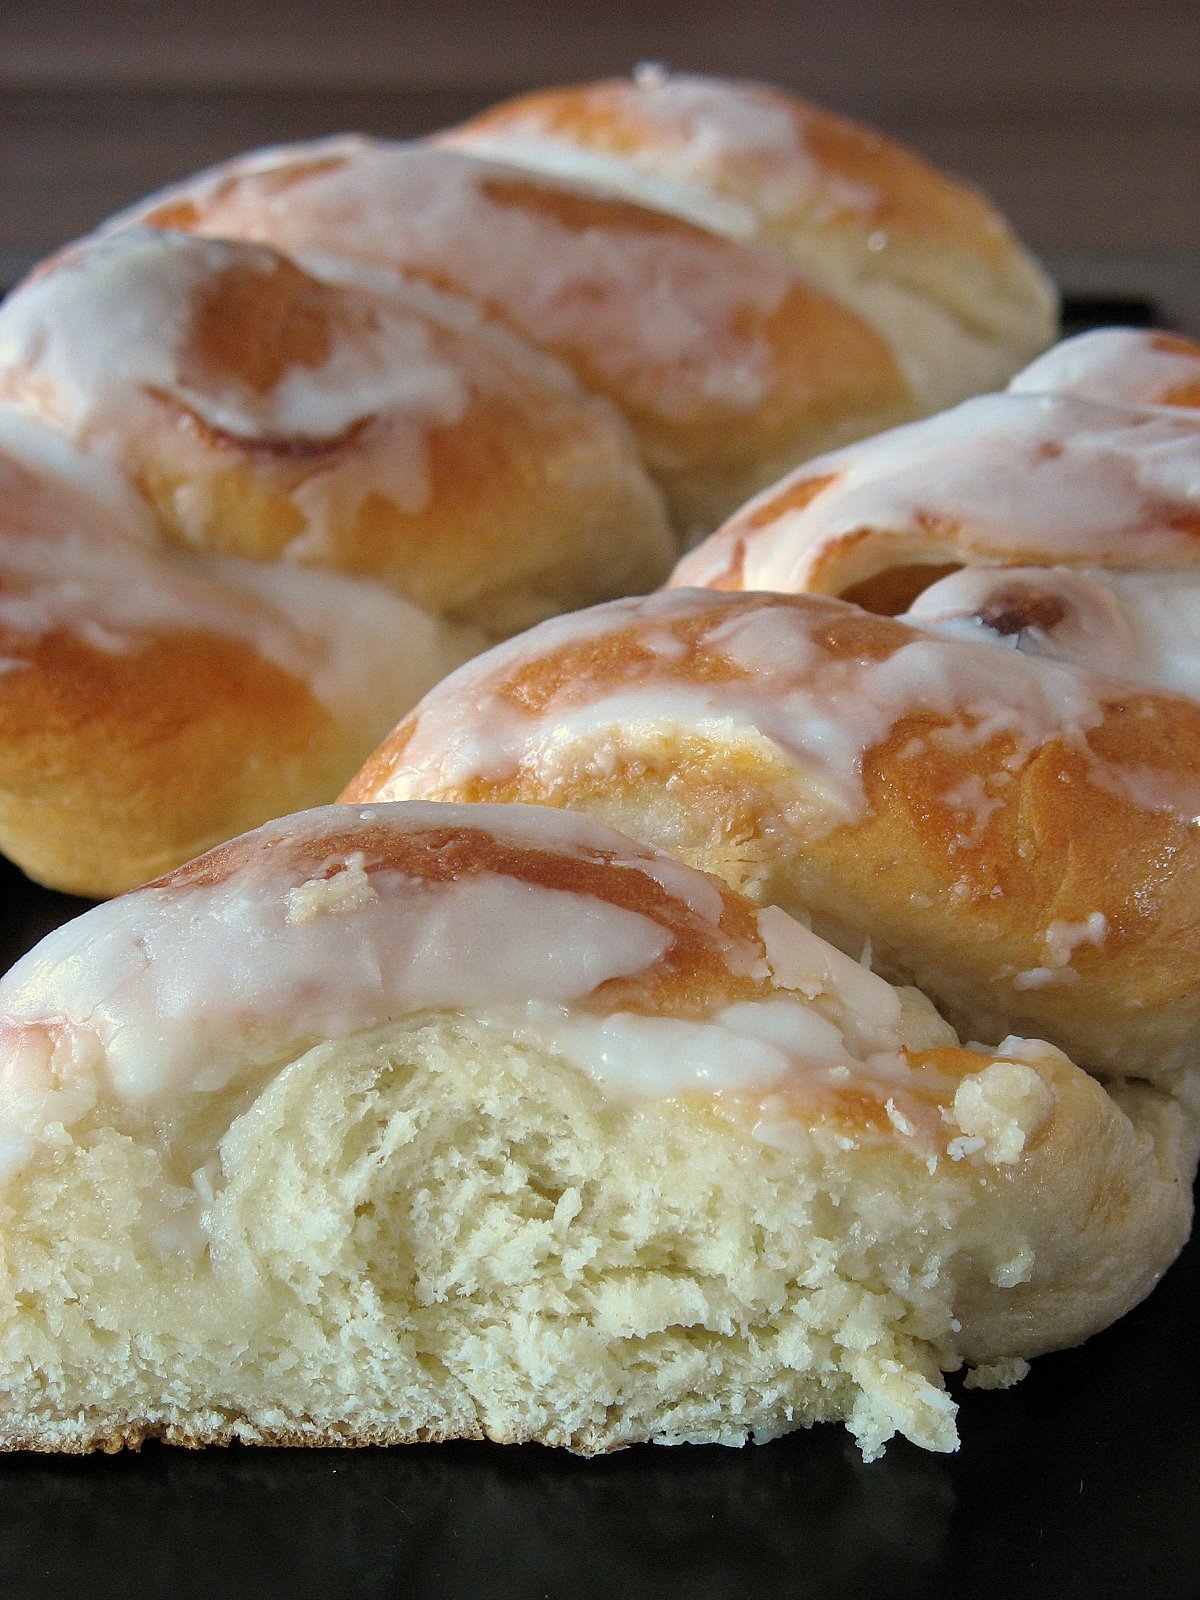
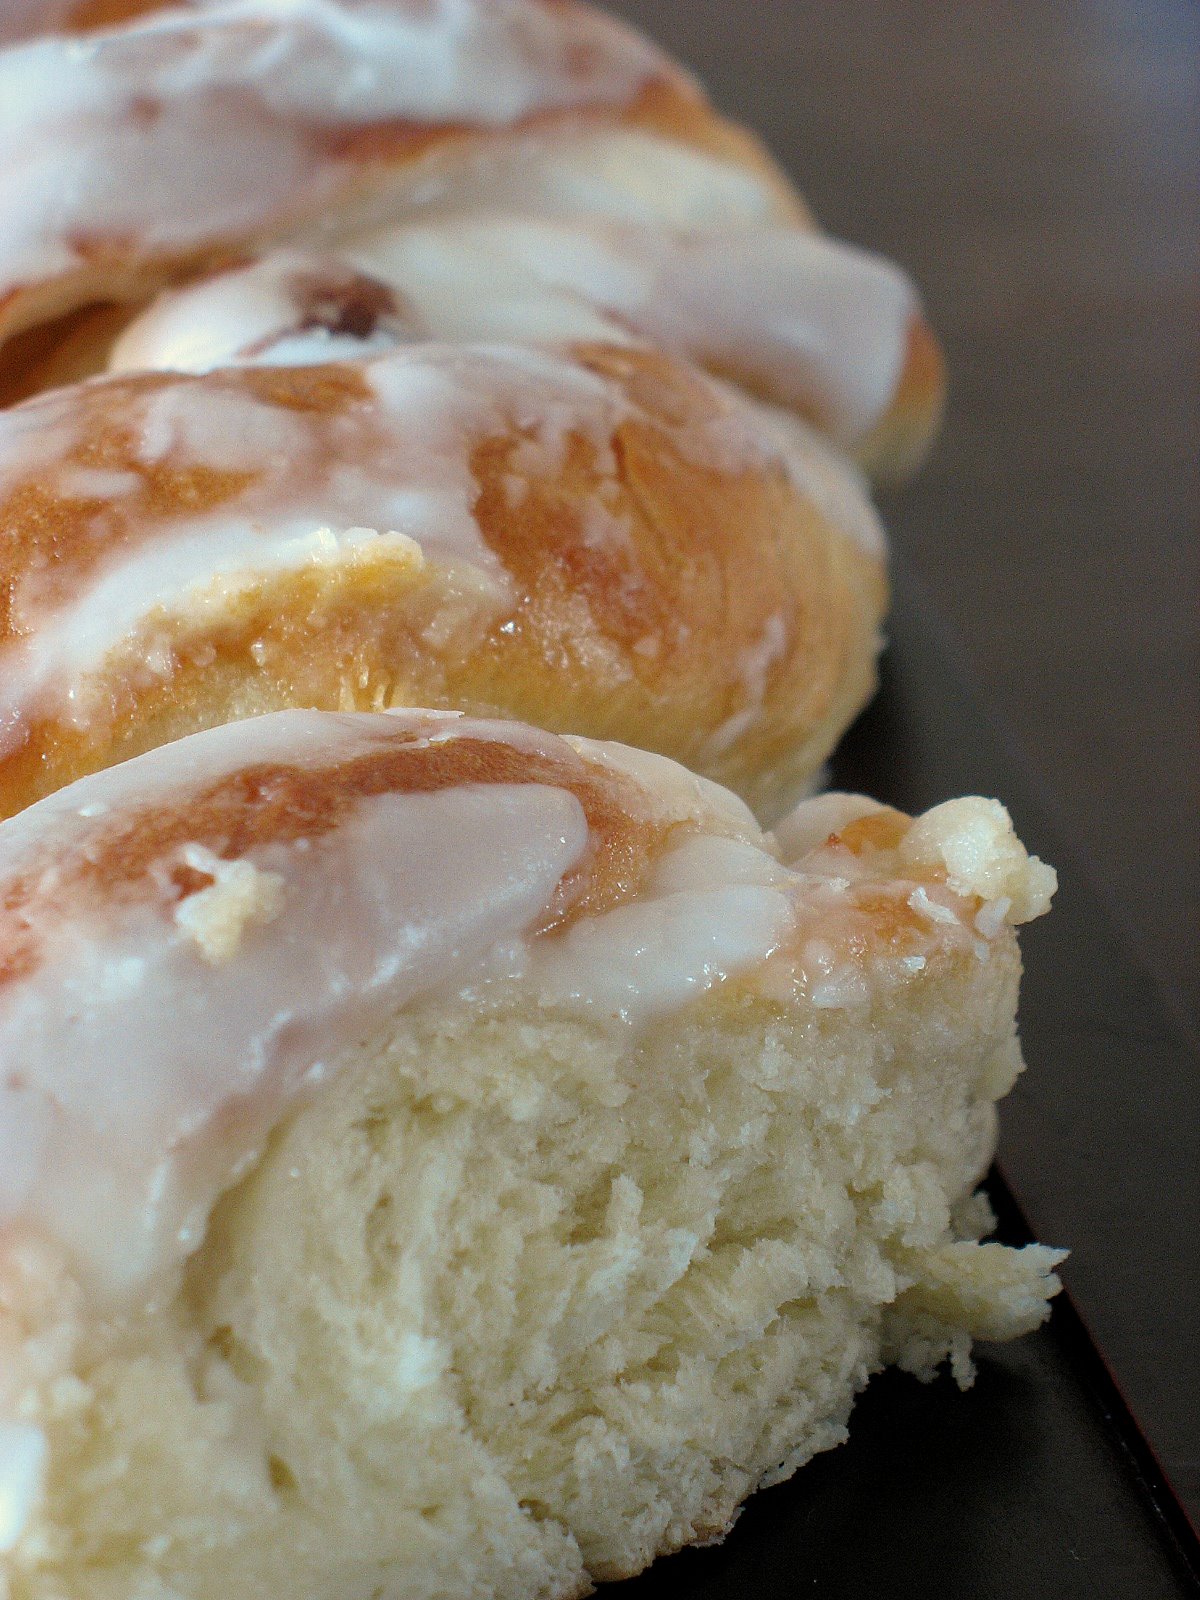
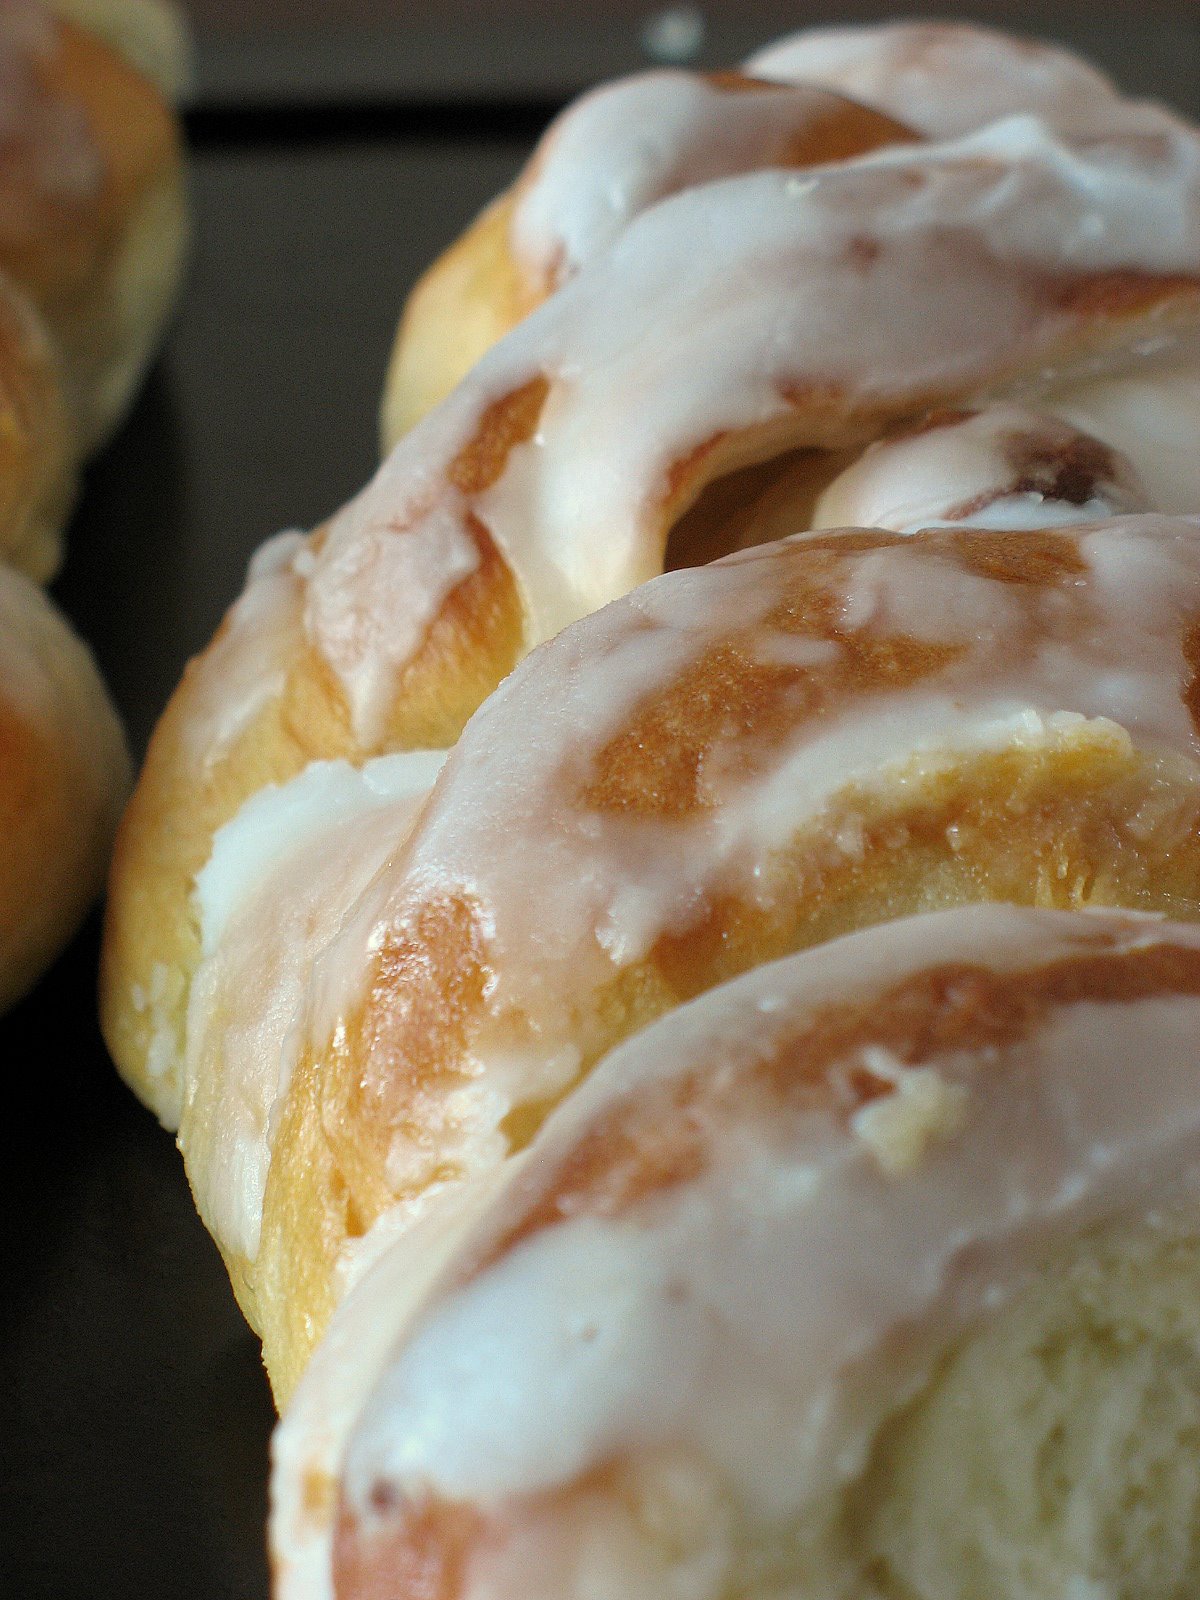
People think I am crazy when I tell them how I relax on the weekends….I knead dough, I watch yeast proof and bubble, I covet the rising of my loaves and delight in the smell pervading through the house. The week has been strange and hectic as I mentionned a couple of days ago and yet the only way I know to relax and recover from it is by making breakfast treats for us or the neighbors. I have got scones in the oven as we speak and we just devoured a half of this beautiful cream cheese braid you see up there.
It seems that I have done a lot more bread baking than actual dessert making this week but what you don’t see is the behind the scene…There was a couple of birthday cakes, a French croquembouche for a wedding rehearsal and a whole lot of chocolate making. Granted some weeks my kitchen ressembles more a bakery than a restaurant but I am ready for a change with a couple of greatevents that are coming up. I also have to confess that the weather has been so nice that I have been caught playing outside when I should have been doing more adult chores (paying bills, cleaning, etc…no fun!)
What is special about this braid…? The cream cheese replaces most of the butter and leaves you with a very soft dough, very creamy without being over the top. The same dough can be the base of multiple variations and I usually do a hazelnut or almond filling alonside this one because it seems that one is never enough!
The inspiration to replace the butter with the cream cheese came from this recipe. The Fresh Loaf is a mine of knowledge and ressources for novice or advanced bakers and this blueberry braid filled with all that creamy goodness made me want to incorporate the cream cheese in the dough to see if the flavor would mellow through it and if the dough would be nice and soft as a pillow. I also have to say that I was getting a little lazy with the whole rolling, spreading the cheese inside, braiding, etc… thus dumping the cheese in the Kitchen Aid alongside the butter. It worked one night and I never looked back!
Dough:
2 eggs
1 1/2 teaspoons salt
1/3 cup sugar
2 1/2-3 cups unbleached all-purpose flour
6 oz. cream cheese, softened
2 oz. butter, softened
Glaze:
1 cup powdered sugar
1 Tb. melted butter
milk
For the sponge: mix the sugar, yeast, and flour together in bowl. Pour in the warm milk. Beat until smooth, then cover with plastic wrap and set aside for 1/2 hour.
Add the eggs, salt, sugar, and one cup of the flour to the sponge. Beat until smooth. Then add the cream cheese and butter in small chunks and beat well. Add the remaining flour a handful at a time and mix in until you get a soft dough.
Knead the dough by hand or with a mixer about 5 minutes.
Place the dough in a greased bowl, cover with plastic wrap, and let rise and room temperature until doubled in size, 1 1/2 to 2 hours. Deflate the dough, recover the bowl, and refrigerate overnight.
The next day, take the dough out of the fridge, deflate and divide in 2 equal pieces. For the braid, I divide one piece in too and twist them together (so not exactly the conventional braid, but at this point I can’t wait any longer!!). Place it on parchment paper lined baking sheet, allow to rise 45 minutes, brush with some egg was and bake at 375 for 20- 25 minutes.
Take out of the oven, and while it cools a little, prepare the glaze. Add enough milk to the powdered sugar and melted butter to make a soft spreadable glaze and our all that goodness on your braid…and go ahead and eat because after all that you really deserve it!
Do the same for the other braid, or roll out into a rectangle and fill with your avorite filling and braid it according to the recipe on the Fresh Loaf. The details are great and you can’t mess up, makes me wish I ad blueberries left because I have the other loaf awaiting its fate in the fridge…