
bread

Butterhorn Garlic Knots

Butterhorns Garlic Knots-Copyright©Tartelette 2008 Last month I posted about a Gruyere stuffed loaf that I had baked during a live Skype baking session with a bunch of flour obsessed gals and gents. We did not intend to make it a monthly thing, we are not even a baking group, Lord knows we are all super busy with, work, life, blogging, etc…We just decided to take one morning here and there to bake in our comfies and just let our mouths get a little loose and our minds in the gutter and I somehow get blamed for this each time (wink wink I also teach them how to type in Helenese but that is for another post). Ok, I’ll admit that last time I did say out loud that the loaves looked like female genitals or breasts implants gone wrong. This time I am glad to report that I passed on the baton to Kelly who formed little turdy things with little funny things sticking out.

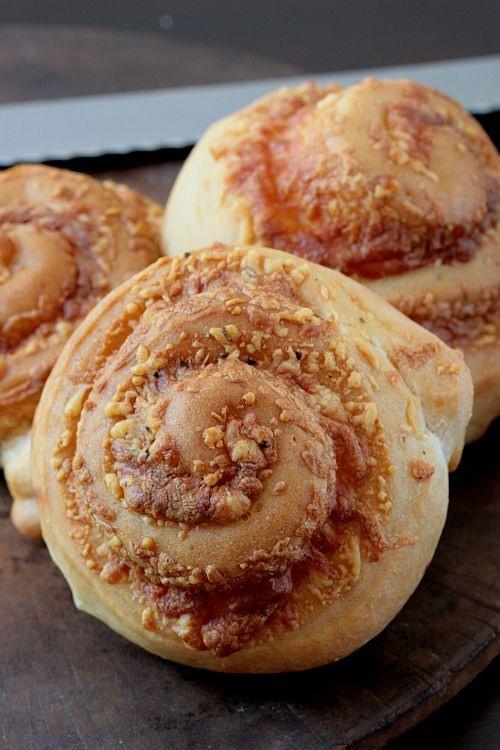
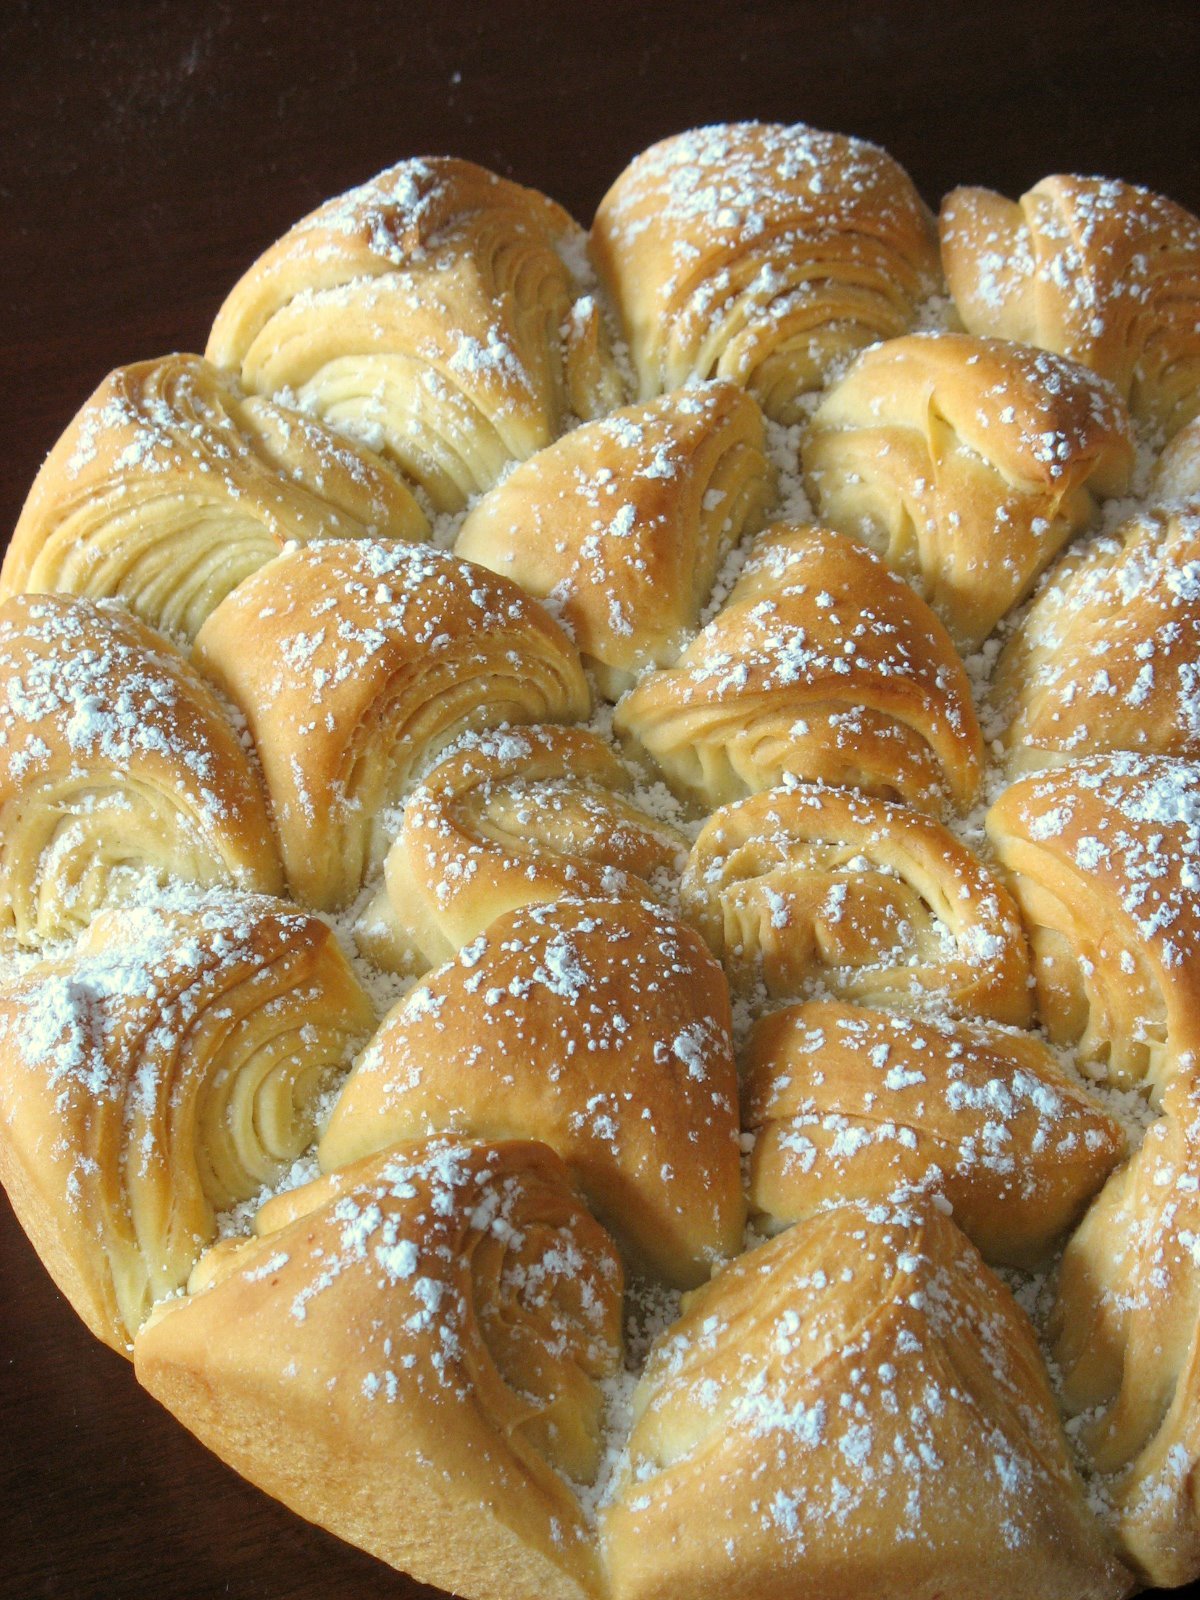
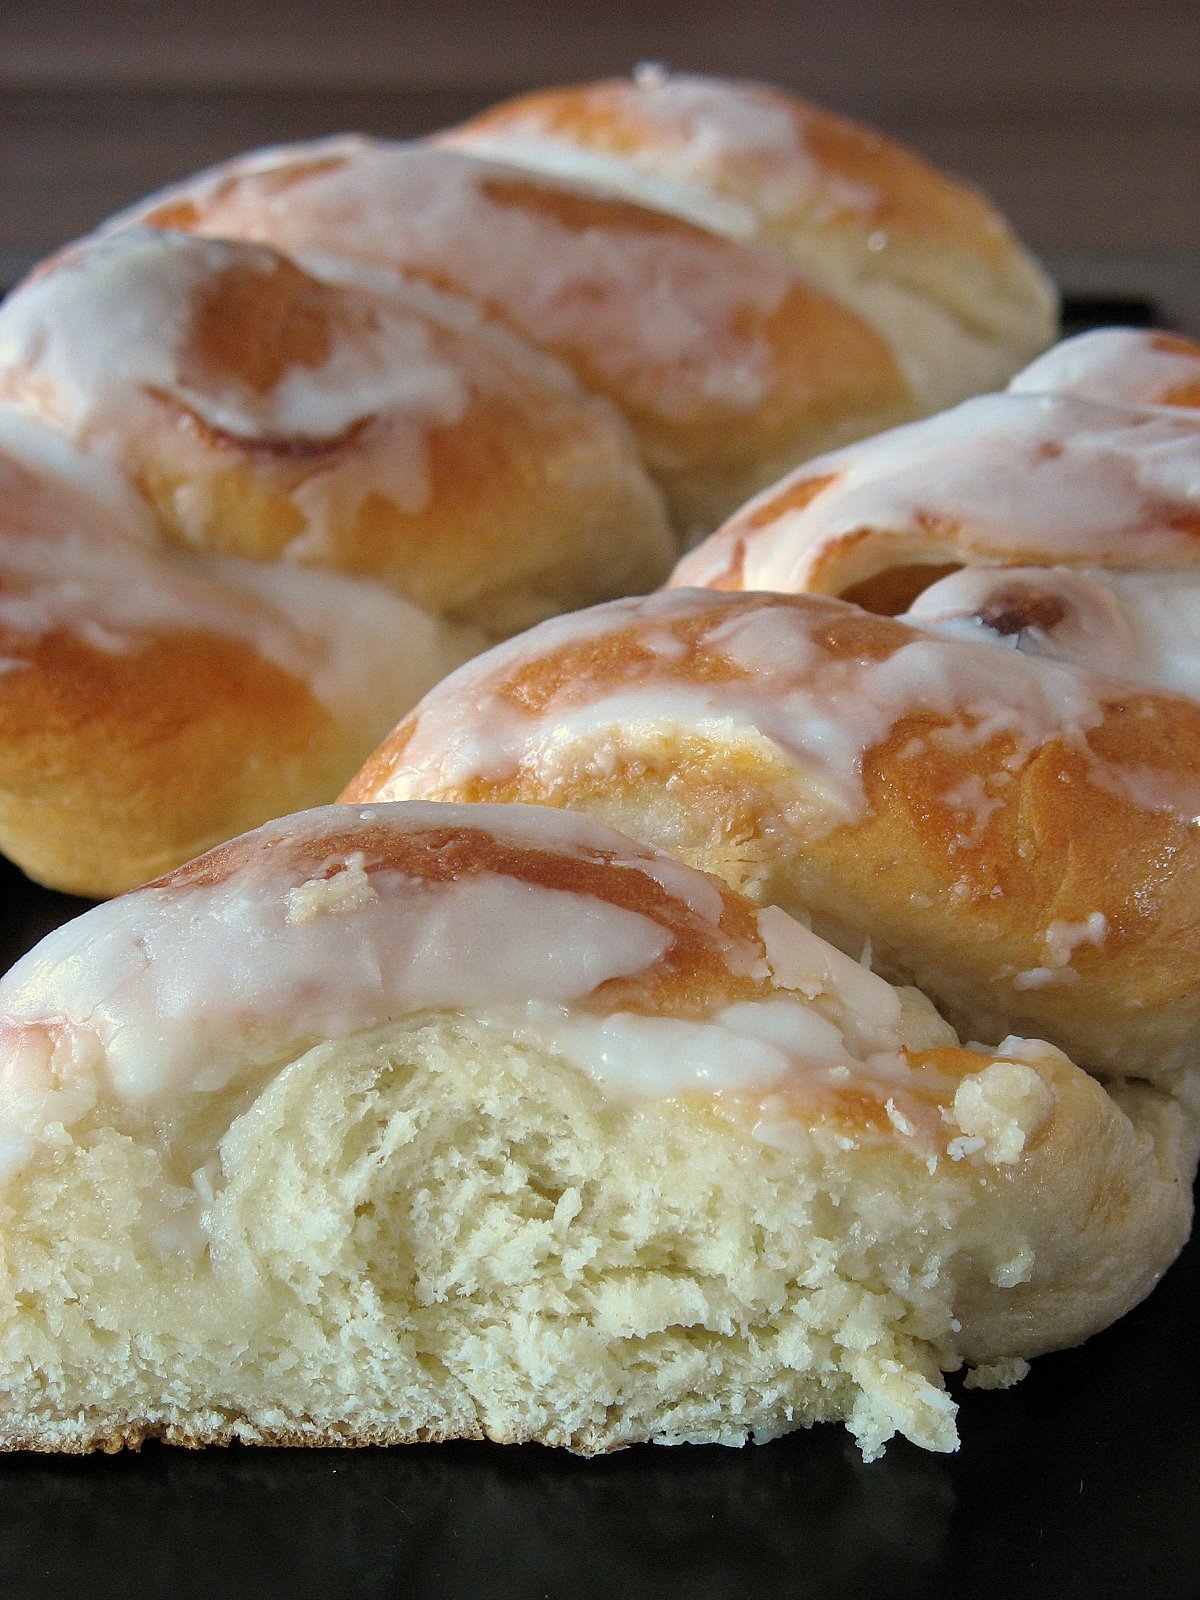
We had not really planned to get together again so soon but then Lisa started to email us with visions of garlic rolls she recently had at a restaurant and you know that if you mention rolls and yeast, I lift an eyebrow and Mary sends you the recipe within 12 hours so after a little scheduling we were on for this past Sunday. We decided to pick between two different recipes and although I plan to do the King Arthur one soon, it just was not going to happen that weekend for various reason I will get to another time. I got to give it to Mary though for elaborating blindly on a Bon Appetit recipe based on Lisa’s description, the end product may not have been exactly what she remembered but the rolls were inhaled eaten in three days, no neighbor involved.

I don’t often post about breads unless it is a Daring Baker challenge or another event but Sunday is bread baking day at the house so B. did not find anything unusual in my baking behaviour that day execpt for running back and forth to the laptop and giggling and laughing every other minute. A couple of times he came wondering why I was staring at the screen, with my arms crossed holding my ribs. "They’re writing too fast, I have a missing wobbly w, a missing h, and a wandering m…" When you bake bread, there is some downtime (dough rising) and some fun time (dough shaping, which proved me that I can’t have Lisa on the phone and make a bread knot at the same time!) so bread, cooking, laundry, grocery shopping were also accomplished by some or all while we left the chat window opened.

Beside the three ladies mentionned above, Tanna, Chris, Marcela, Sara, and John, joined in the fun to make the garlic knots.

Butterhorn Garlic Knots-Copyright©Tartelette 2008
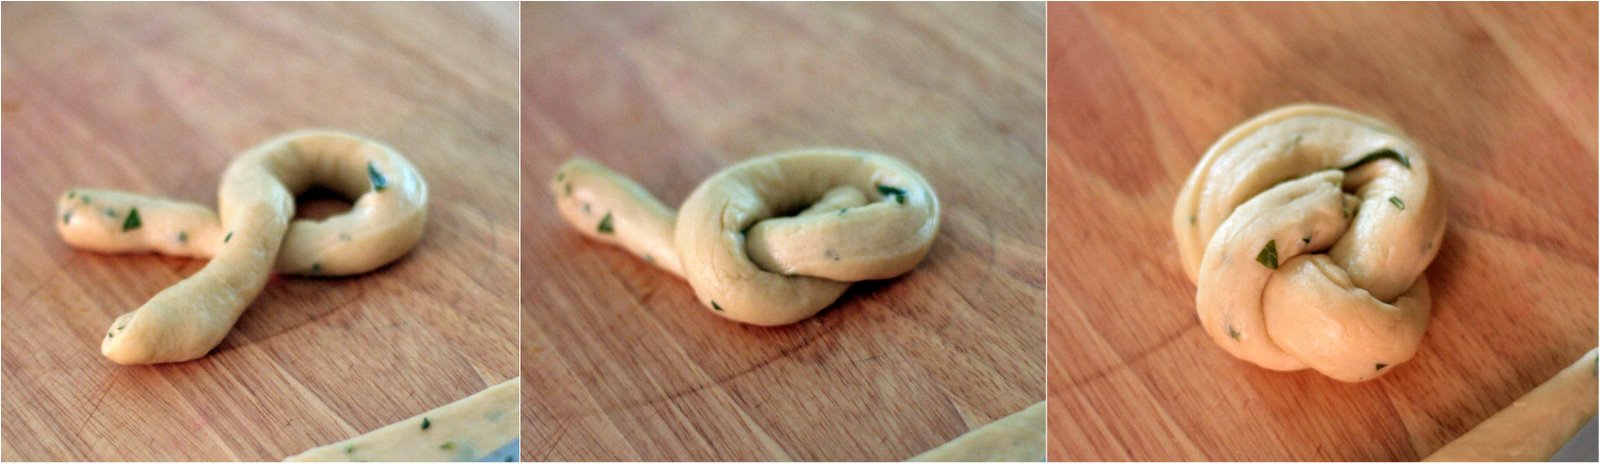
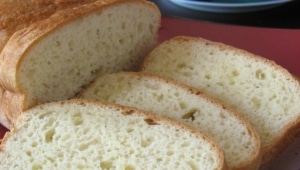
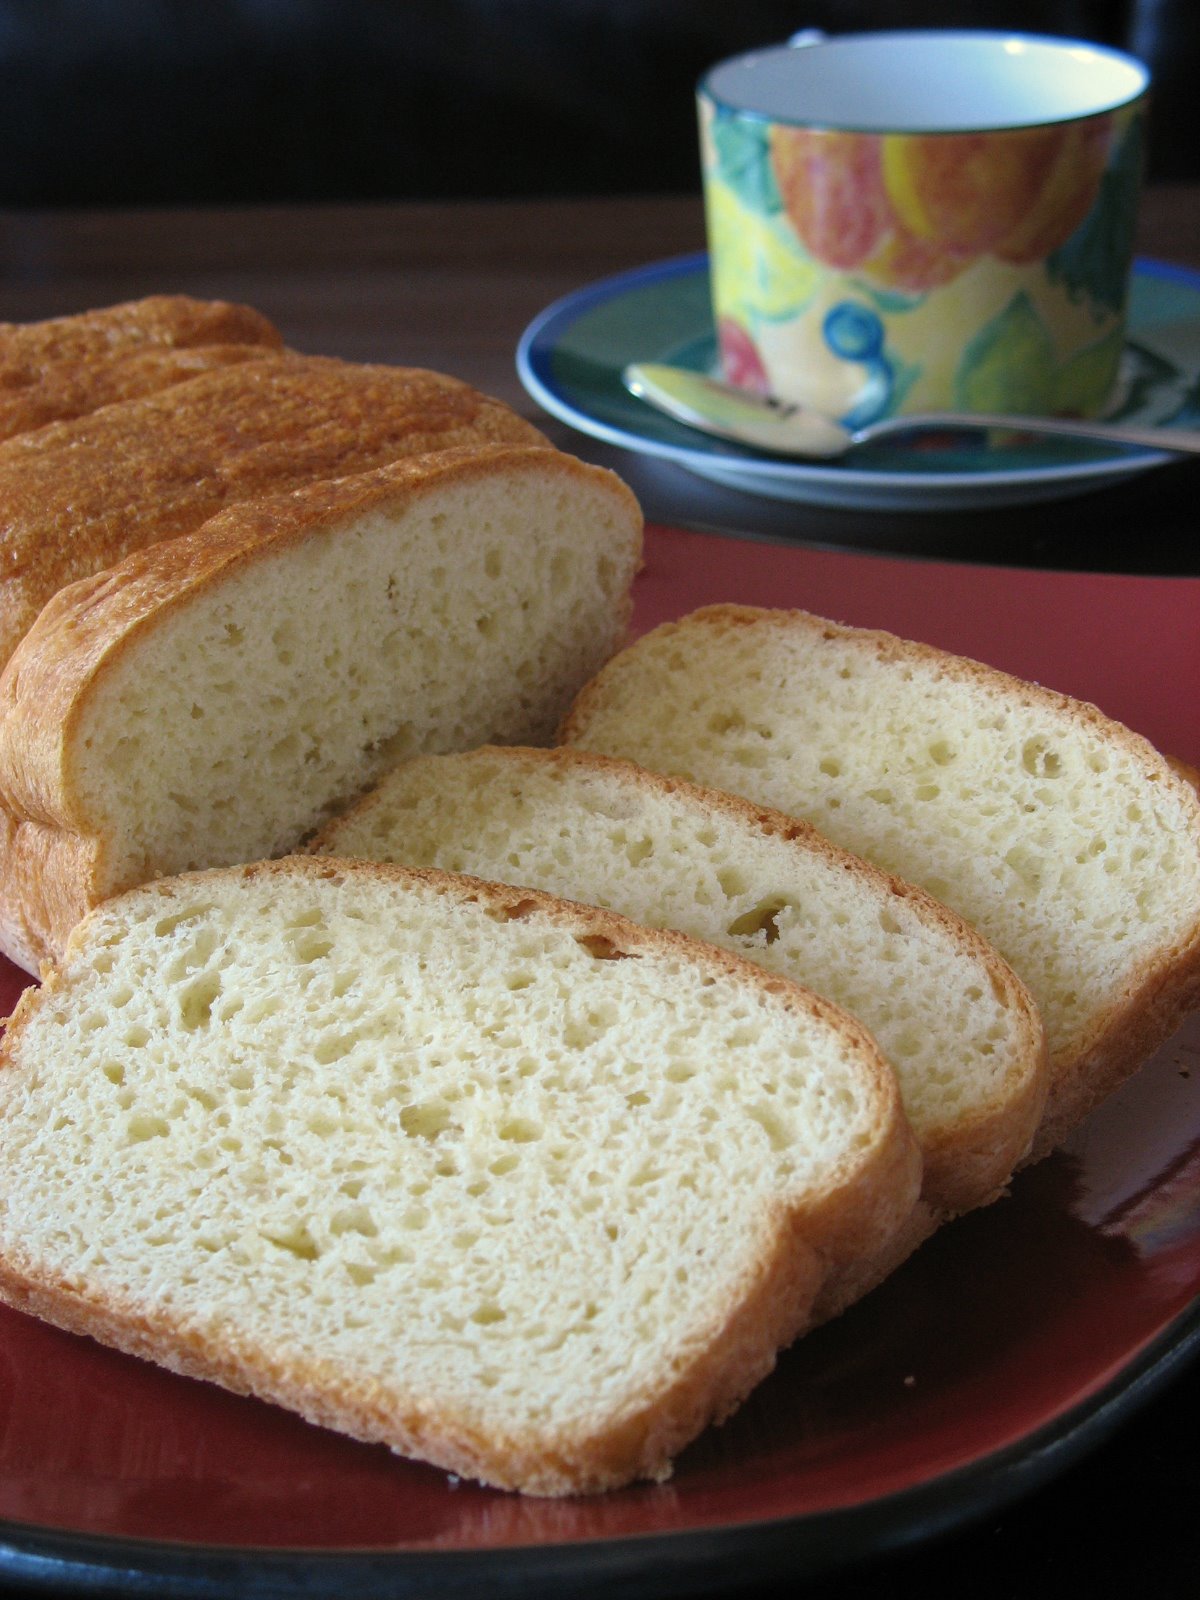
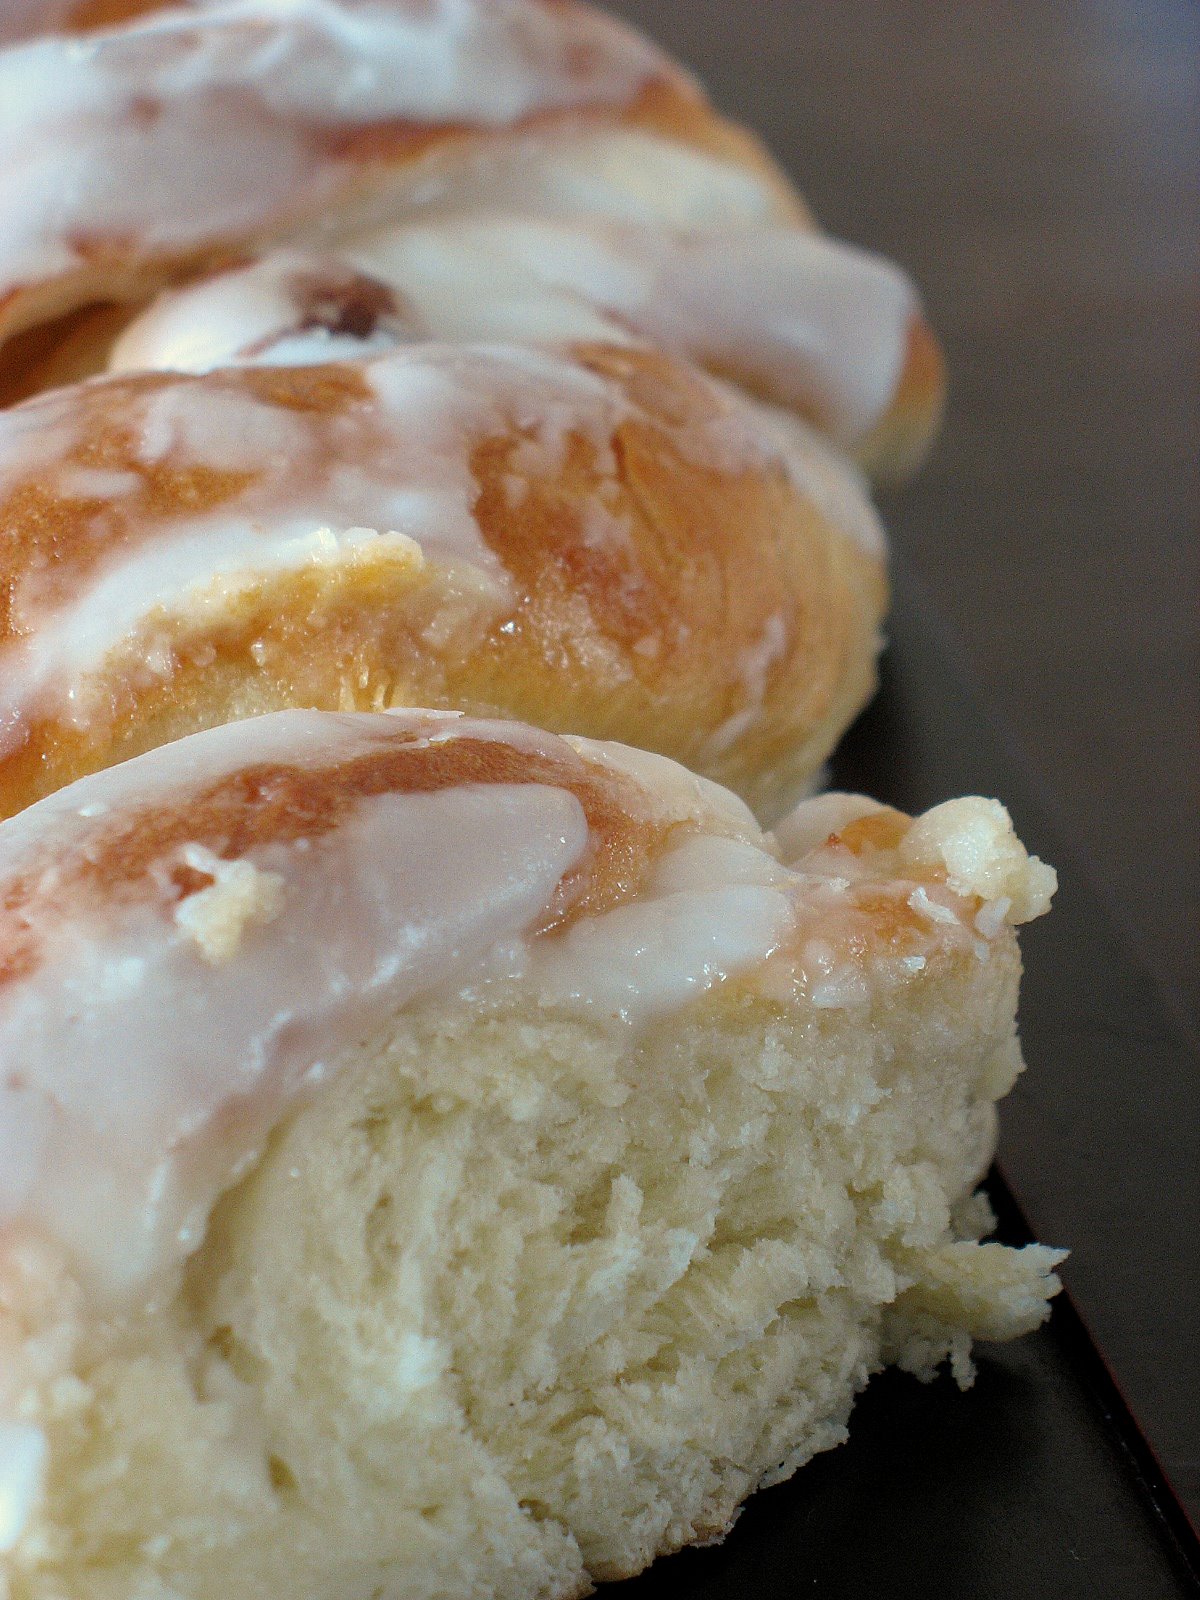
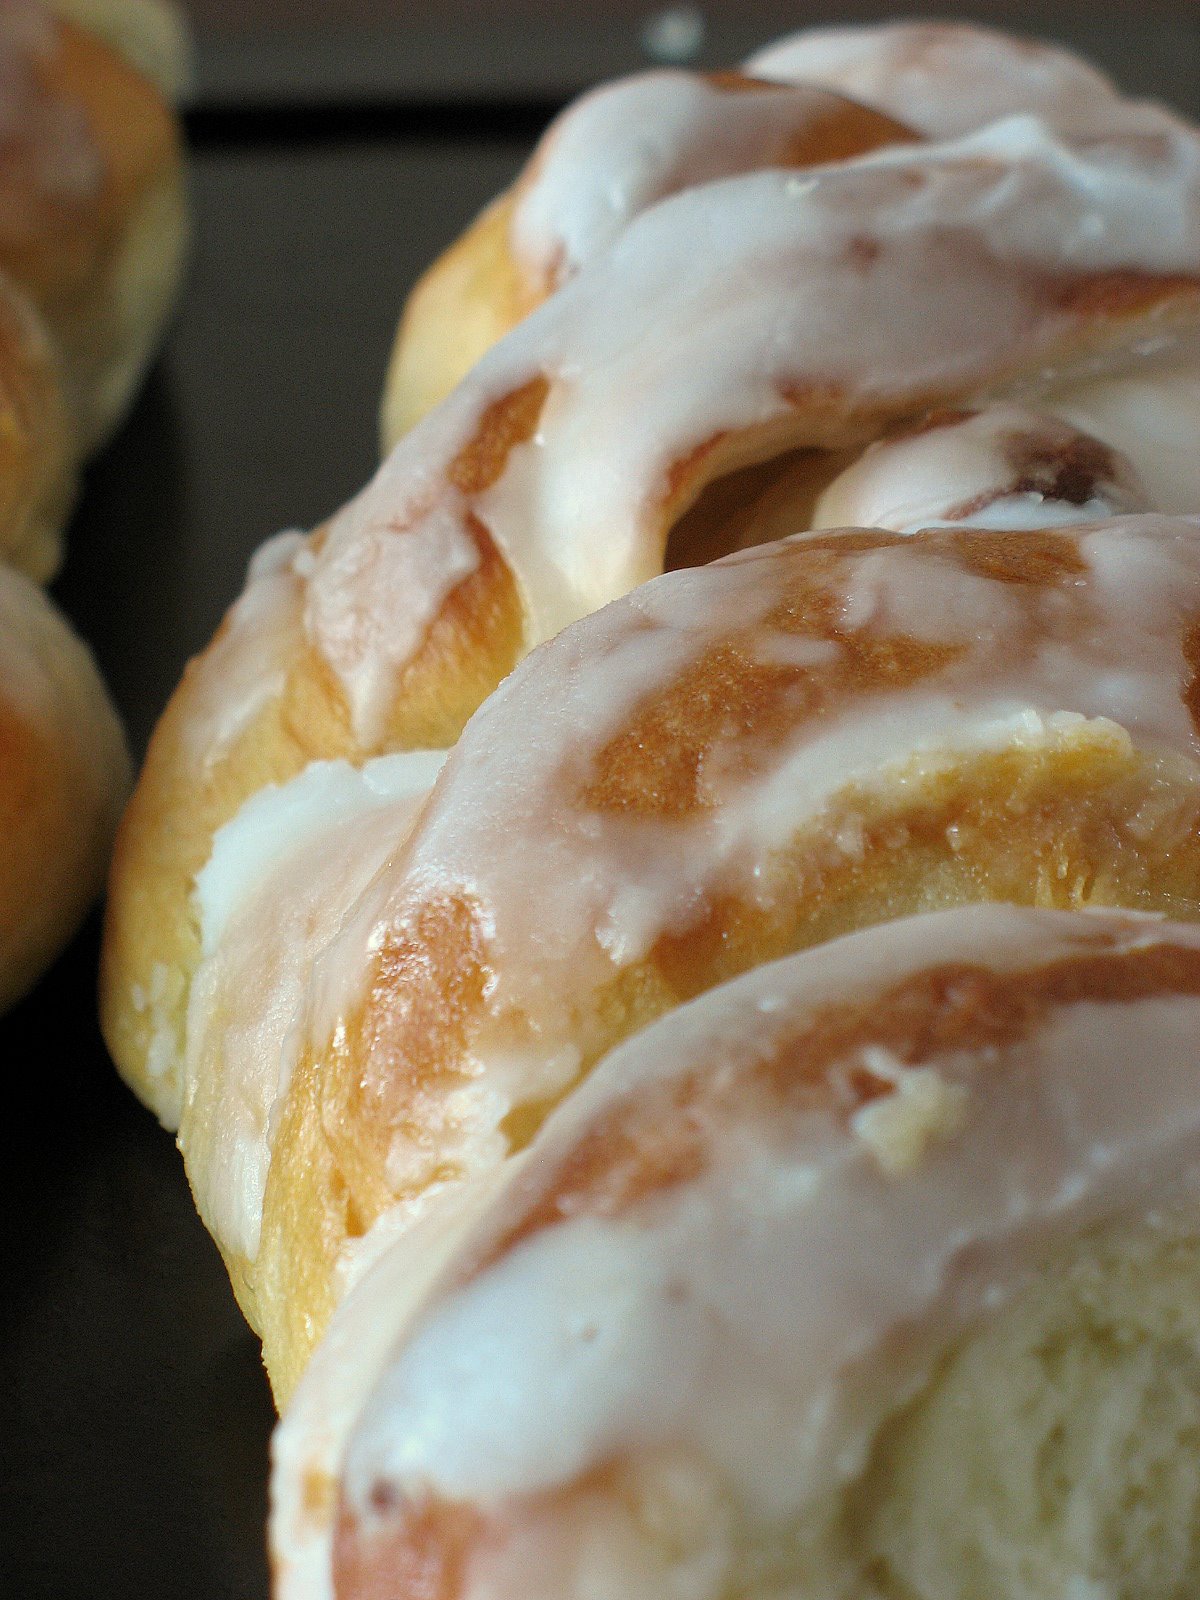
The rolls? Good…no, very good! A little too sweet but since I had made a half batch that day, I made another half batch with my correction later Monday evening and those worked better for our taste. European yeast rolls are not as sweet as they are here so B. was happy with the first batch as I was with the second. The shaping was fun if not strange, I did some just fine and dandy and some had me think I had glued fingers and a stalling brain but it’s dough….gather your mess into a ball and do it again, no biggie. I have to say that the more I was looking at the post on the KA blog, the more confused I was getting…step away from the computer and just knot.

Butterhorn Garlic Knots-Copyright%copy;Tartelette 2008 
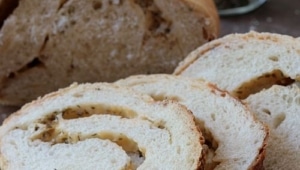
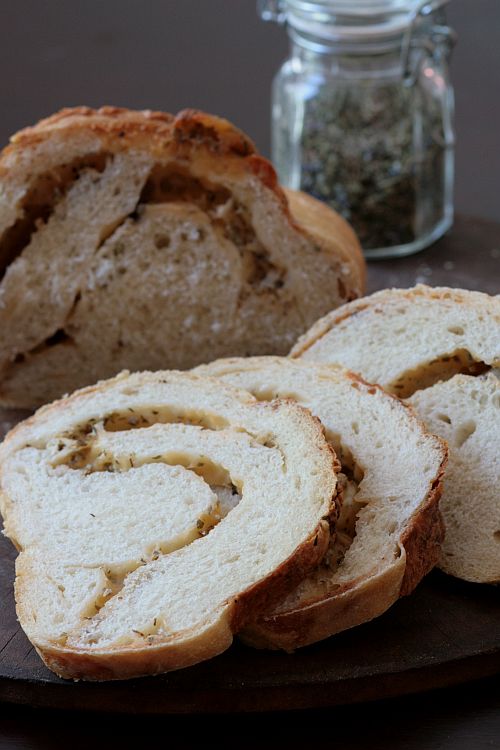
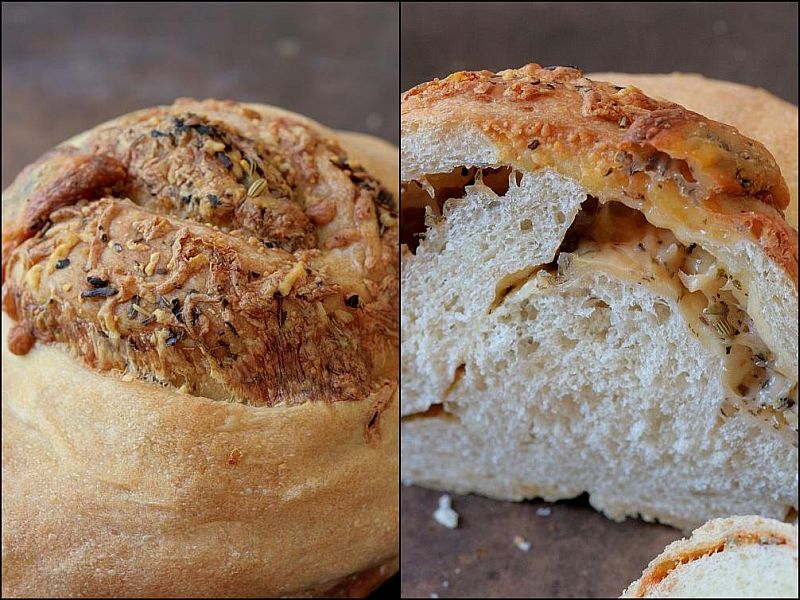
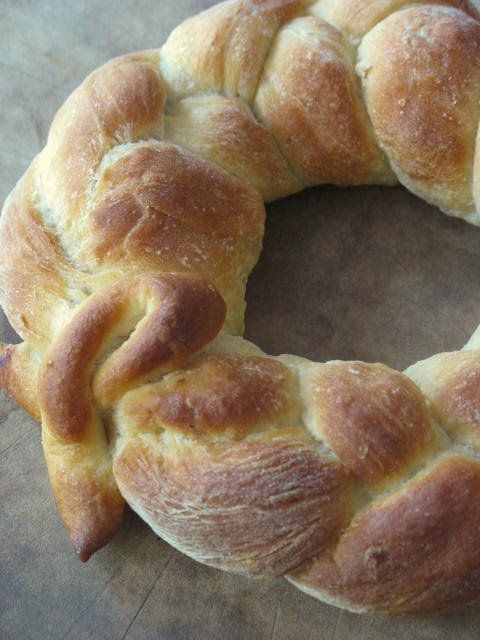
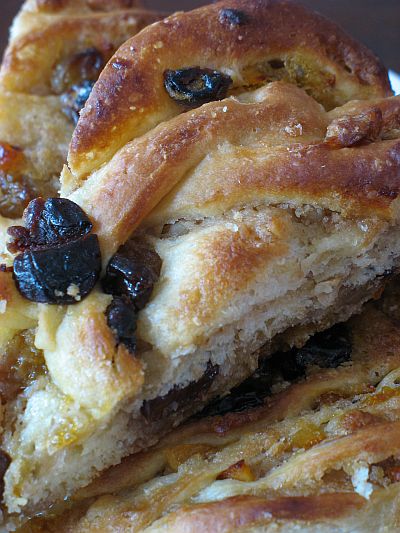
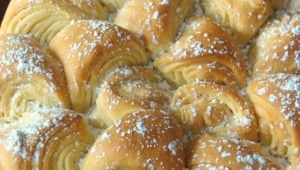
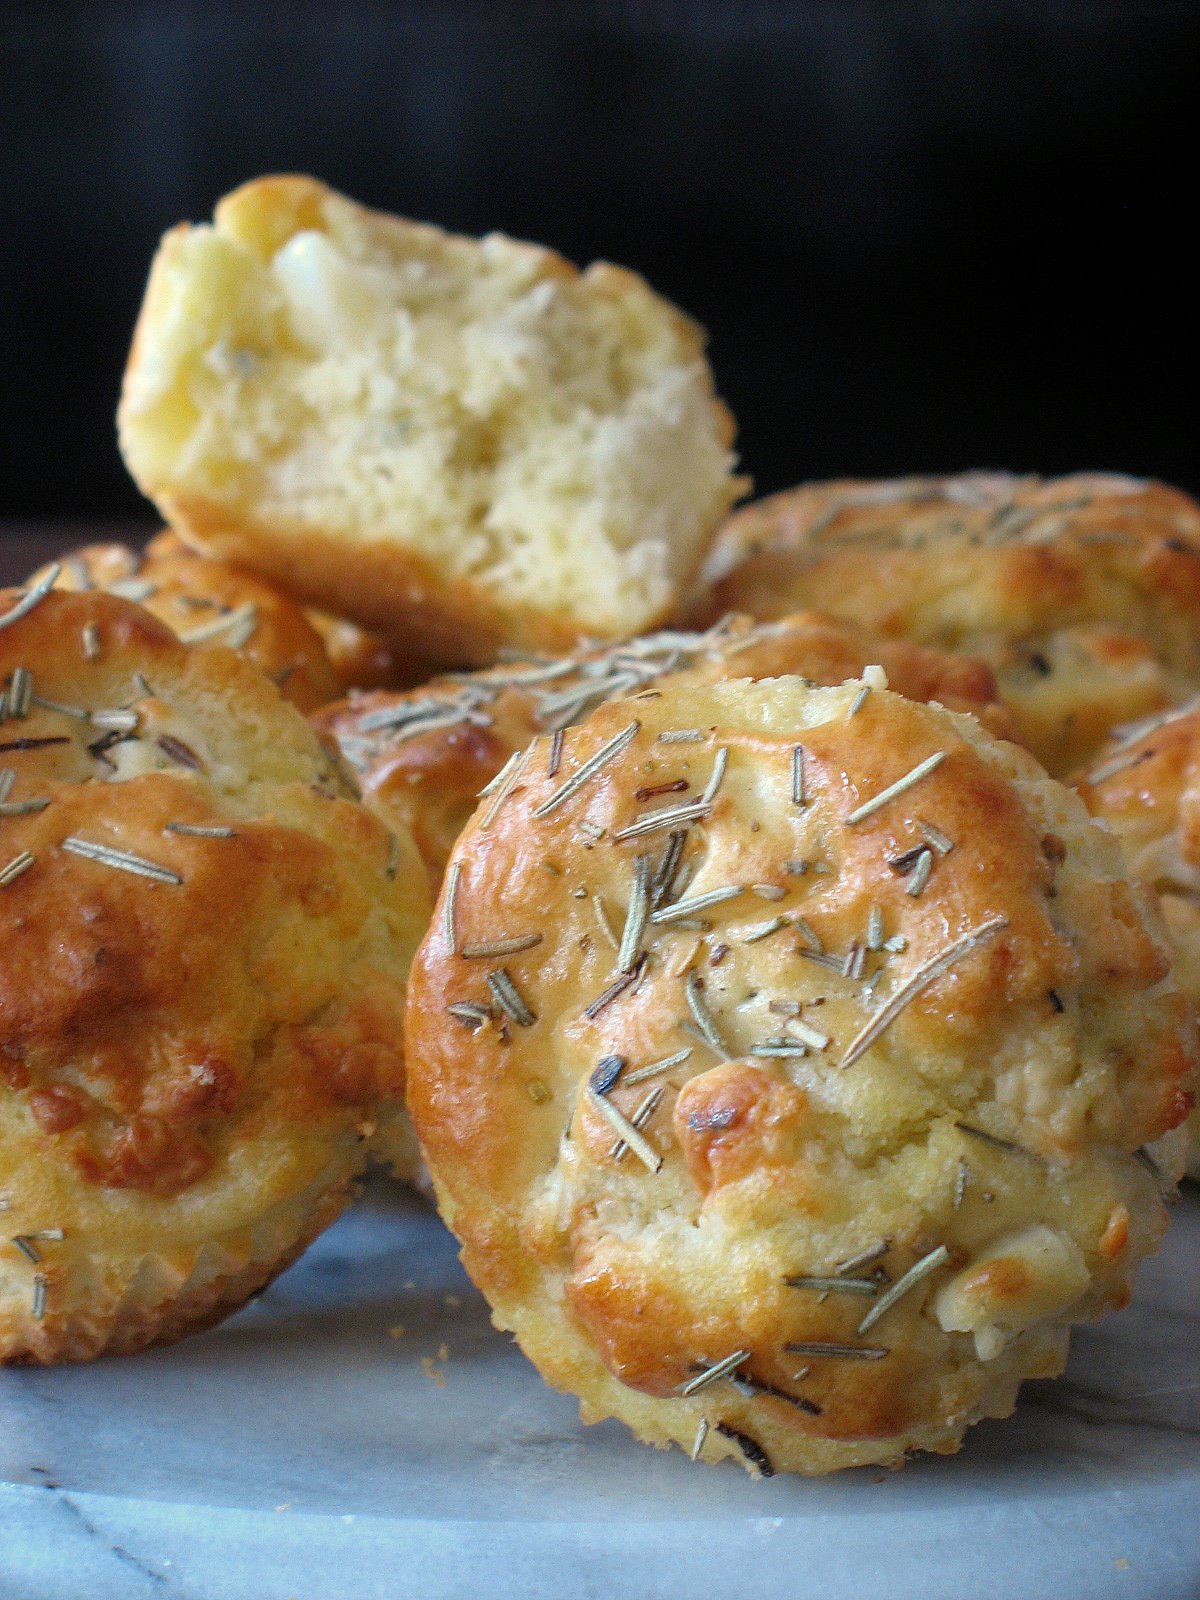
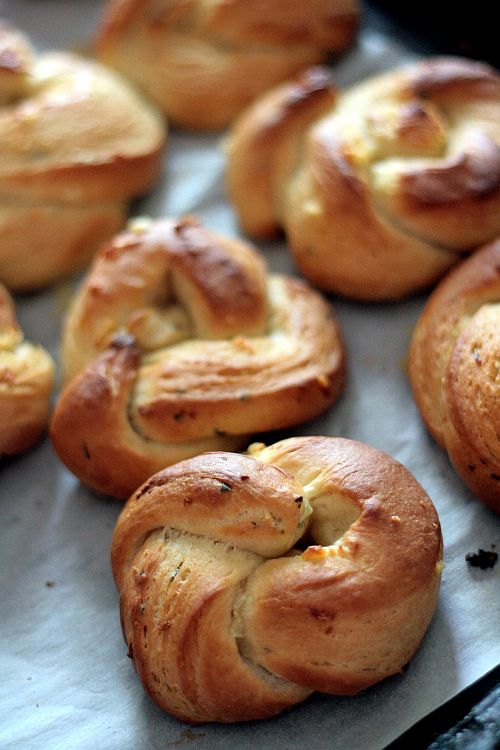
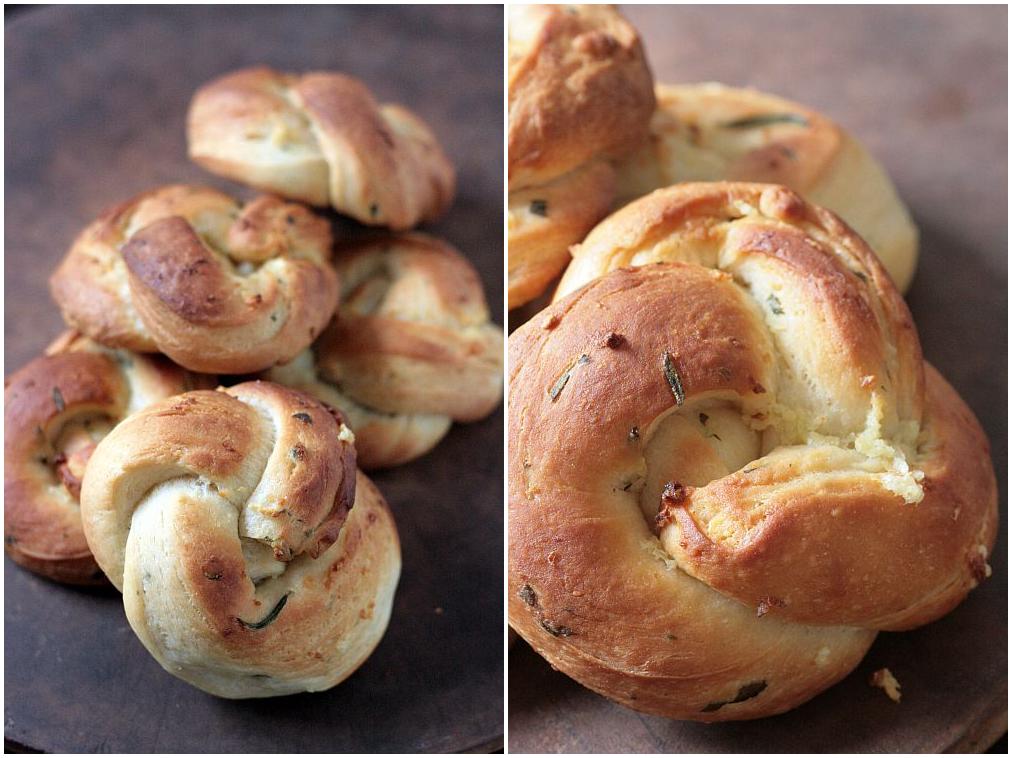
Once the knots were formed, the instructions were to brush them with melted butter and crushed garlic. I had planned to use some fermented black garlic that I had received as a gift but I had a foggy brain that morning and just chopped regular garlic before I remembered. Another reason to do these again. They got brushed before, during and after baking and all that butter soaking in the rolls gave them a really moist texture without making them greasy. I did add fresh chopped basil and rosemary to the dough. The house smelled like a pizza parlor the whole day, and with the neighborhood males gathered in the garage "watching" the thunderstorms and drinking beers, I guess it did feel like one!

Butterhorn Garlic Knots-Copyright©Tartelette 2008 Butterhorn Garlic Knots (originally from Bon Appetit, worked on by Mary and reworked by me)

Makes 18
1/2 cup whole milk
6 Tb unsalted butter cut into pieces
1/4 cup warm water
1/2 tsp plus 1Tb sugar, divided
1 Tb dry instant yeast
1 large egg, room temp
3 to 3 1/2 cups, AP flour
1tsp salt
1/2 Tbsp melted butter
1/3 cup unsalted butter, melted
3 cloves garlic, minced finely

In heavy medium sized sauce pan over low heat, heat milk and 6 Tb of butter until the butter is melted. Do not let it boil. Let cool to 115F degrees. Combine warm water, 1/2 tsp sugar, and yeast in small bowl and let stand for 5 minutes (this is for flavor not to proof yeast, unless you are using active yeast in which case you are proofing and getting flavor)
In large bowl of stand mixer using the whisk attachment, beat egg and remaining sugar at low speed until blended. Beat in milk mixture. Gradually add 2 cups of flour, 1/2 cup at a time until blended smooth. Replace the whisk with dough hook. Add yeast mixture, salt, and 1 cup of flour (1/2 cup at a time), beat at medium low speed. You will have a very wet and loose dough that climbs the dough hook but falls back down the bowl by this time. One Tb at a time, add enough remaining flour to form a firm but sticky dough ball. The dough balls will pull away from the sides of the bowl and not flop back to the sides.

Pour 1/2 Tbsp melted butter in large bowl that can be fitted with a lid or that plastic wrap clings to well. On very lightly flour covered counter and with lightly floured hands, give dough 3 – 5 quick hand kneads to form good dough ball and then put in buttered bowl, turning dough over to coat with butter. Cover bowl with lid or plastic wrap and let rise in a warm, draft free place (I like the oven turned off with the pilot light light on…or the laundry room when the dryer is on!) until doubled, about 1 1/2 hours. Punch down dough, fold dough over in half and then half again, and brush with melted butter. Cover bowl again and let rise again in same warm draft free place until doubled (about 1 hour).
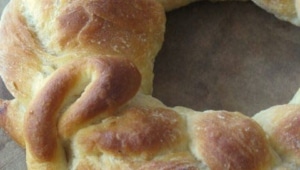
From here follow the directions for making the knots as shown on the KA website . Just don’t tuck the ends in to get the shape you want.
Cover and let rise until double, brush with melted butter and garlic and bake in 350F preheated oven for 15 -20 minutes.

Cheese Stuffed Crusty Bread – Baking With The Gals

Cheese Bread-Copyright©Tartelette 2008 Remember when a bunch of crazy gals decided to revisit a cinnamon bun recipe by making the Cinnabon knock-offs a few months back thanks to a recipe that Lisa provided? Well, another type of breadish yummy bake got into our mail boxes last month and this time Mary was tempting us with promises of hot cheesy bread on a quiet Saturday afternoon. Gruyere Stuffed Crusty Rolls from the King Arthur Flour site to be precise. Was I game? You bet I was…so where Lisa, Ivonne, Stephanie, Laura-Rebecca, Sara and Kelly. When I said I’d join in the fun I had no idea that the day in question would turn out so…weird.

Before I tell you more about it though I have to say that I may not be the most eloquent blogger today or the most "happy" one…The reason why our "Cheese Bread" day was weird is the same why I am feeling awkward posting today. B.’s band mate L. has been sick with cancer for over two years now, the same one that took my brother away, the same devastating oesophagus cancer. A couple of days before we gathered last week on Skype to make and bake our bread and chat and laugh, he was sent home after a difficult stay at the hospital. He knew the end was near and he asked to be able to say goodbye to all the musicians and friends he had played with and for over the years. His wife called the young ones who had the most energy to help make this smooth and organized and that’s why B. was on duty calling all the numbers they could find of anybody who might want to come and visit one last time. I volunteered to be in the kitchen fixing a breakfast and a lunch buffet for whoever might stopped by. I was also doing a little stint at the old restaurant that night to get them over the hump of Mother’s day…as if I had nothing more to add to make the day complete, right?!!

I had post-its everywhere to start the bread on Friday since it needs a little starter the day before. Saturday morning I took the starter, flour and cheese to L.’s house just in case I would get stuck there and needed to proceed with the bread. I ended up mixing it up, letting it rise, rolling it, filling with the cheese (parmesan and Monterey Jack), and rolling it into a ever rising and expanding log, all over there. That’s when it hit me: I have got to drive across town with that huge…giant snake of a dough in my trunk, shower, cut it, bake it…and leave it to the hungry wolves of neighbors that I have!!

I was running high on adrenaline and lack of sleep and I think that once it actually come out of the oven, I went to type that it looked like…bleep-bleep-bleep…Well, I don’t think, I know and there is actually our Skype archived conversation to prove it. Well, let’s just that my mind was in the gutter big time when the bread came out of the oven, but the smell of the cheese and the herbes de Provence I had added was too hard for me to resist and as soon as it was cool enough to handle, I ripped one round open and "oh my"…I just wanted to stay there and forget the day, the world and the reality of what was actually going on.

I left for work and I left 3 1/2 rounds of bread on the kitchen counter. When I came back that evening there was 1 1/2 loaf left….I love that I have such a generous husband, so giving in fact that he took 2 loaves down to the neighbors for our weekly get together. I would have probably done the same but…after I took some pictures!! Anyways…From what they said, it was a hit! Seriously, can you resist hot, melting cheese on/in bread fresh from the oven? Nah…me neither!
We loved it so much that I made it again later that week but rolling and cutting "the snake" in 12 rolls as if I were making cinnamon rolls minus the herbs that time. Another "oh my" came out of my mouth that day too. I urge you to go ahead and make it…it is highly comforting, addictive and simply wonderful.

Cheese Bread-Copyright©Tartelette 2008Here is the recipe as I modified it because I did not use the King Arthur brand of flour and I went with all purpose flour instead of bread (except for the starter) without a problem. I also replaced the gruyere with what was in the fridge since the crazy week and weekend made my brain very spongy and I forgot to get gruyere everytime I went to the store.

Cheese Stuffed Crusty Rolls:

Starter:
1 1/4 cups (5 1/4 ounces) bread flour
1/2 teaspoon salt
1/2 teaspoon instant yeast
1/2 cup (4 ounces) cool water

Dough
all of the starter
1 cup + 2 tablespoons (9 ounces) to 1 1/4 cups (10 ounces) lukewarm water (I used the lesser amount since it was humid that day)
1/2 teaspoon salt
3 1/2 cups (14 3/4 ounces) all purpose flour
1/2 teaspoon instant yeast

Filling
1 1/2 cups (10 ounces) grated Montery Jack cheese
1 cup grated Parmesan
2 Tb Herbes de Provence

To make the starter: Mix the 1 1/4 cups flour, salt, yeast, and 1/2 cup water in a medium-sized bowl. Mix till well combined. Cover and let rest overnight at room temperature.
To make the dough: Combine the risen starter with the water, salt, flour, and yeast. Knead by hand or with a stand mixer for a few minutes (I went with 5 minutes by hand). Place it in a lightly greased bowl, cover, and let it rise for 1 1/2 to 2 hours, until it’s nearly doubled in size. Gently deflate the dough, and pat and stretch it into a ¾"-thick rectangle, about 9″ x 12″. Spritz with water, and sprinkle with the grated cheese and the herbs. Starting with a long side, roll it into a log, pinching the seam to seal. Place the log, seam-side down, on a lightly floured or lightly oiled surface. Cover it and let it rise for 1 to 1 1/2 hours, till it’s puffy though not doubled in size. Towards the end of the rising time, preheat the oven to 425°F. Gently cut the log into four crosswise slices, for mini-breads; or simply cut the dough in half, for two normal-sized loaves. Place them on one (for two loaves) or two (for four mini-loaves) lightly greased or parchment-lined baking sheets, cut side up. Spread them open a bit, if necessary, to more fully expose the cheese. Spritz with warm water, and immediately place them in the preheated oven. Bake for 20 minutes (for the mini-loaves), or 35 minutes (for the full-sized loaves), or until the cheese is melted and the loaves are a very deep golden brown. Remove them from the oven, and cool on a rack.
Note: You can also roll the log and cut 12 slices from it and set them on a parchment paper lined baking sheet and proceed with the recipe as written.

Cheese Bread-Copyright©Tartelette 2008

L. went back to the hospital in the middle of the week so I brought half the rolls to his nurses and the doctors taking care of him. I hesitated posting at all about it today because Lee passed away Saturday night, one week to the day we organized this little visits-marathon weekend for him. I just would like you to indulge me in a little description of him: really tall…think over 6 feet, really big…think Santa Clause belly…about 72 years old although people easily gave him 10
years less…and one of the sweetest and most considerate guys I have met. I am a band wife…the youngest in the band actually, which means that I still go to their gigs on a regular basis and he would always treat me like a daughter, pushing his wife, to come along if he knew I was there. They were married just 15 years ago, finally finding the right companion and lover in each other. L. loved food, he loved bread and he loved desserts…so here you go big guy! This one is for you! His favorite song? "Just A Bowl Of Butterbeans"…. Love you L.! Thank you for all the giant hugs and giant laughs, you will be as missed as you were loved.

A New Bready Bunch: The Daring Bakers' Tender Potato Bread


Braid or Couronne

What if I were to tell you I am anti-carbs?….Ahahahahah!!! Well, you reacted the way I expected: a big loud laugh instead of throwing me a stone. Yeah, because let’s face it, telling you that Tartelette is a blog sans carb would be telling you it never snows in Ohio. Where am I going with this? To the latest Daring Bakers’ Challenge, Tender Potato Bread, chosen by this month host, Tanna from My Kitchen In Half Cups.

Bread….Oh there is home made bread here at the house, surprise, surprise! We love bread and are always looking for the next best loaf and now we want Tanna to live on our street too. (gosh, there is a whole lot of bloggers I want as neighbors I just realized!!) Not only can the woman bake but she also knows to pick a very fun challenge. I know for some I am the weirdo down the street who likes to get hand deep in dough and make bread, 4-5 loaves a week…and there are just 2 of us (oh yeah, B. adapted the bread – cheese – salad dinner of the Mrs. without a complaint!) : dried fruit bread, brioche for our breakfasts and a couple of other breads like multigrain, rustic, artisan or European breads. There are a couple of starters in the fridge, in marked containers : Gertie is purple lidded, Bob is green. Gertie, my potato sourdough starter gives me the best bread ever so I was really thrilled to be able to play with another potato bread recipe this month.


Fougasse

Play is the word: sticky dough up to my elbows for about 15 minutes….now talk about some spa treatment!! The recipe calls for 8 to 16 oz of potatoes, the more potato the stickier the dough and mine was about 12 oz raw. I ended up using 7 cups of flour (6-8 cups were suggested) and boy was B. in for a treat of severe looks and mild curses. I know I appear all cool collected and calm on my blog but Lisa will tell you that when I get aggravated well, all that Southern cool goes out the window. When the boy asked if dinner was ready, I think the look I gave him was enough to sent him back to his garage to play or organize or bang on something because I was in the middle of pure sticky heaven. Don’t get me wrong, that was not challenging in itself. The challenging part was to keep everything I touched free of bread goo….I started to wonder how the dough would behave upon shaping.

Tanna gave us a lot of playroom with the shapes and flavors we could give our breads. I decided to go for a French shape first, a fougasse, filled with fresh oregano, a braid, and a fig and feta boule. The epis I made got eaten before I could take pictures so we’ll just have to imagine that one or wait until I do the challenge once again. The beauty of such a sticky dough is that if you mess up while shaping there does not seem to be a problem of over kneading. I think I played with the braid shape three or four times before I was happy and it still turned out tender. The only drawback we had with this recipe was that the bread turned a little tough after it was frozen for a week or so. Ah, what am I saying? It made great toasts, so I guess there isn’t anything bad with this bread.

I want to thank Tanna for choosing such a high quality recipe and being such an awesome host, responding promptly to all Daring Bakers’ inquiries, issues and troubles. Hats off to you!! You make the group proud! Check out the other 300 other Daring Bakers by visiting our blogroll. Thank you Ivonne and Lisa for making it as much fun for me every month!

Fig and Feta Boule
Tender Potato Bread, From Home Baking: The Artful Mix of Flour & Tradition Around the World by Jeffrey Alford and Naomi Duguid

4 medium to large floury (baking) potatoes, peeled and cut into chunks variety of potatoes you might want to use would include Idaho, Russet & Yukon gold (8 to 16 oz)
4 cups water (See Note)
1 tablespoon plus
1 teaspoon salt
2 teaspoons active dry yeast
6 ½ cups to 8 ½ cups unbleached all-purpose flour
1 tablespoon unsalted butter, softened
1 cup whole wheat flour

Put the potatoes and 4 cups water in a sauce pan and bring to boil. Add 1 teaspoon salt and cook, half covered, until the potatoes are very tender. Drain the potatoes, SAVE THE POTATO WATER, and mash the potatoes well. Measure out 3 cups of the reserved potato water (add extra water if needed to make 3 cups). Place the water and mashed potatoes in the bowl you plan to mix the bread in – directions will be for by hand. Let cool to lukewarm – stir well before testing the temperature – it should feel barely warm to your hand. You should be able to submerge you hand in the mix and not be uncomfortable.
Mix & stir yeast into cooled water and mashed potatoes & water and let stand 5 minutes.
Then mix in 2 cups of all-purpose flour and mix. Allow to rest several minutes.
Add yeast and flour to the cooled mashed potatoes & water and mix well. Allow to rest/sit 5 minutes. Sprinkle on the remaining 1 tablespoon salt and the softened butter; mix well. Add the 1 cup whole wheat flour, stir briefly.
Add 2 cups of the unbleached all-purpose flour and stir until all the flour has been incorporated. At this point you have used 4 cups of the possible 8 ½ cups suggested by the recipe. Turn the dough out onto a generously floured surface and knead for about 10 minutes, incorporating flour as needed to prevent sticking. The dough will be very sticky to begin with, but as it takes up more flour from the kneading surface, it will become easier to handle; use a dough scraper to keep your surface clean. The kneaded dough will still be very soft.

As a beginner, you may be tempted to add more flour than needed. Most/many bread recipes give a range of flour needed. This is going to be a soft dough. At this point, add flour to the counter slowly, say a ¼ cup at a time. Do not feel you must use all of the suggested flour. When the dough is soft and smooth and not too sticky, it’s probably ready.

Place the dough in a large clean bowl or your rising container of choice, cover with plastic wrap or lid, and let rise about 2 hours or until doubled in volume. Turn the dough out onto a well-floured surface and knead gently several minutes. It will be moist and a little sticky.
The dough is now ready for you to shape your breads in many different ways:

Divide the dough into 2 unequal pieces in a proportion of one-third and two-thirds (one will be twice as large as the other). Place the smaller piece to one side and cover loosely.
To shape a large loaf: Butter a 9X5 inch loaf/bread pan. Flatten the larger piece of dough on the floured surface to an approximate 12 x 8 inch oval, then roll it up from a narrow end to form a loaf. Pinch the seam closed and gently place seam side down in the buttered pan. The dough should come about three-quarters of the way up the sides of the pan. Cover with plastic wrap and let rise for 35 to 45 minutes, until puffy and almost doubled in volume.
To make a small loaf with the remainder:Butter an 8 x 4 inch bread pan. Shape and proof the loaf the same way as the large loaf.
To make rolls:Butter a 13 x 9 inch sheet cake pan or a shallow cake pan. Cut the dough into 12 equal pieces. Shape each into a ball under the palm of your floured hand and place on the baking sheet, leaving 1/2 inch between the balls. Cover with plastic wrap and let rise for about 35 minutes, until puffy and almost doubled.
To make focaccia:Flatten out the dough to a rectangle about 10 x 15 inches with your palms and fingertips. Tear off a piece of parchment paper or wax paper a little longer than the dough and dust it generously with flour. Transfer the focaccia to the paper. Brush the top of the dough generously with olive oil, sprinkle on a little coarse sea salt, as well as some rosemary leaves, if you wish and then finally dimple all over with your fingertips. Cover with plastic and let rise for 20 minutes.Place a baking stone or unglazed quarry tiles, if you have them, if not use a baking/sheet (no edge – you want to be able to slide the shaped dough on the parchment paper onto the stone or baking sheet and an edge complicates things). Place the stone or cookie sheet on a rack in the center of the oven and preheat to 450°F/230°C. Bake the flat-bread before you bake the loaf; bake the rolls at the same time as the loaf.If making foccacia, just before baking, dimple the bread all over again with your fingertips. Leaving it on the paper, transfer to the hot baking stone, tiles or baking sheet. Bake until golden, about 10 minutes. Transfer to a rack (remove paper) and let cool at least 10 minutes before serving.
Dust risen loaves and rolls with a little all-purpose flour or lightly brush the tops with a little melted butter or olive oil (the butter will give a golden/browned crust). Slash loaves crosswise two or three times with a razor blade or very sharp knife and immediately place on the stone, tiles or baking sheet in the oven.
Place the rolls next to the loaf in the oven.
Bake rolls until golden, about 30 minutes. Bake the small loaf for about 40 minutes. Bake the large loaf for about 50 minutes. Transfer the rolls to a rack when done to cool. When the loaf or loaves have baked for the specified time, remove from the pans and place back on the stone, tiles or baking sheet for another 5 to 10 minutes. The corners should be firm when pinched and the bread should sound hollow when tapped on the bottom.
Let breads cool on a rack for at least 30 minutes before slicing. Rolls can be served warm or at room temperature.

Apricot Couronne – World Bread Day

Apricot Couronne
Just like my baking partner in crime, Peabody (who is packing and moving right now), I am not posting as much as I would like to and let alone comment on other people’s blogs but the past few months have been rich with life and full of good times and family moments that have kept me away and scrambling for time to come here and post. Not, that I haven’t been baking! First there was my goddaughter Sophie during August, then a brief escapade to the beach and then my parents arrived. This Thursday I will be flying to my favorite home away from home and walking the markets and baking up a storm with another favorite lady of mine. That’s right folks, Lisa and I are at it again, but this time we have Mary to add fuel to the fire! I "need" a little weekend away! When I come back next week, we have another friend staying with us for a week….so you can imagine than my posts will be sparse…but I promise a filled November…how’s that?

I could not leave for my little escapade without celebrating World Bread Day, hosted again by the wonderful and talented Zorra from Kochtopf. Last WBD was a huge success and the After Party was a blast also. I know this is last minute, but this will give you the general mood of things around here at Casa Tartelette for the past few months and the coming weeks….rush…rush…rush… Except that for this bread, ain’t nothing but waiting, and being rewarded with the sweetest scent of yeasted apricot dough on a chilly morning (allright everything was there but the chilly part this morning). I know it’s last minute to post about World Bread Day, but trust me we have been celebrating by nibbling on this all day long!

The recipe is from one of my favorite break baker, the super talented Paul Hollywood. I first caught a glimpse of his talent during an interview on the French food network years ago and I fell in love with his simple and down to earth demeanour. I started collecting some of his recipes and was delighted to find a library of his tv show on the UK food network. Some recipes also have videos to go along and it becomes quite entertaining to listen to him while you bake. I bookmarked his recipe for Apricot Couronne at least a couple of years ago and it took me all this time to finally make it. Boy! Did I miss on something good for a long time! This bread is easy to make, the dough is soft and stretchable at will and the scent as you cut into it and serve it with a hot cup of tea is just …perfect. Makes me want to have a never ending supply of apricots and yeast to make this everyday! I made a a few change to it by substituting dried cherries for the raisins, adding orange marmelade inside with the filling instead of using it for a glaze. Don’t be scared by the cutting through of the roll and twisting of the dough, there is really nothing to it if you just dive in (Look at the video and you will see what I am talking about).

Apricot Couronne Apricot Couronne, adapted from Paul Hollywood.

For the dough
250g strong white flour
5g salt
50g butter, softened
120ml warm milk
12g fresh yeast or 7g dried (one packet)
1 egg, beaten

For the filling
120g dried apricots
150ml orange juice
90g butter
70g light brown sugar
35g plain flour
60g dried cherries
65g chopped walnuts
50g apricot jam

1. Prepare the filling. Place the apricots and orange juice in a bowl and set aside to marinate for a couple of hours.
2. To make the dough, place the strong white flour, salt, butter, warm milk, yeast and egg in a mixing bowl. If using dried yeast, dissolve in the warm milk first, let stand 10 minutes, then add the rest of the ingredients.
3. Mix well together to form a dough.
4. Turn the dough onto a lightly floured surface and knead for 6 minutes.
5. Return the dough to a clean mixing bowl and set aside to rise in a warm place for 1 hour.
6. While the dough is rising, drain the marinated apricots.
7. In a mixing bowl, cream together the butter and brown sugar until fluffy. Mix in the drained apricots, flour, dried cherries, and walnuts.
8. Turn the risen dough out onto a lightly floured surface. Roll out the dough into a rectangle, approximately 25 x 33cm.
9. Spread the apricot mixture evenly over the dough rectangle. Spread the orange marmelade over it.
10. Roll up the rectangle tightly until it resembles a Swiss roll. Roll it slightly then cut lengthways along the dough and plait the 2 dough lengths together.
11. Place the dough plait on a lined baking sheet and set aside to rise for 1 hour.
12. Preheat the oven to 200°C/400F
13. Bake for 25 minutes until risen and golden. Set it aside to cool.

Waiter, There Is Something In My…Brioche!

When Andrew announced the theme of this month WTSIM, my head started spinning….Bread! I make bread a couple times a week, from the simple dinner roll to sandwich bread to the more complicated sourdoughs and multigrains. This time around I thought about impressing my family with yet another elaborate creation but then I thought that the few readers that I have might want to know a little bit more about my tastes and the only thing to showcase that is in a simple brioche.

I like complicated, I like challenging, I thrive for multi level prepared plated desserts but comes sunday morning I live for my toasted slice of brioche. Simply buttered and touched by a spoonful of strawberry jam…nothing makes me happier. B. knows the ritual and has easily adapted to his French bride’s habits. Let’s face it: wine, cheese, brioche… who is to complaint?!

I have tried a multituted of brioche recipe over the years but I have to admit that since last month the recipe from Epicurious (extremely similar to Dorie Greenspan’s) is the one I have made every saturday afternoon. Hands down, it is the most flavorful and most adaptable one around. I play with the flavor with different fillings like chocolate chips, raisins, pralines, and extracts such as rum, toffee, and in today’s case orange water. I put this stuff in most of my baked goods, cakes, breads and crepes. It lends a subtle aroma that never makes me think of orange but if spring flowers all making my tastebuds sing on sunday mornings.

Golden Brioche, adapted from Epicurious:

Makes 2 large loaves

1/3 cup warm water (105°F to 115°F)
1/3 cup warm milk (105°F to 115°F)
1-2 Tb orange water (according to taste)
2 envelopes dry yeast
3 3/4 cups all purpose flour
2 teaspoons salt
3 large eggs
1/4 cup sugar
1 1/2 cups (3 sticks) unsalted butter, cut into pieces, at room temperature
Egg wash:1 egg, beaten to blend with 1 tablespoon water

Place 1/3 cup warm water, warm milk, orange water and yeast in bowl of standing heavy-duty mixer; stir until yeast dissolves and let proof (10 minutes)
Fit mixer with dough hook. Add flour and salt to bowl; mix on low speed just until flour is moistened, about 10 seconds. Scrape sides and bottom of bowl. Beat in the eggs on low speed, then add sugar. On medium,beat until dough comes together, about 3 minutes. Reduce speed to low. Add butter, 1 piece at a time, beating until each piece is almost incorporated before adding next. Increase speed to medium-high and beat until dough pulls away from sides of bowl, about 7 minutes.
Cover bowl with plastic wrap. Let dough rise at room temperature until almost doubled in volume, about 1 hour. Punch the dough down to deflate it. Cover bowl with plastic and chill until dough stops rising, lifting up dough around edges and allowing dough to fall and deflate in bowl every 30 minutes, about 2 hours total.
At this point you can tackle forming the brioche loaves or refrigerate overnight to do this the next day.
Butter and flour 2 large loaf pans. Divide dough into 2 equal pieces. Cut each dough half into 3 logs. Arrange 3 logs crosswise in bottom of each prepared loaf pan. Place loaf pans on baking sheet, cover with plastic wrap and let rise another 2 hours.
Preheat oven to 400°F. Brush the brioches with the egg wash and bake until they are golden brown and sound hollow when tapped, about 30 minutes. Let cool to room temperature, if you can wait that long and enjoy!

Now you know, if you knock on my door on sunday mornings you are most likely to be handed a couple of slices of brioche and a cup of coffee…

Sunflower Bulgarian Bread: WTSIM Easter Basket

Do you ever get stuck on one picture and its recipe while reading your favorite blogs and you go back to it many many times? The minute I saw this bread, I hit the "add to favorite' button, and stared at it several times a day while reading emails or researching items on the computer. The recipe comes originally from Zapbook and has already traveled the French blogosphere quite a bit during this past month. I have been fond of Petite Lolie’s blog from the day I stumbled upon it. There is something aboout her site…it is beautiful, that’s what it is. Full of life, warmth, knowledge, know hows ans how tos…It’s fresh and abundant in lip smacking recipes.

Although the exact source of the bread is unknown, the recipe delivers a sunflower looking like brioche. I followed Petite Lolie recommendation and added a bit more sugar. I don’t think I kneaded the dough quite enough as the the texture of the dough was not as soft as my previous brioche. Always room for improvement. The actual shaping of each roll may seem time consuming but it took me about 15-20 minutes and the end result (look wise) is well worth it.

Sunflower Bulgarian Bread, adapted from Zapbook and Petite Lolie:

200 gr. milk
1/4 cup sugar
1 tsp. salt
2 eggs
500 gr. flour
2 tsp. dry yeast
50 gr. melted butter
extra melted butter for shaping the rolls

Put the yeast in a non reactive bowl. Heat the milk to lukewarm, and pour it over the yeast. Stir with a fork or spoon to make sure it dissolves properly. Add 2 Tb. sugar and slat and let the yeast proof for 10 minutes.
In a stand mixer fitted with the dough hook attachment, combine the flour, eggs, remaining sugar, melted butter. Turn the mixer on slow and slowly pour in the yeast mixture. Let the dough come together and continue the kneading either by hand or with the mixture for a good 5-8 minutes.
Put the dough into an oiled bowl and let rise for 1 hour or until doubled in size.

Shaping of the bread:
Once the dough has risen, divide it into 16 equal portions. Roll each portion out into a circle or oval. Take one piece, brush with melted butter, stack another piece on it, brush with melted butter again and repeat with 2 other portions. You are actually making 4 stacks of 4 portions each. Roll each stack tightly. Cut each into 4 triangular pieces. Position the rolls in a 10 inch round pan, with pointy ends facing toward the center.
Let rise for another 45 minutes. Preheat the oven to 375. Once the dough has risen, brush with an egg wash (egg beaten with some milk) and bake for 30 minutes.

End result…one could argue that brioche is brioche and this is yet another recipe. But come on, look at those plump folds! Every nation has its version of the basic brioche dough and I like exploring other cultures through bread baking. I am looking forward to making this one again, probably for the only reason that it looks gorgeous, tastes great, behaves well, and made my morning brighter! Yep, I am not complicated…making bread fuels my fire! I am wondering if such a bread exists in Bulgaria so I am on the lookout for a source, let me know if you have one.

One thing for sure: I am definetely putting this in my Easter Basket to be delivered to The Passionate Cook as part of this month’s Waiter There’s Something In My…(and because my dear mother in law is organizing brunch next sunday, as a pre-Easter menu testing).

Spinach Chappatis: Thinking Outside My Bread Box

It is an understatement to say that B. and I love Indian food. We particularly love it when it comes from a small restaurant down our street. We have visited them quite enough to be familiar faces, but we always come back because of their sincere kindness and love of good food. You can’t be in a rush while visiting them. Everything is prepared fresh so it is not unusual to wait 45 minutes for an awesome lamb curry and a plate of piping hot naan, chappatis or parathas. It’s not that we go there every week but each time we never order from the menu and instead surrender to whatever the chef feels like cooking. There is nothing like giving him carte blanche because he then prepares foods the genuine way, does not shy on the spices and even agrees to give me some cooking secrets and tips.

Many moons ago, he told me how to make chappatis and since I make curry or other related Indian dishes a couple of times a month, I always end up calling the restaurant for an order of bread for fear mine won’t be as tasty as theirs.

It’s funny how a couple of things prompted me to make these awesome spinach chappatis. I have this big blue binder in which I collect recipes found on other blogs, cooking sites and such and every three months or so I pull it out and weed through the ones that I know I will never make, the ones I can find again easily, or the ones that have actually ended up on this blog. As I was looking for a brioche recipe (yes again), I found one I had printed exactly a year ago for 'cottage cheese and spinach chappatis". I was making lamb curry that night and since on Sundays, I usually prepare a couple of bread items, rolls, baguettes, sliced bread, brioche and things like that, I thought it was a perfect opportunity to think outside my bread box and make a batch.
I followed the recipe to the letter and ended up with six beautiful flat breads. We ate a couple that night and I have used the remainder throughout the week for lunch wraps and for individual pizzas. Perfect!

I found the recipe on Saffron Hut and since I did not change a thing from it, I will just give you the link. I followed the basic version for the chappatis (meaning no potato stuffing) but given how good they turned out, I plan on making Saffron’s full recipes for the parathas. Undoubtedly, I will still order some from the restaurant but I intend to broaden my horizons of Indian breads.

Happy baking!

Pear And Blue Cheese Mini Cakes With Cardamom and Rosemary

Let me start by saying "thank you" for understanding my frustration last night and for your support which prevented me from banging my head against the computer screen or eating half the cheesecake I had baked earlier. I love the blogging community because whatever ails you, evening something trivial as losing your post, a lot of you came and offered advice, humor and great relief that I may not be a complete 'puter moron after all!

Now back to our regular programming.

It is no news that I have been hooked on blogging events… like an addict I impatiently await my directives every month and the creative and talented Meeta did not disappoint with her latest Monthly Mingle focusing on savory cakes. I was happy to come up with something that would combine my love of savory and sweet foods. Yes, B. and I do not live on desserts and pastries only….well except on sundays it seems like!

The first time my mom made a savory cake I thought it to be the strangest thing in the world…back then I already knew I would live for all things sweet! She would bake, slice thick and cubes perfect morsels of cakes with ham and gruyere, roasted red pepper and feta, crab and dill, etc…her combinations were endless. They became some my favorite items to make and serve with a glass of wine before dinner, at a cocktail party and other events involving finger foods. I regret not copying her recipe down when I visited this past Christmas and my parents are relax in the Alps I chose not to bither them with such a small inquiry. I figured I could easily come up with my own and so I went googling around. After reading many a savory cake recipe I finally settled on this one.

I already had an idea of what I wanted for this challenge: something sweet, something salty and one or two spices and/or herbs to complement them. I played around for a couple of days and came up with a dozen combinations of fruits such as figs/prosciutto, pineapple/ham, peppers/feta, seafood/mascarpone. The possibilities are endless, limited only by your imagination. I decided upon pear and blue cheese because of their classic sense of companionship. I love cardamom in everything, especially crushed up over roasted pear, and the grassy flavor rosemary goes well with both fruit and blue cheese.Instead of my mom’s usually little cubed morsels, I chose to bake these in regular sized muffin tins.

Pear And Rosemary Mini Cakes With Cardamom and Rosemary, adapted from Regal:

Makes 12 muffin sized cakes

200 gr. flour (about 2 cups) You could use half regular and half whole grain flours.

2 tsp. baking powder

pinch of salt

3 eggs

10 cl. milk

5 cl. olive oil

1 pear, peeled, cored and diced

5 oz. blue cheese, crumbled

1 tsp. ground cardamom (I used fresh green pods that I crushed with the back of my knife)

1 Tb. dried rosemary

In a large bowl, combine the flour, baking powder and salt. Add the eggs, olive oil, and milk and whisk until well combined. Gently fold in the pear, cheese and spices/herbs with a spatula until incorporated.

Pour into muffin tins (use paper molds or grease well), and bake at 350 for 25-20 minutes or until a knife inserted in the middle comes out clear.

Let cool to room temperature.

Notes: baked as the recipe is written, we both regretted not taking a more pronounced stance: sweet or savory. In the morning, I would not mind a little bit more sugar whereas in the afternoon a little bit more salt would be appreciated. I am just so bad at choosing that I have come up with my own solution: a spat of strawberry jam in the morning and a spat of salted butter in the evening.

These are great for a sunday brunch, dinner party and they are great as mid morning or afternoon snacks. They taste fantastic with a cup of tea.

Sunday Baking Makes For Good Eating

People think I am crazy when I tell them how I relax on the weekends….I knead dough, I watch yeast proof and bubble, I covet the rising of my loaves and delight in the smell pervading through the house. The week has been strange and hectic as I mentionned a couple of days ago and yet the only way I know to relax and recover from it is by making breakfast treats for us or the neighbors. I have got scones in the oven as we speak and we just devoured a half of this beautiful cream cheese braid you see up there.

It seems that I have done a lot more bread baking than actual dessert making this week but what you don’t see is the behind the scene…There was a couple of birthday cakes, a French croquembouche for a wedding rehearsal and a whole lot of chocolate making. Granted some weeks my kitchen ressembles more a bakery than a restaurant but I am ready for a change with a couple of great events that are coming up. I also have to confess that the weather has been so nice that I have been caught playing outside when I should have been doing more adult chores (paying bills, cleaning, etc…no fun!)

What is special about this braid…? The cream cheese replaces most of the butter and leaves you with a very soft dough, very creamy without being over the top. The same dough can be the base of multiple variations and I usually do a hazelnut or almond filling alonside this one because it seems that one is never enough!

The inspiration to replace the butter with the cream cheese came from this recipe. The Fresh Loaf is a mine of knowledge and ressources for novice or advanced bakers and this blueberry braid filled with all that creamy goodness made me want to incorporate the cream cheese in the dough to see if the flavor would mellow through it and if the dough would be nice and soft as a pillow. I also have to say that I was getting a little lazy with the whole rolling, spreading the cheese inside, braiding, etc… thus dumping the cheese in the Kitchen Aid alongside the butter. It worked one night and I never looked back!

Cream Cheese Braid, inspired from the Fresh Loaf:

Makes 2 braids

Sponge:
1 tablespoon instant yeast
1 tablespoon sugar
1 1/2 cup warm milk
2 cups unbleached all-purpose flour

Dough:
2 eggs
1 1/2 teaspoons salt
1/3 cup sugar
2 1/2-3 cups unbleached all-purpose flour
6 oz. cream cheese, softened
2 oz. butter, softened

Glaze:
1 cup powdered sugar
1 Tb. melted butter
milk

For the sponge: mix the sugar, yeast, and flour together in bowl. Pour in the warm milk. Beat until smooth, then cover with plastic wrap and set aside for 1/2 hour.
Add the eggs, salt, sugar, and one cup of the flour to the sponge. Beat until smooth. Then add the cream cheese and butter in small chunks and beat well. Add the remaining flour a handful at a time and mix in until you get a soft dough.
Knead the dough by hand or with a mixer about 5 minutes.
Place the dough in a greased bowl, cover with plastic wrap, and let rise and room temperature until doubled in size, 1 1/2 to 2 hours. Deflate the dough, recover the bowl, and refrigerate overnight.

The next day, take the dough out of the fridge, deflate and divide in 2 equal pieces. For the braid, I divide one piece in too and twist them together (so not exactly the conventional braid, but at this point I can’t wait any longer!!). Place it on parchment paper lined baking sheet, allow to rise 45 minutes, brush with some egg was and bake at 375 for 20- 25 minutes.

Take out of the oven, and while it cools a little, prepare the glaze. Add enough milk to the powdered sugar and melted butter to make a soft spreadable glaze and our all that goodness on your braid…and go ahead and eat because after all that you really deserve it!

Do the same for the other braid, or roll out into a rectangle and fill with your avorite filling and braid it according to the recipe on the Fresh Loaf. The details are great and you can’t mess up, makes me wish I ad blueberries left because I have the other loaf awaiting its fate in the fridge…