
berries

Gluten Free And Vegan Daring Bakers' Challenge

Gluten Free Crackers and Salted Butter Caramel Sauce


It is indeed a first in the history of the Daring Bakers, a gluten free and vegan challenge! Since being a Daring Baker in December 2006, I have seen the group grow by leaps and bounds, with members from all walks of life partaking in our monthly bake-offs. I know it is daunting at times for some Daring Bakers to adapt recipes to fit their dietary lifestyles and I always marvel at how creative and resourceful gluten free and vegan members are. I was really excited to see that our hostesses this month, Natalie from Gluten A Go Go, and co-host Shelly, of Musings From the Fishbowl, chose Lavash Crackers from Peter Reinhart’s The Bread Baker’s Apprentice: Mastering The Art of Extraordinary Bread.

Natalie being a gluten free baker asked us to challenge ourselves and make the crackers gluten free while Shel asked us to come up with vegan dips and spreads to go along. Being a ubber cool group, we still had the choice to make them with regular flour if gluten free baking did not appeal to us. I welcomed both challenges with open arms! Indeed, there are quite a few gluten free eaters among our friends and family members and I can always stretch my gf baking repertoire. Coming up with vegan dips and spreads was a good opportunity to try a couple of different ingredients, but furthermore really understand and appreciate many people put behind being vegan.

Lavash Crackers and Toppings


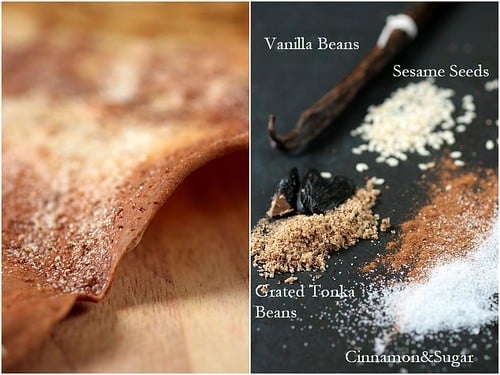
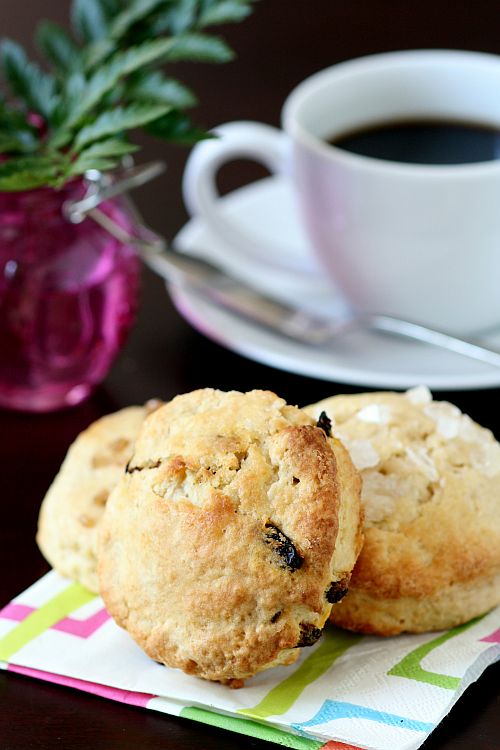
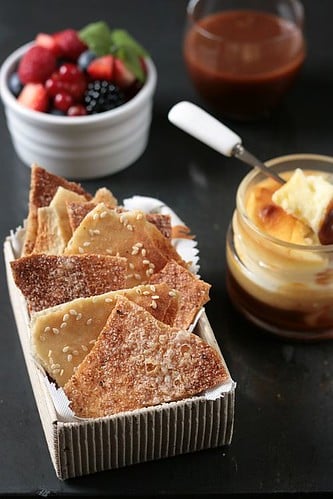
The past month has been quite busy and full of twists and turns and I did not get to make the dough until Wednesday afternoon. I used a gluten free baking mix by Bob…..and realised after the first rise that had forgotten to add xanthan gum to the dough which acts like gluten in baked goods and helps stretch and relax the dough. I did not even bother rolling that one out, waited until Thursday to go buy some xanthan gum and started again. The quantities are so small here that I mixed the dough by hand and left it to rise, rolled it paper thin, baked and then broke it to shards. I rolled the dough into one large baking sheet and topped 1/4 with sesame seeds, 1/4 with grated Tonka Beans, 1/4 with cinnamon sugar and the last quarter was brushed with agave syrup and half a vanilla bean, seeded. The smells that were invading the house made it hard to resist not breaking into it as soon as it came out of the oven!!

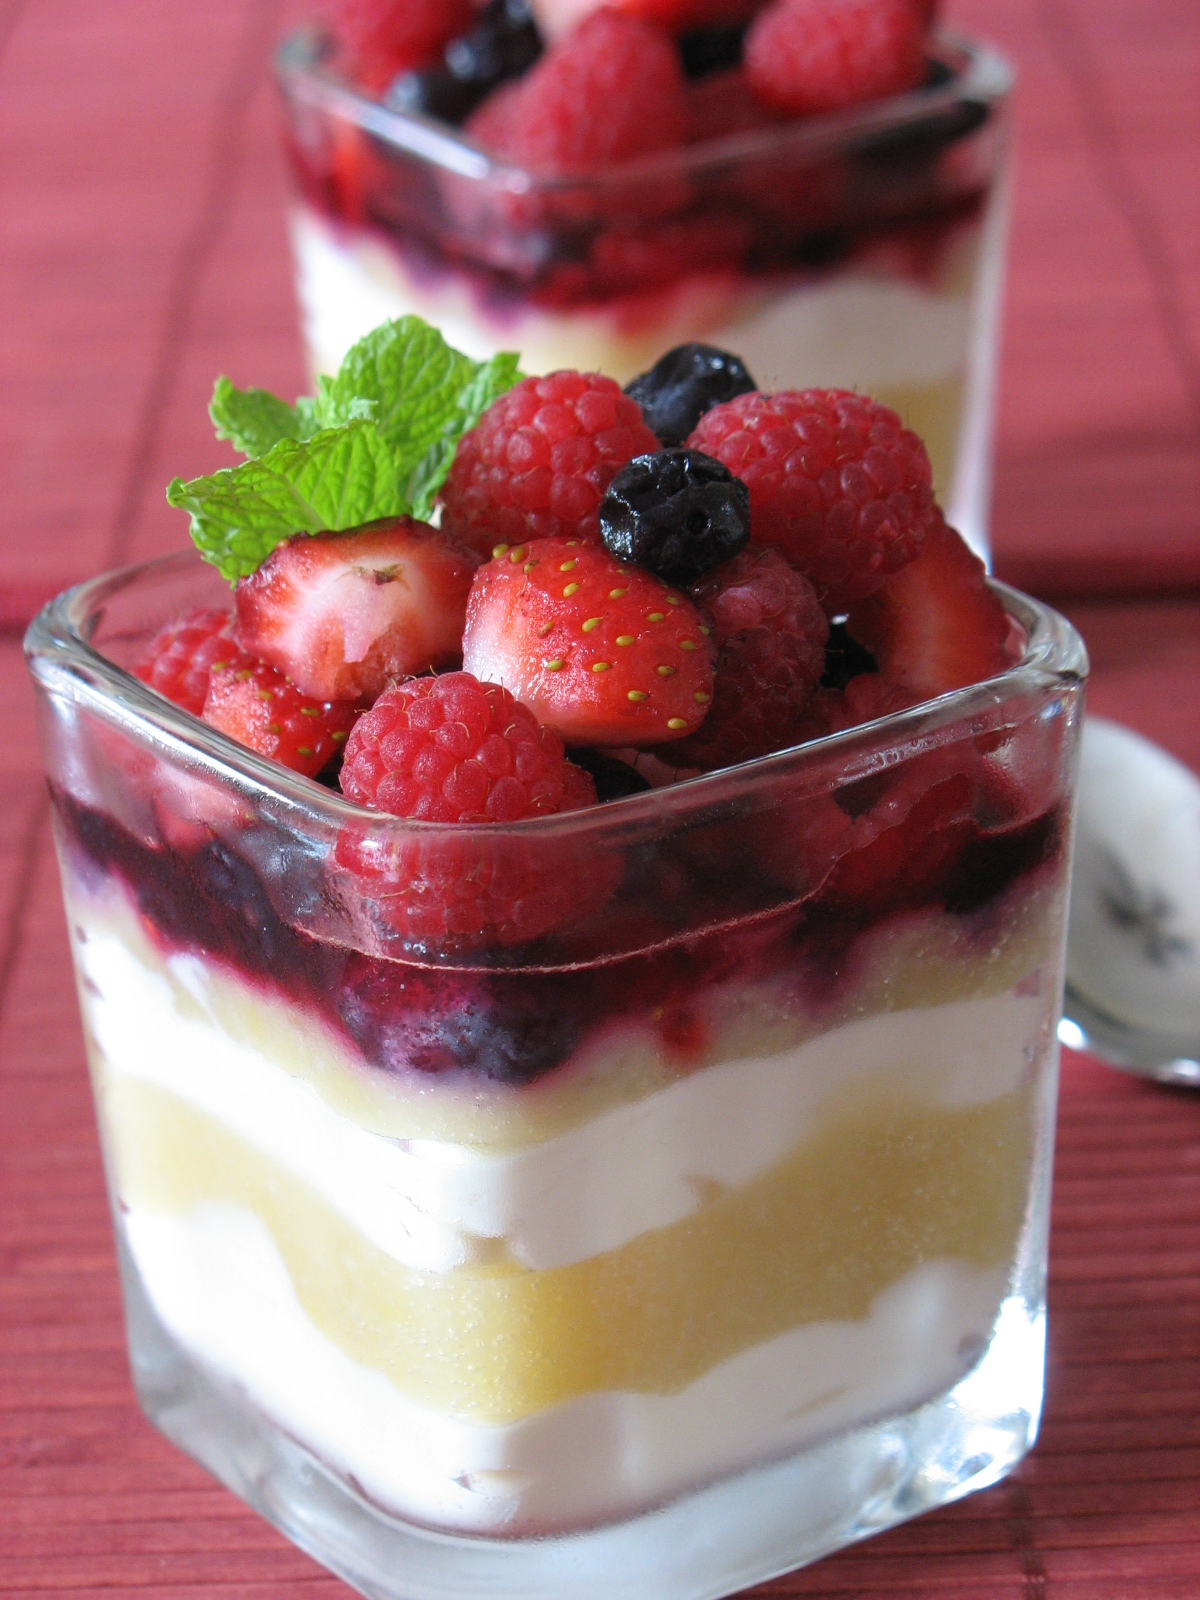
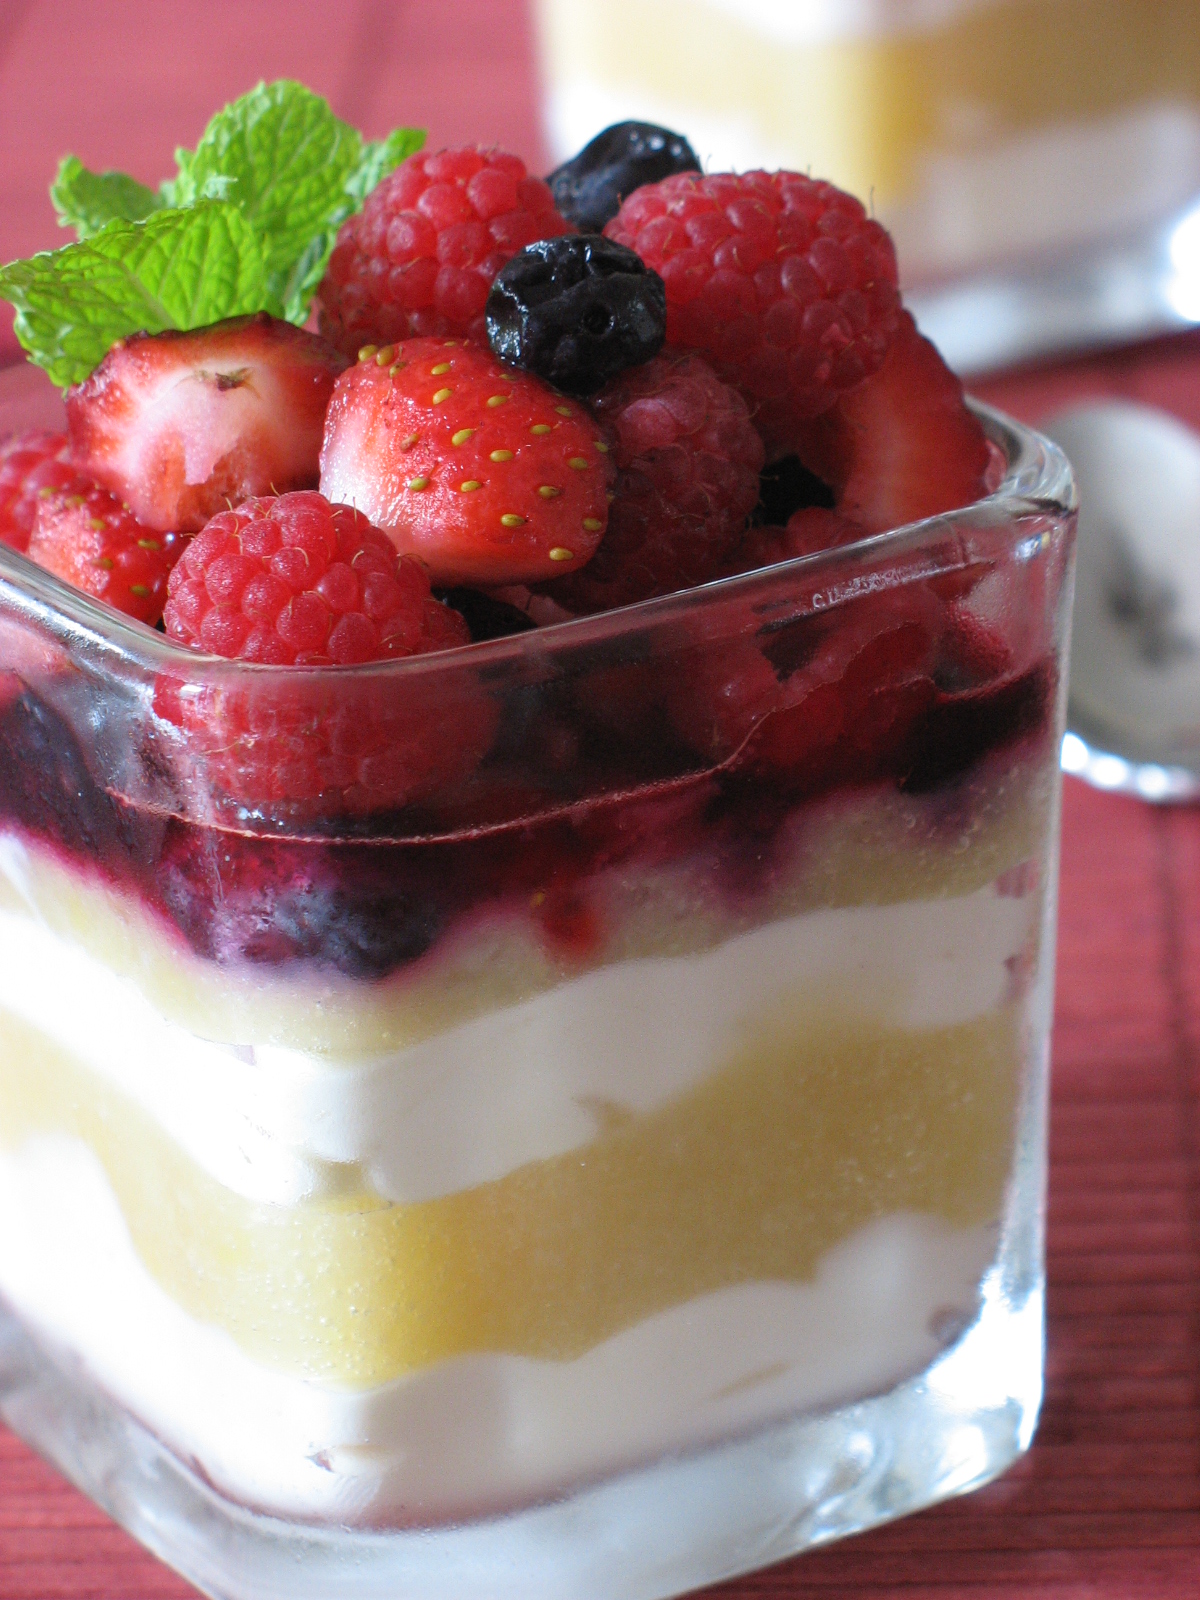
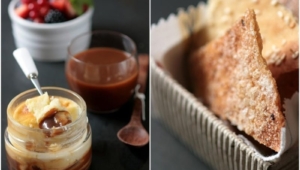
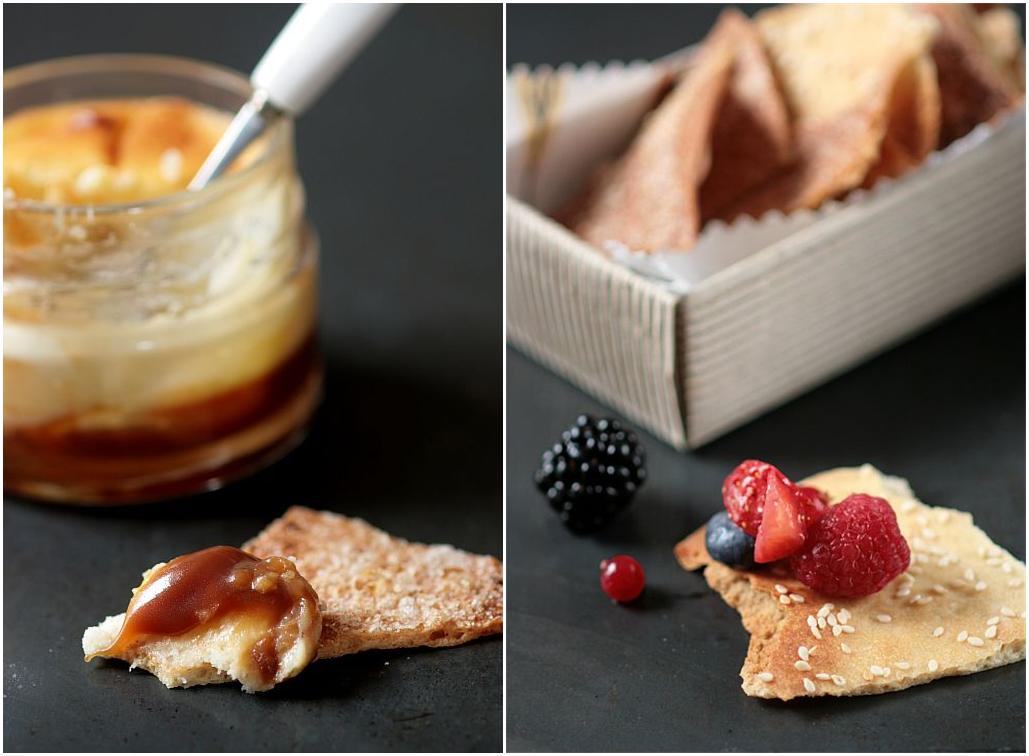
For the toppings, our hostesses gave us complete freedom with only one rule: it had to be vegan. I was really interested to see how some of my favorites would turn if made vegan and with the tremendous array of choices and progress made in vegan foods, I was able to serve the crackers with a vegan salted butter caramel sauce, a vegan caramel cheesecake in a jar spread and my now favorite lemon balm infused berry salad. I love salted butter caramel anything, not being a fashion victim but I grew up on that stuff!

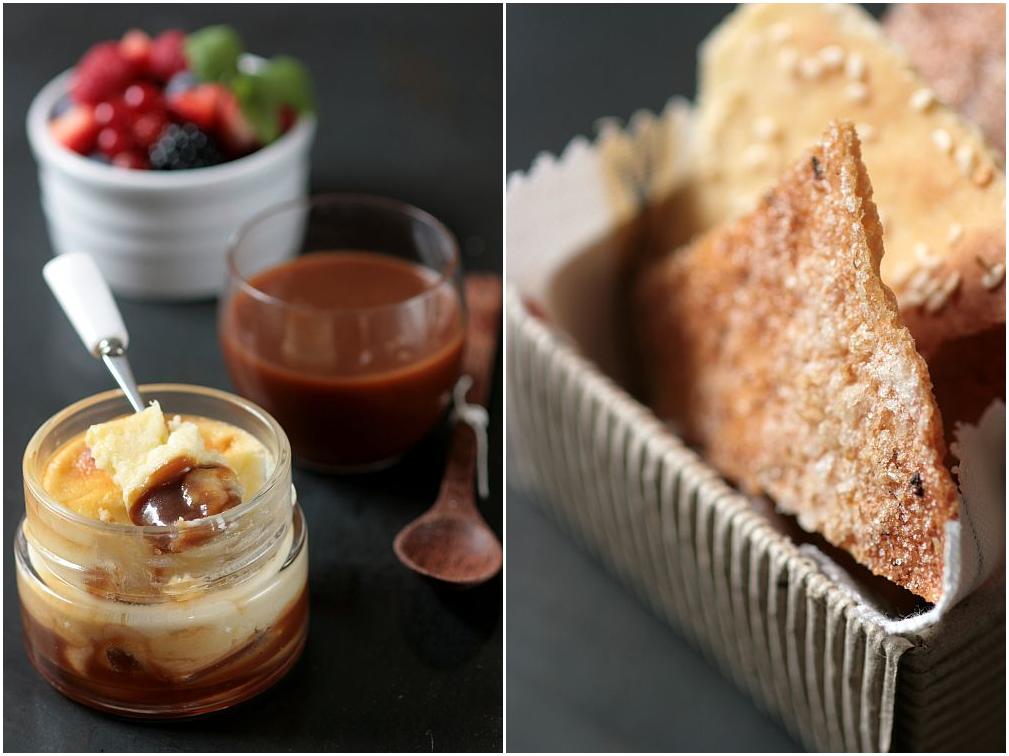
The salted butter caramel sauce is an adaptation of my favorite sauce and the only problem encountered was that it took a longer time for the butter and sugar to come to a caramel color and consistency but the rest was the same. I used Earth Balance butter and soy creamer instead of their regular counterparts and added some Fleur de Sel for the salty factor. I could taste a difference from the original, sure can’t say it’s the "real thing" but it came out pretty darn close and what mattered is that I was able to make one of my vegan neighbors very very happy!!

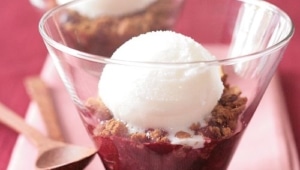
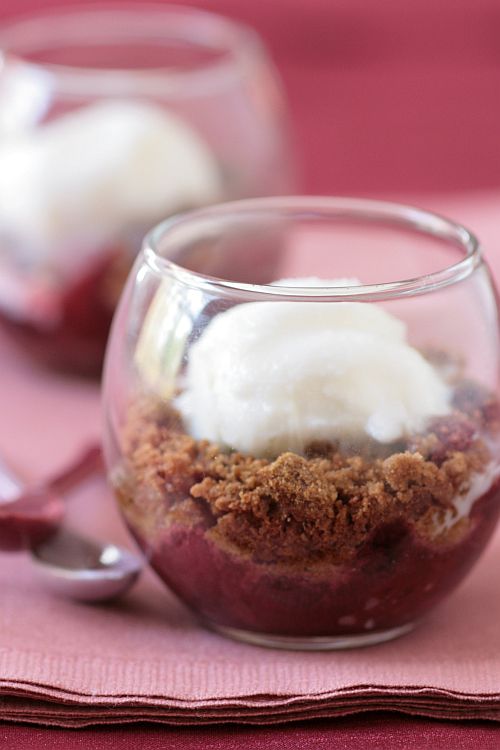
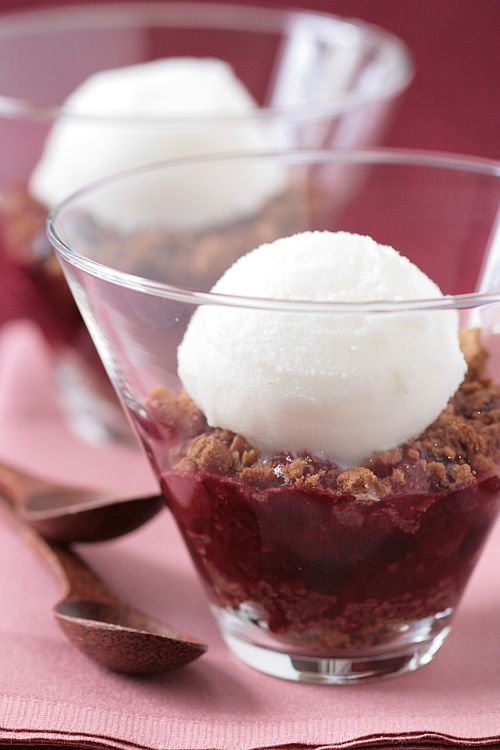
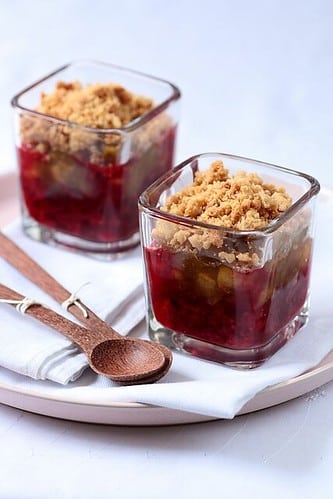
The vegan caramel cheesecake is also an adaptation and was easy to make using Ener-G Egg Replacer and vegan cream cheese (Tofutti brand). I divided the batter between four jam/jelly jars and added some salted butter caramel sauce at the bottom. I have to say that B. thought it was "different but worth eating" and I loved it.

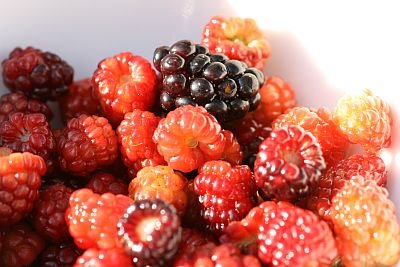
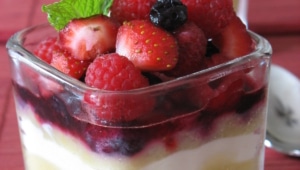
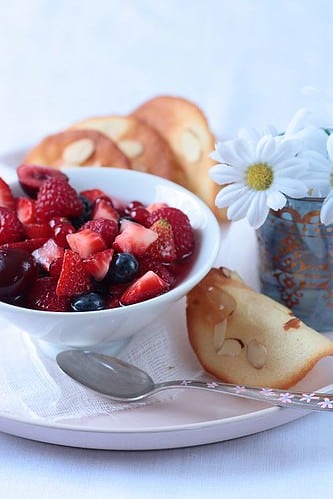
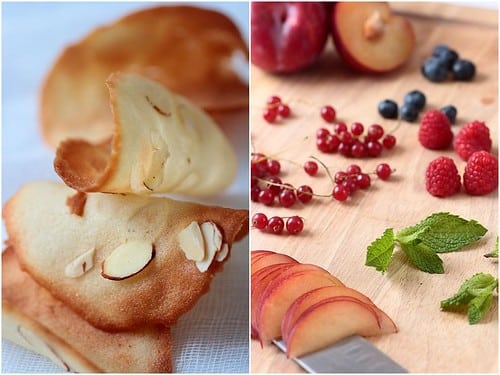
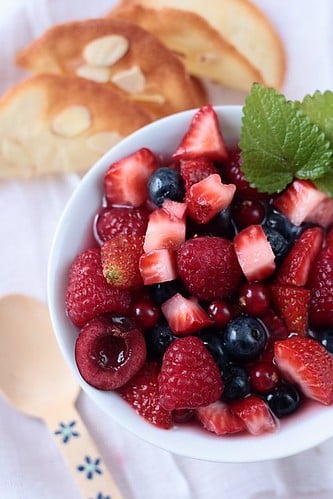
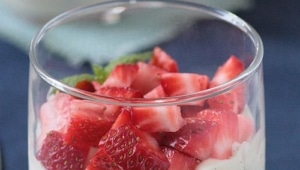
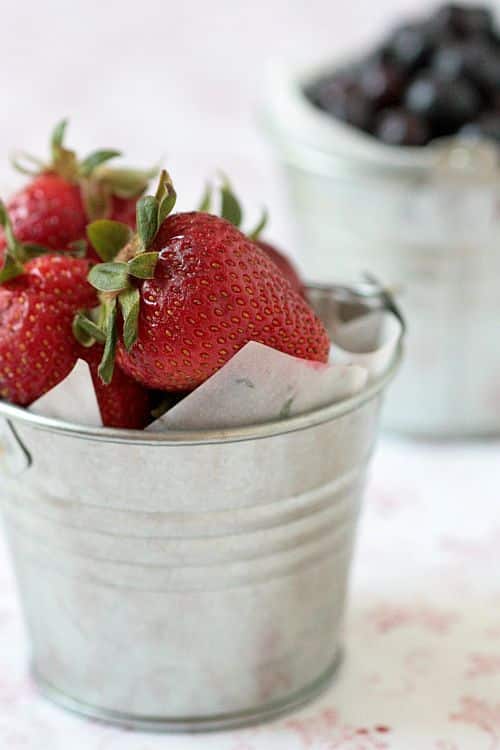
The berry salad is nothing new but since I made this lemon balm berry salad, it has been on rotation at the house and for dinner parties with the neighbors. It works just like a savory salsa with the crackers and is great for a little 4 o’clock pick me up with a cup of tea.

Thank you Natalie an Shelly for this opportunity to bake gluten free and vegan! It was a blast! Check out the others' creations here.


Gluten Free Lavash Crackers:

Makes one sheet pan:

1 1/2 cups (6.75 oz) unbleached bread flour or gluten free flour blend (If you use a blend without xanthan gum, add 1 tsp xanthan or guar gum to the recipe)
1/2 tsp (.13 oz) salt
1/2 tsp (.055 oz) instant yeast
1 Tb (.75 oz) agave syrup or sugar
1 Tb (.5 oz) vegetable oil
1/3 to 1/2 cup + 2 Tb (3 to 4 oz) water, at room temperature
Poppy seeds, sesame seeds, paprika, cumin seeds, caraway seeds, or kosher salt for toppings

In a mixing bowl, stir together the flour, salt yeast, agave, oil, and just enough water to bring everything together into a ball. You may not need the full 1/2 cup + 2 Tb of water, but be prepared to use it all if needed.
For Non Gluten Free Cracker Dough: Sprinkle some flour on the counter and transfer the dough to the counter. Knead for about 10 minutes, or until the ingredients are evenly distributed. The dough should be firmer than French bread dough, but not quite as firm as bagel dough (what I call medium-firm dough), satiny to the touch, not tacky, and supple enough to stretch when pulled. Lightly oil a bowl and transfer the dough to the bowl, rolling it around to coat it with oil. Cover the bowl with plastic wrap.
For Gluten Free Cracker Dough: The dough should be firmer than French bread dough, but not quite as firm as bagel dough (what I call medium-firm dough), and slightly tacky. Lightly oil a bowl and transfer the dough to the bowl, rolling it around to coat it with oil. Cover the bowl with plastic wrap.
Ferment at room temperature for 90 minutes, or until the dough doubles in size. (You can also retard the dough overnight in the refrigerator immediately after kneading or mixing).
For Non Gluten Free Cracker Dough: Mist the counter lightly with spray oil and transfer the dough to the counter. Press the dough into a square with your hand and dust the top of the dough lightly with flour. Roll it out with a rolling pin into a paper thin sheet about 15 inches by 12 inches. You may have to stop from time to time so that the gluten can relax. At these times, lift the dough from the counter and wave it a little, and then lay it back down. Cover it with a towel or plastic wrap while it relaxes. When it is the desired thinness, let the dough relax for 5 minutes. Line a sheet pan with baking parchment. Carefully lift the sheet of dough and lay it on the parchment. If it overlaps the edge of the pan, snip off the excess with scissors.
For Gluten Free Cracker Dough: Lay out two sheets of parchment paper. Divide the cracker dough in half and then sandwich the dough between the two sheets of parchment. Roll out the dough until it is a paper thin sheet about 15 inches by 12 inches. Slowly peel away the top layer of parchment paper. Then set the bottom layer of parchment paper with the cracker dough on it onto a baking sheet.
Preheat the oven to 350 degrees Fahrenheit with the oven rack on the middle shelf. Mist the top of the dough with water and sprinkle a covering of seeds or spices on the dough (such as alternating rows of poppy seeds, sesame seeds, paprika, cumin seeds, caraway seeds, kosher or pretzel salt, etc.) Be careful with spices and salt – a little goes a long way. If you want to precut the cracker, use a pizza cutter (rolling blade) and cut diamonds or rectangles in the dough. You do not need to separate the pieces, as they will snap apart after baking. If you want to make shards, bake the sheet of dough without cutting it first.
Bake for 15 to 20 minutes, or until the crackers begin to brown evenly across the top (the time will depend on how thinly and evenly you rolled the dough).
When the crackers are baked, remove the pan from the oven and let them cool in the pan for about 10 minutes. You can then snap them apart or snap off shards and serve.

Vegan Salted Butter Caramel Sauce:
240 gr. sugar (1 1/4 cups)
80 ml water
115 gr vegan butter (1 stick)
150 ml vegan creamer
1 1/2 tsp Fleur de sel

In a heavy saucepan set over low heat, combine the sugar and water and heat just until the sugar is dissolved. Add the butter. Let it come to a boil and cook until it reaches a golden caramel color (takes between 25-35 minutes), stirring occasionally. Remove from the heat and add the creamer ( it will splatter and get crazy, but do not fear and trust the recipe). Whisk to combine and put back on the stove. Let it come to a boil again over low heat and cook 10-15 minutes until you reach a nice creamy consistency. Remove from the heat, add the salt and stir until melted. Keeps for about 2 weeks.

Vegan Caramel Cheesecake In a Jar:
1/2 cup salted butter caramel sauce
8 oz vegan cream cheese, at room temperature
1 Tb. vegan butter
1/2 cup sugar
3 Tb. Egg-Replacer mixed with 1/4 cup water

Divide the caramel sauce between 4 small jam jars. Set aside.
In a large bowl, with the electric mixer or by hand , mix the cream cheese, butter and sugar. Add the egg replacer mixture and beat until well incorporated.
Divide the batter among the 4 jars. Set them in a roasting pan and fill with water until it reaches halfway up the sides of the jars. Bake at 300F for 20-30 minutes. Let cool completely before refrigerating or serving.

Lemon Balm Infused Berry Salad:
Click here for the recipe.

Gluten Free Lavash Crackers And Vegan Spreads

Roasted Caramel Figs, Berry and Apple Compote Verrines

Roasted Figs, Berries and Apple Verrines


When I visited Lisa last year in October, I kept marveling at the coming of Fall, the changing nature of the landscape and the foliage. Those deep reds, perfect greens and deliciously rich golds…they were making me happy and dreamy. She got quite amused by my attitude toward something so natural as Fall and asked what on earth was going on deep in the South for me to act as if I had not seen Fall in ages? Didn’t leaves change colors down there? She was stumped when I told her that they turned from green to brown. No luscious displays of colors, just brown…and if we were lucky a little beige-orange. Nothing like the landscape that was unfolding in front of my eyes as we were driving along.

It becomes difficult to start cooking with pumpkins, pears and apples when you are still wearing shorts and tee-shirts in the middle of November. Granted the evenings are chilly but nothing that a light cardigan can’t fix. Stores and floral shops do their best to put us in the mood by displaying the right colors and adding sweaters and buckled shoes into their window displays but food…I have to close my eyes and pretend I am experiencing Fall in my kitchen. As much as I dislike the heat and humidity of our summer I do realize how lucky we are to be grilling out late in the year without a coat on and not shoveling snow in February. So, yes I am torn…I relinquish saying goodbye to the bounty of summer fruits but I am also eager to cook with more seasonal ones when we can’t quite experience Fall like others up north.

To celebrate the arrival of mellower days, I decided to make a "transition dessert" including berries, figs and apples. When I was a little girl growing in Apt, Provence, we used to have a small fig tree next to the driveway and I remember coming home from school in late September, early October and picking up the fruits as soon as I would hop out of the car. Summer was picking up cherries from our giant tree and as soon as school would start it was figs and juicy apples from the next door neighbor. The seasons were milder there too but you could clearly feel the changes in the air. Although I grew up eating figs, we rarely cooked with them, that came later when I truly appreciated the virtues of a good fig puree, enhanced by a little caramel.

The other day I was on the phone with my mother and we started to reminisce about grandma and her cooked fruits, her compotes rather. She made the best apple one and her cooked berries were always one of our requests for breakfast. I hung up with mom and told myself that it was exactly what I was going to do and layer them in a "verrine" and serve them with some cookies. The weather was clement, there was even a light chill that morning so the cookies turned into a crumble and the figs got mixed with the berries….What is Fall without a little crumble on top?!! A few spoonful of it the other night and we almost wanted to build up a fire!!

Roasted Figs, Berries and Apple Verrines


The verrine did not start that way actually. I had a small basket of figs that I needed to use rather fast and decided to dip them into caramel before roasting them briefly in the oven. We enjoyed some hot or warm on a few scoops of vanilla ice cream and I was left with just enough to add them to something else. I put that thought away and moved on to other things….not for long though! It is preferable to serve this warm or room temperature, thus it is better to start by making the crumble part, so once you have all the other elements ready, all you have to do is layer them in glasses. Before you think there are too many elements to make this an easy desserts, let me tell you that you can prepare everything over a couple of days. Make the compotes ahead of time (freeze them if you want), then reheat them just before serving. The crumble can be kept in an airtight container for up to 4 days (can be frozen also), and just pop it in the microwave or the oven before serving.

Roasted Caramel Figs, Berries and Apple Compotes Verrines:

Serves 6

For the crumble:
1 cup (140 gr) all purpose flour
1/2 cup (100 gr) light packed brown sugar
1 stick (113 gr) butter, softened

In a medium bowl, combine with your fingertips or a pastry blender the flour, sugar and butter and form large clumps of dough. Lay them on a parchment lined baking sheet and bake at 350F until golden brown. Let cool to room temperature before breaking the clumps into smaller crumbs.

For the caramel figs:
3 Tb ( 42 gr) butter
1/4 cup (50gr) packed light brown sugar
6 fresh figs, halved.

Line a baking sheet with parchment paper and place the half figs on it, set aside.
Preheat the oven to 375F.
In a medium saucepan, combine the butter and brown sugar and cook them over medium heat until the sugar is dissolved and the butter is melted (2-3 minutes). Remove from the heat.
With a spoon, divide the caramel over the figs and roast them in the oven for about 3 to 5 mintues or tunil they become tender and wrinkly. Set aside to cool and puree them in a food processor, set aside.

For the berry compote:
1/2 cup (120gr) raspberries
1/2 cup (120gr) strawberries
1/4 cup sugar (62 gr) sugar
zest and juice of one lemon

Combine all the ingredients in a heave saucepan over medium heat and cook for about 5 minutes or until the fruits start to release their juice and become soft. Let cool.
Add this compote to the caramel fig puree. Set aside.

For the apple compote:
4 large apples (your preference) peeled, cored and diced
1/4 cup (50gr) packed light brown sugar
2 Tb water
1 tsp cinnamon

Combine all the ingredients in a saucepan and cook over medium heat until the apples become soft and almost mushy. Remove from the heat and let cool.

To assemble: layer the berry-fig compote at the bottom of 6 glasses, top with a layer of apple compote and top with the crumble. Serve warm or at room temperature.

Roasted Figs, Berries and Apple Verrines

Lemon Balm Infused Berries And Almond Tuiles

Fresh Berrries With Lemon Balm Syrup and Tuiles Cookies


I seem to have a hard time letting go of summer….stone fruits, berries, herbs are always sneaking in into my shopping basket. It is easy to get inspired or to focus on writing certain chapters of a book when you have a big bowl of juicy and plump fruit in front of you! It is a little less fun when our new puppy set his mind to chew our lemongrass plant, mix it up with a little rosemary, adds a little spice with a touch of Thai basil and finally decides that the game can’t be complete until he ends with a few springs of lemon balm! Why do we let him? We don’t!! I did not realize that he had grown so much that he was not able to pull on the leaves, take the pots down and have a feast! Just right when I was starting to think I finally grew a green thumb, no kidding people, I can even kill a silk plant (ask my mother in law!).

I consolidated my schedule to be able to work more from home and for longer stretches of times which is perfect to bake and write but I guess I don’t see him grow as much as he actually is. When C. tells me every week "Oh…he’s grown again!", I smile and say "Hmm, really? Maybe"…when really I am thinking "He’s still my little baby" go to pick him up and think "how did you get heavier overnight?"… When I let him out on the porch and heard a big and bang of things falling and tumbling I knew we had passed a stage. When I saw him feasting on the plant, I was somewhat reassured of his good taste…well maybe not right then but his fascination with lemon balm inspired me to use again.

These days, when B. opens up the fridge, he is faced with plates and many posts-its bearing dessert names, dates, preparation stages. Sometimes one reads "don’t you even think", or "not ready yet", sometimes "please finish it, I can’t eat anymore!!" There are days when I make his head spin naming things he can have for dessert. There are days after pictures, testing and distribution among friends and neighbors, when the fridge is empty again, waiting for another wave. It is then that I resort to my long standby of fresh fruit marinated in some infused syrup and served with a plate of cookies. Although I tried this dessert with ice cream before, I have come to want to leave it out of the equation over the years. The syrup is so delicious on its own that all you need is a tuile cookie to sponge the little bit of syrup left at the bottom of your cup after you are done with the fruit.

Feel free to use any combinations of fruits and berries that you like. For this I used a mix of cherries, blueberries, redcurrant, raspberries and strawberries. I started cutting up a plum to add it to the mix but somebody found it more interesting to snatch if from the cutting board and I completely forgot to add it back after that. Same goes for the syrup, I had planned on using mint but the puppy convinced me to lemon balm! Lemon verbena, lemon thyme, even rosemary or a mild basil work great in this. For the cookie, I used the same batter I used to make the decorations here and here. I spooned some into rounds about 3 inches in diameter, sprinkled sliced almonds and baked them for 8-10 minutes at 350F. Once removed from the oven, lay them over a rolling pin or bottle to take the shape of a tile. I can’t get enough of these, they were my favorites as a child, and they remain my favorite as an adult! How many do you think I need to bake in prevision of all the storms that are about to pound us?!!

Tuiles and Dessert Mise En Place

Lemon Balm Infused Berries With Almond Tuiles:

Serves 4

2 cups fresh berries or fruit of your choice
1/3 cup sugar
4 springs lemon balm, slightly bruise the leaves between your fingers to release the oils
3/4 cup water
1 Tablespoon lemon juice

In a medium saucepan set over medium high heat, bring the sugar, lemon balm, water and lemon juice to a boil. Remove from the heat and let cool completely. Place the fruit in a large bowl, pour the cooled syrup through a strainer over the fruit. Discard the lemon balm leaves and let the fruit macerate for 30 minutes to one hour. Divide amomg 4 soup plates, bowls, etc…

For the tuiles:
see recipe here and spread into rounds, sprinkle with almonds and bake as dirested. Shape into a tuile if desired by laying the cookie on top of a curved surface like a rolling pin until cooled.

Fresh Berrries With Lemon Balm Syrup and Tuiles Cookies

Berry Pavlovas: Crunchy Colorful Sweet Birthday Bites

Berry Pavlovas-Copyright©Tartelette 2008Today is B’s birthday and while in the middle of cleaning the house, preparing a little get together for him and speed training a puppy, I realised that I always wish my parents a happy birthday or mother’s day, father’s day, etc…on this blog but I rarely wish B. a happy birthday. Without wanting to make a big deal about it, I think he is a big deal, but a crunchy, colorful and sweet one.

He is very instrumental to my being here doing the things I do and sharing things with you. He happily ventures his spoon in dishes and desserts I set out in front of him. He knows to always take his cell phone with him while running an errand for me at the grocery store. He has quickly come up with associations to remember who is so and so that I keep talking about, and stopped asking me if I have the hiccups when I giggle at the screen chatting online at night. He looks forward to other bloggers' visits as he has an excuse to use all the attachments on the vacuum cleaner (he is so going to yell at me for telling you this!). But more importantly he has more than accepted my bizarre schedule as of late and for that he deserves extra kudos and a public "I Love You – You Rock – Happy Birthday!"

There will be cake for him and a few guests for dinner tonight but this morning he will have some pavlovas filled with fresh blueberries, raspberries and strawberries. Boy do I love summer lately! I can’t get enough of the gorgeous fruits at the market lately and berries have been either my breakfast or my lunch a couple lots of times this week . I can’t say he chose to have this has a birthday breakfast but it’s been a juggling of egg yolks and egg whites lately in the fridge and some room had to be made. Knowing him, I know he’ll have more than one!

I made the shells when Chris was here and kept them in an airtight container at room temperature so they would still be crunchy today. There were just a touch softer in the middle but with the heat and humidity of South Carolina, that was to be expected. To fix that, I turned the oven on to 350F last night before going to bed, put the meringue shells in it and turned the oven off. It helps give them some of that crisp back so I can still hear him say "so-crunch-what is-crunch-for dinner-crunch-tonight- crunch crunch ?"…I love that sound!

Berry Pavlovas-Copyright©Tartelette 2008Pavlovas With Fresh Berries:

Makes 8-12 shells depending on size

3 egg whites
3/4 cup sugar
1 1/2 tsp cornstarch

Preheat oven to 275F. In small bowl, mix the sugar and corn starch together and set aside. In a stand mixer fitted with the balloon whisk, start whipping the egg whites to soft peaks. Start with the machine on low speed to break them a bit and get them "shaking" then increase to speed to medium high. Slowly add the sugar mixture in a slow steady stream, or one tablespoon at a time. At this point you can either spoon the meringue, making 12 circles on 2 parchment paper lined baking sheets or fill a pastry bag fitted with a star tip and pipe the shells onto them. Bake at 275 for 30 minutes and reduce your oven to 250F and continue baking them for another 30 minutes.

For the berries: I did not measure how much of each berry I was mixing in, I went with a couple of handfull of each, sprinkled some sugar on top and chopped fresh mint and let it macerate for a couple of hours.

Berries And Cream – My Little Bastille Day

Berries And Cream-Copyright©Tartelette 2008 Allright before I get on to this dessert and explain this post title, I guess I should answer the question "So….who won the giveaway?". First off, I need to tell you that I surely did not expect such an incredible turnout…Wow! Ya’ll love cookies!! At the time of the drawing after midnight 478 had stopped by! I almost fell off my chair! I am sorry I only have one cookie cutter to offer as a prize and because of that I have decided to draw a second winner for a cookbook I went to pick up at my favourite antique books shop. It is called "Tested By Time – A Collection of Charleston Recipe", and I am sure it will find a good home among one of you.

I have read and jotted down everybody’s name with an appropriate number attached to it because there were a few duplicates in the comment box and I wanted to be absolutely fair. So…. "a." is the lucky recipient of the Brigitte-Keks cookie cutter and Kim from My Plate, My World will receive the cookbook. If you both can contact me with your mailing address, I can get these on to you a.s.a.p (my email address is in my profile page). Congratulation!

Last thing, I have received numerous emails on how to get the cookie cutter in the US and other parts of the world. I got mine through a lady in France organizing a group order and my mom advanced the Euros for me. The company that makes is Stadter . I am thinking that if we all send them an email maybe they will think about expanding their retail map. I also know that it is available through Amazon Germany and since Amazon France seems to deliver pretty easily to the US, it might be worth it to see if the German branch will do the same.

UPDATE: a reader just emailed me saying that the company will ship individually for about 15 euros a set or or they will ship a large order to one person and give a discount on the cost of the cookie imprinter as well as shipping. As much as I would love to help more, I cannot, at this time, become the person organizing such a thing and hope that another blogger will step forward and do that. The contact info is Christoph Reermann at info AT coolinarium DOT de

On to today’s post…. All day long I thought about the many ways I could approach it so it is without fireworks or parade that I come to wish all my friends and family back home a Happy 14th of July. I still don’t call it Bastille Day, not that I am a royalist but even French people don’t call it Bastille Day. I had never hears that phrase until I moved to the US to tell you the truth! Just like the English Channel is not called that in France either…but that is a story for another time!

Berries Ready To Eat-Copyright©Tartelette 2008
I know what my family is doing today, they are watching the parade on the television (don’t miss the videos here and here ) and having a nice barbecue with a good glass of wine, just like these folks. To see the young culinary students preparing the Gala Dinner, click here. I come from a military family in France, all corps represented so we watch the parade and I have got to tell you….it is both rather impressive and beautiful even if you don’t care for the military, a nice organized ballets of men, horses, even firefighters and policemen are included…basically if you were a uniform you’re in! I miss that, I miss the fireworks on the lawn of the town hall, I miss holding my cousins' hands, scared of the noise and mesmerized by the lights. I miss meeting my friends behind the church to share the only bottle of very cheap wine we could afford before getting back to the family supper. I miss sitting out on the terrace and listening to my uncles tempers veering red as they start discussing politics.

That’s all…I miss it…but I am not making a big deal about it because I had my fireworks last week with my friends here and my husband. There is a whole French contingent meeting tomorrow for dinner and celebrating in town but I won’t be there. Main reason being that the group is not really my age so their idea of fun French music is little bit more antiquated than mine and too often I find that the conversations turn to how much they wish they were back home. I am not saying I don’t but I am here now. Everybody is different and I am not criticizing how people deal with being far away from home. I find that I did better by immersing myself in the here and now. That’s how I operate everyday to make the distance with my family easier. I am having a blast here and I know it will be hard to leave when/if we decide to go back to my native Provence. When I moved here I had no car, no debt, no bills, still studying for a job and everything I had fit in two suitcases, if I were to move now…Oh geez, I can’t even start to think about it!!

I am comfortable here, I love discovering this country, the people and everything that is crazy, insane or very cool about it. One thing I love about the US is that you can reinvent yourself fifty times over if you want to, much like the dessert I made us to celebrate the 14th of July, berries and cream. You can change the orders of the berries to suit your fancy or to celebrate both countries. B' glass will be red, white and blue and mine blue, white and red because in spite of having the same colors on our flags (I love that!) we nonetheless call them out differently…got to keep that little difference, you know?!! Mallory, this one is for you, to soothe your France withdrawals! Once you have the pastry cream done, it is more a method than a recipe depending on how big your glasses or dishes are, how much fruit you want in each, etc… There are many different recipes for pastry cream, I just happen to have the one given below ingrained in my brain from the restaurant so it is easy to make on a whim. I am working on combining two versions that I love and tonight I think I got it right…although I can’t tell you about it yet, 3 words came to mind when I tasted it: bowl, spoon, alone!

Berries And Cream-Copyright©Tartelette 2008
Berries and Cream:

Serves 6

Pastry Cream:
2 cups/ 500ml whole milk
1/2 vanilla bean, cut open down the middle, seeded
1/4 tsp of salt
4 tablespoons of cornstarch
1/2 cup sugar
2 large eggs

Heat the milk, vanilla seeds and salt in a pan and put over medium heat, and bring to a boil. In a large mixing bowl, whisk the sugar, cornstarch and eggs until smooth. Slowly add 1/2 of the milk mixture into the egg and whisk constantly to temper them. Add the remaining milk and return the whole thing to the saucepan. Cook over medium heat until it comes to a boil or until you get a thick consistency, whisking non-stop. Remove from heat and pour into a bowl, cover the surface with plastic wrap, directly touching the cream, poke holes in the plastic with a knife or skewer, let cool completely.

Remaining ingredients:
3 cups diced strawberries
3 cups blueberries, fresh if possible

Layer the cream and the berries as you wish…..Et Voila!

~~~~~~~~~~~~~~~~~~~~~~~~~~~~~~~~~~~~~~~~~~~~~~~~~~~~~~~~~~~~~~~~~~~

I also need to tell you about the one of the Bastille Day presents I got over the weekend. A couple of weeks ago I started openly telling Fifi how much I love her painting style and with Carol they are my absolute must read blogs when I get up (beside food ones)…I close my eyes and I am in one of their fabulous paintings! Well, Fifi offered to create a Silhouette for Tartelette and all I had to do was give her some directions for colors and tools…bowl, whisk, hair wild to the wind, polka dots,…and today SassyTartey was born so she’s right up there on the sidebar and in my profile page. Thank you so much Fifi! You made my day!

Nutella or Blackberry or Quince or Loquat Danish Braid With The Daring Bakers?

You know by the title of this post that there is a story coming up don’t you? Well, this time I have got to thank Kelly and Ben, our Daring Bakers' hosts this month for our house producing and eating danish braids and various other danishes all month long….for real. Not that I made a big batch of it and ate it throughout the month. No…to easy….I sat down yesterday actually counting the times I had made the recipe they provided for June: 1 full batch and 3 half batches. Hmmm…how did that happen?

Quickly after they posted the recipe inspired by Sherry Yard, The Secrets Of Baking, my mother-in-law was hosting her garden club and since I usually provide these ladies with some sort of baked goods, I thought of doing a half batch of the braid. Then a few days later, my Bakenistas and I met on Skype on Sunday morning and made a full batch. I had worked an overnight at the restaurant and I had started the dough there on my break. I arrived right on time to meet up with Lisa, Ivonne, Mary, Kelly, Ben, Chris and John. Same rowdy bunch, same coffee spillage laughing out loud. That batch was distributed around the neighborhood and B’s students. The weekend after that, he gave me a pity party for not having any left so I agreed to make another half batch. The last one? Yesterday…of all days…when I could not retrieve my Danish Braid picture folder and sent a screeching help email to whomever could help. Thank you John for the programs because they obviously work….and I can write this post eating a slice of Danish without freaking out or melting down.

Summary? Well, we have one Nutella filled Danish Braid, one Blackberry Cream Cheese Braid with Almond Streudel Topping, a few Quince Danishes (thanks to Marcela who brought me a huge can of quince paste from Argentina, 2 pounds of it!), a few Loquat Jam filled Danishes.

Basically, I’d be lying if I told you that we did not enjoy it or that I did not find it a breeze to work with…even in the heat we are having and all the humidity. I do admit that I have a secret (well, not anymore) weapon when it comes to rolling laminated dough like danishes or puff pastry in the summer in South Carolina: a pastry board with ice pack inserts, which you can see see here.

For the filings I spooned Nutella right from the jar and the loquat jam was spread the same way, from the jar. For the blackberry filled braid, I simply cooked some berries with sugar and spooned 4 oz of cream cheese mixed with 2 Tb of sugar on the dough before the blackberries. For the quince paste, I did put a small spoonfull of mascarpone before the paste in the danish. No real recipes, just trying what I have on hand.Kelly and Ben provided a wonderful apple filling recipe for the braid but I had to make room in the fridge and not very much time to do it, but I have it bookmarked for this winter. One other thing: I skipped the egg wash and just sprayed the braids and danishes with some water before baking, to keep the layers light and crispy during baking.


Danish Braid, inspired by Sherry Yard, The Secrets of Baking:

Makes 2-1/2 pounds dough

For the dough (Detrempe)
1 ounce fresh yeast or 1 tablespoon active dry yeast
1/2 cup whole milk
1/3 cup sugar
Zest of 1 orange, finely grated
3/4 teaspoon ground cardamom
1-1/2 teaspoons vanilla extract
1/2 vanilla bean, split and scraped
2 large eggs, chilled
1/4 cup fresh orange juice
3-1/4 cups all-purpose flour
1 teaspoon salt

For the butter block (Beurrage)
1/2 pound (2 sticks) cold unsalted butter
1/4 cup all-purpose flour

Dough:Combine yeast and milk in the bowl of a mixer fitted with the paddle attachment and mix on low speed. Slowly add sugar, orange zest, cardamom, vanilla extract, vanilla seeds, eggs, and orange juice. Mix well. Change to the dough hook and add the salt with the flour, 1 cup at a time, increasing speed to medium as the flour is incorporated. Knead the dough for about 5 minutes, or until smooth. You may need to add a little more flour if it is sticky. Transfer dough to a lightly floured baking sheet and cover with plastic wrap. Refrigerate for 30 minutes.
Without a standing mixer: Combine yeast and milk in a bowl with a hand mixer on low speed or a whisk. Add sugar, orange zest, cardamom, vanilla extract, vanilla seeds, eggs, and orange juice and mix well. Sift flour and salt on your working surface and make a fountain. Make sure that the “walls” of your fountain are thick and even. Pour the liquid in the middle of the fountain. With your fingertips, mix the liquid and the flour starting from the middle of the fountain, slowly working towards the edges. When the ingredients have been incorporated start kneading the dough with the heel of your hands until it becomes smooth and easy to work with, around 5 to 7 minutes. You might need to add more flour if the dough is sticky.

Butter block: Combine butter and flour in the bowl of a mixer fitted with a paddle attachment and beat on medium speed for 1 minute. Scrape down the sides of the bowl and the paddle and then beat for 1 minute more, or until smooth and lump free. Set aside at room temperature.
– After the detrempe has chilled 30 minutes, turn it out onto a lightly floured surface. Roll the dough into a rectangle approximately 18 x 13 inches and ¼ inch thick. The dough may be sticky, so keep dusting it lightly with flour. Spread the butter evenly over the center and right thirds of the dough. Fold the left edge of the detrempe to the right, covering half of the butter. Fold the right third of the rectangle over the center third. The first turn has now been completed. Mark the dough by poking it with your finger to keep track of your turns, or use a sticky and keep a tally. Place the dough on a baking sheet, wrap it in plastic wrap, and refrigerate for 30 minutes. – Place the dough lengthwise on a floured work surface. The open ends should be to your right and left. Roll the dough into another approximately 13 x 18 inch, ¼-inch-thick rectangle. Again, fold the left third of the rectangle over the center third and the right third over the center third. No additional butter will be added as it is already in the dough. The second turn has now been completed. Refrigerate the dough for 30 minutes.
– Roll out, turn, and refrigerate the dough two more times, for a total of four single turns. Make sure you are keeping track of your turns. Refrigerate the dough after the final turn for at least 5 hours or overnight. The Danish dough is now ready to be used. If you will not be using the dough within 24 hours, freeze it. To do this, roll the dough out to about 1 inch in thickness, wrap tightly in plastic wrap, and freeze. Defrost the dough slowly in the refrigerator for easiest handling. Danish dough will keep in the freezer for up to 1 month.

Danish Braid:
Makes enough for 2 large braids
1 recipe Danish Dough
filling of your choice

– Line a baking sheet with a silicone mat or parchment paper. On a lightly floured surface, roll the Danish Dough into a 15 x 20-inch rectangle, ¼ inch thick. If the dough seems elastic and shrinks back when rolled, let it rest for a few minutes, then roll again. Place the dough on the baking sheet.
– Along one long side of the pastry make parallel, 5-inch-long cuts with a knife or rolling pastry wheel, each about 1 inch apart. Repeat on the opposite side, making sure to line up the cuts with those you’ve already made.
– Spoon the filling you’ve chosen to fill your braid down the center of the rectangle. Starting with the top and bottom “flaps”, fold the top flap down over the filling to cover. Next, fold the bottom “flap” up to cover filling. This helps keep the braid neat and helps to hold in the filling. Now begin folding the cut side strips of dough over the filling, alternating first left, then right, left, right, until finished. Trim any excess dough and tuck in the ends.

Proofing and Baking
– Spray cooking oil (Pam…) onto a piece of plastic wrap, and place over the braid. Proof at room temperature or, if possible, in a controlled 90 degree F environment for about 2 hours, or until doubled in volume and light to the touch.
– Near the end of proofing, preheat oven to 400 degrees F. Position a rack in the center of the oven.
– Bake for 10 minutes, then rotate the pan so that the side of the braid previously in the back of the oven is now in the front. Lower the oven temperature to 350 degrees F, and bake about 15-20 minutes more, or until golden brown. Cool and serve the braid either still warm from the oven or at room temperature. The cooled braid can be wrapped airtight and stored in the refrigerator for up to 2 days, or freeze for 1 month.

Check out all the other Daring Bakers' wonderful creations this month by heading over to the blogroll. Thank you all for visiting during these busy coming days and I will try my best to do the same. Scoring DMBLGIT is not a quick task so bear with me for the DB and the contest results which I plan on posting by Wednesday.

Lemon And Yogurt Scones And Unexpected Finds

Marcela is finally here, safe and radiant from her stay in Seattle and New York, ready to chill under the Southern sun. After many late night chats on Yahoo with Lisa over the past year or so, it is a blast to finally laugh in person instead of in front of the computer and discover the many facets of Argentina through her experiences and her eyes. As the nerds that we are, we spent most of the evening of her arrival Tuesday on Google earth checking out the country with the perfect guide. Today was spent downtown Charleston with us showing her some of our favorite places, streets, parks, etc… but I will get to that a little bit later.

After my post admitting that I was a clafoutis fanatic, going as far as eating it everyday, I stumbled on a great looking scone post by Julie of A Mingling Of Tastes. Her blog is one of my regular reads where I get my fix of yummy breakfast ideas, and after many weeks of thinking I ought to make scones again, because after all we do like them, she timely tempted me with these Lemon Buttermilk Scones with Currants. With Marce coming in town I figured it was high time I baked scones again and changed the clafoutis routine a bit. I liked her recipe a great deal but I had to adapt given the raisin hater I have in the house (B. who is by the way loving having two women cooking up a storm in the kitchen right now!!) and use the supplies I accumulate and only get around to use like Goji berries and pearl sugar (regular and brown, also found as rock candy or rock sugar). He still won’t go for the Goji berries as they look too similar to raisins but the scones sprinkled with sugar are already disappearing 3 at a time. If I catch him in the jar of dulce the leche that Marcela brought me….arghhhh!

For the scones I used a mix of whole wheat and all purpose flour and replaced the buttermilk with yogurt, same tang and creamier texture. I like to pat, roll and cut dough a lot so I went for round scones instead of wedges, plus there is more space for jam to be spread (or my dulce de leche). We fell in love with these and I may not need to attend a 12 step program for my clafoutis habit after all, although I feel it won’t be long before we can have a plum or a peach one for breakfast soon.

Lemon And Yogurt Scones, various toppings and add-ins:

Printable Recipe

1 3/4 cup all purpose flour

3/4 cup whole wheat flour

2 Tb granulated sugar

2 teaspoons baking powder

1/2 teaspoon salt

3/4 cup plain yogurt

1 large egg

6 tablespoons cold unsalted butter

1/3 cup goji berries (optional, use raisins if desired)

1 tablespoon lemon zest

Preheat oven to 350 degrees. Combine flours, sugar, baking powder and salt in the bowl of a food processor and pulse several times to blend. Add the chilled butter, cut in small chunks and pulse until the mixture resembles pea size crumbs. In a large bowl, whisk the egg, yogurt and lemon zest. Add the dry ingredients and the goji berries to the egg mixture and stir just until moistened. Turn the dough out onto a lightly floured surface and knead into a ball. Pat or roll the dough out to about 1 to 1 1/4-inch thick. With a 3 inch cookie cutter dipped in flour, cut the dough into 10 and place on a parchment lined baking sheet, about 2 inches apart. Brush with a little milk and bake for 20 to 25 minutes, until golden brown. If you use pearl or rock sugar, sprinkle that on top of the scones after the brushing of milk so they adhere to the top better.

Unexpected sightings in Charleston or when to look high and when to look low: I guess I walk the streets downtown with a purpose and never the one to just look and breathe in the scenery. Well not after today when Marcela and I found dozens of Loquat trees downtown. We met a nice English gentleman who threw his hat up on the tree and made a couple fall in our hands. We almost knock on somebody’s door to see if we could harvest theirs since they seemed to be left to rot on the tree. What a shame! Loquats are the perfect balance of sweet and sour in one bite. I have to check with a couple of people if they have one of those trees close by otherwise I am coming back at night with my ladder and basket….

The second unexpected find of the day was bushes after bushes of wild blackberries in the woods in front of our house. I gathered a few at different ripening stage just to compare and was stunned to hear B. say "Oh yeah, the twins have been gathering them like crazy and I mowed a whole row on the side of the yard"….

"You what?!!!! Malheureux (crazy fool)…do you know what blackberries cost and here they grow wild?!!"

Last but not least, above is what my eye catches when I am leisurely walking the streets downtown. Missing shutters on a house where only the hook testifies of its previous existence. Circles in the middle of intricate wrought iron gates. It is just a circle…but to me it was a circle with a day off in the company of a friend.

Warm Berry Crumbles And Fromage Blanc Ice Cream

Berry Crumble-Copyright©Tartelette 2008
I meant to post this yesterday but I found out that home improvements seriously interferes with blogging. Noting like holding crown molding with one hand and typing with the other, right?!! We decided to tackle the little things we skipped when we built our house (and I mean "we" as owner/builder), exhausted after 15 months spent on a dream and ready to relax on the sofa with a book and a cup of tea. In that spirit, it looks like my friend Inne from Vanille & Chocolat might be coming to the end of her DIY home improvements and share with us this lovely Lemon And Lavender Cake. I am mentioning this, because in the world of food blogging, two things that will never cease to amaze me in the awesome sense of community and incredible friendships that we create. We take notice when somebody does not update for a while, we inquire about certain recipes and enthusiasm and support are kings! Having this cookbook giveaway this past weekend was a way for me to pass on the goodwill and tell you how much I appreciate your support and readership. two things that push me to improve in all aspects of life.
With this said…I am happy to announce the winner of the Nestle dessert cookbook: Congratulations to Kelli from Life In General, in Texas! Send me your mailing address at marinette1 @ comcast . net and the book will be on your way! Thanks to all that participated, it was really great to read about all your favorite cookbooks and I have since added a few to my wish list.

This weekend was what I consider typical April weather, well the kind of days I grew up with, and that makes me very nostalgic about home and my family. Sunny and windy, warm and inviting, with fresh and fragrant smells of blooming trees. The kind of weekend that makes you want to kiss the familiar comfort of winter goodbye and embrace the warmer days ahead. When C. called to get together as we do on most Saturdays (oyster roasts, bbqs, etc…) to ask what I was bringing for dessert, I said "I have got ice cream churning, still figuring out the rest"…which was a complete lie but I don’t like telling her what I am bringing ahead of time, spoils the fun of having dessert, don’t you think?

This Warm Berry Crumble With Fromage Blanc Ice Cream was completely in sync with the day itself and inspired by one of my favorite cookbooks, the "Larrousse Des Desserts" by Pierre Herme (I know, I know…him again). No oven was turned on and yet it sent us back to the few colder days we had: the berries are cooked on the stove with a splash of olive oil, white balsamic vinegar and a dash of cracked black pepper, the crumble part is just crushed ginger snap cookies (crumbled graham cracker sheets work great too). I used a mix of strawberries, blueberries, and raspberries, basically whatever I had in the refrigerator that day that needed to get used pronto. Next time I might add a bit of rhubarb to it, it is so beautiful this time of year and I go through pounds of it like mad in April and May.

The promise of warmer days called for some ice cream to top the crumble with, and I went for one of my new favorites, fromage blanc ice cream. One of the things I miss the most about home is having "fromage blanc" at the end of a meal with a fruit (typical dessert in my family) or in the morning with some granola on top. You can find it at nicely stocked health food stores, or even online, but it can cost an arm and leg (money I’d rather save for the increasing price of flour lately). Thus, I started making my own at home following this recipe, and keep it well covered in the refrigerator. In a pinch, I found that Greek Yogurt works great for the ice cream, both have similar texture and taste, and I realise that not everybody is considering buying a cow and a goat like I am sometimes so I could have all my favorite dairy product readily available.

Beryy Crumbles-Copyright©Tartelette 2008 I already talked about how cancer affected my life by taking away family members and friends, but one thing occured to me while I was making these: they are packed of wonderful nutrients and essentials vitamins and minerals. Berries are natural superfoods, full of radical fighting agents and the yogurt or fromage blanc is packed with digestive building bacteria, all crucial for healthy living. I hope that Chris from Mele Cotte will agree and include these in her Cooking To Combat Cancer Event.

Warm Berry Crumble With Fromage Blanc Ice Cream:
Serves 6
Printable Recipe

For the ice cream:
400 ml water
240 gr. sugar (about 1 cup)
zest and juice of one lemon
350gr. fromage blanc (or use store bought or Greek yogurt)

In a large and heavy saucepan, bring the water to a boil with the sugar, zest and juice of the lemon, until the sugar is dissolved. Let cool completely. Add the fromage blanc and and whisk until well blended (it is ok if it appears to separate, it will come together in the ice cream process). If you have an ice cream maker, freeze and process the mixture according to the manufacturer’s instructions.
If you do not ave an ice cream maker: freeze the mixture for a couple of hours, take it out and give it a good whip either with a stand mixer or a hand held blender, repeat the process a couple of times, every two hours.

For the crumbles:
1 – 2 cups coarsely crushed ginger snap cookies or graham crackers (amount will vary according to the size of your dishes and how "crumbly" you want to get versus the amount of fruit)
2 cups mixed red berries
1 Tb olive oil
1/4 cup sugar
1 Tb white balsamic vinegar
1/4 tsp cracked black pepper

In a large saucepan, heat the olive oil over medium heat, add the berries and cook just until they start to soften. Remove from the stove and add the vinegar and black pepper.
Sprinkle some cookie crumbs at the bottom of your glasses or dishes, divide the berries evenly on top, add some of the juices too. Top with some more crumbs of desired and a scoop of ice cream.

Berry Crumbles-Copyright©Tartelette 2008
What next? I am off to check out my two adoptee bloggers, because I have been a bad godmother and need to see what delicious goodies they have made lately!

Berry Salad on Yuzu And Mascarpone Creams


It is probably no news that I love berries, lemons, and mascarpone, but what I love when two bloggers give me the chance to put them together. Lisa from La Mia Cucina and Kelly from Sass & Veracity got together and concoted a Salad Extravaganza event in their quest to shrink their hips and thighs.

I first thought about doing a simple fruit salad with a drizzle of honey and lemon juice, maybe a dollop of barely sweetened whipped cream. However, after several email exchanges with Lisa and her desire to keep the taste and bang factor while watching what she eats, I wanted to share with her that one can keep that "wow" factor by using regular ingredients but decreasing the portion size. I too have had my battle with my thighs and over the years I have found out that they respond well the old "quality over quantity" phrase (although I have been known to have my cake and eat it too!).

I first tried yuzu in a tart purchased from the amazing pastry chef Sadaharu Aoki while in Paris last Christmas. How to describe the taste? Sometimes it is like a grapefruit or a perky tangerine in your mouth, sometimes it has a lemon kick to it, the kind that makes you gums go "ouyee" overall it just is plain good if you love citrus! I cannot find fresh yuzu fruits here but thanks to the internet the juice is easily accesible.
These "verrines" are a dessert we have often as it is light and tasty, easy to put together and extremely refreshing. Don’t tell be but I even enjoy a few spoonful in the morning before my run. With the yuzu juice, I make a simple (lower calorie) curd that I layer with a mascarpone cream spiked with lemon zest. The berries don’t really need anything else as you dip your spoon and mix them with the creams.

Berry Salad on Yuzu and Mascarone Creams:

Serves 4

For the yuzu curd:

2/3 cup yuzu juice
1/3 cup sugar
2 eggs

Combine the sugar and juice in a saucepan, and bring to a simmer.
In a small bowl, beat the eggs until light.
Beat some of the yuzu mixture into the eggs to temper. Scrape the mixture back into the saucepan and cook stirring constantly until it thickens up, about 5 minutes.Strain and refrigerate, covered with plastic wrap until ready to use.

For the mascarpone cream:

8 oz mascarpone, at room temp
1/4 cup powdered sugar
grated zest of one lemon

Mix all the ingredients together and keep at room temperatue, it will be easier to layer.

For the mixed berry salad:

1 cup cut up fresh strawberries
1 pint fresh raspberries
1 pint fresh blueberries

To assemble: layer the yuzu curd and mascarpone cream in glasses or cups and top with a generous amount of the mixed berry salad.


Hope you enjoy it ladies!