And there you have it…these macarons are the reason why we did not have eggs left for or breakfast sunday morning…that and the lime squares I took to T&D for dinner that night.
I am a little late in catching themacaronsbug but now I don’t wish for a cure. They have become very enjoyable to make and after the fear of the first batch I have spend many hours dreaming of different flavor combinations. Some I came up with were interesting, not to say weird and some complemented the arrival of fall and its chilly days. I have to dream of chilly weather because here it is sill 82-85 degrees (!)
I use the same basic recipe everytime and vary either the topping or the flavor. This time I made plain ones dusted with cocoa powder and filled with a raspberry ganache, vanilla flavored ones with coarse brown sugar topping with a rum ganache and coffee ones with a hazelnut praline ganache. I made a firm ganache as I was going to package some for D. as a hostess gift and wanted the texture to withstand the car ride. Basically, 1/2 cup of heavy cream for one cup of chocolate. Also remember that for every ounce of liqueur, you have to increase the chocolate of one ounce also or you will end up with a runny texture.
Lisa, I have not forgotten your wish and I promise to send you some very soon!
—————————————————————-
Note: maman, Arnaud et les reste de la smalla, n’hesitez pas a laisser un commentaire si le coeur vous en dit!
Apparently I like the book! Ihavetriedsomeoftherecipes and so far there has not been one we did not like. It is a great read for novice bakers as it contains all sorts of basics from breakfast treats, cookies, bars, cakes, ice creams and more. It appeals to the intermediate cook who wants to broaden his/her repertoire with all the variations Dorie gives on the sidebar of the recipes. It is full of homey, uncomplicated delights for the seasoned chef who wants to return to the basics or does not want to fuss with complicated techniques and hard to find ingredients.
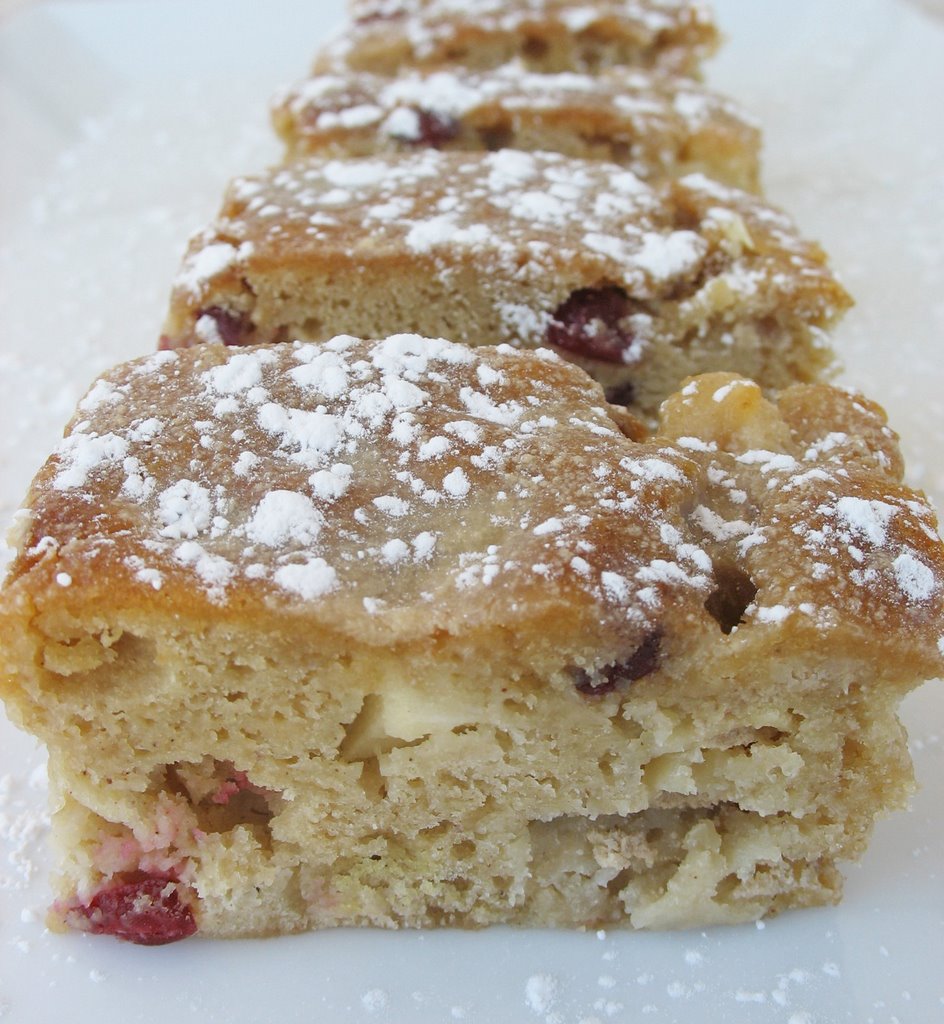
Sunday afternoon, the boys were working on the boat and given that the weather was a little bit in the chilly side I thought that a batch of these apple bars with a nice cup of coffee would be totally appropriate to make them take a break. The bars are rich but not heavy, you can play with the kind of apple you use as well as the amount of spices. The recipe called for raisins but B. has a childhood aversion to them so I used dried cranberries instead and it worked even better (at least in my book). I also used Calvados instead of applejack because that was what I had on hand.
Applesauce Spice Bars, adapted from Dorie Greenspan:
For the bars:
1 1/4 cups flour
1 tsp. baking powder
1/4 tsp. baking soda
1 tsp. ground cinnamon
1/4 tsp. allspice
1/4 tsp. salt
1 stick butter
1 cup packed light brown sugar
2 large eggs
1/2 cup unsweetened applesauce
1 tsp. vanilla extract
1 Tb. applejack
1 baking apple, peeled, cored and finely diced
1/2 cup dried cranberries
1/2 cup chopped pecans
For the glaze:
2 1/2 Tb. heavy cream
1/3 cup packed light brown sugar
2 1/2 tsp. butter
1 tsp. light corn syrup
1/2 tsp. vanilla
Butter and flour a 9×13 inch baking pan. Preheat the oven to 350.Whisk together the flour, baking powder, baking soda, spices and salt.In a medium heavy bottomed saucepan, melt the butter over low heat. Add the brown sugar and stir until smooth. Remove from the heat.Still in the saucepan, whisk in the eggs, one at a time, mixing well until blended. Add the applesauce, vanilla and liqueur until smooth. With a spatula, add the dry ingredients, cranberries and nuts and mix until combined.Scrape into the pan and bake 20 -25 minutes.
Let cool and prepare the glaze in the meantime.
In a saucepan, whisk the cream, sugar, butter and corn syrup over medium heat and bring to a boil. Reduce the heat and simmer for 5 minuts. Remove from the pan and stir in the vanilla.
Remove the bars from the pan and set on a wire rack positioned on top of a sheet pan to catch the drips. Pour the glaze over the bars and let set, cut as desired.
I usually make us some eggs on sunday morning since B. has more time to enjoy breakfast. We sit quietly looking at the river without the t.v or radio on, just looking at the herons or the crabs. When I woke up this morning, the first words out of my mouth were "Oh no! How did I let this happen?", to which B. gave me the most puzzled look. Him: "Did you have a bad dream hon?" Me: "This is no dream. We are out of eggs!" How could I let this happen? Well, the answer is easy: I made a double batch of macarons and lime squares yesterday and I am left with 4 egg yolks. After many funny and interesting ways we devised to cook those yolks for breakfast, we quickly abandonned the sunday egg fix. B. nicely suggested we could go out for brunch, but I like to lounge in my pjs, hair undone, having as many refills of coffee as I want without a frown from the staff. No! I will think of something!
In one of my moments of recycling or using items I have on hand I came up with one of my childhood favorites, a "chausson": a little pocket of buttery dough filled with anything sweet and yummy. Fifteen minutes these little pastries were getting golden brown in the oven. Some leftover puff pastry dough, some homemade pear jam and the use of one egg yolk for color and we would have breakfast!
8-9 pears, peeled cored and chopped
1/4 cup lemon juice
1 (1 3/4 ounce) box pectin, Sure-Jell no-sugar, powdered
1 vanilla bean, split and scraped
3 cups sugar
Place the chopped pears and the lemon juice in a heavy pot.
Mash pears with a potato masher to desired chunkiness. If you like it fine you can coarsely grind it. But a food processor will make it too pureed for this recipe.
Stir-in the powdered pectin, spices and ginger.
Bring to a boil and boil hard for one minute.
Add the sugar.
Bring back to a boil and boil hard for 4-minutes stirring frequently.
Ladle into sterile jars, seal and process for 10 minutes.
Yield 7 half pints.
For the pastries:
1 sheet pastry puff
pear jam (or your favorite)
1 egg yolk mixed with 2 Tb. water
With a large cookie cutter, cut out rounds in the puff pastry. Layer 1 or 2 tsp. jam in the middle of a round, brush the edges with the egg wash, layer another round on top and press the air out of the pocket. Brush more egg wash on top and prick the edges closed with the tines of a fork.
Repeat with the remaining puff pastry and jam. Bake 15 minutes or until cooked through and golden brown.
Seriously easy, seriously good, even the crabs and herons wanted some!
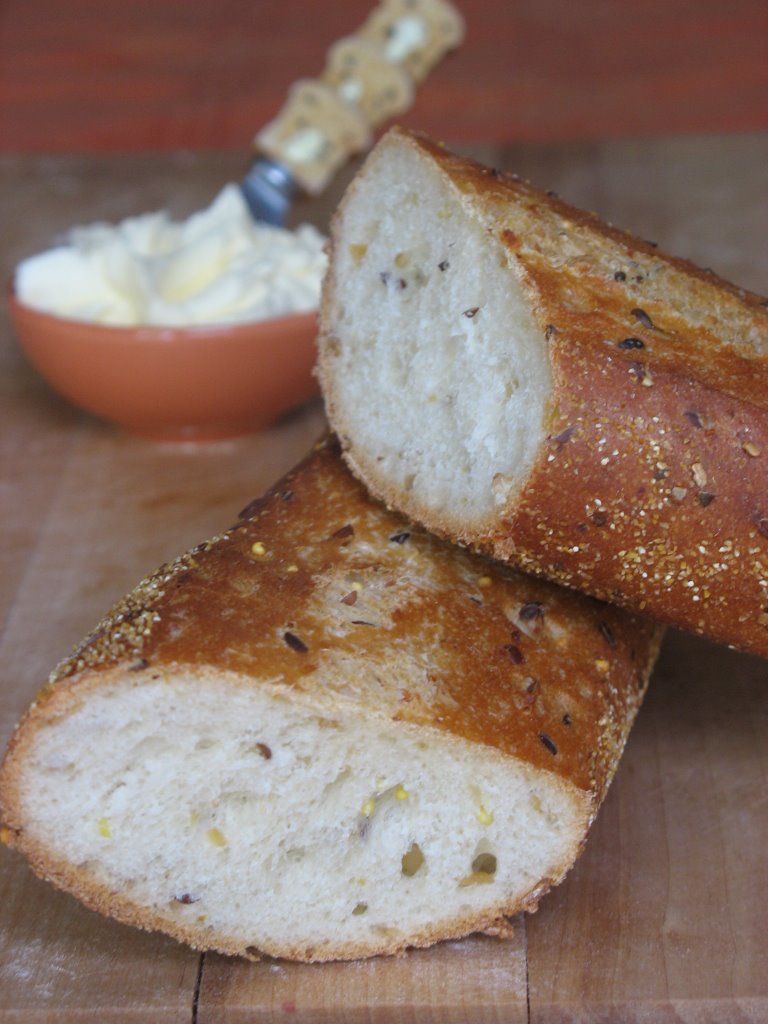
When Zorra suggested a World Bread Day event back in October I had no idea how many people would participate: over 100 bread recipes were submitted. I was extremely impressed with the round up as that many posts to post about might have turned into a headache. I was even more imoressed when she suggested an "After Hours Party" in which we could try somebody else’s creation and post about it. I think I spent hours on it but I actually went through every post, yes, I am that dedicated to bread! I discovered new blogs, plenty of great recipes and amazing photographs.
I finally settled on a multi grain bread as this is one that we like the most in our house. I found it on The Barmy Baker, a blog written by Jen out of California. Click here to see her original post and picture.
Rustic Pain de Campagne or Muligrain Bread, from Jen, adapted from Peter Reinhart’s The Bread Baker’s Apprentice :
1 recipe pate fermentee:
1 1/8 cups unbleached all-purpose flour
1 1/8 cups unbleached bread flour
3/4 tsp salt
1/2 tsp instant yeast
3/4 cup + 2 Tbsp water, room temp
Mix flours, salt and yeast in a bowl, add the 3/4 cup water and stir until everything comes together. If you feel things are a bit too dry or stiff, add the other 2 Tbsp of water and mix in.-Turn dough out onto a floured surface and knead for about 6 minutes or until the dough is soft and pliable and tacky.Transfer to a lightly oiled bowl and turn the dough to coat the top with oil. Cover and allow to ferment for 1 1/2 hours or until doubled in size.
Turn dough out onto a lightly floured surface and gently knead to de-gas, return it to the bowl, cover it tightly and place in the refrigerator overnight or up to three days.
1 recipe "soaker" for the seeds:
3 Tbsp whole flax seeds
2 Tbsp sesame seeds
3 Tbsp cornmeal (coarse ground if you can find it)
1 cup water
Mix all together, cover tightly and refrigerate overnight. The seeds and cornmeal will soak up a good deal of the water.
For the rest of the recipe:
1 3/4 cup unbleached bread flour
1/3 cup whole wheat flour
3/4 tsp salt
1 tsp instant yeast
2 Tbsp wheat germ soaker, from above
1/2 cup lukewarm water
Remove the pate fermentee from the refrigerator, cut into about 10 pieces, cover with plastic wrap and allow to sit at room temp for an hour to remove the chill.
Sift flours, salt and yeast together into a bowl with the pate fermentee.
Add the soaker and the water and stir until the mixture comes together (you may need to add a little more water).
Turn dough onto a lightly floured surface and knead for 8 to 10 minutes until the dough is soft and elastic. Lightly oil a large bowl and place dough inside, turning it to coat in oil. Cover and let bulk ferment for about 2 hours, or until it doubles in size.
Gently remove the dough from the bowl so as to de-gas as little as possible. Divide the dough into 2 pieces and gently shape into batards. Sprinkle cornmeal lightly onto sheetpans, or a peel and place the loaves on the sheetpans. Cover with plastic and allow to proof for about 1 hour, or until they are about 1 1/2 times their original size.
Preheat your oven to 500f. If you are going to use steam, put your pan in the oven now, and get some water heating about half hour before you are going to bake the bread.
When the loaves are ready, uncover and slash the loaves as you see fit. Either slide the loaves from your peel to your baking stone, or slide the sheetpans into the oven. If you are using steam, pour a cup of the hot water into your steam pan and shut the door (beware of evil steam burns!) After about 5 minutes, lower the oven heat to 450f. After 5 more minutes, if there is still any water in the steampan, remove it carefully. Bake for at least 20 more minutes, checking the loaves and rotating as needed. The bread should be a deep golden brown, and feel light for it’s size.
Thank you Jen for a wonderful recipe! It was an intense labor of love but the end result was quite worth it!
It’s been a while since I have made Madeleines and while I was reading this book again I found a recipe for Earl Grey Madeleines. Great! I did not have Earl Greay at the house. Looking on the side bar titled “Playing Around”, Dorie Greenspan gives variations for the recipe using rosemary-orange, cinnamon and ginger and lavender. That I had plenty of! Her instructions are to infuse the melted butter with the tea leaves or lavender buds. I decided to play around a little and actually keep some of the buds in. I was afraid it would take on a bitter aftertaste but it actually did not. Definitely a repeat!
Lavender Madeleines, adapted from Dorie Greenspan "Baking: From My Home To Yours"
Makes 12
5 Tb. Butter
1 Tb. edible lavender
¾ cup flour
½ tsp. baking powder
Pinch of salt
1/3 cup sugar
Grated zest of half a lemon
2 large eggs
2 Tb. honey
2 tsp. vanilla extract
Preheat oven at 400 degrees.
Melt the butter with the lavender and let sit for 10 minutes to infuse. Strain but keep half of the lavender in with butter, or discard the whole amount.
Combine the flour, baking powder and salt.
Working with a stand mixer, beat the eggs, sugar and lemon zest until pale and thick, about 3 minutes. Add the honey and vanilla and beat for one minute more. Switch to a rubber spatula and incorporate the dry ingredients. Fold in the butter. Refrigerate the batter at least 2 hours or up to 3 days. (helps with the bumps characteristic of the madeleines).
Butter and flour your madeleines molds and divide the batter evenly. My molds are smaller tan hers so I got 24 small cookies. Bake 12-14 minutes until they are golden brown.
No story to go along…except they are almost gone and the neighbors did not get any…(hoping they forgot the blog address)
In my family November 1st is known as "All Saints Day" but for Isabel it was her day to make "Bread of the dead". I recall her telling me that she got into the habit soon after she started dating a man from Mexico named Anton and was trying to please him by making his mom’s Pan de Muertos. From what I understood, she came very close but any married woman will tell you that there are dishes that only "his" mom will ever get right.
Well, I knew I would not be able to replicate the exact same bread that Isabel used to do, much like she had not been able to make hers exactly like Anton’s mom. She had only given me spoken instructions for this bread and I was a little worried to mess it up so I did an online search and found a recipe that looked very close. The breads are usually shaped into rolls having the shape of bones or limbs and glazed with a light orange sugar syrup. I wanted these for dinner tonight so I skipped the glazing part, I might use it for the remaining rolls tomorrow morning. As you can see I have also skipped shaping the buns into bones and such, a little too morbid for me.
1/2 cup butter
1/2 cup milk
1/2 cup water
5 to 5-1/2 cups flour
2 packages dry yeast
1 teaspoon salt
1 tablespoon whole anise seed
1/2 cup sugar
4 eggs
In a saucepan over medium flame, heat the butter, milk and water until very warm but not boiling.
Meanwhile, measure out 1-1/2 cups flour and set the rest aside. In a large mixing bowl, combine the 1-1/2 cups flour, yeast, salt, anise seed and sugar. Beat in the warm liquid until well combined. Add the eggs and beat in another 1 cup of flour. Continue adding more flour until dough is soft but not sticky. Knead on lightly floured board for ten minutes until smooth and elastic.
Lightly grease a bowl and place dough in it, cover with plastic wrap and let rise in warm place until doubled in bulk, about 1-1/2 hours. Punch the dough down and shape into loaves resembling skulls, skeletons or round loaves with "bones" placed ornamentally around the top. Let these loaves rise for 1 hour.
Bake in a preheated 350 F degree oven for 40 minutes. Remove from oven and paint on glaze.
Glaze
1/2 cup sugar
1/3 cup fresh orange juice
2 tablespoons grated orange zest
Bring to a boil for 2 minutes, then apply to bread with a pastry brush.
If desired, sprinkle on colored sugar while glaze is still damp.
And yippee today was the day to get one (sugar fix). I have been meaning to post this since this morning but we are having terrible internet connections these days…off/on/off/on…enough to drive you crazy!
These cookies may not look like the ones you will find on the shelves of professional decorators but this is what you get for working with a dinosaur, two knights, a mermaid, a pirate and a zebra…yes, we had a slight chance of costume programming! We took the kids trick or treating on an old golf cart with a trailer attached to the back and they had a great time!
Cut Out Sugar Cookies, adapted from allrecipe site:
3 cups all-purpose flour
1 teaspoon baking soda
1/2 teaspoon baking powder
3/4 cup butter, softened
1 cups white sugar
1 egg
1 teaspoon vanilla extract
Preheat oven to 375 degrees F (190 degrees C). In a small bowl, stir together flour, baking soda, and baking powder. Set aside.
In a large bowl, cream together the butter and sugar until smooth. Beat in egg and vanilla. Gradually blend in the dry ingredients. Refrigerate dough, roll out and cut as desired
Bake 8 to 10 minutes in the preheated oven, or until golden. Let stand on cookie sheet two minutes before removing to cool on wire racks.
Royal Icing, from Joy of Baking site
4 cups (440 grams) confectioners' sugar
3 tablespoons (30 grams) meringue powder
1/2 teaspoon extract (vanilla, lemon, almond)
1/2 – 3/4 cup (120 – 180 ml) warm water
In the bowl of your electric mixer (or with a hand mixer), beat the confectioners' sugar and meringue powder until combined. Add the water and beat on medium to high speed until very glossy and stiff peaks form (5 to 7 minutes). If necessary, to get the right consistency, add more powdered sugar or water. To cover or 'flood' the entire surface of the cookie with icing, the proper consistency is when you lift the beater, the ribbon of icing that falls back into the bowl remains on the surface of the icing for a few seconds before disappearing.
The icing needs to be used immediately or transferred to an airtight container as royal icing hardens when exposed to air. Cover with plastic wrap when not in use.
Makes about 3 cups
Sometimes it’s good to just bake with the kids and be one again!
Yes, Halloween is here. It is kind of a new holiday for me and even after 10 years of being here, I still enjoy playing dress up and waiting for little goblins and witches to knock on my door. You can see the excitement in the kids' eyes as they prepare their costumes and have them laid out on the bed, ready for their big day. You can sense that pre-sugar rush as they get ready to go trick or treating. Seems like we are going to have a small Halloween block party with sugar, chocolate and a hay ride around the neighborhood.
After SHF, I spent most of the weekend baking and decorating Halloween cookies and I can say that after many dozens of pumpkins, ghosts, bats and cats that I have no desire of becoming a cookie decorator. The novelty wore out after the first 2 dozens. My fingers are covered in orange, black and green food coloring. I believe I have more sugar sparkles in my hair than Dolly Parton has sequin on her dress, but that is for another post!
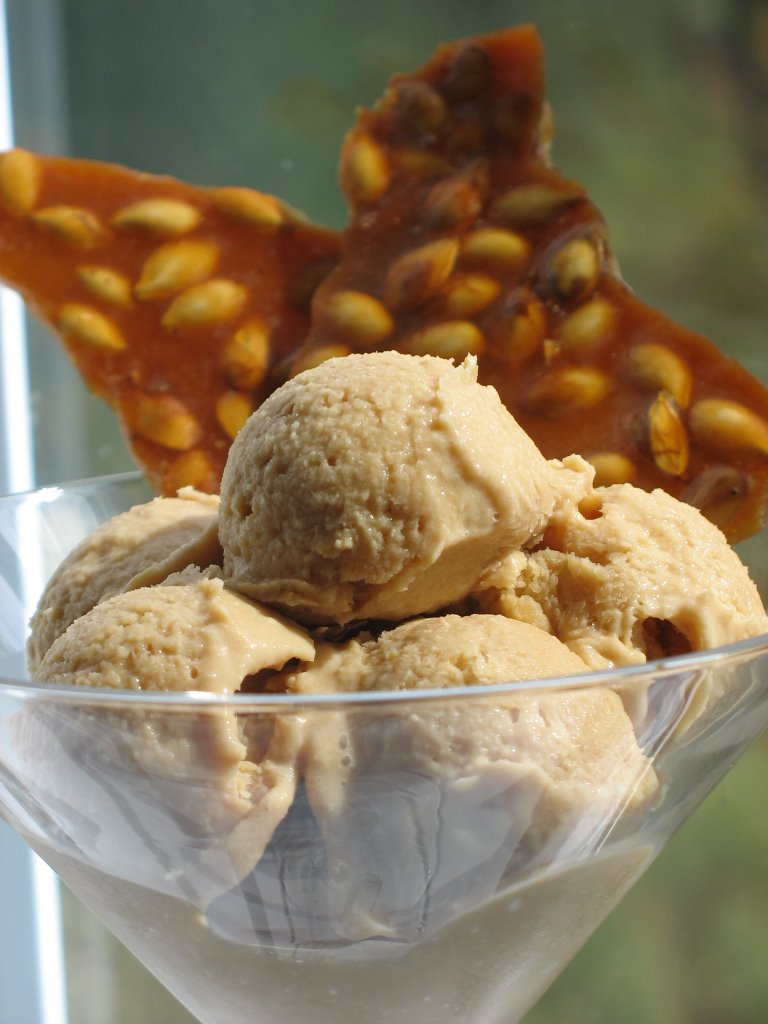
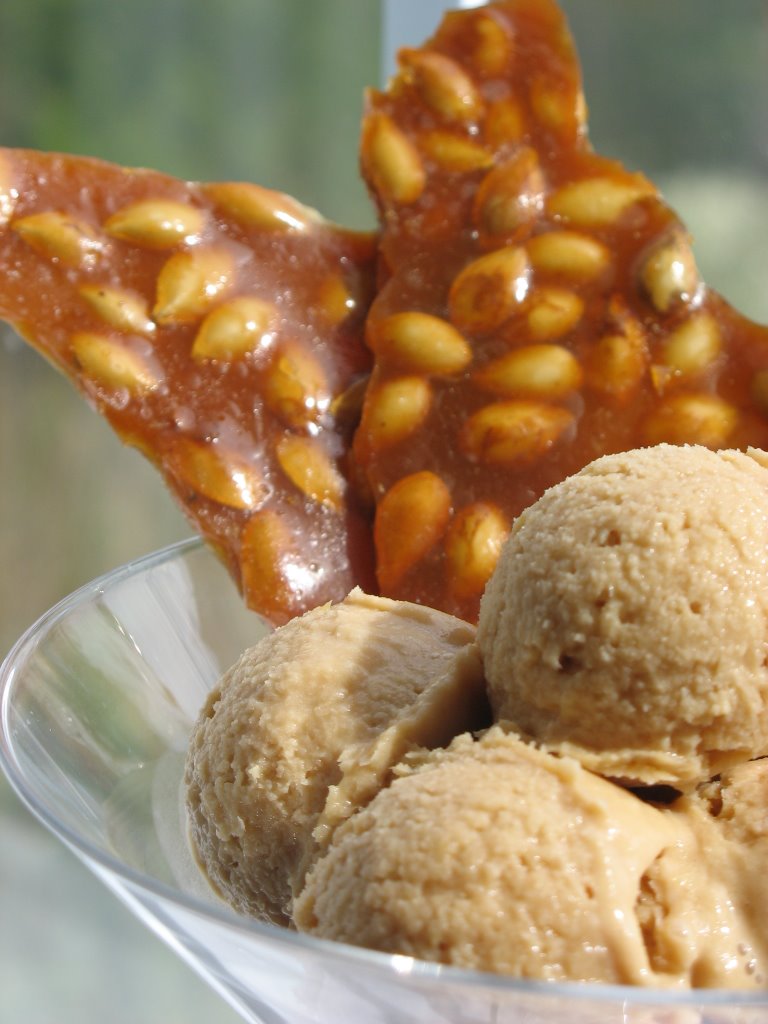
No Halloween would be complete without carving a pumpkin. Problem is, I got one much more for getting the flesh and seeds than for the carving itself so my design remained minimal. I only had one thought in mind: I wanted to make pumpkin seed brittle as I thought it would make a nice edible garnish to a warm slice of Apple Cinnamon Cake. My mind kept on going and I thought that ice cream would be great with it too, but not necessarily vanilla. I was browsing through Dorie Greenspan’s Baking: From My Home To Yours, when I found this incredible ice cream recipe. It is smooth and creamy, caramely but not too sweet. It was good enough to eat on its own but incredible combine with the cake and the brittle.
Burnt Sugar Ice Cream, adapted from Dorie Greenspan:
1 cup sugar
3 b. water
2 cups whole milk
1 cup heavy cream
4 egg yolks
pinch of salt
1 1/2 tsp. vanilla extract
Stir the sugar and water in a saucepan and cook over medium heat until the sugar dissolves. Increase the heat and cook until it becomes a caramel of deep amber color. Lower the heat and add the milk and cream. It will bubble like mad but continue stirring until it is smooth, remove from the heat.
In a large bowl, whip the egg yolks and salt until a little thick, slowly pour the hot milk mixture over it and whisk to tamper the yolks. Put back into the saucepan and cook until it coats the back of a spoon (creme anglaise consistency or 170 degrees F).
Let cool completely and churn into your ice cream maker. Freeze for 2 hours or moreor until firm to scoop….if you can wait that long!
Pumpkin Seed Brittle, from Martha Stewart
1/4 cup (1/2 stick) unsalted butter, plus more for baking sheet
1/2 cup packed light-brown sugar
1/4 cup honey
1 cup fresh pumpkin seeds, rinsed well, dried, and toasted
Preheat oven to 350°. Butter an 11-by-17- inch rimmed baking sheet; set aside.
Melt butter in a small saucepan over medium heat. Stir in sugar and honey. Bring to a boil. Cook, without stirring, until mixture is medium amber and a candy thermometer registers 280°, about 6 minutes. Stir in pumpkin seeds. Cook until mixture reaches 300°, about 2 minutes. Pour onto prepared baking sheet. Let cool completely. Break into pieces.
I realized the other day that it had been a while since my last few, weekly bananaposts, especially so when B. (that’s the hubby) handed me the fruit bowl with that heavy sigh : "please, do something, put an end to their misery, pleeeeeeze". I had to go teach a couple of classes so I put the dear bananas in the back of my mind.
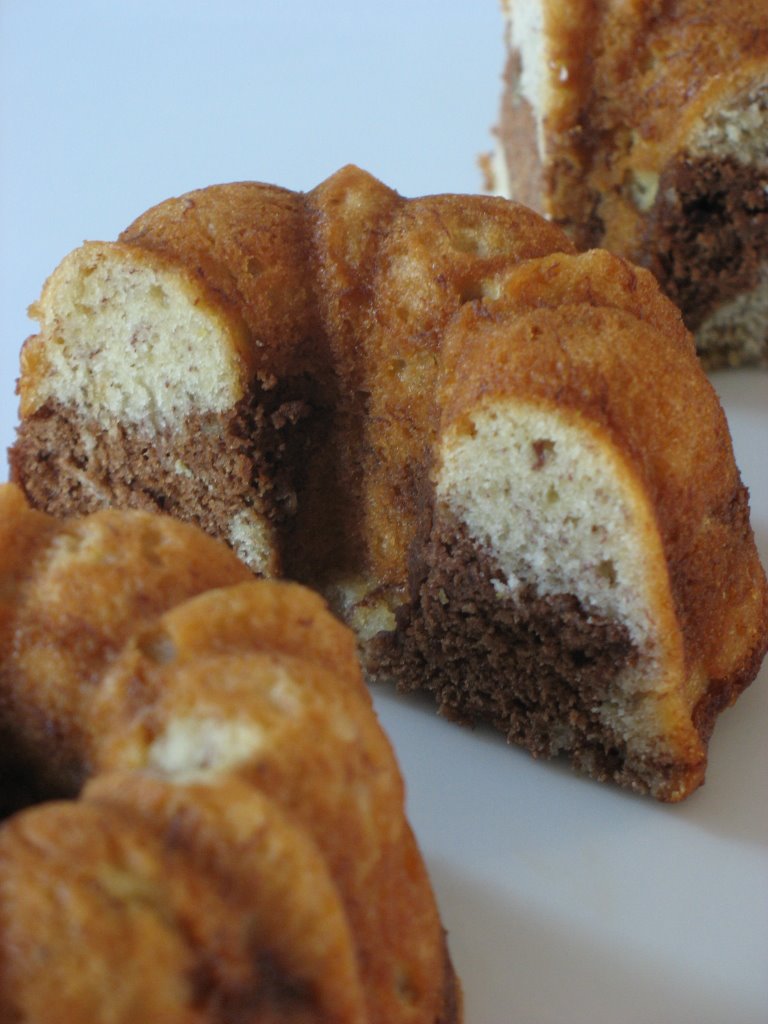
Later in the afternoon, we were outside with the rest of the neighborhood, and the kids (ages 3 to 9) were vividly talking about their Halloween costumes. Looks like we are going to have a fairy, a princess, a baby pumpkin, a skeleton, a couple of ghosts, a zebra and a tiger. We are trying to come up with a couple of games that could keep them entertained for a while as well as some fun foods that adults and kids can enjoy. That’s when the bananas came to haunt me… I remembered a marbled banana cake I had seen on the Cooking Light website when I was looking for the Apple Cinnamon Cake from the other day.
I made it and baked them in mini bunt shapes. As soon as I took some next door, the kids exclaimed : "oh look! They look like Zebras! They look like Tigers" and that’s how this marbled cake got a new name, at least around Halloween.
Marbled Chocolate Banana Bread, aka Zebra and Tiger Cakes, adapted from Cooking Light:
2 cups all-purpose flour
3/4 teaspoon baking soda
1/2 teaspoon salt
1 cup sugar
1/4 cup butter, softened
1 1/2 cups mashed ripe banana (about 3 bananas)
2 eggs
1/3 cup plain low-fat yogurt
1/2 cup semisweet chocolate chips
Preheat oven to 350°.
Lightly spoon flour into dry measuring cups, and level with a knife. Combine the flour, baking soda, and salt, stirring with a whisk.
Place sugar and butter in a large bowl; beat with a mixer at medium speed until well blended (about 1 minute). Add banana, egg substitute, and yogurt; beat until blended. Add flour mixture; beat at low speed just until moist.
Place chocolate chips in a medium microwave-safe bowl, and microwave at HIGH 1 minute or until almost melted, stirring until smooth. Cool slightly. Add 1 cup batter to chocolate, stirring until well combined. Spoon chocolate batter alternately with plain batter into an 8 1/2 x 4 1/2-inch loaf pan coated with cooking spray or mini bundt pans. Swirl batters together using a knife. Bake at 350° for 1 hour and 15 minutes or until a wooden pick inserted in center comes out clean. Cool 10 minutes in pan on a wire rack; remove from pan. Cool completely on wire rack.
Since using smaller pans, they baked a little faster, more like 30-40 minutes, depending on your oven.
They were great with some vanilla ice cream.
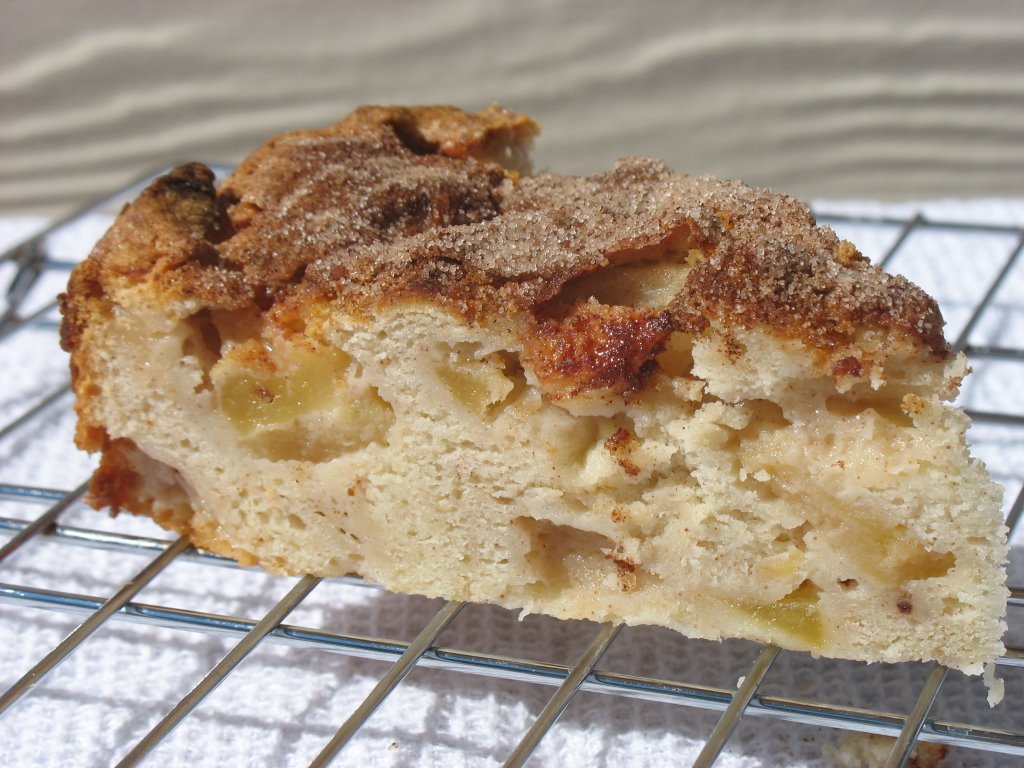
You know how it happens… you wake up one morning and the ligh has changed, the cold air starts nipping at your nose and the landscape has changed! I wish the switch in seasons was that pronounced in the South Carolina Lowcountry but we are definetely not in summer anymore! My in laws went apple picking in the upstate a couple of weeks ago and were nice enough to make us a big basket of gorgeous, fragrant and delicious apples. They were so good at the first bite that I immediately decided I had to do something with them. Because of our activities this weekend (I do not recommend teaching Pilates with a hangover), I put those lovelies to the side and got myself covered in powdered sugar instead.
Everything in the air today prompted me to make an apple dessert and I remembered reading about a Cooking Light recipe on a blog just recently. I can’t backtrack my steps to the actual post or blog (as it happens often after a couple of hours browsing), but I did find the recipe on the magazine website and with so many great reviews I felt encouraged to try it, even or especially (depending on which way the scale dips today) if it is "light".
The only changes I made were to use real butter instead of stick margarine. I am not being an hypocrite since I just admitted using some Crisco in my latest buttercream but I don’t keep margarine in the house so butter it was, and regular cream cheese. I also only used 2 TB. of the cinnamon sugar called to top the cake prior to baking and not the 1/4 cup the recipe suggested.
Result? Delicious! Strong but not overpowerig cinnamon flavor. I can’t wait to try it with cardamom.
Cooking spray. Preheat oven to 350°.
Beat 1 1/2 cups sugar, butter, vanilla, and cream cheese at medium speed of a mixer until well-blended (about 4 minutes). Add eggs, 1 at a time, beating well after each addition. Combine flour, baking powder, and salt. Add flour mixture to creamed mixture, beating at low speed until blended.
Combine 1/4 cup sugar and cinnamon. Combine 2 tablespoons cinnamon mixture and apple in a bowl, and stir apple mixture into batter. Pour batter into an 8-inch springform pan coated with cooking spray, and sprinkle with remaining cinnamon mixture.
Bake at 350° for 1 hour and 15 minutes or until the cake pulls away from the sides of the pan. Cool the cake completely on a wire rack, and cut using a serrated knife.
Note: You can also make this cake in a 9-inch square cake pan or a 9-inch springform pan; just reduce the cooking time by 5 minutes. Yield: 12 servings