
Truffle, How Do I love Thee?

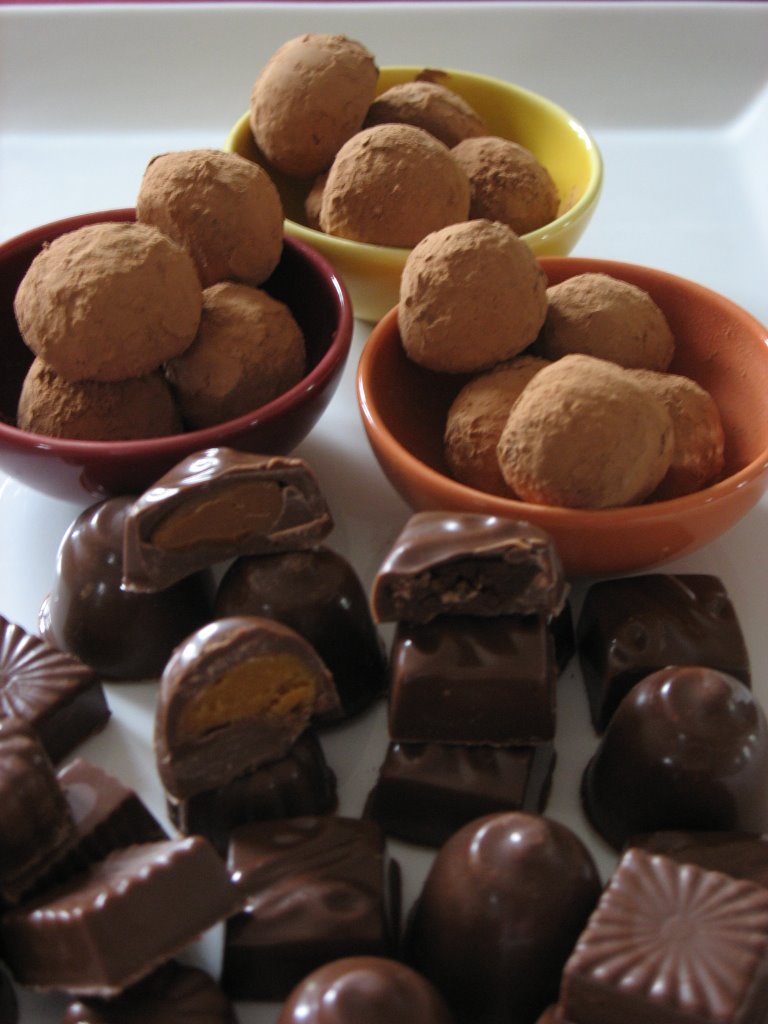
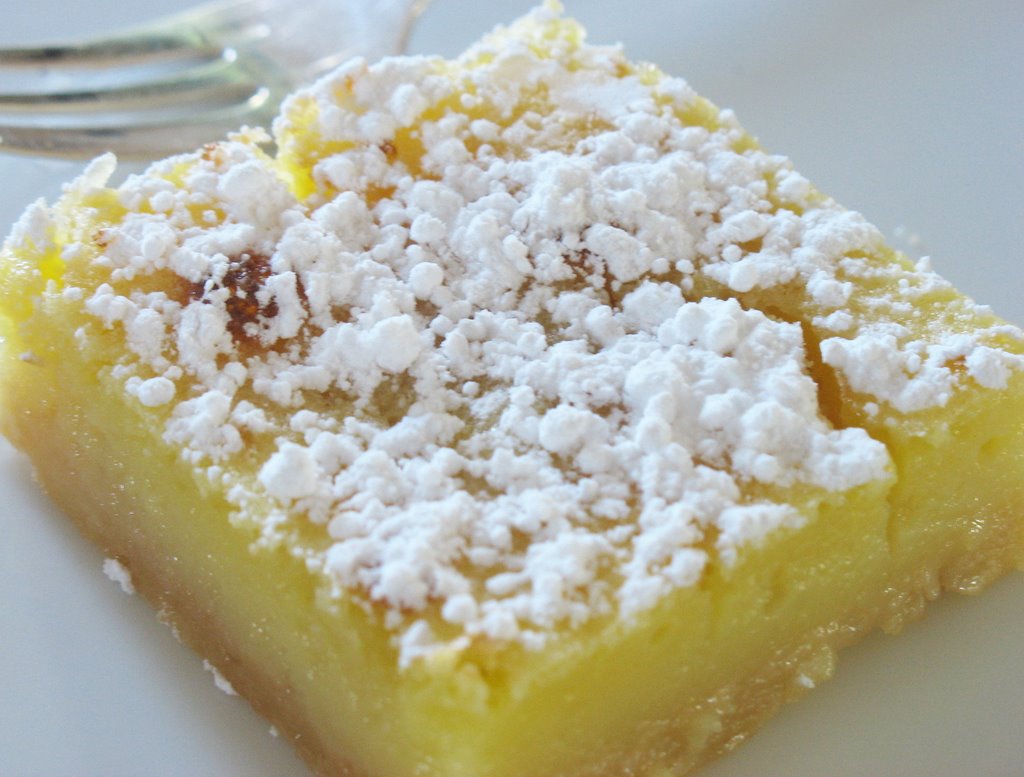
In the bowls, clockwise: dark chocolate, candied ginger, pecan praline.
Molded chocolate truffles, from front to back: dark chocolate pumpkin, Dulce de Lece, coffee buttercream

A lot, obviously! When ThePassionate Cook gave us "Truffles" as the theme for Sugar High Friday 25, I did a little happy dance. Finally a reason to cover myself and my kitchen in chocolate. Finally a reason to go back to one of my true pastry loves: making chocolate. I applaud Danielle for making a single truffle from scratch, but I wanted to play around with my molds that had been in the attic since we moved in last year.

Making truffles is a tradition for me around the holidays. While my grandmother was busy making her marzipan stuffed fruits, I was in the kitchen next to her making and rolling balls of ganache in cocoa powder. I never thought it was a big deal as I was used to making them every Christmas, and then as I grew older, I started experimenting.
At the restaurant, I was in full truffle making mode early December with Christmas parties, wedding and party favors. I do miss certain aspect of the industry, like plating desserts, the availability to order great quality chocolates, butter, produce, molds and pans. I mean, who would not love to say: "and please add a 5o ppound box of that Valrhona couverture you (vendor) recommended last week"?! If I were to do the same desserts here I would be broke buying equipement and supplies, that’s why I stick to more homy concotions.
My husband did not understand my transformation into Mr. Hyde when "truffle time" came around at the restaurant, until he came by one afternoon, and saw that I was like a kid again, hands deep in chocolate and a big smile on my face. Making truffles makes me truly happy. Many an argument with the ex. chef or the husband have been settled around a plate of them.

I am getting excited again and I disgress….
Playing with chocolate (and yeast and sugar) here can get quite tricky because of the high temperatures outside and the high level of humidity, so after a few batches of not so right chocolates some years ago, I purchased "The Art of Chocolate" by Elaine Gonzales, and it has been one of my best technique books so far. The woman knows her stuff! She will guide you from basic hand rolled to tempered and molded chocolates, to beautiful chocolate boxes, roses and more.
I have adopted her techniques for rolled truffles after one summer in South Carolina when no matter what I did, the cocoa powder would sink into the truffle and disappear. If you follow her instructions for hand dipped or molded chocolates, you will become a master in no time.

Classic Hand Rolled Chocolate Truffles:

8 oz bittersweet or semisweet chocolate, coarsely chopped
1/2 cup heavy cream

Heat the cream over low heat unil bubble form around the edges of the pan. Pour the cream into a bowl and let cool 1 minute. Ass the chocolate. When the pieces are soft, start stirring until the ganache mixture is smooth.
Cover loosely and refrigerate for 30 minutes to an hour.
Spoon the ganache into a pastry bag and squeeze mounds, 3/4 inch in diameter. If you want really nice round truffles, use your hand to form them. Refrigerate, uncovered for a day. The trick is to let the truffle form a skin so that when you roll them in the cacao, the powder does stay on for a long time, regardless of the temperature in the room.
Dip into cocoa powder to cover.

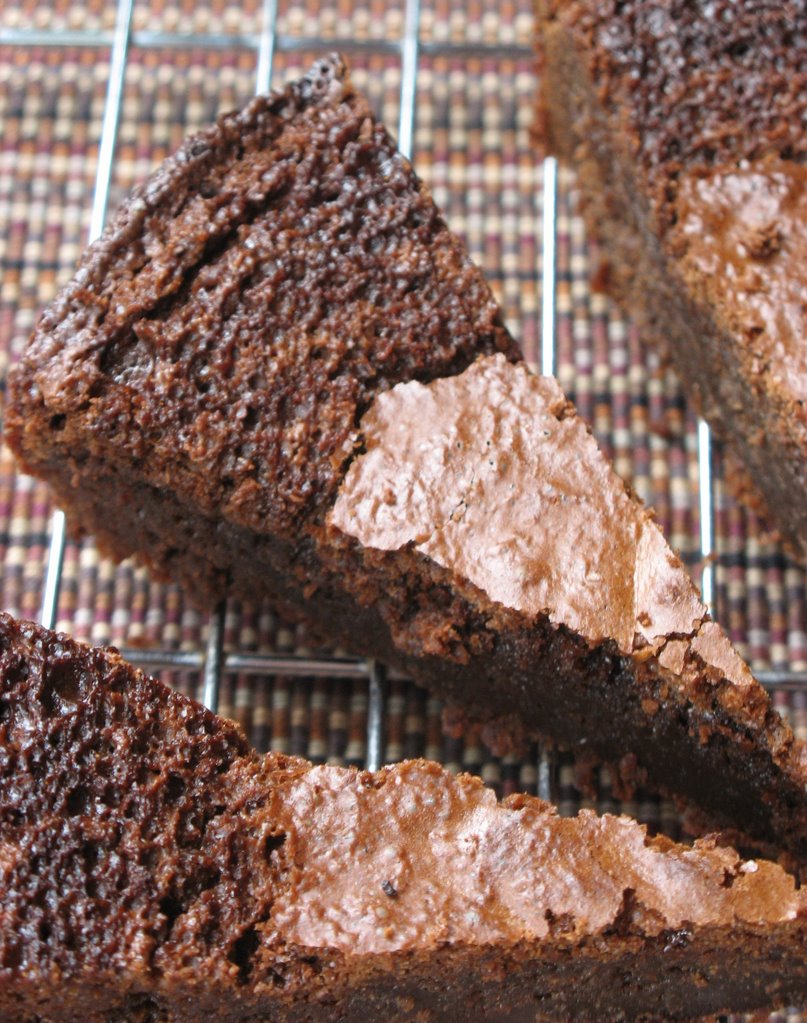
For the 3 different hand rolled truffles that I made I doubled the recipe and divided the ganache in 4.
1/ remained plain
2/ I added 1/2 cup crushed up pecan praline
3/ I added 1/2 cup chopped candied ginger
4/ I added 1/2 cup pumkin puree and 2 tsp. pumpkin spice (I used it in the molded chocolate)

Molded Chocolate Truffles:
Source for the molds: Kitchen Krafts

Tempered Chocolate for the shells: (classic method, only used if you don’t have the tempered chocolate chunks required in the seeding method)

1 pound semisweet chocolate, coarsely chopped.

Over a double boiler, melt the chocolate to 115 F. Let cool to 84 F. Reheat until it reaches no higher than 90F. If you exceed this temp. you must reheat the chocolate and start all over again. The remp. may be 2 or 3 degrees lower but not higher.
Your chocolate is now tempered.

Making the Molded Truffles:

Line your work aread with parchement paper. Make sure wyour molds are clean and free of particular. Pour enough tempered chocolate to fill the cavitites completely with chocolate. Tap your mold on your counter to remove any air bubbles. Invert the mold over the parchement paper. Shake it in a circular motion to coax most of the excess chocolate to run out. Using a large spatula scrape the the excess chocolate off of the top and edges. Invert and let the chocolate harden. Fill with your desired ganache or filling.

Seal the cavities: remelt and retemper the chocolate. Spoon chocolate over the filling, going slighty over the rim. Tap the bottom of the molds on the counter. Using a large spatula, scrape the excess chocolate. Refrigerate until set.

To unmold: tap the bottom of the mold once on the counter, and flex the mold a little if necessary.

For the Coffee Buttercream filling:
4 egg yolks
1/4 cup water
1/2 cup sugar
8 oz. butter (2 sticks) room temp.
2 Tb. strong coffee

Whip the egg yolks until light and fluffy with a stand mixer. Combine water and sugar in a saucepan over low heat. Stir occasionally until the sugar is dissolved. Increase the heat and bring the syrup to 238 on a cansy thermometer. Pour over the yolks and quickly stir to combine. Return the bowl to stand mixer and whip at high speed until completely cold. Add the butter and mix in on medium speed. Add the coffee and mix .

For the Dulce de Leche: (prepare one day in advance)

Submerge a small can of sweetened condensed milk in water in a big pan. Bring to a boil and let boil for a couple hours, making sure the can of milk is ALWAYS under water.
Let cool for one day, before opening.
I know there is a cooked method out there on the internet but could not locate it.

I brought this assortment to Thanksgiving dinner to be enjoyed with coffee. I was a bit worried about how the pumpkin ganache would be received but everybody loved it.
Making molded truffles is a lenghthy process but I had plenty of time on tuesday with the cold and rainy day we were having (read: I got lazy and stayed home)

Raspberry Crostada

I am not ignoring pumpkin or pecan pies by bringing raspberries to our table but this crostada has been part of "our" Thanksgiving for a few years now. I need to explain the "our" before I explain the pie. I don’t get to cook Thanksgiving dinner which always leaves me frustrated, so I cook a mini dinner with all the traditional items just for the two of us on tuesday. B. thinks of it as practice, I, on the other hand, like searching for new recipes, setting up the table, enjoying the evening and telling him how thankful I am for his love and friendship. We had this beautiful crostada for dessert instead of the traditional Thanksgiving pies and the reason for it dates back to my first year at the restaurant. After making dozens of pumpkin, pecan and apple pies for that day I started craving something else for dessert and I am thankful that I have a husband ready to indulge my weirdness and my cooking whims so this is what I served that (rehearsal) evening.
Like a lot of people this holiday season, I am always on the lookout for variations of the traditionals dishes and desserts, maybe another brined turkey recipe or a pecan streudel pumkin pie, or a chocolate and pecan pie, that kind of variation. I liked my old recipe for the crostada but when I read about the one I am about to post I knew I wanted to try it. Why? Because it came with a beautiful story.

A few month ago, Mrs. B of Eating Suburbia, asked some food bloggers if they’d be willing to test some recipes for the upcoming release of the book she wrote with Michele Anna Jordan, The World is A Kitchen. I just did it for the fun of it , but as a "thank you", Mrs B. sent me a copy of the book, which I devoured the day I received it. The subtitle explains it all "Cooking Your Way Through Culture Stories, Recipes and Resources". It is chock full of wonderful stories, inspirational cultures and traditions. Monday night, I remembered reading the beautiful story of Giuseppa teaching Caterina how to make Crostada from scratch in her Italian kitchen. Just reading about Caterina’s struggle to grasp the making of the dough or how to respect the food instead of trying to conquer it makes you want to try your hand at it. I believe this has making my new "to go" recipe for rapsberry tart. I used raspeberry but you can use strawberry or plum.

Raspberry Crostada, adapted from "The World is A Kitchen":

For the dough:
2 cups flour
1/2 cup sugar
2/3 cup butter, at room temperature
1 egg + 1 egg yolk
grated zest of a lemon

Filling:
2 cups raspberry jam

Mix the crust ingredients until they form a ball, trying to knead the dough as little as possible. Refrigerate for an hour. Roll out to 1/4 inch to 1/2 inch thick. Fit into a 9 inch pie plate. Cut whatever dough hangs from the sides. Spread jam over the bottom. Re-roll and cut remaining crust and cut out decorative shapes and strips to form a lattice. Bake at 350 for 25 minutes. Cool and serve.

It was delicious. The addition of the grated lemon zest makes the world of difference. The only change I would make would be to blind bake the crust 15 minutes prior to filling it.
If you struggle with your lattice work, head over to Smitten Kitchen where Deb wrote a great post to help out.

Freak Storm, Coffee Cake And A Cream Puff

I had been eyeing a certain coffee cake recipe for a few days and something prompted me to make it last night and bake it this morning. Tuesday is an early day for B. so I figured I had plenty of time to bake at least one in time for his breakfast. The coffee cake was waiting for its fate in the fridge where it had plenty of time to rest and rise overnight and its sight filled me with promise of warmth and comfort this early in the morning.

I looked at the river through the back window and turned around….then I stopped dead in my tracks and had to do a double take…SNOW! It was snowing! Now! in November! In South Carolina! Did the world go upside down overnight? I mean, last week we were in shorts and t-shirts and a little while ago I was complaining about our lack of Fall weather! The weather people called it a "Freak Storm". I called it "Perfect for Coffee Cake". We sat there, at the dining room table, mugs smoking hot with coffee, looking at the snow (big slushy flakes that don’t stay on the ground but nevertheless…snow), and devouring our breakfast.

I completely understand Yvonne when she jokingly wondered if it was bad to eat one by yourself. Bad? No. Wise, absolutely not! Good? The Bomb!
The only changes I made to the recipe were to spread each dough with 1/4 cup cream cheese and sprinkle 1/4 cup broken praline over each before rolling them, instead of using the almond filling. It smelled so good that we skipped the icing, we could not wait!

Raised Almond Coffee Cake, adapted from Wanda’s Pie in the Sky by Wanda Beaver, and Cream Puff

For the coffee cake dough:
1 envelope active dry yeast
4 tbsp. sugar
2 to 3 tbsp. warm water
1/2 tsp. salt
1 large egg, beaten
1/2 cup light cream
2 cups all purpose flour, sifted
1/2 cup unsalted butter, at room temperature

In a bowl, mix together the warm water, yeast and 1 tbsp. of the sugar. Stir to dissolve and let sit for 5 to 10 minutes or until the mixture begins to look creamy and foamy.
Add the other 3 tbsp. of sugar, the salt, the egg and the cream. Combine well.
Pour the mixture in to the bowl of an electric mixer and add 1-1/2 cups of the flour. With the dough hook, mix on low speed until smooth (a few minutes).
Add the remaining flour and mix on low speed until the dough is well mixed. It will be a bit stiff.
Flour a work surface and turn the dough out. Roll the dough to a thickness of a 1/4 inch. Spread the softened butter on two-thirds of the dough.
With a knife, mark the dough into thirds by place a tiny mark at the top edge of the dough. Fold 1/3 of the dough over the middle third. Take the last third of the dough and fold it over that.
Do a quarter turn and roll the dough out again to 1/4 of an inch thick. Once again, fold the dough into thirds. Wrap in plastic wrap and refrigerate for 30 minutes. Repeat the rolling, folding and quarter turn three more times, refrigerating the dough for 30 minutes between each time. Once you’ve completed these steps, keep the dough in the refrigerator until you’re ready to fill it and bake the coffee cakes.

For the coffee cake filling:
1 cup blanched whole almonds
1/2 cup sugar
1/2 cup fine breadcrumbs
2 tbsp. unsalted butter, melted
1 large egg, beaten
1 tsp. almond extract
1-1/2 tsp. vanilla extract
1/2 tsp. cinnamon
1/2 cup unsalted butter, melted

In a blender or food processor, grind the almonds with half the sugar. The almonds should be finely ground, but not pasty.
Add the rest of the sugar, the breadcrumbs, the 2 tbsp. melted butter, the egg, the extracts and the cinnamon. Combine well and set aside.

To assemble the coffee cakes:

Preheat the oven to 350 degrees F.
Remove the dough from the refrigerator and divide in half.
Roll each half into a rectangle that’s roughly 9 inches long by 6 or 7 inches wide.
Take the 1/4 cup of melted butter and brush the surface of the dough with some of the butter.
Spread half the filling over the first rectangle of dough. Be sure to leave a 1 to 1-1/2 inch border all the way around to avoid the filling leaking out.
Beginning with the top edge, roll the rectangle towards you to form a long roll. Join the ends of the roll to form a ring. You may want to wet the ends slightly to ensure that they stick together.
Transfer the ring to a cookie sheet lined with parchment paper. With a knife or with scissors, cut the ring of dough into slices that are about 1 inch thick. Don’t cut all the way through, but cut almost to the centre of the ring. Turn the pieces of cut dough slightly upwards so that you create a fan effect.
Cover the dough with a towel and let it rise for 30 minutes. Repeat with the other rectangle of dough.
Bake the coffee cakes for 30 minutes. Cool completely on a wire rack before glazing.

For the glaze:
1/2 cup icing sugar, sifted
2 to 3 tsp. light cream
1/2 tsp. vanilla extract
1/4 tsp. almond extract

Mix all the ingredients until you have a smooth glaze. Drizzle the glaze over the cooled coffee cakes and let set (about an hour or so).
If the glaze is too thick, add more cream until you achieve the consistency you want.

No Knead Bread…I Am a Follower

Before you say "another No Knead Bread recipe? What is it with you people?", I am telling you to surrender and become a follower! Ah well, when I see a good thing I can’t leave it unattended. When I read about a good thing I know it won’t be long before I end up making it, especially when that particular item has been tried and endorsed by so many of us out there. I hate being left out of the loop! I have to admit that this is probably the first time I have followed a recipe in its entirety.
The bread is really easy to make. I made it in the evening, shaped it and let it rise again the next morning, baked it exactly according to the recipe and we had wonderful grilled cheese sandwiches Sunday at lunchtime. I truly believe that such a great result is achieved by the baking method: preheating your pan, covering the loaf 30 minutes, uncovering it for another 30. When you read such detailed instructions you know you have to respect the baker’s work and do the same. I used a 2 quart Le Creuset casserole dish and I ended up with a beautiful round loaf. I believe it is the reason why I had less air pocket than other loaves I saw on other blogs but I wanted larger slices for sandwiches….hmm…also to spread more butter!

No-Knead Bread, from The New York Times
Yields one 1 1/2 pound loaf

3 cups all-purpose or bread flour, more for dusting
¼ teaspoon instant yeast
1¼ teaspoons salt
Cornmeal or wheat bran as needed.

In a large bowl combine flour, yeast and salt. Add 1 5/8 cups water, and stir until blended; dough will be shaggy and sticky. Cover bowl with plastic wrap. Let dough rest at least 12 hours, preferably about 18, at warm room temperature, about 70 degrees.

Dough is ready when its surface is dotted with bubbles. Lightly flour a work surface and place dough on it; sprinkle it with a little more flour and fold it over on itself once or twice. Cover loosely with plastic wrap and let rest about 15 minutes.

Using just enough flour to keep dough from sticking to work surface or to your fingers, gently and quickly shape dough into a ball. Generously coat a cotton towel (not terry cloth) with flour, wheat bran or cornmeal; put dough seam side down on towel and dust with more flour, bran or cornmeal. Cover with another cotton towel and let rise for about 2 hours. When it is ready, dough will be more than double in size and will not readily spring back when poked with a finger.

At least a half-hour before dough is ready, heat oven to 450 degrees. Put a 6- to 8-quart heavy covered pot (cast iron, enamel, Pyrex or ceramic) in oven as it heats. When dough is ready, carefully remove pot from oven. Slide your hand under towel and turn dough over into pot, seam side up; it may look like a mess, but that is O.K. Shake pan once or twice if dough is unevenly distributed; it will straighten out as it bakes. Cover with lid and bake 30 minutes, then remove lid and bake another 15 to 30 minutes, until loaf is beautifully browned. Cool on a rack.

Pear and Almond Tart

I am always fascinated when I pull something out of the oven, set it on the counter to cool, turn the computer on, only to find out that some have just made and published somewhat of a similar thing. If I can find a couple of bloggers with the same inclinations towards similar flavors, how many of us out there in the world have made the same dessert? (or close).
It fascinated me the same way when at the restaurant customers would gravitate toward the same dessert one night but not the next. Was it something in the air? Familiar flavors of the season?

One thing for sure: there are flavors that will always go together like nuts, fruits, and chocolate. I have made this tart plenty of times and I always change or add something to the original recipe. I sometimes sprinkle chocolate chips over the pears before baking, I change the nuts, I add some liqueur, some caramel…I serve it with creme anglaise, chocolate sauce, raspberry coulis, ice cream (vanilla or more funky flavors)…the possibilities are endless, let your creative side speak! This time however, I give you the original version. It comes from a pocket size recipe book that I have had for the past 10 years filled with sweet and savory tart recipes. It travels with me almost everywhere I go.

Pear and Almond Tart, adapted from "Idees Recettes, Les Tartes Salees et Sucrees":

Sweet Tart Dough (I now have adopted the one from Dorie Greenspan):
In a food processor, combine 1 1/2 cups flour, 1/2 cup powdered sugar and 1 stick of butter, pulse until it ressembles coarse meal, add 1 egg yolk and pulse until combined into a ball. I flattened it into a disk in between sheets of plastic wrap, refrigerated it and rolled it out to cut rounds big enough to fit into my mini tart pans. The dough gets soft very fast so you can flour your fingertips to push it up and down the sides and bottoms of the pan. Cover with parchment paper, add pie weights (I use dry beans) and blind bake at 350 degrees until the crust is completely baked through. Let cool.

Filling:
4 ripe pears, peeled, cored and sliced
4 eggs
200 gr. sugar
100 gr. ground almonds
1 cup heavy cream
2 tsp. vanilla extract

In a blender or food processor, combine the sugar, eggs, almonds, cream and vanilla and pulse until combined.
When your pie crust has cooled, arrange the pear slices at the bottom and slowly pour the cream over them. Bake at 350 F. until golden brown.
You don’t have to use your food processor to combine the filling ingredients together and you could it by handby whipping the sugar and eggs together, then adding the almonds, cream and vanilla.

Note: I had leftover cream and baked it in 2 ramequins in a water bath, kind of like a compromise between a flan and a creme brulee. It was delicious too!

Walnut Chocolate Cake

Yep, no fancy name, no weird ingredient, just the pure comfort of dark chocolate in a slice. I am probably the last one to post her entry for "Dishes of Comfort" a one-off event created by Yvonne and Orchidea, and I realized today I had passed the deadline. Hopefully they will be able to include this, if not well, you can have it all for yourself!

When I first read about the event, I immediately thought about my grandmother’s apple pie, my aunt Agnes chocolate mousse, or my mom’s chocolate cake. I don’t know if mom remembers it but for the longest time, one of my brothers birthday requirement was homemade Walnut Chocolate Cake. What they did not know is how happy to see his birthday roll around…or why…don’t get me wrong I love him dearly, but I also love chocolate cake!
I also think that Grandma Paulette and Auntie Agnes deserve a post of their own. However, it has got to be somebody’s birthday somewhere…out there…and if no one wishes to claim a slice I will because it is comforting and good for any reason, any occasion.

Why is this cake so comforting to me? For one it does not look perfect, and as I get older I find that highly reassuring. All crusty on top, crumbly when you cut it. Easy to eat anytime of the day, cold with milk for breakfast, warm with your afternoon coffee, with ice cream for a romantic dinner and perfect for anybody’s birthday (unless they hate chocolate).
I am not sure when the recipe came from but it is one of those I bundled up in my suitcase when I moved here and one I make for B. when his birthday comes to town.

Walnut Chocolate Cake:

200 gr. dark chocolate (6 1/2 oz)(time to get your best out)
200 gr. butter (6 1/2 oz)
5 eggs
1/4 cup ground walnuts
250 gr. sugar (7 oz)
2 tsp. vanilla extract

Preheat oven to 375. In a saucepan set over low heat, melt together the chocolate and the butter. Add the sugar and stir until incorporated. Remove from the heat and let cool 5 minutes. Add the eggs one at a time and stir well after each addition. With a spatula, add the ground walnuts and vanilla. Pour into an 8 or 9 inch round cake pan and bake for 30 minutes or until a knife inserted in the middle comes out "clean"

Cake Aux Fruits Confits

Allright, it’s a fruit cake. Hold on before you run away! This one is far away from the mass produced and displayed ones you see on grocery store shelves or given to you by your dear Auntie and that you try to pass on to your not-so-dear neighbor. This one is good, light and airy, buttery, soft and studded with only a reasonable amount of candied fruits. They always made me think of little gems and I have loved them since I had whole candied fruits and traditional Provencal Epiphany cake where I grew up in Provence.

When I moved to the US, I brought along with me a little black notebook filled with recipes that both my mother and grandmother would make on a regular basis as well as some of my favorite cake recipes, including this one. I forgot about it for a while because I quickly discovered pumpkin, sweet potatoes and pecan pies, cornbread and biscuits. As the holidays approached I grew a little homesick and I became really excited when I found fruit cake at the grocery store. I bought one, and decided to have a couple of slices with my afternoon tea. I got anxious upon cutting it, kinda dense…. when I put the slices on my plate it was a big disappointment: where was the cake? All I could see was a big mass of candied fruits and nuts barely needing cake batter. I made it my mission to make the one I used to have at home.

I made three that first time, one for roomie and me, one for the two guys downstairs and one for Isabel. It took a little convincing but they tried it and loved it! When B. and I spent our first Christmas together, I then used womanly persuasion and he agreed to try it, he liked it so much that now he calls me from the grocery store as soon as he sees candied fruit on the shelf. I have already made 3 this week and the neighbors want more. Even if you think you don’t like fruit cake, I think it is worth a try. My sister in law can’t stand it so we make it with almonds instead, I guess the batter is really good on it own.

I believe my mother got the recipe from a magazine many moons ago claiming that it came from the Lenotre Patisserie. I cannot validate this statement but I would not be surprised if it did as all their confections and desserts are scrumptious.

Candied Fruit Cake, adapted from Lenotre:

4 oz. butter
4 oz. powdered sugar
3 eggs
5 1/2 oz. flour
2 tsp. baking powder
1/4 cup rum
8 oz. candied fruits

Soak the fruits in the rum while you prepare the batter. Cream butter and powdered sugar together. Add the eggs one at a time, incorporating well after each addition. Add the flour and baking powder. Drain the fruits and add to the batter with 2 Tb. of the rum. Pour into a loaf and
bake in a 350 degree oven for 20 to 30 minutes. The top will get brown quick so make sure the cake is dry in the middle (insert knife) before you remove it from the oven.

Cake Aux Fruits Confits, adapte de chez Lenotre:

120 gr. beurre
120 gr. sucre glace
3 oeufs
165 gr. farine
10 gr. levure
4 c.s rum
240 gr. fruits confits

Faire tremper les fruits avec le rum pendant la preparation du cake.
Reduire le beurre en pommade avec le sucre glace. Incorporer les oeufs un a un, en melangeant bien apres chaque addition. Ajouter la farine et la levure. Egoutter les fruits confits, les ajouter a la preparation avec 2 cs. du rum. Mettre dans un moule a cake et faire cuire a 180 C pendant 20 a 30 minutes.

Chocolate and Praline Tart

This tart was really a spur of the moment "what is in the fridge" kind of dessert. As I mentionned the other day, we never really don’t know how our saturday gatherings with the neighbors are going to be like or if we’ll have one altogether (holidays, weather, …) Around 4pm, I got a call from the bachelor next door asking me if I had a good recipe for clam chowder. I looked around at all my cookbooks and realized with a good laugh that 99% of them were baking/dessert related ! I have a couple of French cooking "bibles" and a collection of southern recipes in case B. wants gumbo and biscuits… you get the point… the neighbor was ringing the wrong person. I did not want to shatter his image of me being a great chef (hm, hm) so I quickly went online and found one that sounded fairly easy for him to make. That’s when the inevitable question followed: what was I going to bring to the party?

I had made a Banana Poundcake from Dorie Greenspan’s latest book but I wanted to keep that more for breakfast or snacks. Dang! Quick come up with something that has time to bake and cool! As I said previously, sometimes leftovers are a good thing: I remembered I had a batch of tart dough in the freezer and leftover ganache from the macarons. A chocolate tart! I added 1/2 cup of crushed up pecan pralines (nut toffee of any knid would work too) to the ganache and there it was, dessert, on the fly.

Chocolate Praline Tart:

One recipe "pate sucree":
In a food processor, combine 1 1/2 cups flour, 1/2 cup powdered sugar and 1 stick of butter, pulse until it ressembles coarse meal, add 1 egg yolk and pulse until combined into a ball. I flattened it into a disk in between sheets of plastic wrap, refrigerated it and rolled it out to cut rounds big enough to fit into my mini tart pans. The dough gets soft very fast so you can flour your fingertips to push it up and down the sides and bottoms of the pan. Cover with parchment paper, add pie weights (I use dry beans) and blind bake at 350 degrees until the crust is completely baked through. Let cool.

One recipe chocolate ganache:
In a saucepan, heat 1 cup of heavy cream to scalding point, remove from heat and add 1 1/2 cups good quality chocolate. Let stand 2 minutes and slowly stir until well incorporated. Add 1/2 cup of crushed up praline or toffee. Pour the ganache in the tart shell, let cool 15 minutes and refrigerate until the ganache is completely firm.

I have a tendency to cut small slices because it is almost like eating a big truffle, nothing wrong with that I know. It is easy to put together even if you don’t have all the ingredients beforehand, and it goes real well with a nice cup of coffee.

Key Lime Squares


You must be in the same situation I am: you read blogs everyday, your mouth waters at gorgeous pictures and great recipes. You copy them, you print them and your collection keeps on growing. I have binders full of recipes I see on blogs and it ususally takes me longer than a few days to get around one of them, but these were the exception. When I saw the original recipe on Mary’s blog, I knew I had to make them almost immediately. I love anything lime or lemon as much as I love chocolate.

I made them last week, early saturday afternoon, you know, in case of a snack attack, and I had no idea that they would part of our weekly saturday neighborhood gathering. You probably think we live on Wysteria lane the way I talk about my block, but take away some of the drama and you are not far from the truth. There are bachelors and young couiples, plenty of kids, cats and dogs. It is a fun and crazy mix. The doors are wide open, the kitchens shared and ingredients travel from one pantry to the other. No phone required, just step out on the balcony.
Around 4pm, there is an oyster roast or a clam chowder in the making, ribs and vegetables on the grill, finger foods being set out as well as am assortment of drinks to be passed around.
Around 6pm, the kids gather under my balcony and want to know what is for dessert. Tonight it was something chocolate but last week it was Key Lime Squares.

I altered Mary’s recipe a little and the bars still came ou perfect. For starters, I did not have Meyer lemons but a big supply of Key lime. I also baked the crust in a bigger pan and tripled the filling quantities. These bars or squares are close to perfection. The filling has that perfect balance of tartness and sweetness. The crust is buttery but never soggy or too hard. This recipe is already part of "my favorites" binder.

Key Lime Squares, adapted from Mary at Alpine Berry:

Crust:
1 cup all purpose flour
1/2 cup confectioners' sugar
1/8 tsp salt
4 ounces (1 stick) unsalted butter, cold and cut into 1/2 inch pieces

Filling:
6 large eggs
3 cups superfine or bakers' sugar
6 tbsp all purpose flour
1/2 tsp salt2 Tb finely grated key lime zest
3/4 cup freshly squeezed key lime juice

Preheat oven to 350F. Butter and line a 13×9-inch square pan with parchment paper.
To make crust:Combine flour, confectioners' sugar and salt in the bowl of a food processor. Add butter and pulse until the mixture is pebbly. Press evenly into the bottom of your prepared pan. Bake until lightly golden, about 18-20 minutes. Set aside crust.

To make filling:In a medium bowl, whisk together eggs, sugar, flour and salt. Whisk in lime zest and juice until well combined. Pour over crust (it’s okay if crust is still hot). Bake until filling is just set, about 15 to 18 minutes. Cool completely before serving. Dust with confectioners' sugar if desired.

Thank you Mary for sharing such a great recipe! Tonight’s installment with our weekly gathering was not bad either, but that post will have to wait.

Orange and Cranberry Muffins

I started wondering if people thought we only have egg yolk omelettes and macarons for breakfast given my sunday SNAFU, and decided to make a proper breakfast item. I read throughout the blogosphere about some wonderful foods and flavors of Fall but I have to tell you I am having a difficult time getting in the mood for pumpkin, persimmons, pomegranates and other items when it is still 75-80 degres and I am still in short sleeves. I don’t even want to think about turkey! I know most of you want to throw me a stone right about now and tell me to count my blessings because it is either rainy or cold where you are but seriously all I want right now is a juicy piece of watermelon.

Back to breakfast. One of the things we enjoy a couple times a week, especially when B. is late for work is a good scone or a couple of muffins. Easy to eat on the go, in the car, in a rush or if we have time enjoyed on the deck wishing the leaves would fall. I decided to give myself a little pep talk the other day and finally put a couple of pomegranates and a bag of dried cranberries in my cart (ok, they were also on sale).
There are so many great cranberry recipes out there right now it was difficult to settle on just one. I found one with so many good reviews that I decided to go for it and tweak it to our taste.

Orange Cranberry Muffins, adapted from allrecipes:
Yields: 12 servings

1 1/2 cups all-purpose flour
3 teaspoons baking powder
1/4 teaspoon salt
1/4 cup white sugar
1/4 cup butter, room temp
1 egg, beaten
1 cup orange juice
1 tablespoon orange zest
1 cup dried cranberries

Preheat oven to 400 degrees F (200 degrees C). Grease and flour muffin pan, or use paper liners.Sift together flour, salt and baking powder. Set aside.
Cream butter and sugar together until light. Add egg and beat until smooth. Add orange juice and grated zest. Add flour mixture and stir just until mixed. Fold in cranberries.
Fill greased muffin pans 2/3 full. Bake at 400 degrees F (200 degrees C) for 20-25 minutes.