
Jahresarchive: 2008

Toasted Coconut And Berries Charlottes

Toasted Coconut And Berries Charlottes


"I want a bouquet of berries!"
That’s what my friend Laura exclaimed when we met at the florist to talk bouquets for her upcoming wedding.
"You mean…for real..or on your cake, as a separate flavors, as favors? What? What?"…

Can’t you just sense the panic in my voice? Lord knows I love Laura, I laugh with her, cry with her, call her crazy and yet, I never know when she is joking when she is in charge of making decisions. See, Laura has already changed her mind 3 times for her dress…after it was bought. The ceremony has been changed just about everytime the wind changed direction, the vows?…typed, backspaced, saved, erased, and started over countless times. A couple of things have remained: the groom is still "The Original One" as we have nicknamed Jason, her husband to be, and as always her group of friends has vowed to throw her into the pool after the big event.

I met her while at the restaurant, she was waiting tables and quickly volunteered to be my dessert guinea pig. Laura loves to organize big parties, Halloween bashes, fundraising dinners, etc…and she is good at it. She knows to bring people together, her diplomacy is impeccable and she never loses her cool…but she ended up in the pool more times than she remembers. Over the years we have learned to let her talk and scribble away and wait a couple of days for the finalized plan.

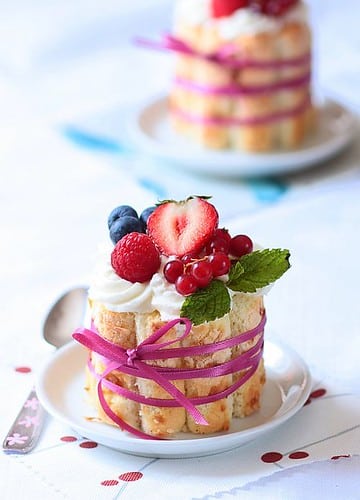
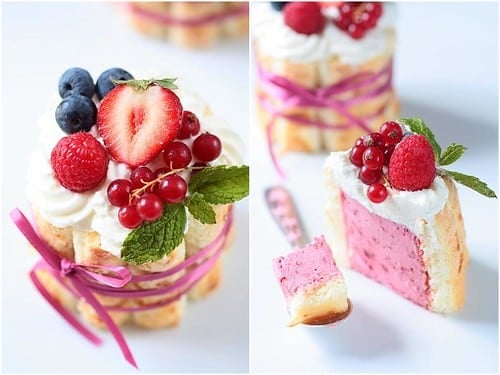
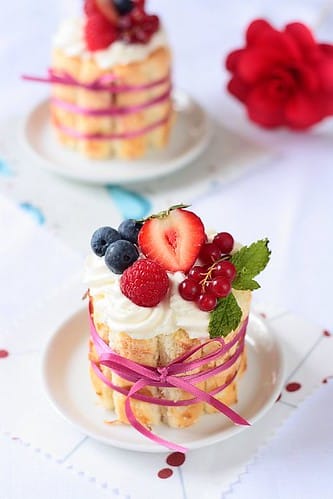
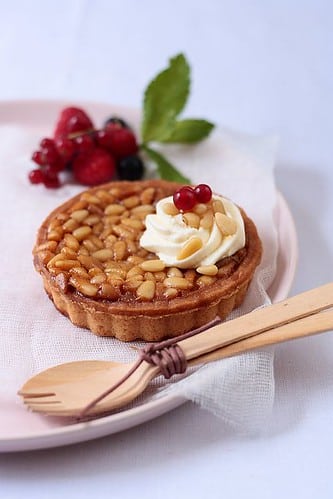
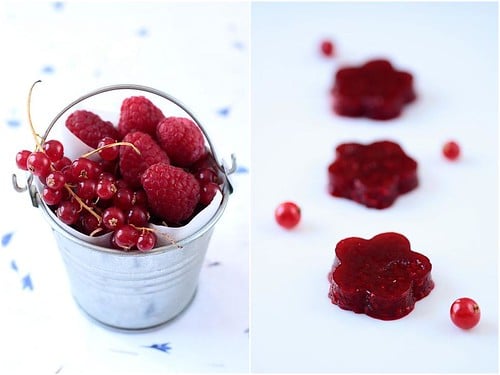
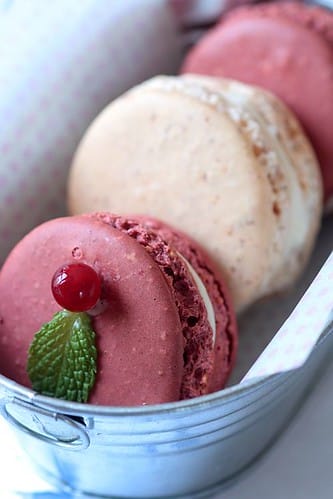
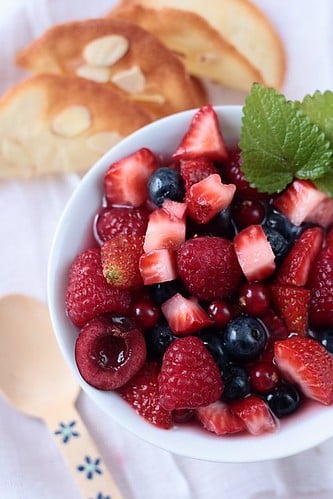
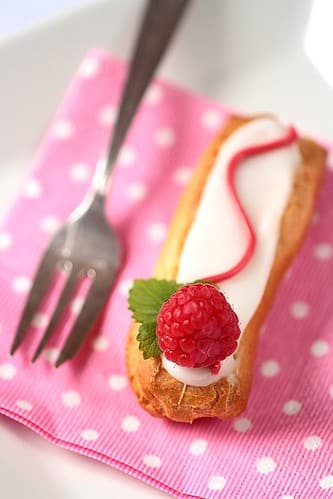
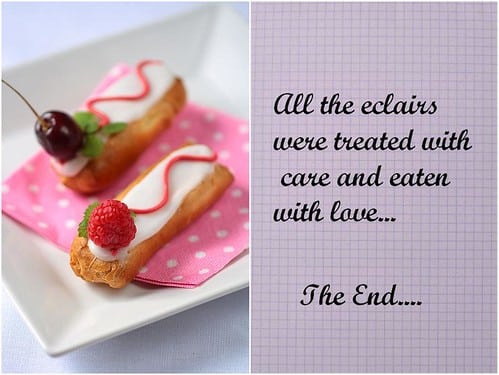
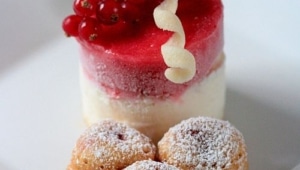
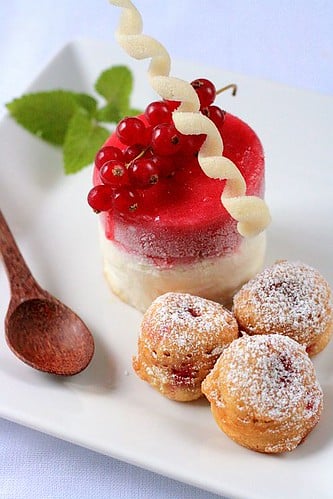
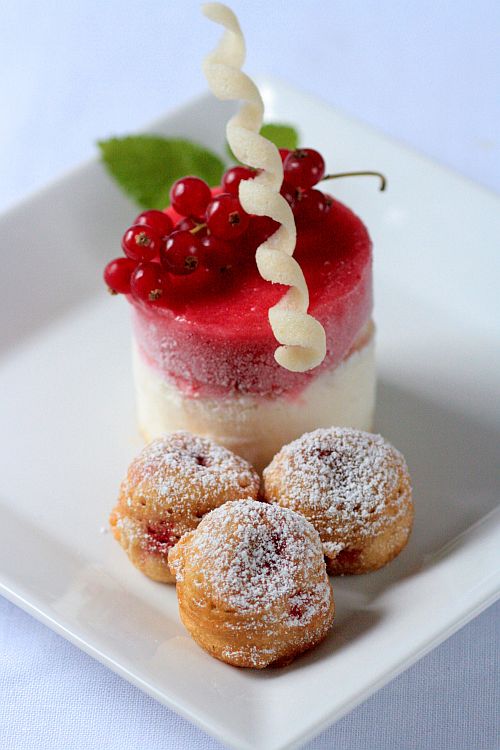
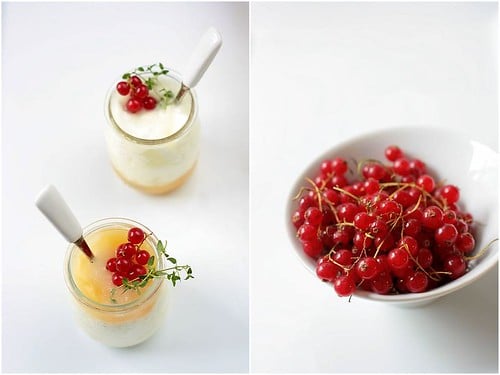
So when she said she wanted a bouquet of berries, I, on the other hand saw a big blue pool… I should have trusted her and let her finish her sentence instead. Had I paid attention, I would have noticed that she was on the phone with Old Chef telling him she did not want a wedding cake but a couple of plated desserts. There will be a mini version of Jason’s favorite, Carrot Cake, made by our friend C., the other pastry chef in the group, and I would make Laura a dessert that represents her. Except nothing really "represents" Laura given her ever changing nature. I threw some ideas to her and finally drew sketches of charlottes made of thin toasted coconut ladyfingers, filled with a raspberry mousse and topped with whipped cream to evoke the white of her wedding dress and topped with berries….a bouquet of berries. One decision made, 85 of these to make for her wedding this coming Saturday.

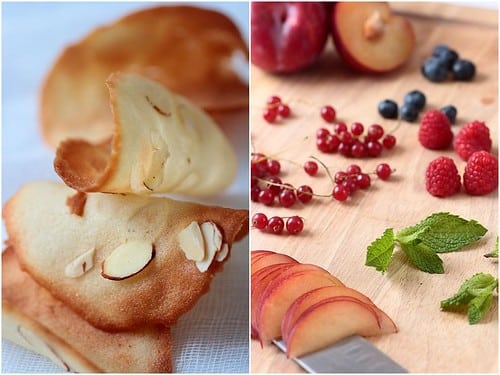
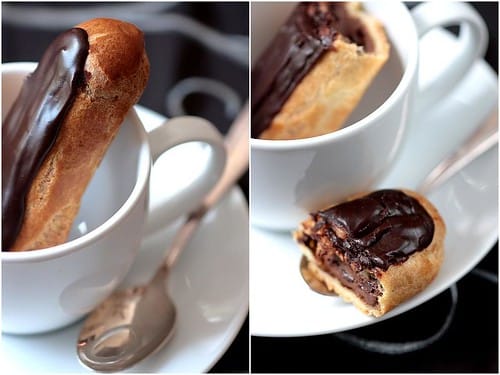
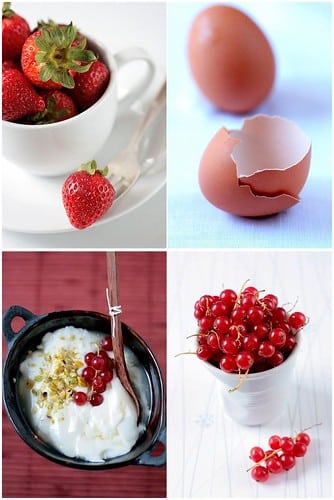
When I make charlottes at home for the family, I like to use savoiardi cookies, not that I am lazy to make my own but they remind me of my grandparents who always kept a box in their pantry. My grandma would give us some to dunk in our tea or hot chocolate and we had a contest to see who could dip the longest without the cookie disintegrate on them. My grandfather would give us some whenever the adults had Champagne so we could get a little taste. I have to admit though that eating freshly made ladyfingers ranks as high as eating freshly cooked sables or shortbreads…very high. Before you run away when you look at the recipe: once again I am a big advocate of spreading plated desserts preparationover a couple of days if you need. Make the ladyfingers one day and store them in the fridge in a tight container and tackle the mousse the next.

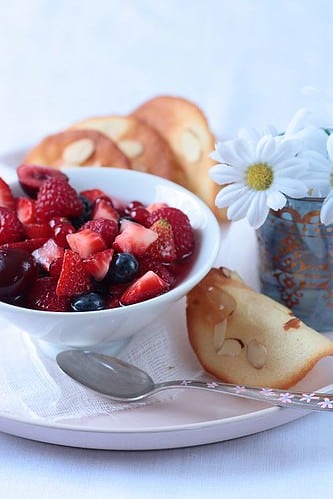
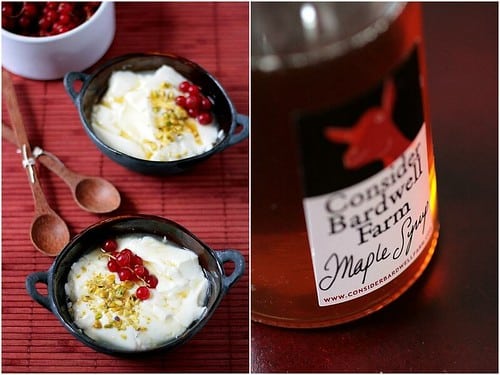
For Laura’s dessert, it was easier to make them and pipe the batter thin to mimic flower stems. The mousse base is a quick Chiboust cream where instead of the traditional Italian Meringue, whipped cream is added to a creme anglaise base and held with some gelatin. There are also two kinds of Chiboust, one with creme anglaise, one with pastry cream, I went for the former. We went for raspberries but strawberries or other would work quite well. For work production purposes I purchased frozen organic raspberries, let them thawed and mashed them before adding them to the mousse base. I like to fold the fruit base into the whipped cream and not the other way around. I find it more consistent, faster and more reliable, but you will read different directions on the subject so experience to find the one you like best.

Toasted Coconut And Berries Charlottes


Toasted Coconut And Raspberry Charlottes:

Makes 6, 3 inch wide charlottes

For the ladyfingers:
1/2 cup (65 grams) cake flour
3 large eggs yolks
1/2 cup (1oo grams) sugar, divided
3 egg whites
1 teaspoon orange blossom water
pinch of salt
1/2 cup to 3/4 grated coconut (both unsweet or sweet are fine)

– Preheat the oven to 350 degrees F and line two baking sheets with parchment paper.
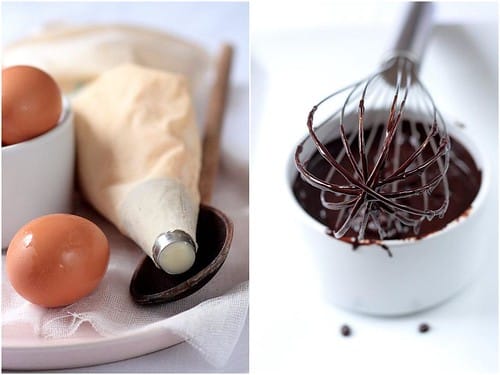
– Fit your mixer with the paddle attachment and beat the egg yolks with 1/4 cup of the sugar until thick and pale yellow at high speed for about 5 minutes. Add the orange blossom water and give the mixer another quick whirl to combine.
– Transfer the batter to a bowl, and sift the cake flour over it but do not fold it in yet.Wash your mixer’s bowl thoroughly before proceeding with the egg whites.
– Fit your mixer with the whisk attachment and whip the egg whites until foamy. Add the pinch of salt and increase the speed and whip until soft peaks form. Gradually add the remaining 1/4 cup of sugar and whip until stiff peaks. Fold the whites into the egg yolk and flour mixture in three additions, mixing just until incorporated. Do not over fold or you will loose air and the cookies will turn flat.
– Transfer the batter to a pastry bag fitting with narrow tip (I used Ateco #807) and pipe the batter into 6 3 inch circles first, then continue with the remaining batter to make 4 inch long ladyfingers.keeping one inch space in between them. Feel free to draw circles and lines on the parchment paper and to invert it prior to baking (so you don’t get ink or pencil lines on your cookies) as a guide.
– Sprinkle as little as 1/2 cup to as much as 3/4 cup of grated coconut, depending on your taste.
Bake for 8 to 10 minutes or until the ladyfingers are firm but only slightly browned and are spongy when pressed with a finger.
– Remove them from the oven and let the baking sheets cool on wire rack for a few minutes. It will be easier to remove the cookies from the parchment paper if you do so when they are still a little warm. Once lifted from the paper, let the cookies cool completely on wire racks before using them.


For the raspberry mousse:
250 ml (1 cup) milk
1/4 cup (55 grams) sugar
3 egg yolks
2 tsp Chambord
2 tsp powdered gelatin + 1/4 cup cold water
1 1/2 cups frozen raspberries, thawed and mashed with a fork
3/4 cup heavy cream

Sprinkle the gelatin over the water and set aside to bloom.
In a medium bowl, whisk the sugar and egg yolks until pale yellow. In the meantime time, in a medium saucepan, heat the milk to boiling point. Slowly pour some of the hot milk over the egg yolks to temper them. Add the remaining milk in one steady stream, whisking well. Pour the liquid back into the saucepan, and cook over medium low heat until it thickens enough to coat the back of a spoon. Remove from the heat, add the Chambord, raspberries and gelatin and stir until the latter is completely dissolved.
Let cool to room temperature. In a large bowl or in a stand mixer fitted with the whisk attachment, whip the cream to soft peaks. Incorporate the raspberry base in 2 additions into the cream. Use immediately.

To assemble the charlottes:
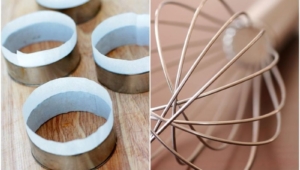
Place 6 rings onto a parchment line baking sheet. Line 6 rings with parchment paper, place a disk of ladyfinger cookie at the bottom and line the inside with as many fingers as will fit in them. Divide the mousse evenly in between the rings. Refrigerate until completely set.
When ready to serve, unmold the charlottes and top with whipped cream and fresh berries.

Toasted Coconut And Berries Charlottes

Saffron And Vanilla Poached Pears

Saffron & Vanilla Poached Pears


It has been really hot and muggy in the last week or so, nothing unusual in our area but we all took it as the usual sign of upcoming rain and thunderstorms. I don’t mind hot and I don’t mind rain, I actually don’t mind hot rain…I dislike the few hours before the sky falls open. The dogs seem to pair up and want out every thirty minutes although they just stand there noses up to the air.

Three days a week I work almost completely from home so they "know" that they will be taken out, played with, petted and loved all this in between cracking a few many eggs and rolling out pastry dough. I get up early and start baking or writing depending on what has not been done the day before and they lie around, right outside the kitchen. When the smell of the coffee brewing reaches their snouts, they suddenly jolt up and want out. Out of the five households in our little custer around the curve, 3 of us work from home while looking over kids or animals. It is not unusual for us to be in our yards, still in our jammies sipping coffee and making sleepy small talk.

Except this morning. This morning was one of those morning you want your entire body to feel, your entire soul to take in. You want mornings like this to enter your pores and breathe inside you for as long as you can take it. This morning, I felt the dew under my bare feet. Not the one you want to capture when you know the day is going to be blistering hot, no, it was harsh and delightfully unsettling. This morning, I felt goosebumps along my arms and legs, and a whiff of cold air brought the feeling of a season trying to change. The dogs started bumping around the yard, excited by all these new scents and sensations. I started taping my feet in the dewy grass, knowing full well it would be another couple of months before we’d get another morning like this, all chilly and wet, all grassy and autumnal. If only I could be a painter of scents….

We all went back upstairs and resumed our activities, baking for me, and you guessed it, sleeping for them. While I was going down my baking to do list, I could not shake away that feeling I had earlier in the yard. It was inspiring and humbling at the same time. Nature does its thing and we just happen to be in the middle of it. So after I was done with half the "to-dos", I tried to recapture the flavors I sensed earlier.

Vanilla Bean Pods & Saffron


Pears seemed perfect by in their femininity and yet firm and assertive natural scent. Vanilla, the smell of a lazy embrace. Saffron, the dewy grass under my feet. Poached….well because we were about to get soaked!! This is a most easy dessert yet rich in flavors, leaving you with nothing with goosebumps. I realize that vanilla beans and saffron are not cheap ingredients. I was very lucky that my mom sent a care package with a bag of vanilla beans and that Veronica shared some of her saffron with me for my birthday back in May. Like most people, we are on a budget but I like to save a little and invest in the "real" thing once in a while. It might seem trivial during our strange economic times to spend extras on more expensive food items, but that is really between you and….you! I am bumm….people send me care package… 🙂 On a serious note, if you want to try this without the vanilla beans and saffron, use 2 Tb pure vanilla extract and the juice of one orange (blood orange if you can) in the poaching liquid and you will still have an excellent dessert.

Saffron And Vanilla Poached Pears:

Serves 4

4 cups water
1 vanilla bean
1 to 2 teaspoons saffron
3/4 cup (170 gr) sugar
juice of one lemon
4 pears

– Peel the pears and sprinkle them with the lemon juice and set them aside while you prepare the poaching liquid.
Note: I don’t core the pears in this dessert, I would do it if they were filled, I like eating around the core but feel free to do so.
– In a large pot or deep saucepan, combine the water, saffron and sugar. Split open the vanilla bean and scrape the seeds out of the pod with a paring knife. Add the seeds and pods to the water and sugar mixture. Bring to boil over medium high heat, stirring a couple of times to make sure the sugar is dissolved. Bring down to a simmer and add the pears with the lemon juice.
– Cover the pot and cook the pears 10-12 minutes, turning them halfway through to make sure they cook evenly and all the way through (insert a toothpick to check).
– Remove the pears from the liquid and set them aside in deep serving plates or small ramequins.
– Simmer the poaching liquid until it reduces by half, about 10 minutes. Remove the vanilla bean and pour the syrup over the pears and serve either hot or room temperature.
I like mine plain but fee free to add some ice cream or whipped cream.

Saffron & Vanilla Poached Pears

Pine Nut Tartelettes – A Taste Of Two South

Pine Nut Tartelettes

Being a Southerner in one continent is often nothing like being a Southerner in another and I am sure many other expats can relate to this. I never thought that things I’d find here in SC would be the same as back home but I never imagined what a wonderful bounty was awaiting me. I know I often reminisce about good times and childhood moments I had in Haute-Provence but I found that they are very similar to the ones B. experienced as a child and young adult. A lot of outdoor times, campfires with his cousins, we had barbecue pits dug right in the ground, they had oyster roasts, we would sleep on the lawn watching meteor showers and they would build a tree house and divert phone lines (yeah…that’s a story for the phone company never to find out!).

When I moved here, I starred amused at yellow mustard potato salad and fried chicken but fell in love with gumbo, okra, yellow squash, cornbread, spoonbread, and pecan pies…I quickly understood that very few people other than B’s mom would make them the "right" way. You know what I am talking about, the way that makes your memories tickle so bad you instantly close your eyes and go "mmm,mmm,mmm…" Instead of trying to duplicate the impossible taste associated with memories, I decided early on in our relationship to bring my South to his and create new flavors, new tastes, new memories. It’s not uncommon for yellow squash to find its way into my ratatouille, my "petit sale aux lentilles" (cured pork slowly cooked with lentils) to spot a couple of pieces of ham hocks, or have lima beans replace broad white beans when I make a lamb roast.

I also carry this "your South meets my South" attitude in a lot of the desserts I make. Most of the time it is because I miss using something and B. bugs me to make one of his favorites and I end up incorporating the two together. This is what happened with these pine nut tarts. I was browsing the aisles at the store and I spotted B. looking at the pastry display, particularly focused on tarts filled with pine nuts, freshly pulled out of the oven. We started talking about doughs and fillings wit the baker and she mentioned being totally in love with these "new" tartlets molds and offered to let me use a set for a while (we know each other so it was not like "eh stranger! Come use my equipment!"). The tarts made me think of pecan pies gone Italian or Provencal. B. wanted to buy one but at $3.99 a pop….I gave him the look…you know if you cook or bake a lot, the one that reads "I can make it cheaper, better, nicer…so keep moving".

Pine Nuts


B. loves pecans, I love pine nuts. He loves pecan pies, I like honey and nut pies. He wanted "the same [he] saw at the store" and I wanted peace and quiet after a long day spent separating old crazy dog and young crazy dog….I apparently failed because the old one lost a tooth while they were trying to prove their virility….Oops! But the tarts turned out exactly like I wanted, the perfect mix of both our cultures and upbringing. The pine nut tartelettes are filled with a similar filling as you would use in pecan pies, replacing the corn syrup with acacia honey, and adding half a vanilla bean, seeded just to give the whole thing a boost. Feel free to use any other honey you like, acacia and lavender happen to be among my favorites. Funny thing is that while making these, I came up with yet another variation but I have to keep it a secret for a little while longer, ehehehe… but if you volunteered to test some recipes for the book, you might find it in your email box pretty soon (makes me nervous already!!)

I am sending these to one of my favorite Italians, Susan at Sticky, Gooey, Creamy, Chewy for her Blog Anniversary Bash!
I know, I know…the recipe….

Pine Nut Tartelettes

Makes 6, 4-inch tartelettes.

For the tart shells:
1 1/2 cups (185 -190g) flour
1/2 cup (65g) powdered sugar
1 stick (113-115g) butter, cut in small pieces
1 egg yolk

In a food processor, combine the flour and sugar, add the butter and pulse a few times. Add the egg yolk and pulse a couple more times until the dough barely comes together. Dump it into a lightly floured work surface and knead until it just comes together. Wrap in plastic and refrigerate at least 30 minutes, preferably an hour. Roll between sheets of plastic wrap and cut out circles larger than your tart shells, fit the dough into the molds and cut out the excess. Set them on a sheet pan, line them with parchment paper rounds and fill them with pie weights or dried beans. Bake at 350F for about 10-15 minutes. Let cool before adding the filling.

For the pine nut and honey filling:
150g (1 cup) pine nuts
2 eggs
75g (5 Tb) butter, melted and slightly cooled
100g (1/2 cup) packed light brown sugar
100g (1/3 cup) acacia honey
1/2 vanilla bean, split open in the middle and seeds scooped out with a pairing knife
or 2 tsp pure vanilla extract or vanilla bean paste

In large bowl, whisk the eggs with the brown sugar, honey and vanilla seeds. Add the melted butter and whisk until incorporated. Divide the pine nuts among the tart shells. Slowly pour the filling over the nuts, trying not to move them around too much. Bake at 350 for about 20 minutes or until golden brown.

Pine Nut Tartelettes

Roasted Caramel Figs, Berry and Apple Compote Verrines

Roasted Figs, Berries and Apple Verrines


When I visited Lisa last year in October, I kept marveling at the coming of Fall, the changing nature of the landscape and the foliage. Those deep reds, perfect greens and deliciously rich golds…they were making me happy and dreamy. She got quite amused by my attitude toward something so natural as Fall and asked what on earth was going on deep in the South for me to act as if I had not seen Fall in ages? Didn’t leaves change colors down there? She was stumped when I told her that they turned from green to brown. No luscious displays of colors, just brown…and if we were lucky a little beige-orange. Nothing like the landscape that was unfolding in front of my eyes as we were driving along.

It becomes difficult to start cooking with pumpkins, pears and apples when you are still wearing shorts and tee-shirts in the middle of November. Granted the evenings are chilly but nothing that a light cardigan can’t fix. Stores and floral shops do their best to put us in the mood by displaying the right colors and adding sweaters and buckled shoes into their window displays but food…I have to close my eyes and pretend I am experiencing Fall in my kitchen. As much as I dislike the heat and humidity of our summer I do realize how lucky we are to be grilling out late in the year without a coat on and not shoveling snow in February. So, yes I am torn…I relinquish saying goodbye to the bounty of summer fruits but I am also eager to cook with more seasonal ones when we can’t quite experience Fall like others up north.

To celebrate the arrival of mellower days, I decided to make a "transition dessert" including berries, figs and apples. When I was a little girl growing in Apt, Provence, we used to have a small fig tree next to the driveway and I remember coming home from school in late September, early October and picking up the fruits as soon as I would hop out of the car. Summer was picking up cherries from our giant tree and as soon as school would start it was figs and juicy apples from the next door neighbor. The seasons were milder there too but you could clearly feel the changes in the air. Although I grew up eating figs, we rarely cooked with them, that came later when I truly appreciated the virtues of a good fig puree, enhanced by a little caramel.

The other day I was on the phone with my mother and we started to reminisce about grandma and her cooked fruits, her compotes rather. She made the best apple one and her cooked berries were always one of our requests for breakfast. I hung up with mom and told myself that it was exactly what I was going to do and layer them in a "verrine" and serve them with some cookies. The weather was clement, there was even a light chill that morning so the cookies turned into a crumble and the figs got mixed with the berries….What is Fall without a little crumble on top?!! A few spoonful of it the other night and we almost wanted to build up a fire!!

Roasted Figs, Berries and Apple Verrines


The verrine did not start that way actually. I had a small basket of figs that I needed to use rather fast and decided to dip them into caramel before roasting them briefly in the oven. We enjoyed some hot or warm on a few scoops of vanilla ice cream and I was left with just enough to add them to something else. I put that thought away and moved on to other things….not for long though! It is preferable to serve this warm or room temperature, thus it is better to start by making the crumble part, so once you have all the other elements ready, all you have to do is layer them in glasses. Before you think there are too many elements to make this an easy desserts, let me tell you that you can prepare everything over a couple of days. Make the compotes ahead of time (freeze them if you want), then reheat them just before serving. The crumble can be kept in an airtight container for up to 4 days (can be frozen also), and just pop it in the microwave or the oven before serving.

Roasted Caramel Figs, Berries and Apple Compotes Verrines:

Serves 6

For the crumble:
1 cup (140 gr) all purpose flour
1/2 cup (100 gr) light packed brown sugar
1 stick (113 gr) butter, softened

In a medium bowl, combine with your fingertips or a pastry blender the flour, sugar and butter and form large clumps of dough. Lay them on a parchment lined baking sheet and bake at 350F until golden brown. Let cool to room temperature before breaking the clumps into smaller crumbs.

For the caramel figs:
3 Tb ( 42 gr) butter
1/4 cup (50gr) packed light brown sugar
6 fresh figs, halved.

Line a baking sheet with parchment paper and place the half figs on it, set aside.
Preheat the oven to 375F.
In a medium saucepan, combine the butter and brown sugar and cook them over medium heat until the sugar is dissolved and the butter is melted (2-3 minutes). Remove from the heat.
With a spoon, divide the caramel over the figs and roast them in the oven for about 3 to 5 mintues or tunil they become tender and wrinkly. Set aside to cool and puree them in a food processor, set aside.

For the berry compote:
1/2 cup (120gr) raspberries
1/2 cup (120gr) strawberries
1/4 cup sugar (62 gr) sugar
zest and juice of one lemon

Combine all the ingredients in a heave saucepan over medium heat and cook for about 5 minutes or until the fruits start to release their juice and become soft. Let cool.
Add this compote to the caramel fig puree. Set aside.

For the apple compote:
4 large apples (your preference) peeled, cored and diced
1/4 cup (50gr) packed light brown sugar
2 Tb water
1 tsp cinnamon

Combine all the ingredients in a saucepan and cook over medium heat until the apples become soft and almost mushy. Remove from the heat and let cool.

To assemble: layer the berry-fig compote at the bottom of 6 glasses, top with a layer of apple compote and top with the crumble. Serve warm or at room temperature.

Roasted Figs, Berries and Apple Verrines

Jasmine Tea Ice Cream In Roasted Plum Cups With Sables Cookies

Jasmine Tea Ice Cream In Roasted Plum Cup


Eat me quick….I am melting….

Thank you all for your concern with the storm. We did get a good bit of rain, enough to make the water come up the hill from the river during the night at high tide but it was all gone by 9am with blue skies, bright sun and scorching heat once more. I woke up at 3am to check the river and the backyard and took Bailey out so he’d let us sleep a little in the morning. Bad mistake…he loves adores water and started doing a little "Dancing In The Rain" number… lovely. Good thing he loves rolling in a towel too, makes our job easier!! Anyway, Hanna turned out to be windy and rainy but nothing compared to the threat that Ike seems to be. Anybody in Ike’s path, be safe.

Didn’t I say a couple of weeks ago with the redcurrant sorbet dessert that it was the last time I was trying to shoot ice cream during summer? Yes, well…either I am a sucker for punishment or I am a sucker for ice cream. Hmm…yes, apparently my love for anything ice cream-ish made me churn a batch of ice cream and sing aloud "que sera sera" when I attempted to take a few decent shots in 5 minutes in the heat and humidity (yes, even with the AC cranked up…I swear it seeps through the windows!). It did not help that cutie-patootie Bailey was pulling on the tablecloth every 10 seconds…that nose could smell that jasmine tea ice cream, or maybe the sables breton. There are days we call him "The Nose" but today he was "Mr. Pull-it-all"…anything hanging came down, all day long.

I loaded up on fresh red plums at the store the other day as I could not resist their beautiful color and perfect roundness, not to mention they were a great bargain. I wasn’t quite sure what to do with them yet but the more I was looking at them in the fruit bowl the more I thought they would be a great vessel for something. During the afternoon I made myself a large mug of jasmine tea, sat down at the computer with a fresh cut plum and started writing, sipping my tea and munching on the plum. That’s when it hit me, a soft vanilla ice cream flavored with jasmine tea and paired with roasted plums. I like some crunch with my ice creams and when my father in law called to ask if I could make some sables bretons for him, I thought I’d keep some for us to get that little crunch while eating the ice cream. I made some cut out cookies and sandwich them with some leftover quick berry jam from the other day and its tartness provided the perfect contrast to the smooth taste of the ice cream. I use one of those Linzer cookie cutters but plain ones will be fine too to sandwich the jam.

Fresh Red Plums


For a take on the roasted plums, I sliced them rather thin, sprinkled them with sugar and popped them in a 300F oven for a few minutes. After they were cooled, I line cups with plastic wrap and laid the slices in, overlapping each other, filled the cup with ice cream and froze them until completely set. I did some in glass cups and some in half sphere silicone molds and both came out fine, so feel free to use either options. You can prepare the ice cream the day before, as well as the plums, assemble the cups the next morning, take care of the cookies while the plum cups set in the freezer and have everything ready for dinner. You can even do the ice cream part a week before if you want to spread your baking time ever more. That’s the beauty of ice cream….it keeps!! I did try to take step by step pictures but I only have one small window in the kitchen and the sun coming through French doors behind me. Some people like my buddy Jen are experts at step by step, I obviously don’t have the proper set up for quality pics and I will keep practicing for the time being.

Jasmine Tea Ice Cream In Roasted Plum Cups With Sable Bretons Cookies:

Serves 6

For the jasmine tea ice cream

4 egg yolks
2 cups (500ml) half and half
4 oz (120gr) sugar
1 tsp vanilla extract
1 bag jasmine white tea, broke open to get the leaves

In a large bowl, whisk the egg yolks and sugar until pale and thick, add the vanilla. In a saucepan, on medium heat, bring the half and half and jasmine tea to boiling point but do not let it boil. Slowly pour the hot cream onto the egg yolks mixture and stir to combine (tempering). Pour the whole mixture back into the saucepan and cook over low heat, stirring constantly, until the cream coats the back of spoon. At this point you have made a custard sauce, also known as "creme anglaise". Let cool completely, strain the tea leaves and refrigerate until cold. Process the custard according to your ice cream maker manufacturer’s instructions.

For the roasted plums:
6 plums
1/4 cup (50gr) sugar

Preheat your oven to 300F.
Cut the plums in half and thinly slice each half, skin on. Lay then down on a silicone mat or a baking sheet lined with parchment paper. Sprinkle them evenly with the sugar and bake for 20 minutes or until the plums become to take color. Watch carefully so that you don’t burn the edges. Remove from the oven and let cool completely.

For the plum cups:
If you use glass cups: line them with a sheet of plastic wrap and lay the plum slices slightly overlapping each other.
If using silicone molds: skip the plastic sheet step and overlap the plum slices directly in the molds.
In both cases, fill each cup with about 3/4 cup to 1 cup ice cream, depending on your mold capacity.

For the Sables Bretons:

Makes about 2 1/2 dozens

1 stick (115 gr) unsalted butter, at room temperature
1/2 cup (100 grams) sugar
1 large egg
1 teaspoon pure vanilla extract or 1 tsp vanilla bean paste
1 3/4 cups (245 gr) all purpose flour
1/8 tsp salt
3/4 cup to 1/2 cup raspberry jam

In the bowl of your electric mixer fitted with the paddle attachment (or with a hand mixer), beat the butter and sugar until creamy. Add the egg and vanilla extract (or paste) and beat until blended. Add the flour and salt and beat until just incorporated.
Transfer the dough to a lightly floured surface, and knead the dough just to bring it together. Divide the dough in half and wrap each half in plastic wrap. Refrigerate until firm for at least an hour.
Preheat oven to 350F and line two baking sheets with parchment paper.
Remove one portion of the dough from the refrigerator and place on a well floured surface so it won’t stick as you roll. Roll out the dough to about 1/4 inch thick. If you have a Linzer cookie cutter (3 inch diameter) with little cut out inserts, use it without the insert to get full circles and start cutting out. Place them on the baking sheet and refrigerate at least 30 minutes. In the meantime roll out the other half of the dough the same way but place the cut out insert in the cutter and cut away the cookies. I keep the little cut out scraps to munch on…my little bakers treat!!
Once cooled filled one cookie with jam and sandwich with another cookie.

Sables Bretons Cookies


A little news flash before my brain melts too:
The 3rd issue of Desserts Magazine is online!! All vegan, all the way! I am pyched to have contributed once more to the magazine (cover picture and pages 4 and 5). Thank you Chris for the lovely polka dots napkins and the pitcher !

Red Berry Macarons

Red Berry Macarons


More berries! It’s not that I won’t find stone fruits and other summer fruits living in a Southern state, it’s just that they will probably taste bland and by the time Fall hits, I know my baking mind will be ready for apples and pears. I have been freezing and preserving a ton these past few days so if I get a craving for juicy roasted peaches and creme anglaise in the middle of November, one trip to the freezer and I am set!

Friday afternoon when B. went to put bottles of water in the freezer as part of our preparations for Tropical Storm Hanna, he was amazed to find the bottom drawer full of halved peaches, halved plums, raspberries, blueberries, watermelon for quick sorbet, not to mention doughs of various kinds, etc… Tucked in a corner he noticed a small box with a few red berry macarons that I had saved "just" for him. He exclaimed "It almost makes me wish we lost power with that storm!" to which I replied "take a peak out the window and tell me that with a straight face!". We live on a tidal creek, our house is 12 feet off the ground so if the water keeps getting up into the yard with the midnight tide, we might get up to see a natural pool in the garage. I took hour by hour pictures this afternoon as I was cooped inside baking and making soup. A tropical storm calls for chocolate cake don’t you think?

Why keep macarons in the freezer? Well, last weekend our friend D. came over and helped me out of a little situation and as a thank you I made her and her husband some macarons for their get together on Labor Day. I tell you what, there are many special moments in life but getting together with close friends, grilling, chilling, playing croquet and eating macarons is definitely one of them! Hard to think that this beautiful sunny day would lead to such a downfall of rain by friday, but such is Mother Nature. It is a very humbling feeling to know that one only can surrender to its plan and go with the flow. It’s kind of appeasing to me, in a weird sort of way. I saw people giving in that collective movement of stress all day long, at the store, the gas station and I just wanted to go up to them and offer them a macaron to help them relax! I think I’ll need a truckload of macarons if we get a hurricane this season (knock on wood real quick, thank you!).

Red Berry Macarons


Since I had a lot of egg whites left from making ice cream and other custards, I made a double batch of macarons, filled them and tucked the away in the freezer, well wrapped for when a little cravings hits us these stormy days. I did do my little rituals of turning the fridge and freezer to the lowest settings and hopefully we won’t lose power for long if at all. Our hosts this past Labor Day love chesecakes and that was the inspiration for the filling, a cream cheese buttercream with a center of quick raspberry and redcurrant jelly. I call it "quick jelly" because it is not a jelly in the traditional sense of the term, it does not cook for long and contains gelatin to help it set, as well as the whole berries and not just their juice. I needed a small quantity for the macarons, hence the rapid method instead of the whole jelly making and ensuing canning. Feel free to subsitute with your favorite berry jam, homemade or not.

I get quite a few emails about macarons and I do not consider myself an authority in the matter, there are indeed quite a few bloggers sharing the same passion, and a quick Google search can quickly lend to macaron heaven as far as choices. I do recommend reading the tutorial in Desserts Magazine: not because I wrote it but because I tried to gather a lot of tips, ideas and methods from other chefs, home cooks and bloggers. It is by no means a comprehensive guide to macaron making but I think it is a great place to start demystifying as well as understanding some key points in the method (regardless of the type of meringue you use). I mostly use the French meringue method with great results but if you want to try your hand at the Italian meringue method, my friend Mercotte in France has written (in English) a great tutorial on the subject.

Red Berries and Jelly


Red Berry Macarons:
Makes about 15-18 depending on size

For the shells:
3 egg whites (about 90 gr)
30 gr granulated sugar
200 gr powdered sugar
110 gr almonds
2 Tb powdered red food coloring

For the whites: the day before (24hrs), separate your eggs and store the whites at room temperature in a covered container. If you want to use 48hrs (or more) egg whites, you can store them in the fridge. In a stand mixer fitted with the whisk attachment, whip the egg whites to a foam, gradually add the sugar until you obtain a glossy meringue. Do not overbeat your meringue or it will be too dry and your macarons won’t work. Combine the almonds and powdered sugar in a food processor and give them a good pulse until the nuts are finely ground. Pass through a sieve. Add them to the meringue,with the coloring and give it a quick fold to break some of the air and then fold the mass carefully until you obtain a batter that flows like magma or a thick ribbon. Give quick strokes at first to break the mass and slow down. The whole process should not take more than 50 strokes. Test a small amount on a plate: if the tops flattens on its own you are good to go. If there is a small beak, give the batter a couple of turns. Fill a pastry bag fitted with a plain tip (Ateco #807 or #809) with the batter and pipe small rounds (1.5 inches in diameter) onto parchment paper lined baking sheets. Preheat the oven to 300F. Let the macarons sit out for 30 minutes to an hour to harden their shells a bit and bake for 8-10 minutes, depending on their size. Let cool. If you have trouble removing the shells, pour a couple of drops of water under the parchment paper while the sheet is still a bit warm and the macarons will lift up more easily do to the moisture. Don’t let them sit there in it too long or they will become soggy. Once baked and if you are not using them right away, store them in an airtight container out of the fridge for a couple of days or in the freezer.

For the cream cheese buttercream:
1 1/2 sticks (170 gr) butter at room temperature
4 oz (120gr) cream cheese, softened
3 egg whites
1/2 cup (100gr) sugar
2 Tb water
1 tsp vanilla extract or vanilla paste or 1/2 vanilla bean split open and seeded.

In the bowl of stand mixer, whip the egg whites until they have soft peaks. In the meantime, combine 2 Tb water with the sugar to a boil in a heavy saucepan and bring the syrup to 250F. Slowly add the sugar syrup to the egg whites. If you use hand beaters, this is even easier and there is less hot syrup splatter on the side of your bowl and in the whisk attachment of the stand mixer. Continue to whip until the meringue is completely cooled. Slowly add the butter, one tablespoon at a time. The mass might curdle but no panic, continue to whip until it all comes together. Add the cream cheese, the same way, a little at a time until everything is smooth. Whisk in the vanilla extract, or paste or bean. Keep it to spreadable consistency for the macarons and refrigerate the leftover for cupcakes or mini toast in the fridge up to 3 days or in the freezer.

For the quick red berry jelly:
1 cup raspberries (250ml)
1 cup redcurrant (250ml)
1/2 cup sugar
1 Tb lemon juice
1 Tb lemon zest
2 tsp powdered gelatin
3 Tb cold water

In a small bowl, sprinkle the gelatin over the water and let it bloom.
In a heavy saucepan,combine the berries, sugar, lemon juice and zest. Bring to a boil, reduce the heat and let simmer 10 minutes to let the fruits release their juices. Remove from the heat, add the gelatin and stir until completely melted into the fruits. Pour into a small plastic container line with plastic wrap, let cool to room temperature and refrigerate until set. Can be kept in the fridge for up to 5 days or in the freezer.

To assemble: pipe or spoon a small amount of macarons on one shell, position some jelly right in the center and top with another shell.

Red Berry Macarons

Lemon Balm Infused Berries And Almond Tuiles

Fresh Berrries With Lemon Balm Syrup and Tuiles Cookies


I seem to have a hard time letting go of summer….stone fruits, berries, herbs are always sneaking in into my shopping basket. It is easy to get inspired or to focus on writing certain chapters of a book when you have a big bowl of juicy and plump fruit in front of you! It is a little less fun when our new puppy set his mind to chew our lemongrass plant, mix it up with a little rosemary, adds a little spice with a touch of Thai basil and finally decides that the game can’t be complete until he ends with a few springs of lemon balm! Why do we let him? We don’t!! I did not realize that he had grown so much that he was not able to pull on the leaves, take the pots down and have a feast! Just right when I was starting to think I finally grew a green thumb, no kidding people, I can even kill a silk plant (ask my mother in law!).

I consolidated my schedule to be able to work more from home and for longer stretches of times which is perfect to bake and write but I guess I don’t see him grow as much as he actually is. When C. tells me every week "Oh…he’s grown again!", I smile and say "Hmm, really? Maybe"…when really I am thinking "He’s still my little baby" go to pick him up and think "how did you get heavier overnight?"… When I let him out on the porch and heard a big and bang of things falling and tumbling I knew we had passed a stage. When I saw him feasting on the plant, I was somewhat reassured of his good taste…well maybe not right then but his fascination with lemon balm inspired me to use again.

These days, when B. opens up the fridge, he is faced with plates and many posts-its bearing dessert names, dates, preparation stages. Sometimes one reads "don’t you even think", or "not ready yet", sometimes "please finish it, I can’t eat anymore!!" There are days when I make his head spin naming things he can have for dessert. There are days after pictures, testing and distribution among friends and neighbors, when the fridge is empty again, waiting for another wave. It is then that I resort to my long standby of fresh fruit marinated in some infused syrup and served with a plate of cookies. Although I tried this dessert with ice cream before, I have come to want to leave it out of the equation over the years. The syrup is so delicious on its own that all you need is a tuile cookie to sponge the little bit of syrup left at the bottom of your cup after you are done with the fruit.

Feel free to use any combinations of fruits and berries that you like. For this I used a mix of cherries, blueberries, redcurrant, raspberries and strawberries. I started cutting up a plum to add it to the mix but somebody found it more interesting to snatch if from the cutting board and I completely forgot to add it back after that. Same goes for the syrup, I had planned on using mint but the puppy convinced me to lemon balm! Lemon verbena, lemon thyme, even rosemary or a mild basil work great in this. For the cookie, I used the same batter I used to make the decorations here and here. I spooned some into rounds about 3 inches in diameter, sprinkled sliced almonds and baked them for 8-10 minutes at 350F. Once removed from the oven, lay them over a rolling pin or bottle to take the shape of a tile. I can’t get enough of these, they were my favorites as a child, and they remain my favorite as an adult! How many do you think I need to bake in prevision of all the storms that are about to pound us?!!

Tuiles and Dessert Mise En Place

Lemon Balm Infused Berries With Almond Tuiles:

Serves 4

2 cups fresh berries or fruit of your choice
1/3 cup sugar
4 springs lemon balm, slightly bruise the leaves between your fingers to release the oils
3/4 cup water
1 Tablespoon lemon juice

In a medium saucepan set over medium high heat, bring the sugar, lemon balm, water and lemon juice to a boil. Remove from the heat and let cool completely. Place the fruit in a large bowl, pour the cooled syrup through a strainer over the fruit. Discard the lemon balm leaves and let the fruit macerate for 30 minutes to one hour. Divide amomg 4 soup plates, bowls, etc…

For the tuiles:
see recipe here and spread into rounds, sprinkle with almonds and bake as dirested. Shape into a tuile if desired by laying the cookie on top of a curved surface like a rolling pin until cooled.

Fresh Berrries With Lemon Balm Syrup and Tuiles Cookies

Chocolate Eclair….Oh Pierre!!

Chocolate Eclairs


Eclairs With Chocolate Pastry Cream and Chocolate Glaze. Sprinkle of crushed Chikki (Indian Praline)

I wanted to write this post for our Daring Bakers challenge last night and started doing other stuff instead and I have just now gotten home from working a small party with Old Chef. I am exhausted and what happens when I am tired and need to focus is that I tend to make phrases and rhymes out of everything, like for our challenge this month, Pierre Herme’s Chocolate Eclairs: "Pierre, your eclairs, c’est du tonnerre. Soyons clairs, j’en suis fiere…" (does not sound that great translated but it basically reads that the eclairs were great!). I made the eclairs as written by our hosts but then played around a bit witht the eclairs and kept some of the pate a choux to make religieuses and cream puffs for a later post (without rhymes then, promise).

Indeed, Meeta and Tony made a great choice by going with Pierre Herme’s Chocolate Eclairs. Does PH really needs an introduction? I think not…He is pretty darn remarkable, not only by his creations but by his excellent timing and the excellence of the teams he puts together. I even But you see I have what the French call "un coeur d’artichaud", a heart like an artichoke…with many leaves for many people. So yes I like to look at and read Herme, but also Michalak, Aoki Bau, Glacier, Felder, and of course our favorite Zen Chef…And yes, B. knows and he is ok with it, except that PH had some serious shoes to fill regarding eclairs. Me? Never met an eclair I did not like so I was pretty happy to try a new recipe.

Eclairs Mise En Place

Pate a Choux for the eclairs – Chocolate sauce used in the chocolate glaze

Eclairs Mise En Place

It often starts with the egg….and ends with chocolate… giving the American icon Baker’s chocolate a go and the result was surprisingly very good and smooth.

A little story there…real short this time (humhum): a couple of years ago when we went home to France to see my family for Christmas, we left the chaos of family fun for a little two-day escapade in downtown Paris. On our way back we stopped at La Maison Du Chocolat and selected some delicious pastries to share with my parents. B. could not wait for after dinner and bought one single dark chocolate eclairs to have on the train ride back. When we split that one eclair, the world around us magically evaporated. No noise, no rocking from the train against the tracks, no little lady telling her grandchild to please sit down 5 times every 2 minutes, no brouhaha from kids playing with their little Christmas toys. We looked at each other and exclaimed at the same time with our mouths full "oh my god…this is incredible…" We did not even feel the stares of the people on the train. When we noticed them, we looked as guilty as if we had been caught up in a passionate moment of affection!

I often promised B. I’d try to make them as good as that one from La Maison du Chocolat but I never did. I knew that no matter how close I’d come or even if I were to succeed, there would always be something missing: Christmas, Paris and a train ride…. However, Pierre Herme’s eclairs got pretty darn close…very close if you kept the recipe given by our hosts as written: eclair shells, bittersweet pastry cream and bitter sweet chocolate glaze. That is a lot of chocolate, eggs, sugar, cream, butter heavens all spread throughout the Daring Bakers world!

White Fondant Eclairs & Chocolate Rose Filling

Rose pastry cream, poured fondant and raspberry….add a lychee and it is a PH’s Ispahan eclair…

I did the full batch of doug but divided the pastry cream: half the pastry cream was chocolate trying to re-capture that elusive eclair described above. I did top some of the chocolate eclairs with some crushed Chikki (Hi Bina!). Inspired by PH’s Ispahan creations, I added rose water to the other half and made a poured fondant for the glaze. A poured fondant starts with a sugar syrup brought to high temperature then cooled dwon then whipped to a firm consistency. Once you have that block of fondant, you add some simple syrup and warm it up to pouring consistency. Why not do powdered sugar and water and call it a day? First, knowing your hot syrups is always a good thing…kidding (well, almost) but essentially this poured fondant is not as sweet as a simple glaze, goes on smooth and dries well, allowing you to stack, pack and transport those eclairs and pastries with ease….yes even if they only make it to your mouth! I borrowed The decoration for the second batch is inspired by Michalak and his book "C’est du gateau!" I love the picture in it and the smarts that went into it.

Allright…you need a recipe and I need sleep…

Chocolate Eclairs

Most mornings I only have coffee for breakfasts except last week! Eclairs instead!

Pierre Hermé’s Cream Puff Dough. All recipes below from Chocolate Desserts by Pierre Hermé
(makes 20-24 eclairs)
½ cup (125g) whole milk
½ cup (125g) water
1 stick (4 ounces; 115g) unsalted butter, cut into 8 pieces
¼ teaspoon sugar
¼ teaspoon salt
1 cup (140g) all-purpose flour
5 large eggs, at room temperature

In a heavy bottomed medium saucepan, bring the milk, water, butter, sugar and salt to theboil.Once the mixture is at a rolling boil, add all of the flour at once, reduce the heat to mediumand start to stir the mixture vigorously with a wooden spoon. The dough comes together very quickly. Do not worry if a slight crust forms at the bottom of the pan, it’s supposed to. You need to carry on stirring for a further 2-3 minutes to dry the dough. After this time the dough will be very soft and smooth. Transfer the dough into a bowl of a mixer fitted with the paddle attachment, or using your handmixer or if you still have the energy, continue by hand. Add the eggs one at a time,beating after each egg has been added to incorporate it into the dough.You will notice that after you have added the first egg, the dough will separate, once again do not worry. As you keep working the dough, it will come back all together again by the time youhave added the third egg. In the end the dough should be thick and shiny and when lifted itshould fall back into the bowl in a ribbon.The dough should be still warm. It is now ready to be used for the éclairs as directed above.
Notes: Once the dough is made you need to shape it immediately. You can pipe the dough and the freeze it. Simply pipe the dough onto parchment-lined bakingsheets and slide the sheets into the freezer. Once the dough is completely frozen, transfer the piped shapes into freezer bags. They can be kept in the freezer for up to a month.
Preheat your oven to 375 degrees F (190 degrees C), bake for 7 minutes. After the 7 minutes, slip the handle of a wooden spoon into the door to keep in ajar. When the éclairs have been in the oven for a total of 12 minutes, rotate the sheets top to bottom and front to back. Continue baking for a further 8 minutes or until the éclairs are puffed, golden and firm. The total baking time should be approximately 20 minutes.

Chocolate Pastry Cream
2 cups (500g) whole milk
4 large egg yolks
6 tbsp (75g) sugar
3 tablespoons cornstarch, sifted
7 oz (200g) bittersweet chocolate, preferably Velrhona Guanaja, melted
2½ tbsp (1¼ oz: 40g) unsalted butter, at room temperature

In a small saucepan, bring the milk to a boil. In the meantime, combine the yolks, sugar and cornstarch together and whisk in a heavy‐bottomed saucepan.
Once the milk has reached a boil, temper the yolks by whisking a couple spoonfuls of the hot milk into the yolk mixture.Continue whisking and slowly pour the rest of the milk into the tempered yolk mixture.
Strain the mixture back into the saucepan to remove any egg that may have scrambled. Place the pan over medium heat and whisk vigorously (without stop) until the mixture returns to a boil. Keep whisking vigorously for 1 to 2 more minutes (still over medium heat).Stir in the melted chocolate and then remove the pan from the heat.
Scrape the pastry cream into a small bowl and set it in an ice‐water bath to stop the cooking process. Make sure to continue stirring the mixture at this point so that it remains smooth.
Once the cream has reached a temperature of 140 F remove from the ice‐water bath and stir in the butter in three or four installments. Return the cream to the ice‐water bath to continue cooling, stirring occasionally, until it has completely cooled. The cream is now ready to use or store in the fridge.
Notes:The pastry cream can be made 2‐3 days in advance and stored in the refrigerator.
In order to avoid a skin forming on the pastry cream, cover with plastic wrap pressed onto the cream.Tempering the eggs raises the temperature of the eggs slowly so that they do not scramble.

Chocolate Glaze
(makes 1 cup or 300g)
1/3 cup (80g) heavy cream
3½ oz (100g) bittersweet chocolate, finely chopped
4 tsp (20 g) unsalted butter, cut into 4 pieces, at room temperature
7 tbsp (110 g) Chocolate Sauce (recipe below), warm or at room temperature

In a small saucepan, bring the heavy cream to a boil. Remove from the heat and slowly begin to add the chocolate, stirring with a wooden spoon or spatula.Stirring gently, stir in the butter, piece by piece followed by the chocolate sauce.
Notes: If the chocolate glaze is too cool (i.e. not liquid enough) you may heat it briefly
 in the microwave or over a double boiler. A double boiler is basically a bowl sitting over (not touching) simmering water.
It is best to glaze the eclairs after the glaze is made, but if you are pressed for time, you can make the glaze a couple days ahead of time, store it in the fridge and bring it up to the proper temperature (95 to 104 F) when ready to glaze.

Chocolate Sauce
(makes 1½ cups or 525 g)
4½ oz (130 g) bittersweet chocolate, finely chopped
1 cup (250 g) water
½ cup (125 g) crème fraîche, or heavy cream
1/3 cup (70 g) sugar

Place all the ingredients into a heavy‐bottomed saucepan and bring to a boil, making sure to stir constantly. Then reduce the heat to low and continue stirring with a wooden spoon until the sauce thickens.
It may take 10‐15 minutes for the sauce to thicken, but you will know when it is done when it coats the back of your spoon.
Notes: You can make this sauce ahead of time and store it in the refrigerator for two weeks. Reheat the sauce in a microwave oven or a double boiler before using.
This sauce is also great for cakes, ice-cream and tarts.

For a great poured fondant recipe with step by step pictures, check out this post.

The End.....

Redcurrant Sorbet And Faisselle Ice Cream With Fried Strawberries

Redcurrant Sorbet and Faisselle Ice Cream With Fried Strawberries


Sounds complicated right? Well, really it’s not…trust me. If I have so little time these days that I forget to take my apron off before heading out of the house, then you can trust me when I say that this is nothing short of delicious but not intricate. I like multi layered, multi component desserts because they allow my brain to relax and my stress level to go down since I know I can plan and assemble them over several days.

Did I just say that I went out with my apron on? Yep…I really laughed because I had mentioned to some of you that it might happen and it did. I did walk the dogs and went to the grocery store with my apron still tied around my waist. The funny part is that the neighbors did not act surprised nor did the personnel at the store! That grocery store around the corner from our house sees me just about everyday. The cashiers know my name, my habits, the produce guy even offered me a job on more than one occasion. I had to fess up and explain that no, one person did not eat that much food in a week and that I had a job at hand, but yes I would probably the one customer with the odd requests.

When I arrived at the store with my apron on, no one looked surprised at all, I think they were betting on how long it would take for me to forget something like that! What they really wanted to know is why I had not brought them some goods and samples instead!! I regretfully told them that I had been working on ice creams lately and that it was not an easy item to bring them to try. Nor is it to take pictures of in this darn heat! After 5 minutes I had to stop and admit defeat the day I shot this dessert and that’s why I only have a couple of pictures to show for it. I stood there looking at the plate with an ever growing pool of goodness with mixed feelings of anger and frustration!

I take pictures upstairs in the guest bedroom where the light is better throughout the day on a table set at the foot of the bed. After a minute of wondering if it was worth it to take another one of these ice creams out of the freezer, plate and shoot again, I figured I’d try one more shot of a spoon full of ice cream. I dug in, set in down, looked at it but never took the camera to shoot it. No….instead I took the spoon, the whole plate and sat on the bed and ate it. The whole thing, all by myself, something I rarely do. I instantly felt better! I felt bad for two seconds that I did not shoot more but the guilt melted away as fast as the ice cream in my mouth….

Mise En Place


With summer reaching its end I have been loading up on fresh berries as much and as fast as I could lately and I had enough redcurrants to turn them into a refreshing sorbet. I still had a good amount of faisselle left so I turned it into ice cream and spooned both inside rings (I use cut pvc pipe). Feel free to use any other soft and smooth dairy like fromage blanc, petit suisse, goat cheese, cream cheese, etc…The main concern here is to drain it thoroughly before adding it to the ice cream base so I recommend draining it overnight until it becomes fresh cheese or yogurt cheese if you want. Feel free to use any other soft and smooth dairy like fromage blanc, petit suisse (both drained overnight), goat cheese, cream cheese, etc…

I like contrasting textures and flavors a lot in desserts and I also like to contrast temperatures, hence the fried strawberries. I was a little worried that they would lose a lot of their quality in the frying process but they held up nicely. While the outside was hot and crunchy the strawberries just barely got warm and retained their texture. I used rice flour for the batter in order to be light and smooth but all purpose flour works too, I just found it a little overwhelming to fry fresh fruits. You can make the ice creams and pipe them into molds one day and take care of the strawberries just before serving, even if that time comes days later….ice cream will wait…if you can! Don’t throw away your egg whites….you can always try your hand at macarons!
Redcurrant Sorbet and Faisselle Ice Cream with Fried Strawberries.

Redcurrant Sorbet:
1 cup water
3/4 cup sugar
2 1/2 cups redcurrants, picked over

Bring the water and sugar to a boil in a small saucepan over medium heat. Make sure the sugar is dissolved and remove from the heat. Let the sugar syrup cool to room temperature.
Puree the redcurrant in a food processor with the cooled syrup. Strain the puree through a sieve into a bowl. Refrigerate the puree until thoroughly chilled and then freee in an ice cream maker according to the manufacturer’s directions. Makes about 2 cups.

Faisselle Ice Cream:
2 cups whole milk (50o ml)
1/3 cup heavy cream (100 ml)
3/4 cup sugar (170 gr)
3 egg yolks
1 Tb vanilla bean paste or 1/2 vanilla bean, seeded
3 oz drained faisselle (90gr)

Whisk the egg yolks with the sugar. In a saucepan set on medium heat, bring the milk and the cream to boiling point, slowly pour a small amount on the egg yolks to temper. Pour the remaining over the yolks and sugar. Stir well then pour back in the saucepan and cook over medium low heat until the cream thickens and coats the back of a wooden spoon. Remove from the heat and whisk in the faisselle until completely incorporated. Cool to room temperature. Cover and refrigerate until cold. Process in an ice cream maker according to your machine’s manufacturer’s instructions.

Once both ice creams are ready, pipe the faisselle into 4 rings lined with parchment paper (makes is easier to unmold) and freeze again until set. Proceed the same way with the redcurrant sorbet. Cover the tops with plastic wrap. Unmold just before serving and plate with the fried strawberries.

Fried Strawberries:
12 small strawberries, hulled and wiped clean with a paper towel
1 1/4 cups rice flour
1/2 cup sugar
1 teaspoons baking powder
1 Tablespoon lemon zest
1 cup water
vegetable oil for frying
powdered sugar for dusting

Heat the oil to 350F.
In a large bowl, whisk together the flour, sugar,baking powder and lemon zest. Slowly add the water until the batter is smooth and without lumps. Dip the strawberries into the batter and then drop them into the oil until they are golden brown. Drain on paper towels and dust with powdered sugar. Serve hot or warm with the ice creams.

The Faisselle Experiments – Part Two…And Three

Faisselle and Maple Syrup


Allright, so let’s start this off the right way before I lose my mind. We all gathered today and read all your suggestions for a name for the dessert in the previous post and it was not easy making a decision…ya’ll are good!! But….the overall favorite was "Transatlantic" from Miss Lillas who said "Salted butter caramel from Normandy, American chocolate brownie. An elegant bringing together our 2 continents"….So Miss, please send me your mailing address so I can send this wonderful book your way! Congratulations!

A couple of weeks ago I took a long trip down memory and you were so kind to indulge me and read about my attempt to recreate a fresh cheese that my dad loves. The outcome was not "faisselle" like I remembered but something closer to fresh ricotta. The desire to recreate this unique product came from a conversation I was having with expat friend Aran from Cannelle Et Vanille after our first foray into re-creating desserts from our childhood and cultural heritage. She had a hankering for mamia and so did B. and I after we had a most delicious one on a trip back home at L’Ami Jean, a Basque restaurant in Paris. We started talking about making it right before she left on vacation so in the meantime that got me thinking about trying my hand at "faisselle" and when she came back we both agreed that it would be more logical and more fun to give you two experiments instead of one. Fast forward to last week, when my favorite Basque experimented with mamia and I with faisselle.

Much like her first batch of mamia, my first batch of faisselle for this post did not turn out as I hope for. After the batch I made last month, I decided to take away the added yogurt and to get straight for heating the milk, adding the rennet and letting it sit, until nice floppy large chunks of curd form and separate from the whey. Well, I got zippo zippeedee zip….I got liquid and tiny curds which once drained gave me about 1 cup of ricotta. For one gallon of milk you can expect that it did not cut it. I did not use raw milk this time and I don’t think it was the local homogenized whole milk I used…nope…just could not put my finger on it. In one email she mentioned she was trying another batch of mamia adding cream and dry milk and I went back to the drawing board with mine. Then I had the "genius"(self sarcasm) idea to call my dad and have him read the ingredients on a jar of store bought faisselle…Guess what?….Yep, added cream and dry milk, a little ratio working and I was back in !

Faisselle and Lemon Thyme Lemon Curd


I heated the milk again, added the dry milk, cream and rennet. Let it sit for a couple of hour and the result was exactly what it was supposed to be: large floppy and soft curds slowly separating from the whey. The first spoonful made me think I was definitely on the right track but it needed to develop a little character and an overnight stay in the fridge fixed that. Traditionally, faisselles are drained in molds set in larger containers so that the whey pooling at the bottom keep the cheese moist. I just drained the cheese with a large slotted spoon and scooped the cheese in containers. It did continue to render a lot of whey but I was too happy to have succeeded to be bothered!! The texture is soft but firm enough to separate into curds as you dig your spoon in it and the flavor is really not comparable to any dairy found here, neither sour nor tart.

My dad likes his with chopped fresh chives and fresh cracked pepper, which I have come to like, but I also love it on the sweet side. I served some with some lemon thyme lemon curd and some with chopped pistachios, redcurrants and maple syrup. Deborah from Bonbon Oiseau sent me a bottle of a local Vermont maple syrup producer and it arrived the day I was finishing the faisselle. My bottle of "maple crack" as she refers to it could not have come at a better time! Thank you! I played around with the remaining faisselle and used in some other pastry applications. It’s been a busy couple of weeks so I have not come around to sift through those pictures or even put them in a proper post yet…soon though.

Faisselle and Maple Syrup

Faisselle:

1 quart whole milk ( 4 cups – 946ml)
1/2 cup heavy cream (118ml)
1/4 cup dry milk powder (60 gr)
8 drops liquid rennet

In a heavy saucepan, combine the milk, heavy cream and milk powder and bring the mixture to 120F over medium heat. Let cool to room temperature and add the rennet. Stir once with a wooden spoon, transfer to a clean bowl (porcelain, glass or plastic), cover with a clean kitchen towel and let sit undisturbed for 2 to 4 hours. Place in the refrigerator and let sit overnight to develop more taste. Drain and used as desired the next day.

Lemon Thyme Lemon Curd:

3 large eggs
1/3 cup (80 ml) lemon juice
1 Tb freshly grated lemon zest
1/4 cup fresh lemon thyme
1/4 cup (60gr) granulated sugar
4 tablespoons (55 grams) unsalted butter, at room temperature, cut into small pieces

In a bowl placed over a pan of simmering water, whisk together the eggs, sugar, lemon thyme, lmeon zest and lemon juice until blended. Cook, stirring constantly until the mixture reaches 160F. Remove from the heat and strain the mixture over a bowl. Cut the butter into small pieces and whisk into the mixture until the butter has melted. Cover with some plastic wrap directly in contact with the curd to prevent a skin from forming. You can refrigerate it for up to a week. Makes about 1 1/2 cups.
Note: I used liquid vegetarian rennet that I found at the health food store near me, but you can also find it here.

Faisselle And Lemon Thyme Lemon Curd