
Jahresarchive: 2007

Ultimate Lemon Pound Cake

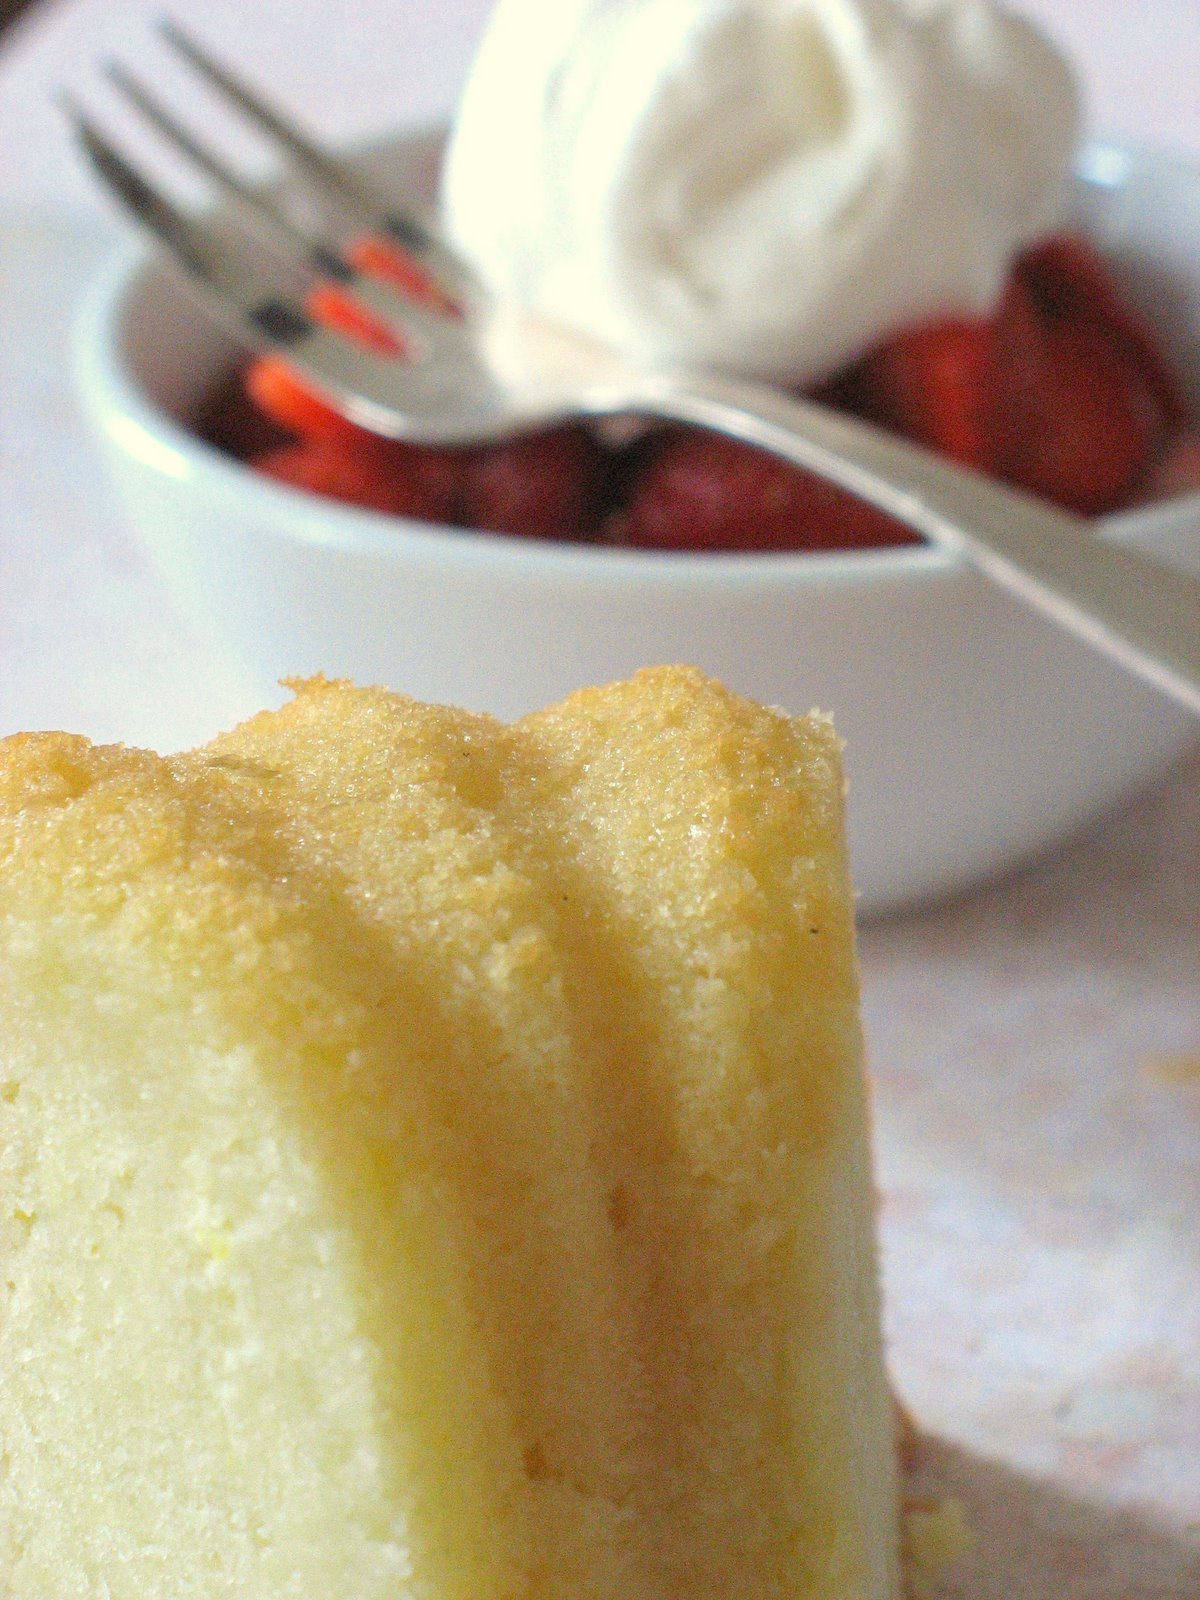
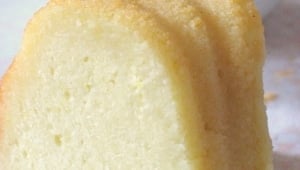
I wish I could claim I finally found the secret to the ultimate lemon pound cake but she did, and I wish I could thank her for the best slice of cake I have had with my afternoon tea in a long time.
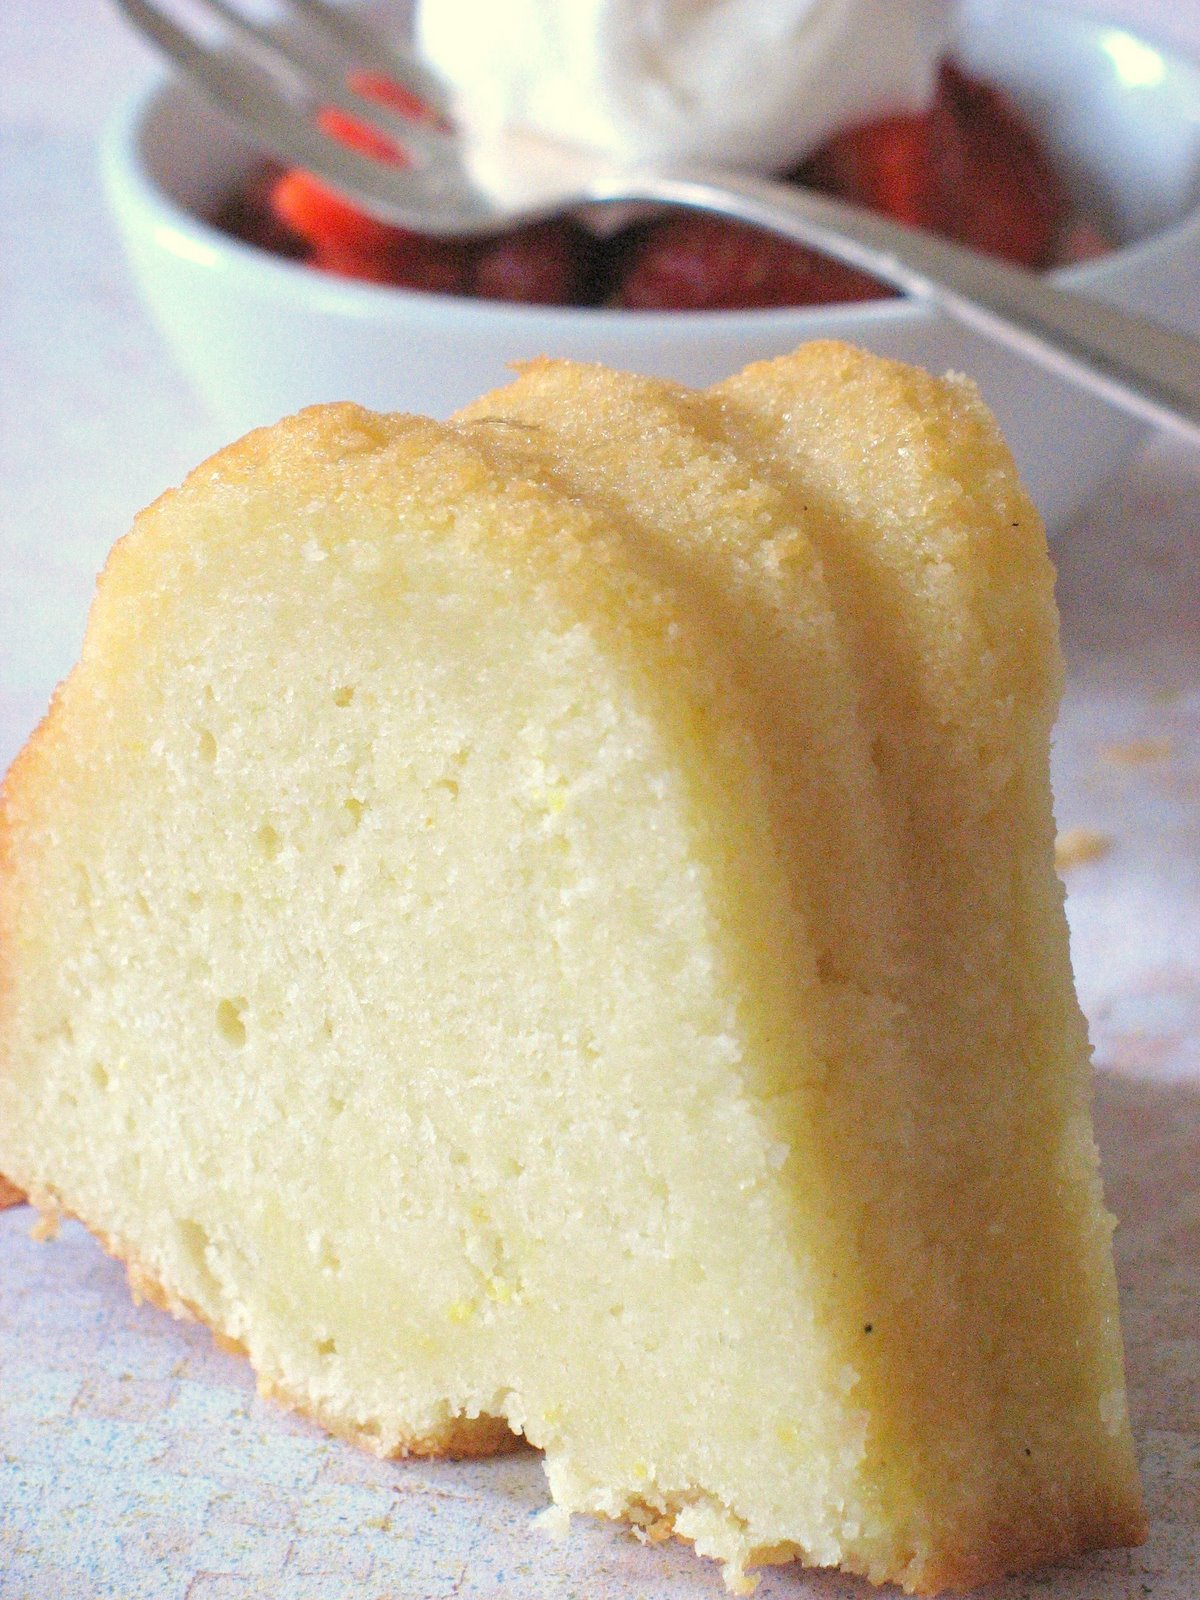
If someone describes a cake as "perfect-moist, finely texture, sweet (but not too sweet), and refreshingly tart", wouldn’t you be tempted to make it for yourself? Taste is subjective and with such a strong title I was tempted to make it just to prove her wrong…Well, ok, let’s be honest: because a cake drenched with 1/2 cup of lemon syrup sounds irresistible to me!

Everything about this cake is hands down good. It is easy to make, is full of fresh and simple to find ingredients, bakes well, smells out of this world and tastes better and better as the days go by…although there were not that many days between the first and the last slice. I loved it so much I made 2 for a cookout tonight because I can bet the host is going to want one just for herself.

Whenever I make a lemon dessert, I have a tendency to double up on the zest or amount of juice called for in the recipe because I need and love tart. I need my tongue to burn and my gums to hurt…well, maybe not exactly that bad but you get the idea. Looking at Lori Longbotham’s recipe, it seemed that I probably did not need to change much and decided to make it "almost" the way it was written. Hers calls for cake flour and I did not have any left, so I made do with all-purpose, decreasing the amount a bit. I also left out the vanilla extract (1 tsp) to make sure nothing would get in the way of my lemons!

Ultimate Pound Cake, adapted from Lori Longbotham:

Serves 12 (in theory)

2 3/4 cups all purpose flour
1/2 tsp baking powder
1/4 tsp salt
3 sticks unsalted butter at room temperature
2 1/4 cups sugar
6 large eggs
1 cup milk
1 1/2 TB lemon zest
1 tsp. pure lemon extract
1/2 cup fresh lemon juice

Preheat oven to 300F. Butter and flour a 12 cup Bundt pan.
Sift the flour, baking owder and salt together twice.
Cream the butter and 1 3/4 cups sugar until pale and fluffy. Add the eggs, one at a time, beating well after each addition. Reduce the speed and add the flour mixture, alternating with the milk, beginning and ending with the flou. Stir in the lemon zest and lemon extract.
Pour the batter into the prepared apn and bake for 1 1/2 hours, or until a knife inserted in the middle comes out clean. Let cool in the pan for 15 minutes. Poke holes all over the cake with a wooden skewer
Meanwhile, bring the lemon juice and remaininf sugar to a boil over medium high heat in a small saucepan, stirring until the sugar is dissolved.
Invert the cake onto a rack, position over a baking sheet and slowly pour the syrup over the cake, it will seap through the holes and into the cake. Let cool to room temp.

Verdict: the best I have had so far. Fresh, wholesome, light (if possible for a pound cake) and so lemony…It is perfect for an Easter cookout, reunion, brunch or gathering. I even had a slice topped off with Donna Hay’s white chocolate mousse…delicious!

This one is going to make an appearance at Julia's event Easter Cake Bake. Check her site in a few days for a tasty sweet roundup!

Hay Hay! Today’s The Day For Mousse!

When I read my emails early Sunday morning, April Fool’s Day nonetheless, I thought I was still vaguely dreaming when Peabody announced that I had won HHDD #10 “Cheesecakes”. I knew it was a close vote and I felt grateful and thrilled that this cheesecake came out to be a winner. Thank you Peabody for the very cool book that I received in the mail today!
Then a mild mix of panic and excitement set in, as it meant that I would be the one orchestrating this next round. Thank you Barbara, the creator of the event, for your guidance in the past couple of days. You are a true star in the world of bloggers!
I am loving this already as it gave me the opportunity to better get to know Donna Hay, and read more of her books (as if I needed another excuse to sit at the local coffee shop with a cookbook and a latte for hours).

I had a couple of ideas in mind but every minute of the day I was coming back to the same thing…Mousse! so there you have it. In this HHDD # 11, you may make a sweet or savory mousse, it can be layered or scooped, simple or fancy. The only requirement is that it be an attempt to be at the least “mousse-like”. So get out there and whip it up!

You must post your mousse recipe no later than April 20th. Once your post is up, email it to me at marinette1 AT Comcast Dot net, including your name, name of your blog and its URL, title of your recipe and URL to your post, a picture of your mousse.
The round up will be posted and voting will begin on April 24th, and the winner will be announced on May 1st.
The winner will receive this book by Trish Deseine and of course the chance to host HHDD #12!

To help you get started, here is a recipe from Donna Hay’s The Instant Cook, for the mousse you see in this post:

Blueberry and White Chocolate Mousse

6 servings

3 Tb. water
2 tsp. gelatin powder
5 oz. white chocolate
2 cups single or pouring cream (18% fat)
1 cup blueberries
Extra blueberries for garnish

Place the water in a bowl and sprinkle the gelatin over it. Let stand until the gelatin absorbs the water.
Place the chocolate and cream in a saucepan over medium-low heat. Stir until smooth and the chocolate is fully incorporated. Add the gelatin mixture and stir for 1 minute to dissolve. Remove the pan from the heat and pour the mixture into a bowl. Whisk for 3 minutes or until cooled. Stir in the blueberries and pour into six 1-cup-capacity greased serving glasses. Refrigerate the desserts for 45 to 60 minutes to set. Serve with extra blueberries, if desired.

Little Birdie Almond Apple Bar


When I saw Mary's beautiful picture and mouth watering post, I know it would not take me long to give it a try. Since my first apple bar inspired by Dorie Greenspan, I was on the look out for another one.
I have yet to establish a system in my labyrinth of "to-try" recipes but I have taken a spring resolution of some sort to bake one to two recipes that I have bookmarked from another blog each week, and if you knew how many I put in my "favorites" each day, you would see that it is not a small endeavour!

I adapted her recipe a little bit given what I had in my pantry, but mostly because I got sidetracked by my dog chasing a bird that had flown into the house, hence the title of this post. The bars were delicious. I had a difficult time not nibbling at the little pieces sticking out in the corners, the uneven edges or the crumbly topping. I had a harder time saving some for B., needless to say the neighbors never saw a sample of these, not even a crumb!

Little Birdie Almond Apple Bars, adapted from Mary’s recipe:

Crust:
1 1/4 cup all purpose flour
3 ounces cream cheese, softened
2 ounces (4 tbsp) unsalted butter, softened
1/4 tsp pure almond extract
1/4 cup granulated sugar
1/4 cup light brown sugar
1/3 cup ground almonds

Topping:
1/4 cup tbsp all purpose flour
1/4 cup brown sugar
2 Tb. butter, cold

Filling:
5 ounces cream cheese, softened
1/2 cup granulated sugar
1 large egg
1 tbsp freshly squeezed lemon juice
3 medium apples, peeled, cored & cut into thin (I chose Braeburn)

Preheat oven to 350°F. Line a 9×9 inch square baking pan with parchment. Spray with cooking spray.
Make the Crust:
Combine the flour and ground almonds and set aside.
In the bowl of a stand mixer, fitted with the paddle attachment, beat the cream cheese and butter on medium speed until smooth. Add the almond extract and beat on medium until smooth, about 1 minute. Add both sugars and beat on medium speed until blended. On low speed, mix in the flour/almond just until the dough comes together. It should be crumbly.
Reserve about 2/3 cup of the crust mixture.
Press the remaining dough evenly into the bottom of the prepared pan.
Bake until light golden, about 16-18 minutes. Remove crust from the oven.

Make the Topping: Add the flour, brown sugar to the reserved dough. Cut in the butter and mix with your fingertips. It should remain crumbly. Set aside.

Make the Filling:
In a large mixing bowl, beat the cream cheese and sugar until smooth. Beat in the egg and the lemon juice.

To assemble:
Arrange the apple slices over the baked crust. Pour the cream cheese filling over the apples and gently spread the filling to cover. Crumble the topping over the filling. Bake until lgolden brown, about 45-50 minutes. Let cool to temperature.
I found the bars easier to cut after a chill time in the fridge. The flavors were even more pronounced the next day (given the one square I had saved for the picture)

——————-
No, no, this is not the new HHDD event but stay tuned…the theme will be posted before the end of the week.

Thank You!

Thank you to everyone who voted for this cheesecake during the last HHDD event hosted by Peabody, and created by Barbara.
Peabody did an amazing job hosting and rounding up everybody’s entries. I am thrilled and exciting to be hosting HHDD for April.

Stay tuned as I will announce the theme in a couple of days.

Thanks again!

Chocolate-Caramel-Pecans : Compromise in a Square

Turns out that we are not very much in sync these days with what we want for dessert. I thought B. would be happy to have more fruits and light mousses to eat after dinner since Spring is here and the weather is very clement but it seems that I was wrong given the response I had this afternoon with my lemon dessert…

"Is there any chocolate in the house, I think I saw some caramel sauce in the fridge, what could you make with that?"…Arrrghhhh! I could have told him to whip something up himself but for one thing he can’t cook and for another, the kitchen is my territory. A few looks around and a few clicks on the computer later, I had these Chocolate – Caramel and Pecan Squares chilling in the fridge.

There’s nothing grand to them, just simple home baking, but making bars or squares is still relatively new to me. This is not the kind of treats we make in France and I am still quite intrigued by the multitude of recipes for all kinds of bar and squares, from fruity to nutty, cakey to crumbly. The novelty has not worn of yet and I really appreciate this kind of down home baking that I first encountered visiting family in Canada and then after settling in the States. I must have 50 recipes bookmarked here and there already and the list grew just trying to find a recipe for these! I used salted butter caramel sauce I had leftover from a cheesecake, but the following recipe gives you the instructions to make your own.

Chocolate, Caramel and Pecan Squares, adapted from several recipes at allrecipes:

Crust:

1 cup Graham crackers crumbs

1/4 cup melted butter

2 Tb. sugar

1/2 cup ground toasted pecans

Caramel Chocolate Layer:

2/3 cup butter

1/2 cup light brown sugar

2 Tb. heavy cream

1 cup milk chocolate chips

1/2 cup toasted chopped pecans for garnish

Preheat oven to 350F.

In a medium bowl combine the crackers crumbs, butter, nuts and sugar. Mix well and pat in a 8×8 baking pan, lined with aluminium foil. Bake for 10 minutes. Set aside.

While the crust is baking. Prepare the chocolate-caramel filling: in a heavy saucepan combine the butter and brown sugar and cook on medium heat until bubbly. Add the cream and cook 2 more minutes. Remove from the heat and measure 1/4 cup of the mixture and set aside. Add the chocolate to the remaining caramel and stir until melted. Pour it over the crust, bake for another 5 minutes.

Remove from the oven. Let cool for 5 minutes and drizzle the reserved caramel and sprinkle with the chopped nuts. Chill until set (easier to cut that way too).

I truly wish I could have these breakfast, lunch and dinner. They are the right combination of crunch and smooth. I did not put a certain number of serving for the simple reason that in my house it serves 2….especially on the weekend….On a more serious note, you are in charge of the size of the squares….I will not be held responsible for expanding waistlines!!

Sour Cherries, Avocado and Mascarpone Verrines


I am not what people would call a "fashion victim", food wise or clothes wise. I know the shape and curves of my body and what will feel good on it, what fabric I like and cuts that I love and look good on me. The same goes with food… with the exception of verrines, or what one might call "creations in a glass". Whether savory or sweet I have been fascinated by them since I saw them on Mercotte's blog over a year ago, and since I was given this book at Christmas. The European culinary scene seems to have been quite fond of them for a couple of years now and I totally fell for them , so go ahead…say it…I am a verrine fashion victim…and it is mighty sweet.

I am also another kind of food fashion victim as I love to participate in blog events. Not only do I have the chance to share my passion with others but I also discover a multitude of great blogs and talented cooks everywhere in the world. When I read about Chris from Mele Cotte’s event Cooking to Combat Cancer, I knew I could not sit back and not participate.

Too many people in my life have been taken away by cancer, particularly my grandmother and my brother. I felt complete loss of control when they died: could I do anything to prevent this in me? Probably not if it is in my genetic profile, but since there is no way to know and since our family health history is not that great, it could certainly be improved, and I could do my part with what I would put in my body. My diet was not bad to start with since my parents very rarely served us boxed or processed foods but I think I developed a sort of acute awareness to the cancer fighting essentials around me.

I know what looks good on me, but I also know what does my body good and food wise, even desserts can do their part in fighting cancer. For this particular event I wanted a shock full of cancer fighting foods in evey bite and although I was not sure how my little creation would turn out I thought it was worth the try. These verrines turned particularly tasty, surprisingly tasty!
I am new to avocados in desserts but after my first try a few days ago, I have to say I am a convert and they won’t go only in my salads anymore!

Sour Cherries, Avocado and Mascarpone Verrines:

Makes 4-8, depending on the size of the glas you use.

Mascarpone mousse:

5 egg yolks
1/2 cup sugar
8 ounces mascarpone, softened to room temperature
1 cup heavy cream

Cream together egg yolks and sugar in a heatproof bowl set over a pot of simmering water. Whisk until mixture is thick and doubled in volume. Remove from heat. Stir in the mascarpone until completely blended.
In a chilled bowl, whip the heavy cream to soft peaks. Fold the whipped cream into the mascarpone mixture.

Avocado Mousse:

3 avocados, pitted, skin removed and cut into cubes
1/4 sugar, or to taste
1 cup heavy cream
juice of 1 lime
In a food processor, combine the avocados, sugar and lime juice and puree until smooth. Whip the cream to soft peaks and slowly fold it in the avocado mixture.

Sour Cherry Topping:

1 cup sour cherries
1 cup sour cherry jam

Heat the jam and cherries over low heat. Let cool to room temperature until ready to assemble.

Assemble:

Do this just before serving as the avocado will oxydize a bit and get brown over time.

Layer the mascarpone and avocado mousse in glasses or conainers of your choice and top each with a 2-3 Tb. of the sour cherry mixture.

This dessert is health in a glass (if you forget the heavy cream….) as avocados are rich in glutathione, a powerful antioxidant that attacks free radicals in the body. They are also high in protein, fiber, niacin, thiamin, ribofalvin, folic acid, zinc and healthy fats (see…you can forget about the heavy cream!). Cherries contain the anti-cancer bioflavonoid quercetin.

Update: I apparently converted my temperatures wrong for the salted butter caramels. I corrected the recipe accordingly.

Sunflower Bulgarian Bread: WTSIM Easter Basket

Do you ever get stuck on one picture and its recipe while reading your favorite blogs and you go back to it many many times? The minute I saw this bread, I hit the "add to favorite' button, and stared at it several times a day while reading emails or researching items on the computer. The recipe comes originally from Zapbook and has already traveled the French blogosphere quite a bit during this past month. I have been fond of Petite Lolie’s blog from the day I stumbled upon it. There is something aboout her site…it is beautiful, that’s what it is. Full of life, warmth, knowledge, know hows ans how tos…It’s fresh and abundant in lip smacking recipes.

Although the exact source of the bread is unknown, the recipe delivers a sunflower looking like brioche. I followed Petite Lolie recommendation and added a bit more sugar. I don’t think I kneaded the dough quite enough as the the texture of the dough was not as soft as my previous brioche. Always room for improvement. The actual shaping of each roll may seem time consuming but it took me about 15-20 minutes and the end result (look wise) is well worth it.

Sunflower Bulgarian Bread, adapted from Zapbook and Petite Lolie:

200 gr. milk
1/4 cup sugar
1 tsp. salt
2 eggs
500 gr. flour
2 tsp. dry yeast
50 gr. melted butter
extra melted butter for shaping the rolls

Put the yeast in a non reactive bowl. Heat the milk to lukewarm, and pour it over the yeast. Stir with a fork or spoon to make sure it dissolves properly. Add 2 Tb. sugar and slat and let the yeast proof for 10 minutes.
In a stand mixer fitted with the dough hook attachment, combine the flour, eggs, remaining sugar, melted butter. Turn the mixer on slow and slowly pour in the yeast mixture. Let the dough come together and continue the kneading either by hand or with the mixture for a good 5-8 minutes.
Put the dough into an oiled bowl and let rise for 1 hour or until doubled in size.

Shaping of the bread:
Once the dough has risen, divide it into 16 equal portions. Roll each portion out into a circle or oval. Take one piece, brush with melted butter, stack another piece on it, brush with melted butter again and repeat with 2 other portions. You are actually making 4 stacks of 4 portions each. Roll each stack tightly. Cut each into 4 triangular pieces. Position the rolls in a 10 inch round pan, with pointy ends facing toward the center.
Let rise for another 45 minutes. Preheat the oven to 375. Once the dough has risen, brush with an egg wash (egg beaten with some milk) and bake for 30 minutes.

End result…one could argue that brioche is brioche and this is yet another recipe. But come on, look at those plump folds! Every nation has its version of the basic brioche dough and I like exploring other cultures through bread baking. I am looking forward to making this one again, probably for the only reason that it looks gorgeous, tastes great, behaves well, and made my morning brighter! Yep, I am not complicated…making bread fuels my fire! I am wondering if such a bread exists in Bulgaria so I am on the lookout for a source, let me know if you have one.

One thing for sure: I am definetely putting this in my Easter Basket to be delivered to The Passionate Cook as part of this month’s Waiter There’s Something In My…(and because my dear mother in law is organizing brunch next sunday, as a pre-Easter menu testing).

Sugar High Friday 29: Cocoa Nibs Pavlovas

Well, there is more to these than just "pavlovas"…

I really thought I would have to sit this one out…The theme for this month’s Sugar High Friday was "Raw Chocolate" …. where am I going to find raw chocolate in my neck of the woods? There were the obvious choices like homemade chocolate including cocoa butter in the ingredient list, or cocoa nibs that I had successfully located a couple months back. I was feeling less than inspired. I kept looking at my pantry, at the cocoa nibs, at the fridge, and then inspiration came late friday night with these:

Cocoa Nib Pavlovas, Avocado Cream, Honeyed Strawberry and Pineapple, Cocoa Nib and Pistachio Praline….

Yep….just that…Really, I can’t be left alone… and before you turn your heads away, let me tell you that sweet avocado rocks! I wanted to keep up with the raw theme throughout this dessert so beside the cocoa nibs everything else is in its original form. I thought at first of filling the meringue disks with a citrus curd or a chocolate cream, but I wanted something soft and light that would let your mouth taste the cocoa nibs as well as the crunch of the praline.

I am not going to lie, I was a bit skeptical about having avocados on the sweet side, but I found tons of recipes out there for avocado dessert so it gave me the confidence to break away from my savory conceptions and get whipping. And you know what…it is amazingly good!

All the components can be made up to one day ahead. These were assembled and served saturday night for a dinner party. I did not tell people about the avocado part, everybody assumed it was pistachio custard until one guest asked me for the recipe and everybody stopped eating, raised their heads, looked at their dessert funny for a minute and digged in again to the sound of :"crunch…crunch…crunch…this is so surprising…this is so good…"

Cocoa Nibs Pavlovas, adapted from Eggbeater, via Simply Recipes:

Makes 12 shells, but I only used 6.

3 egg whites
3/4 cup sugar
2 1/4 tsp cornstarch
1/2 cup cocoa nibs

Preheat oven to 275.
Mix the sugar and corn starch and set aside. In a stand mixer fitted with the ballon whisk, start whipping the egg whites to soft peaks. Slowly add the sugar mixture in a slow steady stream, or one tablespoon at a time. Stop the mixer and with a spatula, fold in the cocoa nibs.
Line 2 sheet pans with parchment paper, and with a large spoon, mounds 12 meringue rounds. Bake at 275 for 40 minutes. Reduce heat to 250 and bake for another 20 minutes. At this point you can remove them from the oven, or turn the oven off and let them cool in the oven for a few hours. I let mine sit there overnight.

Avocado Cream, adapted from Avocado.org:

Serves 6

3 avocados, pitted, skin removed and cut into cubes
1/4 sugar, or to taste
1 cup heavy cream
juice of 1 lime

In a food processor, combine all the ingredients and puree until smooth. Refrigerate until ready to assemble.

Cocoa Nib and Pistachio Praline:

100 gr. sugar, divided
1/4 cocoa nib
1/4 shelled raw pistachios

Line a sheet pan with parchment paper and set aside.
In a heavy saucepan, melt 50 gr. sugar until light golden brown. Add the remaining 50 gr. sugar and stir until the sugar melt and the caramel is dark golden. Remove from the heat, quickly add the nuts and the nibs. Pour it onto the sheet pan and let cool completely. Break into pieces to decorate the meringues.

For the fruit I just cut up some strawberries and pineapple and drizzled them with some honey to taste.

Assemble the Pavlovas:
Do this just before serving.
Set one meringue disk on a plate. Scoop about 1/4 cup of the avocado cream. Spoon some fruit over the cream and add piece of praline to decorate.

This was perfect last night, as it was still over 80 degrees at 8pm, and it finished our dinner al fresco with style, simplicity and a very light feeling both in the stomach and the mouth.

Salted Butter and Chocolate Caramels

These are soft, chocolatey homemade butter caramels with a hint of salt linguering on my tongue…and I admit it without guilt or shame that I have been eating way too many of them..the ones in the picture were gone in one minute… oops…

I admit that I am a bit of a caramel, cooked sugar, freak and it is not uncommon that I play with it for fun or to enhance a dessert. I am particularly fond of salted butter caramel anything and I was in heaven when we visited Normandy and Brittany because caramels are everywhere (region’s specialty) Unfortunately, B. and I are out…we finished the last one a couple of weeks ago and we are starting to show some signs of "salted butter caramels deprivation"…and it got me thinking that there must be a tried and true recipe out there that I can cook up to save us.

I started searching familiar cooking sites and pondered on this one from Epicurious, but the 70/30 rate of success and disaster made me discard it (and there were some pretty awful reviews)… After some more research I found myself on Guillemette's blog again, staring at these several times a day.

Even if you are a novice baker/cook, I encourage you to try your hand at these, especially following the recipe below as it is simple and straightforward. Making homemade caramels is not complicated but some steps are important to follow:
– just like with any other confections or desserts, only use the best quality ingredients available
-always undercook your caramel, meaning do not let it get dark golden, because it will continue to cook once removed from the heat
– buy a candy thermometer, it is cheap and will make your life so much easier
-be patient. Depending on the humidity or heat in your house, your caramel might take longer to cook than what the recipe says…but always read your thermometer and don’t try to outsmart burning sugar…

Salted Butter and Chocolate Caramels, adapted from Guillemette:

100 gr. salted butter
3 gr. sea salt
50 gr. bitter sweet dark chocolate
20 ml. water
100 gr. light corn syrup
250 gr. sugar
200 ml. heavy cream

Melt the chocolate in the microwave or over hot water bath and set aside. Heat the cream to lukewarm in the microwave also, and set aside.
In a heavy saucepan, set over medium heat, combine the water and corn syrup. Add the sugar and let it caramelize until it reaches a light golden brown.
Remove from the heat and slowly add the cream to the caramel. It will bubble like made but do not worry…it will not bubble over and things come down eventually.
Return the pan to the heat and add the butter and the salt. Let the mixture cook until a thermometer registers 118 C ( about 245 F). Remove from the heat, add the chocolate and stir until completely smooth.
Pour into a parchment lined 8X8 inch baking dish. Let sit overnight.
Unmold and cut squares the next day. Wrap them in parchment paper or candy foil if they last long enough to be packed up for guests.

Here are the converted measurements, thanks to Lisa from La Mia Cucina:

½ c. salted butter
½ tsp. sea salt
2 oz. bitter sweet dark chocolate
2 Tb water
1/3 c. light corn syrup
1 ¼ c. sugar
3/4 cup heavy cream

Spinach Chappatis: Thinking Outside My Bread Box

It is an understatement to say that B. and I love Indian food. We particularly love it when it comes from a small restaurant down our street. We have visited them quite enough to be familiar faces, but we always come back because of their sincere kindness and love of good food. You can’t be in a rush while visiting them. Everything is prepared fresh so it is not unusual to wait 45 minutes for an awesome lamb curry and a plate of piping hot naan, chappatis or parathas. It’s not that we go there every week but each time we never order from the menu and instead surrender to whatever the chef feels like cooking. There is nothing like giving him carte blanche because he then prepares foods the genuine way, does not shy on the spices and even agrees to give me some cooking secrets and tips.

Many moons ago, he told me how to make chappatis and since I make curry or other related Indian dishes a couple of times a month, I always end up calling the restaurant for an order of bread for fear mine won’t be as tasty as theirs.

It’s funny how a couple of things prompted me to make these awesome spinach chappatis. I have this big blue binder in which I collect recipes found on other blogs, cooking sites and such and every three months or so I pull it out and weed through the ones that I know I will never make, the ones I can find again easily, or the ones that have actually ended up on this blog. As I was looking for a brioche recipe (yes again), I found one I had printed exactly a year ago for 'cottage cheese and spinach chappatis". I was making lamb curry that night and since on Sundays, I usually prepare a couple of bread items, rolls, baguettes, sliced bread, brioche and things like that, I thought it was a perfect opportunity to think outside my bread box and make a batch.
I followed the recipe to the letter and ended up with six beautiful flat breads. We ate a couple that night and I have used the remainder throughout the week for lunch wraps and for individual pizzas. Perfect!

I found the recipe on Saffron Hut and since I did not change a thing from it, I will just give you the link. I followed the basic version for the chappatis (meaning no potato stuffing) but given how good they turned out, I plan on making Saffron’s full recipes for the parathas. Undoubtedly, I will still order some from the restaurant but I intend to broaden my horizons of Indian breads.

Happy baking!