
Monatsarchive: April 2007

Get Your Mousse On ! Donna’s Dark Chocolate Mousse

Just a reminder that there is one week left to post and send me your entry for HHDD Mousse!

In case you need some inspiration, here is another one from Donna Hay (thanks Peabody for the email).

Dark Chocolate Mousse, from Donna Hay Modern Classics 2

Serves 6 to 8

200g(7oz) dark couverture chocolate, chopped
75g(2 1/2 oz) butter, chopped
4 eggs, separated
1 cup(8 fl oz) cream
2 TBSP icing(confectioner’s) sugar

Place the chocolate and butter in a saucepan over low heat and stir until melted and smooth. Pour the mixture into a bowl and add egg yolks, one at a time, beating until well combined. Set aside.Place the cream in a bowl ans whip until soft peaks form. Set aside.
Place the egg whites in a bowl ans whisk until soft peaks form. Sift over the icing sugar and whisk until the mixture is thick and glossy.Gently fold the cream through the chocolate mixture, then fold the egg whites through.
Spoon into bowls and refrigerate for at least 3 hours.

It was the first time (if my memories serves me right) that I saw a recipe including both egg whites and whipped cream as the lightening agent of the mousse and thought it would be overkill heavy with both egg yolks and heavy cream but it turned out rich but not "stick to your ribs my arteries are shrinking". I used 62% Lindt chocolate and topped it with an extra dollop of whipped cream and some cocoa nibs. Delicious!

Update: in an attempt to explain my mousse making thoughts, it seems that my English was not clear enough. I have always made mousse including egg yolks and whipped egg whites. I have sometimes gone the easier way by combining melted chocolate and whipped cream. What I meant is that I have never combined the three in one recipe.

Arabian Nights – Monthly Mingle 9

Here I am, probably the last one to bring her dishes to Meeta’s Monthly Mingle. I really thought I would never make it on time this month…I fell victim to the old combination of too much work, too much family (but I am happy about that one) and very little play time in the kitchen….isn’t it funny how our kitchen priorities are very different from our boss’s our customers’?..but yet, they are quite happy when we bring them half of whatever we have concocted that day!

I got quite excited when I read about the theme this month: an entire event devoted to Arabian Nights…and then I drew a blank…for about 2 seconds!I immediately thought about dishes and pastries from Morocco and Algeria and decided to bake 3 of my favorites. I had a hard time finding pastries and desserts from other Arabic countries so I am really looking forward to learn more and see what other bakers have come up with. I am also going to check out the library in the future to try to broaden my horizon.

Why Morocco? My parents were born there, mom in Oujda and dad in Rabat, in the 30s and 40s as children of military families, their parents were stationed wherever they were needed and ended up traveling quite a lot, much like nomads. (My dad continued the tradition and this is why I probably ended up here!) Although they did not stay in the country, the Arabic world always had a place in my family, in phrases and sentences, in memorabilia, furniture and of course cooking (just ask anybody about my Grandmother’s couscous).

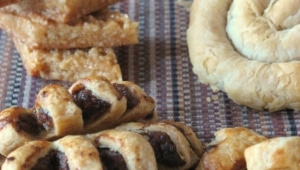
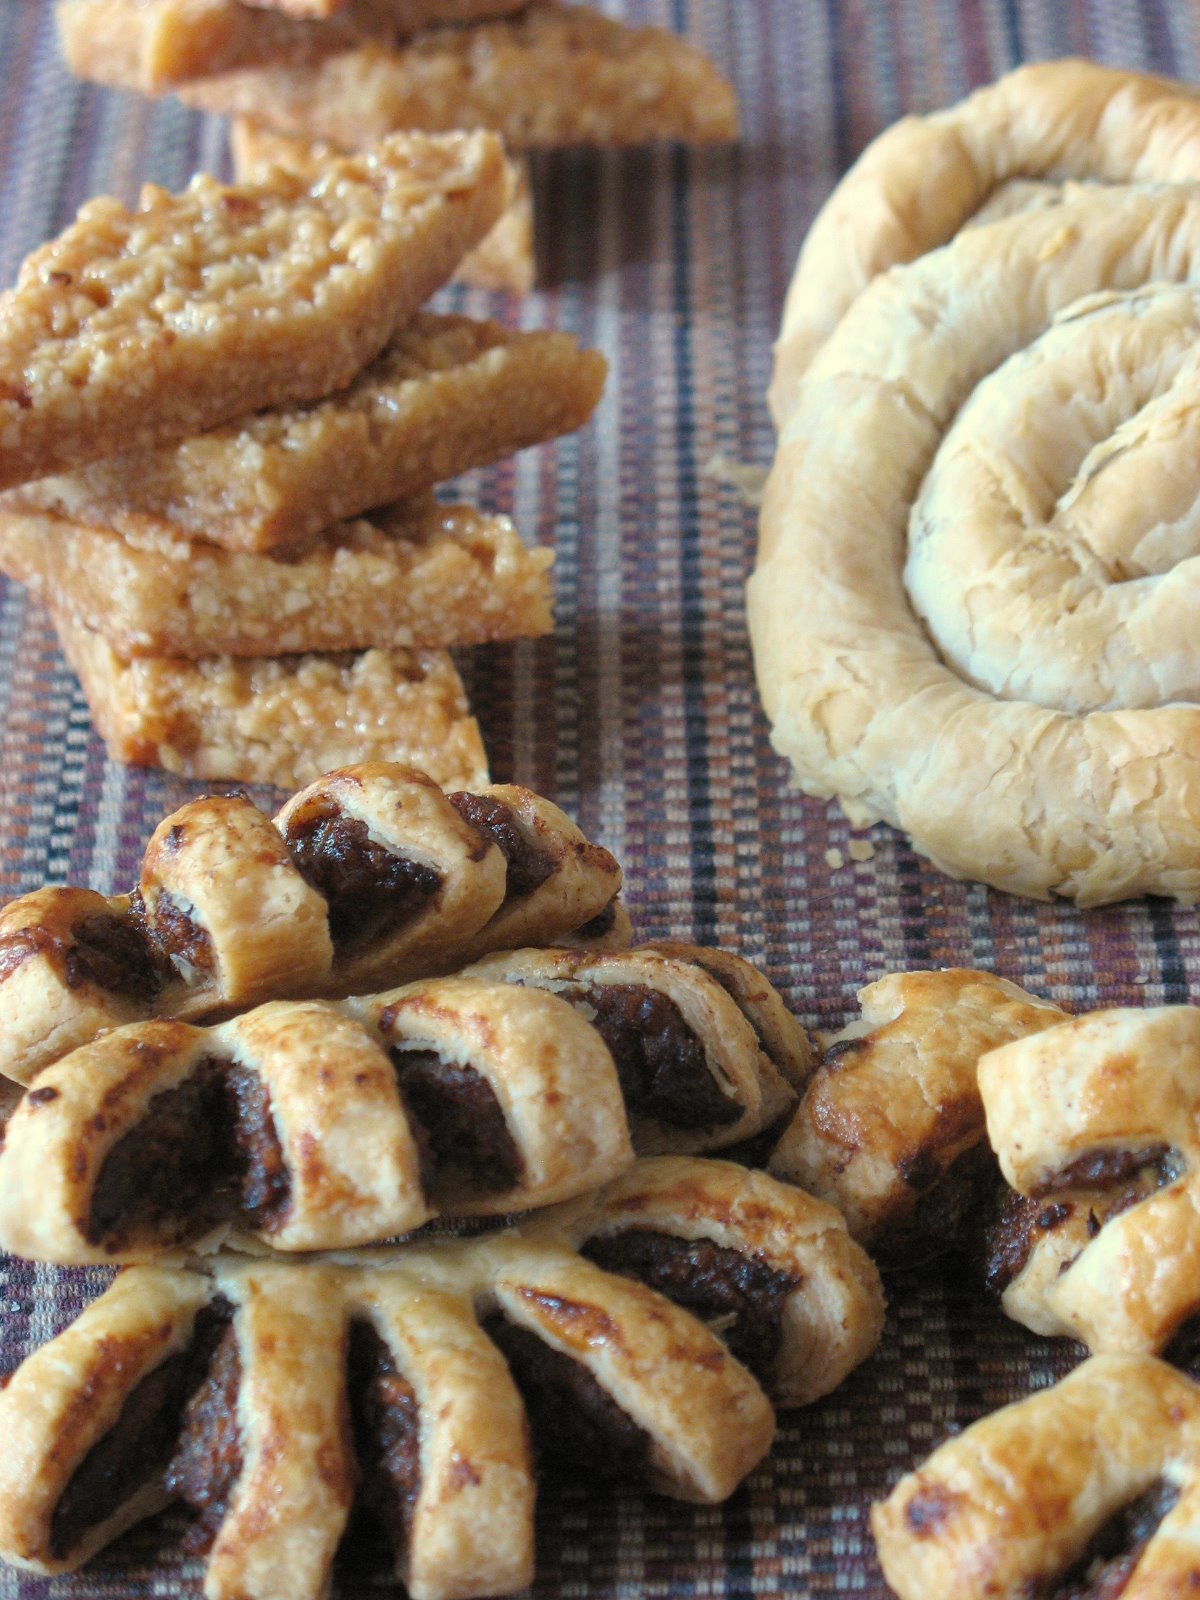
The other reason behind Morocco is because of the vivid memories I have from a little “hole in the wall” bakery that was situated a block away from my University when I was doing my graduate work. I would go there with a couple of girlfriends and get a little pick me up around 4pm before hitting the books again. The owners loved our little group of 3 young plump chicks and we always ended up sampling more than reasonable but for us every free sugar honey dripping morsel was worth its weight in gold! I have yet to find anything close to what they had here in SC but that may not be a bad thing as all the pastries from that part of the world have a tendency to be overly sweet and I know I would develop diabetes in a flash. However, there are three pastries that stuck to my memory, and Meeta’s event was the perfect opportunity to revisit them. Common ingredients in Arabic pastries are nuts, dates, orange blossom flower water, corn meal, fillo dough, honey, sugar and butter. Only a few bites of each one of these would satisfy any sweet tooth.

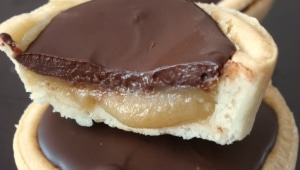
Harissa from Oujda, adapted from Fatema Hal :

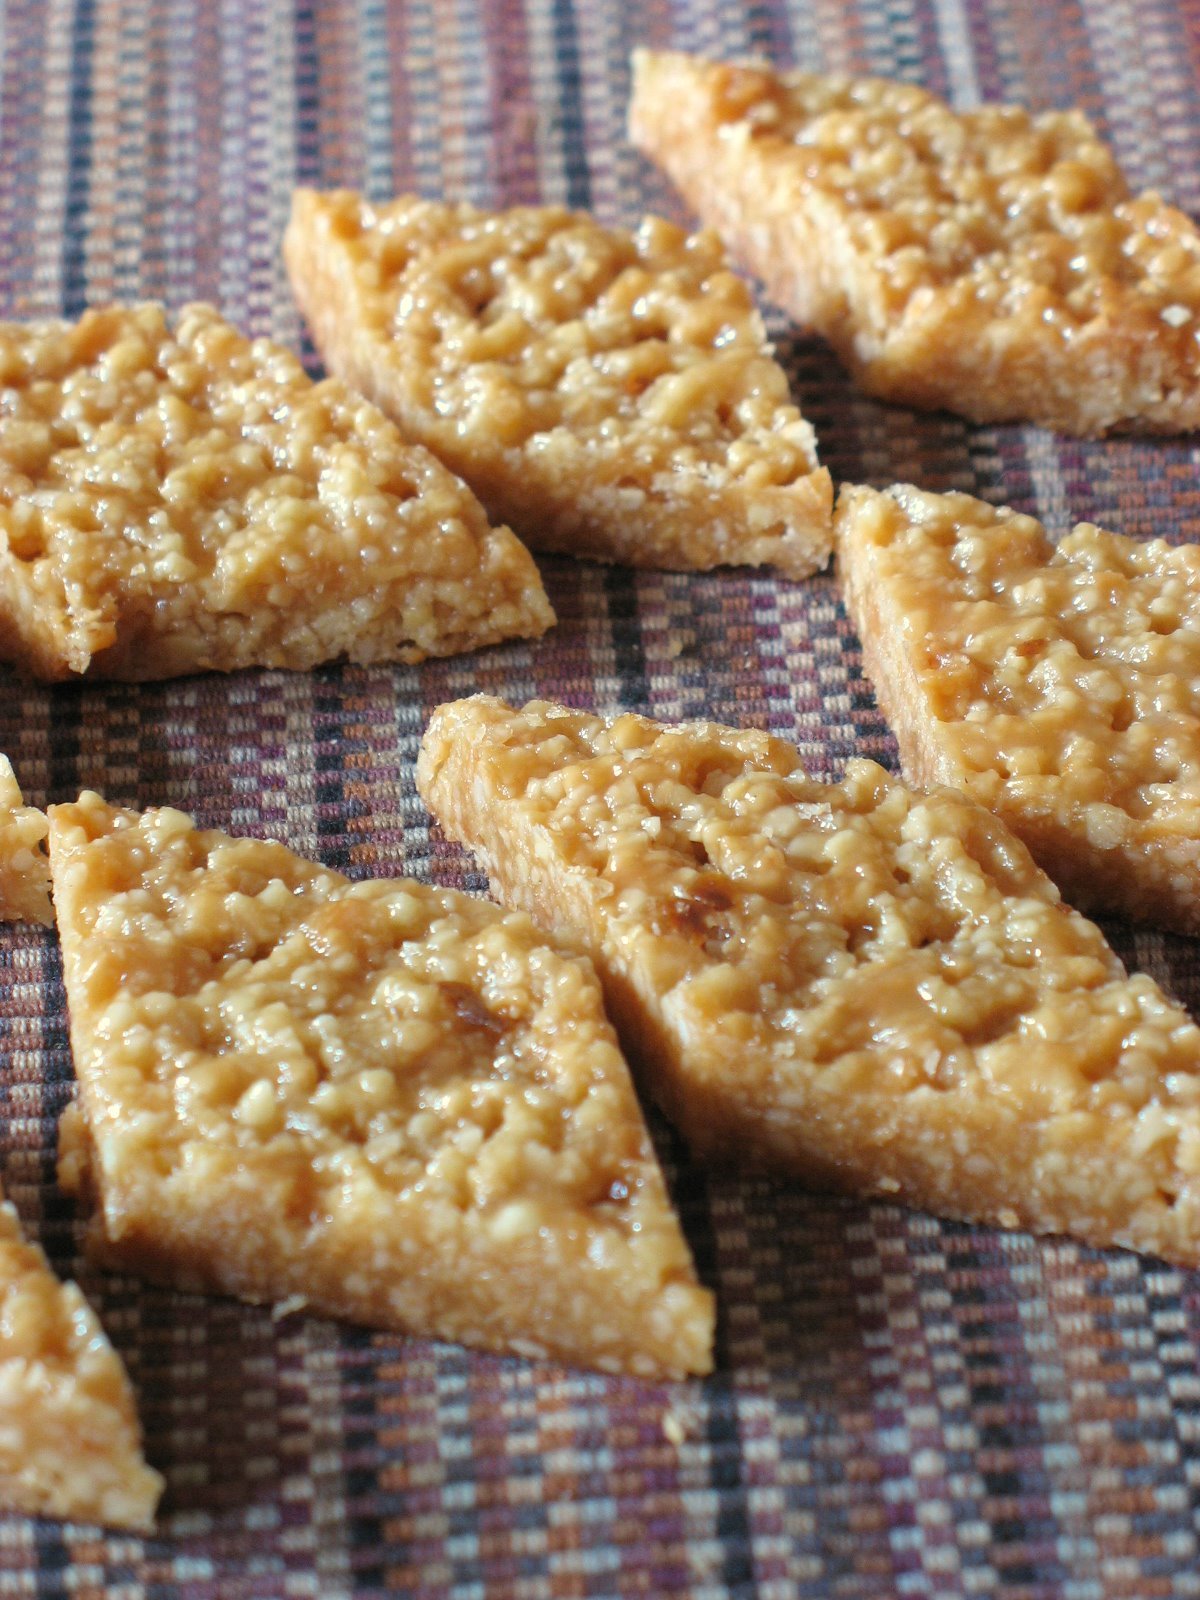
If you are familiar with the hot sauce ‘harissa’, do not ask me why this particular pastry is also called this way as there is nothing hot about it. I am guessing it refers to the cooking style, but if you know, please let me know in the comment box.

250 gr. ground almonds
125 gr. sugar
2 Tb. orange blossom flower water
2 Tb. honey
75 gr. butter

Preheat oven to 350 F.
In a saucepan, mix together the sugar and orange blossom flower and boil for 2 minutes over medium heat. Do not caramelize, but bring to a syrup like consistency. Remove from the heat and stir in the almonds, butter, honey. Mix well. Pour into a 8X8 inch square pan and bake for 15 minutes, or until golden brown. Remove from the ovem, let cool completely and cut into losanges.
They are easier to cut if refrigerated for 1 hour.

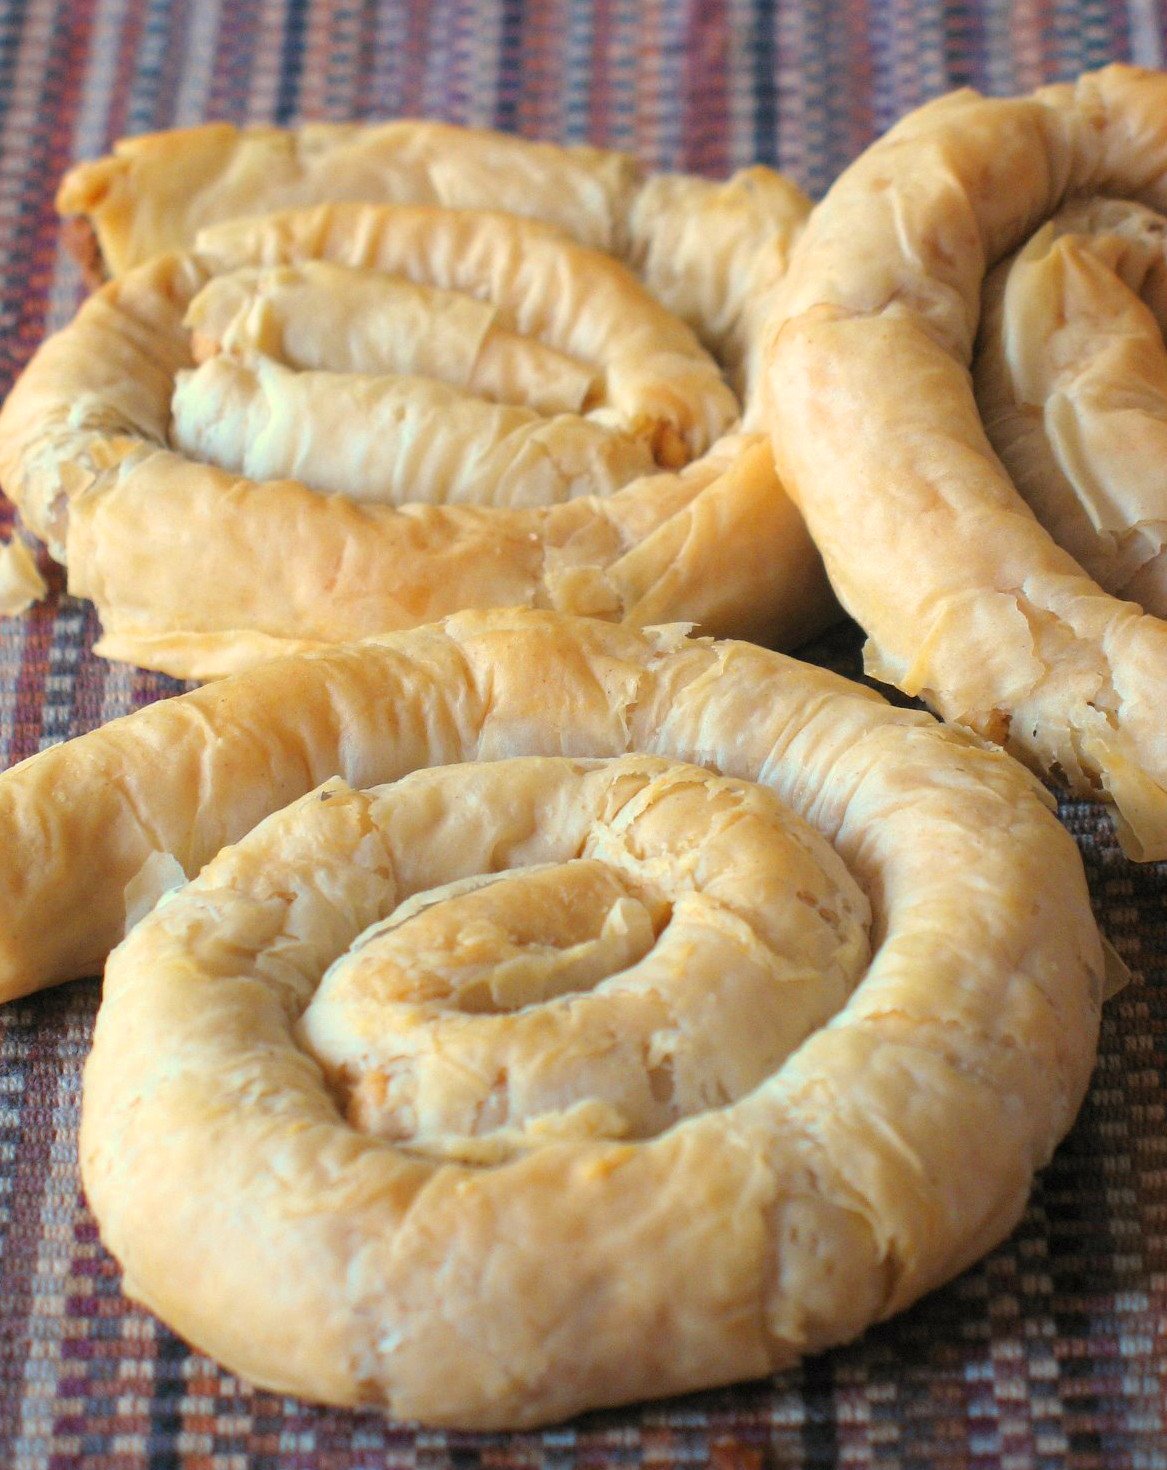
Maancha (also spelled Mhencha) , Snake pastries:

Makes 8

16 sheets
1/3 cup granulated sugar
2 1/2 cups almonds
1/4 cup melted butter + 1 Tb.
1 teaspoon orange blossom water
honey to drizzle

Preheat oven to 400 F.
In a food processor, grind sugar and almonds. Add orange blossom water and 1 Tb.butter. Blend into a smooth paste.
Stack 2 sheets of filo dough, brush with melted butter and place 1/4 cup of the almond paste and spread it down the center, in the shape if a thick pencil.
Roll the dough around the paste, and form into a snake coil. Repeat with remaining dough and paste. Brush evenly with buttter and drizzle with honey if desired. Bake for 10 minutes.

Date Snails, adapted from Celine:

Mine ended up looking like bear claws, because I could not get them to roll the right way. I’d rather come up with another solution than have something aesthetically weird. The following directions are given for making snails.

Makes 16-18

Dough:

1 lb all purpose flour
1 1/2 sticks butter
2 Tb. sugar
2 TB orange flower blossom water
1 egg

Filling:

1 cup chopped, pitted dates mixed with a pinch of cinnamon and a dash of orange water

For the dough:
Mix all the ingredients together and add a little bit of warm water if necessary to obtain a smooth dough. Cover the dough and refrigerate for 30 minutes to relax it.

Form the filling into little logs. Roll out the dough into a thin rectangle. Put one log on the longest side and roll once over to encase the date filling.
Keep doing this with the remaining date logs and dough.
With scissors, cut slits into each log at 1/2 inch intervals, not cutting all the way through. Cut each log at 5 inch intervals and coil the dough onto itself to form a snail.Bake at 350 F for 10 minutes or until golden brown.

Donna Hay’s Millionaire Shortbread

Or in this case Mini Millionaire Shortbread Pies….

Funny things happen in the kitchen when the timing is right or the stars are aligned. In preparation for this month’s "Hay Hay It’s Donna Day", I spent a lot of time at the library reading her books and getting to know her easy going cooking focusing on fresh ingredients and no fuss methods. I made a few copies, took some books home and one evening my eyes settled on her Millionaire Shortbread in Gourmandises (yes, the library had 3 of her books in French thanks to Mr. Martinet, the expat head librarian). From that sunny thursday afternoon until last night I could not stop thinking about it. Seriously, after lemon this one was my biggest craving of the weekend. Finally this morning I broke down and made this before heading out to the gym….I know I am evil…!

I decided to make these in mini muffin tins instead of a square pan. I love anything mini and small enough to take one or two bites out of without feeling like I am a glutton…even if I end up eating 6 of them. I was taking them to a dinner party and thought they would be great as a little bite with coffee. They turned out to be as everybite as wonderful as pictured and described in the book. The size was perfect to enjoy them without being hit on the head by a spoon full of sugar.

Millionaire Shortbread Mini Pies, adapted from Donna Hay:

Makes 12

For the shortbread crust:

150g all purpose flour / 1.5 cups

100g brown sugar / 0.5cup

125g butter, melted / 1 stick plus 1 Tb

Mix the flour, sugar and melted butter. Spoon (or use your fingertips) the mixture into the bottom of the mini muffin tins. Bake for 10 minutes at 350 F. Remove from the oven and set aside while you prepare the filling.

Caramel Filling:

130 gr. golden syrup / 1.5 cups (I used grade B maple syrup)

125 gr butter / 1 stick plus 1 Tb.

1 can sweetened condensed milk (14 0z)

Combine the golden syrup, butter and condensed milkin a large saucepan and cook over low heat for about 10 minutes, or until it thickens and takes on a golden color. Remove from the heat, let cool for a minute and divide among the tart shells. Bake for 20 minutes. Remove from the oven and let cool completely.

Chocolate Ganache:

185 gr dark chocolate / 6.5 oz

1 Tb. vegetable oil

Melt the chocolate in the microwave or on top of a double boiler. Add the oil and mix well to combine. Spoon some over each tart shells and allow to set in the fridge.

Verdict: I doubled up on the quantities to make sure I had some for us and the girls at work tomorrow and I am glad I did. These disappeared while the host was pouring coffee. I am looking forward to making them again.

Ultimate Lemon Pound Cake

I wish I could claim I finally found the secret to the ultimate lemon pound cake but she did, and I wish I could thank her for the best slice of cake I have had with my afternoon tea in a long time.
If someone describes a cake as "perfect-moist, finely texture, sweet (but not too sweet), and refreshingly tart", wouldn’t you be tempted to make it for yourself? Taste is subjective and with such a strong title I was tempted to make it just to prove her wrong…Well, ok, let’s be honest: because a cake drenched with 1/2 cup of lemon syrup sounds irresistible to me!

Everything about this cake is hands down good. It is easy to make, is full of fresh and simple to find ingredients, bakes well, smells out of this world and tastes better and better as the days go by…although there were not that many days between the first and the last slice. I loved it so much I made 2 for a cookout tonight because I can bet the host is going to want one just for herself.

Whenever I make a lemon dessert, I have a tendency to double up on the zest or amount of juice called for in the recipe because I need and love tart. I need my tongue to burn and my gums to hurt…well, maybe not exactly that bad but you get the idea. Looking at Lori Longbotham’s recipe, it seemed that I probably did not need to change much and decided to make it "almost" the way it was written. Hers calls for cake flour and I did not have any left, so I made do with all-purpose, decreasing the amount a bit. I also left out the vanilla extract (1 tsp) to make sure nothing would get in the way of my lemons!

Ultimate Pound Cake, adapted from Lori Longbotham:

Serves 12 (in theory)

2 3/4 cups all purpose flour
1/2 tsp baking powder
1/4 tsp salt
3 sticks unsalted butter at room temperature
2 1/4 cups sugar
6 large eggs
1 cup milk
1 1/2 TB lemon zest
1 tsp. pure lemon extract
1/2 cup fresh lemon juice

Preheat oven to 300F. Butter and flour a 12 cup Bundt pan.
Sift the flour, baking owder and salt together twice.
Cream the butter and 1 3/4 cups sugar until pale and fluffy. Add the eggs, one at a time, beating well after each addition. Reduce the speed and add the flour mixture, alternating with the milk, beginning and ending with the flou. Stir in the lemon zest and lemon extract.
Pour the batter into the prepared apn and bake for 1 1/2 hours, or until a knife inserted in the middle comes out clean. Let cool in the pan for 15 minutes. Poke holes all over the cake with a wooden skewer
Meanwhile, bring the lemon juice and remaininf sugar to a boil over medium high heat in a small saucepan, stirring until the sugar is dissolved.
Invert the cake onto a rack, position over a baking sheet and slowly pour the syrup over the cake, it will seap through the holes and into the cake. Let cool to room temp.

Verdict: the best I have had so far. Fresh, wholesome, light (if possible for a pound cake) and so lemony…It is perfect for an Easter cookout, reunion, brunch or gathering. I even had a slice topped off with Donna Hay’s white chocolate mousse…delicious!

This one is going to make an appearance at Julia's event Easter Cake Bake. Check her site in a few days for a tasty sweet roundup!

Hay Hay! Today’s The Day For Mousse!

When I read my emails early Sunday morning, April Fool’s Day nonetheless, I thought I was still vaguely dreaming when Peabody announced that I had won HHDD #10 “Cheesecakes”. I knew it was a close vote and I felt grateful and thrilled that this cheesecake came out to be a winner. Thank you Peabody for the very cool book that I received in the mail today!
Then a mild mix of panic and excitement set in, as it meant that I would be the one orchestrating this next round. Thank you Barbara, the creator of the event, for your guidance in the past couple of days. You are a true star in the world of bloggers!
I am loving this already as it gave me the opportunity to better get to know Donna Hay, and read more of her books (as if I needed another excuse to sit at the local coffee shop with a cookbook and a latte for hours).

I had a couple of ideas in mind but every minute of the day I was coming back to the same thing…Mousse! so there you have it. In this HHDD # 11, you may make a sweet or savory mousse, it can be layered or scooped, simple or fancy. The only requirement is that it be an attempt to be at the least “mousse-like”. So get out there and whip it up!

You must post your mousse recipe no later than April 20th. Once your post is up, email it to me at marinette1 AT Comcast Dot net, including your name, name of your blog and its URL, title of your recipe and URL to your post, a picture of your mousse.
The round up will be posted and voting will begin on April 24th, and the winner will be announced on May 1st.
The winner will receive this book by Trish Deseine and of course the chance to host HHDD #12!

To help you get started, here is a recipe from Donna Hay’s The Instant Cook, for the mousse you see in this post:

Blueberry and White Chocolate Mousse

6 servings

3 Tb. water
2 tsp. gelatin powder
5 oz. white chocolate
2 cups single or pouring cream (18% fat)
1 cup blueberries
Extra blueberries for garnish

Place the water in a bowl and sprinkle the gelatin over it. Let stand until the gelatin absorbs the water.
Place the chocolate and cream in a saucepan over medium-low heat. Stir until smooth and the chocolate is fully incorporated. Add the gelatin mixture and stir for 1 minute to dissolve. Remove the pan from the heat and pour the mixture into a bowl. Whisk for 3 minutes or until cooled. Stir in the blueberries and pour into six 1-cup-capacity greased serving glasses. Refrigerate the desserts for 45 to 60 minutes to set. Serve with extra blueberries, if desired.

Little Birdie Almond Apple Bar


When I saw Mary's beautiful picture and mouth watering post, I know it would not take me long to give it a try. Since my first apple bar inspired by Dorie Greenspan, I was on the look out for another one.
I have yet to establish a system in my labyrinth of "to-try" recipes but I have taken a spring resolution of some sort to bake one to two recipes that I have bookmarked from another blog each week, and if you knew how many I put in my "favorites" each day, you would see that it is not a small endeavour!

I adapted her recipe a little bit given what I had in my pantry, but mostly because I got sidetracked by my dog chasing a bird that had flown into the house, hence the title of this post. The bars were delicious. I had a difficult time not nibbling at the little pieces sticking out in the corners, the uneven edges or the crumbly topping. I had a harder time saving some for B., needless to say the neighbors never saw a sample of these, not even a crumb!

Little Birdie Almond Apple Bars, adapted from Mary’s recipe:

Crust:
1 1/4 cup all purpose flour
3 ounces cream cheese, softened
2 ounces (4 tbsp) unsalted butter, softened
1/4 tsp pure almond extract
1/4 cup granulated sugar
1/4 cup light brown sugar
1/3 cup ground almonds

Topping:
1/4 cup tbsp all purpose flour
1/4 cup brown sugar
2 Tb. butter, cold

Filling:
5 ounces cream cheese, softened
1/2 cup granulated sugar
1 large egg
1 tbsp freshly squeezed lemon juice
3 medium apples, peeled, cored & cut into thin (I chose Braeburn)

Preheat oven to 350°F. Line a 9×9 inch square baking pan with parchment. Spray with cooking spray.
Make the Crust:
Combine the flour and ground almonds and set aside.
In the bowl of a stand mixer, fitted with the paddle attachment, beat the cream cheese and butter on medium speed until smooth. Add the almond extract and beat on medium until smooth, about 1 minute. Add both sugars and beat on medium speed until blended. On low speed, mix in the flour/almond just until the dough comes together. It should be crumbly.
Reserve about 2/3 cup of the crust mixture.
Press the remaining dough evenly into the bottom of the prepared pan.
Bake until light golden, about 16-18 minutes. Remove crust from the oven.

Make the Topping: Add the flour, brown sugar to the reserved dough. Cut in the butter and mix with your fingertips. It should remain crumbly. Set aside.

Make the Filling:
In a large mixing bowl, beat the cream cheese and sugar until smooth. Beat in the egg and the lemon juice.

To assemble:
Arrange the apple slices over the baked crust. Pour the cream cheese filling over the apples and gently spread the filling to cover. Crumble the topping over the filling. Bake until lgolden brown, about 45-50 minutes. Let cool to temperature.
I found the bars easier to cut after a chill time in the fridge. The flavors were even more pronounced the next day (given the one square I had saved for the picture)

——————-
No, no, this is not the new HHDD event but stay tuned…the theme will be posted before the end of the week.

Thank You!

Thank you to everyone who voted for this cheesecake during the last HHDD event hosted by Peabody, and created by Barbara.
Peabody did an amazing job hosting and rounding up everybody’s entries. I am thrilled and exciting to be hosting HHDD for April.

Stay tuned as I will announce the theme in a couple of days.

Thanks again!

Chocolate-Caramel-Pecans : Compromise in a Square

Turns out that we are not very much in sync these days with what we want for dessert. I thought B. would be happy to have more fruits and light mousses to eat after dinner since Spring is here and the weather is very clement but it seems that I was wrong given the response I had this afternoon with my lemon dessert…

"Is there any chocolate in the house, I think I saw some caramel sauce in the fridge, what could you make with that?"…Arrrghhhh! I could have told him to whip something up himself but for one thing he can’t cook and for another, the kitchen is my territory. A few looks around and a few clicks on the computer later, I had these Chocolate – Caramel and Pecan Squares chilling in the fridge.

There’s nothing grand to them, just simple home baking, but making bars or squares is still relatively new to me. This is not the kind of treats we make in France and I am still quite intrigued by the multitude of recipes for all kinds of bar and squares, from fruity to nutty, cakey to crumbly. The novelty has not worn of yet and I really appreciate this kind of down home baking that I first encountered visiting family in Canada and then after settling in the States. I must have 50 recipes bookmarked here and there already and the list grew just trying to find a recipe for these! I used salted butter caramel sauce I had leftover from a cheesecake, but the following recipe gives you the instructions to make your own.

Chocolate, Caramel and Pecan Squares, adapted from several recipes at allrecipes:

Crust:

1 cup Graham crackers crumbs

1/4 cup melted butter

2 Tb. sugar

1/2 cup ground toasted pecans

Caramel Chocolate Layer:

2/3 cup butter

1/2 cup light brown sugar

2 Tb. heavy cream

1 cup milk chocolate chips

1/2 cup toasted chopped pecans for garnish

Preheat oven to 350F.

In a medium bowl combine the crackers crumbs, butter, nuts and sugar. Mix well and pat in a 8×8 baking pan, lined with aluminium foil. Bake for 10 minutes. Set aside.

While the crust is baking. Prepare the chocolate-caramel filling: in a heavy saucepan combine the butter and brown sugar and cook on medium heat until bubbly. Add the cream and cook 2 more minutes. Remove from the heat and measure 1/4 cup of the mixture and set aside. Add the chocolate to the remaining caramel and stir until melted. Pour it over the crust, bake for another 5 minutes.

Remove from the oven. Let cool for 5 minutes and drizzle the reserved caramel and sprinkle with the chopped nuts. Chill until set (easier to cut that way too).

I truly wish I could have these breakfast, lunch and dinner. They are the right combination of crunch and smooth. I did not put a certain number of serving for the simple reason that in my house it serves 2….especially on the weekend….On a more serious note, you are in charge of the size of the squares….I will not be held responsible for expanding waistlines!!