
Jahresarchive: 2006

Lavender Madeleines


It’s been a while since I have made Madeleines and while I was reading this book again I found a recipe for Earl Grey Madeleines. Great! I did not have Earl Greay at the house. Looking on the side bar titled “Playing Around”, Dorie Greenspan gives variations for the recipe using rosemary-orange, cinnamon and ginger and lavender. That I had plenty of! Her instructions are to infuse the melted butter with the tea leaves or lavender buds. I decided to play around a little and actually keep some of the buds in. I was afraid it would take on a bitter aftertaste but it actually did not. Definitely a repeat!

Lavender Madeleines, adapted from Dorie Greenspan "Baking: From My Home To Yours"
Makes 12

5 Tb. Butter
1 Tb. edible lavender
¾ cup flour
½ tsp. baking powder
Pinch of salt
1/3 cup sugar
Grated zest of half a lemon
2 large eggs
2 Tb. honey
2 tsp. vanilla extract

Preheat oven at 400 degrees.
Melt the butter with the lavender and let sit for 10 minutes to infuse. Strain but keep half of the lavender in with butter, or discard the whole amount.
Combine the flour, baking powder and salt.
Working with a stand mixer, beat the eggs, sugar and lemon zest until pale and thick, about 3 minutes. Add the honey and vanilla and beat for one minute more. Switch to a rubber spatula and incorporate the dry ingredients. Fold in the butter. Refrigerate the batter at least 2 hours or up to 3 days. (helps with the bumps characteristic of the madeleines).

Butter and flour your madeleines molds and divide the batter evenly. My molds are smaller tan hers so I got 24 small cookies. Bake 12-14 minutes until they are golden brown.


No story to go along…except they are almost gone and the neighbors did not get any…(hoping they forgot the blog address)

Pan De Muertos

In my family November 1st is known as "All Saints Day" but for Isabel it was her day to make "Bread of the dead". I recall her telling me that she got into the habit soon after she started dating a man from Mexico named Anton and was trying to please him by making his mom’s Pan de Muertos. From what I understood, she came very close but any married woman will tell you that there are dishes that only "his" mom will ever get right.

Well, I knew I would not be able to replicate the exact same bread that Isabel used to do, much like she had not been able to make hers exactly like Anton’s mom. She had only given me spoken instructions for this bread and I was a little worried to mess it up so I did an online search and found a recipe that looked very close. The breads are usually shaped into rolls having the shape of bones or limbs and glazed with a light orange sugar syrup. I wanted these for dinner tonight so I skipped the glazing part, I might use it for the remaining rolls tomorrow morning. As you can see I have also skipped shaping the buns into bones and such, a little too morbid for me.

Pan De Muertos, adapted from Global Gourmet:

1/2 cup butter
1/2 cup milk
1/2 cup water
5 to 5-1/2 cups flour
2 packages dry yeast
1 teaspoon salt
1 tablespoon whole anise seed
1/2 cup sugar
4 eggs

In a saucepan over medium flame, heat the butter, milk and water until very warm but not boiling.
Meanwhile, measure out 1-1/2 cups flour and set the rest aside. In a large mixing bowl, combine the 1-1/2 cups flour, yeast, salt, anise seed and sugar. Beat in the warm liquid until well combined. Add the eggs and beat in another 1 cup of flour. Continue adding more flour until dough is soft but not sticky. Knead on lightly floured board for ten minutes until smooth and elastic.
Lightly grease a bowl and place dough in it, cover with plastic wrap and let rise in warm place until doubled in bulk, about 1-1/2 hours. Punch the dough down and shape into loaves resembling skulls, skeletons or round loaves with "bones" placed ornamentally around the top. Let these loaves rise for 1 hour.
Bake in a preheated 350 F degree oven for 40 minutes. Remove from oven and paint on glaze.

Glaze
1/2 cup sugar
1/3 cup fresh orange juice
2 tablespoons grated orange zest

Bring to a boil for 2 minutes, then apply to bread with a pastry brush.
If desired, sprinkle on colored sugar while glaze is still damp.

I Need A Sugar Fix

Happy Halloween!

And yippee today was the day to get one (sugar fix). I have been meaning to post this since this morning but we are having terrible internet connections these days…off/on/off/on…enough to drive you crazy!
These cookies may not look like the ones you will find on the shelves of professional decorators but this is what you get for working with a dinosaur, two knights, a mermaid, a pirate and a zebra…yes, we had a slight chance of costume programming! We took the kids trick or treating on an old golf cart with a trailer attached to the back and they had a great time!

Cut Out Sugar Cookies, adapted from allrecipe site:
3 cups all-purpose flour
1 teaspoon baking soda
1/2 teaspoon baking powder
3/4 cup butter, softened
1 cups white sugar
1 egg
1 teaspoon vanilla extract

Preheat oven to 375 degrees F (190 degrees C). In a small bowl, stir together flour, baking soda, and baking powder. Set aside.
In a large bowl, cream together the butter and sugar until smooth. Beat in egg and vanilla. Gradually blend in the dry ingredients. Refrigerate dough, roll out and cut as desired
Bake 8 to 10 minutes in the preheated oven, or until golden. Let stand on cookie sheet two minutes before removing to cool on wire racks.

Royal Icing, from Joy of Baking site
4 cups (440 grams) confectioners' sugar
3 tablespoons (30 grams) meringue powder
1/2 teaspoon extract (vanilla, lemon, almond)
1/2 – 3/4 cup (120 – 180 ml) warm water

In the bowl of your electric mixer (or with a hand mixer), beat the confectioners' sugar and meringue powder until combined. Add the water and beat on medium to high speed until very glossy and stiff peaks form (5 to 7 minutes). If necessary, to get the right consistency, add more powdered sugar or water. To cover or 'flood' the entire surface of the cookie with icing, the proper consistency is when you lift the beater, the ribbon of icing that falls back into the bowl remains on the surface of the icing for a few seconds before disappearing.
The icing needs to be used immediately or transferred to an airtight container as royal icing hardens when exposed to air. Cover with plastic wrap when not in use.
Makes about 3 cups

Sometimes it’s good to just bake with the kids and be one again!

Pumpkin Seed Brittle and Burnt Sugar Ice Cream

Yes, Halloween is here. It is kind of a new holiday for me and even after 10 years of being here, I still enjoy playing dress up and waiting for little goblins and witches to knock on my door. You can see the excitement in the kids' eyes as they prepare their costumes and have them laid out on the bed, ready for their big day. You can sense that pre-sugar rush as they get ready to go trick or treating. Seems like we are going to have a small Halloween block party with sugar, chocolate and a hay ride around the neighborhood.
After SHF, I spent most of the weekend baking and decorating Halloween cookies and I can say that after many dozens of pumpkins, ghosts, bats and cats that I have no desire of becoming a cookie decorator. The novelty wore out after the first 2 dozens. My fingers are covered in orange, black and green food coloring. I believe I have more sugar sparkles in my hair than Dolly Parton has sequin on her dress, but that is for another post!

No Halloween would be complete without carving a pumpkin. Problem is, I got one much more for getting the flesh and seeds than for the carving itself so my design remained minimal. I only had one thought in mind: I wanted to make pumpkin seed brittle as I thought it would make a nice edible garnish to a warm slice of Apple Cinnamon Cake. My mind kept on going and I thought that ice cream would be great with it too, but not necessarily vanilla. I was browsing through Dorie Greenspan’s Baking: From My Home To Yours, when I found this incredible ice cream recipe. It is smooth and creamy, caramely but not too sweet. It was good enough to eat on its own but incredible combine with the cake and the brittle.

Burnt Sugar Ice Cream, adapted from Dorie Greenspan:

1 cup sugar
3 b. water
2 cups whole milk
1 cup heavy cream
4 egg yolks
pinch of salt
1 1/2 tsp. vanilla extract

Stir the sugar and water in a saucepan and cook over medium heat until the sugar dissolves. Increase the heat and cook until it becomes a caramel of deep amber color. Lower the heat and add the milk and cream. It will bubble like mad but continue stirring until it is smooth, remove from the heat.
In a large bowl, whip the egg yolks and salt until a little thick, slowly pour the hot milk mixture over it and whisk to tamper the yolks. Put back into the saucepan and cook until it coats the back of a spoon (creme anglaise consistency or 170 degrees F).
Let cool completely and churn into your ice cream maker. Freeze for 2 hours or moreor until firm to scoop….if you can wait that long!

Pumpkin Seed Brittle, from Martha Stewart

1/4 cup (1/2 stick) unsalted butter, plus more for baking sheet
1/2 cup packed light-brown sugar
1/4 cup honey
1 cup fresh pumpkin seeds, rinsed well, dried, and toasted

Preheat oven to 350°. Butter an 11-by-17- inch rimmed baking sheet; set aside.
Melt butter in a small saucepan over medium heat. Stir in sugar and honey. Bring to a boil. Cook, without stirring, until mixture is medium amber and a candy thermometer registers 280°, about 6 minutes. Stir in pumpkin seeds. Cook until mixture reaches 300°, about 2 minutes. Pour onto prepared baking sheet. Let cool completely. Break into pieces.

Zebra And Tiger Cakes: The Other Side of Bananas

I realized the other day that it had been a while since my last few, weekly banana posts, especially so when B. (that’s the hubby) handed me the fruit bowl with that heavy sigh : "please, do something, put an end to their misery, pleeeeeeze". I had to go teach a couple of classes so I put the dear bananas in the back of my mind.
Later in the afternoon, we were outside with the rest of the neighborhood, and the kids (ages 3 to 9) were vividly talking about their Halloween costumes. Looks like we are going to have a fairy, a princess, a baby pumpkin, a skeleton, a couple of ghosts, a zebra and a tiger. We are trying to come up with a couple of games that could keep them entertained for a while as well as some fun foods that adults and kids can enjoy. That’s when the bananas came to haunt me… I remembered a marbled banana cake I had seen on the Cooking Light website when I was looking for the Apple Cinnamon Cake from the other day.

I made it and baked them in mini bunt shapes. As soon as I took some next door, the kids exclaimed : "oh look! They look like Zebras! They look like Tigers" and that’s how this marbled cake got a new name, at least around Halloween.

Marbled Chocolate Banana Bread, aka Zebra and Tiger Cakes, adapted from Cooking Light:

2 cups all-purpose flour
3/4 teaspoon baking soda
1/2 teaspoon salt
1 cup sugar
1/4 cup butter, softened
1 1/2 cups mashed ripe banana (about 3 bananas)
2 eggs
1/3 cup plain low-fat yogurt
1/2 cup semisweet chocolate chips

Preheat oven to 350°.
Lightly spoon flour into dry measuring cups, and level with a knife. Combine the flour, baking soda, and salt, stirring with a whisk.
Place sugar and butter in a large bowl; beat with a mixer at medium speed until well blended (about 1 minute). Add banana, egg substitute, and yogurt; beat until blended. Add flour mixture; beat at low speed just until moist.
Place chocolate chips in a medium microwave-safe bowl, and microwave at HIGH 1 minute or until almost melted, stirring until smooth. Cool slightly. Add 1 cup batter to chocolate, stirring until well combined. Spoon chocolate batter alternately with plain batter into an 8 1/2 x 4 1/2-inch loaf pan coated with cooking spray or mini bundt pans. Swirl batters together using a knife. Bake at 350° for 1 hour and 15 minutes or until a wooden pick inserted in center comes out clean. Cool 10 minutes in pan on a wire rack; remove from pan. Cool completely on wire rack.

Since using smaller pans, they baked a little faster, more like 30-40 minutes, depending on your oven.
They were great with some vanilla ice cream.

Fall is Here! Apple Cinnamon Cake Too!

You know how it happens… you wake up one morning and the ligh has changed, the cold air starts nipping at your nose and the landscape has changed! I wish the switch in seasons was that pronounced in the South Carolina Lowcountry but we are definetely not in summer anymore! My in laws went apple picking in the upstate a couple of weeks ago and were nice enough to make us a big basket of gorgeous, fragrant and delicious apples. They were so good at the first bite that I immediately decided I had to do something with them. Because of our activities this weekend (I do not recommend teaching Pilates with a hangover), I put those lovelies to the side and got myself covered in powdered sugar instead.

Everything in the air today prompted me to make an apple dessert and I remembered reading about a Cooking Light recipe on a blog just recently. I can’t backtrack my steps to the actual post or blog (as it happens often after a couple of hours browsing), but I did find the recipe on the magazine website and with so many great reviews I felt encouraged to try it, even or especially (depending on which way the scale dips today) if it is "light".

The only changes I made were to use real butter instead of stick margarine. I am not being an hypocrite since I just admitted using some Crisco in my latest buttercream but I don’t keep margarine in the house so butter it was, and regular cream cheese. I also only used 2 TB. of the cinnamon sugar called to top the cake prior to baking and not the 1/4 cup the recipe suggested.
Result? Delicious! Strong but not overpowerig cinnamon flavor. I can’t wait to try it with cardamom.

Cinnamon Apple Cake, adapted from Cooking Light

1 3/4 cups sugar, divided
1/2 cup butter, softened
1 teaspoon vanilla extract
6 ounces block-style cream cheese, softened (about 3/4 cup)
2 large eggs
1 1/2 cups all-purpose flour
1 1/2 teaspoons baking powder
1/4 teaspoon salt
2 teaspoons ground cinnamon
3 cups chopped peeled Rome apple

Cooking spray. Preheat oven to 350°.
Beat 1 1/2 cups sugar, butter, vanilla, and cream cheese at medium speed of a mixer until well-blended (about 4 minutes). Add eggs, 1 at a time, beating well after each addition. Combine flour, baking powder, and salt. Add flour mixture to creamed mixture, beating at low speed until blended.
Combine 1/4 cup sugar and cinnamon. Combine 2 tablespoons cinnamon mixture and apple in a bowl, and stir apple mixture into batter. Pour batter into an 8-inch springform pan coated with cooking spray, and sprinkle with remaining cinnamon mixture.
Bake at 350° for 1 hour and 15 minutes or until the cake pulls away from the sides of the pan. Cool the cake completely on a wire rack, and cut using a serrated knife.
Note: You can also make this cake in a 9-inch square cake pan or a 9-inch springform pan; just reduce the cooking time by 5 minutes. Yield: 12 servings

Celebrating With The Neighbors

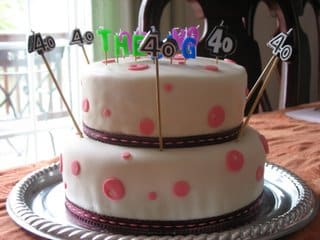
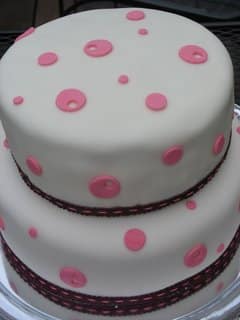
This cake is one of the reasons why I was away from this blog over the weekend. One of our neighbors turned 40 on Sunday and we all gathered to steam some oysters, eat some pulled BBQ pork, cheeses, drink a lot (like a truck ran over me 5 times already)and eat this cake. I made her a 2 tiered dark chocolate cake filled with cream cheese frosting and covered in fondant. I had a great time making it and it was a big hit. I can’t believe we almost ate our way through the whole thing!

I’ll be back later for recipes and instructions.

For the cake layers, I used this recipe I found on Lisa’s blog, La Mia Cucina. I made 5 batches as I’d rather be on the safe side and I am OK with recycling what’s left over. I made a couple of changes though. You can find her recipe here, below is the one I used.

Dark Chocolate Fusgy Cake:

2 1/4 c. all-purpose flour
1 tsp. baking soda
1 tsp baking powder
1/2 tsp. salt
1/2 c. butter
1 c. sugar
3 eggs
1 1/2 teaspoons vanilla extract
8 oz. good quality bittersweet chocolate melted
1 cup sour cream
1 c. boiling water
2 TBS. instant espresso powder
Preheat oven to 350 degrees F (175 degrees C).
Sift together the flour, baking soda and salt. Set aside.
In a large bowl, beat 1/2 cup butter and sugar until well mixed. Add eggs one at a time. Beat in the vanilla and melted chocolate. Add 1/2 c. of the sour cream and then 1/2 the dry ingredients to the butter mixture until well blended. Add the reamining sour cream and remaining dry ingredients to the batter. Stir in boiling water with espresso powder.
Bake in a 9 or 10 inch cake pans.

As I said I made 5 batches and I filled 3 10 inch pans and 2 8 inch pans.

For the frosting I made 2 batches of the following recipe, and before you scream and send me to Pastry Hell, yes I used Crisco! I found that in SC where the humidity is very high 99% of the time, Crisco helps my buttercream set and prevent my cakes and fondant from sweating, shifting, and ultimately collapsing. I did use the trans-fat free one though.

2 lbs. of powdered sugar
1/3 C. warm water
3 1/2 oz. cream cheese , softened
7 oz. trans-fat free Crisco

In stand mixer, cream Criso and cream cheese until very smooth. Add sifted powdered sugar and water. Mix until well incorporated.
Fill and cover the cakes with this. Refrigerate until ready to cover with fondant.
You can find the original here.

For the fondant, I usually go 2 ways: either I run around town and look for glycerin and glucose to make my recipe or I call C. who runs the pastry department at the restaurant across from the one I used to work for. She is my to go source when I am lazy and hers is always perfect. I decided to go another route this time again and decided on this recipe after seeing Monisha’s cake last week. Amazingly easy and fun to make and so smooth to roll and handle, no tear which meant no tears for me saturday night when I used it.
I made 2 batches since I plan on using some next week for another cake. For the dots I used pastry decorating tips and used the openings or bases to cut different size circles.

It got so humid overnight and it rained all day long sunday, I started worrying as the fondant might sweat and stretch, get gooey or gummy and start chnaging the overall appearance of the cake. I think I was the only one to notice the little shifts and things but the birthday girl was extremely happy with it. It looked and tasted good, you would expect it to be sickenly sweet but it wasn’t that much. So it was a shock full of sugar! Hey, it was a birthday after all!

Sweet Recycling

I guess I owe this to my upbringing but I am known in my family as the Queen of Recycling. At the restaurant, the executive chef and the owners loved me for that: failed cheesecake? No problem, we’ll have cheesecake mousse in parfaits glasses! Leftover pastry cream? No problem, we’ll have Bavarois! Dry chocolate cake? I’ll pulverize it and use the crumbs for crusts, decorative crumbs or something…Hey! I could even use it in those parfaits glasses to layer my mousse with! You get the picture. Mind you, not everything got recycled, in spite of my best effort.

I was reorganizing the pastry/baking drawer of my freezer the other day when I found some Sour Cream Pastry Dough that needed to be used by the end of the month. I had made a cheesecake for a friend during the week and had some leftover filling. I was also staring at a half jar of Blueberyy Tea Jelly which color looked like a gem stone in the sun. I had a vessel, a filling and a crown! I had been craving small bites to go along my tea or my coffee in the afternoon so I decided to make tinsy mini tartlets using my min muffin tins.

Sweet Cheese Tartlets with Blueberry Tea Jelly Crowns.

Sour Cream Pastry, adapted from Flo Braker’s Sweet Miniatures.

2 cups all purpose flour
1/8 tsp. salt
8 oz. unsalted butter, cut into small pieces
1/2 cup sour cream

In a large bowl, combine the flour and salt. Add the butter and cut in with a pastry knife or your fingers until you get pea sized crumbs.Add the sour cream and blend in quickly into a ball. Don’t over work the dough or it will be too elastic. Divide in half, wrap in plastic and refrigerate for 4 hours or overnight.

Cream Cheese Filling
8 oz. cream cheese, at room temperature
1/2 cup sugar
1 large egg
1 tsp. finely grated lemon zest

In a bowl, blend the cream cheese and sugar. Add the egg and lemon zest. Blend well. Roll out the dough on a lightly floured surface and cut 3 inch circles. Fit them into the cavities of the mini muffin tin and divide the cream cheese filling evenly among them. Bake at 350, for 10-15 minutes. Let cool completely.

For the Glaze:
Melt 1/2 cup of your favorite jelly. I used Blueberyy Tea that I made over the summer. Divide evenly on top of the tartlets and refrigerate until set.

Make yourself a cup of tea or coffee and pop a few into your mouth!

Sweet Potato Cake and Spiked Sugar Glaze – Blog Party 15

Today I learned that a friend had breast cancer. Today I learned that a family member had passed away. Today I learned of a couple getting married. Today I learned a friend had her baby. Sorrow and happiness were overwhelming and I dealt with them the only way I know how: I am not an emotion eater, I am an emotion baker.

Faced with life’s joys and pains my preservation system is to put on some music and get myself in the kitchen. I baked non stop this afternoon. I found myself wanting round small things, Fall flavors, butter, eggs: familiar things that I knew how to control.By the end of the day my apron was covered in sugar, my slippers dusted with flour, my kitchen sink overflowing with pots and pans. I was calmer, I was tired, I was happy. Did I make all these baked goods for us? No. You see, part of my emotion coping system is to make sure everybody else around me is well fed, hydrated, and happy. I packed some of the stuff in containers, got some milk and rang the neighbors' doors. That’s when hubby said: "you are like the woman in the book you just read!" and then I knew I had my entry for Stephanie’s Blog Party 15.

The theme this month was to make something from one of our favorites books. I baked a recipe for a cake I found in this book I just finished, Eat Cake, by Jeanne Ray. I know she said an appetizer and a drink but I blog about sweets, so I hope she’ll accept my entry as a "if you still have room for dessert" one as far as the cocktail part, there is rum in the glaze! Although it is not my favorite book, it is an easy read and I found a lot of similarities with the main character. When faced with difficult decision or stressful situation, Ruth calms her nerves by picturing herself inside a cake. She then proceeds to bake one and gives ot to her family or friends. This afternoon I was Ruth by making one of her famed cakes. The author was gracious enough to include the recipes for the featured cakes at the end of the book and I picked the Sweet Potato Bundt Cake one, minus the raisins as my husband dislikes them, and made mini ones.

Sweet Potato Mini Bundt Cakes and Spiked Sugar Glazed, adapted from "In The Sweet Kitchen" by Regan Daley:
Makes 12 small cakes or a large one

Cake:
2 cups mashed sweet potatoes
4 eggs
2 cups sugar
1 cup vegetable oil
2 tsp. vanilla extract
3 cups all purpose flour
1 tsp. baking powder
1 tsp. baking soda
1 1/2 tsp. cinnamon
1/2 tsp. freshly grated nutmeg
3/4 cup buttermilk
1/2 cup rum, divided

Preheat oven to 350. Grease and flour a mini bundtcake pan (used twice) or one large pan.In a large bowl of stand mixer, beat the eggs a little to break them up. Add the sugar and beat 2 minutes until thick and pale. Add the oil and vanilla. Add 1/4 cup rum and sweet potatoes. Mix thoroughly.
In a separate bowl, sift the flour, baking powder, baking soda, cinnamon and nutmeg. Add the flour mixture to the batter in 3 additon, alternating with the buttermilk in 2 additions, beginning and ending with the dry ingredients.
Divide into the pan cavities and bake for 30-45 minutes. Cool for about 10 minutes, invert onto a cooling rack set over a baking sheet to catch the excess glaze.

Glaze:
Combine 1/2 cup dark brown sugar (I used light), 4 Tb. butter and 3 Tb. whipping cream in a saucepan over medium high heat until it comes to a boil. Continue to boil until it thickens a bit, about 3 minutes. Remove from the heat and add 1/4 c. remaining rum.Poke holes in the cakes with a skewer and spoon the glaze all over the cakes. Wait 15 min utes. Scoop the glaze that has dripped into the baking sheet and repeat the procedure.
These are good!

World Bread Day 2006

Well, the macarons are just going to have to wait because today is one of my new favorite days: World Bread Day! I don’t really need an excuse to celebrate bread but it is sure good to stop and smell the grains once in a while. Thank you Zorra for launching this event!

When I first moved to the US, one of my first quests was to find a decent bakery in downtwon Charleston, preferably specialized in European breads. I was not being a snob, just too far away from home for comfort and trying to find familiar foods and ingredients. That lasted for about a month…every visit to the grocery store or farmer’s market was teaching me more and more about local specialties. It is also thousands of miles away from home that I became more acquainted with other cultures' foods, isn’t that ironic? I ate more lasagna, empenadas, kebabs, bagels, pastillitos, curries in one year than I had in 20 years in France. My senses were awakened and my horizons expanded everytime I would open my mouth and eat.

Isabel lived in the downstairs apartment and she was a beautiful, graceful woman in her fifties. She loved and lived to cook and the smells coming from her kitchen were enough to make everyone miss the sidewalk passing under her window. My room was right above her kitchen and the wonderful aromas of freshly baked breads and pastries were an awful distraction. I remember taking my books to her apartment and lying in the hamoc while she was mixing, kneading, swirling…If I were a man I think I would have had the biggest crush on her. She spoke Portuguese all the time so that nobody would disturb her, but one day I begged for hours on hand for her to speak English long enough so I could copy down her Portuguese Sweet Bread recipe.

It is similar to a brioche but less buttery and the consistency is a little bit denser. I love making it and freezing half for French toasts on sundays.
I saw Isabel the other day at the market and realized it had been months since I had made a batch so it was a great way to celebrate friendships, cultural differences and World Bread Day

Isabel’s Portuguese Sweet Bread:
1 package yeast (2 1/4 tsp)
3/4 warm milk
1/2 cup sugar
1/4 cup butter, softened
1/4 teaspoon salt
3 cups all-purpose flour
2 eggs
Preheat oven to 350 degrees. Dissolve yeast in warm milk and add the sugar, butter and salt; stir until butter is melted. Add the eggs, previously beaten slightly.Add 1/2 the flour to the milk/sugar/butter/salt, and mix until smooth. Continue to add remaining flour to make soft dough. Remove it from the bowl and place on floured board. Knead until smooth and satiny (about 15 mins.). Shape into a ball and place in buttered bowl. Cover and let rise until double in size (2 hours). Punch risen dough down and divide it in 10 pieces Place in a greased pan (8-9 inches round). Let rise in warm place until double in size (1-1/2 to 2 hours). Bake in 350 degree oven for 20 minutes or until golden brown.