Jahresarchive: 2006
Tippy does not look convinced that we can get this whole new computers set up done right! I already gave up and wait on the Husband to get it. I took refuge in the kitchen to take care of some ripe bananas (again!)
Head over to Sweetnicks later on today for the latest Weekend Dog Blogging round up.
Sorry if I have not posted much lately but we are getting a whole new computer installation set up here and it is taking me a while to get acclimated to it. Needless to say that the current heat wave has not been conducive to baking and cooking either. But I did come up with a little dessert one night that I was staring at some fresh apricots starting to wilt and wrinkle.
Apricots and Almond Mousse:
Serves 2/3
For the Apricots:
Puree 4 apricots with a Tb of lemon juice and 2 Tb of sugar.
In a separate dish dissolve 1 1/2 tsp. powdered gelatin in 1/4 cup cold water.
On medium heat, warm up the apricot puree. Off the heat, stir in the gelatin until dissolved. Let it cool a few minutes before pouring into dessert dishes.
For the Almond Mousse:
Heat up 1 cup of almond milk over medium heat. In a separate bowl, dissolve 2 tsp. powdered gelatin. When the milk is hot, stir in the gelatin.
Let cool to the consistency of unbeaten egg whites.
In a separate bowl, whip up 1/2 cup of heay cream until slightly stiff. Gently fold this in the cooled almond milk.
Pour over the apricot gelee and refrigerate 1 hour. Decorate with fresh berries if you want.
This was nice and light for dessert under the heat!
I peroused the Cooking Light website while he was getting ready and found what promised to be a great recipe according to the reviews. I did not have the dried apricots the recipe calls for but I did have some peach nectar instead of apricots. The result was very light but flavorful scones, ready in no time. What a delighful way to start the day!
We were invited to T & D yesterday afternoon for a great Barbeque and relaxing time. They are both fine cooks, gourmets and gourmands. He is the master at the grill and she always has a lovely spread of appetizers and sides. As you may guess, I was in charge of dessert, one thing I volunteer with pleasure!
I brought a White Chocolate and Strawberry Mousse Cake. I would post the recipe but it is 3 pages long. The cake is not complicated but the making components are multiple and the assembly takes time. The base of the cake is a toasted almond sponge, cut in 3 parts and alternatively filled with white chocolate and strawberry mousses. The leftover white chocolate mousse is spread around the caek, almonds to decorate and I added the white chocolate triangles on top.
It was the perfect endind to a great meal, rich but light.
The recipe can be found in this book.
My husband knows how much I hate to throw away food. I am a big believer of recycling foods, whether savory or sweet. They become omelettes, crepes, quiches, bread, tartes, etc… you name it.
There I was staring at 3 bananas going darker and darker, and yet I did not feel like making another banana bread. Nothing wrong with them, I just get tired of making them. I remembered a tart I used to make often a few years ago and that my college friends always finished to the last crumbs whenever we had a study session or a relaxing chill out time.
It’s funny after so many years of making it, I don’t need to look at the recipe anymore, which in this case was good because since the move I can’t seem to put my hand on the little book it came from. Can’t even give the reference of it, except it came from a series of pocket books including one on American Fare, one on North African foods, one on sauces, etc…
So here it is, from the "Forgotten Book":
Banana Almond Tart:
Ingredients:
One homemade or store bought pie crust, pre-baked
3-4 ripe bananas (depends on their size)
2 eggs
1/2 cup sugar
1/2 cup sour cream
1/2 cup milk
juice of 1/2 lemon
sliced almonds for decorating
In a blender or food preocessor, puree 2 bananas, eggs, sugar, lemon juice, sour cream and milk. Pour into prebaked crust. On top slice the remaining bananas and arrange in a decorative pattern, sprinkle some almonds on top and bake at 360 until golden brown.
Some times I had ground almonds to the batter, sometimes I use a lime instead of lemon, sometimes I add a dash of Rum.
Et voila! Yummy with a glass of milk or a summer punch, you decide!
We lost…I need comfort food…I need limes or lemons, they are my comfort foods. And don’t get me started about Zidane. I am so mad at him right now, he let down his team mates, his country and his career because he thought with his "ego" (we’ll use this word today) rather than his head. Stupido…oh yeah and Barthez…
Congrats to the Italians…but I will keep my cake to myself and not share nahnahnah.
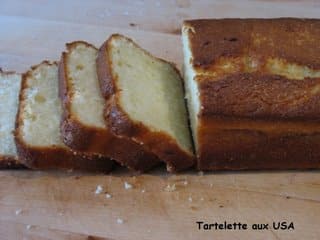
Here is a recipe for a Lemon Cake Mousseline that I found here a few days ago and kept in mind in case of a loss. The recipe is a winner:
This recipe comes from Francoise Bernard who has written several books on traditional French cuisine. The cake is tender, almost like a mousse.
Preparation time: 20 minutes
Baking time: 50 minutes
Ingredients:
200 gr. flour
1 1/2 tsp. baking powder
200 gr. sugar
pinch of salt
1 lemon, zest and juice
100 gr. softened butter
2 eggs
1/2 cup milk
In the bowl of a mixer, cream butter and sugar, add the eggs, one at a time, add the lemon juice and zest. Scrape the bowl to make sure all the ingredients are well mixed. Add the flour, baking powder alternating with the milk. Mix on medieum speed for a couple of minutes to bring air into the mix.
Pour into a buttered cake pan and bake at 360 degrees for 45 to 50 minutes. If the top of the cake seems to get too dark, cover with foil until the cake is done.
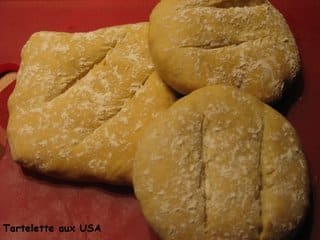
One of them could be the lunch I had today. While everybody was cheating on pizza at our managers' meeting, I patiently waited to get home to make me one of these: Salmon on fresh toasted Ciabatta rolls.
Fresh slamon, panseared and flaked, fresh local tomatoes, greens, onions and local jalapenos…Delish!
I make a big batch of these rolls on sundays and stash them in the freezer so I can prepare a nice panini or improved burger for Mr. B and after almost 8 years of marital bliss he still thinks I am Da Bomb!
The recipe is really easy:
Ciabatta, from Epicurious.
This flavorful Italian loaf begins with a biga, the Italian term for "starter dough." Make the biga a day before baking the bread.
1 cup plus 1 tablespoonroom-temperature water (75°F to 80°F)
1 1/4-ounce package dry yeast
3 1/3 cups bread flour
For dough Biga (starter dough; see above)
3/4 cup plus 2 tablespoons room-temperature water (75°F to 80°F)Pinch of dry yeast
1/2 cup plus 3 tablespoons semolina flour*
2 1/2 teaspoons salt
Additional semolina flour
*Also called pasta flour, semolina flour is available at natural foods stores, Italian markets and some supermarkets.
Make biga:Place water in processor. Sprinkle yeast over. Let stand until yeast dissolves, about 8 minutes. Add 1 cup flour; process until blended. Scrape down sides of work bowl. Add 1 cup flour; repeat processing and scraping. Add remaining 1 1/3 cups flour. Process until small moist clumps form. Gather dough into ball (dough will be firm); place in large bowl. Cover; chill overnight (biga will soften, resembling thick oatmeal in texture).
Make dough:Pull biga into walnut-size pieces; place in a clean large bowl. Add water, yeast and 1/2 cup plus 3 tablespoons semolina. Using 1 hand, squeeze ingredients together 2 minutes. Work dough 4 minutes by scooping sections from sides of bowl and pressing into center, blending into very soft, shaggy mass. Using spatula, scrape dough from sides of bowl into center. Let dough rest in bowl, uncovered, 10 minutes.
Sprinkle salt over dough. Using 1 hand, knead dough by rotating bowl 1/4 turn at a time, scooping dough from sides and folding down into center until dough starts to come away from sides of bowl, about 5 minutes. Scrape dough from hand and sides of bowl. Cover bowl with towel; let dough rest 20 minutes.
Rotating bowl 1/4 turn at a time, fold dough over onto itself 6 times; turn dough over in bowl. Cover with towel and let dough rest in bowl 20 minutes.
Bake bread:Preheat oven to 425°F. Sprinkle work surface with additional semolina. Turn dough out onto semolina. Using pastry scraper or large knife, cut dough in half; keep halves separated. Let stand, uncovered, 20 minutes.
Sprinkle 2 large baking sheets with additional semolina. Transfer each dough half, semolina side up, to 1 sheet. Stretch each dough half to 16×4-inch rectangle. Press fingertips into dough in several places to dimple surface (characteristic of this bread). Bake until golden brown, about 25 minutes. Cool. (Can be prepared 2 weeks ahead. Double-wrap in aluminum foil to freeze.) Makes 2 loaves.
I usually skip the shaping process and form rolls or subs.
The recipe may look intimidating but all that kneading is actually quite relaxing.
I think the saying usually goes "when life throws you lemons, make lemonade". Well, here in the South, it usually is "when life throws you pecans, make sandies". Pecan sandies are a very popular treat in my house and although they are not difficult to make, I feel that I could buy shares of this Keebler treat. Mr. B is addicted, a whole pack does not survive the weekend, especially during events like the World Cup, the Tour de France or the Olympics.
Well, little Elf you ain’t going to get my money anymore!
Another reason for making these has come from a good summer cleaning of the freezer to make room for the ice cream maker canister and bags of frozen fruits for instant frozen yogurts and smoothies. I found 3 huge bags of shelled pecans that I collected last year from our pecan tree. I think pecan pie is calling my name next!
The particularity of the Pecan Sandies, is not as much in the pecans as it is in the crispy, buttery taste, the "sandy" aspect of it, and all the recipes I had tried up until now were lacking this shortbread quality… until today. Can’t figure out why it took me so long to check this site, but I should have known that somebody, in the trillions of people who try recipes everyday, somebody would come with a great one for Sandies. Store bought cookies always have this extra bite to them, that mass produced, artificial preservative taste. Not here! Pure buttery joy!
I took some liberty with the original recipe and you can find my notes in ().
Pecan Sandies, adapted from allrecipes.com
Prep Time: 15 MinutesCook Time: 10 Minutes
Ready In: 30 MinutesYields: 96 servings (mine yielded half because I used a 2Tb. cookie scoop)
INGREDIENTS:
1 cup margarine, softened (I used butter)
1 cup vegetable oil
1 cup white sugar
1 cup confectioners' sugar,
sifted
2 eggs
1 teaspoon vanilla extract
4 cups all-purpose flour
1 teaspoon baking soda
1 teaspoon cream of tartar (did not use)
1 teaspoon salt
2 cups chopped pecans
1/2 cup white sugar for
decoration (did not use)
DIRECTIONS:
1.Preheat oven to 375 degrees F (190 degrees C).
2.In a large bowl, cream together the margarine, vegetable oil, 1 cup white sugar and confectioners' sugar until smooth. Beat in the eggs one at a time, then stir in the vanilla. Combine the flour, baking soda, cream of tartar and salt; stir into the creamed mixture. Mix in the pecans. Roll dough into 1 inch balls and roll each ball in remaining white sugar. Place the cookies 2 inches apart onto ungreased cookie sheets.
3.Bake for 10 to 12 minutes in the preheated oven, or until the edges are golden. Remove from cookie sheets to cool on wire racks.
Find the original here.
I had to hide the second batch…from the both of us!
Let’s start this wonderful day with a revelation from our dog Tippy: I need to stop blogging around and do some laundry…darn!
Check out the round up of the latest Wekend Dog Blogging at Sweetnicks


